In This Chapter
About video
Recording and playing back videos
Editing movies
With the addition of Movie mode on the Rebel T1i/500D, a new avenue of creative expression is open to you. Now the visual stories that you capture with the Rebel can be enriched with high-definition movies. The creative possibilities are virtually endless. In short, you have all the tools you need to create compelling visual stories of any subject you choose. Of course, it's also really nice that the Rebel's movie quality is some of the best available. And it's packaged for you in a lightweight camera that accepts more than 60 lenses to enhance your videos in ways that traditional video cameras cannot.
This chapter is by no means exhaustive, but it is written to be a starting point for you as you explore the world of digital video with the Rebel T1i/500D.
For still photographers, videography seems like learning a new language. And while the language is different, it's a subset of the creative communication that's part and parcel of traditional still photography. So now is a good time to think beyond still shooting and envision ways to create rich multimedia stories with the Rebel T1i/500D.
To appreciate the Rebel's high-definition video capability, it is good to have a basic understanding of digital video and how it relates to the Rebel T1i/500D.
In the world of video, there are several industry standards including 720p, 1080i, and 1080p. The numbers relate to the resolution of the video, while the letters relate to the way in which the video is displayed.
The numbers 720 and 1080 represent vertical resolution. The 720 standard has a resolution of 921,600 pixels, or 720 (vertical pixels) × 1280 (horizontal pixels). The 1080 standard has a resolution of 2,073,600 pixels, or 1080 × 1920. It seems obvious that the 1080 standard provides the highest resolution, and, therefore, you'd think that it would be preferable. But that's not the entire story.
The rest of the story is contained in the "i" and "p" designations. The "i" stands for interlaced. Interlaced is a method of displaying video where each frame is displayed on the screen in two passes — first, a pass that displays odd-numbered lines, and then a second pass that displays even-numbered lines. Each pass is referred to as a field, and two fields comprise a single video frame. This double-pass approach was engineered to keep the transmission bandwidth for televisions manageable. And the interlaced transmission works only because our minds automatically merge the two fields, so that the motion seems smooth with no flickering. Interlacing, however, is the old way of transmitting moving pictures.
The newer way of transmitting video is referred to as progressive scan, hence, the "p" designation. Progressive scan quickly displays a line at a time until the entire frame is displayed. And it happens so quickly that we see it as if it were being displayed all at once. The advantage of progressive scanning is most apparent in scenes where either the camera or the subject is moving fast. With interlaced transmission, fast camera action or a moving subject tends to blur between fields. That's not the case with 720p, which provides a smoother appearance. So while 1080i offers higher resolution, 720p provides a better video experience.
Another piece of the digital video story is the frame rate. In the world of film, the frame rate was 24 frames per second (fps), and this frame rate is responsible for the classic cinematic look of old movies. In the world of digital video, the standard is 30 fps. Anything less than 24 fps, however, provides a jerky look to the video. The TV and movie industries use standard frame rates including 60i that produces 29.97 fps that's used for NTSC (National Television System Committee); 50i that produces 25 fps and is standard for PAL (Phase Alternating Line) that's used in some parts of the world, and 30p that produces 30 fps that produces smooth rendition for fast-moving subjects.
With this very brief background, let's look at the digital video options on the Rebel T1i/500D.
By now, you're probably asking how the Rebel T1i/500D stacks up to industry standards, and other questions including how long you can record on your SD/SDHC card, and how big the files are? Following is a rundown of the digital video recording options that you can choose on the T1i/500D.
Full HD (Full High-Definition) at 1920 × 1080p at 20 fps. You get about 12 minutes of recording time with a 4GB card, and about 49 minutes with a 16GB card. The file size is 330MB per minute. Full HD enables you to use HDMI output for HD viewing of stills and video.
HD (High-Definition) at 1280 × 720p at 30 fps. You get about 18 minutes of recording time with a 4GB card, and 1 hour and 13 minutes with a 16GB card. The file size is 222MB per minute.
SD (Standard recording) at 640 × 480 at 30 fps. You get 24 minutes of recording time with a 4GB card, and 1 hour and 39 minutes with a 16GB card. The file size is 165MB per minute.
So you have two high-quality video options albeit at different frame rates. While the Full HD resolution is a tempting option for its high resolution, 20 fps creates a less than smooth rendition. While the Full HD video option may be an option for still or slow-moving subjects — perhaps an interview with a person who doesn't move around the set — my recommendation is to use the 720p/30 fps HD movie option.
The Rebel produces QuickTime MOV files. This means that videos can be viewed in Apple's QuickTime Player. The QuickTime Player is free, although Apple offers a professional version that supports full-screen video as well as other features.
Here are other important aspects to consider when shooting video.
Audio. You can use the Rebel T1i/500D's built-in monaural microphone that is adequate and better than nothing if you don't want to invest in a separate audio recorder and microphone. The audio is 16-bit at a sampling rate of 44.1 kHz and is output in mono. If you use the built-in mic, be aware that all of the mechanical camera functions are recorded including the sound of the Image Stabilization function, the focusing motor, wind, background noise, and so on. You also have no control over the recording volume.
Exposure and camera settings. Video exposure is fully automatic, although you can use AE Lock and set Exposure Compensation of +/2 stops. You can see what aperture and shutter speed the camera is using by pressing the Display (DISP.) button during recording. You cannot, however, maintain the same exposure through a series of movie sessions. But you can change the focus mode, Picture Style, white balance, recording quality, and still image quality before you begin shooting in Movie mode.
Battery life. At normal temperatures, you can expect to shoot for slightly more than 1 hour, with the time diminishing in colder temperatures. Movie playback with a fully charged battery is approximately 2.5 hours.
Video capacities and cards. The upper limit is 4GB of video. When the movie reaches the 4GB point, the recording automatically stops. You can start recording again provided that you have space on the card, but the camera creates a new file. As the card reaches capacity, the Rebel warns you by displaying the movie size and time remaining in red. Also, Canon recommends a Class 6 SD/SDHC card or faster. Slower cards may not provide the best video recording and playback. If you have a slow card, a five-level meter appears on the left of the LCD to show you how much data is buffered, waiting to be written to the card. If the buffer fills up, recording stops. If you're going to record movies, buy fast cards.
Note
The Rebel T1i/500D does not support the newer SDXC memory card.
Focusing. You have the same options for focusing as you have in Live View shooting with one caveat: If you choose Quick mode, the camera automatically switches to Live focusing mode, for good reason. In Quick mode, the reflex mirror has to flip down to establish focus, and that blackout would create a lousy video experience. I recommend using Live mode or manual focusing and focusing before you shoot.
Note
For more details on Live View focusing options, see Chapter 4.
Still-image shots during recording. You can capture a still image at any time during video recording by pressing the Shutter button completely. This results in a 1-second pause in the video. The still image is recorded to the card as a file separate from the video. The still image is captured at the image-quality setting you've previously set for still-image shooting, and the camera automatically sets the aperture and shutter speed, defaults to Single-shot drive mode, and doesn't use the built-in flash. The white balance, Picture Style, and quality settings that you've set for shooting in P, Tv, Av, M, and A-DEP shooting modes are used for still images.
Some of the setup options for Movie shooting are the same as or similar to those offered in Live View shooting. In particular, the focusing modes are the same in both modes except that Quick focusing isn't used in movie recording.
Before you begin shooting, set up the options you want. When the video is recorded, you have several options for playback described in the following sections.
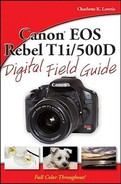
Choosing Movie mode setup options is the first step to shooting video with the Rebel T1i/500D. You can choose the movie recording size, whether to record mono audio, focusing mode, and, as with Live View shooting, you can also display a grid to line up vertical and horizontal lines, set the amount of time the camera retains the last metering for exposure, and whether to use a remote control.
To set movie options, follow these steps:
Set the Mode dial to Movie shooting mode, and then press the Shutter button halfway. The reflex mirror flips up and a live view of the scene appears on the LCD.
Press the Menu button. The Movie mode (red) menu appears. The only time this menu appears is when the Mode dial is set to Movie shooting mode. You'll also notice that the number of menu tabs is decreased in Movie mode.
Select each menu item by pressing the up or down cross key, press the Set button, and then press the appropriate cross key to choose the option you want. You can choose the following options:
Grid display. Selecting the Grid 1 option displays a 3 × 3 grid on the LCD and selecting the Grid 2 option displays a 6 × 4 grid either of which helps you square up horizontal and vertical lines during Live View shooting.
Metering time. Choose the length of time for the camera to maintain the most recent exposure settings. The options are 4, 16, and 30 seconds, and 1, 10, and 30 minutes. If you change between different lighting often, choose a short amount of time. If you are shooting in unchanging light, choose a longer time interval.
Movie rec. size. Full HD at 1920 × 1080p at 20 fps, HD at 1280 × 720p at 30 fps, or SD at 640 × 480 at 30 fps.
AF mode. The options are Live mode, Live mode with Face Detection, and Quick mode. Even if you choose Quick mode, the camera automatically uses Live mode. You can also focus manually, although the action of changing the focus is distracting and intrusive during the movie.
Sound recording. The options are On or Off. If you are using a separate audio recorder and a mic, then choose Off. Because there is no terminal on the camera for another mic, you will have to buy a separate standalone or shoe-mountable unit.
Remote control. The options are Enable or Disable. Choose Enable if you're using the accessory Remote Controller RC-1/RC-5. With RC-1, you can set a 2-second delay, and then press the transmit button. If the switch is set to immediate shooting, then still images will be taken.
Press the Shutter button halfway. The live view of the scene appears on the LCD with a ribbon of camera settings displayed on the left side of the screen. The settings are: focus mode, Picture Style, white balance, movie recording quality, and still-image recording quality.
Press the Set button. The first setting at the left of the screen is selected and displayed in blue.
Turn the Main dial to cycle through to the setting you want.
Press the down cross key to select the next setting you want to change, and then turn the Main dial to make changes.

To record a movie, follow these steps:
Set the Mode dial to Movie shooting mode.
Focus on the subject using the focusing mode you've chosen. Here is how to use the focusing options.
Live mode. Press a cross key to move the white magnifying rectangle so that it is over the part of the subject that you want in focus, and then press the AE Lock button on the top right back of the camera. When focus is achieved, the AF-point rectangle turns green. In Live mode, it can take up to 5 seconds to establish and lock focus.
Live (Face Detection) mode. The camera looks for a face or faces in the scene, and displays corner marks or corner marks with left and right arrows, respectively, over the face(s) it selects. You can press the left or right cross key to move the focusing frame to another face. To focus, press the AE Lock button. When focus is obtained, the corner marks appear in green. If the camera can't find a face in the scene, it displays a solid rectangle and the camera uses the center AF point for focusing.
Manual focusing. You can manually focus by turning the focusing ring on the lens. If you have to change focus during shooting, manual focusing avoids the noise of the AF motor being recorded, but the focusing adjustment can be intrusive to the video.
Press the Live View shooting/Movie shooting/Print/Share button on the back of the camera. A red dot appears in the upper right of the screen indicating recording is in progress. The recording quality and video length are displayed on the left side of the screen.
If you want to set Exposure Compensation, press and hold the Av button on the back of the camera as you turn the Main dial. The amount of compensation is displayed on the Exposure Level Indicator displayed at the bottom of the LCD.
Alternately, you can use Auto Exposure Lock by pressing the ISO button. To cancel AE Lock, press the AF-Point Selection/Magnify button.
Press the Live View shooting/Movie shooting/Print/Share button to stop recording the movie.
As you work with video recording with the T1i/500D, you'll doubtless begin to want more exposure control. Here are a few tips that you can use to get slightly more control and to create better videos.
Exposure. While the Rebel automatically sets the exposure, you can use workarounds. It's beyond the scope of this book to explain advanced metering techniques, but for those who are familiar with metering off a gray card, you can meter off a gray card for video shooting, and then press the ISO button (which becomes the AE Lock button in Movie mode) to retain the meter reading for the video recording.
Depth of field. Without the ability to change the aperture, your creative options for changes in depth of field lie in using the inherent characteristics of your lenses creatively. For example, use a telephoto lens to create a shallow depth of field, and a wide-angle lens for extensive depth of field.
White balance. If you're shooting under mixed light or indoors, you can set a custom white balance for the light you're shooting in before you begin recording the movie. Then when you have the camera ready to shoot, simply switch to the Custom white balance setting (described previously), and it will be used for the video recording.
Smooth recording. Just as with Live View shooting, video recording quickly reveals just how unsteady your hands are and what a challenge it is to create smooth pans and zooms. You can use a tripod with a sturdy ball head or pan and tilt head, but there are other options. The pricey Steadicam Merlin frees you from the tripod and allows you steady handheld shooting because the apparatus absorbs your body movements. Alternately, Manfrotto and other companies produce more affordable camera stabilizers and support systems.
For a quick preview of your movies, you can play them back on the camera LCD. Of course, with the high-definition quality, you'll enjoy the movies much more by playing them back on a television or computer.
To play back a movie on the camera LCD, follow these steps:
Press the Playback button, and then press the left or right cross key until you get to a Movie file. Movies are denoted with a movie icon and the word Set in the upper left of the LCD display.
Press the Set button. A progress bar appears at the top of the screen, and a ribbon of controls appears at the bottom of the display.
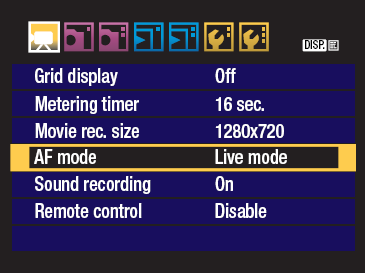
Press the Set button to begin playing back the movie, or press the left or right cross key to select a playback function, and then press the Set button. You can choose from the following:
Exit. Select to return to single-image playback.
Play. Press the Set button to start or stop the movie playback.
Slow motion. Press the left or right cross key to change the slow-motion speed.
First frame. Select to move to the first frame of the movie.
Previous frame. Press the Set button once to move to the previous frame, or press and hold the Set button to rewind the movie.
Next frame. Press the Set button once to move to the next frame, or press and hold the Set button to fast forward through the movie.
Last frame. Select to move to the last frame or the end of the movie.
Volume. Denoted as ascending gray or green bars, just turn the Main dial to adjust the audio volume.
Press the Set button to stop playing the movie.
Note
You can choose to play back only movies. Just go to the Playback 2 (blue) menu, choose Slide show, and then press the Set button. On the Slide show screen, press the up or down cross key to select All images, and then press the Set button. Press the up or down cross key until Movies is displayed, and then press the Set button. Press the down cross key to select Start, and then press the Set button to begin playing all movies. Press the Set button to stop playing the movies.
To play back movies on a TV, follow these steps. To connect the camera to an HD TV, you must have an accessory HDMI Cable HTC-100.
With the camera turned off, connect the supplied AV cable to the camera's A/V Out/Digital terminal. For an HD TV, connect the HDMI cable to the HDMI terminal on the camera's HDMI Out terminal.
Connect the other end of the AV cable to the Video In terminal and Audio In terminals of the TV. For an HD TV, connect the HDMI cable to the HDMI In port.
Turn on the TV and select the video input to the connected terminal.
Turn on the camera, and then press the Playback button.
Unless you're an accomplished videographer, your movies will almost certainly benefit from judicious editing. And editing is the way to join multiple video clips, add titles, and add background music to present a polished and complete story.
Basic editing is available using Canon's MovieEdit Task program and is accessible through the Zoom Browser/Image Browser program on the supplied EOS Solution Disk. You can edit movies except 1920 × 1080 MOV files. With this program, you can:
Arrange and order movie clips on a storyboard, and then add effects including text or filters such as sepia, enlarge parts of the movie, and set transitions.
Adjust the audio with Fade In and Fade Out volume changes, add MP3, AIFF, or WAV audio files as background music.
Cut movies to set the start and end points.
Grab a still frame from video footage. Frame grabs range from 2 million pixels for a 1920 × 1080 video, 1 million pixels for a 1280 × 720 video, and about 300,000 pixels for a 640 × 480 video.
Certainly Canon's Image Browser is a good starting point. If you want greater functionality for movie editing, there are many commercial programs that range in price from shocking and sobering to comfortably affordable. Here are some programs that you may want to consider.
Apple Final Cut Pro. This advanced video-editing program is part of Apple's Final Cut Studio 2 suite. Final Cut Pro supports all video formats.
Adobe Premier. This is also an advanced editing program that enables you to work with multiple videos, add audio tracks, color correct, and make other edits.
Adobe Premier Elements. This is the "light" version of Adobe Premier that's designed for nonprofessional videographers. Use it to add audio, narration, text, special effects, transitions, and pictures in pictures, and more.
Corel VideoStudio Pro X2. This Windows program enables you to capture, edit, burn, and view HD video as well as create montages, picture-in-picture effects with multiple video, add audio and title tracks, and more.
iMovie. This Mac-only program is easy to use and enables you to skim movies, cut and paste video clips together, add music, add themes, titles, and special effects, correct color, and more.
Windows Movie Maker. This PC-only program offers the same general capabilities as iMovie.
Sony Vegas. This line of programs comes in packages for users of different skill levels. The Platinum version supports HD video editing, and you can alternately move up to the Platinum Pro Pack or Vegas Pro at, of course, increasing cost levels.