
Chapter One
Getting Started with InDesign
InDesign is a powerful page layout program renowned for its ease of use, precision, and integration with other applications in the Adobe Creative Suite. Hallmark features of InDesign include professional type and graphics handling, drawing tools, transparency, and Adobe Photoshop effects. Expert preflight tools help you prevent possible output problems when working on print publications. For online publications, you can export InDesign files that contain movies, sounds, and interactivity as media-rich PDFs and—new to InDesign CS4—you can export interactive SWF files. With powerful creative tools and flexible workflow features at their fingertips, graphic designers around the globe use InDesign to produce all types of print and electronic publications. Many of the publications you see—including magazines, books, newsletters, brochures, posters, and online catalogs—are produced in InDesign, often in concert with Adobe Photoshop and Adobe Illustrator.
InDesign is a mature program with many features. It’s possible, after all, to use InDesign to do everything from creating a one-color business card or a five-color poster to exporting XML tags for an automated catalog system. That’s why this book breaks down the software into the 100 most essential tasks you need to know to hit the ground running. Whether you’re new to page layout software or you’re switching from another program, you can use this book to learn InDesign’s most important features and start producing your own high-quality publications.
A few notes about this book may help you understand its approach. Although keyboard shortcuts can really streamline tasks, we did not include them. Almost every feature has a keyboard shortcut, so including them for both Mac OS and Windows adds a significant amount of clutter. For the complete keyboard shortcut list, see the InDesign Help file. In addition, InDesign offers several ways to perform almost every task. Rather than attempt to include every method, we present the easiest and most obvious methods.
In this chapter, you’ll learn how to customize the software and interface; how to manage the many floating panels; and how to use Help.
When you first launch InDesign, the Welcome screen displays (Figure 1). If you’re new to InDesign, you can use features of this screen to orient yourself to your new software. If you’re ready to launch into a project, however, you can open new and existing files from this screen. The Welcome screen also provides quick access to InDesign and Adobe resources such as user groups and plug-ins.

To open existing InDesign files, use the options in the Open a Recent Item area in the upper-left corner of the Welcome screen.
• File List: The Open a Recent Item area lists the last nine documents you opened. To open one of these documents, click its name.
• Open Button: To open any InDesign file, click the Open button. This opens the Open a File dialog box to the last location (file path) from which InDesign opened a file (see #12 for more information).
If you’re ready to get started on a new project, use the Create New area in the upper-right corner of the Welcome screen.
• Document: This lets you set up the page size and other details for a new document (see #9 for more information).
• Book: This lets you create a book file for managing all the documents that make up a single publication (see #84 for more information).
• Library: This lets you create a library for quick access to frequently used objects (see #71 for more information).
• From Template: This opens Adobe Bridge so you can locate and open a template to use as the basis for a new document.
The lower-left corner of the Welcome Screen provides one-stop shopping for more information about InDesign and other Adobe products:
• Getting Started: Click this link to display the Getting Started page of the Help file, which takes you to information about installation, new features, and more.
• New Features: Click this link to display the What’s New page of the Help file and focus on the differences between CS3 and CS4.
• Resources: Click this link for video workshops, free extras such as fonts and templates, customer support information, and the like.
The Community links in the lower-right corner of the Welcome screen take you to InDesign information on the Adobe Web site. The links provide:
• InDesign Exchange: Download templates, tutorials, plug-ins, and scripts—many of which are free.
• InDesign User Group: Read news and participate in discussions.
• InDesign Partners: Get information on print providers and trainers.
• InDesign Plug-ins: Find useful third-party plug-ins that expand the software’s capabilities.
Preferences let you customize various features in InDesign. For example, you can change the measurement system, the color of guides, and the display quality. If you’re working on a document or project and find yourself thinking “I wish InDesign did it this way...” chances are you’ll find a preference to fulfill your wish.
The most important thing to know about preferences is whether you’re changing them for an individual document or for InDesign:
• When no documents are open, changes to preferences affect all new documents; they do not affect existing documents.
• When documents are open, changes to preferences affect only the active document.
To edit preferences, choose InDesign > Preferences > General (Mac OS) or Edit > Preferences > General (Windows). In the Preferences dialog box (Figure 2), click an option in the list at left to display that pane. You can also choose an option from the Preferences submenu (such as Type, Grids, or Spelling) to open the Preferences dialog box to a specific pane.
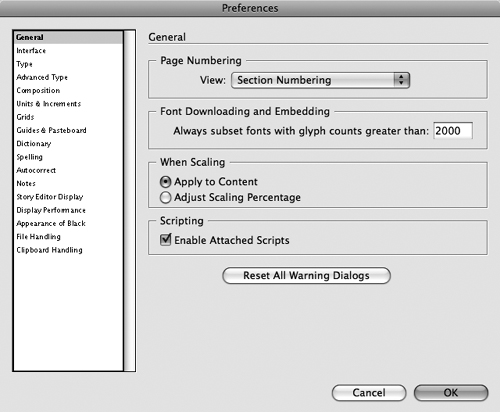
With its 17 panes and more than 100 options, the InDesign Preferences dialog box offers more controls than we can cover in this book. However, if a preference setting has a significant impact on how something works, we mention it in the context of that feature. For example, we discuss Spelling preferences in #30. It’s definitely worth your time to flip through the panes in the Preferences dialog box to see if there’s anything you’d like to change. Preferences with default settings you might want to change include:
• Type pane: If you’re accustomed to leading being paragraph-based rather than character-based, you can check Apply Leading to Entire Paragraphs while adjusting other typography settings. If you’re working with long blocks of text, you might want to turn on Smart Text Reflow, which automatically adds pages and threads text frames to contain all the text in an imported file. (This is similar to auto-page insertion in QuarkXPress.)
• Units & Increments pane: If you’re not comfortable working in the default measurement system of picas, change it here.
• Spelling pane: If InDesign is your primary word processor, you might prefer to have possible misspellings flagged as you type. If so, check Enable Dynamic Spelling.
• Display Performance pane: By default, InDesign attempts to optimize speed with quality when displaying type and graphics. You can adjust these settings to see more detail, increase speed, and more. For example, you can choose High Quality from the Default View menu if you prefer to see high-resolution previews of graphic files. You can also decrease the Greek Type Below value to prevent text from displaying as gray bars onscreen.
InDesign provides hundreds of keyboard shortcuts to streamline your work. Nonetheless, some features do not have keyboard shortcuts and some of the shortcuts are hard to remember. Fortunately, you can change the keyboard shortcuts to better suit the type of work you do and your manual dexterity. For example, if you frequently use the Change Case commands or the Fill with Placeholder Text command in the Type menu, you can create keyboard shortcuts for those commands. Or, if a command you use frequently has a finger-contorting shortcut, you can replace it with an easier one.
InDesign stores keyboard shortcuts in sets. You can create your own sets of keyboard shortcuts and select a different set at any time while you’re working.
To specify a shortcut set for use with InDesign, choose Edit > Keyboard Shortcuts. Choose an option from the Set menu. If you’re familiar with PageMaker 7 or QuarkXPress 4, you can use that program’s keyboard shortcuts for similar features. The selected shortcut set is in use for your copy of InDesign—it is not saved with the active document.
You can edit the shortcuts for any command in any set—even the Default, PageMaker 7, and QuarkXPress 4 sets. However, it’s a good idea to keep these default sets intact. Instead of editing them, create a new set based on one of them, and then edit it. To edit shortcut sets:
1. Choose Edit > Keyboard Shortcuts.
2. Choose an existing set to edit from the Set menu, or click New Set. If you create a new set, enter a name for it and choose an option from the Based on Set menu to specify a source for the initial list of keyboard shortcuts.
3. To locate the command whose shortcut you want to edit, choose an option from the Product Area menu. For example, if the command is in the Type menu, choose Type Menu.
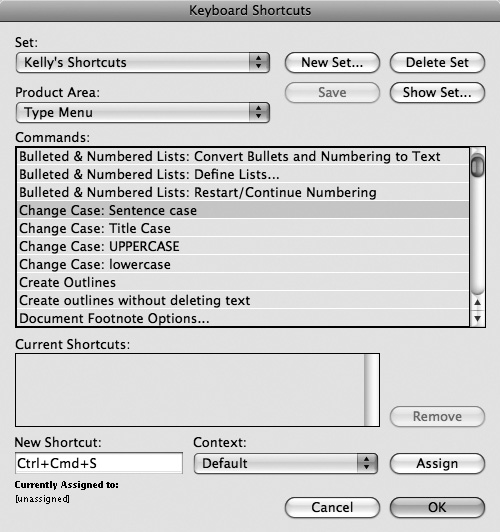
4. Scroll through the Commands list to locate the individual command and select it. For example, if you want to create a shortcut for Type > Change Case > Sentence case, select it (Figure 3).
5. If the command already has a keyboard shortcut, it’s displayed in the Current Shortcuts field. Select it and then click Remove.
6. Click in the New Shortcut field, and press the new keyboard shortcut you’d like to use for the command. A note under the field lets you know if that shortcut is already in use.
7. If you want the shortcut to work only in certain situations—such as when working with text—choose an option from the Context menu. (Otherwise, leave it at Default.)
8. Click Assign.
While you’re working in the Keyboard Shortcuts dialog box, you can click Save at any time to preserve your changes.
Ninety-nine percent of the time you’re working, you will have the Tools panel open so you can create and modify the objects that make up your pages. You’ll reach for the Tools panel frequently to switch tools, so you’ll want to position it and configure it in a way that’s convenient for you.
If the Tools panel isn’t displayed onscreen, choose Window > Tools. To configure and position the Tools panel:
• By default, the Tools panel is docked at the left side of the screen. Drag the title bar (the light gray bar) at the top of the Tools panel to reposition it. Once you drag it away from the edge of the screen, the panel is no longer docked. You can dock it again by dragging it to the edge of the screen.
• When the Tools panel is docked, click the small double arrows on the title bar to toggle between a double column and a single column.
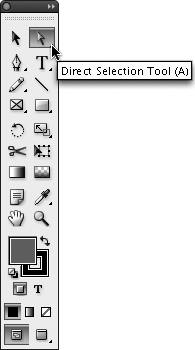
• When the Tools panel is not docked, click the small double arrows on the title bar to switch among a double column, a single column, or a single row (Figure 4a).
You can also configure the Tools panel by choosing an option from the Floating Tools Panel menu in the Interface pane in the Preferences dialog box. The options are Single Column, Double Column, and Single Row.
In the Tools panel, the tools are positioned according to function. Starting at the top (or at left if the panel is horizontal), first you’ll find selection tools, and then drawing and type tools. After that, the panel contains transformation tools followed by modification and navigation tools. If you move the pointer over a tool, a tool tip displays the name of the tool and its keyboard shortcut (Figure 4b).
If tool tips are not displaying, choose Normal or Fast from the Tool Tips menu in the Interface pane in the Preferences dialog box.
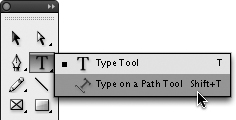
To select a tool, move the pointer over it and click. To use a tool that’s hidden in a pop-out menu (indicated by a small triangle next to the tool’s icon), click and hold on the tool. When the pop-out menu displays, select another tool (Figure 4c). The hidden tool replaces the original tool in the Tools panel.
To quickly switch tools, you can press the keyboard shortcuts shown in the tool tips. For example, you can press P to select the Pen tool or H to select the Hand tool. (If the text cursor is flashing, you cannot use the single-letter shortcuts.)
The context-sensitive Control panel provides comprehensive options for modifying whatever is currently selected—a graphics frame, text frame, text, graphic, table cells, and more. In fact, if you keep the Control panel open, you are unlikely to need many of InDesign’s other panels and dialog boxes. Since the Control panel is so useful, you’ll want to keep it handy.
• When you first launch InDesign, the Control panel is docked to the Application bar at the top of the screen. (A panel is “docked” when it snaps to—or automatically aligns with—the edge of the screen or another panel.)
• You can drag the Control panel to any location, such as the bottom of the screen, by dragging its title bar (the vertical gray bar at the far left edge of the panel).
• Click the arrow
![]() at the right side of the panel to display the Control panel menu. At the bottom, you can choose Dock at Top, Dock at Bottom, or Float to position the panel.
at the right side of the panel to display the Control panel menu. At the bottom, you can choose Dock at Top, Dock at Bottom, or Float to position the panel.
• To reduce the width of the Control panel (when it is not docked), drag the lower-right corner. Depending on how much you reduce the width, some of its options may be hidden.
• To open and close the Control panel, choose Window > Control.
The options on the Control panel change depending on what you’re editing at any given moment (Figures 5a–5c). For example, if you select a frame using the Selection tool, a set of options relating to frames displays. For the most part, these options change automatically. When you’re formatting text, you can click the character button
![]() or the paragraph button
or the paragraph button
![]() to control which options display more prominently at left.
to control which options display more prominently at left.
As with the Tools panel, point the mouse at any option on the Control panel to display its tool tip and find out what it does.
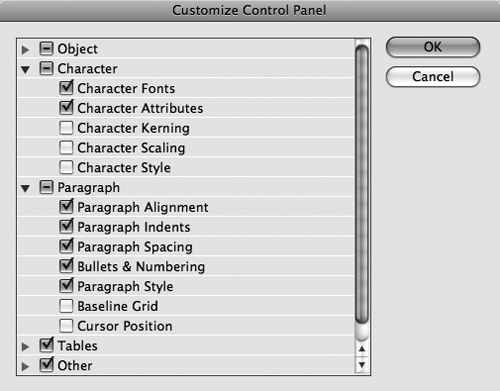
To increase the power—or to reduce the size and complexity—of the Control panel, you can customize it. Choose Customize from the Control panel menu to open the Customize Control Panel dialog box (Figure 5d). Click the arrow next to a category of controls (such as Character) to see all the options (such as Fonts, Kerning, or Style). Check any options you want to add to the Control panel and uncheck any options you want to hide. For example, check Paragraph Style to add a menu for applying paragraph styles to the Control panel. When you’re finished, click OK.
InDesign’s feature set is so rich and sophisticated that it can leave users overwhelmed by the sheer number of panels and menu commands. You can streamline the interface to suit your needs, displaying only the panels and menu commands you need, and configuring panels according to how you work. Once you have the interface set up the way you like it, you can save it as a workspace. It’s easy to switch to different workspaces and restore the default interface.
The panels in InDesign put all the artistic tools you need at your fingertips. As you’ll quickly discover, however, the scores of panels can clutter your screen. If you have a second monitor, you can relocate them there, leaving them open and ready to use. But if you don’t have that luxury, particularly if you’re working on a laptop or you’re using a small monitor, you’ll need to control which panels are open and their positions onscreen.
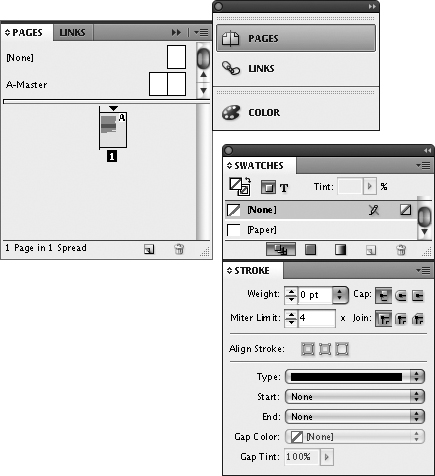
The best way to understand the panel-management techniques is to simply click around and play with the panels. Once you get the hang of it, choose Window > Workspace > Reset Essentials (or the current workspace name) to restore the default configuration. You can then set up the panels the way you want them and save the configuration as a workspace. In the default panel configuration, the most frequently used panels are open but minimized into icons and docked on the right side of your screen (Figure 6). To manage panels:
• Working with icons: To expand an icon from the dock into a panel group, click its icon. A group is a collection of panels that move as a unit. From the dock, only one panel group can be expanded at a time.
• Working with the dock: To remove an expanded panel group from the dock, drag the group’s title bar away from the dock. You can drag individual panels and panel groups back into the dock in the same way. If you drag all the panels out of the dock, you can recreate the dock by dragging panels to the edge of the screen.
• Opening and closing panels: To open a panel, choose its name from the Window menu. To close a panel, click its close button in the upper-left corner or choose its name from the Window menu again.
• Working with groups: To display a panel within a group, click its tab. You can also drag a panel out of a group so it stands alone or drag it into another group.
• Stacking panels: You can snap stand-alone panels and groups together vertically so they move together as a unit. To do this, drag a panel or group to the bottom of another panel or group. Drop the panel or group when a blue line displays.
• Resizing panels: You can resize panels such as Pages, Paragraph Styles, and Character Styles by dragging the lower-right corner.
If the menus are too long or complex for your taste, you can easily remove commands you don’t use to shorten and simplify them. You can save edited menus as sets, and save the menu sets in your workspaces.
To customize the menus, choose Edit > Menus. In the Menu Customization dialog box, use the Category menu to specify Application Menus or Context & Panel Menus. Then, locate and uncheck any commands you want to hide. Click Save As to give the menu set a name. Choose the set to use from the Set menu, and then click OK. Anytime you want to switch to the default menus, choose Window > Workspace > Show Full Menus.
Plug-ins are software modules that add features to InDesign. Many standard features of InDesign are actually implemented through plug-ins, so they can be easily updated. You can install additional plug-ins from Adobe and other companies to customize InDesign to your workflow. For example, you might purchase a plug-in that adds sophisticated database publishing features for automatically laying out a catalog.
Adobe makes it easy to find third-party plug-ins that meet your publishing needs, and InDesign makes it easy to control which ones you’re using at any given time. Features added by plug-ins are integrated directly into the software as menu commands, panels, dialog boxes, and so on.
If you have a specific publishing need, check the Adobe Web site for a complete list of third-party plug-ins available for InDesign. (Choose Help > Welcome Screen, and then click InDesign Plug-ins.) If you know that you could save a lot of time if InDesign “just did this,” search for a plug-in. You’ll find plug-ins for automatically activating fonts as you open documents, for performing math calculations in InDesign, and for creating bar codes, among the many other plug-ins available.
Once you acquire a plug-in, follow the instructions provided with it for installation. If no instructions are provided, drag the file to the Plug-Ins folder within your InDesign application folder.
If you buy a lot of plug-ins, you’ll be tempted to run them all—all the time. Why get them if you’re not going to use them? However, since plug-ins take time to load when you start up InDesign and they sometimes conflict with each other, you might not want to run all of them all the time. To control which plug-ins load, you can create sets of plug-ins, which you can share with other users. (Some plug-ins provided by Adobe with InDesign are required by the program so you can’t change their status.)
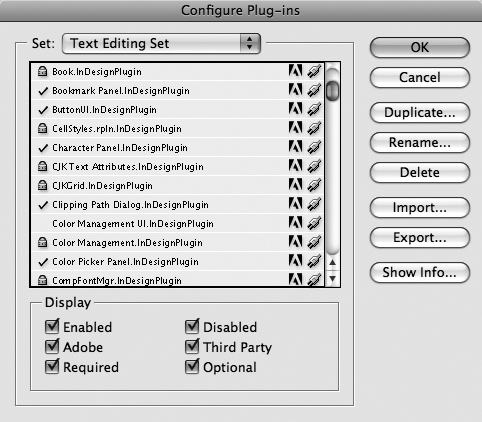
To configure the plug-ins running in InDesign, choose InDesign > Configure Plug-ins (Mac OS) or Help > Configure Plug-ins (Windows). The Configure Plug-ins dialog box (Figure 7) lets you manage plug-ins as follows:
• Set menu: Choose a set of plug-ins to edit or to run with InDesign. You cannot edit the default sets (All Plug-ins, Adobe Plug-ins, or Required Plug-ins), but you can duplicate them and then edit the duplicates.
• Plug-ins list: Click a check mark to the left of a plug-in name to control whether it loads with InDesign.
• Duplicate and Rename buttons: To create a custom set of plug-ins, duplicate one of the default sets and then rename it. For example, you might create a set of plug-ins specifically for production processes.
• Delete button: If you no longer need a set of plug-ins, you can remove it by clicking Delete. This does not delete your plug-ins—only the set.
• Import/Export buttons: Use these buttons to share plug-in sets in a workgroup; each user needs his or her own copies of the plug-in software as well.
• Show Info button: Click this button for information about a selected plug-in such as the version number and vendor.
Note that changes made in the Configure Plug-ins dialog box—including selecting a new set of plug-ins to load—take effect only when you restart InDesign.
InDesign CS4 introduces a new, interactive, online InDesign Help and Support Center. Choosing Help > InDesign Help launches your favorite browser and takes you to a special section of the Adobe Web site. This approach has several advantages: Adobe can update the information as necessary; information about all the Adobe Creative Suite products is in one place; and training materials, videos, articles, and troubleshooting tips are consolidated in this area. The most promising aspect of this new system is that you enter an entire community of InDesign users who can provide real-world ideas and assistance as well. The trick is to not become overwhelmed—or sidetracked—by the sheer volume of information.
To get started with InDesign Help:
1. Choose Help > InDesign Help. If you do not have a live Internet connection, see the sidebar at left. The InDesign Help and Support page opens in your preferred browser.
2. To get straight to the answer you need on InDesign, click InDesign Help at right. InDesign-specific Help opens in a new window.
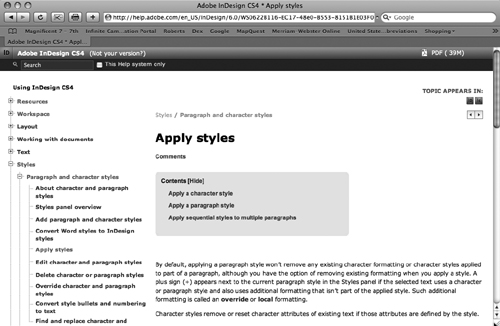
3. Click the options under Using InDesign CS4 at left to display various topics (Figure 8a). While reading feature descriptions and steps, you can read user comments and add your own.
You might be tempted to search the InDesign Help rather than fumbling through the topics list, attempting to guess where a feature might be covered. However, the Search works like a search-engine search, providing a list of possible resources to wade through. For best use:
1. Type specific keywords in the Search field, which is above the Using InDesign CS4 topics list.
2. Check This Help System Only next to the Search field. This narrows the answers to the InDesign Help rather than the entire Adobe Web site.
3. Press Return/Enter to display links that may help (Figure 8b).
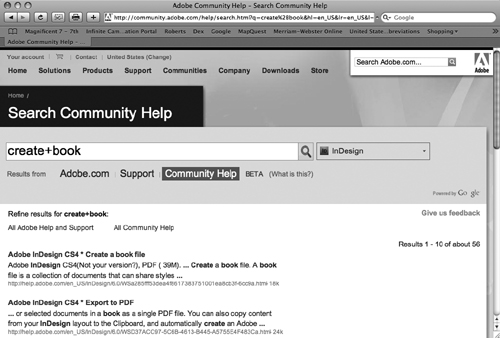
4. Click a link to display the information.