Chapter Ten
Creating Rich Interactive Documents
InDesign is generally thought of as page layout software for print publishers, and rightly so. It has many typographic, page design, and long document features that print publishers use to create design-intensive publications. InDesign also has several features that let you create visually rich, interactive online publications.
The ability to export InDesign layouts as dynamic SWF files is new in InDesign CS4 and allows publication designers and interactive design professionals to collaborate on interactive documents. The SWF files you export can include interactive buttons, hyperlinks, and page transitions and can be viewed using the free Adobe Flash Player. If you want to take things even further, InDesign CS4 lets you export XFL files, which you can open in Flash CS4 Professional to add more sophisticated interactivity, movies, animation, sound, and navigation.
You can also create media-rich interactive documents for online distribution and viewing by exporting InDesign layouts as Adobe PDF files. Over the past decade, PDF has become an important technology for both print and Web publishing. InDesign lets print publishers export documents and books as PDF documents that can be used for a variety of purposes, from electronic distribution and onscreen review to high-resolution output. Web publishers can create InDesign layouts that include hyperlinks, bookmarks, buttons, movies, and sounds. Viewers can use the free Adobe Reader to view the interactive, media-rich PDF documents that you export from InDesign.
In this chapter you’ll learn how to add hyperlinks, buttons, and page transitions to InDesign layouts that you will export as SWF and PDF.
If you want to export a layout that was created for onscreen display as a SWF file or PDF document, you have the option to include hyperlinks that viewers of the exported files can click to jump to other places within the document, to other documents, or to Web sites.
To create a hyperlink, you have to specify two components: the source, which is the object or text that will act as the jumping-off point, and the destination to which the source points and where the user is taken after clicking. A hyperlink destination can be a page or a range of text within the document, another document, or a Web site.
To create a hyperlink destination on the Internet:
1. Choose Window > Interactive > Hyperlinks to open the Hyperlinks panel.
2. Choose New Hyperlink Destination from the panel menu.
3. In the New Hyperlink Destination dialog box (Figure 90a), choose URL from the Type menu. Specify a name for the destination and enter a valid Internet address in the URL field. Click OK.

To create a hyperlink that jumps to a range of text within a layout, you must first create a text anchor to use as the hyperlink destination. To create a text anchor, click within text or select a range of text, and then choose New Hyperlink Destination from the Hyperlinks panel menu. You can use the default name in the Name field or assign a different name.
After you create hyperlink destinations, you’re ready to create the source hyperlinks that jump to them. To create a new hyperlink:
1. Select an object or highlight a range of text, and then choose New Hyperlink from the Hyperlinks panel menu.
2. In the New Hyperlink dialog box (Figure 90b), choose Shared Destination in the Link To menu so that you can select the hyperlink destination you created earlier. The choice you make in this menu determines the controls displayed in the Destination section.
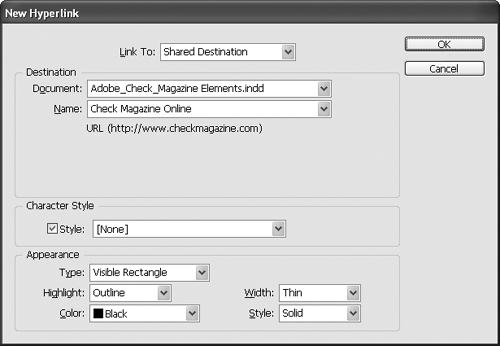
3. Choose the hyperlink destination you created earlier (see previous page) from the Name menu in the Destination section (or choose a different name if you’ve created more destinations).
4. Use the controls in the Appearance area to specify how the hyperlink is displayed in the exported SWF or PDF document.
You can test a hyperlink by selecting it in the Hyperlinks panel and then choosing Go To Destination from the panel menu.
If you’ve included hyperlinks in an InDesign document, make sure you check Include Hyperlinks in the Export SWF dialog box or the General tab of the Export Adobe PDF dialog box when you export the document. For information about exporting InDesign documents as SWF and PDF, see #93.
Creating hyperlinks is one way to add interactivity to InDesign documents that you export as SWF or PDF. Adding buttons is another. Buttons are similar to hyperlinks in that you can configure them to jump to other pages within a document, to other documents, and to URLs; however, buttons can also perform other actions, such as opening a file, changing the view magnification, or—in an exported PDF document—playing a movie or a sound.
To create a button:
1. Select the object you want to use as a button and choose Object > Interactive > Convert to Button.
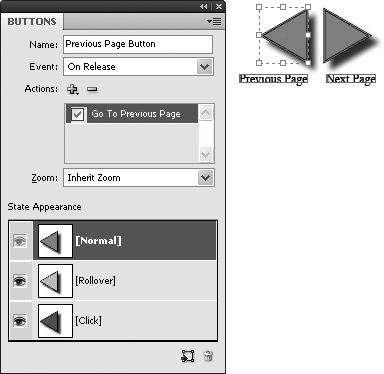
2. In the Buttons panel (Figure 91), enter a name for the button in the Name panel, and then choose a mouse action—On Release, On Click, On Roll Over, On Roll Off, On Focus, or On Blur—from the Event menu that will trigger the action associated with it. If you want the action to occur when the user releases the mouse button after clicking, choose On Release.
3. Click Add new action for selected event (
![]() ) to display a menu of available actions, and then choose an action.
) to display a menu of available actions, and then choose an action.
4. Some actions display additional options that let you control one or more aspects of the action. For example, if you choose any of the go-to-page options (for example, Go To First Page), you can also choose the Zoom setting that’s applied when the button is used. If you choose Go To URL, the URL field lets you specify a URL.
If you want, you can add multiple mouse events with different actions to a single button, and you can add multiple actions to a single mouse event. For example, you could configure a single button that plays a sound when a user of the exported SWF or PDF file moves the pointer over the button (Rollover) and plays a movie when a viewer clicks the button (Click). Click Add new action for selected event (
![]() ) each time you want to add an action to the selected mouse event.
) each time you want to add an action to the selected mouse event.
If you’ve included buttons in an InDesign document, make sure that when you export the file as SWF or PDF you check Interactivity: Include Buttons in the Export SWF dialog box and you check Include Interactive Elements in the General pane of the Export Adobe PDF dialog box.
The ability to add animated page transitions that users will see as they navigate between pages in the SWF and PDF files you export is new in InDesign CS4. You can preview the built-in page transitions in InDesign as Flash animations, and you can experiment with different speeds and transition directions. Among the dozen page transition options are Curl, Wipe, Dissolve, and Split Window.
When a viewer of an exported SWF or PDF file navigates from page to page—for example, by clicking Previous Page and Next Page buttons—the page transitions you specify determine what happens visually when one page replaces another onscreen.
To specify the visual effect that’s used when a page is displayed in an exported SWF or PDF file:
1. Select a page in the Pages panel (Window > Pages). Select multiple pages to apply a transition to all of the selected pages.
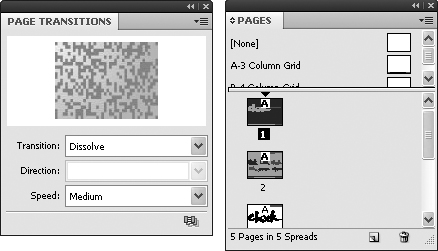
2. Choose Window > Interactive > Page Transitions to display the Page Transitions panel (Figure 92).
3. In the Page Transitions panel, choose an option from the Transition menu. For most options, you can also specify Direction and Speed.
Figure 92 When you choose a page transition, it’s applied to the pages that are currently selected in the Pages panel. In this example, pages 1 and 2 are selected, so the dissolve transition will display at medium speed—as specified in the Page Transition panel—when these pages are displayed after the file is exported as SWF or PDF.
Unfortunately, you can’t actually see the page transitions you’ve applied until you view the exported Flash or Adobe PDF file.
To clear all of the page transitions you’ve added to a layout, choose Clear All from the Page Transition panel menu.
When you’ve finished adding buttons, page transitions, and hyperlinks to a rich interactive layout, you’re ready to export it as a Flash (SWF) file or PDF file. Once you’ve exported an SWF or PDF file, you should open the file and test your interactive elements. (Note: SWF files can be opened and viewed using Adobe Flash Player, a free utility available at the Adobe Web site [www.adobe.com]. PDF files can be opened and viewed using Adobe Reader, also available for free from the Adobe Web site.)
To export an InDesign layout as a Flash file:
1. Choose File > Export.
2. In the Export dialog box, choose SWF from the Save As Type menu (Windows) or the Format menu (Mac OS), and enter a name in the File name field.
3. Use the controls in the Export dialog box to choose a storage location for the exported file, and then click Save.
4. Modify the settings in the Export SWF dialog box (Figure 93a). Make sure you check Include Buttons, Include Hyperlinks, and Include Page Transitions in the Interactivity section.

If you select Generate HTML File in the Export SWF dialog box, an HTML page that contains the SWF file is created, and you can view the page in your Web browser. If you also select View SWF after Exporting, the HTML file automatically opens and plays the embedded SWF file in your default browser. (Note: View SWF after Exporting is available only if Generate HTML File is selected.)
Exporting a PDF file that contains interactive and multimedia elements (see sidebar at left) is much the same as exporting an SWF file:
1. Choose File > Export.
2. In the Export dialog box, choose Adobe PDF from the Save As Type menu (Windows) or the Format menu (Mac OS), and enter a name in the File name field.
3. Use the controls in the Export dialog box to choose a storage location for the exported file, and then click Save.
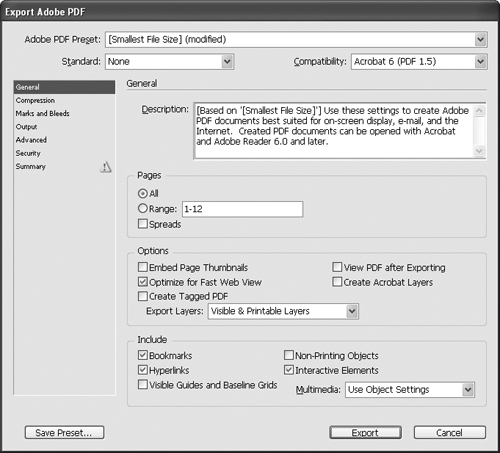
4. In the Export Adobe PDF dialog box (Figure 93b), choose Smallest File Size from the Adobe PDF Preset menu. Make sure you check Buttons, Hyperlinks, and Interactive Elements in the Include section of the General pane. Click OK when you’re done making changes.