![]() Constraints can get a bad rap sometimes. Once you understand the nuts and bolts and how to think about them, they become a great tool in creating more expressive animation.
Constraints can get a bad rap sometimes. Once you understand the nuts and bolts and how to think about them, they become a great tool in creating more expressive animation.
5
Constraints
SOONER OR LATER every animator must have a character interact with a prop, and that means we need to work with constraints. They can seem a tad complicated at first, but once you understand how they work, you can design a constraint system that is simple and flexible. The next few cheats will tell you what you need to know about constraints as an animator. Then we'll look at some tools that will make constraining a breeze.
Parenting
NOVICE ANIMATORS SOMETIMES confuse parenting and constraining. These two processes behave somewhat similarly, but are quite different under the hood. First let's look at how parenting works.
Parenting is essentially indicating the center of an object's universe. By default, an object created in Maya exists in 3D space, and the infinite area inside the viewport is its central universe.
When we parent an object to another object (referred to as the parent), we are making the child object's central universe the parent object, instead of the 3D space. The child can still be moved independently, but its location is defined by where it is in relation to its parent, not where it is in space.
Think of it like this: you are currently parented to the earth. If you are sitting at your computer reading this book, as far as you're concerned, you're not moving. If you get up to get a soda from the fridge, you would say you've moved to a new location. Now think beyond earth and consider your position in the galaxy. When you're at your computer thinking you're not moving, you actually are moving through space (at 65,000 mph!) because the earth is moving through space and you are on it. It's your own perspective that you're not moving, but in relation to the entire universe, you are. This relationship of you to the earth to the galaxy is the same as a child parented to its object in Maya's 3D space. Let's observe this in Maya.

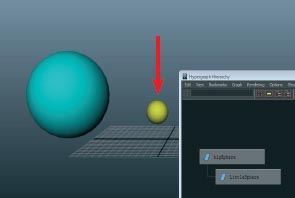
1 Open parenting.ma. Here I've created two spheres, and right now they're independent of each other. We can see in the hypergraph (Window > Hypergraph: Hierarchy) that they're side by side, indicating two separate objects.
2 Notice the coordinates for the little sphere in the Channel Box, indicating their position in world space. Move the little sphere and you will see these coordinates update accordingly.

3 First select the little sphere (the child), then shift select the big sphere (the parent) and press ![]() to parent them. We can see in the hypergraph that they are now connected. We've created a hierarchy. The little sphere now uses the big sphere as its reference point.
to parent them. We can see in the hypergraph that they are now connected. We've created a hierarchy. The little sphere now uses the big sphere as its reference point.

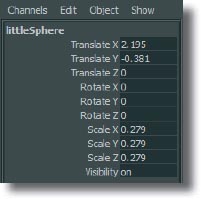
4 This is also indicated in the Channel Box, where we see that, although nothing has changed in the viewport, the little sphere coordinates are different, to reflect the new relationship.

5 Move the big sphere using the move tool ![]() , and the little sphere follows accordingly, maintaining its position.
, and the little sphere follows accordingly, maintaining its position.
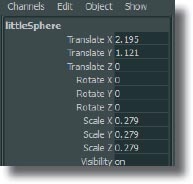
6 If we look at the little sphere's coordinates in the Channel Box they're still the same. Its reference point for moving is only in relation to the big sphere, just like our intro example: our perception of moving is related to the earth, rather than the universe.
7 Use the move tool again to translate the little sphere.
8 Now the translate channels for the little sphere change, because it's in a different position relative to the parent.

9 What's this have to do with animating? Knowing the difference between parenting and constraining will help you make a flexible system when using props with your characters. Next we'll look at how constraints work, and then how to use these methods together.
![]()
parenting.ma
When parenting, the order you select the objects in determines what is parented to what. Think “child runs to the parent” to help you remember to select the child first. To unparent, use ![]() +
+![]() with the child selected.
with the child selected.
Parent Constraints

CONSTRAINED OBJECTS are fundamentally different from parented ones in that they still ultimately reference their position from the origin. They simply get their translate, rotate, and/or scale information told to them by their master object. Think of it as a direct line from the master object's attributes to whichever attributes are constrained (which can be any or all of them) in the target object. When we have constrained a prop to a character's hand, it isn't actually “stuck” there; it just receives the same location information which makes it follow along.
Because of this direct line, we can't move constrained objects, because they're “hardwired” to the master object. We can turn the constraint off (using what's called the weight), but if it's on, the constrained attributes cannot be altered independently of the master object.
We can see that there is sort of a yin-yang balance with parenting and constraints. Parenting cannot be turned off or on over the course of an animation, but you can move the child object independently. Constraints can be turned on or off yet are locked to their master object while on. In setting up effective constraint systems, we can use the strengths of each to get the results we need.

1 Open parentConstraint.ma. There are many types of constraints, but as an animator you'll probably use parent constraints most of the time. Parent constraints connect the translate and rotate attributes, and the constrained object behaves as if it were parented, except for not being able to move it independently.

2 In this scene we have two independent objects, a cone and a box. Go to Window > Hypergraph: Hierarchy. Notice how they are not connected.
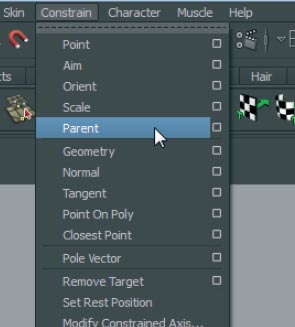
3 Constraint selection order is the opposite of parenting, with the master object being selected first. Select the cone, then shift select the box, and in the Animation menu go to Constrain > Parent. The names can make things confusing, but keep in mind this is a constraint, so you are not actually parenting these objects.

4 In the hypergraph, notice that the objects stay disconnected, and we see a constraint node appear. This is connected to the box, because it looks at the translate and rotate data of the cone, and “tells” the box to do the same.
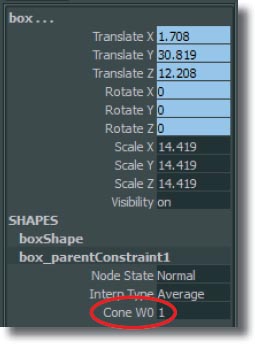
5 In the Channel Box the box's translate and rotate channels are blue, indicating they're constrained to something. If you click on the box_parentConstraint1 node, you'll see “Cone W0.” This is the weight, or how much the constraint is affecting the object. 1 = 100% influence.

6 Translate and rotate the cone and the box follows. Notice how it maintains its position relative to the cone. This is why it's a parent constraint, because it assumes the pivot point of its master object, just like in a parent-child relationship.
![]()
parentConstraint.ma
Constraint weights are used when we need to have an object constrained to different objects at different times in an animation. For instance, if we had a character throw a ball to another character who catches it, the ball would need to be constrained to their hands at separate times. We set keys on the weights to tell Maya which constraint to use at a given time. It's also possible (but not common) to have multiple weights on. Two objects at 100% influence would keep the object halfway between both of them. We'll look at weights in the cheat on pages 126–7.
Constraining a Prop

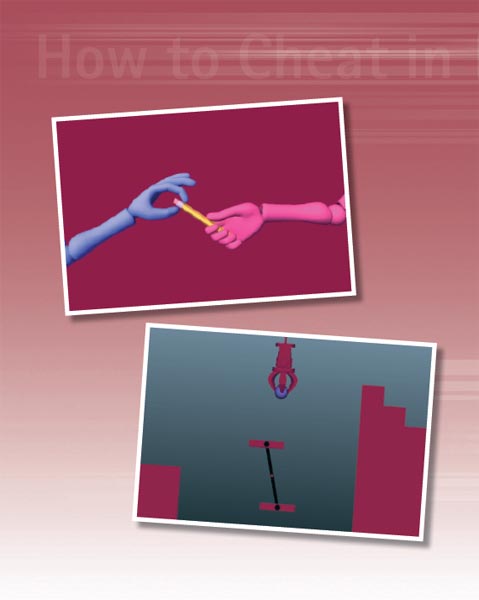
WE'RE GOING TO USE both parenting and constraining to get the most flexibility in animating our props. Instead of just constraining the prop itself, we're going to constrain a locator that has the pencil parented to it. A locator is simply a blank object that you can translate, rotate, and scale. Not only does this create insulation between the rig and prop, but it also gives us the flexibility to reposition the prop and animate it. We're using the benefits of parenting and constraining in conjunction to make animating flexible and easier.
This approach can be very handy if you want to make some adjustments to a prop after you've already constrained and animated with it. We'll see how this can allow us to animate the writing movement of the pencil while keeping it in sync with the moving hand.
In a nutshell, the pencil is parented to the locator, which is constrained to the hand. Parenting the pencil lets it follow the locator, but still allows us to keyframe it. Since the locator is constrained to the hand, it follows how we want it to, while still giving us control to animate the pencil movement, keeping it isolated from the rig.

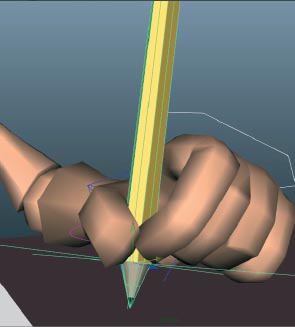
1 Open propConstraint_start.ma. Go to Create > Locator and move it in the area of the prop. If you can't see it, make sure Show > Locators is enabled in your viewport menu. Use the scale tool ![]() to make it larger.
to make it larger.

2 In the perspective view, position the locator at the pivot point where the character will hold the prop and where the fulcrum of movement will be. It doesn't have to be mathematically exact, but get it as close as you can, being sure to check the position from all angles.

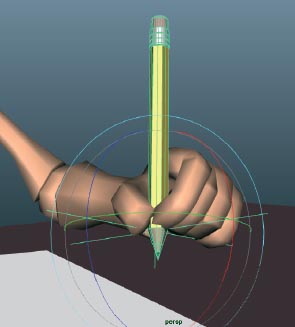
3 Select the pencil and press ![]() for the move tool. Then press the insert key on the keyboard to go into pivot mode. Hold down the
for the move tool. Then press the insert key on the keyboard to go into pivot mode. Hold down the ![]() key and middle click the center of the locator to snap the pencil pivot to it. It may help to press
key and middle click the center of the locator to snap the pencil pivot to it. It may help to press ![]() to go into wireframe mode to do this. Press insert again to return to the normal move tool.
to go into wireframe mode to do this. Press insert again to return to the normal move tool.

4 Select the pencil, then the locator, and press the ![]() key to parent them. Moving the locator will now move the pencil. Using the locator, position the pencil in the character's hand. Keep in mind where it will pivot from between the fingers.
key to parent them. Moving the locator will now move the pencil. Using the locator, position the pencil in the character's hand. Keep in mind where it will pivot from between the fingers.
5 Select the hand control, then the locator, and go to Constrain > Parent. The channels on the locator will turn blue indicating a constraint.
6 Now when we translate or rotate the hand, the pencil follows along. We can now easily animate the hand and arm writing. For the subtle movement of the pencil, we can simply key the pencil itself (perhaps with some animation on the fingers as well).
![]()
propConstraint_start.ma
propConstraint_end.ma
When creating any constraint system, it helps to diagram it on paper first. Just diving into Maya and parenting and constraining with reckless abandon can make things very confusing very quickly. Think about what you need to accomplish, where you need control, diagram it, and name your props and locators appropriately. Remember, disorganized constraining will make animating more difficult and ultimately affect your work negatively.
Constraint Weights

WHEN WE'RE USING PROPS and objects in our animations, there will be times when things need to be constrained to multiple characters. If a prop is passed between two or more things, it will have to be constrained to all of them at some point in the animation.
To tell Maya which constraint we want active at a specific time, we need to use the constraint's weight attribute.
It may be helpful to think of the weight as an on/off switch. Every time we constrain an object to something else, a weight attribute for that particular object is automatically created in the constraint's node in the channel box. Then we simply need to key it at 1 (on) and 0 (off) at the appropriate times.
In this simple animation of one hand giving another a pencil, we're going to see how to switch the constraint weights over one frame to get a seamless transition.

1 Open constraintWeights_start.ma. In a viewport menu, go to Panels > Perspective > shotCam to see the camera for the animation. If you like, press the viewport's Film Gate button to frame the animation more accurately.
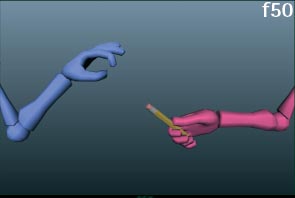
2 Scrubbing through the animation, we can see that the hands go through the motion of giving the pencil, but the blue hand doesn't actually take it. Right now there is only a parent constraint on the pencil for the pink hand.

3 In the layer panel, turn on the Controls layer to see the rig controls. Select the control on the pencil and click on pencil_anim_parentConstraint1 in the Channel Box. Here we can see the weight attribute for the right hand since the pencil is constrained to it.

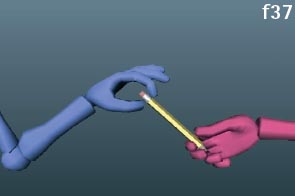
4 Go to frame 32. We want to constrain the pencil to the hand on this pose, as the blue hand will take control of it from this point on. Select the blue hand IK control, then the pencil control, and go to Constrain > Parent.

5 You'll see the new weight for the left hand (the blue hand) created in the Channel Box, but now the pencil floats between both hands. This is because both weights are on, pulling the object equally to keep it exactly between them.

6 Select the pencil control. At frame 32, set the Hand Left weight to 0 (off). Then select both weights, right click and choose Key Selected to set a key on both weights. If you scrub through now, the pencil stays with the pink hand the entire animation again.

7 Go to frame 33 and switch the weights values to the opposite, turning off the pink hand's constraint and turning on the blue hand's. Select both weights, right click and choose Key Selected.

8 The pencil should now get taken by the blue hand after frame 33. On your own projects, remember to design your animation so you have the right pose to pick up a prop and make the switch look natural.
9 You'll notice that the pencil goes through the pink hand's fingers after it is taken. Once we have the constraint working properly, its much easier to animate the fingers following the pencil as they let go. Open constraintWeights_end.ma to see the final result.
![]()
constraintWeights_start.ma
constraintWeights_end.ma
Constraint weights don't have to be switched over one frame. They can blend over however many frames you want by simply setting the weight keys further apart. Then the constraint will gradually drift into the next one. You can even edit the blend's curve in the Graph Editor. For animations like this one, that obviously wouldn't work, but for situations without obvious contact changes it can be handy.
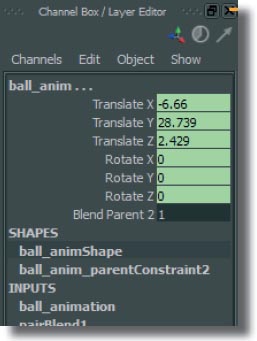
Animating with Constraints
THERE WILL INEVITABLY be situations where the easiest way to animate something is to keyframe it at certain places, and constrain it in others. Maya makes this simple with an attribute called “Blend Parent,” which we can key on and off depending on what we need at a given moment. When Blend Parent is set to off (0), Maya will ignore any constraints on an object and follow the keyframe data. When Blend Parent is on (1), it will ignore keyframes and conform to any constraints currently active. The best part about Blend Parent is it's created automatically whenever you set a key on a constrained object, or constrain something that already has keyframes set on it. When either of these situations happens, Maya creates a pairBlend node that allows us to switch between the two modes (or even blend somewhere in between, hence the name…).
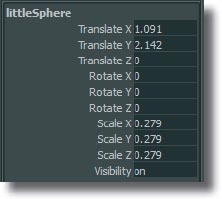
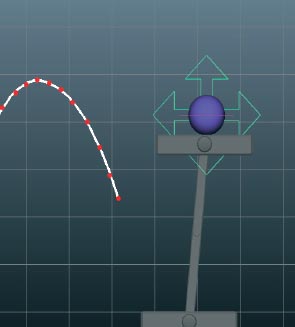
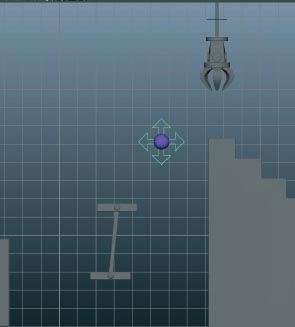
Many times, I find animations that need this approach are simplest when done in a rather straight-ahead fashion. That isn't to say the animation isn't planned out, it most certainly is, but I've always found keeping track of things easiest if the constraints are done during the blocking process. We're going to take that approach here, where we'll start by animating an object (a bouncing ball: the cornerstone of animation education), constrain it to a platform, then keyframe it again, constrain it to a claw, and finally keyframe it through the end. Sounds complicated in theory, but this exercise with a living ball as our character will show you how simple it really is.

1 Open ballCourse_constraints1.ma and switch to the front view. I've done some preliminary animation of a ball hopping over to a platform, which is also animated. Scrub through and you'll see that the ball doesn't follow the platform after frame 41.
2 Select the platform the ball is on, then the ball move control, and in the animation menu set go to Constrain > Parent. Notice that our channels turn green, indicating both keyframe and constraint data, and the Blend Parent attribute automatically appears.

3 Scrubbing through the animation, we see that the ball now follows the platform, but stays there the entire time. Because Blend Parent is on (1), Maya ignores the keys and follows the constraint. We need to key it on at f41, but have it off up until then to see the animation.
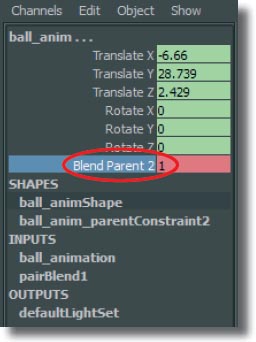
4 At frame 41, right click on the Blend Parent attribute and do Key Selected to set a key on it. This ensures that we will be at 1 (on) at the frame where we want the ball to start following the platform. The channel will turn orange once you set the key.
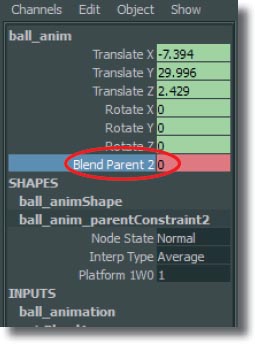
5 Go to the frame before, frame 40, and set Blend Parent to 0 (off). Right click it and key selected again. Since this will be the first key for Blend Parent, all the frames up to it will be off as well.
6 Scrub again and you'll see that the ball is once again animated until frame 41, where it follows the platform perfectly.
![]()
ballCourse_constraints1.ma
An “all or nothing” approach is usually best when working with constraints. If it's a more complex character animation, it's often easier to ignore any constraints until the animaton is in its polish phase. Then you can constrain props without worrying about having to shift frames around or make big changes to the movement.

7 Open ballCourse_constraints2.ma. This file has everything we've just done, as well as the blocking animation to get the ball up to where the claw grabs it. Scrub through to frame 88.

8 Select the claw control, then the ball control and go to Constrain > Parent. Notice in the Channel Box that we get a Claw Control W1 attribute. Remember that these weight attributes tell Maya which constraint is currently active.

9 If you scrub, you'll notice the ball acting strangely at the constrained parts of the animation. This is because, since both constraint weights are on, they both pull at the ball equally.

10 Let's key the Blend Parent so the ball starts to follow the claw's constraint at frame 88. Go to frame 87, enter 0 in the Blend Parent attribute and RMB > Key Selected. At f75, key the Blend Parent at 0 as well. This will make the ball follow its keyed animation from frames 75–87.
11 At frame 88, key the Blend Parent to 1. This makes it switch on over one frame, making our transition seamless. The ball still doesn't follow the constraints properly though, as we need to set keys on the weights to tell Maya which constraint we want active.

12 At frame 41, RMB > Key Selected to set a key with the Platform weight at 1, and the Claw Control at 0. The ball will snap back to the platform. However, it should follow the claw at frame 88, so the weights need to change there.

13 Set a key on both weights at frame 87 so this value holds through there. Then at frame 88 key the weights at the opposite values; the platform at 0 and the claw control at 1. Also key the Blend Parent back to 1 so it switches to following the constraint.

14 Now the ball stays with the platform when it's supposed to, jumps on its own from f75–f87, and follows the claw after frame 88.
![]()
ballCourse_constraints2.ma
The reason we use 0 and 1 for turning constraints on or off is that it's like binary: 0 = off, 1 = on. Or you can think of 1 being 100% and 0 being 0%, whatever is clearer to you.

15 If you notice the ball behaving strangely during the constrained sections, check the Graph Editor. If the curves for the Blend Parent or weight attributes have any drift in them, they will mess up the constraints. Be sure to zoom in and check the curves closely, as they can look flat zoomed out.

16 If you find this happening, simply select the curves and set them to flat, linear, or stepped tangents using the buttons at the top of the Graph Editor. Any of these tangent types will work for this purpose. See Chapter 2 for more details on how the different tangent types work.

17 Open ballCourse_constraints3.ma and it will have everything we've done, along with the final blocking animation of the ball being released and bouncing down the stairs. We can't see it, however, because we need to key Blend Parent off once more, to tell Maya to once again use the keyframe data on the ball.

18 At frame 112, key Blend Parent to 1 to hold it through that frame, then key it to 0 at frame 113. Scrubbing through, you should see the ending blocking animation. We now have blocking of all the animation, including the constraints. If you have more constraints in an animation, remember to always have the active constraint's weight keyed at 1, and all others at 0. Always set a redundant key at the frame before the weights and Blend Parent change to hold the current state up to that point. Remembering those two steps will get you through using any number of constraints, no matter how many there are!
![]()
ballCourse_constraints3.ma
You can set the options for a parent constraint in Constrain > Parent > options. Here you can tell Maya to only constrain specific axes, if you only need certain ones for your animation.
The Right Stuff:
Making sure shots on your reel have
everything you need to get noticed
by Eric Luhta
ASSEMBLING SHOTS FOR YOUR DEMO REEL CAN BE TRICKY, particularly if you're trying to get your first animation gig. When thinking about what goes on a reel, every animator asks themselves, “What does the person judging my reel want to see?” But rather than give you an arbitrary checklist of types of shots to do, let me impart some ideas that I've come to see as much more important. While there are no surefire ways to make a reel that will guarantee you the job you apply for, here are some elements that will help you stand out from the crowd. If you work hard to incorporate these elements successfully in everything on your reel, getting a job will likely be much easier.
Entertainment The reason for doing any type of character animation at all is, in the end, to entertain. The word entertainment doesn't just mean “funny.” Anything that engages us, makes us interested, makes us feel something, and that we want to keep watching is entertainment. A tragic, sorrowful acting scene is just as entertaining as a slapstick pantomime bit if it's successful. Look at every piece you've created and ask yourself “if this wasn't my own work and it came on TV or the movie screen, would I want to watch it or have it be part of something I paid to see?” Be honest with yourself, and if you decide (or others you trust tell you) it's not, rework it or create a new shot that is entertaining.
Physicality The physics and body mechanics of what you've animated have to be working in a believable way. If you're applying for professional animation work, the people evaluating your reel will see poor physicality instantly. If you struggle with physical animation (and many of us do, including myself), get lots of feedback from others! Even non-animators will often be able to say something doesn't feel right, even if they can't say why. Don't skimp here by any means, as I've seen plenty of acting tests that had really nice acting choices, but the unpolished physicality was distracting and ultimately hurt the work. Study live reference of the physical movement in your shot, and seek lots of feedback until everyone tells you it feels good. Correct physicality is the one aspect of animation that isn't subjective.
Believable Characters As a character animator, your job is to give things their personalities and souls! Even if you're doing a simple physical test, it should be done by a character you've created for yourself—one who has a past, a unique personality, likes and dislikes, different experiences that shaped who they currently are, and more. It may seem like overkill at first, but working a character's backstory out before you do a test will surprise you with the choices that it opens up to you. Creating a character will give you limits; things that this particular being would never do and approaches which they will gravitate towards. Limits are where creativity truly thrives.
Sincere Acting The acting of your characters should be carefully considered and worked out with much diligence. Every action should have a reason for being in there, from the broadest gesture to the smallest eye dart. Avoid theatrical, “animationy” cliche acting and use lots of reference to come up with fresh yet appropriate choices for your characters. Analyze the gestures you're using and ask yourself “Are these motions I see people doing in real life or in live action movies and not just in animation?” If not, work to find something better—it will set you apart more than you probably realize. Also, study subtext in life and film and make use of it whenever possible. Bland characters are doing and saying exactly what they are thinking inside, interesting characters are often contrasting their internal thought with their external action.
Story As much as possible, you should try to tell a little story with your shots. Have a twist or something that surprises, like an unexpected result of the character's actions or an interesting take on a line of dialogue you're animating to. Dialogue tests should imply a larger picture and story beyond what you've animated. Showing command over story crafting, even in simple terms, will get you very far indeed. Something with a good story to it and an interesting acting performance, even if it's not the most polished work, will be better received than amazingly polished animation that is boring to watch.
Those are the core elements I think every animator should work to have in their tests, and do your best to have all of them to some degree. So even if you're doing a shot to work on something very standard, like lifting a heavy object, you can easily incorporate character, story, entertainment, and physicality to create something that not only demonstrates your animation craft, but also your skill as a storyteller and filmmaker. Stop thinking only as an animator, and instead also as a storyteller and entertainer, and you'll soon create a reel that gets you in the door.