
![]() Making changes, tracking arcs, working with multiple pivots, using the timeline, and much more are discussed in depth in this chapter.
Making changes, tracking arcs, working with multiple pivots, using the timeline, and much more are discussed in depth in this chapter.
4
Techniques
FOR EVERY ANIMATOR there are a variety of techniques that are used throughout the animation process. As you develop your skills, a portfolio of mantras that you call upon regularly will also develop: your kung fu, so to speak.
This chapter contains a wide selection of very useful tools and techniques for animating. While creating a piece of animation, you may call upon some of these techniques dozens of times, others only once, but all of them will make a regular appearance in any animator's workflow. Prepare, grasshopper, for efficiency lies within…
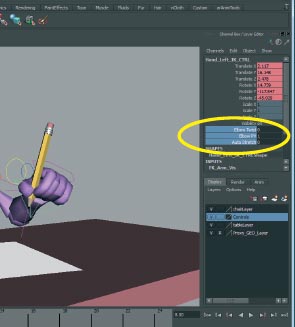
Auto Key
HAVING TO PRESS THE ![]() KEY incessantly while animating does two things: gets tedious, and wears out your
KEY incessantly while animating does two things: gets tedious, and wears out your ![]() key. So in the interest of preventing tedium and extending your keyboard's life, let's look at the different ways we can use Maya's Auto Key. This feature eliminates most of your manual keying, and while it's pretty straightforward, it works great with the Hold Current Keys option, which is easy to overlook.
key. So in the interest of preventing tedium and extending your keyboard's life, let's look at the different ways we can use Maya's Auto Key. This feature eliminates most of your manual keying, and while it's pretty straightforward, it works great with the Hold Current Keys option, which is easy to overlook.

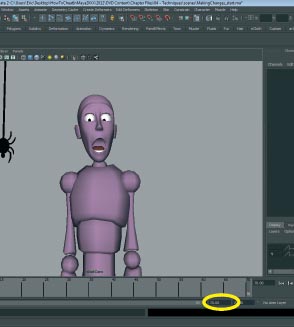
1 Open AutoKey.ma. The quickest way to turn Auto Key on or off is the button in the bottom right corner. Make sure it's red to indicate Auto Key is on.
2 There are currently no keys set on the character, he's just posed. Grab the L hand and move it, and you'll notice no key is set. Auto Key only sets keys on controls when you've manually set a key on it first. Undo the move and set a key on it by pressing ![]() .
.
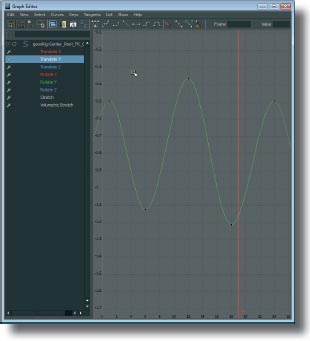
3 Go to f08 and move the hand in Translate Y. Now a key will be set, but only on Translate Y. By default Auto Key only sets a key on the attributes that are changed, not the entire control.
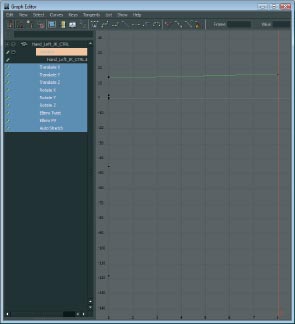
4 Looking at the Graph Editor, we see that there are keys on all the hand attributes at f01, but only on Translate Y at f08.
5 In the Channel Box, select the last of the attributes on the L hand control, right click and choose Delete Selected to erase all keys on this channel.
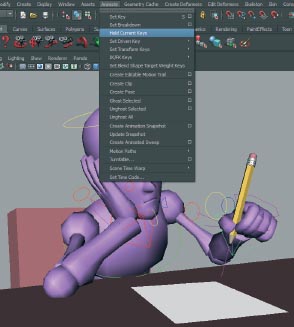
6 Move to f14 and go to Animate > Hold Current Keys. When using Auto Key, you may want to keep some attributes unkeyed, yet still set a key on all keyed attributes. Using this menu option will set a key on all keyed attributes of a control, but not on unkeyed ones.
![]()
AutoKey.ma
You can manually key just the Translate, Rotate, or Scale attributes by pressing ![]() +
+![]() ,
, ![]() +
+![]() , or
, or ![]() +
+![]() , respectively.
, respectively.
Timeline Techniques

THE TIMELINE is the interface element you will use more than any other when animating in Maya. It has a lot of functionality beyond scrubbing, but its simple appearance can hide how powerful it is. There are lots of edits you can do without ever leaving it, from copying and pasting keys, to reordering them or setting tangent types. Even playblasting is readily available. After working through this cheat, you'll have some timeline chops that will serve you as long as you animate.
We're going to use a simple animation of the Goon doing a take. We have three basic poses and right now that's all they are: poses that interpolate to each other. Let's use some fancy timeline editing to make it less poses and more animation.
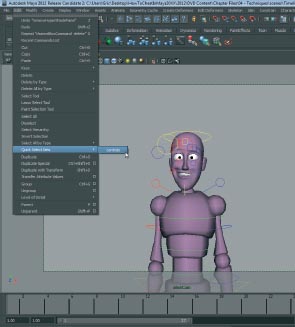
1 Open Timeline.ma. The first pose needs to hold a few frames longer before the anticipation pose. Go to Edit > Quick Select Sets > controls to use a predefined set to select all of the Goon's controls.
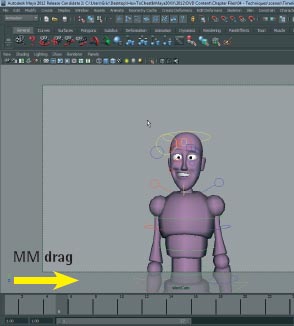
2 In the timeline MM drag from f01 to f05. The animation doesn't change like when you scrub. MM dragging holds the frame on wherever you started, so it's a quick way to copy poses. Make sure the tangents are set to Auto, and set a key at f05.
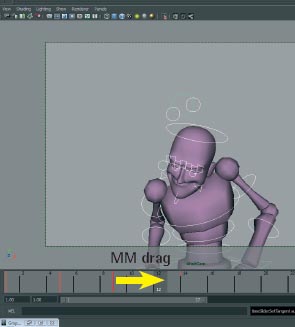
3 Now he doesn't move to the anticipation pose until f05, but he needs to hold there also. MM drag from f09 to f12 and set a key to copy that pose also.
4 It's looking better, but let's make the transition into the anticipation a little snappier. ![]() click f05 and it will turn red.
click f05 and it will turn red.
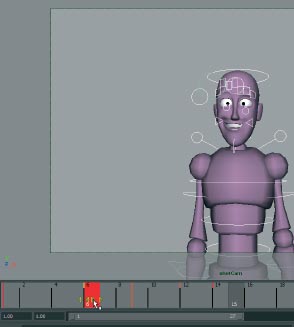
5 Click and drag on the two center arrows to move the key to f06. Now the transition is only three frames, which feels better.
![]()
Timeline.ma
Timeline_end.ma
You can hold down ![]() and drag in the viewport to scrub without being on the timeline.
and drag in the viewport to scrub without being on the timeline.

6 He hits the anticipation pose very hard, so let's cushion him hitting that pose. Shift drag from f06 through f09 to highlight them red.

7 Grab the end arrow and drag it through f12 to scale the keys’ values out and ease into the anticipation pose.
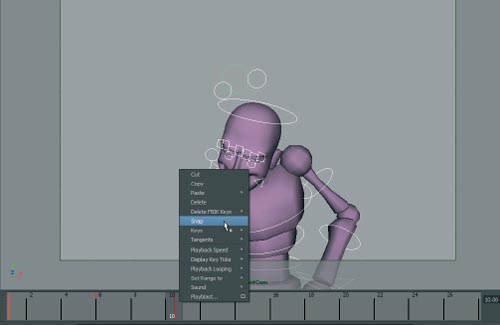
8 That feels much better, but the scaling has put the key between f11 and f12, which can make refining more unpredictable and cause motion blur problems. Right click on f11 and choose Snap to snap the key to the closest frame, which puts it back on f11.

9 The timeline right click menu has many options. You can change the tangents of keys without the Graph Editor, playblast, adjust speed and display options, and more. Use these for speeding up your workflow considerably.
The timeline is where you can activate sound for dialogue animations. Import the sound file through the File menu, then right-click on the timeline and select the sound to activate it during scrubbing and playback.
Cartoony Motion
CARTOONY STYLE IS A VERY DIFFICULT style to attain. Most novices make the mistake of trying to push all of the fundamentals. By exaggerating EVERYTHING, they feel like the animation will automatically become cartoony. This could not be further from the case.
To create cartoony movement, we need to create the IMPRESSION of an exaggerated movement by picking a visual simile. What does that mean? Choose a motion that is realistic, and can be observed in everyday life, and put that motion into your character.
You've seen it all before – a character's head rings LIKE A BELL after he gets punched. A character falls the ground LIKE A SHEET OF PAPER after he gets flattened. A character's arm wobbles LIKE SPAGHETTI after he gets a shot of Novocain in it. All of these examples reference REALISTIC motions that, when we put them into the body of our character, become cartoony. You will notice none of these examples mention anything about exaggerating. We're going to be creating the last example of the numb arm in this cheat, using some reference geometry. Using reference geometry we do not have to guess the motion we're trying to get out of the wobbly arm, it's right there in front of us to copy. Use this cheat whenever you need to closely reference any motion for cartoony-styled animation.
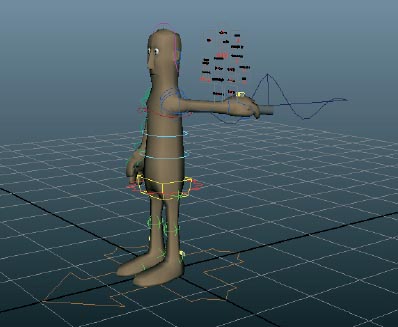
1 Open cartoony_Start.ma. We have a character just gliding through the scene. We can imagine they are running away. We want to give the impression his arm is totally numb, and flopping around like spaghetti. Let's get started.

2 There is a cylinder attached to Bloke's arm. That is the piece of geometry we are going to use to apply the wobbly motion for reference. Select the cylinder geometry, and in the Channel Box, go down to the wave1 input and turn the Envelope parameter up to 1.

3 Now that the cylinder is wobbling very Spaghetti-like, let's key our arm to follow it. Grab all of the arm controls and set a key matching the pose on f01.

4 Continue going through the animation on 2s, and then back again on 1s, until the arm matches the movement of the cylinder in the entire shot.

5 Done! Hide the cylinder and play your animation back and watch the awesome wobbly motion come to life. Remember, we didn't just exaggerate, we used motion inspired by real life. This is how true cartoony action comes to life.
![]()
cartoony_Start.ma
cartoony_End.ma
We used a wave deformer to get this wave action, but there are many different ways to get awesome cartoony movements, including deformers, dynamics, and even hair and cloth. Think about the IMPRESSION you want to give, and then create some reference geometry that it's as easy to reproduce as copying into your character's body.
Trax Editor
THE TRAX EDITOR, apart from being the best place to import and manipulate audio, was actually built to load animation “clips” onto character sets. This can be very fun and intuitive.
Manipulating clips is kind of like “mixing” animation. You can create a library of clips and mix and match the animation to create entire performances, or, perhaps more usually, multiple permutations of background animation. Imagine how easy it would be to animate a small crowd if you can just drag and drop animation clips onto the characters, mixing movement into cycles and blending between clips. The Trax Editor does just that.
Some things to know about using clips is that the character sets normally have to be identical, so working with a finished rig is highly recommended. Also, you want to make sure your animation is created to be mixed and matched. Meaning you should be thinking about creating actions that are modular and/or layered to be used in a non-linear fashion.

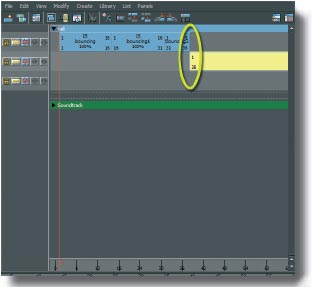
1 Open trax_Start.ma and set up your panels like these above are arranged, with the Trax Editor on the left and persp camera on the right. Just go to Panels > Panel > Trax Editor.
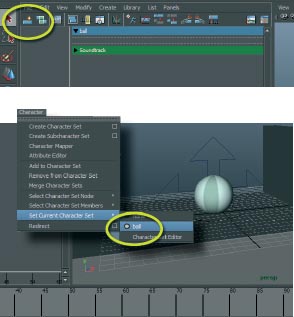
2 Set the current character set by hitting F2 to switch to the animation menu set and then going to Character> Set Current Character Set> ball. Then create a track in the Trax Editor by clicking the button in the top left corner.
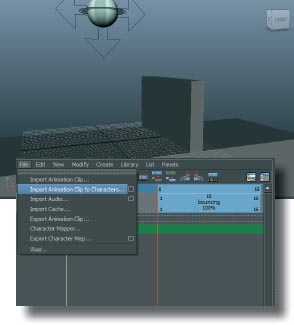
3 Import the first animation clip (the ball bouncing) by going (in the Trax Editor) to File > Import Animation Clip to Characters. Choose Bouncing_Clip.ma. It will load into the Trax Editor and you can find it using the normal camera tools or by hitting ![]() to frame it.
to frame it.
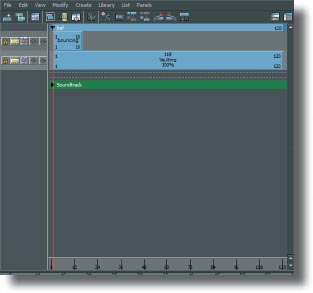
4 Import another clip by going to File > Import Animation Clip to Characters… Choose Vaulting_Clip.ma and it will load into a new track.

5 Now copy the bouncing clip by selecting it and hitting ![]() +
+ ![]() . Paste it twice by hitting
. Paste it twice by hitting ![]() +
+ ![]() , and arrange them one after another on the same track. Drag the clip range of the last clip to end on f08 of the clip, by grabbing the top right corner and dragging it left to “8”.
, and arrange them one after another on the same track. Drag the clip range of the last clip to end on f08 of the clip, by grabbing the top right corner and dragging it left to “8”.
6 Finally, drag the Vaulting_Clip so that frame 1 lines up with frame 8 of the third Bouncing_clip. Play back the animation, and you'll see the ball bounces twice, then lands, and vaults over the wall.
![]()
trax_Start.ma
trax_End.ma
These clips were exported with the animation taking place in ‘relative’ space. This setting means that the position of the controls will start from the end position of the last clip. So, you can have a clip where a character starting at 0 walks forward 5 units, and then in the next clip he'll automatically walk from 5 to 10.
Copying Curves
COPYING DATA GOES BACK to the earliest functionality of computers, and it is alive and well in computer animation. Maya's curve-copying abilities are rather extensive, and it offers many options for shuffling animation data around to save time and effort. We're going to build on a laughter animation in which the character is yet a bit too static, by copying curves onto his head, neck, and body to make him much more, well, animated.
As we'll see in this cheat, copying isn't only for putting the same curve on another control. Any attribute's curve can be copied to any other attribute. This is great for taking a curve that is similar in shape to what we want onto another control (even if it's a rotate going to a translate, for example) and using it as a starting point. Tweaking a curve can be much faster than positioning the control and setting keys. Faster = good.

1 Open CopyingCurves_start.ma.

2 In the Graph Editor, select the Rotate X, Y, and Z attributes for the head control. Be sure to select the attributes in the left panel, not the curves themselves.

3 Go to Edit > Copy in the Graph Editor menu to copy the curves.

4 Select the neck control. Before we paste these curves, go to Edit > Paste > ![]() . Set the Time range to Clipboard (to use the curves we just copied), Paste Method to Replace, and Replace Region to entire curve. Then press Paste Keys.
. Set the Time range to Clipboard (to use the curves we just copied), Paste Method to Replace, and Replace Region to entire curve. Then press Paste Keys.

5 The curves will automatically be placed on the same attributes they were copied from if nothing is selected in the Graph Editor. They've been copied to the neck, but now his head is back a bit too far.
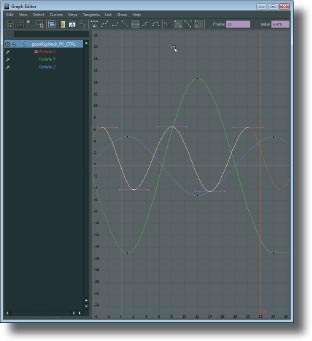
6 I moved up the entire Rotate X curve to bring his head forward, then scaled the whole curve down. Now his movement is bigger, but not too much.
![]()
CopyingCurves_start.ma
CopyingCurves_end.ma
This is a perfectly valid method for blocking in simple animations, but works best with things that are short, or loop, such as a dance or other cycle.

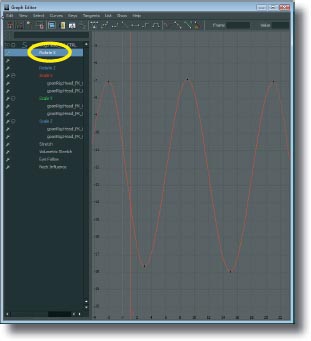
7 Let's use some of these curves to add side-to-side movement on the chest. The head's Rotate Z curve has a similar contour to what we want to start with, so select the attribute in the Graph Editor and go Edit > Copy.

8 Select the chest control and set a key at f01. Since we'll be putting the head's Rotate Z on the chest's Rotate Z and Rotate Y, we need to be able to select those attributes in the Graph Editor. Without a key they won't appear.

9 In the Graph Editor, select the chest's Rotate Y and Z attributes and go Edit > Paste. The curve will be put on both attributes.

10 I shifted both curves one frame earlier for a little offset, and scaled them up. Now his movement is much more energetic.
11 Finally, let's add some bounce on his body. The curve most similar to what we want is the head's Rotate X, so select that attribute on the head and copy the curve.
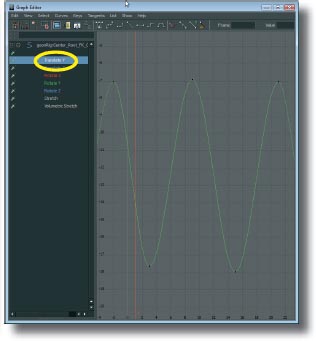
12 Select the main body control and set a key at f01. Select its Translate Y attribute and paste the curve onto it. He'll move out of frame because of the values, so let's quickly tweak this curve.
13 I edited the curve so it starts on f01 and his bounces stay in frame. There are also some differences in the values so everything doesn't feel exactly the same.

14 The animation can be refined a lot from here, including adding some bounce in the shoulders, but now you see how we can quickly get a smooth starting point simply by copying curves, without doing any character positioning.
Copying curves is a great technique, but it's almost always best for quickly giving you a curve to start refining, rather than a finished result. It can also work well for starting overlapping action on things like tails and floppy ears.
Editable Motion Trails

IN ORDER TO GET APPEALING, polished animation, it's a good idea for the motion to travel in pleasing arcs. After all, it is one of the twelve animation principles! There have been plenty of tools made for Maya to track arcs, but what about fixing them directly in the viewport? Wouldn't that be nice? Or even adjusting your spacing without having to go into the Graph Editor? If only there was a way…
There is. One of the best features in Maya 2013 for tracking and editing arcs (and other things) is the Editable Motion Trail. Not only does it show you the path an object is taking through 3D space, but it also allows you to edit that path directly in the viewport. Needless to say, this has been a feature animators have desired for quite some time, and Maya 2013 makes it a reality.
Editable Motion Trails give you lots of power. They work in conjunction with the other keyframe tools (the Graph Editor, and the Dope Sheet) so anything you edit on them will be reflected everywhere else. You can adjust the path of action, timing, and spacing, as well as add, delete, and move keyframes right on the path. This cheat will give you all the ins and outs of this most welcome addition to Maya's animation toolset.

1 In the project file EditableMotionTrail.ma, double check that your tangents are weighted, and that the tangent type is set to Auto (see Chapter 2 for more information on this). The motion trail's behavior is dictated by what tangent settings are present on the curves. Select the ball and go to Animate > Create Editable Motion Trail.

2 Open the Attribute Editor if it isn't already and click on the motion trail to bring up its options. You can also right click directly on the trail to quickly access the settings most commonly toggled on and off.
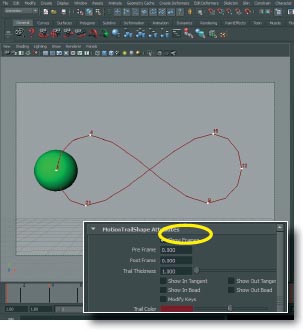
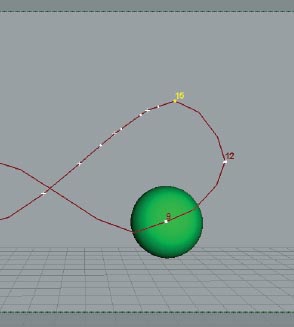
3 The trail shows the path the object takes in 3D space. The white beads show where keyframes exist along the trail. Click the Show Frames box in the Attribute Editor to display the frame number for each key.

4 Select the move tool ![]() and select the key at f04. Just like moving an animation control, you can move the key in 3D space and adjust the path instantly.
and select the key at f04. Just like moving an animation control, you can move the key in 3D space and adjust the path instantly.

5 Notice the Translate Y curve before and after the change made in the previous step. Adjusting keys in the motion trail is really just another more visual and natural way of editing the curves.

6 You can select multiple keys and move them just as easily. ![]() dragging will move the selected keys perpendicular to the viewport (i.e., backwards or forwards), without having to change cameras to make an edit.
dragging will move the selected keys perpendicular to the viewport (i.e., backwards or forwards), without having to change cameras to make an edit.
![]()
EditableMotionTrail.ma
The Trail Color slider is very handy for when you have multiple motion trails happening. Keeping the colors different makes it easier to remember what is what.

7 Select the key at f09 and in the Attribute Editor (or right click menu) turn on Show In Tangent and Show Out Tangent to show handles for the key. Remember that the way these handles will behave depends on the settings for the curves they are found on.

8 Marquee select the handle and you can use it to edit the spacing in the motion path, just like in the Graph Editor. Editing handles is easiest when you only use one axis on the manipulator at a time, rather than grabbing them in the middle and dragging all axes freely.

9 If you break the tangent handles (select the curves or keys in the Graph Editor and click the break tangents button), you can edit them independently in the viewport as well.
10 Select the key at f15 and click Show Out Bead in the Attribute Editor or right click menu. Beads representing the in-between keys appear on the trail. Notice that you cannot show both tangents and beads at the same time, as they're really just different representations of the same thing – spacing of the in-betweens.

11 Simply clicking and dragging on the beads lets you adjust the spacing. Remember, if you don't see any beads, it's because your tangents on this key are not weighted.
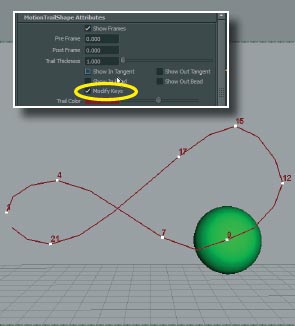
12 Click the Modify Keys box in the Attribute Editor or right click menu. When this is turned on, simply clicking on the trail will add keys, which will use whatever default tangents are currently set.
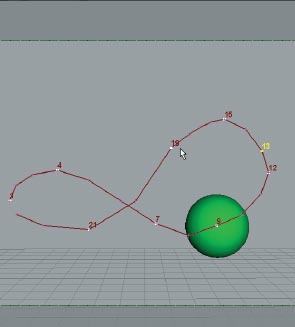
13 For making quick timing changes with Modify Keys, simply hold ![]() and MM drag keys. You'll see the frame number adjust, as well as the marks indicating the current position of the in-between frames. Very nice!
and MM drag keys. You'll see the frame number adjust, as well as the marks indicating the current position of the in-between frames. Very nice!

14 In the Attributes, you can enter Pre and Post Frame values. This controls how many frames before and after the current frame to display. This helps if the path crosses over itself multiple times in a small space, which makes the trail hard to read. Setting 0 shows all frames.
The Pinned option means that the trail will stay present all the time. If you turn it off, it will only appear when the object with the trail is selected.
IK and FK
A LMOST ANY RIG that is intended for character animation will have the arms and legs available in two modes, IK (inverse kinematics) and FK (forward kinematics). Many animators have a mode they prefer to use when either is viable, but there will often be times when you have to use a specific mode, at least for part of the animation. If your character is going to plant his hand on something to support his weight or push or pull it, you will have no choice but to use IK arms if you want acceptable results. Switching between the modes can seem tedious at first, but when you understand how switching works, it's really quite simple.
For a quick refresher, FK (forward kinematics) means that the position of the hand (or foot) is dependent upon the joints leading up to it. This is how our bodies work in the real world. To reach up and grab something with your hand, your shoulder must rotate, taking your upper arm with it, which takes your forearm with that, which takes your hand up to the object. You can't raise your hand without at least raising your elbow, and so on. With FK, if you move the character's body, it will move the arm as well. This works well for things like walks and gesturing, but not for pulling or pushing things.
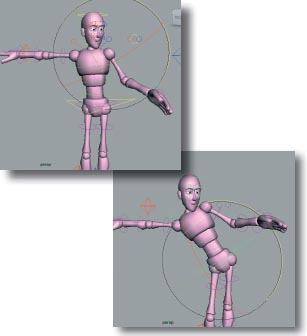
IK (inverse kinematics) is the opposite. The hand is positioned on its own, and Maya figures out where the rest of the arm would be angled based on that. You can think of the hand almost as a separate object that's tethered to the body. If you move the body the hand will stay where it is, making it ideal for pushing or pulling. This way we can work on the body animation without losing the positioning of the hand.
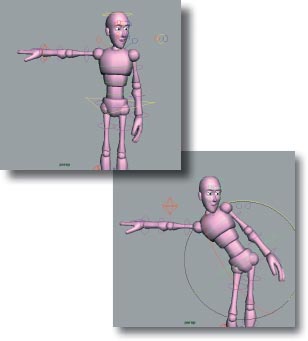
1 Open IK_FK.ma. The left arm is currently in FK. Rotating any of the body controls brings the arm along with it.
2 Undo the body rotation and put the L arm in any pose you wish. Again, the arm will follow along with anything we move in the body and spine.

3 Undo everything and select the hand control. In the Channel Box is the Chest Influence attribute. Change it to 0. The arm may jump slightly when you do this, which is normal.
4 When Chest Influence is 0, the FK arm will follow with translation of the body, but not rotation. Some animators prefer this because you need to do much less correction on the arms if you change the body.
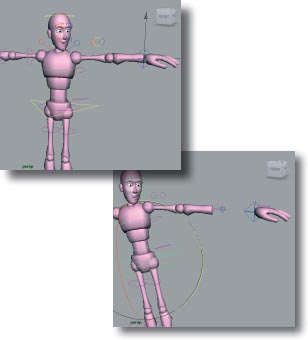
5 Undo everything. Select the hand control and set the IK weight to 1 (100%). The arm will move to the IK control and is now an IK arm. Move the body and the hand will stay in place no matter what you do.

6 On the IK control if you set Auto Stretch to 1, the geometry will stretch between the hand and body, rather than separating at the wrist.
![]()
IK_FK.ma
Some rigs have advanced options for IK arms. These hands are in world space, but it's possible to switch that if it's built into the rig. For example, it can have a root space option, which means the IK will move if the root does, but nothing else.
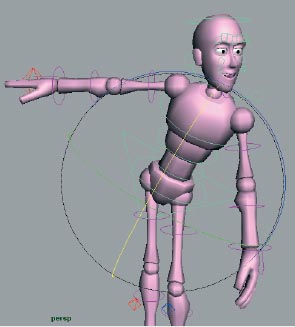
IK/FK Switching
W HEN PLANNING AN ANIMATION, an important step is determining if it's best to use IK, FK, or both at different times. When we need to use both, switching between them in a way that's smooth and seamless is the key to quality work. While some animators may dread this element of animating, when you keep in mind how switching works under the hood, it's very straightforward.
The thing to realize is that there are actually two different arms as far as the joints underneath the geometry are concerned. One arm isn't switching between IK and FK modes, we're actually moving the geometry to another joint skeleton. So when you switch to from, say, FK to IK, keep in mind that the frame where IK takes over, the FK arm is still in its last position, following along (albeit invisibly). Remembering that there are two arms at work will make switching clearer in your mind.
While it's possible to blend into the other arm over several frames, I believe it's almost always best to do the switch over a single frame. When you blend, there are frames where the geometry is partially attached to both arms, so both controls affect the geometry to varying degrees. This makes it difficult to be precise in both posing and timing. It can work, of course, but I always prefer complete control at every frame.
Some rigs do have IK/FK snapping, which makes life much easier by automatically aligning either arm to the other. Many rigs don't, however, and you just have to pose the switching frame manually, which is how we'll do it here.
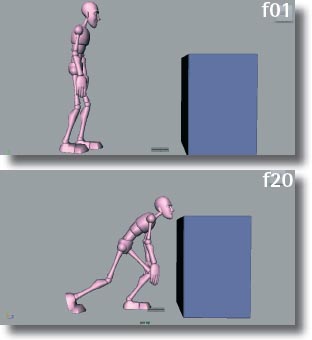
1 Open IKFKswitching_start.ma. There's a simple blocking animation of the character standing, then stepping to push the box. The arms aren't animated yet and they start in FK.

2 First we'll do the switch manually, without the snapping tool. F11 is where the switch to IK will happen, so select the hand controls and move to f10.

3 At f10, in the Channel Box right click and choose Key Selected on the IK weight attribute. This keys it again at 0 so we hold in FK up to f10.
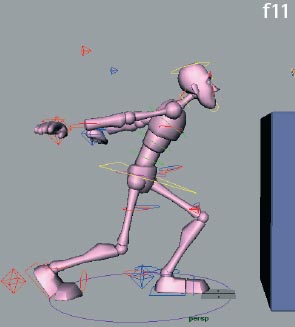
4 At f11, key the IK weight attribute at 1 (for 100% IK). The arms will snap back to where the IK arm skeletons are located.
5 At f11, pose the IK hands and fingers on the box. Use the shoulders to help you get a good pose. When doing a switch, it's helpful to first establish the pose you're switching to, rather than basing it on the transition into the pose.

6 At f10, key the FK arms and pose them going into the IK pose. Try to ignore the fingers and just focus on the palm, since we'll need to edit them again anyway. It won't be perfect yet, as we'll also have to adjust the IK pose again in a moment, so just get it in the ballpark.
![]()
IKFKswitching_start.ma
IKFKswitching_end.ma
For any kind of IK/FK switching, don't sweat the small stuff until the transition is working. Focus on just the hands and hide or ignore the fingers until the foundation is set.

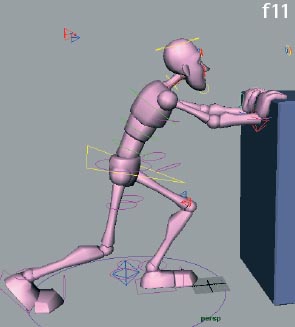
7 Now that the transition is better, we can improve the contact point. Right now his hand just kind of sticks to the box and we don't feel it compress into it. Select the IK controls and set a key at f14 to set the same pose a little later.
8 Go back to f11 and pull the IK controls away a bit and rotate them down slightly. Again, focus only on the palm and don't worry about the fingers yet. Make the palms ease in nicely to f14 to give a feeling of the palms pressing.

9 With the press working better, now is a good time to rough in some finger poses and have them trail the palms pressing for some overlap.

10 You probably noticed that once you get the switch frame, the rest is just normal animating except you're switching between two different types of controls.
11 You may or may not have the problem of his arms going crazy during the transition. If so, it's because of gimbal lock, which can happen from time to time.

12 To fix it, select all the FK arm curves in the graph editor and use Curves > Euler Filter.

13 Now his arms interpolate to the push pose the way we'd expect and we can continue to refine the animation from there.
In most FK to IK switches where the hand is planting on something, take care that it just doesn't stick and remain frozen on the object. The hand should feel organic, the flesh slightly squishing against the object.
Character Sets
DURING PART OR ALL of their animation process, some animators like to use character sets, which are basically selection sets you don't need to select to key. They're kind of a legacy feature, as they've been around since the earlier versions of Maya, but a number of animators still find them useful. Personally, I think they work best in situations where you have to do a lot of keyframing on specific channels of a control, such as the fingers, and for that they can be handy. In this cheat we'll look at how to create and edit character sets.

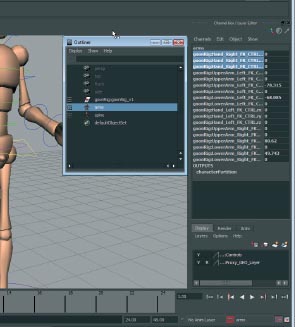
1 Open CharacterSets.ma. The Character Set selection menu is at the bottom right, next to the Auto Key button. Click the arrow next to it and select spine.

2 Without selecting anything, press ![]() to set a key. This set contains all the spine controls, so they will automatically be keyed with any key. Notice their channels are yellow, indicating they are connected to a set.
to set a key. This set contains all the spine controls, so they will automatically be keyed with any key. Notice their channels are yellow, indicating they are connected to a set.
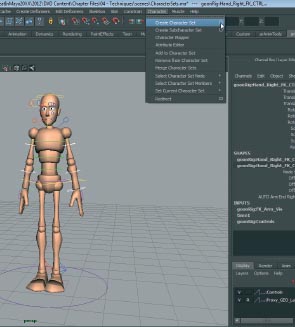
3 Let's create a set for the arms. Select all the arm controls and in the animation menu set (F2) go to Character > Create Character Set > Options box.
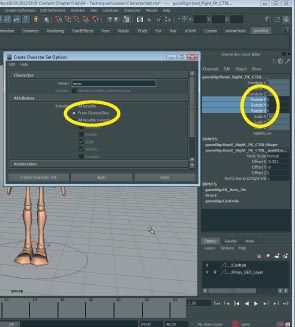
4 In the options, name the set ‘arms’ and select From Channel Box. Highlight the Rotate XYZ channels in the Channel Box, and click Create Character Set.

5 With the arms set selected, setting a key will now key all the controls. Open the Animation Preferences and turn on Auto Key if it isn't already. On character sets, set to Key all attributes.

6 Now adjusting any of the arm controls will set a key on all the other arm controls automatically. This can be handy for blocking if you make a set for all controls.
7 To remove attributes, go to Window > Outliner and select the set you want to edit. The attributes will appear in the Channel Box. Select the attributes you want to remove and go to Character > Remove from Character Set.

8 To add to a character set, have it selected in the list at the bottom, select the objects or attributes you wish to add, and go to Character > Add to Character Set.
![]()
CharacterSets.ma
It's best to create character sets before you start animating. If you need to create a set with controls that are already animated, create a new set with nothing selected. Then add the controls or attributes to the set using Add to Character Set.
Multiple Pivot Points
ONE ISSUE THAT CAN ARISE when animating props is needing different pivot points at different frames. Being able to rotate an object from other pivot points when you need to makes animating much easier. While it is possible to key the pivot point of an object to different spots during the animation, this method is difficult to make changes to and keep track of. It also does not give a clear indicator, such as a Channel Box attribute, that the pivot point is being animated. Instead, then, we're going to use grouping to achieve the control we need and make animating multiple pivots more straightforward.
Grouping is basically parenting your object to an invisible object that can be moved, rotated, and translated just like any other object. You might think of it as a container for an object or objects. We can define the pivot point of the group wherever we like, and we can nest groups as many times as we need to get the number of pivots we require.

The important thing to remember is, once the groups are created, always animate from the top group down. In other words, the last group we create (the highest in the hierarchy, group 2 in the above diagram) is the first one we animate. Also, once you “leave” one group and move to the next one down for the next pivot point, you cannot go back to the previous one at a later frame. You must plan ahead beforehand so you don't animate yourself into a corner.
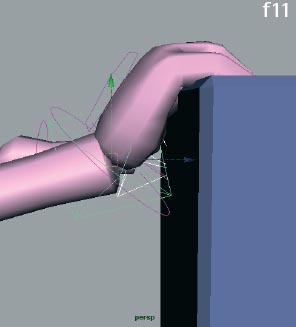
It may sound a bit precarious, but this cheat will give you all the info you need to have as many pivots as your heart desires. Always be sure to plan your animation first, determine how many pivots you need, where you need them, and the order in which they happen. For this animation, the shuriken will be flying through the air, so we will need to first animate it from its center, meaning that's the last group we will create for it. It will then stick into a wall with one of the tips. The shaking from hitting the wall will resonate from that tip, so that's where the other pivot will be, within the first group.
So in a nutshell, create the groups working backwards from the end of the animation. Animate them starting at the top group (the last one you create).

1 Open MultiplePivots_start.ma and go to Window > Hypergraph : Hierarchy to open the hypergraph. This editor displays objects' hierarchies (what they are parented to). Currently the shuriken is by itself.
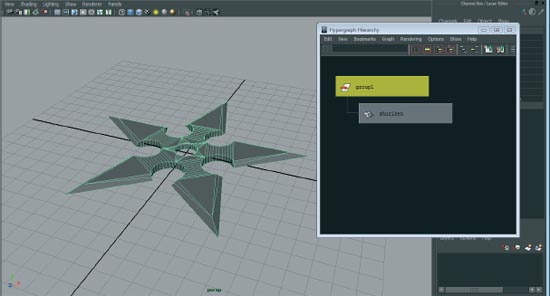
2 Select the shuriken and press ![]() +
+ ![]() to create a group node and put it inside. You can see in the hypergraph it now appears underneath the group object, meaning it's the child and the group is the parent.
to create a group node and put it inside. You can see in the hypergraph it now appears underneath the group object, meaning it's the child and the group is the parent.
![]()
MultiplePivots_start.ma
MultiplePivots_end.ma
Never use grouping on a rig, as adding a parent-child relationship can break it. Only use it on props and simple objects. If you need this type of pivot control in a character, it must be built into the rig.

3 Rename the group to reflect what pivot you're animating by ![]() double clicking the name. Again, we're creating them backwards from how we'll animate them, so this is the tip pivot.
double clicking the name. Again, we're creating them backwards from how we'll animate them, so this is the tip pivot.

4 With the tipPivot group still selected in the hypergraph, select the Move tool and press the Insert key. The tool goes into pivot mode (the arrowheads disappear). Move the pivot to a tip and press Insert again to exit pivot mode.
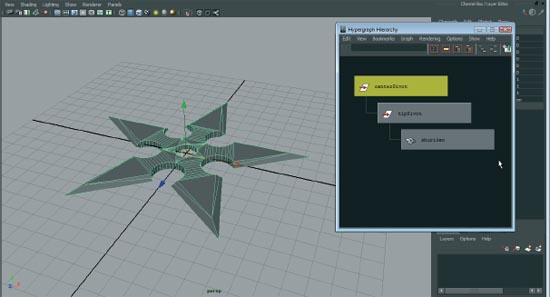
5 Making sure that the tipPivot group is selected, press ![]() +
+![]() again to create another group at the top of the hierarchy and rename it ‘centerPivot’. This is the center of the object which we will animate first, as the shuriken is flying through the air. We won't change the pivot on this one since it's already where we need it to be.
again to create another group at the top of the hierarchy and rename it ‘centerPivot’. This is the center of the object which we will animate first, as the shuriken is flying through the air. We won't change the pivot on this one since it's already where we need it to be.

6 Open MultiplePivots_end.ma to see how the animation works. The centerPivot group is animated from f01 to f19. As stated before, the last group that's created is the first one that's animated. As the frames progress and the pivots change, you simply work your way down that list, and never go back to a pivot after the following one has been keyed.

7 From f19 to the end the tipPivot group is animated for the residual energy from hitting the wall.
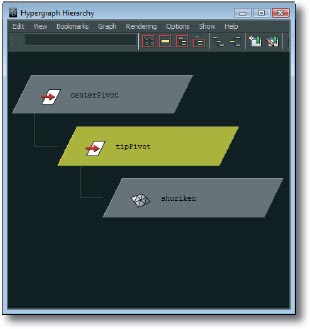
8 When animating multiple pivots, it's easiest to use the hypergraph to quickly select the group you want to animate. You can also select the object and use the up or down arrow keys to move through the hierarchy.
You can use grouping to scale sets and scenery, provided they are just models and not rigged. Simply select everything, group it, and use the scale controls on the group to make it fit your character.
Reblocking

IT IS INEVITABLE, IT IS YOUR DESTINY… as an animator the time will come (and regularly at that) where you'll need to make changes to work you already started refining. It can be frustrating when it happens, but it's one of the tiny cons to the major pro of doing the coolest thing in the universe. Doing a reblock in the middle of an animation is just a fact of life for an animator. The key to making changes smoothly is knowing how to save what you can, when to shuffle around poses that can be salvaged for other spots, and not allowing the new stuff to derail what's already working.
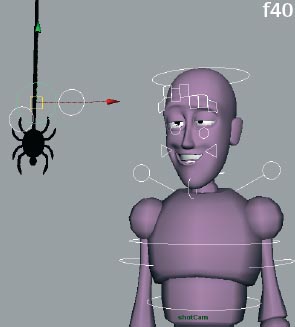
We're going to look at a sort of test case where we take something that's already in the refining stages of animation, and insert another acting beat into it. We'll start with a simple take animation, and imagine we've been given the direction to have him see a spider first, which then makes him do the take.

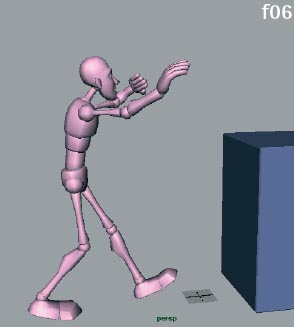
1 Open MakingChanges_start.ma. We have a simple animation of the Goon doing a take, and we need to add a spider coming down screen left, which he sees and then does the take from there.
2 The first thing we need to do is expand the frame range. Click in the Display End field and enter 70. Typing a number greater than the whole range here automatically expands the entire range.

3 Go to Edit > Quick Select Sets > controls to use the predefined selection set to select all his controls. Select all the keys from f06 on, and move them to start on f50.

4 He'll be looking at the spider when he starts the anticipation, so that's a good spot to begin. Select the spider, move it into position at f40, and set a key.

5 At f50 alter his pose to make him look at the spider calmly.

6 Let's keep his eyelids low until he does the actual take, so select the two eye controls. MM drag to f01 and set a key to copy the eye pose.
![]()
MakingChanges_start.ma
MakingChanges_end.ma
When doing this reblocking, I say things like ‘we'll hold this pose for 30 frames.’ This animation will be augmented in other cheats with keep alive things, such as blinks, moving holds, etc. Since this is a reblocking, we still want to think in the broad strokes of overall poses, but there will be animation within those poses when we're finished.
7 Alter his mouth pose to give him a smug, vacant expression. This will add some variety when he changes to the smile as he looks at the spider, and hopefully make it funnier.
8 We'll have him hold while looking at the spider for 10 frames for a delayed reaction. Select all controls, and in the timeline MM drag from f50 to f40. Set a key to copy the pose.

9 MM drag from f01 to f30 and key all to hold the first pose for 30 frames.

10 Select the spider and, at f10, translate it up out of frame and key it.

11 On the spider, MM drag from f10 to f17 so he has a 7 frame drop down.

12 Rekey the spider at f19 with the same pose as f17. Then go back to f17 and lower him a bit more. This will give him a little overshoot when he hits the bottom.

13 To finish this reblocking, we just need to make him look at the spider at the end. At f58, move the eyes to a better position.

14 With a minimum amount of work, we are able to make this animation much more interesting than its previous version. It's now ready for some more detailed refining with the face and overlap.
Here's a good trick when you need to insert new material into an already refined animation: isolate the sections that won't change by inserting keys (hold ![]() and middle click) in the Graph Editor on all curves before and after where the change happens. Then delete all keys in between the sections to give yourself some working space. Inserting the keys makes sure any new poses you'll add won't affect the animation you don't want to change.
and middle click) in the Graph Editor on all curves before and after where the change happens. Then delete all keys in between the sections to give yourself some working space. Inserting the keys makes sure any new poses you'll add won't affect the animation you don't want to change.
Office Etiquette
by Kenny Roy
IF YOUR GOAL IS TO WORK in a production setting there are some things you should know about the studio environment that may help you avoid problems in the workplace. The guidelines below will ensure a copacetic working environment for all.
It is always a good idea to sit silently in a few dailies sessions to observe the culture before offering any feedback to another animator. This not only differs from studio to studio, but from project to project; different clients, different supervisors, budget and schedule constraints all have an effect on how ‘town hall’ the dailies are going to be. See if the supervisor or director gets all his or her comments out before opening up the floor for discussion. If you are encouraged to give feedback, ALWAYS phrase your feedback positively. In fact, I'd only offer ideas when a supervisor asks for it, at least until I get to know my coworkers very well.
Always listen to your music or your dialogue tracks through headphones. Always use headphones that have good sound insulation. Heavy metal has a way of being even more annoying when you can hear the sound escaping someone else's headphones. The rule of thumb is that your ideal working conditions cannot disturb other artists.
I feel this should go without saying, but you have to bathe regularly and manage your body odors. Animators' desks are commonly placed end-to-end and you will be working in close proximity to others for at least eight hours a day. It is unfair to put others in the uncomfortable position of having to ask you to remedy rogue aromas. Animation is hard enough to create without an awkward air in the room (pun intended). I am not above sending an animator home to shower if it is necessary.
Pipeline is more than just a suggestion; it's a rule. And in relation to office politics, adhering to pipeline will keep you out of a lot of trouble. For instance, it is common that your animation will be handled by a few different departments before it finally goes on screen. However, if for some reason your work goes against the studio pipeline, you may have created more work for someone else down the line. You can quickly alienate other artists if you are constantly straying from the established pipeline.
Equipment can be a point of contention. Hopefully the studio has a bit of standardization; everyone gets dual monitors and the same speed workstation, etc. It's not always best to be the squeaky wheel when it comes to equipment, including desks and chairs. The more senior artists may become upset if you get the brand-new chair, widescreen LED monitors and a screaming fast workstation on your first day after complaining. Until you have established yourself, Wait to bring up your equipment woes to your supervisor, or worst-case scenario you cannot get your work done with the equipment you've been given. And never steal someone else's chair!
Another thing that should go without saying, wash your hands every single time you use the restroom. Colds and the flu can travel around studios at light speed because of the close proximity. If you are sick, always cover your mouth (preferably with your sleeve and not your hands) when you cough or sneeze.
Never go over anybody's head. If you have a lead, bring your questions and concerns to him or her. If the problem is big enough, it will be elevated to the supervisor or director. The established hierarchy is set up to make it so that the amount of work that needs to be completed is done in an orderly fashion. Breaking the pecking order not only hurts your relationship with your higher-ups, it's bad pipeline.
Finally, make an effort to be courteous and generous to your coworkers. The animation industry is an exciting business, but that doesn't mean every day is a picnic. There's overtime, challenging work, computer crashes, schedule delays, and nightmare clients. You're all on the same team, so always be cheerful and helpful and the whole team will brave the difficulties together.