Chapter 1
Installing Red Hat Enterprise Linux
The following topics are covered in this chapter:
This chapter covers no exam objectives.
To learn how to work with Red Hat Enterprise Linux (RHEL) as an administrator, you first need to install it. This chapter teaches you how to set up an environment in which you can perform all exercises in this book.
On the Red Hat Certified System Administrator (RHCSA) exam, you do not need to install Red Hat Enterprise Linux. However, because you need to install an environment that allows you to test all items discussed in this book, you start by installing Red Hat Enterprise Linux in this chapter. This chapter describes all steps that you will encounter while performing an installation of RHEL 9. It also discusses how to set up an environment in which you can perform all exercises in this book.
“Do I Know This Already?” Quiz
The “Do I Know This Already?” quiz enables you to assess whether you should read this entire chapter thoroughly or jump to the “Exam Preparation Tasks” section. If you are in doubt about your answers to these questions or your own assessment of your knowledge of the topics, read the entire chapter. Table 1-1 lists the major headings in this chapter and their corresponding “Do I Know This Already?” quiz questions. You can find the answers in Appendix A, “Answers to the ‘Do I Know This Already?’ Quizzes and Review Questions.”
Table 1-1 “Do I Know This Already?” Section-to-Question Mapping
Foundation Topics Section | Questions |
|---|---|
Preparing to Install Red Hat Enterprise Linux | 1, 2, 6 |
Performing an Installation | 3–5, 7–10 |
1. You want to install a test environment to practice for the RHCSA exam. Which of the following distributions should you avoid?
The most recent Fedora version
CentOS Stream
AlmaLinux
Rocky Linux
2. Which of the following features is available in both RHEL and CentOS Stream?
Hardware certification
Software certification
The right to make support calls
Software updates
3. Why should you install the server with a GUI installation pattern?
To prepare for RHCSA, you need some tools that run in a GUI only.
The minimal installation is incomplete.
If you do not install a GUI immediately, it is hard to add it later.
The Server with GUI is the default installation that is recommended by Red Hat.
4. Which is the default file system that is used in RHEL 9?
Ext3
Ext4
XFS
Btrfs
5. Which feature is supported in Ext4 but not in XFS?
The ability to shrink the file system
Snapshots
File system quota
A maximum size that goes beyond 2 TB
6. Which of the following is not a reason why Fedora should be avoided?
Fedora contains features that may or may not be available in future RHEL releases.
Fedora distributions show a much later state of development than RHEL.
Fedora software is not stable.
Software in Fedora may differ from the same software in RHEL.
7. Which of the following options is not available from the Installation Summary screen?
Time & Date
Keyboard
Language Support
Troubleshoot an Existing Installation
8. After setting the root password that you want to use, you cannot proceed in the installation. What is the most likely reason?
The password is unsecure, and unsecure passwords are not accepted.
The password does not meet requirements in the password policy.
You also need to create a user.
If an unsecure password is used, you need to click Done twice.
9. Which statement about the system language is not true?
You can change the system language from the Installation Summary screen.
You can change the system language directly after booting from the installation media.
When setting the installation language, you can also select a keyboard layout.
After installation, you cannot change the language settings.
10. When installing a server that uses LVM logical volumes, you’ll get at least three storage volumes (partitions or LVM). Which of the following is not part of them?
/boot
/var
/
swap
Foundation Topics
Preparing to Install Red Hat Enterprise Linux
Before you start installing Red Hat Enterprise Linux, a bit of preparation is helpful, as discussed in this section. You first learn what exactly Red Hat Enterprise Linux is. Then you learn how you can get access to the software. We then discuss the setup requirements. After you know all about these, you move on to the next section, where you learn how to install Red Hat Enterprise Linux.
What Is Red Hat Enterprise Linux 9 Server?
RHEL 9 is a Linux distribution. As you probably know, Linux is a free operating system. That means that the source code of all programs is available for free. However, some enterprise Linux distributions are sold as commercial products, with bundled support and maintenance, which is the case for RHEL 9. To use RHEL 9 for free you can register for a free Red Hat developer subscription at https://developers.redhat.com. With this subscription, you can run up to 16 unsupported instances of RHEL in any environment you’d like.
To use RHEL 9, you need a subscription. Only if you use a valid subscription can you get access to free patches and updates. When you pay for Red Hat Enterprise Linux, Red Hat offers you a supported Enterprise Linux operating system, which has some key benefits that are a normal requirement in corporate environments:
Monitored updates and patches that have gone through a thorough testing procedure
Different levels of support and help, depending on which type of subscription you have purchased
A certified operating system that is guaranteed to run and to be supported on specific hardware models
A certified platform for running enterprise applications such as SAP middleware, Oracle Database, and many more
Access to the Red Hat Customer Portal at https://access.redhat.com, where you can find much detailed documentation that is available to customers only
Red Hat understands that not all potential customers are interested in these enterprise features. That is why Red Hat is involved in two free alternatives also:
CentOS Stream
Fedora
Apart from these, there are also two community initiatives to provide free alternatives to RHEL, which contain the same software but without the Red Hat branding:
Rocky Linux
AlmaLinux
You learn more about these free alternatives in the upcoming sections of this chapter.
Getting the Software
There are different ways to get the software required to perform all exercises in this book. In this section, you learn what your options are.
Using Red Hat Enterprise Linux
If you want to learn how to work with the different programs, tools, and services that are provided in Red Hat Enterprise Linux 9, the easiest way is to use the developer program that Red Hat offers. Go to https://developers.redhat.com to register for the free developer program. This program gives you access to Red Hat Enterprise Linux for free, which allows you to work with RHEL in your own test environment without having to purchase it.
The most important thing that you get in the official RHEL 9 Server release is access to the Red Hat Customer Portal. Through this portal, you have access to a wide variety of information regarding RHEL, in addition to updates provided through Red Hat Network (RHN). In particular, the Red Hat knowledge base is invaluable; you can use it to find answers to many common problems that have been posted there by Red Hat consultants.
Using CentOS Stream
CentOS is the Community Enterprise Operating System. CentOS started as a recompiled version of RHEL, with all items that were not available for free removed from the RHEL software. Basically, just the name was changed and the Red Hat logo (which is proprietary) was removed from all the CentOS software packages. Before 2020, CentOS provided a good and completely free alternative to RHEL.
In the past years, Red Hat has acquired CentOS and changed its policy. Nowadays CentOS is provided as CentOS Stream. CentOS Stream is a Linux distribution where new features that will be released in the next version of RHEL are introduced. In the RHEL development cycle, new features are introduced in Fedora. After testing in Fedora, some features are introduced in CentOS Stream, which is used as the last testing platform before the features are included in RHEL. New features are continuously integrated in CentOS Stream, and for that reason, it doesn’t know any sub-versions such as RHEL 9.1. This makes CentOS Stream not a good candidate for production environments.
Other Distributions
Another Linux distribution closely related to Red Hat Enterprise Linux is Fedora, a completely open source Linux distribution that is available for free. Red Hat has a lot of staff dedicated to contributing to the Fedora project, because Red Hat uses Fedora as the development platform for RHEL. The result is that Fedora offers access to the latest and greatest software, which in most cases is much more recent than the thoroughly tested software components of RHEL (which is why you should not use Fedora to prepare for the RHCSA exam). Fedora is also used by Red Hat as a testing ground for new features that might or might not be included in future RHEL releases. If you were to choose Fedora, you would be working with items that are not available in RHEL, which means that you would have to do things differently on the exam. So, don’t use it!
AlmaLinux and Rocky Linux are community distributions that provide the same software as in RHEL, but without any license restrictions or support. These distributions are independently developed and in no way supervised by Red Hat. If you want to use a 100 percent compatible alternative for RHEL without being bound by any license conditions, both AlmaLinux and Rocky Linux are good alternatives.
Understanding Access to Repositories
An important difference between RHEL and the other distributions is the access to repositories. A repository is the installation source used for installing software. If you are using free software such as AlmaLinux, correct repositories are automatically set up, and no further action is required. If you are using Red Hat Enterprise Linux with a subscription, you’ll need to use the Subscription Manager software to get access to repositories.
Tip
If you install Red Hat from the RHEL 9 installation disc but do not register it, you will not have access to a repository, which is why you need to know how to set up a repository access manually. Manually setting up a repository is a key skill that you should master on the exam. In Chapter 9, “Managing Software,” you learn how to do this.
Setup Requirements
RHEL 9 can be installed on physical hardware and on virtual hardware. For the availability of specific features, it does not really matter which type of hardware is used, as long as the following minimal conditions are met:
1 GiB of RAM
A 10-GiB hard disk
A network card
Tip
One GB is 1000 × 1000 × 1000 bytes. With hardware vendors it is common to work with multiples of 1000; however, that doesn’t correspond with how a computer works, which is why most computer software works with KiB, MiB, and GiB instead. In this context, one GiB is 1024 × 1024 × 1024 bytes (which is 1.07 GB).
The preceding requirements allow you to run a minimal installation of RHEL, but if you want to create an environment that enables you to perform all exercises described in this book, make sure to meet the following minimal requirements:
64-bit platform support, either Intel based or ARM
2 GiB of RAM
A 20-GiB hard disk
A DVD drive, either virtual or physical
A network card
Note
Some resources on the Internet mention different minimal requirements. This is not a big deal for the RHCSA exam.
Cert Guide Environment Description
To set up an environment to work your way through this book, I suggest you start by installing one RHEL 9 server, following the instructions in the next section. For the chapters in Part IV, “Managing Network Services,” it is useful if you have a second server as well. This second server doesn’t have any specific requirements.
To set up the Cert Guide environment, I recommend that you use a solution for desktop virtualization, such as VMware Workstation (or VMware Fusion if you are on Mac), Microsoft Hyper-V, or Oracle VM VirtualBox. Using one of these solutions has the benefit that you can use snapshots, which enables you to easily revert to a previous state of the configuration. Other virtualization solutions, such as KVM, are supported as well, but because KVM runs on Linux, you’ll need to have some Linux knowledge already if you’d like to start with KVM. You can also install on real hardware, but that solution will be less flexible.
Tip
In all chapters, you’ll find step-by-step exercises that tell you exactly what to do to configure specific services. At the end of all chapters, you’ll find end-of-chapter labs that provide assignments that are very similar to the types of assignments that you will encounter on the exam. To get the most out of the end-of-chapter labs, it is a good idea to start from a clean environment. The most efficient way to do this is by creating snapshots of the state of your virtual machines when you are starting the chapter. This allows you to revert to the state your virtual machines were in when you started working on the chapter, while still keeping all the work that you have done in previous chapters.
Performing an Installation
Even if RHEL 9 can be installed from other media such as an installation server or a USB key, the most common installation starts from the installation DVD or, when you are working in a virtual machine, from the installation DVD ISO file. So, take your installation DVD (or its ISO) and boot the computer on which you want to install the software. The following steps describe how to proceed from the moment you see the installation DVD boot screen:
Step 1. After booting from DVD, you’ll see the RHEL 9 boot menu. From this menu, you can choose from different options:
Install Red Hat Enterprise Linux 9.0: Choose this for a normal installation.
Test This Media & Install Red Hat Enterprise Linux 9.0: Select this if before installing you want to test the installation media. Note that testing will take a significant amount of time and should not be necessary in most cases.
Troubleshooting: Select this option for some troubleshooting options. This option is useful if you cannot boot normally from your computer’s hard drive after RHEL has been installed on it.
When the installation program starts, you can pass boot options to the kernel to enable or disable specific features. To get access to the prompt where you can add these options, press Tab from the installation menu. This shows you the kernel boot line that will be used and offers an option to change boot parameters.
Step 2. To start a normal installation, select the Install Red Hat Enterprise Linux 9.0 boot option (see Figure 1-1). Note that the exact sub-version will change if you install a later version of RHEL 9.

Figure 1-1 Select Install Red Hat Enterprise Linux 9.0 to Start the Installation
Step 3. Once the base system from which you will perform the installation has loaded, you see the Welcome to Red Hat Enterprise Linux 9.0 screen. From this screen, you can select the language and the keyboard setting. For the RHCSA exam, it makes no sense to choose anything but English. If you are working on a non-U.S. keyboard, from this screen you can select the keyboard setting. Make sure to select the appropriate keyboard setting, after which you click Continue to proceed (see Figure 1-2).

Figure 1-2 Select the Appropriate Language and Keyboard Setting Before Continuing
Step 4. After selecting the keyboard and language settings, you’ll see the Installation Summary screen (see Figure 1-3). From this screen, you specify all settings you want to use. On this screen, you have several different options:
Keyboard: Used to change the keyboard disposition.
Language Support: Used to add support for additional languages.
Time & Date: Used to specify the current time and date, as well as the time zone.
Root Password: Used to enable or disable the root user, and if this user is enabled, to set a password.

Figure 1-3 Specify the Complete Configuration of Your Server from the Installation Summary Screen
User Creation: Used to create a non-root user account and, optionally, mark this user as an administrator.
Connect to Red Hat: Used to register your system with Red Hat before starting the installation. Notice that all exercises in this book assume that your system is not installed with Red Hat!
Installation Source: Used to specify where to install from. Typically, you’ll install from the installation DVD, which is referred to as Local Media.
Software Selection: Offers different installation patterns, to easily install a default set of packages.
Installation Destination: Used to identify to which disk(s) to copy the files during the installation.
KDUMP: Allows you to use a KDUMP kernel. This is a kernel that creates a core dump if anything goes wrong.
Network & Host Name: Allows you to set IP address and related settings here.
Security Profile: Offers a limited set of security policies, enabling you to easily harden a server.
From this Installation Summary screen, you can see whether items still need to be configured—these items are marked with an exclamation mark and a description in red text. As long as any issues exist, you cannot click the Begin Installation button (that is, it is disabled). You will not have to change settings for each option in all cases, but for completeness, the following steps describe the different settings available from the Installation Summary screen, with recommended changes where appropriate.
Step 5. Click the Keyboard option to view the settings to configure the keyboard layout. From this screen, you can also select a secondary keyboard layout, which is useful if your server is used by administrators using different keyboard layouts. Not only are different language settings supported, but also different hardware layouts. If many administrators are using an Apple Mac computer, for instance, you can select the standard keyboard layout for Mac in the appropriate region.
After adding another keyboard layout, you can also configure layout switching options. This is a key sequence that is used to switch between different kinds of layout. Select Options to specify the key combination you want to use for this purpose. After specifying the configuration you want to use, click Done to return to the Installation Summary screen.
Step 6. The Language Support option on the Installation Summary screen is the same as the Language Support option that you used in step 3 of this procedure. If you’ve already configured the language settings to be used, you do not need to change anything here.
Step 7. Click Time & Date to see a map of the world on which you can easily click the time zone that you are in (see Figure 1-4). Alternatively, you can select the region and city you are in from the corresponding drop-down list boxes. You can also set the current date and time, and after setting the network, you can specify the Network Time Protocol (NTP) to be used to synchronize time with time servers on the Internet. This option is not accessible if the network is not accessible—you’ll have to set up your network connection first to access this option. When using network time, you can add the network time servers to be used by clicking the configuration icon in the upper-right part of the screen. After specifying the settings you want to use, click Done in the upper-left corner of the screen to write the settings.

Figure 1-4 Selecting Time & Date Settings
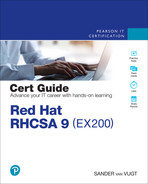
Step 8. In the User Settings section, select Root Password. This opens the screen that you can see in Figure 1-5. By default, the root user account is disabled. If you want to be able to work as root, you need to set a password here. Enter the same password twice, and next click Done to continue.
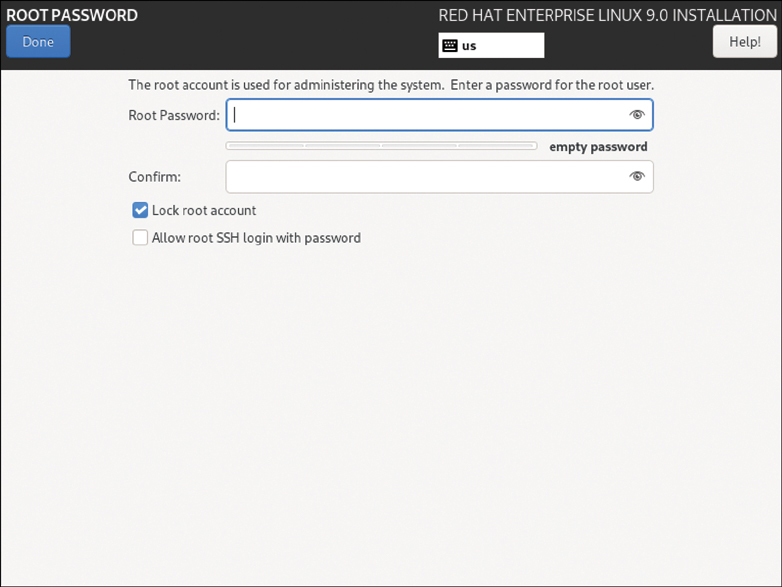
Figure 1-5 Setting the Root User Password
Step 9. After you have set a password for the root user, scroll down to get access to the User Creation option. Click to open it, so that you can see the screen shown in Figure 1-6. In this screen, enter student in the Full Name and User Name fields and set a password. Also, select the option Make This User Administrator and then click Done to continue.

Figure 1-6 Creating an Administrator User
Step 10. In the Software section of the Installation Summary screen, click Installation Source to see the screen shown in Figure 1-7. If you have booted from a regular installation disc, there is nothing to specify. If you have booted from a minimal boot environment, you can specify the network URL where additional packages are available, as well as additional repositories that need to be used. You do not have to do this for the RHCSA exam, but if ever you are setting up an installation server, it is useful to know that this option exists. Click Done.

Figure 1-7 Selecting the Installation Source
Step 11. Click Software Selection to access an important part of the installation procedure (see Figure 1-8). From here, you select the base environment and choose additional software available for the selected environment. The Minimal Install option is very common. This base environment allows you to install RHEL on a minimal-size hard disk, providing just the essential software and nothing else. For this book, I assume that you install the server with the Server with GUI option. To perform the tasks that need to be performed on the RHCSA exam, some easy-to-use graphical tools are available, so it does make sense to install a server with a graphical user interface (GUI), even if you would never do this in a production environment. All additional packages can be added later. At this point, you do not have to select any additional packages. Click Done.

Figure 1-8 Make Sure You Select Server with GUI for Every Server You Are Going to Use for the Exercises in This Book
Note
Some people say that real administrators do not use the Server with GUI installation pattern. Preparing for the RHCSA exam is not about being a real administrator. The big advantage of using the Server with GUI installation pattern is that it provides an easy-to-use interface. Some tools discussed in this book only run on a GUI. Also, when using a server with a GUI, you can use multiple terminal windows simultaneously, and that makes working with the RHEL command line really easy!
Step 12. After installing the software, you need to specify where you want to install to. Click Installation Destination on the Installation Summary screen. By default, automatic partitioning is selected, and you only need to approve the disk device you want to use for automatic partitioning (see Figure 1-9). Many advanced options are available as well. You can install using the Automatic option under Storage Configuration to ensure that no matter how your server is started, everything is configured to have it boot correctly and your file systems are configured with the default XFS file system.

Figure 1-9 Click Done to Proceed and Automatically Create the Storage Configuration
Step 13. The next part of the Installation Summary screen enables you to set up networking. Notice that you must configure something. If you do not do anything, your server might not be able to connect to any network. Click Network & Host Name to set up networking. This opens the screen that you see in Figure 1-10.

Figure 1-10 On the Network & Host Name Screen, Ensure the Network Card Is Connected
After switching on the network connection (if it wasn’t already), set the hostname to server1.example.com. Next, you could click Configure to add further configuration. Networking is discussed in detail in Chapter 8, “Configuring Networking,” so you do not have to do that now and can just leave the default settings that get an IP address from the Dynamic Host Configuration Protocol (DHCP) server. Click Done when finished to return to the main screen.
Step 14. The Security Profile option does not need any change.
Step 15. After specifying all settings from the Installation Summary screen options, you can click Begin Installation to start the installation. This immediately starts the installation procedure and displays the screen shown in Figure 1-11.

Figure 1-11 Starting the Installation
Step 16. When the installation has completed, you’ll see the screen shown in Figure 1-12. You’ll now need to click Reboot System to restart the computer and finalize the installation.
Figure 1-12 Reboot to Finalize the Installation
Step 17. After rebooting, you have to go through a couple of additional setup steps to set up your user environment. First, you’ll be prompted to take a tour. Feel free to select No Thanks to skip this tour, which otherwise would introduce you to the workings of the GNOME graphical desktop. Next you will see a prompt mentioning that your system is not registered. Click to dismiss this prompt; you should NOT register your system at this moment because that will complicate all the exercises about repository management that you’ll find in Chapter 9.
Summary
In this chapter, you learned what Red Hat Enterprise Linux is and how it relates to some other Linux distributions. You also learned how to install Red Hat Enterprise Linux 9. You are now ready to set up a basic environment that you can use to work on all the exercises in this book.
Exam Preparation Tasks
As mentioned in the section “How to Use This Book” in the Introduction, you have several choices for exam preparation: the end-of-chapter labs; the memory tables in Appendix C; Chapter 27, “Final Preparation”; and the practice exams.
Review All Key Topics
Review the most important topics in the chapter, noted with the Key Topic icon in the margin of the page. Table 1-2 lists a reference of these key topics and the page number on which each is found.
Table 1-2 Key Topics for Chapter 1
Key Topic Element | Description | Page |
|---|---|---|
List | How to perform a RHEL 9 installation |
Define Key Terms
Define the following key terms from this chapter and check your answers in the glossary:
Review Questions
The questions that follow are meant to help you test your knowledge of concepts and terminology and the breadth of your knowledge. You can find the answers to these questions in Appendix A.
1. You do not want to buy a RHEL license, but you want to create an environment to practice for the exam. Which distribution should you use?
2. What happens to the network configuration if you don’t specify anything during the installation?
3. You want to install a minimal system. How much RAM do you need?
4. Why is it a good idea to have Internet access on all servers you are installing?
5. You want to install a virtual machine on a computer that does not have an optical disk drive. What is the easiest alternative to perform the installation?
6. Why is it a good idea to install a GUI?
7. What is the default file system on RHEL 9?
8. Can you install RHEL if you do not have Internet access?
9. What is the most important benefit of using Subscription Manager to register your RHEL 9 installation?
10. Which installation pattern should you use if you have a very limited amount of disk space available?
End-of-Chapter Lab
In this chapter, you learned how to set up Red Hat Enterprise Linux. At this point, you should have one server up and running. For exercises in later chapters in this book, one additional server is needed.
Lab 1.1
Repeat the procedure “Performing an Installation” to install one more server. Details about the additional configuration on this server follow in exercises in later chapters. For now, it is sufficient to ensure that the following conditions are met:
Use the server name server2.example.com.
Set the network configuration to obtain an IP address automatically.
Install this server using the Minimal Installation pattern.