
Let’s look at a JVM test to see how it is structured. When Android Studio generated GeoQuiz’s project files, it also generated some unit tests for you. In com.bignerdranch.android.geoquiz (test), find and open ExampleUnitTest.kt:
    class ExampleUnitTest {
        @Test
        fun addition_isCorrect() {
            assertEquals(4, 2 + 2)
        }
    }
Both JVM and instrumented tests are executed using the JUnit testing framework. JUnit is the most popular way of unit testing code in Java and Kotlin and is widely supported on Android.
JUnit tests are encapsulated by classes. Within these classes, individual tests are functions marked by the @Test annotation, which you can see in the example. When running your tests, JUnit finds and executes the annotated functions.
The normal rules for naming functions do not apply to test functions.
In fact, names for test functions should be descriptive and verbose.
We generally prefer names that describe the behavior we are trying to verify.
The name of the example test, addition_isCorrect(), clearly shows what it is designed to check.
It is a simple test that checks an expected value against an operation – here, 4 and 2 + 2.
To perform this check, addition_isCorrect uses the assertEquals() assertion.
With JUnit, you can assert that two values are equal, as in this example, or that one value is true, or any of several other conditions.
You can also perform multiple assertions within a single test.
JUnit uses these assertions to determine whether your test passes or fails:
If any of the assertions fails, then the entire test fails.
Here, assertEquals() function takes in two parameters: 4 and 2 + 2.
Since those expressions evaluate to the same value, the assertion passes – and, as a result, the test passes.
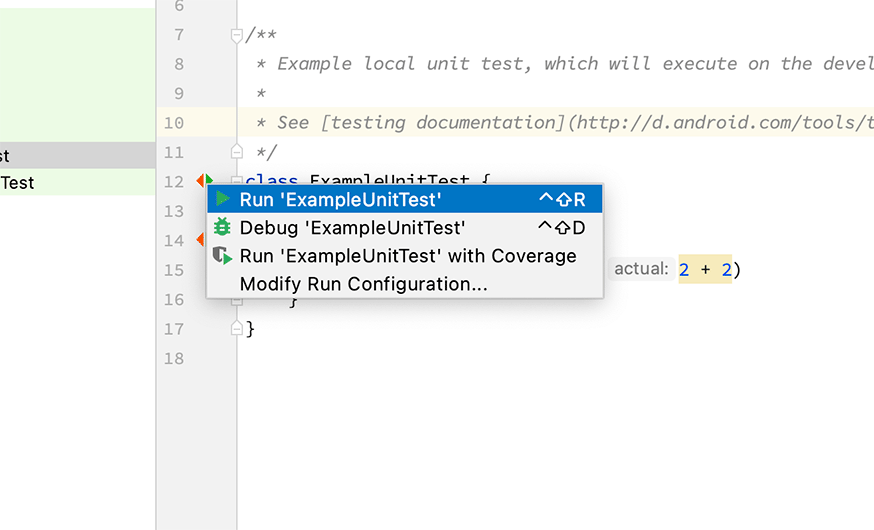
On the left side of the editor tool window, in the gray area known as the gutter, you should see a ![]() icon on the same line as the class definition.
Click that icon and then, in the pop-up, click Run 'ExampleUnitTest' (Figure 6.2).
icon on the same line as the class definition.
Click that icon and then, in the pop-up, click Run 'ExampleUnitTest' (Figure 6.2).
After compiling your code, Android Studio will open the run tool window and execute the unit tests for the class. When the work is complete, you will see that your test passed (Figure 6.3).

The Tests passed: 1 result in the lower-left corner of the Android Studio window indicates the test’s successful result.
To see what a failing test looks like, try changing the 4 to a 5.
Run the test again.
Make sure to revert your changes before moving on.
Unit tests can be quick and easy ways to verify that your code is behaving the way you expect. And JVM tests like addition_isCorrect() execute very quickly: The time required will vary based on the horsepower of your development machine, but it could take as little as a millisecond to complete execution.
Now it is time for you to write your own test. A common pattern is to group and name tests based on the class that they are testing, so, for example, MainActivity would have its associated tests in a class called MainActivityTest. The first tests you are going to write will verify the behavior of QuizViewModel.
You could create a new class file within the test source set and set up a QuizViewModelTest class definition yourself, but Android Studio can help you with this common task. In the project tool window, find and open QuizViewModel.kt. Now, in the editor tool window, place your cursor anywhere in the class definition and press Command-Shift-T (Ctrl-Shift-T). In the pop-up, select Create New Test... (Figure 6.4).

This opens the Create Test dialog (Figure 6.5). The defaults for the name (the class name plus “Test”) and the destination package are fine, and you will not be using any of the checkbox options. But there is one field you do need to change: Select JUnit4 from the Testing library dropdown. (JUnit4 is the testing framework Google supports for Android.)

(If you see JUnit4 library not found in the module, click the Fix button and wait a moment for the library to be added and synced.)
Click OK. The next dialog asks you to choose a directory for your new test file. Since the code you are testing does not interact with the core Android SDK, you can create a JVM test. Select the folder with /test/ in its path and click OK (Figure 6.6).

Your new QuizViewModelTest.kt file will open in the editor:
    package com.bignerdranch.android.geoquiz

    import org.junit.Assert.*

    class QuizViewModelTest
As in ExampleUnitTest, you are going to write functions with the @Test annotation. However, your functions will be slightly more complex than the addition_isCorrect() example.
Within a unit test, code is normally organized in three distinct phases: first, you set up your testing environment, then you test a specific unit of code, and finally you verify that the unit of code behaves the way you expect. (You will sometimes see this pattern expressed as given, when, then.)
addition_isCorrect() is a very basic test. It requires no setup, and it tests and verifies behavior on a single line. Your tests will set up by directly initializing a QuizViewModel, test by performing some action on your QuizViewModel, and then verify by confirming that the output is what you expect.
The first test you will write will verify that your QuizViewModel provides the correct question text for the first question just after it is initialized.
Recall that QuizViewModel’s only constructor parameter is the SavedStateHandle. You will first need to initialize a saved instance state, which you can do with just an empty constructor, so that you can initialize a QuizViewModel. Then you can use the same assertEquals() function you saw in the example to verify that the currentQuestionText property on your QuizViewModel provides the expected value.
Write your test, using the descriptive name providesExpectedQuestionText():
Listing 6.1 Writing your first JVM test (QuizViewModelTest.kt)
import androidx.lifecycle.SavedStateHandle
import org.junit.Assert.assertEquals
import org.junit.Test

class QuizViewModelTest {
    @Test
    fun providesExpectedQuestionText() {
        val savedStateHandle = SavedStateHandle()
        val quizViewModel = QuizViewModel(savedStateHandle)
        assertEquals(R.string.question_australia, quizViewModel.currentQuestionText)
    }
}
Run the test by clicking the ![]() icon next to QuizViewModelTest and verify that it passes.
Note that this test includes set-up and verify phases, but no test behavior.
Your next test will include all three phases.
icon next to QuizViewModelTest and verify that it passes.
Note that this test includes set-up and verify phases, but no test behavior.
Your next test will include all three phases.
The empty constructor is not the only one available to SavedStateHandle. You can also pass an initial saved instance state as a map of key-value pairs into the SavedStateHandle constructor. Take advantage of this functionality to write a test verifying the expected behavior when you are at the end of the question bank and move to the next question: It should wrap around to the first question.
Listing 6.2 Passing input to your QuizViewModel (QuizViewModelTest.kt)
class QuizViewModelTest {
    ...
    @Test
    fun wrapsAroundQuestionBank() {
        val savedStateHandle = SavedStateHandle(mapOf(CURRENT_INDEX_KEY to 5))
        val quizViewModel = QuizViewModel(savedStateHandle)
        assertEquals(R.string.question_asia, quizViewModel.currentQuestionText)
        quizViewModel.moveToNext()
        assertEquals(R.string.question_australia, quizViewModel.currentQuestionText)
    }
}
Run both your tests and verify that they pass.
The ability to create instances of a ViewModel and pass data in as constructor parameters allows you to write useful and reliable unit tests. This is one of the many reasons we recommend keeping business logic in ViewModels rather than Android components like Activity.