For your last task in this chapter, you will switch to the view layer and get PhotoGalleryFragment’s RecyclerView to display some images.
Start by creating a layout for an individual list item. In the project tool window, right-click the res/layout directory and choose New → Layout Resource File. Name the file list_item_gallery, set the root element to ImageView, and click OK.
Within the layout, update and add a few XML attributes.
The RecyclerView will provide the list item with an appropriate width, so keep the android:layout_width set to match_parent.
But limit the height to 120dp.
That will allow the user to see multiple rows of images within your RecyclerView onscreen at once.
Flickr does not standardize photo sizing, so you cannot be fully sure of the dimensions of the image. There are two attributes you can use to provide a good experience regardless of any particular image’s dimensions.
First, set android:scaleType to centerCrop.
This will make the image spread its contents all the way to the edges of the ImageView, while maintaining its aspect ratio.
That means that both of the image’s dimensions will be equal to or larger than the dimensions of the ImageView.
Any part of the image that goes beyond the dimensions of the ImageView will be cropped off.
Also, set the android:layout_gravity attribute to center.
This will center the image both vertically and horizontally within the dimensions of the ImageView.
Listing 20.30 Updating the list item layout file (layout/list_item_gallery.xml)
<?xml version="1.0" encoding="utf-8"?>
<ImageView xmlns:android="http://schemas.android.com/apk/res/android"
    android:id="@+id/item_image_view"
    android:layout_width="match_parent"
    android:layout_height="match_parent"
    android:layout_height="120dp"
    android:layout_gravity="center"
    android:scaleType="centerCrop" />

</ImageView>
With the layout defined, you can start on the Kotlin code. As you may recall from Chapter 10, you will need to create two Kotlin classes: one that will extend RecyclerView.ViewHolder and another that will extend RecyclerView.Adapter.
First, you will create PhotoViewHolder, which extends RecyclerView.ViewHolder. It will be responsible for holding onto an instance of the view for the layout you just created and binding a GalleryItem to that view. Next, you will create PhotoListAdapter, which extends RecyclerView.Adapter. It will manage the communication between the RecyclerView and the backing data, providing PhotoViewHolder instances to the RecyclerView and binding those instances with a GalleryItem at the correct position.
Let’s get started. Create a new file named PhotoListAdapter.kt. Define a PhotoViewHolder class in your new file. It should take in a ListItemGalleryBinding as a constructor parameter and have a bind(galleryItem: GalleryItem) function to update itself with the data from a GalleryItem. You will fill out the body of this function shortly.
Listing 20.31 Adding a ViewHolder implementation (PhotoListAdapter.kt)
class PhotoViewHolder(
    private val binding: ListItemGalleryBinding
) : RecyclerView.ViewHolder(binding.root) {
    fun bind(galleryItem: GalleryItem) {
        // TODO
    }
}
Next, add a RecyclerView.Adapter to provide PhotoViewHolders as needed, based on a list of GalleryItems.
Listing 20.32 Adding a RecyclerView.Adapter implementation (PhotoListAdapter.kt)
class PhotoViewHolder(
    private val binding: ListItemGalleryBinding
) : RecyclerView.ViewHolder(binding.root) {
    ...
}

class PhotoListAdapter(
    private val galleryItems: List<GalleryItem>
) : RecyclerView.Adapter<PhotoViewHolder>() {
    override fun onCreateViewHolder(
        parent: ViewGroup,
        viewType: Int
    ): PhotoViewHolder {
        val inflater = LayoutInflater.from(parent.context)
        val binding = ListItemGalleryBinding.inflate(inflater, parent, false)
        return PhotoViewHolder(binding)
    }

    override fun onBindViewHolder(holder: PhotoViewHolder, position: Int) {
        val item = galleryItems[position]
        holder.bind(item)
    }

    override fun getItemCount() = galleryItems.size
}
Now that you have the appropriate nuts and bolts in place for RecyclerView, attach an adapter with updated gallery item data when the StateFlow emits a new value.
Listing 20.33 Adding an adapter to the recycler view when data is available or changed (PhotoGalleryFragment.kt)
class PhotoGalleryFragment : Fragment() {
    ...
    override fun onViewCreated(view: View, savedInstanceState: Bundle?) {
        super.onViewCreated(view, savedInstanceState)

        viewLifecycleOwner.lifecycleScope.launch {
          viewLifecycleOwner.repeatOnLifecycle(Lifecycle.State.STARTED) {
              photoGalleryViewModel.galleryItems.collect { items ->
                  Log.d(TAG, "Response received: $items")
                  binding.photoGrid.adapter = PhotoListAdapter(items)
              }
          }
      }
    }
    ...
}
All the infrastructure is in place to display the images. Unfortunately, you cannot reuse your code from CriminalIntent to display the images this time. For starters, the images are not saved to the device – they will be coming from the internet.
Also, it is more important than ever to efficiently perform this work. You are no longer displaying a single image, like you did in CriminalIntent. This time, you are displaying more than 20. And if the user scrolls down the grid, you will need to load dozens more. This will lead to a significant amount of computing power and memory usage for a seemingly straightforward task. So you need to accomplish as much of that work as possible off the UI thread, because the UI needs to be responsive even while loading all the images.
Efficient image loading is a hard problem. You need to worry about network connections, juggling images across threads, caching images, resizing images to fit their containers, canceling requests when images are no longer needed, and much more. Still, if you wanted to, you could manually write the image loading code you need. In fact, in previous editions of this book, we dedicated an entire chapter to accomplishing this task.
But you should not write this code yourself if you do not have to. And – thanks to modern Android tooling – you do not.
Today, just as there are many libraries for parsing JSON or performing network requests, there are many libraries to help you download and display images on Android. Commonly used ones include Picasso (which is also from Square) and Glide.
In PhotoGallery, you will use Coil, originally developed at Instacart. Coil leverages all the convenient features of the modern Kotlin language and integrates seamlessly with coroutines to manage performing work in the background.
To include Coil as a dependency, add it to app/build.gradle.
Listing 20.34 Adding Coil (app/build.gradle)
...
dependencies {
    ...
    implementation 'com.squareup.retrofit2:converter-moshi:2.9.0'
    implementation 'io.coil-kt:coil:2.0.0-rc02'
    testImplementation 'junit:junit:4.13.2'
    ...
}
Do not forget to sync your Gradle files.
Coil is a highly customizable library, but the basic usage is simple: When binding data to the PhotoViewHolder, call the load() extension function that Coil provides for the ImageView. Pass in the url property from the GalleryItem, and Coil will handle the rest.
Listing 20.35 Loading the image (PhotoListAdapter.kt)
class PhotoViewHolder(
    private val binding: ListItemGalleryBinding
) : RecyclerView.ViewHolder(binding.root) {
    fun bind(galleryItem: GalleryItem) {
        // TODO
        binding.itemImageView.load(galleryItem.url)
    }
}
...
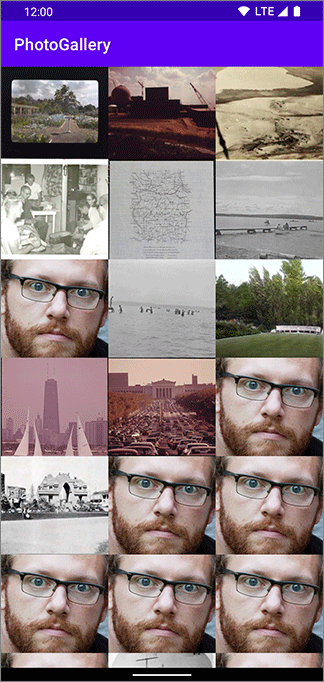
That is it! Run PhotoGallery and admire the interesting photos it displays (Figure 20.11):
Coil also has some fun features that go beyond the basics. You can automatically crop images into a circle. You can cross-fade them as they come in from the network. You can also display a placeholder image while the real image is being downloaded from the internet.
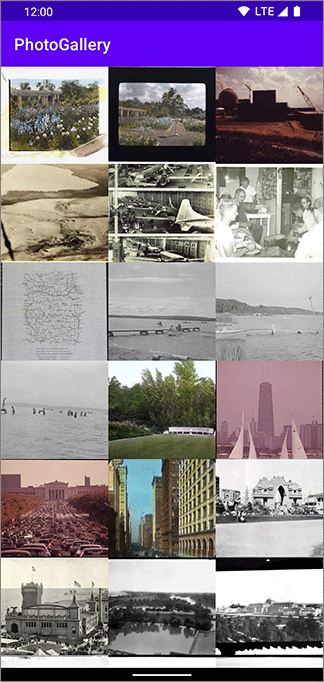
All these customizations can be configured within a lambda expression that is an optional parameter on the load() function you just used. To see how this works, add a placeholder image so your users do not have to look at a blank screen while they wait for photos to load. Find bill_up_close.png in the solutions file (www.bignerdranch.com/android-5e-solutions) and put it in res/drawable. Use it as a placeholder while images download from Flickr.
Listing 20.36 Loading the image (PhotoListAdapter.kt)
class PhotoViewHolder(
    private val binding: ListItemGalleryBinding
) : RecyclerView.ViewHolder(binding.root) {
    fun bind(galleryItem: GalleryItem) {
        binding.itemImageView.load(galleryItem.url) {
          placeholder(R.drawable.bill_up_close)
      }
    }
}
...
Run your app again and watch for the placeholder image to fill the recycler view and then disappear as the images from Flickr arrive (Figure 20.12).