
Chapter 1. Introduction and Test-Driving a C++ Application

Objectives
In this chapter, you’ll do one or more of the following:
■ Test-drive a C++20 application in the Visual C++ compiler in Microsoft Visual Studio Community edition on Windows.
■ Test-drive a C++20 application in the Clang compiler in Xcode on macOS.
■ Test-drive a C++20 application in the GNU C++ compiler on Linux.
■ Test-drive a C++20 application in the GNU Compiler Collection (GCC) Docker Container in Docker running natively over Windows 10, macOS and/or Linux.
1.2 Test-Driving a C++20 Application
1.2.2 Compiling and Running a C++20 Application with Xcode on macOS
1.2.3 Compiling and Running a C++20 Application with GNU C++ on Linux
1.1 Introduction
Welcome to C++—one of the world’s most widely used, high-performance, computer-programming languages—and its current version C++20.
If you’re reading this, you’re on the O’Reilly Online Learning platform (formerly called Safari) viewing an early-access Rough Cut of our forthcoming book C++20 for Programmers, scheduled for publication this summer. We have prepared this content carefully, but it has not yet been peer reviewed or copy edited and is subject to change. When we complete this chapter, we’ll post the reviewed and copy edited version here.
Please send any corrections, comments, questions and suggestions for improvement to [email protected] and I’ll respond promptly. Check for updates here and on the book’s web page:
https://deitel.com/c-plus-plus-20-for-programmers
This book is written for developers using one or more of the following popular desktop platforms—Microsoft Windows 10, macOS and Linux. We tested every program on three popular free compilers:
• Visual C++ in Microsoft Visual Studio Community edition on Windows 10,
• Clang in Xcode on macOS, and
• GNU C++ on Linux and in the GNU Compiler Collection (GCC) Docker container.1
1. At Deitel, we use current, powerful multicore Apple Mac computers that enable us to run macOS natively, and Windows 10 and Linux through virtual machines in VMWare Fusion. Docker runs natively on Windows, macOS and Linux systems.
This early-access version of Chapter 1 contains test-drives demonstrating how to compile and run a C++20 application using these compilers and platforms. The published version of this chapter will contain additional introductory material.
At the time of this writing, some C++20 features are fully implemented in all three compilers, some are implemented in a subset of the three and some are not implemented at all. We point out these issues as appropriate and will update our online content as the compiler vendors implement the rest of C++20’s features. C++20 compiler support for many more compilers is tracked at:
https://en.cppreference.com/w/cpp/compiler_support
“Sneak Peek” Videos for O’Reilly Online Learning Subscribers
As an O’Reilly Online Learning subscriber, you also have access to the “sneak peek” of our new C++20 Fundamentals LiveLessons videos at:
https://learning.oreilly.com/videos/c-20-fundamentals-parts/9780136875185
Co-author Paul Deitel immediately records each video lesson as we complete the corresponding chapter. Lessons go live on O’Reilly Online Learning a few days later. Again, check here frequently for updates.
1.2 Test-Driving a C++20 Application
In this section, you’ll compile, run and interact with your first C++ application—a guess-the-number game, which picks a random number from 1 to 1000 and prompts you to guess it. If you guess correctly, the game ends. If you guess incorrectly, the application indicates whether your guess is higher or lower than the correct number. There’s no limit on the number of guesses you can make.
Usually, this application randomly selects the correct answer as you execute the program. We’ve disabled that aspect of the application so that it uses the same correct answer every time the program executes (though this may vary by compiler). So, you can use the same guesses we use and see the same results.
Summary of the Test-Drives
We’ll demonstrate running a C++ application using:
• Microsoft Visual Studio 2019 Community edition for Windows (Section 1.2.1)
• Clang in Xcode on macOS (Section 1.2.2).
• GNU C++ in a shell on Linux (Section 1.2.3)
• GNU C++ in a shell running inside the GNU Compiler Collection (GCC) Docker container. This requires Docker to be installed and running.
You need to read only the section that corresponds to your platform. At the time of this writing, GNU C++ supports the most C++20 features of the three compilers we use.
1.2.1 Compiling and Running a C++20 Application with Visual Studio 2019 Community Edition on Windows 10
In this section, you’ll run a C++ program on Windows using Microsoft Visual Studio 2019 Community edition. There are several versions of Visual Studio available—on some versions, the options, menus and instructions we present might differ slightly. From this point forward, we'll simply say “Visual Studio” or “the IDE.”
Step 1: Checking Your Setup
If you have not already done so, read the Before You Begin section of this book for instructions on installing the IDE and downloading the book’s code examples.
Step 2: Launching Visual Studio
Open Visual Studio from the Start menu. The IDE displays the following Visual Studio 2019 window containing:

Close this window for now by clicking the X in its tab—you can access this window any time by selecting File > Start Window. We use the > character to indicate selecting a menu item from a menu. For example, the notation File > Open indicates that you should select the Open menu item from the File menu.
Step 3: Creating a Project
A project is a group of related files, such as the C++ source-code files that compose an application. Visual Studio organizes applications into projects and solutions, which contain one or more projects. Multiple-project solutions are used to create large-scale applications. Each application in this book requires only a single-project solution.
To work our code examples, you’ll begin with an Empty Project and add files to it. To create a project:
1. Select File > New > Project… to display the Create a New Project dialog:

2. In the preceding dialog, select the Empty Project template with the tags C++, Windows and Console. This template is for programs that execute at the command line in a Command Prompt window. Depending on the version of Visual Studio you’re using and the options you have installed, there may be many other project templates installed. You can narrow down your choices using the Search for templates textbox and the drop-down lists below it. Click Next to display the Configure your new project dialog:
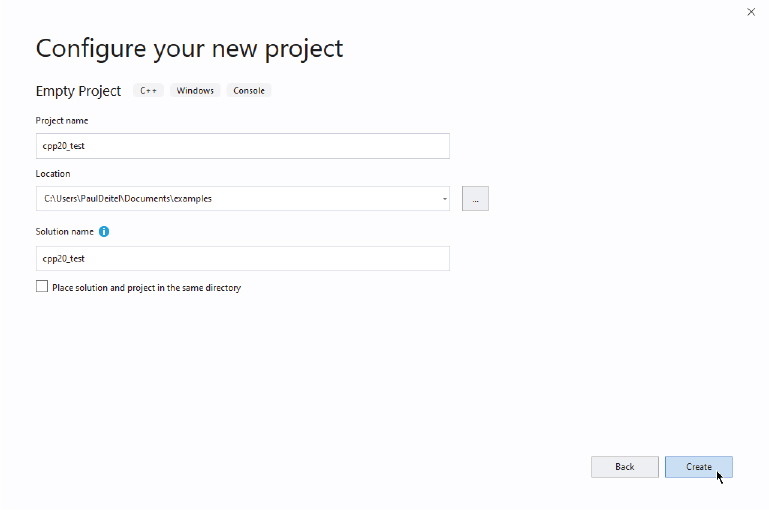
3. Provide a Project name and Location for your project. For the Project name, we specified cpp20_test. For the Location, we selected the examples folder containing this book’s code examples. Click Create to open your new project in Visual Studio.
At this point, the Visual Studio creates your project, places its folder in
C:UsersYourUserAccountDocumentsexamples
(or the folder you specified) and opens the main window:

This window displays editors as tabbed windows (one for each file) when you’re editing code. On the left side is the Solution Explorer for viewing and managing your application’s files. In this book’s examples, you’ll typically place each program’s code files in the Source Files folder. If the Solution Explorer is not displayed, you can display it by selecting View > Solution Explorer.
Step 4: Adding the GuessNumber.cpp File into the Project
Next, you’ll add GuessNumber.cpp to the project you created in Step 3. In the Solution Explorer:
1. Right-click the Source Files folder and select Add > Existing Item….
2. In the dialog that appears, navigate to the ch01 subfolder of the book’s examples folder, GuessNumber.cpp and click Add.2
2. For the multiple source-code-file programs that you’ll see in later chapters, select all the files for a given program. When you begin creating programs yourself, you can right click the Source Files folder and select Add > New Item… to display a dialog for adding a new file.
Step 5: Configuring Your Project to Use C++20
The Visual C++ compiler in Visual Studio supports several versions of the C++ standard. For this book, we use C++20, which we must configure in our project’s settings:
1. Right-click the project’s node—![]() —in the Solution Explorer and select Properties to display the project’s cpp20_test Property Pages dialog:
—in the Solution Explorer and select Properties to display the project’s cpp20_test Property Pages dialog:

2. In the left column, expand the C/C++ node, then select Language.
3. In the right column, click in the field to the right of C++ Language Standard, click the down arrow, then select Preview - Features from the Latest C++ Working Draft (/std:c++latest) and click OK. In a future version of Visual Studio, Microsoft will change this option to ISO C++20 Standard (/std:c++20).
Step 6: Compiling and Running the Project
To compile and run the project so you can test-drive the application, select Debug > Start without debugging or type Ctrl + F5. If the program compiles correctly, Visual Studio opens a Command Prompt window and executes the program. We changed the Command Prompt’s color scheme and font size for readability:

Step 7: Entering Your First Guess
At the ? prompt, type 500 and press Enter. The application displays "Too high. Try again." to indicate the value you entered is greater than the number the application chose as the correct guess:

Step 8: Entering Another Guess
At the next prompt, type 250 and press Enter. The application displays "Too high. Try again.", because the value you entered once again is greater than the correct guess:

Step 9: Entering Additional Guesses
Continue to play the game by entering values until you guess the correct number. When you guess correctly, the application displays "Excellent! You guessed the number!":

Step 10: Playing the Game Again or Exiting the Application
After you guess the correct number, the application asks if you’d like to play another game. At the "Would you like to play again (y or n)?" prompt, entering y causes the application to choose a new number and start a new game. Entering n terminates the application. Each time you execute this application from the beginning (Step 6), it will choose the same numbers for you to guess.
Reusing This Project for Subsequent Examples
You can follow the steps in this section to create a separate project for every application in the book. However, for our examples, you may find it more convenient to remove the current program from the project then add a new one. To remove a file from your project (but not your system), select it in the Solution Explorer then press Del (or Delete). You can then repeat Step 4 to add a different program to the project.
1.2.2 Compiling and Running a C++20 Application with Xcode on macOS
In this section, you’ll run a C++ program on a macOS using the Clang compiler in Apple’s Xcode IDE.
Step 1: Checking Your Setup
If you have not already done so, read the Before You Begin section of this book for instructions on installing the IDE and downloading the book’s code examples.
Step 2: Launching Xcode
Open a Finder window, select Applications and double-click the Xcode icon (![]() ). If this is your first time running Xcode, the Welcome to Xcode window appears:
). If this is your first time running Xcode, the Welcome to Xcode window appears:

Close this window by clicking the X in the upper left corner—you can access it any time by selecting Window > Welcome to Xcode. We use the > character to indicate selecting a menu item from a menu. For example, the notation File > Open… indicates that you should select the Open… menu item from the File menu.
Step 3: Creating a Project
A project is a group of related files, such as the C++ source-code files that compose an application. The Xcode projects we created for this book’s examples are Command Line Tool projects that you’ll execute directly in the IDE. To create a project:
1. Select File > New > Project….
2. At the top of the Choose a template for your new project dialog, click macOS.
3. Under Application, click Command Line Tool and click Next.
4. For Product Name, enter a name for your project—we specified cpp20_test.
5. In the Language drop-down list, select C++ then click Next.
6. Specify where you want to save your project. We selected the examples folder containing this book’s code examples.
7. Click Create.
Xcode creates your project and displays the workspace window initially showing three areas—the Navigator area, Editor area and Utilities area:

The left-side Navigator area has icons at its top for the navigators that can be displayed there. For this book, you’ll primarily work with
• Project (![]() )—Shows all the files and folders in your project.
)—Shows all the files and folders in your project.
• Issue (![]() )—Shows you warnings and errors generated by the compiler.
)—Shows you warnings and errors generated by the compiler.
Clicking a navigator button displays the corresponding navigator panel.
The middle Editor area is for managing project settings and editing source code. This area is always displayed in your workspace window. Selecting a file in the Project navigator, the file’s contents display in the Editor area. You will not use the right-side Utilities area in this book. There’s also a Debug area in which you’ll run and interact with the guess-the-number program. This will appear below the Editor area.
The workspace window’s toolbar contains options for executing a program:

displaying the progress of tasks executing in Xcode:
and hiding or showing the left (Navigator), right (Utilities) and bottom (Debug) areas:
Step 4: Configuring the Project to Compile Using C++20
The Clang compiler in Xcode supports several versions of the C++ standard. For this book, we use C++20, which we must configure in our project’s settings:
1. In the Project navigator, select your project’s name (cpp20_test).
2. In the Editors area’s left side, select your project’s name under TARGET.
3. At the top of the Editors area, click Build Settings, and just below it, click All.
4. Scroll to the Apple Clang - Language - C++ section.
5. Click the value to the right of C++ Language Dialect and select Other….
6. In the popup area, replace the current setting with c++2a and press Enter. In a future version of Xcode, Apple will provide a C++20 option for C++ Language Dialect.
Step 5: Deleting the main.cpp File from the Project
By default, Xcode creates a main.cpp source-code file containing a simple program that displays "Hello, World!". You won’t use main.cpp in this test-drive, so you should delete the file. In the Project navigator, right-click the main.cpp file and select Delete. In the dialog that appears, select Move to Trash. The file will not be removed from your system until you empty your trash.
Step 6: Adding the GuessNumber.cpp File into the Project
In a Finder window, open the ch01 folder in the book’s examples folder, then drag GuessNumber.cpp onto the Guess Number folder in the Project navigator. In the dialog that appears, ensure that Copy items if needed is checked, then click Finish.3
3. For the multiple source-code-file programs that you’ll see later in the book, drag all the files for a given program to the project’s folder. When you begin creating your own programs, you can right click the project’s folder and select New File… to display a dialog for adding a new file.
Step 7: Compiling and Running the Project
To compile and run the project so you can test-drive the application, simply click the run (![]() ) button on Xcode’s toolbar. If the program compiles correctly, Xcode opens the Debug area and executes the program in the right half of the Debug area:
) button on Xcode’s toolbar. If the program compiles correctly, Xcode opens the Debug area and executes the program in the right half of the Debug area:

The application displays "Please type your first guess.", then displays a question mark (?) as a prompt on the next line.
Step 8: Entering Your First Guess
Click in the Debug area, then type 500 and press Return

The application displays "Too low. Try again.", meaning that the value you entered is less than the number the application chose as the correct guess.
Step 9: Entering Another Guess
At the next prompt, enter 750:

The application displays "Too low. Try again.", because the value you entered once again is less than the correct guess.
Step 10: Entering Additional Guesses
Continue to play the game by entering values until you guess the correct number. When you guess correctly, the application displays "Excellent! You guessed the number.":

Playing the Game Again or Exiting the Application
After you guess the correct number, the application asks if you’d like to play another game. At the "Would you like to play again (y or n)?" prompt, entering y causes the application to choose a new number and start a new game. Entering n terminates the application. Each time you execute this application from the beginning (Step 7), it will choose the same numbers for you to guess.
Reusing This Project for Subsequent Examples
You can follow the steps in this section to create a separate project for every application in the book. However, for our examples, you may find it more convenient to remove the current program from the project then add a new one. To remove a file from your project (but not your system), right-click the file in the Project navigator and select Delete. In the dialog that appears, select Move to Trash. You can then repeat Step 6 to add a different program to the project.
1.2.3 Compiling and Running a C++20 Application with GNU C++ on Linux
For this test drive, we assume that you read the Before You Begin section and that you placed the downloaded examples in your user account’s Documents folder.
Step 1: Changing to the ch01 Folder
From a Linux shell, use the cd command to change to the ch01 subfolder of the book’s examples folder:
~$ cd ~/Documents/examples/ch01
~/Documents/examples/ch01$
In this section’s figures, we use bold to highlight the text that you type. The prompt in our Ubuntu Linux shell uses a tilde (~) to represent the home directory. Each prompt ends with the dollar sign ($). The prompt may differ on your Linux system.
Step 2: Compiling the Application
Before running the application, you must first compile it:
~/Documents/examples/ch01$ g++ -std=c++2a GuessNumber.cpp -o GuessNumber
~/Documents/examples/ch01$
The g++ command compiles the application:
• The -std=c++2a option indicates that we’re using C++20—c++2a will become c++20 in a future GNU C++ release.
• The -o option names the executable file (GuessNumber) that you’ll use to run the program.
Step 3: Running the Application
Type ./GuessNumber at the prompt and press Enter to run the program:
~/Documents/examples/ch01$ ./GuessNumber
I have a number between 1 and 1000.
Can you guess my number?
Please type your first guess.
?
The ./ tells Linux to run a file from the current directory and is required to indicate that GuessNumber is an executable file.
Step 4: Entering Your First Guess
The application displays "Please type your first guess.", then displays a question mark (?) as a prompt on the next line. At the prompt, enter 500—note that the outputs may vary based on the compiler you’re using:
~/Documents/examples/ch01$ ./GuessNumber
I have a number between 1 and 1000.
Can you guess my number?
Please type your first guess.
? 500
Too high. Try again.
?
The application displays "Too high. Try again.", meaning that the value you entered is greater than the number the application chose as the correct guess.
Step 5: Entering Another Guess
At the next prompt, enter 250:
~/Documents/examples/ch01$ ./GuessNumber
I have a number between 1 and 1000.
Can you guess my number?
Please type your first guess.
? 500
Too high. Try again.
? 250
Too low. Try again.
?
This time the application displays "Too low. Try again.", because the value you entered is less than the correct guess.
Step 6: Entering Additional Guesses
Continue to play the game by entering values until you guess the correct number. When you guess correctly, the application displays "Excellent! You guessed the number.":
Too low. Try again.
? 375
Too low. Try again.
? 437
Too high. Try again.
? 406
Too high. Try again.
? 391
Too high. Try again.
? 383
Too low. Try again.
? 387
Too high. Try again.
? 385
Too high. Try again.
? 384
Excellent! You guessed the number.
Would you like to play again (y or n)?
Step 7: Playing the Game Again or Exiting the Application
After you guess the correct number, the application asks if you’d like to play another game. At the "Would you like to play again (y or n)?" prompt, entering y causes the application to choose a new number and start a new game. Entering n terminates the application and returns you to the shell. Each time you execute this application from the beginning (Step 3), it will choose the same numbers for you to guess.
1.2.4 Compiling and Running a C++20 Application with GNU C++ in the GCC Docker Container in Docker Running Natively Over Windows 10, macOS and/or Linux
At the time of this writing, GNU C++ implements the most C++20 features. For this reason, you may want to use the latest GNU C++ compiler on your system. One of the most convenient cross-platform ways to do this is by using the GNU Compiler Collection (GCC) Docker container. This section assumes you’ve already installed Docker Desktop (Windows or macOS) or Docker Engine (Linux).
Executing the GNU Compiler Collection (GCC) Docker Container
Open a Command Prompt (Windows), Terminal (macOS/Linux) or shell (Linux), then perform the following steps to launch the GCC Docker Container:
1. Use the cd command to navigate to the examples folder containing this book’s examples.
2. Windows users: Launch the GCC docker container with the command
docker run --rm -it -v "%CD%":/usr/src gcc:latest
3. macOS/Linux users: Launch the GCC docker container with the command
docker run --rm -it -v "$(pwd)":/usr/src gcc:latest
In the preceding commands:
• --rm cleans up the container’s resources when you eventually shut it down.
• -it runs the container in interactive mode, so you can enter commands to change folders and to compile and run programs using the GNU C++ compiler.
• -v "%CD%":/usr/src (Windows) or -v "$(pwd)":/usr/src (macOS/Linux) allows the Docker container to access your local system files in the folder from which you executed the docker run command. In the Docker container, you’ll navigate with the cd command to subfolders of /usr/src to compile and run the C++ code.
• gcc:latest is the container name. The :latest specifies that you want to use the most up-to-date version of the gcc container. Each time you execute the preceding docker run commands, Docker checks whether you have the latest gcc container version. If not, Docker downloads it before executing the container.
Once the container is running, you’ll see a prompt like:
root@67773f59d9ea:/#
The container uses a Linux operating system. It’s prompt displays the current folder location between the : and #.
Changing to the ch01 Folder in the Docker Container
The docker run command specified above attaches your examples folder to the containers /usr/src folder. In the docker container, use the cd command to change to the ch01 sub-folder of /usr/src:
root@01b4d47cadc6:/# cd /usr/src/ch01
root@01b4d47cadc6:/usr/src/ch01#
To compile, run and interact with the GuessNumber application in the Docker container, follow Steps 2–7 of Section 1.2.3’s GNU C++ Test-Drive.
Terminating the Docker Container
You can terminate the Docker container by typing Ctrl + d at the container’s prompt.