5. Sync, Share, and Print Files Using AirDrop, AirPlay, AirPrint, and Handoff
In This Chapter
![]() How to use AirDrop to share content with other nearby Mac, iPhone, and iPad users
How to use AirDrop to share content with other nearby Mac, iPhone, and iPad users
![]() How to use your iPhone or iPad with AirPlay-compatible equipment
How to use your iPhone or iPad with AirPlay-compatible equipment
![]() How to print files wirelessly to a compatible AirPrint printer
How to print files wirelessly to a compatible AirPrint printer
![]() Discover iOS 10’s Continuity and Handoff functionality
Discover iOS 10’s Continuity and Handoff functionality
When it comes to syncing and sharing files and data (including app-specific data), your iOS mobile device is equipped with several tools, including AirDrop, AirPlay, AirPrint, Continuity, and Handoff. These technologies are in addition to iCloud, which is covered in Chapter 6, “Use iCloud and the iCloud Drive App.”
The AirDrop tool enables your iPhone or iPad to wirelessly transfer certain types of files (including photos) and app-specific data to other iPhones, iPads, and Macs that are in close proximity, and that also support the AirDrop function.
To turn on the AirDrop feature on your iPhone or iPad, launch Control Center by swiping your finger upward from the very bottom of the screen (shown in Figure 5.1). When the Control Center appears, tap the AirDrop option.

Figure 5.1 Tap the AirDrop button in Control Center to access the AirDrop menu (shown here on an iPad).
From the AirDrop menu (shown in Figure 5.2), choose whether you want to use AirDrop to communicate with any other nearby users (Everyone) or only with people in your Contacts database (Contacts Only). It’s also possible to turn off the feature altogether by selecting the Receiving Off option.

Figure 5.2 The AirDrop menu enables you to choose whether to utilize this feature with all nearby iPhone, iPad, and Mac users or only people who are in your Contacts database.
When it’s turned on, use this feature to send content from the Share menu that’s built in to compatible apps. For example, if you want to send a photo to another AirDrop user (or one of your other compatible Macs or mobile devices), launch Photos, view and select the photo(s) you want to send, and then tap the Share icon.
When the Share menu is displayed (shown in Figure 5.3 on an iPad), thumbnails representing people in close proximity and who have AirDrop turned on are displayed. Tap the intended recipient, and the selected photos are wirelessly sent. The recipient might need to tap the Accept button to accept the file transfer (shown in Figure 5.4).

Figure 5.3 Select AirDrop from the Share menu of compatible apps to send app-specific content to other iOS mobile devices and Mac users.

Figure 5.4 Shown on an iPhone 5c, the recipient of files sent via AirDrop might need to accept what’s being sent by tapping the Accept button.
![]() Note
Note
AirDrop is available only when using iPhones and iPads released within the last few years that are running iOS 8, iOS 9, or iOS 10.
If you want to use AirDrop between an iOS mobile device and a Mac, the Mac must have been released in 2012 or later and be running OS X Yosemite, OS X El Capitan, or macOS Sierra.
![]() Tip
Tip
In addition to the Photos app, the AirDrop feature is supported by the Share menu found in other apps, including Contacts, Maps, Notes, Safari, iBooks, and iTunes Store.
After you receive content via AirDrop, to access that content, launch the relevant app. For example, to view, organize, or edit photos you receive, open the All Photos/Camera Roll album in the Photos app. If you receive a Contacts entry, it is automatically added to your Contacts database and is accessible from the Contacts app.
![]() Caution
Caution
To avoid receiving unwanted content from strangers when you’re in public places such as an airport or theater, consider turning on the AirDrop feature only when you need it. You can turn it off in Control Center. Alternatively, you can turn on AirDrop but set it up so only content from people with entries in your Contacts app’s database will be received.
Streaming Content from Your iPhone or iPad to Other Compatible Devices Using AirPlay
AirPlay is a wireless feature that enables your mobile device to stream content such as photos, videos, or audio, to an AirPlay-compatible device, such as Apple TV, a Mac, or AirPlay-compatible speakers.
To use AirPlay, your iOS mobile device and the other AirPlay-compatible device must be connected to the same wireless home network (via Wi-Fi). Then, when you turn on the AirPlay feature, the two compatible devices automatically establish a wireless connection.
After the connection is made, an AirPlay icon appears in compatible apps, such as Music, Videos, and Photos, enabling you to transfer (stream) what you would otherwise see on your iPhone or iPad’s screen, or what would be heard through the device’s speaker, to another compatible device.
In addition to being able to stream photos and video (including iTunes Store TV show and movie purchases and rentals), you can use AirPlay to connect external speakers (without cables) to your iOS mobile device, and then stream music (from Apple Music, Pandora, or Spotify, for example) or other audio (such as audiobooks or podcasts) from your device to those compatible speakers.
When it’s available, one of the easiest ways to turn AirPlay on or off is to access it from Control Center. Tap the AirPlay icon, and then choose where you want to stream the content.
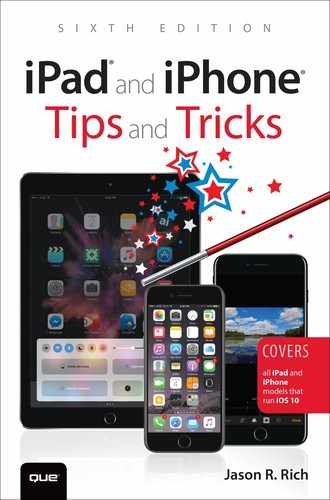
In Figure 5.5, AirPlay is being turned on from Control Center and an AirPlay device (in this case, Apple TV) is being selected.
Figure 5.6 shows that an iPad is wirelessly connected to an Apple TV device to stream digital photos stored in the Photos app on the tablet, so that they can be viewed on the HD television set that’s connected to the Apple TV device.

Figure 5.6 From Photos, tap the AirPlay icon and then select Apple TV (when available) to stream photos from the iPhone or iPad being used to an HD television set (with an Apple TV device connected).
![]() Tip
Tip
It’s possible to use AirPlay to present PowerPoint or Keynote digital slide presentations on a TV or monitor that has an Apple TV connected to it. What appears on the TV is exactly what’s displayed on your smartphone or tablet.
![]() More Info
More Info
AirPlay-compatible speakers are available from a handful of different companies, starting around $49.95. To learn more about AirPlay, visit https://support.apple.com/en-us/HT204289.
Printing Files Wirelessly Using an AirPrint-Compatible Printer
Another wireless feature offered by iOS 10 is AirPrint. It enables compatible apps to wirelessly send documents, data, or photos to be printed on an AirPrint-compatible laser, inkjet, or photo printer. For this feature to work, the iOS mobile device and the printer must be connected to the same wireless network.
![]() More Info
More Info
Dozens of different AirPrint-compatible printers are now available from companies such as Brother, HP, Canon, Lexmark, and Epson. To learn more about AirPrint-compatible printers, visit https://support.apple.com/en-us/HT201311.
After you’ve set up an AirPrint-compatible printer, use the Print feature that’s built in to many apps, such as Pages, Notes, Safari, Maps, and Photos. The Print option is often found in the Share menu of these apps, although this can vary.
![]() What’s New
What’s New
A growing selection of Bluetooth-compatible and wireless printers are also available for use with iOS mobile devices. For these printers, such as the Polaroid Zip Mobile Photo Printer, to work, you also need a free and proprietary app for the printer to print images stored in the Photos app. Read about this printer (and others like it) in Chapter 8, “Shoot, Edit, and Share Photos and Videos.”
![]() Tip
Tip
If you’re not using an AirPrint- or Bluetooth-compatible printer, it’s possible to install specialized software on your Mac, such as handyPrint (www.netputing.com/handyprint) or Printopia (www.decisivetactics.com/products/printopia), to enable any printer to work with the AirPrint feature of your iPhone or iPad, as long as your Mac is turned on.
Using Handoff
Handoff is an iOS feature that works with many apps that come preinstalled with iOS 10, as well as the iWork for iOS apps. It’s also compatible with a growing number of third-party apps. Basically, this feature enables you to begin a task on one of your Mac(s) or iOS mobile devices, and then pick up exactly where you left off on another Mac or iOS mobile device that’s linked to the same iCloud account and is within Bluetooth range (about 33 feet).
To use the Handoff feature between your iPhone and a Mac, the Mac must be running the latest version of OS X Yosemite, OS X El Capitan, or macOS Sierra.
To enable the Handoff feature on your mobile device, launch Settings, tap General, and then tap the Handoff option. Turn on the virtual switch associated with the Handoff option. You must do this on each of your iOS mobile devices. Also, make sure the device you’re using is connected to the same wireless network as the device(s) with which you want to use these features, and make sure that Bluetooth is turned on.
When Handoff is turned on, start performing a compatible task on one of your Macs or iOS mobile devices. Then, to pick up what you were doing on a different iPhone or iPad, wake up the device. On the Lock screen, place your finger on the app icon displayed in the lower-left corner of the screen and swipe upward (shown in Figure 5.7). You can also access the app switcher. Apps available via Handoff are displayed at the bottom of the screen.

Figure 5.7 When it’s possible to take advantage of the Handoff feature, after you wake up your iPhone or iPad, swipe up on the Handoff app icon on the Lock screen.
When you attempt to use the Handoff feature from the Lock screen, it is still necessary to unlock the iPhone or iPad you’re currently using before accessing the app that you were using on your other computer or iOS mobile device.
![]() Note
Note
To pick up what you were previously doing while currently using a Mac, simply open the app you were previously using on your other Mac or iOS mobile device.
Handoff is one of iOS 10’s Continuity features. Another Continuity feature, and one of the coolest if you’re an iPhone user, is that when you receive an incoming call on your phone, when the Continuity/Handoff feature is also active on your iPad and/or Mac, you can answer that incoming call and engage in the phone conversation from one of these other devices.
Your iPhone continues to host the call, but the wireless connection between your iPhone and iPad (or iPhone and Mac) enables you to use the Mac or iPad’s built-in microphone and speaker(s) as a speakerphone.
![]() Note
Note
For this aspect of the Handoff feature to work, your iPad or Mac must be linked to the same Wi-Fi network as your iPhone, plus both devices must be signed in to the same iCloud account and have Bluetooth turned on.
When an incoming call is displayed on your iPad or Mac’s screen, tap or click the Answer icon to answer the call. If you want to initiate a call from your iPad or Mac (via your iPhone), tap or click a phone number in the Contacts, Calendar, Maps, or Safari apps, for example.
Another nice feature of Handoff is that you can send and receive SMS and MMS text messages via your cellular service provider’s texting network (as opposed to Apple’s Internet-based iMessage service) from your iPad or Mac(s). These incoming or outgoing messages use the Messages app running on your iPhone (with its cellular connection) as a conduit.
To determine whether your iOS mobile device or Mac is compatible with iOS 10’s Continuity, Handoff, Instant Hotspot, Phone Calling, and SMS features, visit this page of Apple’s website: https://support.apple.com/en-us/HT204689.
To use the Personal Hotspot feature, which enables you to create a Wi-Fi hotspot (via your 3G/4G/LTE cellular data connection of your iPhone or iPad) for your other Wi-Fi–compatible mobile devices, this feature must be supported by your iPhone’s cellular service provider and your service plan.
To activate the Personal Hotspot feature (if it’s available from your iPhone or iPad), launch Settings and tap the Personal Hotspot option that’s below the Cellular option in the main Settings menu.
From the Personal Hotspot menu, turn on the virtual switch associated with Personal Hotspot (shown in Figure 5.8), and then follow the onscreen directions. Tap the Wi-Fi Password option to create a custom password to access the personal Wi-Fi hotspot that’s being created from your other Wi-Fi-compatible devices.
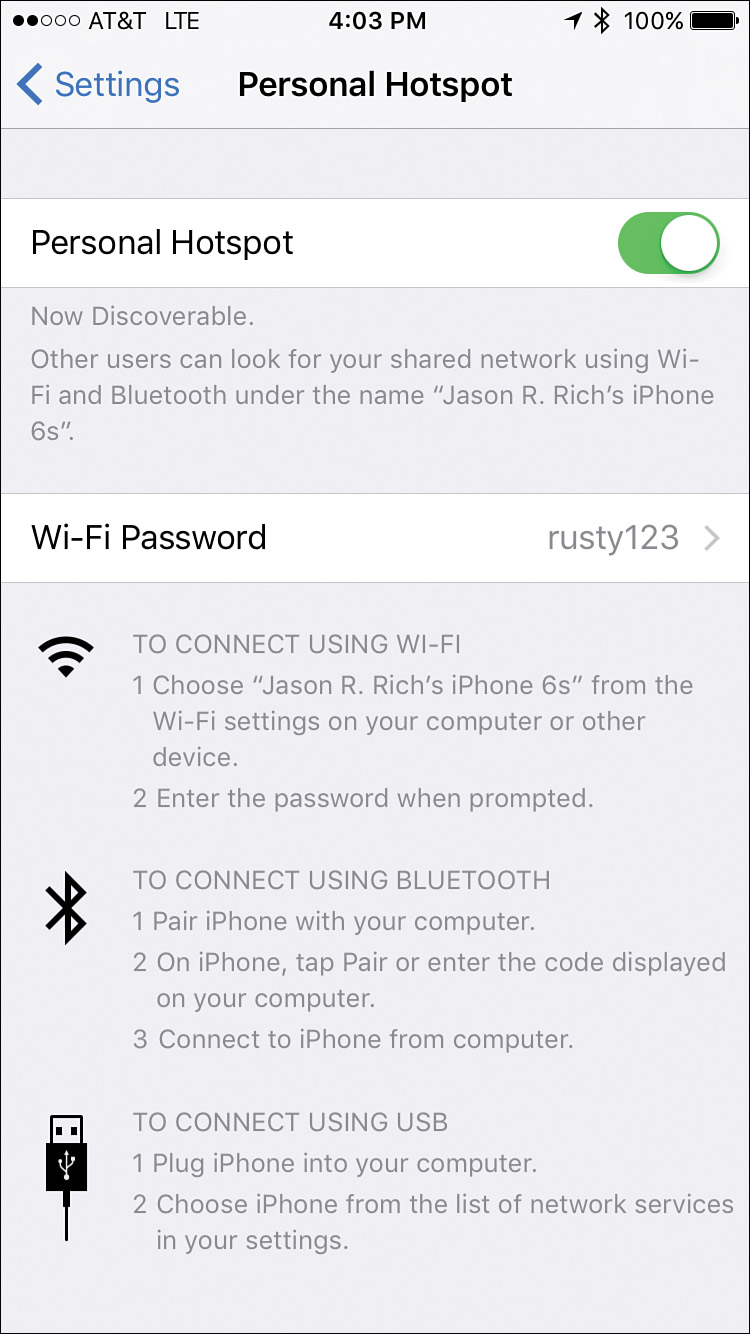
Figure 5.8 Assuming it’s allowed by your cellular service provider and you’re using a compatible iPhone or iPad, you can create a personal Wi-Fi hotspot from your mobile device.