
Lesson 2. Working with Tracks
Lesson Files
APTS GarageBand Book Files > Lesson 02 > 2-1 Ditty Starting, 2-2 Strings Added, 2-3 With Markers, 2-4 Doubled Guitar, 2-5 Ditty Drummer, 2-6 Ditty Finished. APTS GarageBand Book Files > Additional Media > Lexie Shadow.mov
Time
This lesson takes approximately 60 minutes to complete.
Goals
Understanding tracks
Working with the track header controls
Creating new tracks
Duplicating tracks and regions
Renaming arrangement track markers
Creating a drummer track
Reordering tracks
Working with the Drummer Editor
Working with the movie track
In this lesson, you’ll learn how to work with a variety of tracks, including Software Instrument tracks, movie tracks, arrangement tracks, and the brand-new and powerful drummer tracks. Sure, that doesn’t sound like much fun—until you get a better perspective on the power of tracks. Have you ever heard of a four-track recorder? In its time, the four-track revolutionized the music industry as much as the mouse revolutionized computers. The four-track recorder made it possible to record four different instrument tracks on the same piece of tape at a time, and then play them back all mixed together. Eventually, four-track recorders were replaced by eight-track recorders, and finally by digital recording.
What does that mean to you? For one thing, you don’t have to limit your songs to four tracks. In fact, depending on your computer’s speed and power, you can have up to 255 Real Instrument tracks or 64 Software Instrument tracks. Chances are, most of your songs can be arranged in 10 or fewer tracks, but it’s nice to know that if you need more tracks, they’re there for you.
This lesson focuses on some of the different types of tracks. You’ll add and duplicate tracks to build a song and even work with a virtual session drummer to create a drummer track. Finally you’ll work with the arrangement track to identify the parts of the song and add a movie track.
Understanding Tracks
Think of the tracks in your timeline as the different musicians in your band. Each musician plays a different instrument and is represented by a separate track. As the leader of your band, you can decide which instruments are used in a song and how you want to record them. If you don’t like an instrument part, you can always fire the musician—or in this case, just delete the track. If you really like the way a part sounds, you can clone the musician, or just double that track in the timeline.
The best way to understand tracks is to work with them, so let’s get started.
Previewing the Finished Project
Most music creation follows a standard workflow: record parts, orchestrate/arrange more parts, edit/fix the recorded parts, mix the tracks, add effects, and output the finished piece. You’ll notice the lessons in this book follow a similar flow.
So, before we start working with tracks and building the project for this lesson, let’s fast-forward to the end and preview the finished piece. There’s nothing like a good before-and-after comparison to recognize the benefits of crafty track manipulation.
1. Open the project 2-6 Ditty Finished from the Lesson 2 folder. There’s no need to save this version since you won’t be making any changes.

If you look closely you’ll see the arrangement track just below the ruler that shows the three parts of the song (Intro, Verse, and Chorus). Because this lesson is about working with tracks in GarageBand, it seems only fitting to include a new type of track. Another type of track is the movie track, which you will add to the project at the end of this lesson.
2. Press Return to move the playhead to the beginning of the project. Press the Spacebar to play the project.
This song isn’t a masterpiece; it’s not even a full song. It’s more of a ditty that came to me while I was walking my dog Lexie. In fact, as I pondered over what kinds of exercises I should include in this book it occurred to me that one of the early projects should be as easy and carefree as walking my dog. So I recorded the melody Acoustic Guitar part on my iPhone with GarageBand for iOS and the Smart Guitar instrument—while walking the dog. Really! Smart Instruments in GarageBand for iOS, like Software Instruments with Smart Controls and the Arpeggiator in GarageBand for Mac, can make Software Instruments practically play themselves.
![]() More Info
More Info
To learn more about GarageBand for iOS, and how it was used to create this song, you can read Bonus Lesson 2, “Working with GarageBand for iOS.” You can find the bonus lesson online on the same page as the lesson files.
3. Take a look at the number of audio tracks in this project. You should see six total.
4. Play the project again. This time listen carefully to the melody (everything but the bass and drums in this piece).
The parts are identical; they’re just played by different instruments. Technically, they were only played once: by my index finger on my iPhone. The point is that one part was duplicated into different tracks with different instrument sounds to enhance the music.
Now that you’ve heard and seen the finished project, think about this: the entire project was recorded without any musical instruments. The only tools were an iPhone, trackpad, and computer keyboard. With that in mind, let’s open the starting version and get to work building tracks.
Opening a Project from GarageBand
Instead of closing the current project, then going to the Finder or Desktop, for this exercise you’ll just open the lesson project from within GarageBand. Opening a project while another is open will automatically close the current project. Only one project can be open at a time in GarageBand.
1. Choose File > Open, or press Command-O to display the Open dialog.
2. In the Open dialog, select the Desktop > APTS GarageBand Book Files > Lesson 2 > 2-1 Ditty Starting.
3. Click Open, or double-click the file 2-1 Ditty Starting to open it.
4. If prompted to save changes to 2-6 Ditty Finished, click Don’t Save.
The project opens in the GarageBand window. Don’t forget to save a version to your projects folder on the desktop.
5. Choose File > Save As to open the Save dialog.
6. In the Save dialog, select Desktop > My GarageBand Projects. Click Save.
![]() Note
Note
If you didn’t create a My GarageBand Projects folder in Lesson 1, take a moment and create one now. That way you will have a place to save your working versions of each project.
In subsequent lessons, you will be asked to open a specific file and save it to your projects folder on the desktop.
Exploring the Starting Project
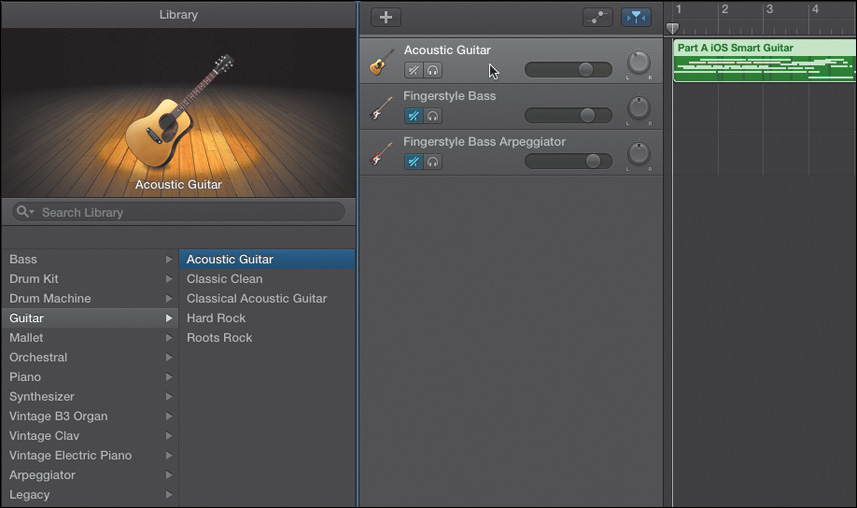
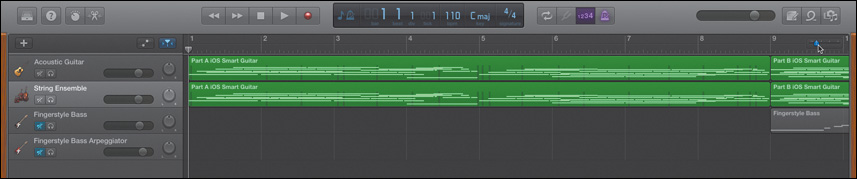
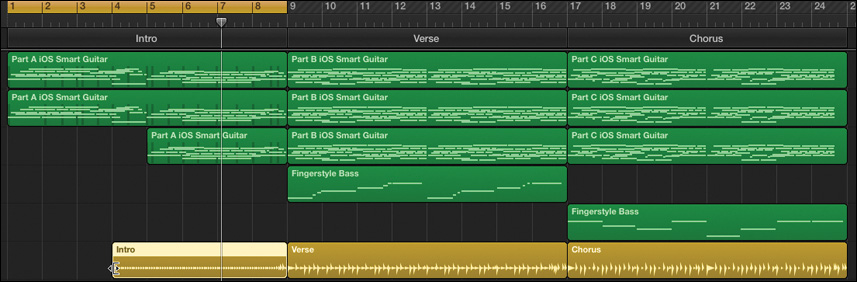
The project 2-1 Ditty Starting has only three Software Instrument tracks: Acoustic Guitar, Fingerstyle Bass, and Fingerstyle Bass Arpeggiator.
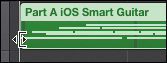
If you look closely at the names of the regions in the Acoustic Guitar track, you’ll see they are named Part A iOS Smart Guitar, Part B iOS Smart Guitar, and Part C iOS Smart Guitar. The “A,” “B,” and “C” reflect the default naming convention in GarageBand for iOS. I added “iOS Smart Guitar” to the name so you’d know at a glance how the part was recorded.

The Acoustic Guitar track was recorded on my iPhone with GarageBand for iOS Smart Guitar with Autoplay turned on and set to display chord strips. Parts A, B, and C each used a different Autoplay setting.

GarageBand for iOS Smart Guitar with Autoplay
1. Play the project to hear the basic tracks.
2. Play the project again and focus your attention on the bass parts.
The Fingerstyle Bass tracks were both recorded in GarageBand with Musical Typing on my computer keyboard. The difference between them is that in the first Fingerstyle Bass track I played each note as it was recorded, whereas I recorded the Fingerstyle Bass Arpeggiator track with the Arpeggiator Smart Control turned on so it played a sequence of notes for each note (key) I pressed on the computer keyboard. You’ll record both of these bass parts in Lesson 4, “Recording and Editing Software Instruments.”
Working with Solo and Mute Controls
With only three tracks and two types of instruments playing at a time, you probably didn’t have any trouble distinguishing among the different tracks as you listened. However, as you build tracks and add instrument parts, it’s a good idea to know how to solo and mute tracks as you work to allow you to focus your ears on the tracks you want to hear (or not hear) during playback.
The basic controls included in the track header are the Mute button, Solo button, Volume slider, and Pan knob. You’ll work with each of these controls throughout this book. For now, you’ll just use the Solo and Mute buttons.

![]() Note
Note
Additional header controls are available through the Track menu, or the track header shortcut menu.
1. Select the Fingerstyle Bass track header; then click the Solo button (headphones) to solo that track. The Fingerstyle Bass track brightens whereas all the other tracks lose the color in their regions. This indicates they will not be heard during playback.

2. Play the soloed Fingerstyle Bass part to hear it. During playback, press S to unsolo the track and hear it with the other instruments.
The keyboard shortcut for solo is S, and the keyboard shortcut for mute is M. These shortcuts work only on the selected track or tracks.
3. Stop playback. Click the Mute buttons on both of the Bass tracks. Play the project and listen to the Acoustic Guitar track without the bass parts. When you are finished, stop playback.
Now you know how to listen to only the tracks you want during playback.
Changing Software Instrument Track Instruments
In the previous lesson you changed the patches for an audio track to enhance the sound of the horn in the track. You also learned that a Real Instrument horn recording will continue to sound like a horn regardless of the instrument patch applied to it.
One of the most exciting things about Software Instruments tracks is that they will change to any Software Instrument that you assign to the track.
In the next series of exercises, you’ll work with changing Software Instrument track instruments. Since each note is digitally recorded as a separate event, you can assign any Software Instrument to play the regions in the track. Rather than worry about the details, let’s just try it.
1. Double-click the Acoustic Guitar track header to open the Library.
2. In the Library, choose Piano from the Instrument category and Steinway Grand Piano as the instrument.

The track icon for the Acoustic Guitar track changes to a grand piano. Other than that, there are no visual differences.
3. Play the project. Wow, it absolutely sounds like a grand piano playing the part. In fact, it works just as well as a piano part.
4. Change the track’s instrument in the Library back to Guitar > Acoustic Guitar. Click the empty space in the tracks area to deselect the regions in the Acoustic Guitar track.
You may have returned the track to its original instrument, but now you know a powerful trick for creating music in GarageBand. Now let’s create a Strings track to enhance the song.
Creating a New Track
Tracks are the foundation for building a project in GarageBand, and there are lots of methods for creating them: the Track menu, the track header shortcut menu, the Add Track button, and the keyboard shortcut, among others. Let’s just use the Add Track button because the important part is choosing the correct type of track in the New Track dialog.
1. Click the Acoustic Guitar track header if it is not already selected. New tracks are created below the selected track. So selecting the Acoustic Guitar track first will ensure that the new track is created where we want it.
2. Click the Add Track button (+) in the tracks area menu bar.
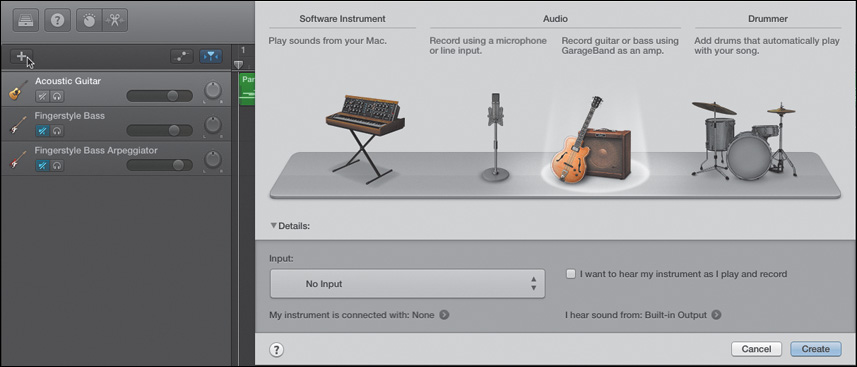
The New Track dialog appears with four track choices:
![]() Software Instrument—This type of track lets you play sounds from your Mac with a MIDI instrument, onscreen keyboard, or Musical Typing window.
Software Instrument—This type of track lets you play sounds from your Mac with a MIDI instrument, onscreen keyboard, or Musical Typing window.
![]() Audio—There are two types of audio tracks. The first is for recording instruments or vocals using a microphone or line input; The second type of audio track is specifically to record an electric guitar or bass using GarageBand as an amp.
Audio—There are two types of audio tracks. The first is for recording instruments or vocals using a microphone or line input; The second type of audio track is specifically to record an electric guitar or bass using GarageBand as an amp.
![]() Drummer—This type of track is for adding drummer regions that automatically play with your song.
Drummer—This type of track is for adding drummer regions that automatically play with your song.
Since it is unlikely you have a string quartet or session violin player in the room ready to record, we’ll create a Software Instrument track to give you the most musical flexibility.
3. In the New Track dialog, click the keyboard under the Software Instrument section to choose that track option. Notice that a spotlight illuminates the selected instrument. Click Create.
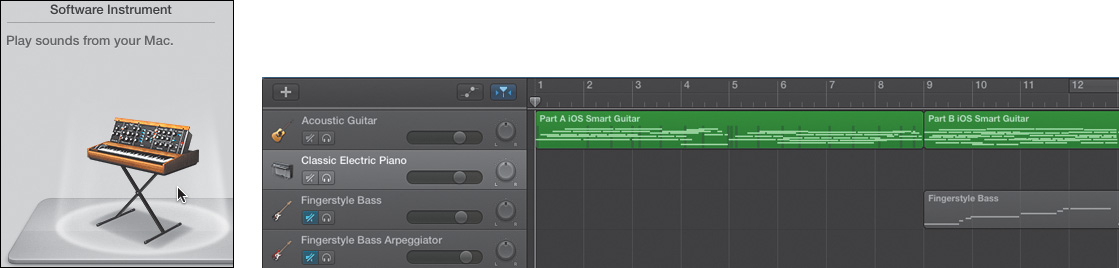
A new Classic Electric Piano track appears in the timeline. Classic Electric Piano is the default Software Instrument, but you can change it at any time to a different Software Instrument.
Great. You’ve created a new Software Instrument track, but how do you know what it sounds like if it is empty?
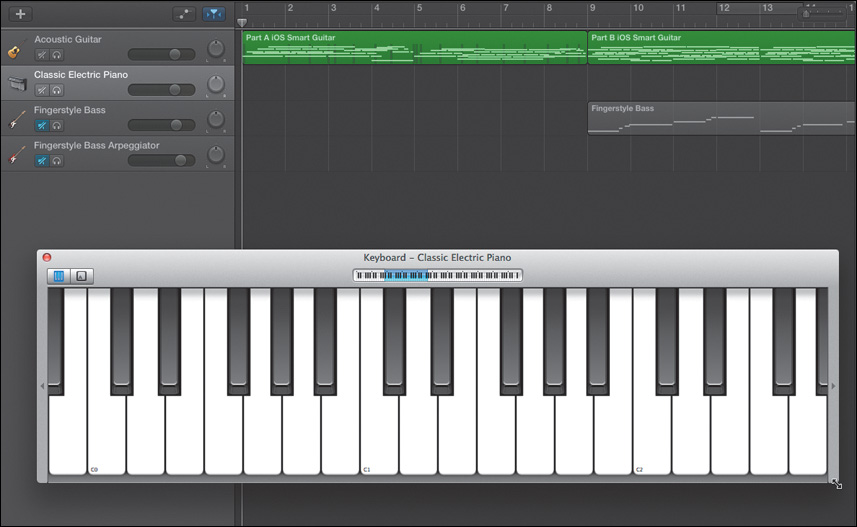
Playing the Onscreen Music Keyboard
To hear the instrument assigned to a Software Instrument track, you can use the onscreen music keyboard. Use the keyboard to both play and record Software Instruments. If you have a MIDI keyboard connected to the computer, you will also be able to play your MIDI keyboard to hear the track instrument.
1. To show the onscreen music keyboard, choose Window > Show Keyboard.
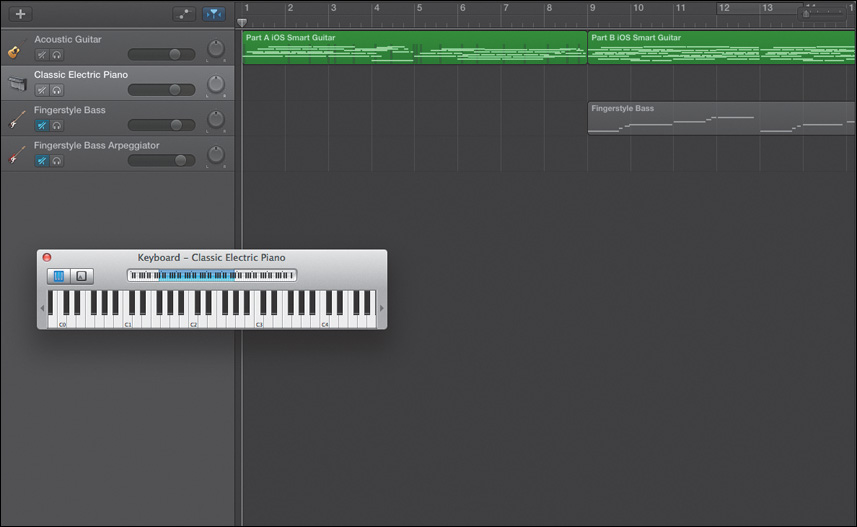
The onscreen music keyboard appears, ready to play the selected Classic Electric Piano track.
The onscreen music keyboard works only for Software Instrument tracks. GarageBand also includes a Musical Typing window that can turn your computer keyboard into a MIDI instrument. For this lesson, however, you’ll just focus on the onscreen music keyboard.
2. Click any of the keys on the onscreen music keyboard to hear the notes. You can drag across the keys to play several notes in succession.
It works! But the keys are so tiny they require both patience and dexterity to play anything specific. Let’s expand the keyboard and the keys at the same time.
3. Drag the lower-right corner of the keyboard down and to the right to resize it for larger keys that are easier to click.
![]() Note
Note
The onscreen music keyboard is touch sensitive. Click the top of the keys to play with a lighter velocity and get a quieter sound. Click the bottom of the keys to play with a harder velocity and get a louder sound. You can always change the velocity of Software Instrument notes in the editor after they’ve been recorded. The blue section of the mini-keyboard above the notes shows which range of notes (octave) you are playing. You can drag the blue region right or left to change octaves in the onscreen music keyboard.
4. Play the onscreen keyboard by clicking the notes on the keyboard.
Although you can play music this way, it’s not the easiest way to create complex music arrangements. However, it will work perfectly for testing the sound of a Software Instrument track.
5. Click the Acoustic Guitar track header to select that track. The onscreen music keyboard header changes to show the name of the selected track.
6. Play the onscreen keyboard to hear the Acoustic Guitar sound.
7. Select the Classic Electric Piano track header. The onscreen music keyboard changes accordingly.
Let’s change the track instrument to strings, which will work better for this project.
8. In the Library, choose Orchestral > Strings > String Ensemble.
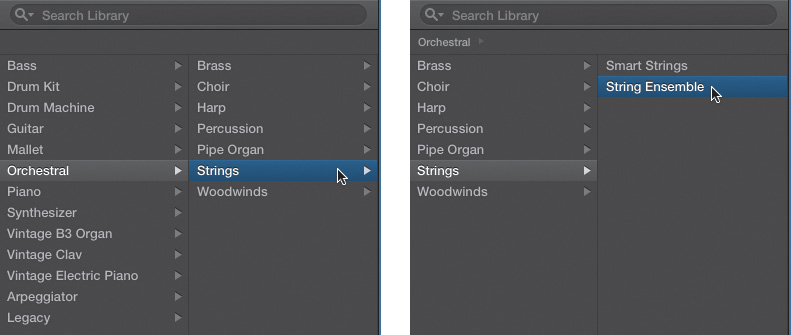
9. Click a few notes to hear the String Ensemble instrument in action.
10. Click the red close button in the upper-left corner of the onscreen keyboard to hide it.
Sounds awesome! The quality of the Software Instrument sounds in GarageBand is amazing. Now all you have to do is find loops that might work, or hire some musicians and orchestrate and record a part to go with the song. Or... you could cheat and try the guitar part in the strings track.
Moving Regions to Different Tracks
You can move regions from one track to another as long as the tracks are the same type (Software Instrument or audio track). In this exercise you’ll move the first guitar region in the Acoustic Guitar track down to the new String Ensemble track to hear how it sounds.
1. Drag the Part A iOS Smart Guitar region from the Acoustic Guitar track to the String Ensemble track. Alignment guides show the position of the region as you move it. You will continue to see the selected region in its original position until you release it in the new position or track in the tracks area.


Holding Shift while dragging a region from one track to another constrains the horizontal movement so that the region stays in the same position in the timeline as you move it vertically from track to track. Just be sure to select the region and start to move it before you press Shift. Otherwise, if you press Shift first, you will not be able to drag the region at all.
2. Play the first part of the song. What do you think of the new strings part? A little busy, but it will work for now. You’ll learn how to clean it up in Lesson 4.
3. Choose Edit > Undo Drag, or press Command-Z to undo the maneuver.
4. Close the Library so you’ll have more room in the tracks area to work.
Why did you undo your last move? Because rather than moving just one region, you’re going to duplicate them all and move the duplicates to the new track all at the same time. Besides, just like music, practice makes perfect.
Duplicating Regions with Option-Drag
Regions can be edited within tracks similar to words in a word processor. You can cut, copy and paste, delete, and duplicate regions in the Edit menu, or by using keyboard shortcuts. For this exercise you’ll use Option-drag to create duplicate regions and move them at the same time.
To begin, simply select a region or regions in a track and hold down the Option key while dragging; this creates a duplicate region. Be careful not to release the Option key before you release the duplicate regions or you will simply move the original regions.
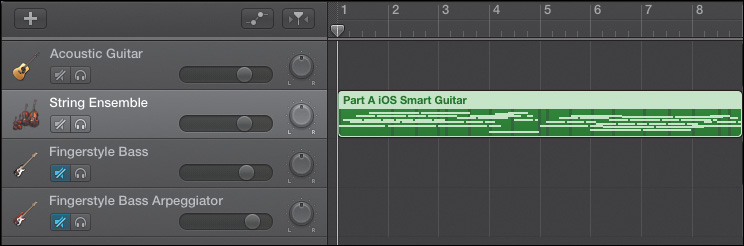
1. Select the Acoustic Guitar track header. All three regions in the track become selected.
2. Option-drag the selected guitar regions and drop the duplicate regions in the String Ensemble track, directly below the Acoustic Guitar track. A green plus (+) indicates you are adding new regions (duplicating) rather than just moving regions.


3. Play the project to hear the two tracks together. Nice, but the strings seem a little overpowering. That can easily be remedied by turning down the volume of the String Ensemble track.
4. Drag the Volume slider on the String Ensemble track toward the left to –6.0 dB. Now it will play 6 decibels (dB) quieter than the default level (loudness) 0.0 dB.

5. Play the beginning of the project. Notice the difference with the strings part now that it is lower in volume.
6. Press Command-S to save your progress.
If you did not complete the previous exercises, open the project 2-2 Strings Added and save it to your folder on the desktop.
As you can see—and hear—duplicating regions and assigning different instruments is a simple yet effective way to build tracks to enhance a song.
Zooming In and Out of the Timeline
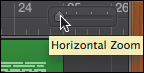
Before you make any other changes to the new String Ensemble track, this is a good time to use the horizontal zoom slider in the tracks area menu bar to get a better look at the first part of the song. The keyboard shortcuts for zooming in and out of the timeline are, respectively, Command-Right Arrow and Command-Left Arrow.
1. Move the playhead to the beginning of the song.
2. Press Command-Right Arrow or drag the horizontal zoom slider toward the right until you only see the first 9 to 12 measures (bars) in the ruler.
This way, the entire visible tracks area is dedicated to the first part of the song.
Resizing Regions in the Tracks Area
There is just one last step to complete the strings part in this lesson, and that is to resize the first region so that it starts later in the song. One of the secrets of creating music is to let the songs build rather than have all the instrument parts start at once. Resizing the first region in the String Ensemble track so that it starts later will give the acoustic impression that the string ensemble joins the guitarist in the song.
For this exercise, your goal is to resize the region so that it begins at bar 5. To do so, you will need to trim the left edge of the region.
1. Hover the pointer over the lower-left corner of the first region in the String Ensemble track (Part A iOS Smart Guitar). The pointer changes to the Resize/Trim tool (left-right pointing arrows).
2. Drag the lower-left corner of the region to the beginning of bar 5 (5 1 1 1). As you resize the region, it will remain intact until you release the Resize/Trim tool.


3. If needed, click the empty tracks area to deselect the region. Play the beginning of the song to hear the changes. What a difference it makes to have musical parts come in at different times!
4. Press Return to move the playhead to the beginning of the song. Press Command-Left Arrow, or drag the horizontal zoom slider toward the left to see the entire song in the timeline.
This little ditty is starting to sound more like a song. Let’s treat it that way and give each section a proper musical name.
Working with the Arrangement Track
Most songs are arranged in distinct sections such as introduction, verse, and chorus. The arrangement track—which appears below the time ruler—makes it easy to see these parts of your song and to move, duplicate, or delete those sections at any time. You’ll work with moving the sections around in Lesson 4, “Recording and Editing Software Instruments.” For now you’ll display the arrangement track and change the names of each section of the song.
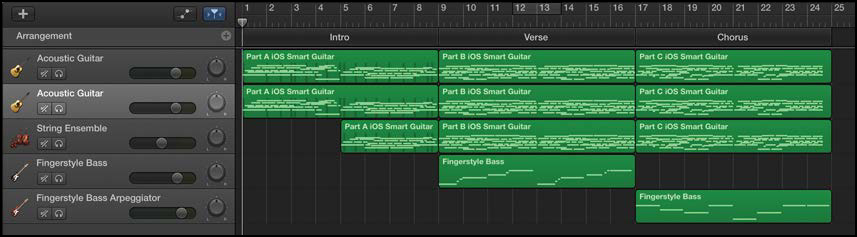
1. Choose Track > Show Arrangement Track. The arrangement track appears in the timeline below the ruler. This track includes three arrangement markers, each labeling a section of the song.

The arrangement track for this project follows the naming convention of the musical parts that were recorded in GarageBand for iOS and shared via iCloud.
Let’s change the names of the arrangement markers to match the musical parts of this song (Intro, Verse, Chorus).
2. Hover over the name of the first arrangement marker until you see a shortcut menu icon (opposing arrows pointing up and down). Click the shortcut menu and choose Intro.

The arrangement marker is now named Intro for the introduction of the song.
![]() Note
Note
When you select an arrangement marker, it brightens. Once selected, all musical parts in that section of the timeline can be inadvertently deleted. So it’s a good idea to deselect arrangement markers when you aren’t using them. To deselect, click any empty space in the tracks area.
3. Change the name of the Section B arrangement marker to Verse.
4. Change the name of the Section C arrangement marker to Chorus.
5. If necessary, click the empty space in the tracks area to deselect the arrangement markers. Save your work.

Now that the sections of the song have proper musical names, the remaining exercises in this lesson will refer to these sections by their new names.
Duplicating a Track
Earlier in the lesson you created a new track and added duplicate guitar regions to make a strings part. For this exercise, you’ll duplicate the Acoustic Guitar track and drag copies of the parts to the duplicate track. In Lesson 8 you’ll add an EQ effect to make the doubled track sound like a different guitar. Doubling tracks like this is a sure way to “fatten” the sound and make a particular musical line stand out. In this case, instead of it sounding like one guitar player, it will sound like two who practice quite a bit, because they play together in perfect unison.
1. If you didn’t complete the previous exercises, open the project 2-3 With Markers and save it to your folder.
2. Select the Acoustic Guitar track header.
Tip
You can press the Up Arrow and Down Arrow keys to change which track is selected (Up Arrow selects the track above, and Down Arrow selects the track below).
3. Choose Track > New Track With Duplicate Settings, or press Command-D to duplicate the selected track. A duplicate Acoustic Guitar track appears directly below the selected track.

Creating a new track with duplicate settings makes a new track, but it does not include any regions. No problem. You already know how to do that.
Project Tasks
It’s time to review and practice some of the skills you’ve already learned in this lesson. Your goal is to select all of the regions in the first Acoustic Guitar track and Option-drag them to the new Acoustic Guitar track. Once the regions are in place, open the Library for the new Acoustic Guitar track. Mute the String Ensemble track so that you only hear the guitar tracks. If you have the full install of all the GarageBand sounds, try all of the different guitar patches during playback. If you are using the free install, try the Classic Clean guitar sound. When you are finished with the guitar patch trials, choose the Acoustic Guitar patch. Turn off the mute buttons for all tracks and listen to the Intro Verse and Chorus. Finally, save your work. If you are confident in following the above directions, go for it. If you prefer a little more guidance, here are some basic steps.
1. Click the top Acoustic Guitar track header to select all the regions.
2. Option-drag the regions to the new Acoustic Guitar track.
3. Double-click the new Acoustic Guitar track header to show the Library for that track.
4. Mute the String Ensemble track.
5. Start playback. In the Library, select a different Guitar patch.
6. Continue playback while you click each of the different guitar sounds to change the patch for the selected track. You can also use the Up or Down Arrow keys to select the next sound accordingly.
7. Select the Acoustic Guitar patch if it is not already selected.
8. Option-click one of the active (blue) Mute buttons to un-mute all of the muted tracks. Listen to the song with the doubled guitar part.
9. Hide the Library and save your work.
Voilà! You created a second acoustic guitar part without recording a new one. Now all this song needs is a drummer.
![]() Note
Note
If you didn’t complete the previous exercises, open the project 2-4 Doubled Guitar and save it to your folder.
Creating a Drummer Track
GarageBand has always made it easy for musicians and composers of all skill levels to create music. However, up until now creating realistic-sounding drum tracks has been a challenge for those of us who don’t play drums. Sure, there are pre-recorded Apple loops and drum machine patterns you can record, but in both cases the repetitive nature of the tracks have a tendency to sound like digitally created patterns rather than performances.
But wait, there’s more! You are about to experience one of the coolest and most intuitive GarageBand enhancements ever—something so amazing it allows you to instantly create human-sounding drum tracks.
That’s right. GarageBand now features Drummer, your own virtual session drummer who follows along with your song, takes directions, and never misses a beat.
1. Choose Track > New Track, or click the Add Track button.
2. In the New Tracks dialog, select the drummer track. Click Create.

Whoa. The GarageBand window just transformed to accommodate your new virtual session drummer, Kyle.

At a glance, you’ll see both the Library and Drummer Editor are showing. There’s also a brand-new SoCal Drummer track below whichever track you had selected. The SoCal Drummer track contains three yellow drummer regions, each with the same name as the song part indicated in the arrangement track. (It’s a good thing we took care of naming the arrangement markers earlier.)
On the left side of the Drummer Editor is more information about your drummer. Kyle is a default virtual drummer with Southern California style, who plays straightforward rock beats on a natural, versatile kit.
3. To simplify the GarageBand window, press Y or click the Library button to hide the Library. You can leave the Drummer Editor showing—just try not to click anything until the next exercise. Feel free to zoom in or out as needed to see the entire drummer track in the timeline.
4. Play the song to hear the drummer track in action. As the song plays, notice how Kyle changes things up between sections of the song to better match the music. What do you think?
Kyle rocks! And so far all you have done is add a drummer track. The drum parts sound incredible, though the drummer region in the Intro section feels too busy and intense for this song. No worries—you can simplify Kyle’s drum kit and give him some direction to change the feel of the Intro section. First, let’s move the drummer track to a different position in the tracks area. Since there can only be one drummer track in a project, you might as well move it where it is easiest to see.
Reordering Tracks
Chances are your SoCal track is near your Acoustic Guitar tracks. Wherever it appears in the timeline, you can easily move it by dragging the track header up or down to a new position. Your goal in this exercise is to drag the SoCal drummer track to the lowest track position so that it will be directly above the Drummer Editor. If you don’t need to move your drummer track, you can skip ahead to the next section.
1. Locate the empty space in the SoCal track header. This is the best place to drag the header without inadvertently changing any track settings.
2. Drag the SoCal track header downward to the empty space below the lowest track (Fingerstyle Bass Arpeggiator). Release the track header.


That’s it. Now the drummer track is directly above the Drummer Editor.
Exploring the Drummer Editor
The Drummer Editor allows you to change drummers, use presets to choose a different playing style for your selected drummer, direct your drummer’s performance, and even add or take away instruments from their drum kit.
The Drummer Editor, like other instrument editors, has controls for the entire track as well as controls for the selected drummer region. You’ll find the drummer track controls—such as genres and drummers—on the left side of the Drummer Editor. Region controls—such as presets, kit variations, fill settings, and an XY pad for adjusting the loudness and complexity of the region performance—are on the right side.

![]() Genres and drummers area—Here you can select a musical genre and choose from the various drummers available for that genre.
Genres and drummers area—Here you can select a musical genre and choose from the various drummers available for that genre.
![]() Drummer presets list—From this list choose a preset for the selected drummer region. These presets include all the region settings located to the right of the presets list in the Drummer Editor.
Drummer presets list—From this list choose a preset for the selected drummer region. These presets include all the region settings located to the right of the presets list in the Drummer Editor.
![]() XY pad—This control allows you to adjust the complexity and loudness of the selected region’s performance.
XY pad—This control allows you to adjust the complexity and loudness of the selected region’s performance.
![]() Drum kit controls—These visual kit controls give you the power to choose different combinations of drum and percussion pieces to use in the kit.
Drum kit controls—These visual kit controls give you the power to choose different combinations of drum and percussion pieces to use in the kit.
![]() Performance controls—Use these controls to adjust the length and number of drum fills in a region. The Swing knob can vary the shuffle feel of a region. Clicking the Details button reveals additional performance controls.
Performance controls—Use these controls to adjust the length and number of drum fills in a region. The Swing knob can vary the shuffle feel of a region. Clicking the Details button reveals additional performance controls.
Auditioning Drummer Presets
You’ll work with the Drummer Editor throughout this book. For now, let’s try different drummer presets to find one that works better with the Intro.
Tip
Always check which region or regions are selected before you start making changes in the editor.
1. Look for the name of the selected region in the yellow bar at the top of the Drummer Editor. Chances are it says “Multiple regions selected” because the drummer track regions are still selected from when you moved the track header. It also means that you can make adjustments to multiple drummer regions at the same time.

2. Click the empty space in the tracks area to deselect the drummer regions. Select the Intro region at the beginning of the drummer track. The name of the selected region is on the left side of the yellow ruler at the top of the Drummer Editor.

3. Play the Intro section of the song to listen to the Intro Drummer region as is.
4. In the timeline, create a cycle area over the Intro section of the song (bar 1 to bar 9). This way, playback will cycle over just that section of the song. This will make listening to different presets much easier.

5. Start playback. In the Drummer presets list, select the first preset in the list called Crash the Party. Select the next preset in the list and continue auditioning different presets. You can use the up and down arrows to move up and down through the list. When you are done, stop playback. They all sound good—just not necessarily for this section of the song.
For the purposes of this exercises let’s use the Half-pipe preset because it fits the groove of the melody track and isn’t too complex for our intro.
6. Select the Half-pipe preset. Listen to the intro with the Half-pipe preset.
Keep in mind that you were only working with the Rock genre presets for your current drummer Kyle. Each drummer has different presets. The good news is that you have learned how to audition drummer presets and select them to change the sound of a drummer region. The bad news is that as the composer/producer of this song we’re still not happy with the drums in the intro. Kyle is awesome, but we need to think of the song, not the drummer. The sound we’re going for is something simpler for the intro—like a shaker. That’s it!
Working with the Drum Kit Controls
Kyle, our virtual session drummer, should be able to play a simple laid-back shaker for us if we help him strip down his drum kit. No problem; all we need to do is make some simple adjustments to the drum kit controls.

The drum kit controls include pictures of the various kit pieces. Whichever pieces are yellow are the ones your drummer plays in the selected region. Before we completely dismantle Kyle’s kit by turning off all of the pieces, why not experiment with them first?
1. Start playback. While the intro plays, click different instruments in the kit controls to turn them on and off. You’ll see different combinations depending on which instruments are on or off.
2. Turn off all of the pieces except for the Hi-Hat. Continue playback.
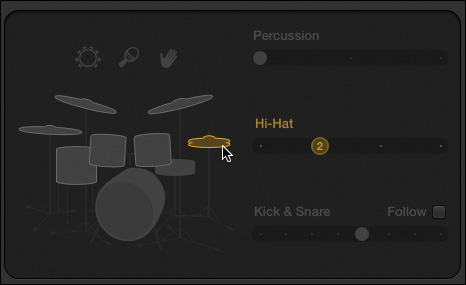
The Hi-Hat can be very expressive and so can stand alone as a percussion part. In fact, there is a Hi-Hat slider with four different settings to go with this genre.
3. Drag the Hi-Hat slider to each of the four settings to hear them during playback.

All four of the Hi-Hat settings sound terrific. Too bad the producer’s heart is set on a shaker.
4. Click the Hi-Hat to turn it off but continue playback. The Intro track is now silent except you may see a little drum fill in the middle and end of the region.

![]() Note
Note
Fills are controlled by the Fills knob on the right side of the Drummer Editor. Feel free to dial the Fills knob to add more fill to your taste.
5. In the drum kit controls, click the shaker to turn it on. The Percussion slider lights up when you turn on the shaker. Try all three settings in the Percussion slider.
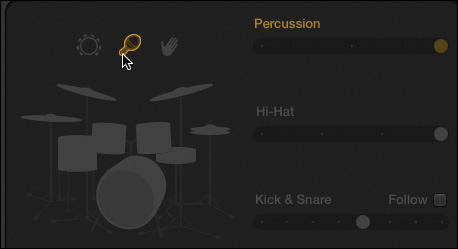
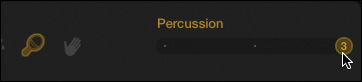
6. Drag the Percussion slider to the third setting. Stop playback. We have a winner. There’s just one little thing. Wouldn’t it be nice if the Intro percussion part started later, say bar 4? Remember to let songs build.
7. Resize the beginning of the Intro Drummer region so that it begins at bar 4. Why bar 4? Because the strings part starts at bar 5 and it will sound better if they come in at different times (at least for this song).
8. Press E to hide the editor, and press C to turn off the cycle area. Play the song from the beginning. When you are finished, save your work.
Bravo! Great drummer track, courtesy of Kyle, the default virtual session drummer, and his real-life assistant—you.
Working with the Movie Track
The last type of track you’ll work with in this lesson is the movie track. A project contains one movie track where you can open a movie file from your computer and play it with your project. Movie files are not saved with the project if you move it to another computer, but you can export or share your finished project with the movie track. You’ll learn about sharing projects like this one in Lesson 9, “Sharing Your Finished Projects.”
In this exercise you’ll display the movie track, open a movie, and resize the movie window.
![]() Note
Note
If you didn’t complete the previous exercises, open the project 2-5 Ditty Drummer and save it to your folder.
1. Choose Track > Show Movie Track.

An empty movie track appears between the arrangement track and the first instrument track. There are several ways to open a movie file, including using the File menu or pressing Option-Command-O. For this exercise you’ll use the shortcut menu in the movie track header. You’ll find the movie for this project in the Additional Media folder in the APTS GarageBand Book Files folder on your desktop.

2. Click the movie track name in the header, and then choose Open Movie from shortcut menu.
3. In the Open dialog, select the Lexie Shadow.mov file (Desktop > APTS GarageBand Book Files > Additional Media > Lexie Shadow.mov). Click Open.
There can only be one movie file in the movie track. If you wish to remove the current movie file, you can choose Remove Movie from the shortcut menu in the movie track header.

Right away you’ll notice a dog in the middle of your workspace. That’s my dog Lexie, who was the inspiration for this ditty. Not only did I record the guitar part from my iPhone while walking her, I also made this video—though not at the same time. I watched her movement and her cadence (step pattern) when I created the melody; you judge for yourself if I managed to capture the carefree feeling. Regardless, you’ve added a movie, so let’s watch it.
4. Play the project to see Lexie in action. Once again, it’s not a masterpiece, but it works.
Although the movie file is called Lexie Shadow, the movie window is named after the project. You’ll see the name of the project in the movie window header.
5. Drag the movie window header to move it to another location on the screen. Drag the edges of the movie window to resize it.
6. Click the close button (X) in the upper-left corner of the movie window to minimize it.

Where did it go? Take a look at the movie track header. The minimized movie window is now thumbnail-sized. You’ll also see a new audio track called Lexie Shadow (named after the movie file) at the top of the track. The orange color indicates that it is an imported file. Notice the thumbnail strip in the movie track. These thumbnails can be used as a reference if you are scoring the video.
7. Click the minimized movie window to return it to its last size and location on the screen.

8. Play the project one last time for nostalgia’s sake. When you are finished, save your work.
Congratulations! You covered a lot of tracks in this lesson. Not only did you create tracks and change track instruments, but you also named the musical parts in the arrangement track, created and edited a drummer track, and worked with the movie track. In the next lesson you’ll build a project from scratch using Apple Loops. Feel free to experiment with this project, modify the drummer regions in the verse and chorus, or change track instruments.
Lesson Review
1. How can you listen to the Software Instrument sound patched to an empty Software Instrument track?
2. What are the four choices in the New Track dialog?
3. Which buttons in the interface control the tracks that are audible during playback? Where are the buttons located?
4. What keyboard shortcut can you use while dragging regions in the timeline to duplicate the selected region or regions?
5. Which area of the GarageBand window contains the patches for changing a track’s instrument?
6. Where do you change the performance, presets, and other parameters of a drummer track?
7. How many movie, arrangement, and drummer tracks can you have in a GarageBand project?
Answers
1. You can use the onscreen musical keyboard to play notes and hear the Software Instrument sound patched to an empty Software Instrument track.
2. The four choices in the New Track dialog are: Software Instrument, Audio to record a microphone, Audio to record a guitar or bass using GarageBand as an amp, and Drummer.
3. The Mute and Solo buttons are located in the track header and can be used to control which tracks are audible during playback.
4. You can use the Option keyboard shortcut while dragging regions in the timeline to duplicate them.
5. The Library is the area of the GarageBand window containing patches for changing a track’s instrument.
6. You can change the performance, presets, and other parameters of a drummer track in the Drummer Editor.
7. A GarageBand project can have one movie track, one arrangement track, and one drummer track.