
16. Introducing the Excel Web App
In This Chapter
• Share a workbook online.
• Create an online form to help users fill in a sheet and print the results.
• Create a survey that can be filled out anonymously by others.
The Excel Web App is a browser-based version of Excel that allows users to enter new data and formulas in an Excel workbook while online. Those users do not need to have Excel installed on their computers to use the app. Mobile workers might use the Excel Web App to access their data while they are out of the office. You also might expect college students to use the Excel Web App to collaborate on group projects using this free version of Excel.
This chapter helps you get started working on and sharing your Excel files online.
Requirements
You don’t need much to get started with the Excel Web App:
• A current browser (minimum: Internet Explorer 7, Mozilla Firefox 3, or Safari 3)
• A Microsoft account, such as Hotmail, Microsoft SkyDrive, Xbox LIVE, Windows Phone, or other Microsoft services
• An Internet connection
With these three items, you can view your Excel workbooks anywhere in the world where you can access SkyDrive at skydrive.live.com.
Acquiring a Microsoft Account
With a Microsoft account, you can access the SkyDrive online storage where you can store, view, edit, and share your Excel workbooks. You don’t need a Microsoft account if you are accessing a public file on someone else’s SkyDrive. But if you want to upload your own files or access a SkyDrive requiring login, you will need a Microsoft account.
A Microsoft account enables you to log in to a variety of websites, such as Windows Live, Hotmail, and Xbox LIVE, using one account. If you already log in to a Microsoft-owned site, it is possible you already have a Microsoft account. You can create the account using an existing email address or obtain a new email address through the live.com or hotmail.com domains. Follow these steps to create a Microsoft account:
1. Use your browser to navigate to https://signup.live.com. If you don’t see a web page similar to the one shown in Figure 16.1, it’s possible you are already signed in to a Microsoft account. In that case, you may see a page with your login name in the upper-right corner. If that’s the case, you don’t need to create a Microsoft account because you already have one.
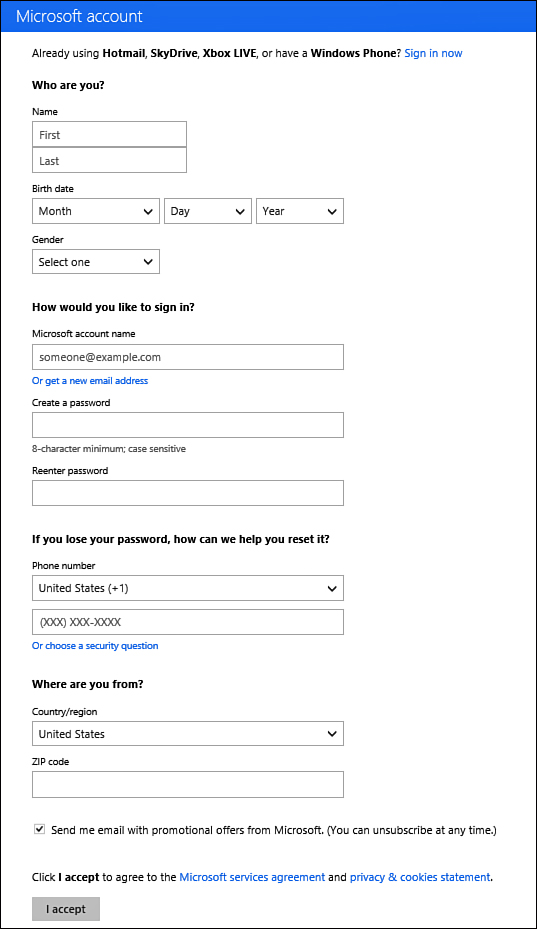
Figure 16.1. Create a Microsoft account to take full advantage of SkyDrive.
2. If you have an existing email address you want to use, type it into the Microsoft Account Name field, press the Tab key, and skip to step 6. Otherwise, click the Or Get a New E-Mail Address link to create a new email address and continue to step 3.
3. In the Microsoft Account Domain List drop-down, select the domain you want to have the address for (live.com or hotmail.com).
4. In the Microsoft Account Name field, type the username you want.
5. If Microsoft Account informs you that the ID isn’t available, repeat steps 3 and 4; otherwise, if the ID is available, continue to step 6.
6. Type your password into the Create a Password field.
7. Type the same password again into the Reenter Password field.
8. Choose an option to reset your password in case you forget it:
• Enter a phone number that can receive a code in a text message.
• If you created a new Microsoft account, enter an alternate email address at which you can receive password reset information. The email address must be different from your Microsoft account.
• Select the Or Choose a Security Question link if you want to verify your identity online. Select a predefined question from the Question list and enter the correct response in the Secret Answer field. The response must be at least five characters.
9. Fill in the rest of the requested information: name, location, gender, and birth year.
10. In the last field, type the characters you see in the image.
11. Click I Accept. Microsoft Account will create your new ID.
Uploading and Downloading Workbooks
You no longer have to remember to move those important files to a USB flash drive and have that flash drive with you. From almost anywhere in the world, you can handle your boss’s desperate call to fix the department budget numbers for his 11:00 a.m. presentation to corporate. All you need is a computer with access to the Internet. After you’ve logged in to your Microsoft account, you can upload your own workbooks or create new ones for viewing, editing, and sharing.
 Caution
Only unprotected workbooks can be opened online.
Accessing the SkyDrive
You can sign in to your Microsoft account from any site that supports the accounts, such as MSN.com or Bing.com, but to quickly get to your SkyDrive, go to skydrive.live.com. After you’re signed in, you’re brought to your SkyDrive, shown in Figure 16.2.
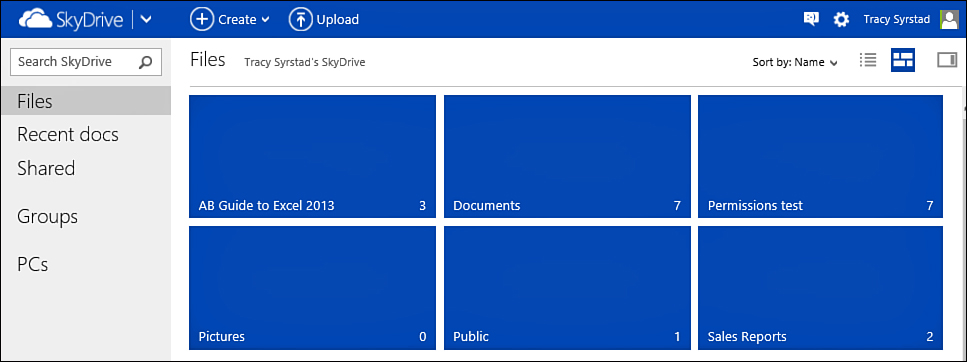
Figure 16.2. Log in to your SkyDrive to interact with it, such as uploading files and creating folders.
Uploading to SkyDrive
You can upload a workbook viewable by just you, selected individuals, or everyone. After it is uploaded, you can view, edit, and share the workbook. Follow these steps to upload your workbook while you’re logged in to your SkyDrive:
1. Select the folder, such as Documents, to which you want to add your workbook.
2. Select Upload, found at the top of the web page.
3. Browse to the location of the file you want to upload and select it.
4. Click Open.
5. The file will be uploaded to your SkyDrive. When the upload is complete, the page will update to show an icon for the file.
Saving to SkyDrive from Excel
Save a file from Excel directly to your SkyDrive by choosing File, Save or Save As, SkyDrive. Excel attempts to log you in automatically, but if it can’t, click the Sign In button and sign in with the account you created in the section “Acquiring a Microsoft Account.”
Deleting a File from SkyDrive
To delete a file from your SkyDrive, right-click on the file and select Delete. A message box, shown in Figure 16.3, temporarily appears in the lower-right corner of the page, giving you the chance to undo the deletion.
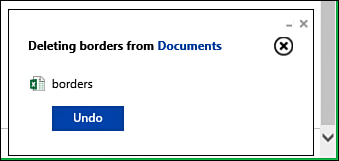
Figure 16.3. You’ll have about 15 seconds to undo an accidental deletion before it becomes permanent.
To delete multiple files, select the check box that appears when you place your cursor over the file. When all the desired files are selected, go to Manage, Delete. The files will be deleted but you will be given the option to undo the deletion.
Opening a Workbook
When you click on a folder, you’ll open it and see all the workbooks in the folder, as shown in Figure 16.4. Place your cursor over a workbook without clicking on it and a check box appears in the upper-right corner of the workbook. Click the check box to select the workbook. An Open drop-down is added to the menu at the top of the web page.
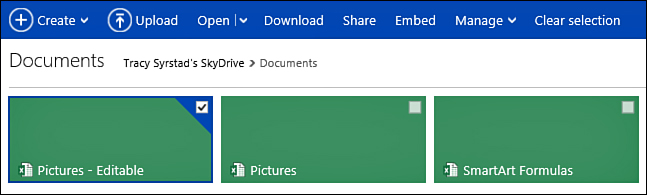
Figure 16.4. Selecting a workbook adds options to the menu at the top of the web page.
 Tip
Tip
When another workbook is already selected, check boxes automatically appear on all other workbooks. You can then select another workbook by clicking anywhere on the workbook icon. Some menu options, such as Open, are not available when multiple workbooks are selected.
Open in Excel Web App
Selecting Open in Excel Web App opens the workbook in the Excel Web App in your browser.
When open in View Only mode, the workbook is read-only. Unlike Read-Only mode on the desktop version of Excel, where you can make changes and save them using the Save As command to save to a new file, you cannot make any changes while in View Only mode. There is no ribbon, either, as shown in Figure 16.5.
Figure 16.5. In View Only mode, the workbook has limited menu options.
When open in Edit mode, changes are automatically saved as they are made, unless the workbook has specific ranges configured for data entry. For more information, see the section “Configuring Browser View Options.” A simplified ribbon is available with the features available in the Excel Web App, as shown in Figure 16.6.

Figure 16.6. A workbook in Edit mode has a simplified ribbon to access available features.
Tip
You can also open the workbook in the Web App by clicking on its icon.
Caution
Opening an Excel legacy file in the Web App converts it to an *.xlsx file.
Open in Excel
Selecting Open in Excel pops up a warning about viruses. If you trust the file, click Yes and it will open in Excel. If you do not trust the file, click No and the file won’t be opened.
If you choose to open the file in Excel, the file remains on the SkyDrive, but you will view it in Excel. If you save changes, the changes will be saved to the online file. To save the file locally, see the section “Saving a File to Your Local Drive.”
Creating a New Workbook Online
You aren’t limited to workbooks created previously in Excel on your desktop PC. You can create a new workbook online and download it when you return to the office.
To create a new workbook on your SkyDrive, follow these steps:
1. Click the folder you want the workbook in.
2. Select Excel Workbook from the Create drop-down at the top of the web page, as shown in Figure 16.7.
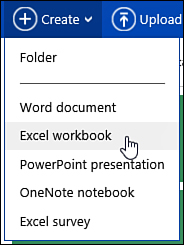
Figure 16.7. Create a workbook online.
3. Enter the name of the workbook and click Create. The file extension (.xlsx) is automatically appended for you.
4. The workbook is opened in the Web App where you can do your work.
Saving a File to Your Local Drive
Eventually, you will want to work on a workbook saved locally. This can be done in several ways:
• With the workbook selected, click Download from the menu. You can also right-click on a workbook and select Download. Your browser will take over the download functionality.
• With the workbook open in the Web App, select the File tab to reveal the following options:
• Open in Excel—Open the workbook locally in Excel. You can then do a Save As for your first save. Select a location on your computer to save the file.
• Save As, Download—Download the workbook to your computer.
• With the workbook open in Excel, but not downloaded, do a Save As for your first save. Select a location on your computer to save the file.
Sharing a Folder or Workbook
SkyDrive doesn’t just provide you with the convenience of being able to work with your workbooks wherever you are. It also helps you share your workbooks and the folders you create with other people.
Creating a New Folder
When you create an account, SkyDrive provides two folders for storing your documents: Documents, a protected folder only you can access, and Public, a folder available to anyone. You can share the Documents folder, but it is not recommended as other apps may save sensitive data to it. Instead, create a new folder to hold files you want to share by selecting Create, Folder from the menu, entering the name of the folder in the provided field, and pressing Enter.
Setting Folder Permissions
When you create a new folder on your SkyDrive, it is not shared. If you create the folder within another folder, it inherits the sharing properties of its parent folder. By setting the share properties of a folder, you can choose who has access to it and whether the person can only view existing files, add new files, or delete files.
To view the properties of a folder, right-click the folder’s icon and select Properties. A task pane opens on the right side of the web page, as shown in Figure 16.8. Under Sharing, you can see the current sharing properties of the folder. The Sales Report folder can be viewed by users on Facebook with a link posted to your Timeline. Another link was created that allows logged-in users who click it to edit the folder.
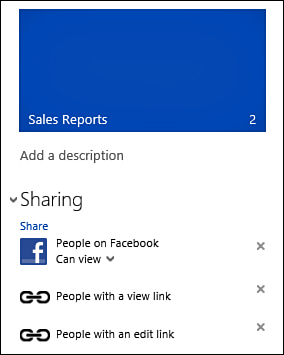
Figure 16.8. You can share a folder in multiple ways, including with online services such as Facebook.
To configure the sharing properties of the selected folder, click the Share link, and the form in Figure 16.9 appears. Choose how you want to share the folder. The options for sharing are as follows:
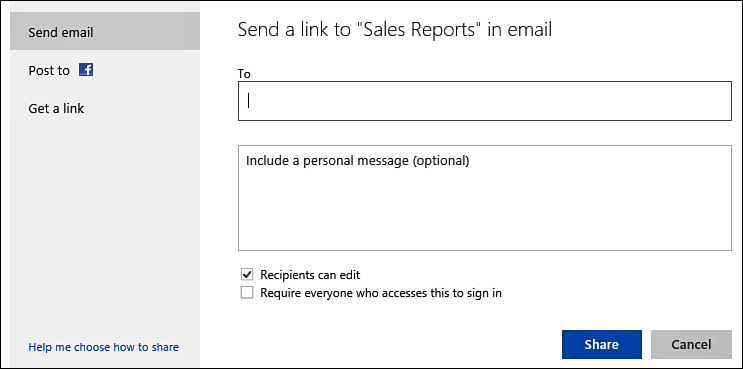
Figure 16.9. Once you click the Share link, you can choose how you want to dispense access to the folder.
• Send Email—Send an email containing a link to your new folder and a link to view each file in the folder. Fill in the To field with the email addresses and include an additional message. Select the Recipients Can Edit check box if the recipients are allowed to edit the contents of the folder. Select the Require Everyone Who Accesses This To Sign In check box if the recipients must log in to their Microsoft accounts before accessing the folder.
• Post to an Online Service—If you have your Facebook, Twitter, or LinkedIn account linked to your Microsoft account, you can post a link to the folder at that service’s site. Recipients will be required to log in to open files. Select Recipients Can Edit if the recipients are allowed to edit the contents of the folder. Select Add Services to add or manage the available services. Under Add Services, Manage My Services will take you to a web page to connect the services to your Microsoft account. Once you’ve posted to a service, you can configure whether recipients are limited to viewing or can also edit the contents of the folder.
 Note
Note
After setting up a service the first time, you must return to the share interface to post to the service.
• Get a Link—Create a link you can share, but also limit what users can do to the contents of the folder. Except for Public folders, users will be required to log in to open files. To retrieve a previously created link, return to the Get a Link option. The available links are as follows:
• View Only—Users can open the files in the folder but cannot make changes unless ranges have been configured for data entry. See “Configuring Browser View Options” for more information. Users will be able to download a copy of the file.
• View and Edit—Users can view and edit the files in the folder.
• Public—Anyone can access the files, even if they don’t have a link.
To delete a share option, click the X to the right of the option. The option will no longer work, even if the users click the previously provided link.
Caution
A user who creates a file in a folder becomes co-owner of the folder. This means if you delete the shared link previously sent to users, the co-owner will have access to any new workbooks added to the folder until the co-owner permission is also deleted from the Sharing list.
Setting File Permissions
Setting file permissions is the same as setting the folder permissions, except you right-click on a file and set its sharing permissions. For details on the sharing options, see the previous section “Setting Folder Permissions.”
Simultaneous Editing
If you’re allowing others to edit your workbook, eventually you will be editing the workbook at the same time as another person. When you are the sole person editing the workbook online, the text in the lower-right corner of your browser window reads 1 Person Editing. If other people are online editing at the same time, the text will update to reflect the number of people. Some limitations to working with a file in the Web App are as follows:
• A desktop user cannot edit the file at the same time as a user is editing it online. The desktop user will be limited to a read-only copy, saving a local copy, or waiting for notification when the file is available.
• If a workbook is open on the desktop, an online user is limited to viewing the file. The online user is not provided with options.
• If a workbook has been configured with specific ranges for data entry, each user who opens the file gets a copy. See the section “Configuring Browser View Options” for more information.
To see who else is in the workbook with you, click the arrow and a window opens up, showing everyone in the workbook, including you, as shown in Figure 16.10.
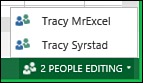
Figure 16.10. You can see who else is editing a workbook with you.
Because changes to workbooks are automatically saved, you can see what the other person is doing almost right away. There is no hierarchy of permissions or way to verify changes, so another user can change your changes as quickly as you can make them.
Interacting with a Sheet Online
Navigating in the Excel Web App isn’t that different from navigating in the desktop version. For example, using keyboard shortcuts and using the mouse are still available. The two exceptions are as follows:
• You can’t click and drag to move cells, rows, or columns.
• Right-click options are limited to cut, copy, and paste and manipulating hyperlinks.
Many of Excel’s tools are still available, some with fewer options, such as charts. Other tools can be set up in Excel and used in the Web App, but not created in the Web App, such as conditional formatting and pivot tables. Some are not available at all, such as WordArt. The tools that are available to various degrees work very much as they do in the desktop version.
Caution
Protected sheets and workbooks do not open in the Web App.
I’ve set up a public folder, AB Guide to Excel 2013, in my SkyDrive account, which you can access at http://sdrv.ms/YN1ajh. In it, you’ll find workbooks with different Excel functionality, which you can test online or download and review locally.
Configuring Browser View Options
You can control which sheets are visible in the Web App. You can also configure specific ranges on the sheet for data entry, whether the user has View or Edit privileges. For example, you can create an online calculator. Or you can create an online entry form the user can save locally or print out. All of this is done through the Browser View Options available through the Save As dialog box in Excel.
When you go to File, Save As and select a folder on your SkyDrive, the Save As dialog box has a button for Browser View Options. Select the button and the Browser View Options dialog box opens. From the Show tab, you can choose to share the entire workbook, selected sheets in the workbook, or selected charts or pivot tables, as shown in Figure 16.11.
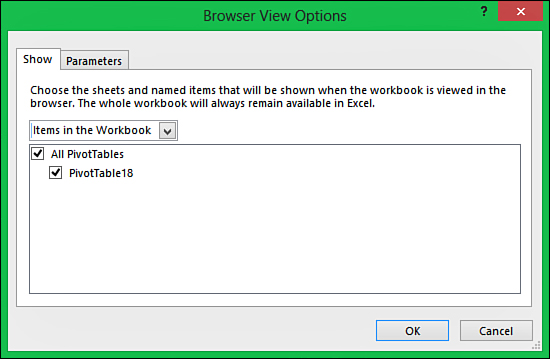
Figure 16.11. Let users only see specific items in a workbook, such as a PivotTable.
Go to the Parameters tab and you can specify named ranges, which the user can edit. Figure 16.12 shows a sheet in the Web App with a task pane in which the user enters data. When the user clicks Apply, the data is entered onto the sheet.
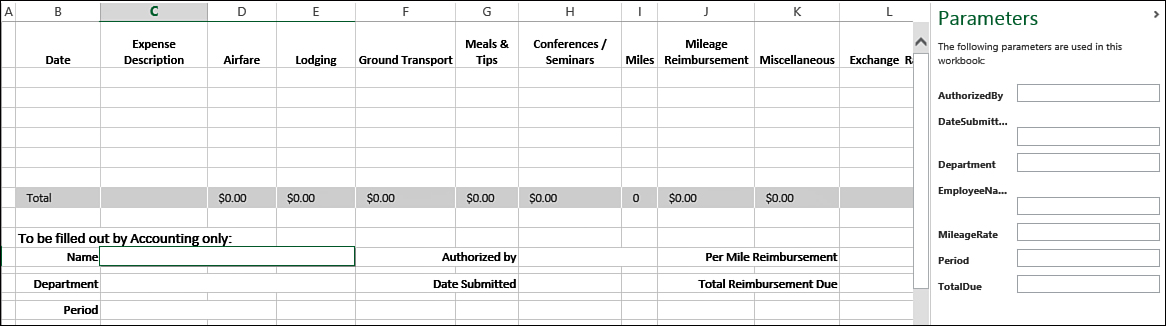
Figure 16.12. Use data entry parameters to limit the users to entering only the required data.
When you add parameters to a sheet, a few of the Web App rules change:
• Recipients with view-only links can enter information in the parameters.
• Recipients with view and edit links can only enter information in the parameters. The rest of the workbook is protected.
• Workbooks with data entry parameters are not shared. Each user opens a unique copy.
• Entries are not automatically saved. The user can save a copy by going to File, Save As, Save a Copy or File, Save As, Download.
• Parameters only affect the online sheet. Once downloaded, the data entry limitations are removed.
Tip
Use short names that will make sense to users as they fill in the form. See the section “Using Names to Simplify References” in Chapter 5, “Using Formulas,” for instruction on creating names.
Follow these steps to allow a user to enter temporary data in specific cells:
1. Select the cell you want the user to edit during the session.
2. Type the name of the cell in the Name box. Press Enter.
3. Repeat steps 1 and 2 for each cell you want editable.
4. Choose File, Save As and select a folder on your SkyDrive. The Save As dialog box opens.
5. Click the Browser View Options button.
6. Select the Parameters tab.
7. Click the Add button and the Add Parameters dialog box opens, listing all defined names in the workbook, as shown in Figure 16.13. Select the named ranges you want users to edit.
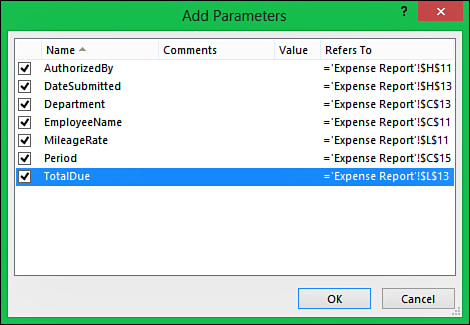
Figure 16.13. Use named ranges to define which cells users can edit.
8. Click OK twice to return to the Save As dialog box.
9. Enter the name of the workbook in the File Name field and click Save.
To view the workbook as a user would, open the workbook online and go to View, Document View, Reading View. The names you defined will appear in a task pane to the right. To return to the creator’s view, go to Edit Workbook, Edit in Excel Web App.
Setting Up a Survey
You can create an online survey from within the Web App and provide a link to others to fill it out. The anonymous results will appear in an online workbook. To create the survey, create a new workbook and go to Insert, Tables, Survey, New Survey.
Figure 16.14 is a small sample survey I created. You can access it at http://sdrv.ms/RAwy2x. You can view the results in the workbook Survey found in the shared folder mentioned in the previous section “Interacting with a Sheet Online.” To create the survey, follow these steps:
1. Create a new workbook in the Web App.
2. Go to Insert, Tables, Survey, New Survey. A data entry form opens.
3. Fill in the title, Getting to Know You, and the description, A survey to learn more about Excel users.
4. Click in the Enter Your First Question Here field and a form to fill in the question details appears.
5. In the Question field, type What year were you born?
6. In the Question Subtitle field, type Age Category.
7. The Response Type field is a drop-down, as shown in Figure 16.15. Select Number.
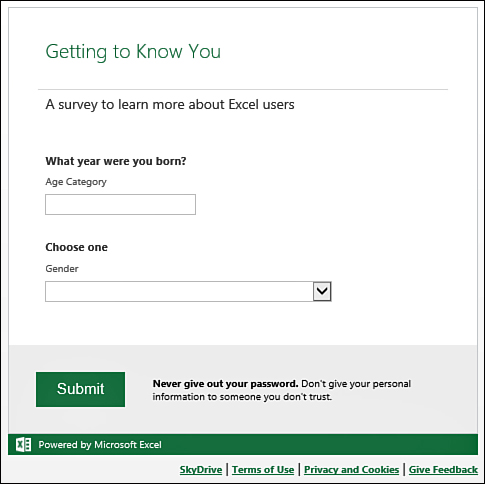
Figure 16.14. Create a survey web page that users can fill out anonymously. The results will feed into your workbook.
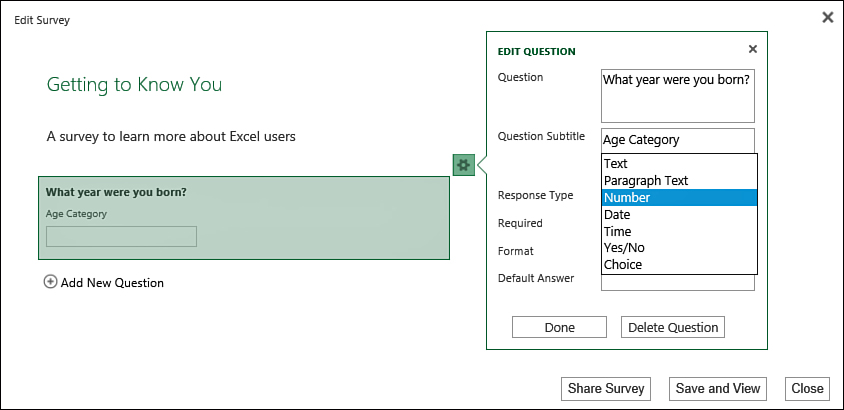
Figure 16.15. Each question can have a different response type.
8. Select the Required box.
9. Because Number is selected as the response type, an additional field, Format, appears. This allows you to format the number as Fixed Decimal, Percent, or Currency. Because we’re asking for the year, leave it blank.
10. Leave Default Answer blank.
12. Click Add New Question.
13. In the Question field, type Choose one.
14. In the Question Subtitle field, type Gender.
15. Select Choice from the Response Type drop-down.
16. Select the Required box.
17. Because Choice is selected as the response type, an additional field, Choices, appears. This allows you to enter the choices the user can select from. Type Female, press Enter, then type Male.
18. Leave Default Answer blank.
19. Click Done.
20. Click Save and View. The survey is saved and you’re brought to a view of the survey as the users will see it. If you’re happy with everything, click Share Survey and a link will be generated. Copy the link and share it so users can fill out your survey. As users fill in and submit their responses, the workbook is updated with the results, as shown in Figure 16.16. You can then filter or create reports as needed.
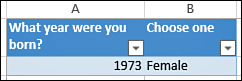
Figure 16.16. Survey results automatically update to the survey workbook.
To edit an existing survey, open its workbook and go to Insert, Survey, Edit Survey. When you click on a question, the Edit Question form appears and you can make changes.