Section 3. Using Office Live Business Applications
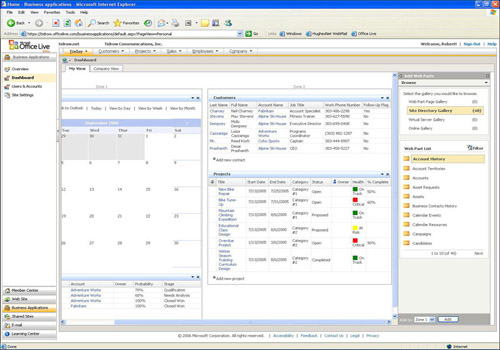
Building and maintaining websites are just two features of Office Live. With an Office Live Essentials or Office Live Collaboration subscription, you also have available the Office Live Business Applications (see Figure 11). These applications help you and your employees conduct daily and periodic tasks. By using them, you can become more efficient at accessing and analyzing data, manage major projects so they stay on time (and within budget), and perform other important tasks.
Figure 11. One of many Office Live Business Applications.

In Office Live, Business Applications are customized views of data that you can use and share within your Office Live site. The data from applications is stored as lists. Each Office Live website can have multiple applications and share with others using site-level access rights. For instance, you can control which users can see which data.
Office Live offers more than 20 different Business Applications. Some are basic types of lists to help you track employees, whereas others can offer sophisticated business intelligence. To help you become acquainted with how to use the applications and their features, each application includes sample data. Keep the data until you get an idea of how to use the application. Then, you should delete the sample data using the Remove Sample Data button on each application. To use the Business Applications, do the following:
- Click the Business Applications button on the left navigation bar. The following tabs appear:
• Today
• Customers
• Projects
• Sales
• Employees
• Company
- Click the down arrow on a Business Application tab, such as Customers.
- Click an application, such as Contact Manager, on the tab drop-down list.
Table 4 shows the Business Application tabs and a description of the Business Applications available.
Table 4. Office Live Business Applications

Using the Dashboard to Manage and Organize Your Business
The Dashboard shows you important information about your business. You can customize the Dashboard to help you get a quick glance of important business events opportunities and other key information. You can access the Dashboard by clicking the Dashboard link on the Business Applications navigation bar.
The default information includes the following areas:
- Calendar Events
- Opportunities
- Customers
- Projects
When you display the Dashboard, it includes two tabs: My View and Company View. The My View tab shows information relating to the current user. When a user logs in to the Office Live site, the My View Dashboard shows the information for that user. To see companywide information—the information is shown to all users logged in to your company's Office Live site—click the Company View tab.
Customizing the My View Dashboard
To get an idea of how you can customize a Dashboard view, the following shows how to customize the My View tab on the Dashboard (see Figure 12). You can modify the Company View tab in the same way.
Figure 12. Customize the Dashboard.
- Click the Dashboard link on the Business Applications navigator bar.
- Click My View tab.
- Click Customize this page. The Add Web Parts pane appears. You can browse different galleries, such as the Site Directory Gallery, for a list of Web Parts you can add to the My View tab.
- Select a Web Part, such as Assets, to add to your Dashboard. To see more Web Parts, click the Next link, which will show the next ten items on the Web Parts list.
- Drag and drop a Web Part to a zone to add it to that zone.
- Continue adding Web Parts as necessary. As you add more parts, the page shows a scrollbar that enables you to scroll to see all the contents of the zones.
- To delete a Web Part, click the X in the upper-right corner of the zone window.
- Click Done at the top-left corner of the My View tab when you finish modifying the Dashboard tab.
Note
You might want to limit the number of Web Parts you display on your Dashboards. Because this view is intended to be a quick glimpse of details on your site, scrolling down to see too many Web Parts could create an "information overload" view, thereby defeating the purpose of the Dashboard application.
To add a new event to the Calendar Events schedule, click the drop-down button next to Create New at the top-left corner of the My View tab and select Event. The New Calendar Event window appears. Fill out the Title, Event Type, and Begin and End Time fields with the event data. You also can fill out the description, location, give it a color, and provide a web address for the meeting. Click Save and Close (which appears at the bottom of the New Calendar Event page) to save the event and to see the new listing on the Calendar Events page.
Link Microsoft Outlook Data to Dashboards
Office Live Essentials enables you to link data from your Dashboard views to your local copy of Microsoft Office Outlook Calendar. This enables you to keep both calendars (the one in Outlook and the one on the Office Live site) synchronized so that you always know your schedule.
Before you can begin using Outlook and your Live Dashboard together, you must download and install the Microsoft Outlook Connector software to your local computer. The Outlook Connector is a free download, so you don't have to worry about paying Microsoft more money than what you have already invested in Office and Office Live. See the next section to read how to access and start using Outlook Connector.
Installing Outlook Connector
If you have Microsoft Office Outlook installed, you can use the Microsoft Outlook Connector to connect Office Live Mail and Microsoft Office Outlook so that you can read and manage your email, calendar items, tasks, and contacts using the Web. In addition, when you are offline—not connected to the Internet—you can use Microsoft Office Outlook to perform all these tasks. Then, when you go back online, Outlook and Office Live can synchronize messages, tasks, calendars, and contacts.
To use Outlook Connector, you must have the following:
- Office Live Essential subscription
- Office Live email account
- Microsoft Office Outlook 2002 or later
- Microsoft Outlook Connector software
To get the Microsoft Office Outlook Connector software, do the following:
- Click the Overview link under the E-Mail navigation bar.
- On the E-Mail page, click Download Now under the Outlook Connector section. The File Download window appears.
- Click Save and then click Save again when prompted for a location to store the file. The MSNOLCON.MSI file downloads to your computer.
- Locate the MSNOLCON.MSI file and double-click it. The Open File dialog box appears. If you have Outlook currently running, you need to shut it down now.
- Click Run. The Microsoft Office Outlook Connector – Setup Wizard screen appears.
- Click Next.
- Fill in your customer information.
- Click Next.
- Click Install. The Connector program installs and displays the Completing the Setup Wizard window when done.
- Click Finish. Microsoft Office Outlook and the Microsoft Office Outlook Connector window appear (see Figure 13).
Figure 13. Set up Outlook Connector.
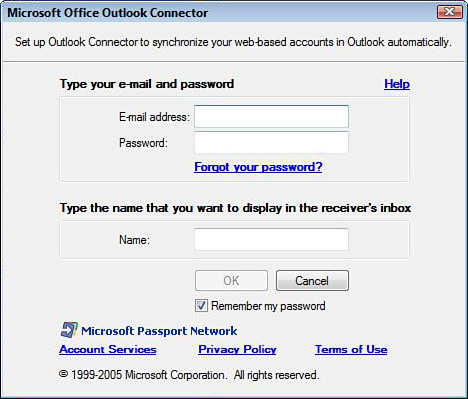
- Fill out the window with your email address, password, and the name you want for the receiver's inbox.
- Click OK. A message appears telling you that you need to restart Outlook.
- Click Yes to restart Outlook.
When Outlook restarts, a new Outlook Connector menu is added to the Outlook window. You can now use Outlook to connect to your Office Live Dashboard, manage email from your Office Live Mail account, and manage Office Live Contacts. Essentially, the Outlook Connector extends Outlook so that it can manage Web-based information, which without the Connector software you could not do.
To link the calendar, do the following:
- Click the My View tab of the Dashboard.
- Click Link to Outlook above the Dashboard calendar. When Microsoft Outlook starts, a login screen might appear.
- Sign in using your Office Live ID. Click Sign In. A message might appear asking whether it is okay for this SharePoint Service folder to be added to Outlook. In this case, the new folder is named Business applications – Calendar Events.
- Click Yes to allow it to link.
Note
Depending on the files and applications installed on your computer, you may need to install additional software to get the Outlook Connector and your Office Live site to work together. For instance, during the writing of this Short Cut, I was required to install a file called OWSSUPP.DLL, which is the Microsoft SharePoint Client Support file. I knew I had to do this when I clicked the My View tab and the Internet Explorer Information Bar (sites below the IE toolbars and above the current web page) displayed a message saying that the website wanted to run the OWSSUP.DLL add-on. I clicked the Information Bar, selected Run ActiveX Control, and clicked Run to install the control. You may need to do the same thing.
Outlook now includes the updated Dashboard Calendar Events listings. When you add new events to your Dashboard calendar, you must click the Link to Outlook link to update Outlook.
Managing Shared Sites Users and Accounts
When you subscribe to Office Live, you receive a set number of users who can access the Office Live Shared Sites. For example, Office Live Essentials provide ten users as a default (you can purchase additional ones in five-user packs). Each user that you want to have access to your Shared Site must have a user and permissions setup. You can create users, set passwords, and manage users from the Users and Accounts screen (see Figure 14).
Figure 14. Manage user accounts.
User permissions provide a layer of security to Office Live so that you can prevent unauthorized users from accessing certain areas of the portal. For example, you might want to create another user who has administrator privileges like yours, if you cannot make changes to the overall site at some points (say you are on vacation and do not want to do them!). On the other hand, most other users will need to have limited permissions, so that they can access only certain parts of Office Live.
Office Live provides three levels of permissions:
- Administrator—Enables the user to set permissions, add, modify, and delete information, and perform other administration tasks.
- Editor—Enables the user to add, modify, and delete information.
- Reader—Enables the user to read only documents and other information. This user cannot add, modify, or delete information.
Creating Users and Accounts
User permissions can be set up for the following Office Live Shared Sites:
- Business Applications
- Human Resources
- SBA (Small Business Application) Sharing Workspace
- Vendor Workspace
To create users and accounts for these sites, use the following steps:
- Click the Users & Accounts link under the Business Applications navigation bar. The User Permissions page appears.
- Click Add User. The Add User dialog box appears.
- Type an email address and the display name of the user you want to configure.
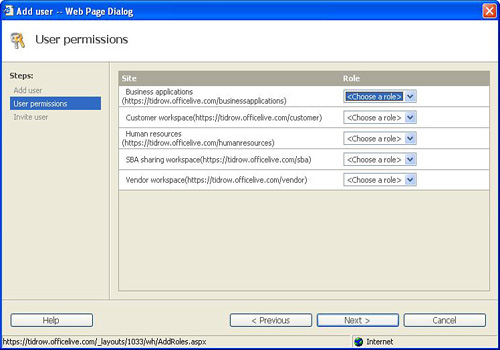
- Click Next. The User Permissions window appears.
- Select a permission from the Role drop-down list for each site (such as Business Applications).
- Click Next. The Invite User window appears, providing a pre-addressed email message you can send to the new user inviting the user to the Shared Site.
- Click Next. A Summary window appears, listing each site to which the user has access and the corresponding permission granted.
- Click Finish. Your new user appears in the User column of the User Permissions page.
When you set up permissions (roles) for a user, you can set up different roles for different sites. For example, you might want user John Doe to have Editor permission to the Business Applications and Customer Workspace sites but have Reader permission to the Human Resources, SBA Sharing Workspace, and Vendor workspaces. In this way, you can have the flexibility to limit or open up resources as needed for your company.
Modifying User and Account Rights
You can change the role of a user by changing the status in the Edit User Information dialog box for that user. To do that, perform the following steps:
- Click the Users & Accounts link under the Business Applications navigation bar. The User Permissions page appears.
- Click the Edit link next to the user you want to modify. The Edit link appears on the right side of the page under the Options column. The Edit User Information window appears.
- Change the permission for a site using the Role drop-down list.
- Click Save. The User Permissions page appears.
Removing Users and Accounts
If a user account no longer needs access to a Shared Site or to all the Shared Sites, you can modify the sites that they can access or delete them from your list of users. When you delete a user altogether, the user account is removed from the User Permissions page under Business Applications. However, the user's email address still exists. You have to remove that user from the Email part of Office Live. The following steps show how to delete a user from accessing any Office Live Shared Sites:
- Click Users & Accounts under the Business Applications navigation bar.
- Click the Delete link next to the user you want to modify. The Delete link appears on the right side of the page under the Options column. The Delete User window appears.
- Select the site from which you want to delete the user. To remove the user altogether, you must select all the sites.
- Click Delete.
If you select only a subset of all the sites in the Delete User window and click Delete, the user still exists in your User Permission window but has access to only those sites from which you did not delete the user.
Filtering the User Permission Page
To quickly see which users have permissions to a specific site, such as to the Customer workspace, you can filter the User Permissions window to show only that information. To filter the window, click the All Sites drop-down list at the top of the window and select the Shared Site permissions you want to view. The window now displays only those users who have permissions set up for that site. On the other hand, to view all your users, select All Sites from the All Sites drop-down list.
Administering Shared Sites Settings
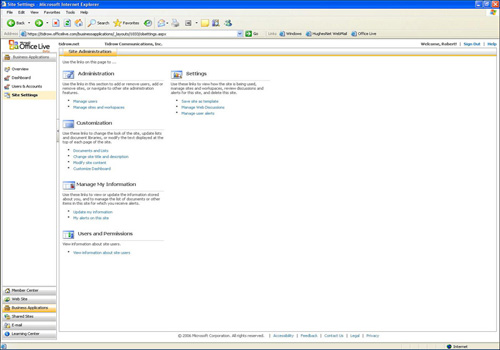
The Site Settings link under the Business Applications navigation bar provides links to several administration-related pages on your site. When you click Site Settings, the Site Administration page appears (see Figure 15). It is divided into five sections with links to administration pages. Some of the links take you to pages you have already used, such as the User Permissions page. The following section describes these sections in more detail.
Figure 15. Modify Shared Sites settings.
Modifying Site Settings
On the Site Administration page, you can choose the following site areas to administer:
- Administration—Provides the Manage User and Manage Sites and Workspaces links. The former links you to the User Permission window, whereas the latter takes you to the Private Sites Manager. There, you can create, import, and delete Shared Sites.
- Customization—Provides links to Documents and Lists, Change Site Title and Description, Modify Site Content, and Customize Dashboard. The Documents and Links link shows the Documents and List page. There, you modify the document libraries that Shared Sites can use. The Change Site Title and Description link displays a web page by the same name. There, you can modify the name of the Shared Site and change its home page description. To change a list, document library, discussion board, or survey, click the Modify Site Content link. Finally, the Customize Dashboard link enables you to change the Dashboard settings.
- Manage My Information—Provides links to Update My Information and My Alerts on This Site. The Update My Information link displays the Personal Settings page, where you can edit your own user information. The My Alerts on This Site link takes you to a page by the same name, from which you can manage alerts received on the list of libraries, files, lists, and other items.
- Users and Permissions—The Users and Permissions link displays the User Permissions page, which is discussed in the previous section.
- Settings—Includes links for Save Site As Template, Manage Web Discussions, and Manage User Alerts. The Save Site As Template link displays a page by the same name, where you can save your website as a template for others to use a site template. The Manage Web Discussions shows the addresses for the documents that have Web Discussions on this site. Finally, the Manage User Alerts link displays a page to manage user alerts.