


SmartCloud Entry installation and configuration
This chapter describes the process of IBM SmartCloud Entry installation and initial administrative tasks including the creation of an administrator, enabling billing, and creation of new users. In addition, this chapter covers connecting IBM SmartCloud Entry to the x86 and Power system-based compute nodes configured in Chapter 4, “Hardware setup and configuration” on page 17.
5.1 Installing IBM SmartCloud Entry
IBM SmartCloud Entry can be installed on x86 or Power nodes. For the purposes of this document SmartCloud Entry is installed on an x86 node with a Linux operating system installed. The installation of the operating system is not covered in this book.
After a virtual server is created and the operating system installed, the installation media (sce240_linux_installer.bin) can be copied to the operating system.
Example 5-1 shows the command (./sce240_linux_installer.bin) executed on the compute node.
Example 5-1 Command and responses to start the installation of SmartCloud Entry
[root@sce-intel SmartCloudEntry]# ./sce240_linux_installer.bin
Preparing to install...
Extracting the JRE from the installer archive...
Unpacking the JRE...
Extracting the installation resources from the installer archive...
Configuring the installer for this system's environment...
strings: '/lib/libc.so.6': No such file
Launching installer..
The installation process requires the specification of language by number as shown in Example 5-2.
Example 5-2 Specifying locale or language
Choose Locale...
----------------
1- Deutsch
2- English
3- Español
.
(additional lines of output were deleted for this example)
.
.
CHOOSE LOCALE BY NUMBER: 2
===================================================================
(created with InstallAnywhere)
Example 5-3 shows the beginning of the installation dialog.
Example 5-3 Preparing CONSOLE mode installation
Preparing CONSOLE Mode Installation...
===============================================================================
Introduction
------------
InstallAnywhere will guide you through the installation of IBMSmartCloud Entry
version on Linux.
It is strongly recommended that you quit all programs before continuing with
this installation.
Respond to each prompt to proceed to the next step in the installation. If you
want to change something on a previous step, type 'back'.
You may cancel this installation at any time by typing 'quit'.
PRESS <ENTER> TO CONTINUE:
Press Enter multiple times to scroll to further licensing details. A final prompt requires a response of Y to continue installation (Example 5-4).
Example 5-4 Accepting license agreement
--- preceded by many screens of license agreement information ---
PRESS <ENTER> TO CONTINUE:
DO YOU ACCEPT THE TERMS OF THIS LICENSE AGREEMENT? (Y/N):
Y <<<<<<<<<<<<<<<<<<<<<< note: a reply of “Y” is required in order to continue
Choose a link location. The link location represents the directory that contains links to the IBM SmartCloud Entry binaries. These binaries are used to start or uninstall SmartCloud Entry. The links are created as a convenience to the administrator. Configure the directory for these links, as shown in Example 5-5.
Example 5-5 Choosing link location
Choose Link Location
--------------------
Where would you like to create links?
->1- Default: /root/SmartCloud_Entry_24
2- In your home folder
3- Choose another location...
4- Don't create links
ENTER THE NUMBER OF AN OPTION ABOVE, OR PRESS <ENTER> TO ACCEPT THE DEFAULT
Specify the installation folder and property folder by either entering the path in response to the prompts, shown in Example 5-6, or choosing the default values. To accept the default, press Enter.
Example 5-6 Choose installation and property folders
Please choose an installation folder.
Where Would You Like to Install? (DEFAULT: /opt/ibm):
Please choose a destination folder for the property files.
Where Would You Like to Install the Property Files? (DEFAULT: /root):
Before continuing to the actual installation, a preinstallation summary is provided (Example 5-7). If the settings are satisfactory, press Enter.
Example 5-7 Pre-Installation Summary
Pre-Installation Summary
------------------------
Please Review the Following Before Continuing:
Property File Install Folder:
/root/.SCE24/
Install Folder:
/opt/ibm/SCE24
Disk Space:
Free: 11242 MB Required: 505 MB
PRESS <ENTER> TO CONTINUE:
The installation progress is indicated in the text-based “progress bar.” A completed progress bar is shown in Example 5-8.
Example 5-8 Installation progress bar
Installing...
-------------
[------------------|------------------|------------------|------------------]
Install Finished
----------------
IBMSmartCloud Entry finished installing.
The next part of the installation is to configure user data. The installation prompts for importing existing SmartCloud Entry data or configuring new data as shown in Example 5-9.
Example 5-9 Specify I want to configure now
You can migrate data from a previous version now or migrate the data later by reading Chapter 12 of the IBMSmartCloud Entry Admin Guide. You can also configure user data now or later by editing the properties files in /root/.SCE24/
1- I want to migrate the data now.
2- I want to configure the user data now.
3- I will manually migrate or configure the properties later.
ENTER THE NUMBER FOR YOUR CHOICE, OR PRESS <ENTER> TO ACCEPT THE DEFAULT:: 2
Add configuration values (Example 5-10).
Example 5-10 Add configuration values
==================================================
Add Configuration Values
------------------------
Changing these properties is optional. All options can be changed post install in /root/.SCE24/authentication.properties. Press <Enter> to accept the default value.
Initial admin user name (DEFAULT: admin):
Initial admin name (DEFAULT: SmartCloud Entry Administrator):
Initial administrator password:
Verify initial administrator password:
===================================================
IBMSmartCloud Entry has been successfully installed
----------------------------------------------------
Example 5-11 shows a successful installation.
Example 5-11 IBM SmartCloud Entry has been successfully installed
IBMSmartCloud Entry has been successfully installed to:
/opt/ibm/SCE24
If you choose to create a silent install response file, it will be located in this directory.
1- Create Silent Install Response File
->2- Do Not Create Silent Install Response File
ENTER THE NUMBER FOR YOUR CHOICE, OR PRESS <ENTER> TO ACCEPT THE DEFAULT:
5.1.1 Starting IBM SmartCloud Entry with console in the background
If SmartCloud Entry was installed manually (not deployed as a virtual appliance), the SmartCloud Entry server is started using a terminal program to access the command line, and issuing the /opt/ibm/SCE24/skc command. Having an open terminal window dedicated solely to running a server is not preferable. If the terminal that was used to start the server closes, the server also exits. To avoid the server from exiting, the preferred way to run the SmartCloud Entry server is by using the screen or nohup commands.
The screen command allows for the terminal in which a program is running to be detached. In this case, this means that the /opt/ibm/SCE24/skc command can be issued in a terminal window and then the window can be closed without aborting the command. To accomplish this, type screen in a terminal. Next, run the /opt/ibm/SCE24/skc command, then type Ctrl+A, then D. At this point, the terminal running the /opt/ibm/SCE24/skc command is detached and all windows can be closed. The SmartCloud Entry server will continue to run. In some situations you might need to re-attach to the detached terminal. From any terminal window running on the SmartCloud Entry virtual server, type screen -r to return to the terminal window in which the command to start SmartCloud Entry was originally run.
The screen program might not be available in some AIX environments, so the nohup command can be used instead. The SmartCloud Entry Administrator's guide gives this example of using the nohup command to start IBM SmartCloud Entry:
nohup /opt/ibm/SCE24/skc -nosplash < /dev/null > /dev/null &
This starts the SmartCloud Entry server in the background and discards any output from the OSGI console. Even if the terminal window is closed, the server continues to run. See Chapter 11 of the IBM SmartCloud Entry Administrator Guide 2.4 for more information about these commands:
5.2 Deploying IBM SmartCloud Entry virtual appliance
SmartCloud Entry is also provided as a VMware virtual appliance. This virtual appliance is easier to install and manage than manually installing. Instead of installing as done in 5.1, “Installing IBM SmartCloud Entry” on page 142, the virtual appliance can be deployed using the Deployment Wizard:

Figure 5-1 IBM SmartCloud Entry Deploy/Configure: Specify file or URL of source
The summary of the virtual appliance is listed (Figure 5-2).
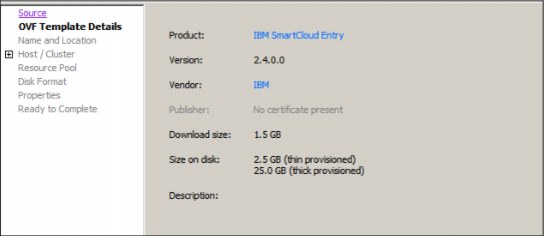
Figure 5-2 IBM SmartCloud Entry Deploy/Configure: OVF template details
2. The appliance has a default name of IBM SmartCloud Entry (Figure 5-3). If necessary, overwrite the name.

Figure 5-3 IBM SmartCloud Entry Deploy/Configure: Name and Inventory Location
3. The deployment wizard next asks for the data center that is to be used (Figure 5-4).

Figure 5-4 IBM SmartCloud Entry Deploy/Configure: Specific data center
4. In the data center, select a preferred host (Figure 5-5).
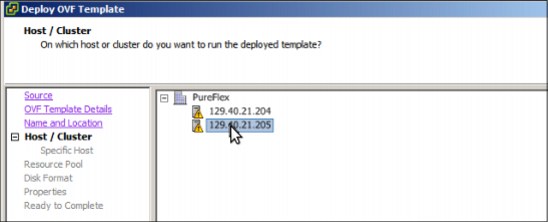
Figure 5-5 IBM SmartCloud Entry Deploy/Configure: Specific Host, IP address selected

Figure 5-6 IBM SmartCloud Entry Deploy/Configure: Storage
6. For this appliance, the thin provision disk format is applicable (Figure 5-7).
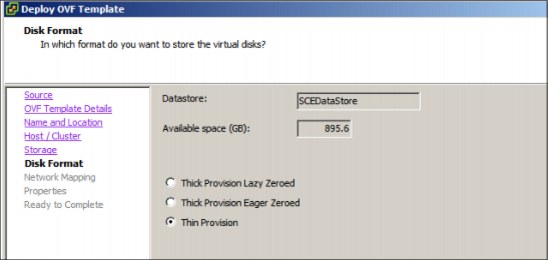
Figure 5-7 IBM SmartCloud Entry Deploy/Configure: Specify Disk Format
7. Select the appropriate VM network (Figure 5-8).

Figure 5-8 IBM SmartCloud Entry Deploy/Configure: Select the network

Figure 5-9 IBM SmartCloud Entry Deploy/Configure: Customize properties of a software solution
9. Verify the values in the summary window (Figure 5-10).

Figure 5-10 IBM SmartCloud Entry Deploy/Configure: Properties summary
5.3 Configuring cloud network pools
In 4.3, “Networking setup” on page 27, three VLANs were configured on the Power nodes. Similar VLANs are configured on the x86 nodes with VMware. SmartCloud Entry must be configured to set the proper information for each of the workload network configurations when deployed.
As the IBM SmartCloud Entry Administrator, log in and select the Network section of the configuration tab.
Figure 5-11 shows a Default Network Configuration option, has a single IP available to it, and is defined by default to enable deployment. To match the VLAN setup for this example, two new network configurations must be created. Click New Configuration.

Figure 5-11 IBM SmartCloud Entry: Administrator Network section
The New Network Configuration panel opens. In this panel, several items can be set, as Figure 5-12 shows. Specify the appropriate data, and save the network configuration.
|
Note: Cloud must be set to None so that more than one pool can use this configuration. The same is true for the Network ID being set to blank.
|

Figure 5-12 New Network Configuration
IBM SmartCloud Entry prompts you about whether the IP address should be added to the configuration (Figure 5-13). Click Yes.

Figure 5-13 Confirmation Prompt: Would you like to configure IP addresses
The IP address panel is displayed (Figure 5-14).

Figure 5-14 Requesting: Add IP Addresses for PureFlex Customer Network
New IPs can be added by clicking Add. A single IP can be added to the configuration or a range. When choosing to add a range, enter the appropriate start address and end address as Figure 5-15 shows. Click OK.

Figure 5-15 Add single IP Address or Range of Addresses
A message indicates that the IP address was added.
The network setup that is being used for this environment also has a private network that is used for the virtual machines that form the basis of the cloud services to communicate with each other. The network configuration setup for this private network is similar to the one described previously. Enter the appropriate data (Figure 5-16).

Figure 5-16 New network configuration
Add an IP address range (Figure 5-17),

Figure 5-17 Add an IP address range
Verify that the addresses were added correctly (Figure 5-18).

Figure 5-18 Summary of IP addresses
Now that both the private and the public network configurations are defined to IBM SmartCloud Entry, cloud pools can be added and the networks can be assigned to them.
5.4 Adding an x86 node based cloud
For IBM SmartCloud Entry to use the x86 nodes that have VMware installed on them, a new cloud configuration must be added. As the IBM SmartCloud Entry Administrator, click Clouds on the Configuration tab (Figure 5-19). Notice that no cloud configurations are defined by default. Click Add Cloud.

Figure 5-19 Selecting Clouds on Configuration tab
The Add Cloud Configuration panel opens (Figure 5-20).

Figure 5-20 Panel used to Add Cloud Configuration
For the VMware environment, use the vCenter Server that was installed in 4.7.5, “Deploy and configure VMware vCenter Server Appliance” on page 123. On this same panel set the following values:
•Type: Set to VMware.
•Host name: Set to the IP address or host name of the vCenter Server.
•Administrator ID: Set to the ID for vCenter Server administrator.
•Password: Set for the vCenter Server administrator's password.
After entering this information, a good approach is to test the connection and the parameters that were entered by clicking Test Connection (Figure 5-21).

Figure 5-21 Test connection
The notification to the administrator indicates that the test was successful (Figure 5-22). Click Add.

Figure 5-22 Test connection successful
The Certificate Information window opens (Figure 5-23). If the information is correct, click Accept Certificate.

Figure 5-23 Certificate Information
The cloud configuration is added successfully, as the message indicates and the you are returned to the Clouds sections of the Configuration tab (Figure 5-24).

Figure 5-24 Cloud Configuration Created Successfully
Notice that there are workloads automatically discovered (Figure 5-25). These workloads correspond to the virtual machines that were deployed earlier.

Figure 5-25 Workloads that correspond to deployed VM
5.5 Adding a Power node-based cloud
Similar to 5.4, “Adding an x86 node based cloud” on page 156, SmartCloud Entry must be configured to “talk to” the Flex Service Manager to deploy cloud services on Power nodes. The first step is to define the following values:
•Type: Set to VMControl.
•Version: Set to 2.4.1.x.
•Host name: Set to the IP address or host name of the FSM.
•Administrator ID: Set to the ID for FSM.
•Password: Set for the FSM.
After entering this information, a good approach is to test the parameters and the connection by clicking Test Connection (Figure 5-26). As with the x86, click Add.

Figure 5-26 Add Cloud Configuration
Click Accept Certificate (Figure 5-27).

Figure 5-27 Certificate Information
The new workload (Figure 5-28) that is automatically discovered is the AIX workload that was captured in 4.6.7, “Capture virtual server” on page 89.

Figure 5-28 New workload: Automatically discovered
5.6 Enable email notifications
The notifications that SmartCloud Entry provides for various events can be sent to users and administrators as email messages. This allows administrators to monitor asynchronous events as they happen and not have to constantly poll the system to see what events warrant their attention.
To enable this functionality, a SMTP relay host must be set. Setting up a relay host is outside the scope of this book.
Complete the following steps:
1. Log in to the command line interface of the host that has IBM SmartCloud Entry installed, or the virtual appliance:
[email protected]'s password:
2. Edit the email.properties file:
IBM-SCE> vi ~/.SCE24/email.properties
3. Look for the following commented line:
#com.ibm.cfs.email.relay.host=email.server.com
4. Edit the line as follows:
a. Remove the pound sign (#) so that the line is now uncommented.
b. Update with the appropriate server information. The line now reads as follows:
com.ibm.cfs.email.relay.host=smtpserver.cloud.private.com
5. Save the file and restart IBM SmartCloud Entry; the output with the command is as follows:
IBM-SCE> /etc/init.d/sce restart
Stopping IBMSmartCloud Entry: [ OK ]
Starting IBMSmartCloud Entry: [ OK ]
IBM-SCE>
5.7 Enable and configure billing
IBM SmartCloud Entry supports a metering system that allows to assign billing information to the resources that are provided by the Flex based environment. Currently, the following characteristics of the cloud services can be associated with the billing system.
•Processor
•Memory
•Disks
By default, SmartCloud Entry billing is disabled. This means that no references to Accounts are listed on the Access Menu when the Access tab is selected, as shown in Figure 5-29.

Figure 5-29 Access menu with billing disabled
If billing functionality is required, it must be enabled in the properties file, which is in the following location in the configuration directory:
~/.SCE24/billing.properties
To enable billing, edit the billing.properties file as follows:
1. Open the file and look for the following line:
com.ibm.cfs.billing.enabled=false
2. Edit the line so the value is set to true:
com.ibm.cfs.billing.enabled=true
After enabling billing, a new subtab (Accounts) is now available on the left side of the Access tab of the IBM SmartCloud Entry portal as shown in Figure 5-30.

Figure 5-30 Access menu with billing enabled
Click the new Accounts subtab in the Access Menu. Two choices are now available in the form of New Account and Delete Account. To add a new account, click New Account.
The New Account dialog panel opens (Figure 5-31).

Figure 5-31 New Account dialog
Use this New Account dialog to set the default information for this account. This information includes the account owner and the account members. When a bill becomes due, the account owner will be emailed with the bill contents.
The starting amount of credits and the low balance threshold are also set here. Figure 5-32 shows an example of creating a new account with a starting balance of $100, a low balance threshold of $10, and only one account member. Click Create.

Figure 5-32 New Account starting balance and low threshold
The account is established and you, as the administrator, are notified, (Figure 5-33).

Figure 5-33 New Account has been created
When modifying billing information for these accounts becomes necessary, a similar set of panels can be used. Simply click the name of the account to be modified.
When an account balance reaches the threshold set, the account members are notified by email that their accounts are delinquent. Figure 5-34 shows that account number 2551 is overdrawn. The default delinquency policy shuts down all workloads associated with this account.

Figure 5-34 Delinquent account email
5.8 Creating users
To create a new user, completing the following steps:
1. Log in as SmartCloud Entry Administrator.

Figure 5-35 Log in to IBM SmartCloud Entry
2. Navigate to the Access menu (using Access tab) in the IBM SmartCloud Entry interface, click Users, and then click New User (Figure 5-36).

Figure 5-36 Specifying new user
3. Provide requested user information. Figure 5-37 and Figure 5-38 on page 167 provide before-and-after views of the New User panel. The information provided indicates a request for the creation of a user with the following attributes:
– User ID: [email protected]
– Name: SCE_User02
– Email: [email protected]
– Password: passW0rd

Figure 5-37 Enter new user specifications

Figure 5-38 New user information provided
A summary panel shows the list of currently defined users (Figure 5-39). Additional new users may be added by clicking New User and repeating the previous steps.

Figure 5-39 New user has been created
5.9 Creating projects
To create a new project, the basic steps are as follows:
1. Log in as SmartCloud Entry Administrator.

Figure 5-40 Projects Panel with New Project as a choice
3. The New Project panel opens (Figure 5-41). Enter the name and description of the project to be created. Click Create.

Figure 5-41 Provide new project description
A new project is created; it is listed on the Projects panel (Figure 5-42). Note the Created project SCE_Project_001 message. On the actual panel, a green icon with a white check mark is displayed to the left of the message near the top of the panel.

Figure 5-42 New project created
5.10 Adding users to projects
To add a user to a project, complete the following steps:
1. Log in as SmartCloud Entry Administrator.
2. As shown in Figure 5-43, select Access Tab → Projects and then select the SCE_Project_001 project name (the project created in 5.9, “Creating projects” on page 168) to which new users are to be added (or continuing on from Figure 5-42, select the project that new members are to be added to). Then, expand the Project Members section (if not already expanded) and click Add.

Figure 5-43 Select project
3. The Add Project Members - SCE_Project_001 panel is displayed (Figure 5-44). On this panel, in the Project role, select User from the drop-down list and select one or more names of the users to be added as Project Members from the prepopulated list. Click OK.

Figure 5-44 Add Project Members pop-up
The newly added member (or members) of the project is listed in the Project Members section of the project. Review the information. Note the message Project members updated successfully for project SCE_Project_001, near the top of the Access panel (Figure 5-45).

Figure 5-45 Newly added members
5.11 Adding members to accounts
To add users as project members, complete the following steps:
1. Log in as SmartCloud Entry Administrator

Figure 5-46 Selected SCE_Flex_Account
3. To add users to the Account Members list, click in the Account members field, which will then display Add and Remove buttons with a list of Available users to the left and current Account Members listed to the right (Figure 5-47).

Figure 5-47 Display available users and account members
4. To add an available user, click the user name from the list of available users, and then click Add. The selected name moves into the list of account members (Figure 5-48). To remove a user from the list of account members, simply select a user from that list and click Remove. The selected name moves back to the Available users.

Figure 5-48 Add user to Account members list
5. When all of the appropriate users are added to (or removed from) the Account members list, click Save. The account summary view is displayed (Figure 5-49); it includes the resulting account members list.

Figure 5-49 Account summary view
5.12 Configure approvals
Approvals allow a SmartCloud Entry Administrator to control how the services in a cloud are used. To enable approvals for a project, complete the following steps:
1. Select the project in the Access tab of the SmartCloud Entry user interface (Figure 5-50).

Figure 5-50 Select a project
2. After the panel loads, expand the Approval Policies widget. Notice that the project will use the default approval policies associated with the cloud.
As the SmartCloud Entry administrator, you can override the default cloud approval settings by using the check boxes. To do this, select Customize Settings.
For this example, all events require approvals, as selected in Figure 5-51. After making the selections, click Save to finalize the changes to the project.

Figure 5-51 Customizing settings
The policies have been updated (Figure 5-52).
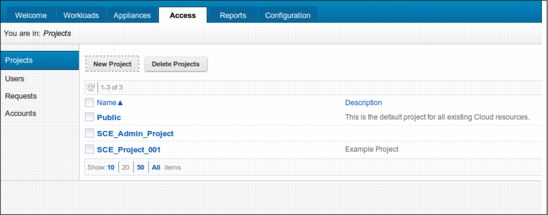
Figure 5-52 List of stored projects
3. Now that the project has the appropriate policies attached, an appliance can be assigned to the project. In the Appliances tab (Figure 5-53), select the appliance to be added to the project with the new approval policies.
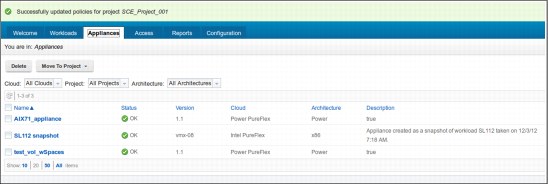
Figure 5-53 Viewing list of appliances on appliance tab
For instance, in Figure 5-54, the AIX71_appliance is moved to project SCE_Project_001. Recall (from 5.8, “Creating users” on page 165) that SCE_Project_001 has two users assigned to it: SCE_User01 and SCE_User02.

Figure 5-54 Choosing Move Appliances to Project
To show the request and approval mechanisms, Figure 5-55 shows user SCE_User01's attempt to request a workload. After user one logs in, the main welcome page opens.

Figure 5-55 Welcome to IBM SmartCloud Entry
4. This window might differ from previous windows in this chapter because SCE_User01 has the role of a regular user rather than an administrator. Again select the Appliances tab (Figure 5-56).

Figure 5-56 Appliance tab
The appliance deployment can be requested. Figure 5-57 shows the requested settings for a new appliance deployment named AIX Deploy 003.

Figure 5-57 Appliance tab: Deploy Appliance
Figure 5-58 shows the notification that the request is being held for approval.

Figure 5-58 Appliance tab
The SmartCloud Entry Administrator will be notified that there is a pending request. Figure 5-59 shows the email that was sent for the AIX Deploy 003 request.
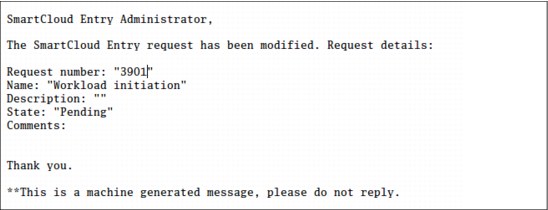
Figure 5-59 Generated email example: Notifies SmartCloud Entry Administrator
The SmartCloud Entry Administrator can then log into the user interface and go the Request Section of the Access tab. Figure 5-60 shows SCE_User01's request (3901) for the AIX Deploy 003 resource. The administrator can approve or reject the request.

Figure 5-60 Access Tab: Approve button
In Figure 5-61, the administrator approves the request.

Figure 5-61 A request ready to be approved
The administrator is notified that the request approval was successful (Figure 5-62).

Figure 5-62 Request has been approved
SCE_User01 is then sent an email to indicate the request was approved (Figure 5-63).

Figure 5-63 User received mail when request has been approved.
SmartCloud Entry begins the deployment after the administrator approves the request. When the deployment is successful, the user is notified and given the important information about the requested appliance (Figure 5-64).

Figure 5-64 User receives email when deployment has been successfully provisioned on the Cloud
The other events that require approval have a similar flow.
5.13 Configure metering
By default, IBM SmartCloud Entry metering is disabled. To enable metering, edit the ~/.SCE24/metering.properties file as follows:
1. Look for the following line:
com.ibm.cfs.metering.enabled=false
2. Change the value from false to true:
com.ibm.cfs.metering.enabled=true
After the changes are made, IBM SmartCloud Entry must be restarted. For an example of a usage metering report, see Figure 3-3 on page 16.
..................Content has been hidden....................
You can't read the all page of ebook, please click here login for view all page.