
High-Level API
Now that you know the basics of the MIDlet's life cycle and general display model, we can start to look deeper into the lcdui package. We will start with another subclass of Screen: Alert. Then we will discuss some simple Items like StringItem and ImageItem. We will explain the use of more advanced Items such as TextField and ChoiceGroup by creating a simple TeleTransfer example application. As we introduce new MIDP high-level UI capabilities like other Screen subclasses, we will extend the TeleTransfer sample step by step.
Alerts
You already know the Form class from the first example. The simplest subclass of Screen is Alert. Alert provides a mechanism to show a dialog for a limited period of time. It consists of a label, text, and an optional Image. Furthermore, it is possible to set a period of time the Alert will be displayed before another Screen is shown. Alternatively, an Alert can be shown until the user confirms it. If the Alert does not fit on the screen and scrolling is necessary to view it entire contents, the time limit is disabled automatically.
The following code snippet creates an Alert with the title “HelloAlert” and displays it until it is confirmed by the user:
Alert alert = new Alert ("HelloAlert");
alert.setTimeout (Alert.FOREVER);
display.setCurrent (alert);
Forms and Items
The most important subclass of Screen is the class Form. A Form can hold any number of Items such as StringItems, TextFields, and ChoiceGroups. Items can be added to the Form using the append() method.
The Item class itself is an abstract base class that cannot be instantiated. It provides a label that is a common property of all subclasses. The label can be set and queried using the setLabel()and getLabel() methods, respectively. The label is optional, and a null value indicates that the item does not have a label. However, several widgets switch to separate screens for user interaction, where the label is used as the title of the screen. In order to allow the user to keep track of the program state, it is recommended that you provide a label at least for interactive items.
Items can neither be placed freely nor can their size be set explicitly. Unfortunately, it is not possible to implement Item subclasses with a custom appearance. The Form handles layout and scrolling automatically. Table 3.1 provides an overview of all Items available in MIDP.
StringItem
StringItems are simple read-only text elements that are initialized with the label and a text String parameter only. The following code snippet shows the creation of a simple version label. After creation, the label is added to the main form in the constructor of the HelloMidp application:
public HelloMidp () {
    mainForm = new Form ("HelloMidp");
    StringItem versionItem = new StringItem ("Version: ", "1.0");
    mainForm.append (versionItem);
}
The label of the StringItem can be accessed using the setLabel() and getLabel() methods inherited from Item. To access the text, you can use the methods setText() and getText().
ImageItem
Similar to the StringItem, the ImageItem is a plain non-interactive Item. In addition to the label, the ImageItem constructor takes an Image object, a layout parameter, and an alternative text string that is displayed when the device is not able to display the image. The image given to the constructor must be non-mutable. All images loaded from the MIDlet suite's JAR file are not mutable.
The difference between mutable and non-mutable Images is described in more detail in the section about Images in this chapter. For now, we will treat the Image class as a “black box” that has a string constructor that denotes the location of the image in the JAR file. Please note that Image construction from a JAR file throws an IOException if the image cannot be loaded for some reason. The layout parameter is one of the integer constants listed in Table 3.2, where the newline constants can be combined with the horizontal alignment constants.
| Constant | Value |
|---|---|
| LAYOUT_CENTER | The image is centered horizontally. |
| LAYOUT_DEFAULT | A device-dependent default formatting is applied to the image. |
| LAYOUT_LEFT | The image is left-aligned. |
| LAYOUT_NEWLINE_AFTER | A new line will be started after the image is drawn. |
| LAYOUT_NEWLINE_BEFORE | A new line will be started before the image is drawn. |
| LAYOUT_RIGHT | The image is aligned to the right. |
The following code snippet shows how a center aligned ImageItem is added to the HelloMidp sample MIDlet:
public HelloMidp () {
    display = Display.getDisplay (this);
    mainForm = new Form ("HelloMidp");
     try {
        ImageItem logo = new ImageItem
            ("Copyright: ", Image.createImage ("/mcp.png"),
             ImageItem.LAYOUT_CENTER | ImageItem.LAYOUT_NEWLINE_BEFORE
             | ImageItem.LAYOUT_NEWLINE_AFTER, "Macmillian USA");

          mainForm.append (logo);
    }
    catch (IOException e) {
        mainForm.append (new StringItem
            ("Copyright", "Sams Publishing; Image not available:" + e));
    }
}
By forcing a new line before and after the image, you ensure that the image is centered in its own line. Figure 3.3 shows the corresponding display on the device. If the image cannot be loaded and an exception is thrown, a simple StringItem is appended to the form instead of the image.
Figure 3.3. The HelloMidp application showing an ImageItem.

Handling Textual Input in TextFields
As shown in Table 3.1, textual input is handled by the class TextField. The constructor of TextField takes four values: a label, initial text, a maximum text size, and constraints that indicate the type of input allowed. In addition to avoiding input of illegal characters, the constraints may also influence the keyboard mode. Several MIDP devices have a numeric keyboard only, and the constraints allow the application manager to switch the key assignments accordingly. The constants listed in Table 3.3, declared in the class TextField, are valid constraint values.
| Constant | Value |
|---|---|
| ANY | Allows any text to be added. |
| EMAILADDR | Adds a valid e-mail address, for instance [email protected]. |
| NUMERIC | Allows integer values. |
| PASSWORD | Lets the user enter a password, where the entered text is masked. |
| PHONENUMBER | Lets the user enter a phone number. |
| URL | Allows a valid URL. |
We will now show the usage of TextFields by creating a simple example Form for bank transfers. A bank transfer form contains at least the amount of money to be transferred and the name of the receiver.
To start the implementation of the TeleTransfer MIDlet, you first need to import the two packages containing the midlet and lcdui classes:
import javax.microedition.midlet.*;
import javax.microedition.lcdui.*;
Every MID application is derived from MIDlet, so you need to extend the MIDlet class, too:
public class TeleTransfer extends MIDlet {
Because you want to create a Form that contains Items for entering the transfer information, you need a corresponding member variable mainForm. You can already initialize the variable at its declaration because it has no dependencies from constructor parameters:
Form mainForm = new Form ("TeleTransfer");
In order to let the user enter the transfer information, add TextFields for the name of the receiver for entering the amount to be transferred. Because of the lack of floating-point values in the CLDC, the numeric TextFields in MIDP can hold integer values only. So you need to split the amount into separate fields for dollars and cents. An alternative would be to use an alphanumeric field and parse the string into two separate values. However, this may result in switching the keyboard to alpha mode on cell phones, making numeric input unnecessarily complicated. In this case, you'll limit the size of possible values to five digits for the whole dollar part and two digits for the fractional cent part. Again, you initialize the variables where they are declared:
TextField receiverName = new TextField
    ("Receiver Name", "", 20, TextField.ANY);
TextField receiverAccount = new TextField
    ("Receiver Account#", "", 12, TextField.NUMERIC);
TextField amountWhole = new TextField ("Dollar", "", 6, TextField.NUMERIC);
TextField amountFraction = new TextField ("Cent", "", 2, TextField.NUMERIC);
Finally, you add a variable storing the Display instance for your application:
Display display = Display.getDisplay (this);
Now you can add the constructor to your application where you added the previous TextFields to the main form:
public TeleTransfer () {
    mainForm.append (receiverName);
    mainForm.append (receiverAccount);
    mainForm.append (amountWhole);
    mainForm.append (amountFraction);
}
When the application is started, you request the display to show your money transfer form by calling setCurrent(). As explained in the “MIDlets” section, the application manager notifies you about the application start by calling the startApp() method. So you implement this method accordingly:
public void startApp () {
    display.setCurrent (mainForm);
}
Please note that startApp() is called also when the MIDlet resumes from the paused state, so you cannot move the initialization code from the constructor to this method.
Both pauseApp() and destroyApp() are declared as abstract in the MIDlet class, so you need to implement these methods in your application, even if you do not have real content for them. You just provide empty implementations, like in the HelloMidp example in the first section:
public void pauseApp () {
}

public void destroyApp (boolean unconditional) {
}
Selecting Elements Using ChoiceGroups
In the previous section, you created a simple to enter information for transferring money between two accounts. Now you will extend the application to allow the user to select different currencies. For this purpose, you will now add a ChoiceGroup to your application.
The ChoiceGroup is an MIDP UI widget enabling the user to choose between different elements in a Form. These elements consist of simple Strings, but can display an optional image per element as well. ChoiceGroups can be of two different types. Corresponding type constants are defined in the Choice interface. These constants are used in the List class as well; the List class allows an additional third type. The three type constants are listed in Table 3.4.
The ChoiceGroup constructor requires at least a label and a type value. Additionally, a String array and an Image array containing the elements can be passed to the constructor. Elements can also be added dynamically using the append() method. The append() method has two parameters, a String for the label and an Image. In both cases, the image parameter may be null if no images are desired.
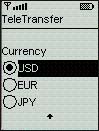
In order to add a ChoiceGroup to the TeleTransfer application, you introduce a new variable currency of type ChoiceGroup. By setting the type to EXCLUSIVE, you get a ChoiceGroup where only one item can be selected at a time. You directly add elements for the United States (USD), the European Union (EUR), and Japan (JPY) by passing a String array created inline. The ChoiceGroup enables the user to choose between three currencies that are represented textually by the abbreviations specified in the String array. The last parameter of the constructor is set to null because you do not want Images to be displayed at this time:
ChoiceGroup currency = new ChoiceGroup
    ("Currency", Choice.EXCLUSIVE,
new String[] {"USD", "EUR", "JPY"} , null);
You still need to add the currency ChoiceGroup to your main Form. As for the text fields, this is done via the append() method of Form:
mainForm.append (currency);
Figure 3.4 shows the TeleTransfer application extended to choose a currency using a ChoiceGroup.
Figure 3.4. The TeleTransfer MIDlet extended to enable the user to choose a currency.
Receiving Changes from Interactive UI Items
If you run the new version of the TeleTransfer MIDlet, you can change the currency using the ChoiceGroup, but the TextField labels for Dollar and Cent are not changed accordingly. You need a way to notify the application if a selection is made in the currency ChoiceGroup.
Receiving changes of interactive high-level UI items in MIDP is based on a listener model similar to AWT. Classes implementing the ItemStateListener interface are able to receive notifications for the following events:
State changes of a ChoiceGroup
Value adjustments of an interactive Gauge
TextField value changes
DateField changes
The events are sent to the method itemStateChanged() of the ItemStateListener, where the item that has changed is given as a parameter. In order to actually receive these events, the ItemStateChangeListener must be registered using the setItemStateListener() method of the corresponding Form.
Now that you know about item state change events, you can add the desired functionality to your TeleTransfer MIDlet. First, you need to add the ItemStateListener interface to the class declaration:
public class TeleTransfer extends MIDlet implements ItemStateListener {
You also need to implement a corresponding itemStateChanged() method. Since the itemStateChanged() method is called for changes of all Items in the Form, you need to check the item parameter indicating the event source first. If the source of the event is the currency ChoiceGroup, you set the labels of the amount and fraction TextFields correspondingly:
public void itemStateChanged (Item item) {
    if (item == currency) {
        int index = currency.getSelectedIndex ();
        switch (index) {
        case 0: amountWhole.setLabel ("Dollar");
                 amountFraction.setLabel ("Cent");
                 break;
        case 1: amountWhole.setLabel ("Euro");
                amountFraction.setLabel ("Cent");
                 break;
        case 2: amountWhole.setLabel ("Yen");
                amountFraction.setLabel ("Sen");
            }
        }
    }
Just adding the interface and implementing the corresponding methods is not sufficient to enable the MIDlet to receive state changes. Additionally, you need to register your ItemStateListener at the Form containing the currency item. You do so by calling the setItemStateListener() method in the TeleTransfer constructor:
public TeleTransfer () {
    mainForm.append (senderAccount);
    ...
    mainForm.append (currency);
    mainForm.setItemStateListener (this);
}
Figure 3.5 shows the new version of the TeleTransfer example, where the labels are changed depending on the state of the currency ChoiceGroup.
Figure 3.5. The TeleTransfer MIDlet extended to change the labels depending on the state of the currency ChoiceGroup.

Using Commands for User Interaction
Now you can enter all the information required for a telegraphic transfer, but you have no means to initiate the actual transfer.
In contrast to desktop computers, which have plenty of screen space for displaying buttons or menus, a different approach is necessary for mobile devices. Some devices provide so-called soft buttons, which are buttons without fixed functionality that are assigned dynamically depending on the application context. The number of soft buttons may vary if they are available. Other mobile devices do not even have space for soft buttons, but provide scrolling menus. MIDP needs to abstract from the concrete device and to provide a mechanism that is suitable for all devices, independent of the availability and number of soft buttons. Thus, the lcdui package does not provide buttons or menus, but an abstraction called Command.
Commands can be added to all classes derived from the Displayable class. These classes are Screen and its subclasses such as Form, List, and TextBox for the high-level API and Canvas for the low-level API.
No positioning or layout information is passed to the Command—the Displayable class itself is completely responsible for arranging the visible components corresponding to Commands on a concrete device. The only layout and display information that can be assigned to a Command except from the command label is semantic information. The semantic information consists of a type and a priority. The priority allows the device to decide which commands are displayed as soft buttons if the number of commands exceeds the number of soft buttons available. For additional commands not displayed as soft buttons, a separate menu is created automatically. The type information is an additional hint for the device about how to display the command. For example, if the Exit command is always assigned to the leftmost soft button in native applications of a certain device type, the MIDP implementation is able to make the same assignment. Thus, a consistent look and feel can be accomplished for a device.
The available command type constants are listed in Table 3.5.
| Constant | Value |
|---|---|
| Command.BACK | Used for navigation commands that are used to return the user to the previous Screen. |
| Command.CANCEL | Needed to notify the screen that a negative answer occurred. |
| Command.EXIT | Used to specify a Command for exiting the application. |
| Command.HELP | Passed when the application requests a help screen. |
| Command.ITEM | A command type to tell the application that it is appended to an explicit item on the screen. |
| Command.OK | Needed to notify the screen that a positive answer occurred. |
| Command.SCREEN | A type that specifies a screen-specific Command of the application. |
| Command.STOP | Interrupts a procedure that is currently running. |
The Command constructor takes the label, the command type and the priority as input. The Command class provides read() methods for all these fields, but it is not possible to change the parameters after creation. Using the addCommand() method, commands can be added to a Form or any other subclass of Displayable.
As in the case of receiving state changes of UI widgets, the MIDP uses a listener model for detecting command actions. For this purpose, the lcdui package contains the interface CommandListener. A CommandListener can be registered to any Displayable class using the setCommandListener method. After registration, the method commandAction() of the Commandlistener is invoked whenever the user issues a Command. In contrast to AWT, only one listener is allowed for each Displayable class. The commandAction() callback method provides the Displayable class where the command was issued and the corresponding Command object as parameters.
With this information, you can extend your TeleTransfer application with the desired Commands. But before going into actual command implementation, you need to add some corresponding functionality. You'll add three commands: a Send command, a Clear command, and an Exit command. For Clear, you just add a method setting the content of the fields of your form to empty strings:
public void clear () {
  receiverName.setString ("");
  receiverAccount.setString ("");
  amountWhole.setString ("");
  amountFraction.setString ("");
}
The Send command is a bit more difficult since you do not yet have the background to really submit information over the network. (Network connections will be handled in Chapter 6, “Networking: The Generic Connection Framework.”) So you just display the content to be transmitted in an alert screen as a temporary replacement:
public void send () {
    Alert alert = new Alert ("Send");
    alert.setString ("transfer " + amountWhole.getString ()
                     + "." + amountFraction.getString () + " "
                     + amountWhole.getLabel ()
                     + "
to Acc#" + receiverAccount.getString ()
                     + "
of " + receiverName.getString ());
    alert.setTimeout (2000);
    display.setCurrent (alert);
    clear ();
}
For leaving the application, the MIDlet already provides the notifyDestroyed() method, so you do not need to add anything here.
Now that you have implemented the corresponding functionality, the next step is to add the actual Command objects to your application class:
static final Command sendCommand = new Command ("Send", Command.SCREEN, 1);
static final Command clearCommand = new Command ("Clear", Command.SCREEN, 2);
static final Command exitCommand = new Command ("Exit", Command.EXIT, 2);
In order to enable the MIDlet to receive command actions, you need to implement the CommandListener interface, and the corresponding commandAction() method. Depending on the command received, you call send(), clear(), or notifyDestroyed():
public class TeleTransfer extends MIDlet
    implements ItemStateListener, CommandListener {

public void commandAction (Command c, Displayable d) {
    if (c == exitCommand) {
        notifyDestroyed();
    }
    else if (c == sendCommand) {
        send ();
    }
    else if (c == clearCommand) {
        clear ();
    }
}
With these modifications, your TeleTransfer MIDlet is able to handle the desired commands. You still need to add the Commands to the Form, and register the TeleTransfer MIDlet as a CommandListener in order to actually receive the commands:
public TeleTransfer () {
    ...
    mainForm.addCommand (sendCommand);
    mainForm.addCommand (clearCommand);
    mainForm.addCommand (exitCommand);
    mainForm.setCommandListener (this);
}
Figure 3.6 shows the Send Alert of the new version of your TeleTransfer application.
Figure 3.6. The TeleTransfer MIDlet showing an alert that displays the transfer information as a summary before sending.

Further Item Classes: Gauge and DateField
Now you have used all the Item subclasses except Gauge and DateField. Both classes are specialized input elements, where the Gauge may also make sense as a pure read-only information item.
The Gauge item visualizes an integer value by displaying a horizontal bar. It is initialized with a label, a flag indicating whether it is interactive, and a maximum and an initial value. If a Gauge is interactive, the user is allowed to change the value using a device-dependent input method. Changes to the gauge value will cause ItemEvents if a corresponding listener is registered to the form.
The following code snippet shows the construction of a non-interactive Gauge labeled Progress that is initialized with a value of 0 and a maximum of 100:
Gauge gauge = new Gauge ("Progress", false, 0, 100);
If a Gauge is used to display progress of a process that takes a longer amount of time, you should also add a corresponding Stop command to the form to abort the progress.
The current value of the Gauge can be set using the method setValue() and read using the method getValue(). Analogous setMaxValue() and getMaxValue() methods let you access the maximum value of the Gauge.
The DateField is a specialized widget for entering date and time information in a simple way. It can be used to enter a date, a time, or both types of information at once. The appearance of the DateField is specified using three possible input mode constants in the constructor. Possible DateField mode constants are listed in Table 3.6.
The DateField has two constructors in which a label and the mode can be specified. Using the second constructor, an additional TimeZone can be passed. The following code snippet shows how a DateField for entering the date of birth can be initialized:
DateField dateOfBirth = new DateField ("Date of birth:", DateField.DATE);
After you enter the date into the DateField, it can be accessed using the getDate() method. The DateField offers some additional methods for getting information about the input mode and methods for setting the date and the input mode as well. The concrete usage of the DateField is shown in Chapter 9 in the Blood Sugar Log application.
Further Screen Classes: List and TextBox
The current version of the TeleTransfer MIDlet shows how to use the Form and the corresponding items available in the lcdui package. The application consists of one main form that holds all application widgets. However, your main form is rather long now, so the question arises how to improve the usability of the application. This section shows how to structure the user interface by using multiple screens and introduces the List and TextBox classes.
The List Class
One possibility to clean up the user interface is to move the currency selection to a separate screen. It takes a lot of space and may need even more room if additional options are added. Also, you can assume that the currency is not changed very often.
You could create a new Form and just move the ChoiceGroup there. However, lcdui provides a special List class inherited from Screen for this purpose. The advantage of the List class is that it provides the IMPLICIT mode that was already mentioned in the section “Selecting Elements Using ChoiceGroups.” Using the IMPLICIT mode, the application gets immediate notification when an item is selected. Whenever an element in the List is selected, a Command of the type List.SELECT_COMMAND is issued. As in the ChoiceGroup, the elements consist of Strings and optional Images.
For initializing the List, the lcdui packages offers constructors. The constructors work like the ChoiceGroup constructors. The first one creates an empty List with a given title and type only. The second one takes the title, the type, an array of Strings as initial amount of List elements, and an optional array of Images for each List element. In the implementation of the TeleTransfer application, you implement a new class CurrencyList extending List that will be used as your new currency selector. Since you will use the IMPLICIT mode, you need to implement a command listener, so you can already add the corresponding declaration:
public class CurrencyList extends List implements CommandListener {
To set the labels of the main form TextFields according to the index of the selected element in the CurrencyList, you create two String arrays, CURRENCY_NAMES and CURRENCY_FRACTIONS:
static final String [] CURRENCY_NAMES = {"Dollar", "Euro", "Yen"} ;
static final String [] CURRENCY_FRACTIONS = {"Cent", "Cent", "Sen"} ;
In order to set the labels of the main forms TextFields for the whole and the fractional amount according to the selected currency in the CurrencyList, you need a reference back to the main TeleTransfer MIDlet. For this reason, you store the TeleTransfer reference in a variable called teleTransfer. The reference is set in the constructor of your CurrencyList:
TeleTransfer teleTransfer;
In the constructor, you also add currency symbol images to the list. You need to load them, but the call to the super constructor must be the first statement in a constructor. So you call the constructor of the super class by specifying the title and type only. Then you create the Images needed for each list element, which are stored in the MIDlet suite's JAR file. You also call setCommandListener() to register the currency list for handling commands that are issued:
public CurrencyList (TeleTransfer teletransfer) {
    super ("Select Currency", Choice.IMPLICIT);

    this.teleTransfer = teletransfer;

    try {
        append ("USD", Image.createImage ("/Dollar.png"));
        append ("EUR", Image.createImage ("/Euro.png"));
        append ("JPY",  Image.createImage ("/Yen.png"));
    }
    catch (java.io.IOException x) {
        throw new RuntimeException ("Images not found");
    }
    setCommandListener (this);
}
The final step in creating the CurrencyList is to implement the commandAction() method of the CommandListener interface. As you already know, a List of IMPLICIT type issues a List.SELECT_COMMAND to the registered CommandListener whenever a new element is selected to indicate the selection change. In case of a selection change, you modify the labels of the main form TextFields. The actual labels are obtained from the String arrays CURRENCY_NAMES and CURRENCY_FRACTIONS. Using the teleTransfer reference, you can access the TextFields. Finally, you call the new method teleTransfer.back(), which sets the screen back to the main form (the back() method will be given at the end of this section):
    public void commandAction (Command c, Displayable d) {
        if (c == List.SELECT_COMMAND) {
            teleTransfer.amountWhole.setLabel
                (CURRENCY_NAMES [getSelectedIndex ()]);
            teleTransfer.amountFraction.setLabel
                (CURRENCY_FRACTIONS [getSelectedIndex ()]);
            teleTransfer.back ();
        }
    }
}
Figure 3.7 shows currency Images and abbreviations in the CurrencyList.
Figure 3.7. The new CurrencyList.

The TextBox Class
Beneath Alert, List, and Form, there is only one further subclass of Screen: the TextBox. The TextBox allows the user to enter multi-line text on a separate screen. The constructor parameters and the constraint constants are identical to those of TextField.
As for the currency list, you can also add a new screen enabling the user to enter a transfer reason if desired. Similar to the CurrencyList, you implement a new class handling the commands related to the new screen. However, this time it is derived from the TextBox. Again, you implement the CommandListener interface:
public class TransferReason extends TextBox implements CommandListener {
In the TextBox, you provide two commands, okCommand for applying the entered text and clearCommand for clearing the text:
static final Command okCommand = new Command ("OK", Command.BACK, 1);
static final Command clearCommand = new Command ("Clear", Command.SCREEN, 2);
Again, you store a reference back to the TeleTransfer MIDlet in the TransferReason TextBox:
TeleTransfer teleTransfer;
The constructor gets the reference back to TeleTransfer MIDlet and stores it in the variable declared previously. You also add the commands to the TextBox, and register it as CommandListener:
public TransferReason (TeleTransfer teleTransfer) {
    super ("Transfer Reason", "", 50, TextField.ANY);
    this.teleTransfer = teleTransfer;

    addCommand (okCommand);
    addCommand (clearCommand);
    setCommandListener (this);
}
Your commandAction() implementation clears the text or returns to the main screen, depending on the Command selected:
    public void commandAction (Command c, Displayable d) {
        if (c == clearCommand) {
            setString ("");
        }
        else if (c == okCommand) {
            teleTransfer.back ();
        }
    }
}
Figure 3.8 shows the TransferReason TextBox.

TeleTransfer with Multiple Screens
Now you have created two additional screens, but you still need to integrate them in your main application. To do so, you need to change the TeleTransfer implementation somewhat. Since the TeleTransfer's ChoiceGroup for selecting the currency is replaced by the CurrencyList, you do not need the ItemStateListener for detecting item changes any more. So you remove the listener and also the corresponding callback method itemStateChanged(). To display the two new Screens CurrencyList and TransferReason, you implement the two commands currencyCommand and reasonCommand. The new commands are added to the MIDlet in the constructor using the addCommand() method. In the clear() method, the new TextBox is also cleared by calling the corresponding setString() method. Finally you add the back() method to the TeleTransfer application; this method is called from the new Screens to return to the main form. The commandAction() method is extended to handle the new commands, displaying the new Screens. Listing 3.1 shows the complete source code of the final version of the TeleTransfer application.