Chapter 9. .NET and Mobile Devices
The increased use by employees of devices other than traditional PCs and laptops, such as personal digital assistants (PDAs) and web-enabled phones, has increased pressure on corporate IT departments to open corporate databases and intranets to a range of non-standard devices. The explosion in use of these devices, and the proliferation of embedded systems and specialized network protocols, has made it important for developers to design their applications in ways that keep it independent of the clients that will access it.
.NET embraces mobile device users and offers developers tools to meet their needs in two ways:
- ASP.NET Mobile Controls
Mobile Controls are web server controls that dynamically generate code that renders web content appropriately on devices such as web-enabled phones and PDAs as well as traditional web browsers.
- .NET Compact Framework
The .NET Compact Framework is a version of the .NET Platform that runs on Windows CE or Pocket PC mobile devices and can be used to develop clients and applications that run on the devices themselves.
Both ASP.NET Mobile Controls and the .NET Compact Framework are supported by Visual Studio .NET 2003.[1]
ASP.NET Mobile Controls
ASP.NET Mobile Controls are special Web Controls that run on the web server and render the appropriate web content targeting a wide array of mobile devices such as mobile phones using Wireless Markup Language (WML) via Wireless Application Protocol (WAP) to PDAs such as Pocket PC, Palm Pilot, and so on. The web server receives requests from the web browsers on the mobile devices just the same as it would receive requests from a full-fledged browser; however, the Mobile Controls on these specialized web pages know how to render the content based on the capability of the requesting web browsers. For example, if the request came from a WML-capable mobile phone, the Mobile Controls would render WML. If the request came from a Pocket PC web browser, the Mobile Controls would render HTML.
System.Web.UI.MobileControls namespace
In the same way that the System.Web.UI.WebControls
namespace provides classes for building web pages that can be
rendered by traditional web browsers, the
MobileControls namespace include classes that for
constructing web pages that will be rendered by mobile devices.
Instead of the Page class discussed in Chapter 7, for
example, the MobileControls namespace provides a
MobilePage class. MobilePage is
the base class to all mobile device Web Forms and derives class from
the ASP.NET Page class. All ASP.NET Mobile Controls derive from the
MobileControl base class, which derives from the
corresponding ASP.NET Control class.
Here, you also have the choice to use the stock controls provided to you similar to ASP.NET Web Controls and Html Controls. You can also customize controls by deriving and extending stock controls, creating user control or composite server controls or even create your own Mobile Control from deriving directly from MobileControl class. Notice that the programming paradigm is still very similar to how you would do it in the normal ASP.NET world.[2]
ASP.NET Web Server Controls Versus Mobile Controls
Table 9-1 shows the mobile controls and their counterparts in ASP.NET where the mapping is one-to-one.
|
Web Server control |
Mobile control |
|
AdRotator |
AdRotator |
|
Calendar |
Calendar |
|
CompareValidator |
CompareValidator |
|
CustomValidator |
CustomValidator |
|
DataGrid |
ObjectList |
|
Image |
Image |
|
HyperLink |
Link |
|
Panel |
Panel |
|
RangeValidator |
RangeValidator |
|
RegularExpressionValidator |
RegularExpressionValidator |
|
RequiredFieldValidator |
RequiredFieldValidator |
|
TextBox |
TextBox |
|
ValidationSummary |
ValidationSummary |
Although most of Web Server controls map one-to-one to a mobile control, others are mapped down to a simpler control that serves the same purpose. Table 9-2 shows such mappings.
|
For these ASP.NET controls |
Use this Mobile control |
|
Button, ImageButton, LinkButton |
Command |
|
DataList, Repeater |
List |
|
CheckBox, CheckBoxList, DropDown, DropDownList, ListBox, RadioButton, RadioButtonLists |
SelectionList |
Other controls, such as PhoneCall, DeviceSpecific, Form, StyleSheet, TextView, are controls that are specific to the mobile environment and do not exist in the standard ASP.NET.
ASP.NET Mobile Web Application
In this section, you will learn how ASP.NET Mobile Controls can be
used to create a mobile web application that utilizes the
PubsWS Web Service developed in Chapter 6. This application queries and displays the list
of books found in the Pubs database. Using the application, mobile
device users can view general information about a book and either buy
a hard copy of the title or download it to a mobile device.
Let’s start by opening a new ASP.NET Mobile Web Application in Visual Studio .NET. To open a Mobile Web application, simply select Mobile Web application in the New Project window.
To view information in the Pubs database, you will use an
ObjectList control. To add the control to your
form, you add the following tags in HTML view:
<mobile:ObjectList id="bookList" runat="server"
   AutoGenerateFields="False">
     <Field DataField="title"></Field>
     <Field DataField="type" DataFormatString="Type: {0}"></Field>
     <Field DataField="price" DataFormatString="Price: ${0}"></Field>
     <Field DataField="title_id" DataFormatString="RefID: {0}"></Field>
     <Field DataField="notes"></Field>
     <Command Name="buy" Text="Buy"></Command>
     <Command Name="dnload" Text="Download"></Command>
</mobile:ObjectList>
The previous code snippet is similar to how you would have a DataGrid on an ASP.NET page. In this case the ObjectList control is used instead. Similar to the Column tags of the DataGrid control, the Field tags are data bound fields that also provide some formatting. The two Command tags represent the two operation that the user will be able to perform on a data item. In this example, the user can buy or download the book.
If you prefer using the VS.NET visual environment, you can drag an
ObjectList onto the form directly from the Mobile
Web Forms menu of the VS.NET Toolbox and then set its properties
using the Property window. The preceding code creates an
ObjectList control, binds it to specific
fields of the Pubs database, and provides for two
commands—Buy and Download—that that the user can issue on
any item selected from the list.
Next, you need to add a web reference to the
PubsWS Web Service and name it
PubsWSProxy (see Chapter 6 to
review how this is done). Finally, you can switch to the code behind
page of your application and write a page load handler that uses the
PubsWS proxy to load the Pubs data into a
DataSet that the ObjectList can
bind to, as shown in the following code fragment:
If Not IsPostBack Then
  Dim oProxy As PubsWSProxy.PubsWS = New PubsWSProxy.PubsWS
  oProxy.Credentials = New Net.NetworkCredential("uid", "pwd", "domain")
  Dim oDS As DataSet = oProxy.GetBooks(  )
  bookList.DataSource = oDS.Tables(0).DefaultView
  bookList.DataBind(  )
End If
There is no need to set up the Credentials for the proxy object if your Web Service allows anonymous access.
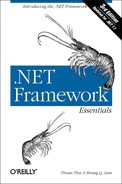
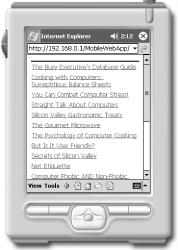
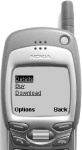
Now if you run the application, the page shown in Figure 9-1 will display in your browser.
We are viewing this application using a desktop Internet Explorer to
test it out. Notice that in Figure 9-1 the
ObjectList control does not show the bound data as
a grid,[3] but instead as a list of hyper links to the first
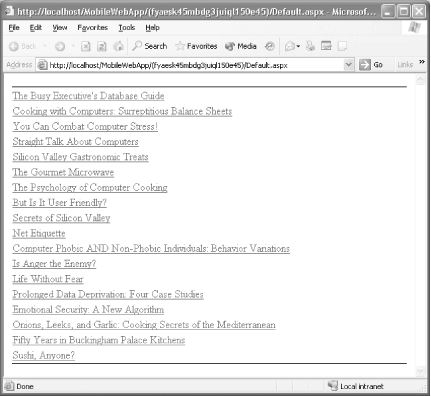
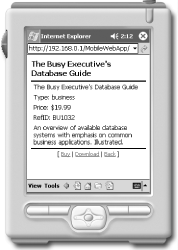
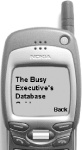
fields of each record.[4] Clicking on any book in the list will cause all fields of
the selected item to be displayed, as shown in Figure 9-2. Note that the commands that apply to the
selected item are also shown on the form.
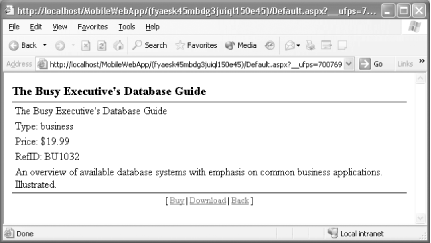
Now let’s add another form to the mobile web application to handle the buying and downloading of the book:
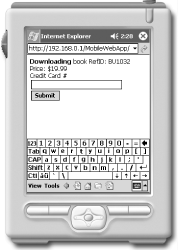
<mobile:Form id=FormPurchase runat="server">
  <mobile:TextView id=txtPurchaseInfo runat="server"></mobile:TextView>
  <mobile:Label id=labelCC runat="server">Credit Card #</mobile:Label>
  <mobile:TextBox id=txtCC runat="server"></mobile:TextBox>
  <mobile:Command id=cmdSubmit runat="server">Submit</mobile:Command>
</mobile:Form>
The purchase form uses a TextView control that
displays some simple formatted text and a TextBox control to collect
a credit card number. The form also makes use of a submit button to
post the form data back to the server for processing.
To complete this part of the application, you must write an event
handler for the ItemCommand event of the
ObjectList that is triggered when the user chooses
to buy or download the book:
Private Sub bookList_ItemCommand _
      ( _
      ByVal sender As Object, _
      ByVal e As System.Web.UI.MobileControls.ObjectListCommandEventArgs _
      ) Handles bookList.ItemCommand
  Dim sTmp As String
  Dim oListItem As MobileControls.ObjectListItem = _
                   CType(e.CommandArgument, MobileControls.ObjectListItem)
  If e.CommandName = "buy" Then
    sTmp = "<b>Buying</b> "
  ElseIf e.CommandName = "dnload" Then
    sTmp = "<b>Downloading</b> "
  End If
  sTmp += "book " + oListItem.Item("title_id")
  sTmp += " " + oListItem.Item("price")
  CType(FormPurchase.FindControl("txtPurchaseInfo"), _
        MobileControls.TextView).Text = sTmp
  ActiveForm = FormPurchase
End Sub
The ItemCommand function inspects the CommandName
of the ObjectList’s event to
decide which button the user clicked in order to display the
appropriate form.
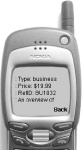
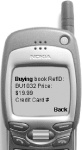
If the user chooses to buy the first book, the device will display the page shown in Figure 9-3.
For the submit click, we don’t really process any ordering but just navigate the user back to the default page:
Private Sub cmdSubmit_Click _
( _
ByVal sender As Object, ByVal e As System.EventArgs _
) Handles cmdSubmit.Click
'More Processing Code Here
RedirectToMobilePage("default.aspx")
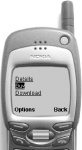
End SubA primary motivation for using mobile controls in this sample application is to make it accessible to browsers other than IE. We can use the actual device to test the application or to use the emulator that comes with .NET Framework SDK (see the sidebar Working with Microsoft Emulators). Figure 9-4 shows how the book list page is rendered by the Pocket PC’s Internet Explorer.
This display is very similar the output from IE that we’ve have seen earlier because Pocket PC Internet Browser is capable of displaying HTML. Figure 9-5 shows the page that is displayed when the user selects the first book in the list.
Finally, Figure 9-6 shows the purchase form displayed when a mobile device user chooses to download the book.
From an emulated web phone (or any WML viewer), however, the screens are drastically different. The reason is that the mobile controls sense the capability of the phone browser and only render WML instead of full blown HTML. Figure 9-7 shows the same application from a phone emulator.
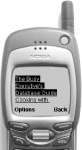
This is the first screen showing the list of books. You can use the center rocker button to move up and down the list. The currently selected book will be highlighted. When you decided on a book, press the center button to select it. Because the screen for the phone is much smaller than the Pocket PC, the WML translation of the page content decided to show the three choices that you can pick for the selected book (View the details, buy, or download the book), as shown in Figure 9-8.
Let’s press the center button one more time to see the book detail screen. Again, this screen is scrollable via the center rocker button. Figure 9-9 and Figure 9-10 show the progression through the data.
Now that we’ve seen the detail for this book and it’s quite interesting, we press the right button (underneath the word “Back”) to go back a screen and press the down button to highlight “Buy,” as in Figure 9-11.
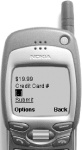
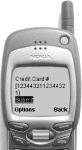
When the user chooses to buy the book, the purchase form appears. Again, the user will have to use the up/down button to scroll down to select the text box to enter the credit card number, as in Figure 9-12 and Figure 9-13.
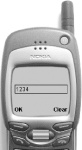
Once the credit card text box is selected, an input box type of screen shows up to collect the credit card number, as in Figure 9-14 and Figure 9-15.
.NET Compact Framework
Instead of accessing a web application from a browser, the .NET Compact Framework allows you to write rich clients and stand-alone applications that actually run on the mobile devices themselves. These applications allow the device users to be productive without being connected to the network.
Unless you like to deal with the complexity of writing code directly to the device’s operating system API, .NET Compact Framework is the answer to writing mobile device applications. Being the subset of the .NET Framework, the Compact Framework provides the same common language runtime and managed code execution. Architecturally, the .NET Compact Framework acts as the abstraction layer on top of the device-specific API so that the mobile applications written on the .NET Framework can be device independent. Figure 9-16 shows the .NET Compact Framework in relation to the mobile application and the device API.
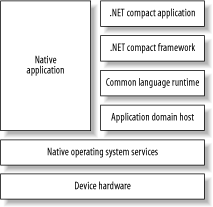
In addition to being abstracted from the native operating system services, these mobile applications also inherit other advantages such as fault isolation, security, and better resource management, because they run within separate application domain hosts.
Currently, the .NET Compact Framework supports Pocket PC and Windows CE .NET-based platforms.
The .NET Framework Versus the .NET Compact Framework
Having a much smaller footprint than the .NET Framework, the .NET Compact Framework provides only the core functionality for writing applications for mobile devices. The following list summarizes the main differences between the two frameworks.
- ASP.NET
ASP.NET is not supported by the .NET Compact Framework for the obvious reason that currently, the reason for running web servers on these mobile device are not compelling enough.[5] This has nothing to do with ASP.NET application running on the servers serving ASP.NET pages to the mobile devices as we’ve shown you earlier in this chapter.
- Data access
Only SQL Server CE .NET data provider is provided. OleDB or Oracle providers are not provided.
- Classes
Being less than one tenth of the size of the full .NET Framework, the number of classes would obviously be smaller. We’ve already previously mentioned that the .NET Compact Framework only provides an essential subset of the full framework for the mobile environment.
Visual Studio .NET 2003 fully support the development and deployment of .NET applications on mobile devices.
To show how easy it is to write a mobile device application with the Compact Framework, let’s write and demonstrate (using an emulator) a simple Hello World program that displays the words “Hello World” in a Windows message box on a Pocket PC.
The first thing you do is to create a New Project in Visual Studio .NET 2003. Choose the language of your choice and pick the Smart Device Application template in the New Project window. Click OK. The Smart Device Application Wizard window shown in Figure 9-17 will be displayed.
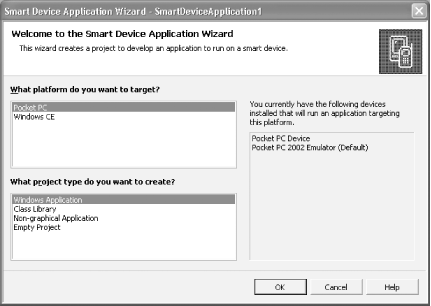
The two platforms currently supported are Pocket PC and Windows CE. For each of these platforms, there are a number of project templates you can choose from: Windows Application, Class Library, Non-graphical Application, or Empty Project.
Because you want to write a standard Windows style application that targets a Pocket PC, you will accept the Wizard’s default settings by clicking OK.
VS.NET uses the Smart Device Application Template to generate all the
files necessary for your application and presents you a blank form
with a default menu attached to it. In this first example, you will
not want to do anything with this default menu. You can also start to
drag and drop controls from the toolbox onto the form and write code
that associates with events for these controls the way
you’ve always done it in previous VB environments.
Again, in this example, we will not add any controls to the form but
only write code to handle the Load event of the
form and display a message box that says “Hello
World!” To do this, just double click on the form
itself. VS.NET creates the default handler for the load event and
moves you to the code view where you can type the following VB.NET
statement:
Messagebox.Show("Hello World!")That’s all to it. Now you start the debugging process by pressing the F5 key. The message shown in Figure 9-18 will appear to ask you to name the type of device to which you wish to deploy the program. We have defaulted our setting to the emulator so all we have to do at this point is click the Deploy button. VS.NET starts the emulator and deploys the application.[6]
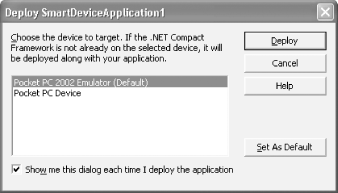
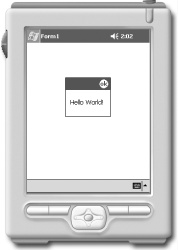
Figure 9-19 shows the output of our first Compact Framework-enabled mobile device application.
Now that you know the process, you’re ready for something a little more involved.
Mobile Devices and SQL Server 2000 CE
A primary motivation for writing stand-alone applications for mobile devices (or any offline device) is because such devices are not always connected to enterprise resources or other data an application needs to do its work. Mobile device applications have to be able to extract the data they need when they are off line. Updates to the disconnected data must be merged enterprise data when it comes time for reconciliation.
Disconnected data can be stored off-line in at least two ways. Data can be stored in a proprietary format file as XML that the application manipulates using custom code or an XML parser, such as the one provided with .NET. With SQL Server 2000 CE, the off-line data can also be stored in a relational database format and manipulated via traditional database management tools.
The following two samples show a movie listing application where you can pick a movie and see where it’s shown and the show times or you can pick a nearby theater and see the movies that the selected theater shows (also with show times).
The first sample shows how this is done with just XML. The XML file represents the off-line data store that is downloaded into the mobile device periodically. For simplicity, we do not show how this file is generated (let’s assume that there is a Web Service out there somewhere that we can ask for local theater and showing information). The example does not have any update to the data, hence, there is no data reconciliation needed.
The second sample shows how the application can be implemented with
SQL Server for CE. Here the .sdf file replaces the
XML file, but the part of generating the .sdf file
is conveniently omitted in order to simplify the presentation.
SQL Server CE provides three methods for synchronization of data between the device and the enterprise data source: Pull, Push, and SubmitSQL. The Pull and Push methods allow your mobile device application to pull tables from and push tables to the enterprise database. Once the tables are on the mobile device, you don’t need to have network connectivity in order for your application to work until you are ready to sync back to the enterprise database. The SubmitSQL method allows the mobile device application to send SQL directly to the enterprise database. This is obviously to keep the database state as synced as possible but it requires constant network connectivity.
You can also setup SQL Server replication so that the application on the mobile device can subscribe and replicate part or the whole database. The replication is similar to how the standard SQL Server Replication works except that your node is on a mobile device and the connectivity between the mobile node and the publisher is through HTTP. As intended, our examples do not cover how to set up your development environment to enable Remote Data Access or SQL Server CE Replication.
Storing off-line data as XML
In this example, we omit how the enterprise data (in this case, movie listing for a selected group of local theaters) XML is generated, and synced to the device. We start out with the assumption that the mobile device application will have the xml to consume. This application basically just parses the xml data and provides a GUI where the user queries movies or theaters information.
The XML for the movie listing is in the following format:
<?xml version="1.0" encoding="utf-8" ?>
<root>
  <theaters>
        <theater id="1" name="Centreville Multiplex"  . . .  />
        <theater id="2" name="Lee Highway Multiplex"  . . .  />
    < . . . >
  </theaters>
  <movies>
        <movie mid="1" name="Narc (R)" summary=" . . . " />
        <movie mid="2" name="25th Hour (R)" summary=" . . . " />
    < . . . >
  </movies>
  <xrefs>
    <xref theaterid="1">
          <movietime refmid="5"
      time="0:5 Fri - Feb 07: 8:00 12:30 | Sat - Feb 08: 12:30 |  . . .  " />
          <movietime refmid="2"
          time="0:4 Fri - Feb 07: 7:00 10:30 | Sat - Feb 08: 8:00 11:30  . . . " />
      < . . . >
    </xref>
    <xref theaterid="2">
          <movietime refmid="5" time=" . . . " />
          <movietime refmid="4" time=" . . . " />
      < . . . >
    </xref>
    < . . . >
  </xrefs>
</root>
There are basically three collections of data: theaters, movies, and xrefs. As the names imply, the theaters and movies collections hold basic information for the theater and movie entities. The xrefs collection serves as the cross-reference between the theaters and the movies to hold the movie show times.
The application starts with the loading of the offline content into the menus and building appropriate data structures to store the theaters, movies, and references between them:
XmlDocument doc = new XmlDocument(  );
doc.Load("\Program Files\XMLMovieListing\listing.xml");
XmlNodeReader oReader = new XmlNodeReader(doc.DocumentElement);

oReader.Read(  );
while(oReader.Read(  )) {
  if(oReader.Name == "theaters" && oReader.IsStartElement(  )) {
    ProcessTheaters(oReader);
  } else if(oReader.Name == "movies" && oReader.IsStartElement(  )) {
    ProcessMovies(oReader);
  } else if(oReader.Name == "xrefs" && oReader.IsStartElement(  )) {
    ProcessCrossRef(oReader);
  }
}
For example, the ProcessTheaters creates the menu with theaters as items, associates the menu click with mnuTheater_Click event handler. This function also creates two hashtables: one to store general theater information keying on the theater id and the other is a hashtable that points to another hashtable that stores movie show times based on movie id for the current theater. Because this application is just an example and the list of local theaters and movies are small, it is ok to store the information in memory. Remember, when you are developing for these mobile devices, memory resource can be scarce and some alternative design should be considered:
private void ProcessTheaters(XmlNodeReader oReader) {
  bool bDone = false;
  string sTheaterKey = "";
  while(!bDone && oReader.Read(  )) {
    if(oReader.Name == "theater" && oReader.IsStartElement(  )) {
      MenuItem mnuItem = new MenuItem(  );
      string sText = oReader["id"] + " " + oReader["name"];
      mnuItem.Text = sText;
      mnuItem.Click += new EventHandler(this.mnuTheater_Click);
      this.mnuTheater.MenuItems.Add(mnuItem);
      sTheaterKey = oReader["id"];
      THEATERS_TIME.Add(sTheaterKey, new Hashtable(  ));
      THEATERS.Add(sTheaterKey,
          new Theater(oReader["name"], oReader["addr1"],
                      oReader["addr2"], oReader["phone"]));
    }
    if(oReader.Name == "theaters" && oReader.IsStartElement(  ) == false) {
      bDone = true;
    }
  }
}
At this point, you probably wonder if you can just rely on the XPath
query to find movie/theater associations. As it turns out, because
you are using the “compact”
framework, some of the functionality that you might be familiar with
in the desktop/web world might not be implemented here. In this case,
XPath is not implemented so you won’t be able to do
SelectNodes to simplify your life.
Similar to the ProcessTheaters function, the ProcessMovies creates the menu with movies as items, associates the menu click with mnuMovie_Click event handler. This function also creates two hashtables: one to store general movie information keying on the movie id and the other is a hashtable that points to another hashtable that stores movie times based on theater id for the current movie:
private void ProcessMovies(XmlNodeReader oReader) {
  bool bDone = false;
  while(!bDone && oReader.Read(  )) {
    if(oReader.Name == "movie" && oReader.IsStartElement(  )) {
      MenuItem mnuItem = new MenuItem(  );
      string sText = oReader["mid"] + " " + oReader["name"];
      mnuItem.Text = sText;
      mnuItem.Click += new EventHandler(this.mnuMovie_Click);
      this.mnuMovie.MenuItems.Add(mnuItem);
      string sMovieKey = oReader["mid"];
      MOVIES_TIME.Add(sMovieKey, new Hashtable(  ));
      MOVIES.Add(sMovieKey,
                 new Movie(oReader["name"], oReader["summary"]));
    }
    if(oReader.Name == "movies" && oReader.IsStartElement(  ) == false) {
      bDone = true;
    }
  }
}
The ProcessCrossRef function fills in the two cross-ref structure so that we can list showing times for a particular movie across all theater or showing times for all movies at a particular theater:
private void ProcessCrossRef(XmlNodeReader oReader) {
  bool bDone = false;
  string sTheaterKey = "";
  while(!bDone && oReader.Read(  )) {
    if(oReader.Name == "xref" && oReader.IsStartElement(  )) {
      sTheaterKey = oReader["theaterid"];
    }
    if(oReader.Name == "movietime" && oReader.IsStartElement(  )) {
      Hashtable o = (Hashtable)THEATERS_TIME[sTheaterKey];
      o.Add(oReader["refmid"], oReader["time"]);
      Hashtable o1 = (Hashtable)MOVIES_TIME[oReader["refmid"]];
      o1.Add(sTheaterKey, oReader["time"]);
    }
    if(oReader.Name == "xrefs" && oReader.IsStartElement(  ) == false) {
      bDone = true;
    }
  }
}
The menu click handler: mnuTheater_Click and mnuMovie_Click perform similar tasks, which basically setup the current mode of selection (by theater or by movie), the current theater or movie based on the mode, the list of movie and show times if the mode is by theater, or the list of theater and show times if the mode is by movie. Other supporting functions help in navigating to show movies and show times by theater or theater and show times by movie.[7]
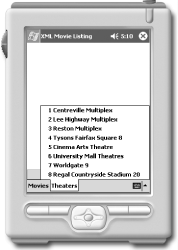
Figure 9-20 and Figure 9-21 show the application running on a Pocket PC while having the Movies and Theaters menu expanded.

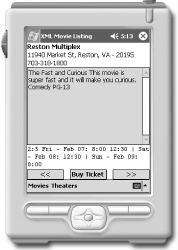
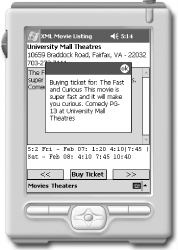
When you select a movie, the application traverses all theaters that show the selected movie and display the show times (see Figure 9-22 and Figure 9-23).
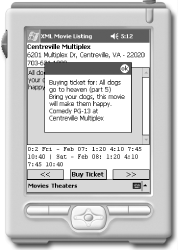
When you pick a theater instead of a movie, the application starts to traverse all movies showing at the selected theater (see Figure 9-24 and Figure 9-25).

Storing off-line data in SQL Server for Windows CE
In the next example, you will rely on SQL Server CE for the data instead of an XML file. This change simplifies the code you write but requires the installation of SQL Server CE on the mobile device, thus the total amount of memory used might be higher than the xml version of the application. We can ignore the resource problem and exchange it with the simplification of the code and, fortunately, VS.NET automatically deploys SQL Server CE on the device the same way it does the .NET Compact Framework.
This version of the application starts by opening a database connection and generating the Theater and Movie menus. Unlike the previous version, you don’t have to build your own data structure to hold the data and cross references. The tables and their references are managed by the database in this example:
m_oConn = new SqlCeConnection(
              "Data Source=\Program Files\SQLCEMovieListing\moviedb.sdf"
              );
m_oConn.Open(  );
GenerateMenus("select theaterid, name from theater",
              new EventHandler(this.mnuTheater_Click),
              this.mnuTheater);
GenerateMenus("select movieid, name from movie",
              new EventHandler(this.mnuMovie_Click),
              this.mnuMovie);
The GenerateMenus function just creates the menu items and associates the event handler to each item:
private void GenerateMenus(string sCommand,
                           EventHandler handler,
                           MenuItem mnuBranch) {
  SqlCeCommand oCmd = new SqlCeCommand(  );
  SqlCeDataReader oReader = null;
  oCmd.Connection = m_oConn;
  oCmd.CommandText = sCommand;
  oReader = oCmd.ExecuteReader(  );
  while(oReader.Read(  )) {
    MenuItem mnuItem = new MenuItem(  );
    mnuItem.Text = oReader["name"].ToString(  );
    mnuItem.Click += handler;
    mnuBranch.MenuItems.Add(mnuItem);
  }
  oReader.Close(  );
}
Here are the handlers for Theater and Movie:
private void mnuMovie_Click(object o, System.EventArgs e) {
  // Get information from the menu item.
  string sName = ProcessMenuClick((MenuItem)o);
  // Obtain the current movie information.
  SqlCeCommand oCmd = new SqlCeCommand(
      "select summary from movie where name = '" + sName + "'"
                                      );
  oCmd.Connection = m_oConn;
  SqlCeDataReader oReader = oCmd.ExecuteReader(  );
  oReader.Read(  );
  m_oCurrentMovie = new Movie(sName, oReader["summary"].ToString(  ));
  // Obtaining all theaters and their show times for this movie
  SqlCeDataAdapter oAdapter = new SqlCeDataAdapter
    (
@"
select t.name, t.addr1, t.addr2, t.phone, st.showtime
from theater t inner join showtime st on t.theaterid = st.theaterid
inner join movie m on m.movieid = st.movieid
where m.name = '" + sName + "'",
    m_oConn
    );
  m_oDS.Clear(  );
  oAdapter.Fill(m_oDS);
  // Start in-memory cursor.
  m_iMode = 0;
  m_iCurrentIndex = 0;
  displayCurrent(  );
}

private void mnuTheater_Click(object o, System.EventArgs e) {
  // Get information from the menu item.
  string sName = ProcessMenuClick((MenuItem)o);
  // Obtain the current theater information.
  SqlCeCommand oCmd = new SqlCeCommand(
     "select addr1, addr2, phone from theater where name = '" + sName + "'"
                                      );
  oCmd.Connection = m_oConn;
  SqlCeDataReader oReader = oCmd.ExecuteReader(  );
  oReader.Read(  );
  m_oCurrentTheater = new Theater(sName,
                                  oReader["addr1"].ToString(  ),
                                  oReader["addr2"].ToString(  ),
                                  oReader["phone"].ToString(  ));
  // Obtain all movie and show times at this theater.
  SqlCeDataAdapter oAdapter = new SqlCeDataAdapter
    (
@"
select m.name, m.summary, st.showtime
from movie m inner join showtime st on m.movieid = st.movieid
inner join theater t on t.theaterid = st.theaterid
where t.name = '" + sName + "'",
    m_oConn
    );
  m_oDS.Clear(  );
  oAdapter.Fill(m_oDS);
  // Start in-memory cursor.
  m_iMode = 1;
  m_iCurrentIndex = 0;
  displayCurrent(  );
}
The rest of the code can be found at http://www.oreilly.com/catalog/dotnetfrmess3/.
Summary
As you can see, writing applications for mobile devices can now be fun and productive. Whether you are going to write Web Application targeting mobile devices or applications that actually run on these devices, .NET would have you well covered. The Mobile Controls as well as the Compact Framework are now part of the standard .NET 1.1 to ensure that all aspects of the enterprise are taken care of. Thanks to great tools such as VS.NET, application developers no longer worry about the tedious legwork of setting up the environment, debugging tools, the SDK, emulators, and so on, and devote all their time to developing the business logic for the mobile application.
[1] In Version 1.0 of the .NET Framework, you have to download separate packages to write ASP.NET mobile applications or applications for smart devices.
[2] The programming paradigm for creating user controls or composite server controls is similar to that of ASP.NET. However, if you are to create device-specific custom controls, you will have to be familiar with writing device-specific control adapters to render the control. ASP.NET mobile architecture depends on a device adapter model so that the controls are device-independent. In order for a control to support different devices, a set of adapters are created to adapt the control to the device specific capabilities. We do not cover how to create device-specific custom mobile controls in this book.
[3] If you want to display an actual table of
data on that tiny screen, you will have to set the
TableFields property of the
ObjectList. This property takes a set of field
names, separated by semicolons. Because the screens of the mobile
devices are normally small, by default the
ObjectList shows the data as a list instead of a
table. One other thing to note is that when the page is rendered to
WML browsers, the table cannot be displayed, and the
ObjectList falls back to the list approach.
[4] Depending on the device, this list can be a list of commands instead of hyperlinks.
[5] This does not mean that it’s impossible. Maybe these devices can soon publish their services to a community of services the way JINI works. Maybe we can write a scaled-down web server that is able to serve ASP.NET applications, yet small enough to not hog all the resources of the device.
[6] The first time the emulator starts up, the .NET Compact Framework is installed. The .NET Compact Framework is less than 2MB in size.
[7] Download the complete code online at http://www.oreilly.com/catalog/dotnetfrmess3/.