
No matter how much you do behind the scenes to create a solid and robust application, the users of your application see only your user interface. Certainly, perfecting the database and application design is crucial—but once that’s done, it pays to devote considerable time to designing a user interface that is workable, aesthetically pleasing, and helps the users get their work done. By implementing the ideas and techniques in this chapter, you’ll be on your way to creating an interface that has ease of use and productivity written all over it.
You’ll learn how to take full advantage of special keystrokes to help users navigate through a complex application. You’ll also learn how to create forms that have no menus or toolbars and how to create a map-based interface that lets users navigate by pointing to and clicking on various parts of a map.
Next, you’ll learn how to ease data-entry pain with forms that let users mark their place while they peruse other records, and how to add shortcut menus to forms. You’ll also see how you can create forms that carry data forward from record to record, how to hide complexity from your users with a dialog that expands on request to reveal complex options, and how to use a combo box not just to select from a list, but also to maintain that list with new entries as they are needed.
Finally, you’ll learn how to create and use two generic, reusable components: a pop-up calendar form for entering dates that makes use of an ActiveX control, and a custom-built status meter form complete with an optional Cancel button.
You’ve used Access’s
AutoKeys macro to create keyboard shortcuts for
your application, but you’d like the shortcut keys to change
based on the currently active form. Is there an easy way to create
context-sensitive keyboard shortcuts in Access?
The SetOption method of the Application object allows you to change global database options programmatically. This solution shows you how to combine this functionality with the Activate and Deactivate event properties of your forms to create custom key shortcut macros for each form of your application.
For an example of key assignments that depend on the active form,
open 09-01.MDB. This sample database contains
information on units, assemblies that make up parts, and parts that
make up assemblies. Open the frmUnit form in form view. At any time,
you can press Ctrl-D to “drill down” to the next level of
detail or Ctrl-R to revert to the previous level of detail. When you
press Ctrl-D on frmUnit, frmAssembly is loaded; if you press Ctrl-D
from frmAssembly, frmPart is loaded (see Figure 9-1). If you press Ctrl-D a third time while
frmPart has the focus, nothing happens. Thus, the behavior of Ctrl-D
changes based on its context. The Ctrl-R keyboard macro is similarly
context-sensitive.

Tip
To keep the example simple, we have not added the additional macro code necessary to keep the forms synchronized. You must manually use Ctrl-R to return to the previous level/form, then navigate to the desired record, and then use Ctrl-D to drill down if you wish to keep the forms synchronized.
To add context-sensitive
AutoKeys macros to your own application, follow
these steps:
Create a key assignment macro for each form in your application (you can use the same macro for more than one form if you like). Follow all the design rules for an
AutoKeysmacro, but give your macro a unique name when you are done. In the sample application, for instance, the three key assignment macros are calledmcrUnitAutoKeys,mcrAssemblyAutoKeys, andmcrPartAutoKeys, so that the macro name reminds you of its function. Table 9-1 shows the settings for themcrUnitAutoKeysmacro.Table 9-1. Settings for the mcrUnitAutoKeys macro
Macro name
Action
Argument
Value
^D
OpenForm
Form Name
frmAssembly
View
Form
Where Condition
[UnitNumber]=[Forms]![frmUnit]![UnitNumber]
Data Mode
Edit
Window Mode
Normal
^R
Close
Object Type
Form
Object Name
frmUnit
You’ll probably want to add comments to your macro to make it easier to understand and maintain, as illustrated in Figure 9-2.
Import the basOptions module from
09-01.MDBinto your own database.Add a
RunCodeaction to yourAutoExecmacro (or create a new macro namedAutoExeccontaining this one action). Set the action’s Function Name argument to:=acbStoreOriginalAutoKeys( )
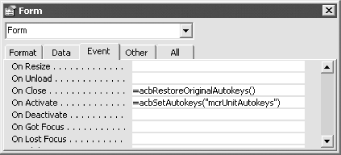
In the OnActivate event property of each of your forms, add a call to the acbSetAutoKeys function. This function takes a single argument, the name of the key assignment macro to use while that form is active. For example, on the frmUnit form in the sample application, this property is set to:
=acbSetAutokeys("mcrUnitAutokeys")In the OnClose event of the last form to be closed in your application (typically, your main switchboard form), add a call to the acbRestoreOriginalAutokeys function. If there is more than one possible last form in your application, you’ll need to add this function call to every possible last form. acbRestoreOriginalAutokeys takes no arguments. Figure 9-3 shows these calls in the sample application.

The special built-in Application object refers to your entire Access application. The GetOption method of this object lets you read the options stored under Tools → Options, Tools → Startup, and additional options that are available only programmatically. The Key Assignment Macro option, which was originally part of the View → Options dialog in Access 2.0, is no longer available from the Access user interface, but fortunately it is still available programmatically.
Because the database options are
stored in the user’s registry, any changes you make to them
will affect not only the current database but also any other database
the user runs. It’s best to store the original value of any
option you change and restore it when your application is closed. The
acbStoreOriginalAutokeys function uses the
GetOption method to read the original key assignment macro name when
your application is loaded and store it in the
mstrOriginalAutokeys module-level
variable. Like the rest of the functions in this solution,
acbStoreOriginalAutokeys is very simple,
consisting of one statement, a few comments, and an error handler:
Public Function acbStoreOriginalAutokeys(  )

   ' Store the user's original Autokeys macro name
   ' so we can restore it when we're done.

   On Error GoTo HandleErr

   mstrOriginalAutokeys = Application.GetOption("Key Assignment Macro")

ExitHere:
   Exit Function

HandleErr:
   MsgBox "Error " & Err.Number & ": " & Err.Description, _
    , "acbStoreOriginalAutokeys(  )"
   Resume ExitHere
End Function
The acbRestoreOriginalAutokeys function resets the option to its original value. This function should be called from the last open form. In the sample database, it is called from the Close event of frmUnit. Its source code is:
Public Function acbRestoreOriginalAutokeys(  )

   ' Put the Autokeys macro setting back the way we found it.

   On Error GoTo HandleErr

   Application.SetOption "Key Assignment Macro", mstrOriginalAutokeys

ExitHere:
   Exit Function

HandleErr:
   MsgBox "Error " & Err.Number & ": " & Err.Description, _
    , "acbRestoreOriginalAutokeys(  )"
   Resume ExitHere
End Function
Each form passes the name of its custom key assignment macro to the acbSetAutokeys function when the form is activated. The Activate event of the form calls this function. The function uses the SetOption method to take the passed macro and make it the key assignment macro. Its source code is:
Public Function acbSetAutokeys(strMacroName As String)

   ' Set a new Autokeys macro. Takes the name of the
   ' macro to use for keyboard reassignment.

   On Error GoTo HandleErr

   Application.SetOption "Key Assignment Macro", strMacroName

ExitHere:
   Exit Function

HandleErr:
   MsgBox "Error " & Err.Number & ": " & Err.Description, _
    , "acbSetAutokeys(  )"
   Resume ExitHere
End Function
You can generalize this technique of using GetOption and SetOption to control many properties of your application at runtime—for example, to activate the status bar and toolbars or to allow the user to pick a new font for datasheets from a list you supply. You should always follow the same three basic steps:
Use GetOption to read the current option value and save it in a module-level variable.
Use SetOption to set your new value. Be sure to use the name of the option exactly as it appears in the Access online help.
Use SetOption to restore the original value when your application is closed.
To reduce the time delay in switching key assignment macros, we decided to reset the user’s key assignment macro only when the last open form is closed. A safer but perhaps slower alternative would be to reset the key assignment macro in the Deactivate event of each form.
The individual calls to the acbSetAutoKeys function are attached to the forms’ Activate events instead of their GotFocus events for a very good reason. Unless there are no controls on a form that can get the focus, the form itself will never receive the focus. Only forms consisting strictly of graphic objects and disabled controls will ever trigger a form-level GotFocus event.
It is interesting to note that AutoKeys functionality is just about the only thing left in Access that can be done only by using macros, not in VBA code.