Chapter 14
Location Sound Techniques
■ The Sound Recordist’s Job
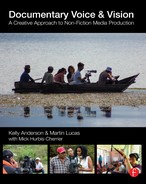
The basic and most common production team on a documentary consists of a cinematographer and one sound recordist (Figures 13.3 and 14.1). The sound recordist is responsible for getting the best quality audio onto the recording format, and this is a big job. These responsibilities include:
- Scouting locations when possible, and doing a location sound survey
- Understanding the acoustics and ambient qualities of a given location, and controlling them as much as possible
- Understanding, as much as is possible, who and what is going to be filmed
- Choosing the most appropriate microphones for the situation
- Placing microphones, whether on people, handholding, on a boompole, or on a stand
- Setting record levels on the camera (for single-system recording) or on the audio recorder (for double-system recording)
- Monitoring the recorded sound during filming, and stopping production if necessary
- Delivering the sound in the appropriate format and configuration for postproduction
- Creating and delivering sound reports indicating key information about what was recorded using which microphones
The sound recordist has to do all these things while keeping the microphones out of the frame, wrangling cables, and staying out of the way of the cameraperson and equipment on the set. This is skilled and difficult work that takes much practice. If you are recording single-system and are cabled to the camera, the job is made all the more difficult because you need to make sure you don’t let the cables pull on the camera while getting your microphones as close to the subject as possible. If double-system, you need to ensure that the sound will sync with the picture (there are a variety of ways of doing this; see Chapters 13 and 17). Despite the importance and difficulty of the job, sound recordists are generally underappreciated by all but experienced filmmakers, who practically worship the ground a good sound recordist walks on. One bit of good news in all of this is that if you understand sound recording and do it well, you will likely always have a job in production.
■ Sound and the Documentary Crew

■ Figure 14.1 A typical documentary crew. Sound recordist J T Takagi, Director Megan Mylan, and Director of Photography Michael Chin filming the short documentary My Little Friends (2013). Photo courtesy of Principe Productions/PrincipeProductions.com.
Because sound recording is so important, we can’t advise beginners (or even seasoned documentary practitioners) to try to do everything on their own. A two-person crew, where one shoots and one does sound, is a tried and true combination, and produces great results even with its small size. There are times, however, where a filmmaker chooses to forego using a sound recordist in order to preserve the intimacy of a situation. If you are highly experienced with shooting, and with sound, this can work. David Alvarado, one of the directors of The Immortalists (2014), has this to say:
I was shooting on The Immortalists, and Jason Sussberg did sound. But there are about 5 or 6 one-man-band scenes in the film that I shot on my own. I had a digital audio recorder with four inputs on the back of the Redrock (shoulder mount, see pp. 154–155), and literally everyone on the set had a wireless microphone on them. And then I put a really good, $3,000 Schoeps microphone on top of the camera. I just set the levels to get the dialogue in the right range, and let the limiter (pp. 237–238) do the rest. It’s not advisable, but for some scenes we did it that way. (See Figure 6.1 for a picture of David shooting as a one-man-band crew.)
It depends on the scene. If it’s a vérité event where a person’s going to be going around talking to different people who aren’t miked, there’s no way around it. If you want good sound you have to have a boom operator in there (pp. 239–241), and they have to have the philosophy of any good recordist, which is “I’m going to get as close as I possibly can without getting into the frame.” And they’re fighting for inches, you know, because every inch you get is better than the inch before it.1
As David suggests, one-man-band shooting relies on a cameraperson who knows a lot about sound and can keep their eye on many variables at one time. In addition, if you are going to want to record good audio for anybody who is not miked, you will need a sound recordist with a boom. Finally, the cost of multiple good wireless mics may make the configuration David describes impractical for many filmmakers.
■ Before the Shoot: Prepping and Scouting
As veteran sound recordist Daniel Brooks says, “The thing that differentiates a good sound person from a mediocre sound person is the proactive anticipation of what is going to happen.” This means that much of the work of sound recording happens before filming. The first step in prepping for a shoot is a conversation between the sound recordist and the director.
Ideally, here is the information a sound person should know in order to be fully prepared:
- What is the topic of the film?
- What style is it? For this particular shoot, will you be filming sit-down interviews, or is it observational? Or a combination?
- What is the location for the particular shoot? Has anybody scouted the location with an ear for sound? If not, is it possible for the sound person to scout (or at least arrive early)?
- How much control do you have over the location? If it’s a restaurant kitchen, for example, can you schedule the shoot at a time when the dining room is empty?
- What camera is the cinematographer using?
- Is this double-system or single-system recording?
- Is there anything particularly sensitive about any of the people you are filming? Are there any restrictions in terms of how the participants can be miked?
- What is going to happen? How many people will be part of the action, and need to be recorded?
- How much prep time will there be on set before the camera rolls?
- What will the daily workflow be in terms of transferring files, etc.?
- What are the specifications for the deliverables: audio file type, record settings, and media format?
Whenever possible, the next step is to scout the location where shooting will take place. On documentaries, for budget and scheduling reasons, it’s rare that the sound recordist will be asked to scout. But if at all possible, somebody who understands sound should do a scout before the shoot, or the sound recordist should plan to arrive on location early enough to evaluate the aural environment.
As sound recordist and filmmaker JT Takagi explains:
Make sure whoever does the location scout is thinking about sound. And you have to ask about that, because if they aren’t thinking about sound, it can be a disaster. You end up on set, and you can’t hear anything initially, because everybody is setting things up, clanging things around and yelling, and when you actually do roll, that’s the only time you get quiet, and it’s at that point you realize, “Oh, what’s that horrible buzzing noise?” or “They’re doing construction down the hall?” All of which could have been addressed ahead of time.2
Common problems in a location include loud highways or traffic nearby, lawn mowers, noisy neighbors, barking dogs, construction, airplane flight patterns, loud HVAC—if you can name it, a sound recordist has probably had to deal with it. While these cannot always be controlled—you would be hard-pressed to find a New York City location without traffic noise, or an office without HVAC—scouting ahead of time can help you figure out whether you can live with the sound problem, mitigate it, or need to find another location. The person doing the scout will complete a location survey (Figure 14.2).
Before arriving on set, sound recordists should also ensure that they understand the technical specs, record media, and delivery details expected for their audio files. Different edit systems, editors, and sound designers prefer their sound elements in various formats or recorded at specific settings (frame rate, sampling rate, bit depth). Also, increasingly deliverables include isolated tracks from all microphones as well as a 2-channel output mixed on the fly by the sound recordist.
in practice
■ Location Sound Problems
We once had some students who were making a short documentary about the renovation of Hunter College’s Roosevelt House, a landmark building where Franklin and Eleanor Roosevelt lived in Manhattan. The students badly wanted to film the Hunter College president in front of the actual building, but when they returned to the classroom with their recorded interview, the sound of construction on the street completely drowned out the sound of the President speaking, rendering it unusable. Unfortunately, it was the type of interview that could only be scheduled once.
What should they have done? Wait until construction was finished, or talk to the workers to see if they could take a break for 15 minutes anytime soon. Or, move the President! As it turned out, the shot was framed tightly enough that you couldn’t really tell Roosevelt House from any other brownstone building in the neighborhood. The students were devastated, but they and everybody else in the classroom that day learned a valuable lesson.
■ On Location: The Shoot
On the day of a shoot, the sound recordist’s job is to:
- Evaluate the location
- Figure out a microphone placement strategy in consultation with the director and the cinematographer
- Prepare the location and set up equipment
- Place and test microphones
- Set levels and tone if possible
- Record the audio
- Deliver the audio files

■ Figure 14.2 This location survey from Professional Sound Services offers a typical checklist of potential sound problems.
Evaluate the Location
On the day of production, the sound recordist should arrive early to listen for any noise-makers at the location, like refrigerators, fans, fluorescent lights, and radiators. What about room acoustics? Will sound blankets be needed?
It is common to unplug refrigerators, but make sure you turn them on again after the shoot! A common trick is to put your keys in the refrigerator so you will have to go back and get them before leaving, which will remind you to turn the fridge back on. Also turn off electronics like computers, answering machines, and phone ringers. Make sure everybody on the set turns off their cellphones.
Finally, the sound person will work to make the location as dead as possible (Chapter 13). For a sit-down interview, this might involve hanging sound blankets outside the frame. For an observational scene, it could involve dragging an area rug into a room with wooden or tiled floors to reduce the number of reflective surfaces.
in practice
■ Dealing with Unexpected Sound Issues on Location
Sometimes, despite the best scouting, there are sound issues that arise on the day of shooting. In addition to all their required production skills, sound people often end up having to be skilled negotiators. JT Takagi explains about one film she did sound on:
The producer and director loved the look of the house, and they had done a scout, which was good. Then they found out, luckily before we shot, that there was a daycare center next door. So they had to find out what times of day the children came outside to play, and we planned to restrict the time we did the interview so it wouldn’t be during those times. The day we went to shoot, of course, they broke their schedule. So then we had to send someone over to negotiate, which sometimes means saying, “Let’s all go and get ice cream!” to get people out of the way. You do things like that. Sometimes it’s an unpleasant neighbor who usually isn’t home during the day, so when the place was scouted it was quiet, but they decided not to go to work that day, and the stereo is on very loudly. Then you have to see who is on the crew who seems the nicest, kindest, or most gorgeous, or whatever, to go negotiate that situation. And once in a while it also involves cash.3
Devising a Sound Recording Strategy
Daniel Brooks explains how much of sound recording is asking the right questions before the camera even rolls:
Once the scene starts, you can’t really do anything invasive like putting a microphone on, rearranging a microphone, or (depending on what the lighting situation is) even adjust the boom much. So you have to think about all these things before you actually start shooting. It’s a constant process of grilling the director. “Who is going to be in the scene?” “What are they going to do?” “Oh, they’re going to talk to somebody else?” “Who’s that other person?” “Can we put a mic on them?” And then, “Oh, then they’re going to go into a car? So are we going to shoot it in the car, or are we just going to let them drive away?” Understanding all that stuff allows you to do things like put the microphone in a position where the seatbelt doesn’t land on top of it and blow out your sound for that scene. If you know that this person is driving, you will put the lav on the right side of them instead of the left side, because the shoulder strap is a killer. So knowing how to ask the right questions, and then processing that information, and thinking of all the variables that could happen, allows you to prepare for them so that when the scene plays out, you are mostly covered. And inevitably somebody will stop and turn to somebody on the street that you haven’t miked, and say “Hey, so what do you think about such-and-such?” So you always have a boom (pp. 239–241). No matter where I go, I always have a boom and it’s always plugged in, and if something happens it’s just a matter of extending it. It could be that a battery dies on the wireless, or that the mic gets ripped from its position, or that the subject turns and talks to somebody who wasn’t supposed to be in the scene. The boom is really essential to cover that kind of stuff.4
A combination of factors will determine whether you record single-system or double-system audio. When dealing with observational situations, most sound people prefer to record double-system so they can find the best possible microphone placement without having to worry about being cabled to the camera. For students, who typically work without time code capable equipment or expensive transmitters, this setup will require a good audio recorder and slating in the field to allow syncing in postproduction. When working this way, you should use the onboard camera mic to record reference audio so you can sync more easily in postproduction (Chapter 17). There are also many situations where having the sound recordist connected to the camera isn’t a big problem. For sit-down (formal) interviews, a single-system setup is perfectly appropriate and an even simpler solution.
The next step in your strategy will involve setting up your microphones. Documentary productions usually record sync sound from at least two microphones. You keep these sounds as separate tracks on your recording media, so that in postproduction the sound editor can favor the best channel, or combine the two. For example, if you are shooting a sit-down interview, a hard-wired lavalier should be placed on your subject, and a boom mic (usually a hypercardioid) should be used as well. In addition to providing backup when the interviewee touches their chest and creates noise on their lavalier (as invariably happens at the most emotional or important part of an interview!), the mic on the boom will capture more of the room presence. Often the lav and the boom mic will be mixed together in postproduction to create an ideal balance between the close sound of the lav and the more full sound of the person speaking in a room with ambience.

■ Figure 14.3 A typical setup for recording documentary sound: wireless microphones are placed on two subjects, and a boom is used to pick up all other sounds. All three microphones are fed into the mixer, and the sound recordist mixes a two-channel output for the camera. They may also record isolated tracks (ISOs) and deliver those.
For observational scenes, you will likely be using a combination of a shotgun mic on a boom, and wireless lavs placed on one or more subjects. The number of wireless mics available to you will largely be determined by your budget, but it is also important to figure out how many people in the scene will be speaking. Often it will be enough to have one wireless lav on your main subject, and a boom to capture any other important audio. This is a common setup for a walk-and-talk scenario, where the main subject walks around a neighborhood or some other location, and speaks mainly to an off-camera director or the cinematographer. If they encounter someone along the way, the boom can be used to capture the audio of the person they speak with.
For observational situations where it is important to record more than one subject, multiple wireless mics can be used. Many reality TV shows routinely wire up six or more people. But be aware that your mixer and/or audio recorder will only be able to record so many channels of audio (2, 4, 6, 12, or 16, depending on the model), and at a certain point it becomes impossible for one person to monitor and mix them adequately. Also, concealing wireless mics takes time and a bit of expertise, and will add substantial prep time to your setup (Figure 14.3).
Regardless of the number of wireless mics you are using, a boom mic is always essential. A boom mic records richer sound than a lav, and because of its narrow pickup pattern a sound recordist can have a great deal of control over what it records. The boom allows the sound recordist flexibility in mic placement. As long as it’s out of the frame, a boom can be above, below, or next to the subject. Resist the temptation to rely solely on wireless, or to put a mic on the camera and leave it at that. The boom is your safety blanket, and will often be the source of your best sound.
For most documentary situations, between one and four wireless mics will be sufficient. Sometimes the sound recordist will record isolated tracks (called iso’s) for each mic, as well as a mix they create “on the fly.” For the beginning documentary sound recordist, keeping it simple by recording two sources on separate channels is advised. See Figure 14.3 for an overview of a common setup.
Setting up Your Equipment
Sound recordists typically move around with all the equipment they need on their body. You will need your recorder and/or mixer, with all of your wireless receivers in one bag. Always carry headphones. If you are booming, you will need to mount your boom mic and wrap your cables so that you can move quickly without problems. Keeping your cables coiled and neat, while remaining prepared to let cable out and coil it back up as needed, is a skill learned with time.
A final step in setting up your equipment is making sure that everything has fresh batteries and is working properly. Change batteries every day to avoid creating problems on set. Interrupting a shoot to change batteries is disruptive and will not be appreciated if it can be helped. Some equipment will need new batteries even more often, and a cable can go bad at any time, so be aware.
Be tactful when putting lavalier microphones on people. Most documentarians want microphones to be invisible, so putting a microphone on someone inevitably involves putting the mic and wires under clothing. Explain to people what you are doing, and ask for their permission before reaching inside their clothing or touching them. It can be helpful to allow them to run the mic up under their shirt or pants and then hand it to you for securing. If you need to plant a mic on a minor, always make sure their legal guardian is present.
Setting Levels
in practice
■ Concealing Lavaliers
For sound recordist Daniel Brooks, concealing a lavalier microphone starts with setting the microphone head in a cocoon made of moleskin, which has an adhesive backing and is designed to stick to human skin. The next step is to ask the subject to drop the cable down under her shirt. Daniel then removes the protective plastic from the back of the moleskin and tacks it on the subject’s chest, asking her to pat it down to make it stick properly. He then connects the transmitter at her waist. The result is a firmly attached and trouble-free microphone, which is relatively impervious to clothing noise (Figure 14.4).5 To see a video of this in action, visit our companion website (www.routledge.com/cw/Anderson).
Getting optimum audio levels depends on a combination of microphone placement and manual audio level adjustment on your recording device. The term setting levels refers to controlling the loudness of a signal as it enters the recorder or mixer, which in turn determines the strength of the recorded audio signal. All professional recorders offer manual level controls. The craft of the sound recordist centers on the ability to find proper levels, which generally means setting the loudest possible record level without overmodulating. The most important tools for monitoring and setting audio levels on a digital recorder or video camera are the peak meter (found primarily on cameras and sound recorders) and the VU meter (found primarily on field mixers).
Setting Levels on a Peak Meter
Peak meters are calibrated in decibels, from –∞ on the low side to 0 dB on the high side. If your audio level approaches 0 dB, your audio will become overmodulated or overloaded, which means the signal is too strong to be sampled accurately and the result is distorted sound. Sudden and loud transient sounds, like a car door slamming shut, which spike above 0 dB, are especially a problem, because even these brief noises can cause crackling on the soundtrack. You cannot fix overmodulated sound in postproduction, so it’s better to record low than to overmodulate.
On the other hand, if you record a level that is too low, you will be required to boost the sound level in postproduction. By turning up the volume of the recorded signal, you also turn up the volume of the unwanted audio noise and the result is greater background and system noise. Recording too low is called recording “in the mud.” Recording too low is different than recording soft sounds, which sometimes, appropriately, barely register on the peak meter.
To make sure you obtain a good, strong signal, but protect yourself from overmodulation, you should set your levels so that the loudest audio in the scene peaks at –20 dB on the peak meter. It can be hard to set levels in a documentary situation, as you don’t know what will occur during filming, but getting a good sense of how loud various people speak in regular conversation is a good guide. The range between –20 dB and 0 dB is called headroom and it gives you a buffer for any unforeseen and sudden audio spikes, like people suddenly yelling or slamming a door (Figure 14.5).
When setting record levels, it is best to avoid extremes on the level control knobs. You never want to have your level control set all the way to its loudest setting or too close to its lowest setting. These extremes usually mean there is either something wrong with your microphone placement or you have some technical problem along the signal path. Also remember that not all sounds need to be recorded at –20 dB. Very low sounds, like papers rustling as someone studies in the library, are fine to record at a low level like –40 dB or –30 dB. Trying to get this soft sound to peak at –20 dB will force you to increase the level to its maximum, which will increase the extraneous room noise (ambient sound) and system noise to an unnaturally high level. If a fairly strong source, say a person speaking, is registering very low on the meter, then it’s preferable to move the microphone in closer than to boost the recording levels too high.
 (A)
(A) (B)
(B) (C)
(C) (D)
(D)
■ Figure 14.4 In (A) we can see the tiny Countryman B6 lavalier in its nest of moleskin. In (B) the microphone is being placed. In (C) Brooks is showing the microphone placement on the subject’s chest. In (D) we can see the subject with the microphone concealed, ready for her interview.
■ –12 or –20?
In professional recording situations, audio levels are expected to peak at –20 dB. Confusion is created, however, by the fact that some prosumer and consumer cameras set their internal standards to –12. This may be adequate but keep in mind that you risk over-modulation by setting your level at –12.
Also, some cameras don’t have numbers on their meters at all! Instead, their peak meter is green or white, and turns to red on the upper end where sounds are likely to be overmodulated. In these cases, make sure to keep your sound level well below the red zone. When in doubt, play back your recorded sound and listen for any distortion.
Another strategy is to use slightly lower recording levels on the second of your two audio channels. So if your audio is peaking at –12 on one channel, lower the level on the other channel so that it is peaking at –18 or –20. This will only work, though, if you are recording the same audio on both channels. And there is no harm in testing a sound file in your NLE if you can.
Setting Levels on a VU Meter
If you use a field mixer for setting levels, you will likely encounter the volume unit (VU) meter, which monitors your incoming audio signal differently than a peak meter. While peak meters respond to all sounds directly entering the recorder, the VU meter indicates an average sound level. It is, therefore, not highly sensitive to short, sharp, percussive sounds. For example, a slamming door in the middle of a moderately quiet scene will cause the needle to jump a bit, but not to the true decibel level of that slam, because the noise is too brief for the needle to respond accurately. In addition, although the VU level range is calibrated in decibels, it has a different scale than the peak meter. The VU meter’s indicators run from –20 on the low end to +3 on the high end, with 0 dB as the optimal level. The point on the scale from 0 dB to +3 is highlighted by a thicker, red bar on a needle scale or red lights on an LED scale (Figure 14.6).

■ Figure 14.5 Normal dialogue should be recorded to peak at –20 dB.
As a general rule, the loudest sounds in a given recording situation should peak at 0 dB. Occasionally, the reading can peak in the red zone but should not spend too much time there, and in no situation should the VU meter needle “pin” against the +3 side of the scale. Normally spoken dialogue is set to average around –3 dB so that any sudden, loudly expressive moments might peak between –1 dB and 0 dB. Very low sounds, like paper rustling in the library, can be set to register around –10 dB. If you read in the previous chapter that 0 dB is the quietest sound audible to the human ear, you may wonder what is going on with this scale. The fact is, the dB scale used for metering is a different one, whereas 0 dB is a defined reference level of sound volume.


■ Figure 14.6 The scale of a VU meter is different from that of a peak meter. The loudest signal should peak between 0 dB to +1 dB, with normal dialogue registering between –5 dB and –2 dB. On the top is a needle-based gauge on the Shure FP33 field mixer. On the bottom, the Wendt X2 portable field mixer features an LED level indicator.
Setting Tone

■ Figure 14.7 Setting tone. A 1 kHz reference tone is used to calibrate the output of the mixer with the input of the camera. The mixer’s VU meter reads the tone at 0 dB (bottom insert), whereas the recorder’s peak meter should be set to register the tone at –20 dB (top insert).
Reference tone is a 1 kHz pure tone that is used to calibrate a chain of audio devices in the field. Let’s say you are plugging your microphone into a field mixer (with VU meters) that you will use to set and monitor levels during the shoot. The audio signal will go from the mixer into either the camera or a sound recorder. This is a very common audio chain, but how do you know where to set your level controls on the recording device so that the recorded audio will match the optimized levels you set on the mixer? All field mixers have a button that will generate the 1 kHz reference tone, which allows you to set the record levels so that what you see on the mixer during the shoot will match what the camera is recording. If you set up your mixer so that the1 kHz tone registers exactly as 0 dB, and then output the tone to the camera and set its level at –20 dB, you will know that if your levels look good on your mixer, they will be good on the camera as well (Figure 14.7).
It is standard practice to record 30 seconds of reference tone at the head of your record media, often accompanied by color bars if you are recording single-system and your camera can generate them. This ensures that audio transfers and levels in postproduction can be calibrated with the original audio recording. This is called bars and tone and it assures the postproduction team that what they are hearing and seeing is exactly what was recorded.
■ Recording Your Audio
Once filming is underway, the sound recordist’s job is to monitor the sound, hold mics, adjust levels, and be the “ears” of the production. Just as a cinematographer is trained to see every light source on the scene, a sound mixer is trained to hear every sound on the location that might wind up on the recording. Knowing when to interrupt production because of unwanted sound problems is difficult and subjective. It is the sound recordist’s job to make sure the audio is clean. On the other hand, there are situations where interrupting what is going on is inadvisable, and it would be easier to “pick up” (rerecord) a particular line later on. You should discuss with the director ahead of time whether he wants you to interrupt production for sound issues. Often, unless it’s a disastrous interference or there is no sound, he will want you to signal to him that there is sound interfering with recording and he will decide whether to stop filming.
Riding the Gain during Recording
When you initially set levels for dialogue, this “normal” dialogue level is only your first reference. As the shooting situation unfolds, it is the job of the sound recordist to make adjustments to audio levels to accommodate the changes in volume that are part of a real-world soundscape. Raising or lowering the record level as needed is called riding the gain, or riding levels.
A word of caution is in order here. The difference between the loudest and softest sounds in any single recording situation is called the dynamic range, and setting levels for a sound situation with a wide dynamic range is a mixer’s greatest challenge. Riding levels too often or too extremely causes unnatural fluctuations in the background noise and can cause unanticipated sounds to spike above 0 dB or fall “into the mud.” A range of loud and soft sounds is natural. It’s important to capture a strong audio signal, and certainly important that dialogue be intelligible, but if you constantly raise and lower the levels so that every sound records at the same level, the effect is terribly unnatural. Use judgment and caution, and listen to your recorded audio to learn what strategies are working for you and which can be tweaked.
As mentioned in Chapter 13, it is critical that you disable Automatic Gain Control (AGC) and adjust your recording levels manually.
Limiters, Microphone Attenuation, and Frequency Filters
While AGC is not recommended, there are other automatic audio controls that you will encounter on cameras, recorders, and field mixers that can be useful. Limiters are volume controls that only come into effect when an audio signal reaches overload (Figure 14.8). At this point, the limiter suppresses the loudness by clipping the sound before it can peak. The danger with employing a limiter is that it can be difficult for an operator to tell if the levels are properly set, as volume extremes never peak when the limiter is turned on. In controlled audio situations, try not to use the limiter at all, though it can be useful when a single person is both booming and setting levels and you anticipate some erratic loud noises in the scene. In these cases, set the levels for the most common audio first, then employ the limiter. Another tool on your mixer or digital recorder is a microphone attenuation or “pad” switch, which cuts the overall volume of incoming audio by 10 or 20 dB (Figure 14.8). This can be very useful in loud sound environments where a sensitive microphone will send a signal that can overload the mixer’s inputs.

■ Figure 14.8 Limiter (A) and Attenuation (B). On this mixer each input has the option of –10 and –20 dB attenuation.
Frequency filters automatically remove unwanted portions of the frequency range. The most common filters found on field mixers and recorders are designed to cut off low frequencies and are variously called bass, bass roll-off, low-pass, or low-frequency attenuation filters. Bass roll-off is common because we often encounter wind noise (wind hitting the microphone diaphragm), traffic noise, and low machinery hum (like rumbling HVAC systems) in the field. For example, perhaps we are filming in a factory where there is a constant, low-frequency machinery hum that is making dialogue difficult to record. A low-frequency filter will automatically suppress frequencies below, say, 50 Hz (the specific frequencies “rolled off” are variable depending on the system). Use frequency filters with caution—the equalizing capabilities in postproduction are far more sophisticated and precise.
Headphone Monitoring
In the field, sound monitoring is always done through headphones. Headphones with isolation pads are essential so the sound recordists can be certain that what they are hearing is only the audio being recorded. Earbuds or small headphones do not prevent sound coming directly to your ears, making it impossible to tell what you are hearing directly and what you are recording (Figure 14.9).
In addition to monitoring for sound problems (like loose connections or signal interference), headphones are also used to evaluate other aural qualities of the recording situation, like background noises or the acoustics of the recording location. This is important because if there is a sound issue, like a car passing by outside your location, you need to make a quick decision whether that noise affec ted your recorded tracks or not. The recorded sound might be quite different from what people in the room experience with their bare ears.
Once record levels are set, the sound recordist can use her headphones to double-check the accuracy of her microphone placement, being sure to keep it on-axis and the subject-to-mic distance consistent (p. 239).

■ Figure 14.9 Large headphones that completely cover the ears should be used to monitor audio, because they block out noise.
It is also important to listen to the output of the sound at the last point in the audio chain. It is entirely possible that your audio will sound great when it leaves the mixer but that there will be a problem in the camera, or on the way to the camera or recorder. For this reason, whenever the output of the mixer is being sent to the camera via wireless transmission, the recordist will always create a backup recording on a portable audio recorder. If you are hard-wired to the camera with a breakaway cable, you can monitor the actual output of the camera through the breakaway cable’s headphone return. As a last resort, plug your headphones directly into the camera—it’s better than not listening!
Microphone Technique
Booming: Clean Sound, Consistency, and Being On-Axis
The key to getting good audio in the field is recording clean and consistent sound. By “clean,” we mean the desired sounds with as little background mixed in as possible. Key to this is choosing a mic with the best “pickup pattern” for the job. In addition, getting the microphone as close to the subject as possible is essential, because the stronger the signal from your desired sound source, the lower you can set your record levels and the lower the extraneous noise will be. Background sound in recording is like salt in cooking: you can always add a little more later, but you cannot take it out if you’ve put in too much.
Consistency means making sure that there are not identifiable differences in the sound as the scene unfolds. This means maintaining more or less the same distance between your microphone and the subject. It is also important to place your mic correctly in relation to your audio source. Mics should be pointing at the mouth of a person speaking, not the top of their head. Also make sure that your target is in the microphone’s optimal sensitivity range. Correct placement is referred to as being on-axis (Figure 14.10). As a rule, the sound recordist needs to be constantly double-checking that the mic is in its best position as the subject moves around. Then they adjust levels on the recorder to get a strong signal. Remember, boosting the input gain to compensate for a badly positioned micro phone will yield poor results.

■ Figure 14.10 Microphones should be positioned “on-axis.” Note how the microphone is pointing directly at the subject’s mouth from above and slightly in front.
One indispensable tool for microphone placement, and a common sight on any film production, is the boom pole, which allows you to position a mic as close as possible to the source but still remain outside the boundaries of the frame (Figure 14.11). A boom pole is a long, lightweight pole that telescopes out to various lengths. At one end is a shock mount that holds the microphone in place. Shock mounts come in many different styles but the principle is the same for all of them. The microphone is held securely in place by a series of rubber bands or other mounting that absorbs any vibrations or handling noise from the boom pole (Figure 14.12).
The boom pole allows the operator to suspend the microphone precisely over and in front of the speaker, and to position it so that it records the audio as it is coming out of their mouth. Sometimes, it is advantageous to hold a boom below the talent and angle the microphone upward, but this can be tricky, as you may pick up background noises from above, like airplanes flying overhead if you are outdoors or fluorescent lights buzzing if you’re inside.

■ Figure 14.11 A boom pole is essential to keep microphones as close to the subject as possible while keeping the mike and boom person off frame.
Boom Technique

■ Figure 14.12 A shock mount keeps the microphone secured and prevents it from picking up vibrations or handling noise from the boom pole.

■ Figure 14.13 Plastic (left) or velcro (right) ties can be used to secure your cable to your boom pole.

■ Figure 14.14 Learn how to coil cable properly and keep your cables well organized.
Using a boom requires careful technique and a lot of practice. Here are a few tips:
- Consistency is essential. A boom operator must maintain both a consistent distance between the speaker and microphone and the proper on-axis mic angle during a take. Pulling the boom away from a speaker, even a few inches, or repositioning the micro phone even slightly off-axis will drastically change the quality of the audio and shift the balance between the audio you want and the background noise.
- Boom poles should be handled gently to reduce vibration on the pole, which can be transmitted up to the microphone. Take off all rings that can tap against the boom pole. Use your body and fingertips to change the angle of the microphone and keep subjects on-axis.
- The boom operator should communicate with the camera operator to determine the limits of the frame. While you should not interrupt the cameraperson during shooting, you can try and assess the expected framing of an interview ahead of time, and set your boom position accordingly. A camera operator will let you know when you are in the frame! Try not to have it happen often.
- Care must be taken not to cast a boom shadow over the set or onto the subject. Usually, the boom operator sets up after everything is ready to go and fits in around the existing camera and lighting situation.
- Often boom operators are called upon to follow moving subjects. Sometimes this means pivoting the body; at other times it may mean walking alongside the subject and camera operator. Care must be taken to move quietly, stay on-axis, and maintain consistent subject-to-mic distance. It is also essential to watch where you are going so you don’t walk into a fire hydrant or light post! Often a production assistant will be assigned to help the camera person, but the sound person is usually on their own to navigate the physical environment, often while staying connected to the camera.
- Some boom poles are made so that the mic cable runs inside, but in cases where the mic cable is free, the cable should be wrapped a few times around the pole to avoid having it slapping against the pole or drooping into the frame. Many sound recordists use velcro or plastic ties (Figure 14.13), or hair bobbles, to attach cables to boom poles.
- Learn how to coil cable (there is a technique for making it loop and lie flat) and keep your cables organized (Figure 14.14). You will have to be able to wrangle your cable (let it out, gather it back up again) quickly as the distance between you and the camera person changes. Don’t let cables lie on the floor where people can trip over them. Conversely, don’t keep them so short that you are pulling on the camera’s connectors. This takes practice.
- In situations that are too tight for a boom pole, it is also possible to mount a microphone on a small handheld device with a shock mount, called a pistol grip (Figure 14.15).

■ Figure 14.15 Recording sound in close quarters can make handling a boom cumbersome; for these situations, a pistol grip is more convenient.
Recording Room Tone
When you are using multiple microphones, it is inevitable that the background noises (or ambient sound) will shift from shot to shot. In postproduction, sound editors and mixers will attempt to create audio continuity between your shots so that there is a seamless sound transition between them. In addition, dialog is often cut up in editing, and you can end up with noticeable gaps, which must be filled.
To help with this process in postproduction, you should always record one minute of ambient sound (or room tone) at each and every location. This is often done when filming is about to wrap. Before anyone starts packing up equipment, the sound recordist asks everyone to “be quiet for room tone.” The mic is then opened at the normal, speech level and the recordist announces the sound take by stating (1) the production title, (2) the location, (3) the date, and announcing “one minute of room tone.” Then everyone stands still while one minute of general ambient sound is recorded. The recordist then calls “End room tone” and wrapping can begin. It is important to do this while the crew and equipment are still on the set. Remember they, too, were part of the ambient atmosphere during each take. Room tone should be recorded even before turning off any lights, because they will make little pinging noises as the metal cools.
Wind Noise
A final common sound challenge, especially outside, is wind noise. Microphones are particularly vulnerable to wind noise because the wind buffets the highly sensitive microphone diaphragm. High winds can sound like a freight train, but soft winds, too, can contaminate sound by generating a low-frequency rumble. Windscreens dampen the effects of the wind on the diaphragm without altering the incoming sound waves. Thankfully, there are many windscreens on the market that fit the head of almost any microphone, even lavaliers, and you should always bring one with you for each mic that you plan to use (Figure 14.16).

■ Figure 14.16 Windscreens come in many sizes and levels of effectiveness. Here we see small foam windscreens for lavaliers (top), and a Rycote Softie provides reasonable protection for a boom mic (center). On the bottom a Rode zeppelin being covered with a “dead cat” for heavy duty weather.
Doing a Sound Report
The day’s filming is over, but there is one more task for the sound recordist. What a particular production will need in terms of a sound report can vary widely but it is always important to create some kind of documentation of your day’s work. Of key importance will be noting which microphone and/or subject was on which input during recording. Also, did you do any wild recording? There is no visual record, so your notes are essential. Also note the location of any room tone, and any specific problems in the tracks. If you are working single-system, it’s a good idea to ask the cameraperson for time code numbers when you start or end a scene. If you are working double-system, you may or may not have time code, but you will definitely have file names and/or numbers. For a typical printed sound report, visit our companion website (www.routledge.com/cw/Anderson).
in practice
■ Mono vs Stereo Recording
Mono recording refers to a setup where each sound source has its own recorded channel. Stereo recording, on the other hand, dedicates two channels to each sound source. Each channel captures the sound from a different perspective in an effort to reproduce the dimensionality of human hearing. Stereo recording is most common for music and sound effects that involve motion, like a train or bird passing by. Detailed information about stereo recording is beyond the scope of this book, but it is increasingly popular.
Because of the need to retain left-right spatial relationships, stereo recording is best done with a stand rather than on a boompole. There are different types of placement, but the X-Y placement (Figure 14.17, left) is the easiest and most common. The two micro phones are close, almost touching to avoid phase error, which occurs when sound waves arrive at different times from the same source, canceling each other out. In addition, the microphones are not particularly close to the source, as close proximity would not give a good sense of the stereo dimensionality (Figure 14.17, right).


■ Figure 14.17 Stereo recording demands careful placement of microphones to achieve the desired audio dimensionality and perspective.
■ Conclusion
Each location and each miking situation is unique and poses a variety of challenges. To a large extent, that’s the fun of this job! As a sound recordist, you need to understand the capabilities and limitations of your equipment, and be resourceful and creative in devising strategies to obtain the best possible audio under any circumstances. Often an entire scene can be created around a special piece of sound, and a rich soundtrack can truly heighten the experience of “watching” a documentary.