

"What a curious feeling!" said Alice."I must be shutting up like a telescope!"
And so it was indeed: she was now only 10 inches high, and her face brightened at the thought that she was now the right size for going through the little door into that lovely garden.[75]
One of the main messages in this book has been "test smarter, not harder"—that is, write fewer tests that each cover more code. If done using the techniques we've described, you can actually improve your effective test coverage while having fewer test cases (but comparatively more test scenarios, or "inputs" and their "expected outputs," for each test case).
This approach should work well for the majority of business code out there. However, almost every project has a "core" element: an engine or state machine that's central to the rest of the system; core business logic that would potentially cost the company millions of dollars if it went wrong; "mission critical" code; intricate algorithms; and so on.
For this type of code, it makes sense to apply a more comprehensive set of tests, which don't just test the outputs of a function, but zoom in to a sub-atomic level and examine the function's internal operations, not leaving any code flow or state transition to chance or assumption. Thankfully, DDT can help here too: you can draw out a design diagram (or set of diagrams) and then use the "standard" DDT pattern to identify test cases and test scenarios.
Warning
Algorithmic unit tests are even finer-grained than "normal" unit tests—i.e., they go sub-atomic. Though algorithmic unit tests are well suited to the types of code we've just described, we wouldn't recommend them for "everyday" code—you'd be there for most of this decade and the next, writing intricate tests for code that almost certainly doesn't require that level of testing.
In this chapter we'll demonstrate how to apply DDT to create algorithmic unit tests. We'll illustrate the process with UML activity diagrams, but the same principles should hold true for other types of "dynamic" diagrams (that is, diagrams that describe a sequence of events or state changes rather than a static model such as a class diagram).
The unit testing techniques described in this chapter build on the "ICONIX Process for Algorithms" roadmap, which originated with Doug's work with the Large Synoptic Survey Telescope image processing pipelines, and is described in the upcoming book ICONIX Process Roadmaps (Fingerpress, September 2010).
Following is a list of the top ten "to-do" items for algorithm testing:
10. Start with a controller from the conceptual design.
9. Expand the controller into an algorithm design using activity diagrams, state-chart diagrams, etc.
8. Tie the diagram loosely to your domain model.
7. Split up decision nodes that look like they're doing more than one check.
6. Create a test case for each node (Activity and Decision nodes).
5. Define test scenarios for each test case, specifying a range of inputs and expected outputs.
4. Create input data from a variety of sources, depending on the algorithm; e.g., use "fuzzing" techniques.
3. Assign the logic flow into individual methods and assign them to classes.
2. Write "white box" unit tests.
1. Apply DDT to other types of design diagrams.
We'll structure the remainder of the chapter around this top-ten list.
Think back to Part 2 for a moment... you've created a slightly higher-level conceptual design (see Chapter 6), and then evolved this into a low-level detailed design (Chapter 5), with a "gritty" real-world sequence diagram drawn out for each use case, exploring all the ins and outs, the sunny day and rainy day scenarios. From this you've identified unit tests that weren't already covered by controller tests, or which looked like they would benefit from a more "zoomed-in" form of test, operating on an individual function instead of a group of functions.
In this chapter we'll create an algorithmic design for a single controller from the Use Address use case from Chapter 7. To recap, here's the full narrative use case. We've shown the part of the Basic Course that we'll focus on in this chapter in bold:
- BASIC COURSE:
The user types an address using all address fields on the Quick Search window. The system enables the "Locate" button as soon as an entry was made in either one of these fields: City, State, Postal, Country.
The user clicks "Locate". The system geocodes the location based on the level of detail provided by the user and stores any candidates in an Address Candidate Collection. If a single candidate is found or exactly one of the multiple candidates has a 100% match rate, the System sets the AOI based on this Address Candidate.
- ALTERNATE COURSES:
The user clicks "Clear": Entries in any fields will be cleared.
Multiple valid candidates found: The System displays an Address Candidate widget with a list of potential candidates to choose from. The user selects an Address Candidate.
No candidates were found: The system displays a message: "Location not found".
Figure 12-1 shows the robustness diagram (i.e., conceptual design) for this use case—we've circled the part that we'll turn into an activity diagram.
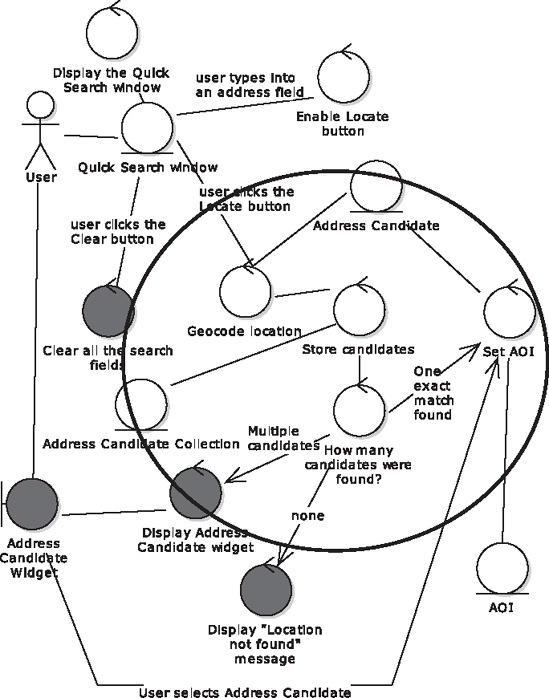
We'll zero in on one of the controllers shortly, but the activity diagram actually covers four of the controllers: Geocode location, How many candidates were found?, Set AOI, and Display Address Candidate widget.
The system geocodes the address using ESRI's Geocoding Service, then checks to see how many candidate hotels were returned. If none, then a separate service—the POI Locator Service—is given a try. If any hotels were found, the AOI ("Area Of Interest") is set around the address candidate; if more than one hotel was found, the address candidates are listed in the Search Widget.
Collectively, this small group of controllers is a subsystem that should get more attention in the detailed design. Much of this design detail could be added to the original sequence diagram, as it falls outside the remit of an "algorithm test." However, we'll focus on the How many candidates were found? controller (in which there's some deceptively complex logic going on) to see how more in-depth testing will benefit the code.
Note
You might well find that one software function covers a single algorithm; e.g., a controller called "Sort Results" would imply that some sorting code will need to be written (assuming there's no suitable sorting algorithm built in to the language or its collections API). So "going sub-atomic" in that case would involve diving inside a single controller and designing the internal logic in fine detail; i.e., you'd draw one activity diagram for a single controller.
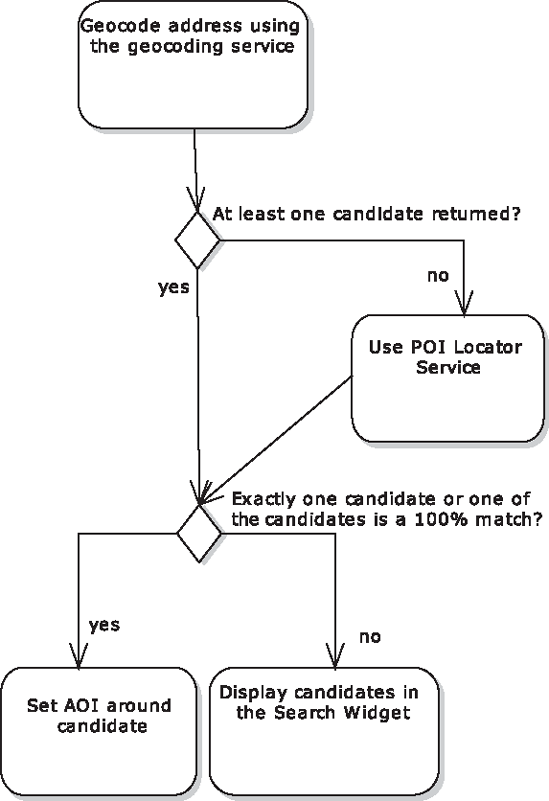
The "Geocode location" and related controllers can be expanded out into the following logic:
geocode the address using the geocoding service
if the geocoding service returns at least one candidate then
  if there is exactly one candidate or one of the candidates is a 100% match then
    set the AOI around that candidate
  else
    display the candidates in the candidate widget
else (no candidates found)
  try the POI locator service
  if there is exactly one candidate or one of the candidates is a 100% match then
    set the AOI around that candidate
  else
    display the candidates in the candidate widget
Figure 12-2 shows the same pseudocode transcribed into an activity diagram.
With a more complex algorithm you may also want to create additional diagrams, or use different diagram types, to describe the logic. The diagram doesn't necessarily need to be UML, as long as the format allows you to describe individual steps and state changes as discrete operations.
Using the ICONIX Process, you create a domain model, then use this during conceptual design—identifying further domain classes in the process—and then allocate behavior to each domain class during the detailed design. Normally you allocate behavior using sequence diagrams, which allow you to draw lines between objects to allocate operations/methods. But when designing algorithms, you're more likely to be using an activity or state chart diagram.
You'll probably already have a pretty good idea which class or classes your algorithm will be implemented in. So at this stage, all that's needed is to drag the relevant domain classes onto the diagram, and place each one down the right-hand side, next to the relevant node—see Figure 12-3.
Think about not just the names mentioned in the activity, but what the output function is—e.g., "Geocode address using the geocoding service" points to "At least one candidate returned?" So from this it's fairly obvious that a collection of Candidates is returned... so we'll add a CandidateCollection class to the model.
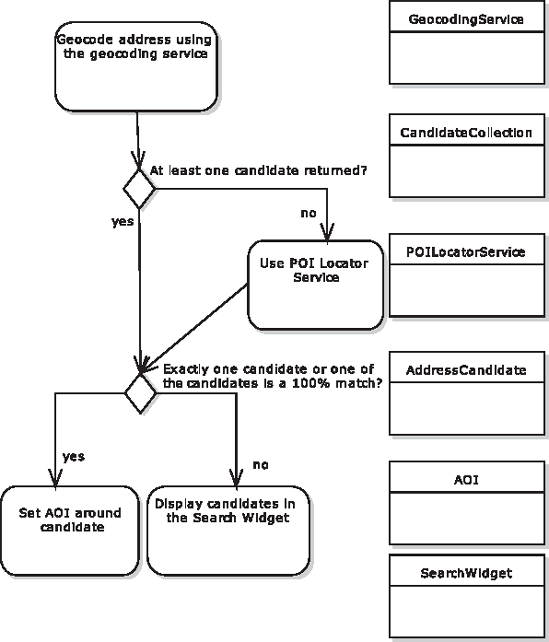
Each of the objects on the right in Figure 12-3 is essentially a "helper object," but the flow of the algorithm itself takes place on whatever class is central to the main operation. In this case it's a server-side Java class called SearchService. (This part of the behavior allocation—linking the main operation to SearchService—would already have been done on a sequence diagram during detailed design.) So each activity in Figure 12-3 will be part of a method on SearchService, and may (or may not, depending how the design turns out) call out to one of the (currently loosely associated) domain classes on the right.
Review decision nodes and identify those that appear to involve more than one check. In Figure 12-3, one of the decision nodes is called "Exactly one candidate or one of the candidates is a 100% match?" That node represents, of course, two checks, so it could be a candidate for being split into two separate decision nodes.
There's no hard and fast rule for this, though. If splitting them up makes the design simpler, and you want to test them as two separate decisions, then split them up. But if you find that it just makes the code or the design more obtuse (with code having to work around the fact that they're separate), then keep them together. But do keep a lookout for such choices while you're designing. (In the example in this chapter, we're keeping it as one check, as it befits the design.)
Create a test case for each activity and decision node. This step is not at all dissimilar from how you'd create behavioral test cases and use case scenario test cases: just identify a control point at the relevant level of granularity (very large-grained, "scenario-sized" for scenario tests; medium-grained, "controller-sized" for controller tests; fine-grained or "function-size" for unit tests, and, of course, "pico-grained"/sub-atomic for algorithm tests).
First create a new diagram beneath the activity diagram's package, to hold the test cases. (In EA, create a "Custom" diagram that is in its "Extended" group of diagram types.) For each node on the activity diagram, create a new test case with the same name (see Figure 12-4).
Note
At the time of writing, EA doesn't yet auto-create test cases from activity diagrams, as it does with other diagram types such as sequence diagrams. Luckily, it takes only a couple of minutes to create the test cases manually, but it's certainly high up on our "wish list" of time-saving new features!
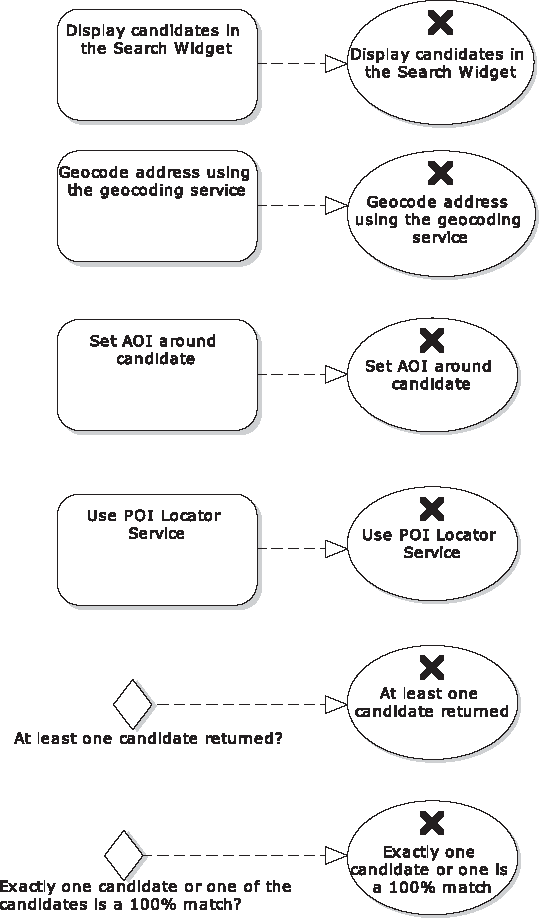
For the example in this chapter, we'll implement and test the two decision point nodes, "At least one candidate returned?" and the snappily titled "Exactly one candidate or one of the candidates is a 100% match?"
Define your test scenarios, as many as you need for each test case. Be sure to specify the range of inputs and outputs for each scenario.
With a normal unit test case, you'd test a function with a variety of inputs, and define the acceptance criteria/expected results for each one. Algorithm test cases are no different.
The "At least one candidate returned" test case, for example, could have test scenarios added, as shown in Table 12-1.
Table 12-1. Test Scenario Details for the "At least one candidate returned" Test Case
Name | Input | Acceptance Criteria |
|---|---|---|
No candidates | an empty CandidateCollection | false returned |
One candidate | CandidateCollection containing one address | true returned |
Two or more candidates | A CandidateCollection containing a random number (>1) of addresses | true returned |
The three test scenarios in Table 12-1 give us the "classic" testing cardinality of "zero," "one," or "more than one," where any value greater than one is essentially treated the same: two will be subject to the same issues, limitations, and effects as 1,000. Our test scenario could use a random value each time.[76] Some tests will benefit from a range of random numbers being used each time; there will be more about sourcing of test data in the next section.
Table 12-2 shows the test scenarios we've added for the second decision node test case, "Exactly one candidate or one is a 100% match."
Table 12-2. Test Scenario Details for the "Exactly one candidate or one is a 100% match" Test Case
Input | Acceptance Criteria | |
|---|---|---|
No candidates | an empty CandidateCollection | false returned |
One candidate | CandidateCollection containing one address | true returned |
Two inexact candidates | CandidateCollection with two addresses, neither of which is a 100% match | false returned |
One exact and some inexact candidates | CandidateCollection with several addresses, one of which is a 100% match | true returned |
Several exact candidates | CandidateCollection containing several addresses, all of which are exact candidates | false returned |
That last test scenario in Table 12-2—"Several exact candidates"—is a crucial one, as you'll see shortly, since (at the risk of revealing the plot too early in the story) it will highlight a bug in the code.
Now that we've added test scenarios, we'll quickly transform our two test cases into UML test classes (Ctrl+H in EA) using the ICONIX_JUnit4 transformation—see Figure 12-5—and turn them straight into JUnit 4 test code.[77]
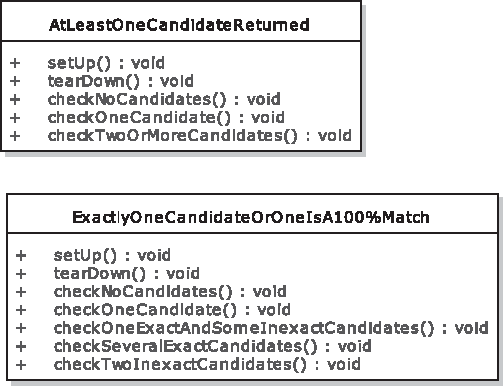
Here's the generated test code for the first test class—the pattern of which should be starting to look pretty familiar by now:
import org.junit.*;
import static org.junit.Assert.*;

/**
 * 'At least one candidate returned' - controller tests.
*/
public class AtLeastOneCandidateReturned {

    @Before
    public void setUp() throws Exception{
        // set up test fixtures here...

    }

    @After
    public void tearDown() throws Exception{
        // destroy test fixtures here...

    }

    /**
     * Input: an empty CandidateCollection
     * Acceptance Criteria: false returned
     */
    @Test
    public final void checkNoCandidates() throws Exception{
}
/**
* Input: CandidateCollection containing one address
* Acceptance Criteria: true
* returned
*/
@Test
public final void checkOneCandidate() throws Exception{
}
/**
* Input: A CandidateCollection containing a random number (>1) of addresses
* Acceptance Criteria: true returned
*/
@Test
public final void checkTwoOrMoreCandidates() throws Exception{
}
}The second test class is more of the same generated "skeleton" code, so we'll skip it for now. You'll see the fully implemented test code later in the chapter, though.
Two is an impossible number, and can't exist...[78]
Admittedly Asimov was referring to absolute singletons like universes and deities when he wrote this. When you're testing, it would be dangerous to assume that certain input values or mid-transition states can never exist: testing outside the expected bounds—adding "rainy day scenarios"—is a key part of DDT.
The test data you use will need to be a mix of "realistic" day-to-day test data, and erroneous data that potentially trips the system up with unexpected input values. You're really testing for two different things here: that the system works as expected, and that it reports errors correctly.
Sourcing useful test data can be a problem. For example, if you happen to be developing a credit risk system (which would use hoards of historical data to predict the likelihood that counterparties will default on their loan repayments), randomly generated data won't be much use: you'll need accurate, real, and, above all, meaningful data.
The data can be loaded into your test from a number of sources, e.g., CSV files or spreadsheets, or via a database (a local DB could be set up to keep the data free from outside interference or ghost reads). A lot depends on the type of algorithm, how much data it needs for effective testing, who needs to create the data (BAs, "quants" or a customer), and whether it needs to be kept up to date once created.
If the purpose of your test is to chase down the "rainy day scenarios" and test the code's resilience to erroneous data, a technique known as fuzzing might be useful.[79] Fuzzing (or fuzz testing) involves finding bugs using malformed or semi-malformed data, randomly generating input values that fall outside the expected range.
Just generating random values may not be especially effective, as hitting the particular value that exposes a bug can become too much like a game of chance with infinitesimally low odds. Another technique, known as constrained random testing (sometimes used in chip design), constrains the inputs in some way so that the potential source isn't infinite; e.g., instead of "any non-zero natural number," restrict the number to the number of known available address candidates in the database.
Think of an algorithm test as more finely grained than a "normal" unit test. In fact, it may help to think of algorithm tests as being sub-atomic.
Like operating a string puppet, the idea behind algorithm tests is (figuratively speaking) to throw a line around each step in the process, and give it a little tug. It's micro-control, as you want to monitor each state change within the algorithm to ensure that it did what you expected based on the design. As individual functions tend to involve more than one state change, this means that your unit test needs to monitor something smaller than a single function.
You may wonder how a unit test can test something smaller than a single function call. Generally a function consists of "Input value
There are essentially two ways to get inside an atomic process:
Inject a "spy object" into the object under test
Divide the function into yet-smaller functions, and write individual unit tests for each one
Which method you choose depends on what you want to achieve from the test, of course. If you use a "spy object" to monitor state changes and report on them afterwards, you're effectively monitoring the overall process from start to end; it's an integration test on a pico scale. Conversely, subdividing the function into smaller functions (like blasting the rocks in a game of Asteroids) means you'll be testing each function separately; each one becomes an isolated unit with its own input value, process, and expected result.
Back to the Mapplet example, we need to create a method for each activity node and assign them to classes. Not all of the activity nodes will turn into a whole method; some will go inside a single method. Deciding whether to create a new method is partially based on the choice of how you're planning to test the activity—i.e., whether you'll pass in a spy object or just test the outputs of individual methods. We'll compare both approaches for the "At least one candidate returned" test case.
Note
EA has a behavioral code generation feature with which you can drag methods from classes onto an activity diagram, and then generate algorithmic code from the diagram. It genuinely creates working source code from your design.[80] We anticipate that it's just a matter of time before it'll also generate the matching algorithm test code. Be sure to keep an eye on the Sparx web site, as well as www.designdriventesting.com, for new developments.
Assigning the methods to classes here creates a "stronger" association than when you earlier placed the domain classes next to nodes on the activity diagram. In fact, much of the behavior allocation should already have been done during detailed design using sequence diagrams, so there should be very little left to do here: any straggling operations should now be allocated to the class that most closely matches their domain.
The domain objects you placed on the diagram should be a pretty strong hint as to which class you allocate each method to; e.g., "At least one candidate returned?" is next to CandidateCollection, and it also seems like CandidateCollection would be a suitable place to put such a check.
Figure 12-6 shows the class diagram with our new methods allocated. The decision node "At least one candidate returned?" has turned into the method hasAtLeastOneCandidate() on CandidateCollection. Also, the Candidate domain class has evolved into AddressCandidate.

The AddressCandidate objects are the ingredients, the slivers of gum, being passed through the algorithm's machinery. The SearchService would call out to GeocodingService and POILocatorService, and in each case receive back a CandidateCollection, which will contain zero or more AddressCandidates. For the test, we'll just create input data consisting of CandidateCollections with varying numbers of AddressCandidates, and pass these into the code under test.
Here's the (currently quite minimal) code for AddressCandidate:
public class AddressCandidate {

    private boolean exactMatch;

    public AddressCandidate(boolean exactMatch) {
        this.exactMatch = exactMatch;
    }

    public boolean isExactMatch() {
        return exactMatch;
    }
}
In the finished implementation, this will also contain identifying data such as a name and lat/long co-ordinates; but for the algorithm in this chapter we need only the exactMatch flag.
We'll dissect the main class that we want to test, CandidateCollection, over the next couple of pages. But to start off, here it is in its entirety:
package com.vresorts.mapplet.geocoding;

import java.util.*;

public class CandidateCollection {

    private List<AddressCandidate> candidates;

    public CandidateCollection() {
        this(new ArrayList<AddressCandidate>());
    }

    public CandidateCollection(List<AddressCandidate> candidates) {
        this.candidates = candidates;
    }

    public boolean hasAtLeastOneCandidate() {
        return candidates.size() > 0;
    }

    public boolean hasOneCandidateOrOneIsDefiniteMatch() {
        if (candidates.size()==1) {
            return true;
        }
        for (AddressCandidate candidate : candidates) {
            if (candidate.isExactMatch()) {
                return true;
            }
        }
        return false;
    }
}
Note
Remember that we mentioned that one of the test scenarios would highlight a bug in the code. If you can spot the bug in CandidateCollection based on the test scenarios in Table 12-2, you win a massive pork pie with lashings of Worcester sauce (just present cash at your nearest grocery store to redeem prize). If not, running the JUnit tests that we're about to implement will also highlight the bug. But no pork pie in that case...
As you can see from the code, CandidateCollection is primarily a wrapper around a java.util.ArrayList (a type of Collection), with added behavior that's relevant to a grouping of address candidates. CandidateCollection has two constructors: one's zero-arg, which will initialize the object with an empty list of AddressCandidates, and the other one takes a pre-prepared list of AddressCandidates. This second constructor is how the collection is initially populated. It will also prove useful shortly, when we inject a "spy object" into the class.
Now that we have the actual code that we want to test, let's go back to the "skeleton" test class that EA generated, and fill in the gaps with the interesting stuff.
Just as a quick recap, Figure 12-7 shows the two decision nodes in the activity diagram that we're going to test here.

We'll now write the test code to validate both these decision nodes.
Tip
Reserve this level of test detail for algorithm tests; avoid going "sub-atomic" for normal unit tests.
Remember that each activity or decision node on the activity diagram has its own test case, and each test case has several test scenarios (i.e., varying input data for the same test case).
So here's the first test scenario, for the "At least one candidate returned" case:
/**
 * Input: an empty CandidateCollection
 * Acceptance Criteria: false returned
 */
@Test
public final void checkNoCandidates() throws Exception{
    CandidateCollection addresses = new CandidateCollection();
    assertFalse( addresses.hasAtLeastOneCandidate() );
}
As we mentioned earlier when looking at the class diagram, CandidateCollection has a no-arg constructor, which initializes the object with an empty list of address candidates. A quick run of the JUnit test runner in Eclipse produces a green bar, so we're golden (or green, depending how you look at it).
On to the next two test scenarios, to complete the first test case. Remember each of these is testing the hasAtLeastOneCandidate method:
/**
 * Input: CandidateCollection containing one address
 * Acceptance Criteria: true returned
 */
@Test
public final void checkOneCandidate() throws Exception{
    List<AddressCandidate> testData = new ArrayList<AddressCandidate>(1);
    testData.add(new AddressCandidate(false));
    CandidateCollection addresses = new CandidateCollection(testData);
    assertTrue( addresses.hasAtLeastOneCandidate() );
}

/**
 * Input: A CandidateCollection containing a random number (>1) of addresses
 * Acceptance Criteria: true returned
 */
@Test
public final void checkTwoOrMoreCandidates() throws Exception{
    int numCandidates = new Random().nextInt(100)+1;
    List<AddressCandidate> testData = new ArrayList<AddressCandidate>(numCandidates);
    for (int num=0; num<numCandidates; num++) {
        testData.add(new AddressCandidate(false));
    }
    CandidateCollection addresses = new CandidateCollection(testData);
    assertTrue( addresses.hasAtLeastOneCandidate() );
}
Note
checkTwoOrMoreCandidates() uses a random function to pass in a varying number of address candidates. Test purists might find this worrying, as it means the test could potentially pass or fail randomly each time it's run. This would be worrying if the random input potentially crossed the range between "correct" and "incorrect" data. However, as long as the random values can fall only within a "correct" (sunny day) range or an "incorrect" (rainy day) range, it's a valid way to eke out unexpected test failures. Also see the section previously on fuzzing, and constrained random testing.
Another quick run of the test runner produces a green bar—as you'd expect really, since the code under test (so far) is just a one-liner. The next test case is a little more complicated, though.
The first test scenario in this case is very similar to the first one for the previous test case. We're calling a different method, but ultimately the input data and expected result are identical. Here's the first scenario, then, for our second test class:
/**
 * 'Exactly one candidate or one is a 100% match' - controller tests.
 */
public class ExactlyOneCandidateOrOneIsAnExactMatch {
    /**
     * Input: an empty CandidateCollection
     * Acceptance Criteria: false returned
     */
    @Test
    public final void checkNoCandidates() throws Exception{
        CandidateCollection addresses = new CandidateCollection();
        assertFalse( addresses.hasOneCandidateOrOneIsDefiniteMatch() );
    }
The second test scenario is also largely identical to the previous test case, so we'll skip that.
In the third test scenario, our test data consists of a CandidateCollection with several AddressCandidates; one is an exact match and the others aren't. Here's the test code:
/**
 * Input: CandidateCollection with several addresses, one of which is a 100% match
 * Acceptance Criteria: true returned
 */
@Test
public final void checkOneExactAndSomeInexactCandidates() throws Exception {
    List<AddressCandidate> testData = new ArrayList<AddressCandidate>(5);
    testData.add(new AddressCandidate(true));
    testData.add(new AddressCandidate(false));
    testData.add(new AddressCandidate(false));
    testData.add(new AddressCandidate(false));
    testData.add(new AddressCandidate(false));

    CandidateCollection addresses = new CandidateCollection(testData);
assertTrue( addresses.hasOneCandidateOrOneIsDefiniteMatch() ); }
Running this gives us another green bar... so we're very nearly home and dry. There's just one more test scenario to go. This is the test method for the "CandidateCollection containing several addresses, all of which are exact candidates" scenario:
/**
 * Input: CandidateCollection containing several addresses, all of which are exact
 * candidates
 * Acceptance Criteria: false returned
 */
@Test
public final void checkSeveralExactCandidates() throws Exception {
    List<AddressCandidate> testData = new ArrayList<AddressCandidate>(3);
    testData.add(new AddressCandidate(true));
    testData.add(new AddressCandidate(true));
    testData.add(new AddressCandidate(true));

    CandidateCollection addresses = new CandidateCollection(testData);
    assertFalse( addresses.hasOneCandidateOrOneIsDefiniteMatch() );
}
This one should return false, even though all the address candidates are exact matches. The business rule requires that exactly one of them be an exact match.
However, the result of running the test is shown in Figure 12-8.

To examine why this test failed, let's revisit the method under test—here it is from earlier:
public boolean hasOneCandidateOrOneIsDefiniteMatch() {
    if (candidates.size()==1) {
        return true;
    }
    for (AddressCandidate candidate : candidates) {
        if (candidate.isExactMatch()) {
            return true;
        }
    }
    return false;
}
As you can see, there's a quite blatant bug in there: there's an assumption that any address candidate with an exact match should result in true being returned. However, the test caught this wrong assumption. The rewritten code is as follows:
public boolean hasOneCandidateOrOneIsDefiniteMatch() {
    if (candidates.size()==1) {
        return true;
    }
    boolean foundExactMatch = false;
    for (AddressCandidate candidate : candidates) {
        if (candidate.isExactMatch()) {
            if (foundExactMatch) {
                return false;
            }
            foundExactMatch = true;
        }
    }
    return foundExactMatch;
}
The idea behind this version is that if the first exact match is found, that's good, but if another exact match is found, the code immediately returns with false. Re-running the tests produces a pass. But seeing as this code caused us a bit of a problem, let's focus on it and see if there are further test techniques we can use to zoom in and peek inside the (supposedly atomic) function.

"Never imagine yourself not to be otherwise than what it might appear to others that what you were or might have been was not otherwise than what you had been would have appeared to them to be otherwise," said the Duchess.[81]
One way to keep an eye on the code's internals and check that they're working as expected is to pass in a "spy object." This is a bit like a mock object, but it's a "tracking" implementation of an object used by the code under test, to record various diagnostics, such as whether a particular method was called, how many times it was called, the order that the methods were called in, and the mid-algorithm, or "transition state" values that were passed around.
Tip
Use spy objects to test for correct state transitions within functions.
Looking at the fixed version of hasOneCandidateOrOneIsDefiniteMatch(), and the checkSeveralExactCandidates() test scenario—which is passing in a collection of three exact matches—we expect the overall size of the collection to be checked once (to see if it has exactly one match), and we expect candidate.isExactMatch() to be called twice. (That should be the case whether three exact matches are passed in or 300, as the code will exit as soon as a second exact match is found.)
So we'll create two spy objects—one for the java.util.ArrayList collection (the "backing store" behind CandidateCollection), and the other for AddressCandidate. In other words, see Figure 12-9.

We'll create both as static inner classes inside the test class. Let's start with SpyList.
Referring back to Figure 12-9, SpyList extends java.util.ArrayList with additional "spy" functionality. Here's our new SpyList inner class:
static class SpyList<E> extends ArrayList<E> {
    public int size() {
        sizeCalled++;
        return super.size();
    }
private int sizeCalled = 0; }
Each time the size() method is called, the spy object first increments its internal count, and then calls up to the "proper" method in the parent class. We'll now modify the test scenario to use the SpyList:
/**
 * Input: CandidateCollection containing several addresses, all of which are exact
 * candidates
 * Acceptance Criteria: false returned
 */
@Test
public final void checkSeveralExactCandidates() throws Exception {
    SpyList<AddressCandidate> spyData = new SpyList<AddressCandidate>();
    spyData.add(new AddressCandidate(true));
    spyData.add(new AddressCandidate(true));
    spyData.add(new AddressCandidate(true));

    CandidateCollection addresses = new CandidateCollection(spyData);
    boolean result = addresses.hasOneCandidateOrOneIsDefiniteMatch();

    assertEquals(1, spyData.sizeCalled);
    assertFalse(result);
}
Running this version produces a test failure, though:
java.lang.AssertionError: expected:<1> but was:<3>
You may already have spotted the reason: in CandidateCollection. hasOneCandidateOrOneIsDefiniteMatch(), there's one explicit call to candidates.size(), but there's also an implicit call in the loop header:
for (AddressCandidate candidate : candidates) {
. . .
That's Java's new-ish sugary syntax for you—candidates.size() is called "behind the scenes" by Java each time the loop iterates. In this case, the code iterates twice, so that's an additional two calls.
As this is valid calling of size(), we can modify the expected test result to get our green bar:
assertEquals(3, spyData.sizeCalled);
Now let's move on to the second spy object, SpyAddressCandidate.

The purpose of this spy object is to ensure that AddressCandidate.exactMatch() is being called the expected number of times. Here's our new SpyAddressCandidate inner class:
static class SpyAddressCandidate extends AddressCandidate {
    public SpyAddressCandidate(boolean exactMatch) {
        super(exactMatch);
    }
    public boolean isExactMatch() {
        exactMatchCalled++;
        return super.isExactMatch();
    }
    private int exactMatchCalled = 0;
}
The pattern is exactly the same as with SpyList: we've overridden one of the methods to increment a count each time it's called, and then defer control up to the real method in the parent class. Aside from that (and the matching constructor to satisfy Java's grammar requirements), absolutely none of the functionality of the real AddressCandidate is modified.
Here's the updated test scenario method in full:
/**
 * Input: CandidateCollection containing several addresses, all of which are exact
 * candidates
 * Acceptance Criteria: false returned
 */
@Test
public final void checkSeveralExactCandidates() throws Exception {
    SpyList<AddressCandidate> spyData = new SpyList<AddressCandidate>();
    spyData.add(new SpyAddressCandidate(true));
    spyData.add(new SpyAddressCandidate(true));
    spyData.add(new SpyAddressCandidate(true));

    CandidateCollection addresses = new CandidateCollection(spyData);
    boolean result = addresses.hasOneCandidateOrOneIsDefiniteMatch();

    SpyAddressCandidate spy0 = (SpyAddressCandidate) spyData.get(0);
    assertEquals(1, spy0.exactMatchCalled);

    SpyAddressCandidate spy1 = (SpyAddressCandidate) spyData.get(1);
    assertEquals(1, spy1.exactMatchCalled);

    SpyAddressCandidate spy2 = (SpyAddressCandidate) spyData.get(2);
    assertEquals(0, spy2.exactMatchCalled);

    assertEquals(3, spyData.sizeCalled);
    assertFalse(result);
}
There's noticeably quite a bit more to this test method now. It's not just trusting that the return value was false by design; it's reaching into the code under test and making flipping well sure that the return value was calculated in the expected and correct way.
Note
Of course, developing a whole project at this "zoomed-in" level would be torturously slow; going into this level of detail on the tests is only worth doing for "core" code that large portions of the project depend on. But in those few rare cases, where every aspect of a section of code needs to work 100% well and the slightest flaw could prove extremely costly, it's well worth doing.
Let's get one more green bar for the road (or gray bar as it'll appear in print, of course), the final one in the book, in fact—see Figure 12-10.

To finish off, we'll briefly look at another way to delve into the code under test.
An algorithm test covers many control points/state shifts within one or more methods/functions. If each of these points is within the same method, then you'd need to pass in a spy object to track what's going on. However, that's assuming that you specifically want to confirm that certain methods are being called.
If, on the other hand, you want to confirm that each portion of code is working, then you'll need to divide the code into smaller methods, so that each one can be tested individually, with its own inputs and expected output.
With hasOneCandidateOrOneIsDefiniteMatch(), we could make a start on doing this by separating out the bulk of the code into a separate method, as follows:
public boolean hasOneCandidateOrOneIsDefiniteMatch() {
    return checkCandidateHasOneMatch()
        && checkForOneExactMatch();
}

boolean checkCandidateHasOneMatch() {
    return candidates.size() == 1;
}
boolean checkForOneExactMatch() {
boolean foundExactMatch = false;
for (AddressCandidate candidate : candidates) {
if (candidate.isExactMatch()) {
if (foundExactMatch) {
return false;
}
foundExactMatch = true;
}
}
return foundExactMatch;
}The code does exactly the same thing, but the two main checks have been separated out so that your unit test code can now call them individually.
checkForOneExactMatch() could be split out further. To do this effectively, and keep the code understandable, you would really need to introduce a new class so that you're not passing state data back and forth between methods, which could get ugly.
Whether you want to go the "whole hog" and do this depends on how deep into the code you feel the algorithm tests need to go. It becomes a case of code readability (and time spent on the tests) versus adding in more tests, and the diminishing returns that increased code coverage may provide.
One of the reasons we wanted to include this chapter was to demonstrate that it's possible to apply DDT to all sorts of design diagrams and models, by applying the same basic DDT formula. As long as you can get from the design model to an "intermediate" point—the intermediate point in this case being test cases and their respective test scenarios—then you should be good to systematically drive test code from your design.
If you're using EA to transform your model elements into test cases, it is possible to write your own transformations. This is generally easiest if you're adapting one of their transformations to go from an existing source (e.g., robustness diagrams) to a new target (e.g., a new version of FlexUnit, TestNG, or whatever). Creating a whole new transform from a new diagram type may be a little trickier, but it's certainly possible.
In this chapter we walked through a Mapplet example to create a design-driven-tested algorithm.
Algorithm unit tests end up being very, very "white box": their knowledge of the code's activities would make an inner-city priest blush. This means that, while you can be confident enough that design-driven-tested algorithms are bug-free, they're not especially maintainable. But they tend to be for "core code," which gets changed only rarely, if at all; so this shouldn't be a problem, as long as algorithm tests are used sparingly.
It's worth noting that the in-depth, "leave no stone unturned" approach described in this chapter is similar to the "push for 100% code coverage" attitude that has grown out of TDD culture, where any line of code that isn't being tested makes the TDDer feel uncomfortable. However, 100% code coverage—even for a small amount of code like an algorithm—is an advanced form of unit testing; taking this approach for the entire code base really would be Too Damn Difficult.
[76] Also see this page for a discussion of useful values to test for: www.testingreflections.com/node/view/4828.
[77] If you're not sure how to do these bits, read through Chapters 5 and 6 first, and then come straight back here...
[78] Isaac Asimov, The Gods Themselves (Doubleday, 1972).
[79] Proving that there's a book available on every subject, see Fuzzing: Brute Force Vulnerability Discovery, and the accompanying web page: http://fuzzing.org/. OWASP also has a page about fuzz testing: www.owasp.org/index.php/Fuzzing.
[80] For more about this feature, see ICONIX Process Roadmaps by Doug Rosenberg (Fingerpress, 2010) and its chapters about SysML and SOA.
[82] See http://projecteuler.net/index.php?section=problems&id=1