

In this chapter, Alice wakes up and wonders if her adventures through the TDD looking glass were all just a disturbing dream. Meanwhile we'll hit Reboot on the Login example and start over, this time following DDT. We hope this will help to illustrate some of the key differences between the two approaches. In particular, DDT provides a systematic method of identifying, up-front, the critical areas of a design that will benefit the most from automated testing.
Note
As this chapter provides an "end-to-end" run of DDT (from requirements to tests and product code), we'll breeze through a number of concepts that we'll return to later, and spend the rest of the book exploring at a more sedate pace. So don't panic if things aren't entirely clear at first; this chapter is more about providing a taste of what DDT is all about.
Before we get started, let's look at the top ten features of ICONIX/DDT. This section expands on the right column in Table 1-1 (see Chapter 1), which lists the main differences between TDD and DDT.
When you design software following the ICONIX Process, you will typically create "requirement" elements in your UML model, and allocate those requirements to use cases. Since you've taken the trouble to do this, it seems only reasonable that any automated support for DDT should create tests to verify that each requirement has been satisfied. So that's what we do.
A key feature of DDT is that you create scenario tests by expanding use cases into "threads." ICONIX Process is a use case–driven approach to development. Following this approach, your use cases will be modeled to identify both sunny day and rainy day scenarios. As it turns out, this is very convenient for defining scenario tests... these tests typically involve a script of user actions and expected system responses. Each "script" or "thread" might involve part of the sunny day scenario combined with one of the "rainy day" branches. DDT includes a thread expansion algorithm that helps us to create these acceptance tests automatically from the use cases. We'll talk more about scenario testing and "use case thread expansion" in Chapter 7.
With DDT, the tests have two purposes:
Validate your implementation of the design (primary task)
Act as regression tests (secondary task)
The tests are driven from the design, and, therefore, the tests are there primarily to validate the design. That said, there's more common ground between this and TDD than you might think. A lot of the "design churn" (aka refactoring) to be found in TDD projects can be calmed down and given some stability by first applying the up-front design and testing techniques described in this book.
With DDT the tests also document the intent of the code to an extent, but that's a nice side effect rather than the main purpose, as the process also generates "real" documentation for you along the way.
So the tests are not the design, and the design is not driven from the tests, but rather the tests are identified systematically from the design. With DDT the design is the design, the code is the code, and the tests are the tests.(Pretty radical, hey?) You'll use modern development tools to keep the documented design model in sync with the code. You'll also distinguish between the design level—unit tests—and the analysis level—acceptance tests—and clearly understand when it's time to write each one.
What's a "controller test," you ask? Simply put, it's similar to a unit test, but it tests a small group of closely related methods that together perform a useful function. You can do controller testing with DDT because the ICONIX Process supports a "conceptual design" stage, which uses robustness diagrams as an intermediate representation of a use case at the conceptual level. If you think of unit tests as "atomic," you can think of controller tests as "molecular."
DDT takes a "test smarter, not harder" philosophy, meaning tests are more focused on code "hotspots." With true DDT, you don't take an incremental approach to design; therefore, you don't need to refactor nearly as much, and you don't need eleventy billion tests poking into every nook and armpit of the deepest recesses of your code. Instead, the tests are targeted precisely at the critical junctures of the code that you've highlighted in the course of the design and requirements modeling as being the most cost-effective areas to test.
DDT unit tests are driven directly from the detailed design. You'll write one or more unit tests for each method you've drawn on a sequence diagram (unless it's already covered by a controller test—but more about that in Chapters 5 and 6).
This contrasts with TDD unit tests (sometimes also called programmer tests), which, as you saw in Chapter 2, are somewhere between classical, atom-sized unit tests and DDT-style controller tests.
As you saw in the overview in Chapter 1, there are a few steps involved in DDT. But at the high level, we first identify test cases from the design, and then we transform the tests into UML classes, from which actual test code can be generated. We've worked with Sparx Systems to build automated test transformations for JUnit, NUnit, and FlexUnit.
As you'll see later in the chapter (and especially in Part 2), once you identify a test you can populate it with things like inputs, outputs, descriptions, and expected results. You can essentially generate test plans from your cases. These will get forward-generated into xUnit test code, and you can also generate test plan reports.
DDT test cases are useful to both developers and QA teams—and the customer and business analysts, too. Since the scope of DDT includes identifying requirements tests and acceptance tests, it's quite naturally relevant to quality assurance folks. So, while still serving the "green bar" needs of comprehensive unit testing by the development team, it's also going to be useful for independent QA teams. As you'll see in Chapter 7, use case scenario descriptions transform rather nicely into QA-style test specs.
One of the big benefits of doing a model-based design that includes identifying requirements and allocating those requirements to use cases, as opposed to refactoring a system into existence, is that you can eliminate a lot of redundant work. A little later in this chapter you'll see an example of a requirement (Validate Password syntax) that is germane to both a Create Password use case and to Login. It's easy to see how someone could assign one of these "stories" to one team and the other to a different team, each of whom could come up with a separate (and, we hope, similar) definition for the requirement and two redundant sets of tests. This sort of duplicate effort is guarded against with DDT, as the requirement (and associated tests) would be defined once, and the tests would be re-used.
In Chapter 1, you saw a "bare bones" description of the steps in DDT. In the real world, of course, even the most agile teams rely heavily on software tools to support their development efforts. So for this walkthrough we'll show you how DDT can be made to sing when it has the right tools support.
As you saw in the previous chapter, TDD is generally used in conjunction with XP-style user stories rather than functional requirements and use cases. TDD and use cases are not incompatible: in fact, TDDers should be able to use a lot from this book, which follows a use case–driven process.
One big differentiator between the two approaches is that ICONIX/DDT separates user stories into "active voice" use cases, which describe user interactions with the system, and "passive voice" requirements, which specify what the customer wants the system to do. There's quite a significant benefit from treating these two kinds of "stories" differently, as you'll see shortly.
Let's consider a simple Login use case, which satisfies the three requirements shown in Figure 3-1.
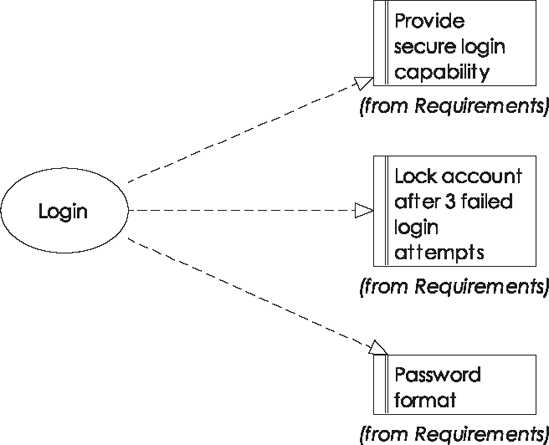
You'll notice a striking similarity between the three requirements and the three user stories from Chapter 2. The Login use case itself consists of the following active voice, user-focused Basic Course (sometimes known as the "sunny day scenario"), and a number of Alternate Courses (the "rainy day scenarios"):
- BASIC COURSE:
The system displays the Login page. The user enters the username and password, and then clicks Login. The system checks the syntax of the password, finds the user's account in the master account list, verifies that the password is correct, and starts a session.
- ALTERNATE COURSES:
Improperly formatted password: System displays "Invalid login credentials" message to user.
Account not found, or password incorrect: System displays "Invalid login credentials" message.
User clicks Cancel: System closes the Login page.
The process for writing a use case of this form is a simple one. First, to identify the Basic Course, ask, what happens? (and then what happens, and then what happens. . .) Second, to identify the first Alternate Course, ask, what else happens? (and how do we deal with that when it happens) And then keep on asking, what else happens? until you can't think of any more Alternate Courses. The key here is to think of as many "rainy day scenarios," or even just different ways the user might want to interact with the system, and make sure they're all recorded. This way, they won't be forgotten about when you move on to the design.[15]
Note
We explore how to write concrete, complete, design-ready use case scenarios in Chapter 7.
Let's move on to the DDT-specific steps to get from our use case to the code and a comprehensive, targeted set of tests. The steps that we'll follow in this chapter are the following:
Step 1: Create a robustness diagram (conceptual design).
Step 2: Create the controller test cases from your robustness diagram.
Step 3: Add scenarios to each test case.
Step 4: Transform your controller test cases into test classes.
Step 5: Generate the controller test code.
Step 6: Detailed design: create a sequence diagram for the use case.
Step 7: Create unit test cases from your sequence diagram, and cherry-pick the non-redundant ones.
Step 8: Fill in the test code using the generated comments as guidance, and write the code to make the tests pass.
Using the ICONIX Process, you create a use case for each robustness diagram. . . whoops, we're still in TDD mode there—let's flip it around! You create a robustness diagram for each use case. You can think of this as the conceptual design phase.
Note
A robustness diagram is a picture version of your use case: it's a form of preliminary, or conceptual, design, in which you start to link your use case scenarios to objects and actions. The robustness diagram also provides a "sanity check" for your requirements: if it's proving difficult to create a loosely modeled conceptual design from your requirements, then it would be virtually impossible to drive code and tests from them. So robustness analysis provides a tighter feedback loop than "requirements then tests+code" to get the requirements right from the start.
If you're following along with EA, here's the neat thing (the first of many): you can generate the robustness diagram using the Agile/ICONIX add-in. To do this, select the use case and choose "Create New Robustness Diagram" from the Add-Ins/ICONIX Agile Process menu (see Figure 3-2).

The add-in creates a new robustness diagram under the use case in the Project Browser, and propagates the requirements (if desired) onto the new diagram—see Figure 3-3.
The add-in also creates a new note that is hot-linked to the use case text—see Figure 3-4.
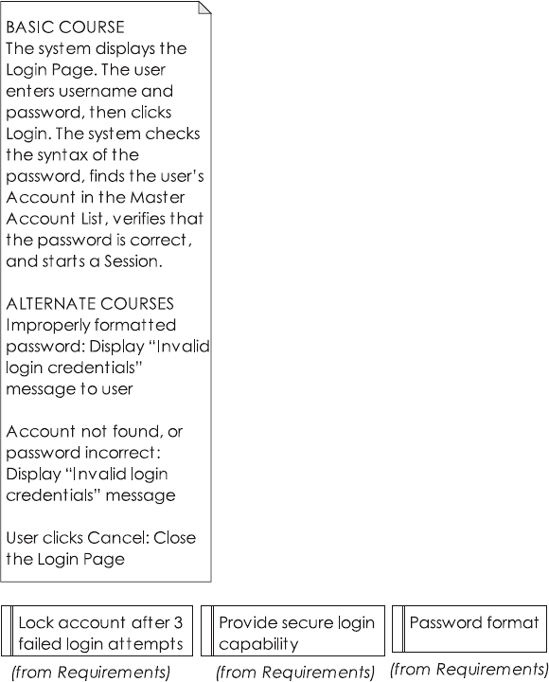
Figure 3-4. The blank robustness diagram, with the use case text and requirements automatically added
Having the requirements on the robustness diagram helps to make sure you haven't forgotten any requirements as you analyze the use case.
Next you'll want to draw the robustness diagram (see Figure 3-5). This is essentially a picture of the use case. Starting from the top left of the diagram, you should be able to trace the use case text along the diagram. Creating the robustness diagram is known as conceptual design—it's an early "sanity check" to ensure that the use case is fit to drive a detailed design, and tests, of course. Don't worry about the details for now. We'll cover robustness analysis in Chapter 6, but for a really detailed illustration of the technique, we can recommend our other book, Use Case Driven Object Modeling with UML: Theory and Practice.

Figure 3-5. The completed robustness diagram. Whoops, why isn't that "lock account" requirement discussed in the use case?
A couple of questions arose during robustness analysis:
Isn't the first alternate course, "Improperly formatted password," better suited to a Create New Account use case, where checks would be made on the new password for such things as minimum size and mix of upper/lower case letters? The idea is that if the same initial check is made when the user is logging in, then it saves a database lookup if the password is obviously invalid—as long as we generate the same "invalid login credentials" message as opposed to a different one.
There's a requirement "Lock account after 3 failed login attempts," but why isn't this also in the use case text? (It should be an alternate course.) That one's easy: we forgot to add it in, but on drawing the robustness diagram, because the requirement is right there on the diagram, it stood out like Che Guevara at a Canary Wharf wine bar.
These kinds of "reality checks"—questions arising about the requirements, prompting a chat with the customer/project stakeholders, or gaps highlighted in the use case text—happen time and time again during robustness analysis. The added benefit for DDTers is that we won't redundantly generate unit tests for the password format requirement in the "Create a New Password" story, as might have happened if two pairs of TDDers were each given one of the stories.
By analyzing your use case using robustness analysis, you've added a lot of information to the model that can be used to drive the testing of the application. To begin with, the add-in can automatically generate test cases for each "controller" on the robustness diagram. . . which brings us to the next step.
On the robustness diagram (see Figure 3-5), the circles with an arrow at the top are controllers. These represent the verbs, or actions—something that the system does in response to a user's impetus. For example, "Lock account," "Validate password syntax," etc. are all actions, so they are represented as controllers. If you think about it, these are the real processing points in the system being designed, so. . . these are the hot spots in the system that you'll want to cover with automated tests.
It's worth emphasizing that, because if you understand this point then you're easily within reach of fully appreciating and understanding the "test smarter" philosophy that underpins DDT:
The controllers represent the system behavior organized into convenient bite-size pieces that usually represent a small group of methods working together to perform a logical function. They're the moving parts in the machine, so they are the critical areas that most need to be tested. As it turns out, robustness analysis is a straightforward, efficient method of discovering these critical areas.
Controllers are also known as logical software functions: when you identify controllers, you're specifying the system behavior. If you think of unit tests as "atomic," you can think of controller tests as "molecular," as in Figure 3-6.[16]

So, to generate the controller test cases, again go to the Add-ins menu, and this time choose "Create Tests from Robustness." For the result, see Figure 3-7. The add-in has generated one test case for each controller on the robustness diagram.
With Figure 3-7, it's not too early to start noticing the increased scope of test coverage compared with Chapter 2. We're immediately getting test coverage across the entire use case, not myopically focused in on password validation. In Figure 3-8 you can see that we're also automatically generating test cases against the requirements.
So the benefits of DDT vs. TDD are beginning to emerge, which, we hope, will benefit you on your own project:
The tools support will help make sure you don't forget any requirements.
You'll get broader test coverage, focusing in on all the "behavior points" of the use case.
You'll be validating functional requirements in addition to testing the design.
You'll be able to do all of the preceding very quickly.

You can also choose to generate test cases for your requirements—see Figure 3-8.

The development team should own the controller tests (the test cases generated from the controllers), while an independent QA team might own the acceptance tests (the test cases and scripts generated from the customer requirements and use cases). We'll discuss acceptance testing further in Chapters 7 and 8.
As you'll see later in this chapter, you can also generate unit test cases for messages on sequence diagrams. The sequence diagrams represent the detailed design, so the tests you generate here are pretty close to the sorts of unit tests you would see in TDD (though they're not an exact match, as we discussed in Chapter 2).
Once you've generated the test cases, you can add test scenarios using EA's "Testing View" (see Figure 3-9). This view is switched on from EA's View menu, or by pressing Alt+3or most easily by simply double-clicking on the default scenario within the test case. For example, let's take the test case that validates the format of a password. You need to check that the password is of the required length, contains a mix of alpha and numeric characters, and is a mix of upper and lower case. Each of these is a scenario.

The "Default Run Scenario" was added to all the test cases by EA, and represents a step in the "basic course" (success, or sunny day scenario) through the use case. In Figure 3-9, note the tabs available for each test scenario in the Testing View: Description, Input, Acceptance Criteria, and Results. The two we're particularly interested in are Input and Acceptance Criteria, as they let you define precisely the input values for each test scenario, and what constitutes a pass or fail given the input values.
Table 3-1 shows all of the test scenarios for the Validate Password Syntax test case, and their Input/Acceptance Criteria values; Table 3-2 shows the same done for the Lock Account test case. For the other test cases we'll just use the default run scenario, and won't add any additional test scenarios.
For "short password should fail," this raises the question, what's the minimum password length? This is the right time to be thinking about this and chasing down the answer, when project stakeholders are present—not later, when the programmer is cutting the code and likely to just make a snap decision himself.
Table 3-1. Test Scenarios for the Validate Password Syntax Test Case
Description | Input | Acceptance Criteria | |
|---|---|---|---|
Default Run Scenario | The "sunny day" scenario | "MyPassword123" | Validation passes. |
all lower case should fail | "mylowercasepassword" | Validation fails. | |
all upper case should fail | "MYUPPERCASEPASSWORD123" | Validation fails. | |
non-numeric should fail | "no-numbers" | Validation fails. | |
short password should fail | Minimum 6 characters | "Ab123" | Validation fails. |
Table 3-2. Test Scenarios for the Lock Account Test Case
Test Scenario | Description | Input | Acceptance Criteria |
|---|---|---|---|
account active after 2 attempts | 2 invalid passwords are submitted | The account should still be active. | |
account locked after 3 attempts | 3 invalid passwords are submitted | The account should be locked. |
In Table 3-2, we haven't included a default run scenario (EA creates it by default, but we removed it from the Lock Account test case), since—checking back to the robustness diagram in Figure 3-5—this test is for an alternate course ("rainy day"); therefore, there is no sunny day scenario.
These values make it through to the generated test code: you'll see them later in the test method "Javadoc" comments, so they're right there for the programmer to refer to. Notice that we haven't filled in all of the descriptions. Where there's redundancy, err on the side of brevity. It beats "filling out the long form," and gets you to the finished product that much sooner.
Even if the add-in did nothing more than what's been shown so far, it would still be extremely useful. But there's significantly more capability ahead.
SparxSystems has developed automatic transforms between test cases and test classes. At the time of writing, transforms exist for widely used unit testing frameworks JUnit 3 and JUnit 4 (for Java), NUnit (for .Net), and (as we go to press) FlexUnit (for Adobe Flex/ActionScript). We're also hoping to see others soon.
In this example, as there are six test cases for this use case, we're going to multi-select all of them and transform the whole lot in one go.
To transform test cases, right-click the selected ones and choose "Transform. . ." The Model Transformation dialog appears (see Figure 3-10). Choose the target transformation. For this example, choose ICONIX_JUnit4. A dialog appears, asking for a root package where the new classes should be created. As these are test classes, create a new view called Test, and select the new view (see Figure 3-11). It's important to keep these test classes in a separate view, as EA replicates the entire package structure beneath the root package that you select.

Tip
In Figure 3-10 there's a "Generate Code on result" check box. If you tick this, the next step (Step 5: Generate Controller Test Code) will be performed straightaway. We've separated the steps for the purpose of this tutorial, but in practice there's no reason you wouldn't merge these two steps and save a few seconds. . .

When you transform your test case using the ICONIX JUnit transform, setup() and tearDown() methods are added automatically, and a test method is created for each scenario (see Figure 3-12). This transformation captures the essence of the Design Driven Testing approach. So, for example, the "all lower case should fail" scenario has a test method generated called allLowerCaseShouldFail(), adorned with a @Test annotation to mark it as a test case.[17]

Figure 3-12. The transformed controller test classes, ready to be code-generated. Note the increased scope of test coverage vs. the TDD Login example in Chapter 2.
Once the controller test cases have been transformed to test classes, they can be code-generated, using EA's normal code-generation techniques (see Figure 3-13). Right-click the transformed test class, and choose "Generate Code. . ." from the pop-up menu (or alternatively just select the test class and hit F11). Figure 3-14 shows the generated code loaded up into Eclipse.
Tip
You can generate several classes at once by multi-selecting them; alternatively, select a package and choose "Generate Source Code. . ." (or press Shift+F11) to generate a whole package of classes in one go.


Here's the complete generated controller test code for ValidatePasswordSyntaxTest.
package com.softwarereality.login;

import org.junit.*;
import static org.junit.Assert.*;

public class ValidatePasswordSyntaxTest {

        @Before
        public void setUp() throws Exception{

        }

        @After
        public void tearDown() throws Exception{

        }

        /**
         * The 'sunny day' scenario
         *
         *        @input "MyPassword123"
         *        @AcceptanceCriteria  Validation passes.
         */
        @Test
        public void defaultRunScenario() throws Exception{

        }

        /**
         *        @input "mylowercasepassword"
         *        @AcceptanceCriteria  Validation fails.
         */
        @Test
        public void allLowerCaseShouldFail() throws Exception{

        }

        /**
         *        @input "MYUPPERCASEPASSWORD123"
         *        @AcceptanceCriteria  Validation fails.
         */
        @Test
        public void allUpperCaseShouldFail() throws Exception{

        }

        /**
         *        @input "no-numbers"
         *        @AcceptanceCriteria  Validation fails.
         */
        @Test
        public void nonNumericShouldFail() throws Exception{
}
/**
* Minimum 6 characters.
*
* @input "Ab123"
* @AcceptanceCriteria Validation fails.
*/
@Test
public void shortPasswordShouldFail() throws Exception{
}
}Obviously there are gaps in the generated code where a programmer needs to hook up the tests with the code under test; but each test method is annotated with the input (values required when setting up the text fixtures); the acceptance criteria can go straight into the assert... statements. We'll return to the test code later in this chapter; first, we need to complete the design and identify unit tests to cover any code not already covered by the controller tests.
By this stage our Login use case is in pretty good shape. You have a set of requirements tests that QA can own, a set of controller test cases and the generated code that just needs the "blanks" filled in, and you have a conceptual design (the robustness diagram in Figure 3-5) from which to drive the detailed design and the code. The next step is to create a detailed design: the point of this step is to really start thinking hard about the implementation details, and to identify any further tests that can be created, which aren't already covered by the controller tests.
To do the detailed design, create a sequence diagram based on the robustness diagram in Figure 3-5. The initial step for the sequence diagram is quite formulaic, so with the help of our Agile/ICONIX add-in, EA can do this bit for you. (If you're using a different UML modeling tool, it doesn't take long to quickly draw this bit, though it's a fairly "robotic" process: put the use case text in a note, and copy the actor(s) and all the "nouns"—entity and boundary objects—onto the new diagram.) Within EA, simply right-click the robustness diagram and choose "Create Sequence from Robustness." The result—a new diagram with the use case note, actor, and all the entity and boundary objects copied over from the robustness diagram—is shown in Figure 3-15.
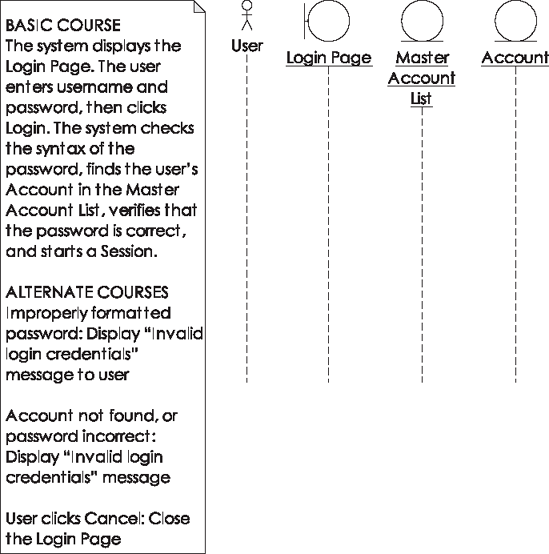
Figure 3-15. The (not-so-blank) sequence diagram that EA creates as a starting point from your robustness diagram
Note
If you've noticed that we're still forgetting to lock the account in Figures 3-15 and 3-16, you've won a pork pie for catching our mistake... and incidentally demonstrated why a careful review of the conceptual design is so important before proceeding with detailed design. These sorts of mistakes are incredibly easy to make, and even authors aren't immune to them. It's worth noting that writing a unit test for all the methods in the detailed design and getting a green bar would completely miss this sort of 'error by omission'. We've got a whole chapter on conceptual design reviews in Use Case Driven Object Modeling With UML - Theory and Practice.
The design session itself must be led by the programmers. The final design should be thoroughly grounded in reality, with all the "nitty-gritty" implementation details discussed and factored into the sequence diagram. The basic guideline is to draw the controllers onto the sequence diagrams as operations/methods; however, this is only a guideline to get you started—while you're allocating behavior to the objects on the sequence diagram, the main thing is to "keep it real." If there are classes and operations involved that weren't in the conceptual design, make sure they're added in now.
Note
There will be more about the detailed design stage—and writing unit tests based on the design—in Chapter 5.
Figure 3-16 shows the result (we've omitted the use case note from the diagram to fit it on the page). To keep the example consistent with the TDD example from Chapter 2, this version also delegates the user credentials checking to an SSO service over encrypted HTTP.
Notice how the method names in the sequence diagram mostly match up with the controller names from the robustness diagram. This is useful, as it means you can check the methods identified on the sequence diagram with the controller names to identify which methods on the sequence diagram are already covered by tests, and which ones are shockingly exposed. That brings us to the next stage. . . now that you have your detailed design, it's time to add the unit tests.

The idea here is to fill in any "important" gaps left by the controller tests; so you wouldn't want to create unit tests for every single operation on the sequence diagram. Instead, cherry-pick the non-redundant ones and write tests for those.
As you'd expect by now, EA can auto-create test cases from your sequence diagram, just as it can from your robustness diagram. Simply right-click the sequence diagram and choose "Create Tests from Sequence." The result can be seen in Figure 3-17.

Figure 3-17. All the operations from each class on the sequence diagram, turned into unit test cases
The generated test case diagram in Figure 3-17 is comprehensive, to say the least. Every operation on each object has been turned into a test case, including the object constructors, any property "getters," and so forth. This could be a TDDer's dream come true: complete, fully mappable test coverage at his or her fingertips! However, since we don't care much for the Department of Redundancy Department, this is of less interest to us—remember that we're following the "test smarter" route. So, what we want to achieve from this diagram is to compare it with the controller tests, and figure out which operations are already covered. When we've done that, we'll create unit tests only for the few operations that don't already have controller tests. The easiest way to do this is literally to print out the test case diagram and then go through it with a colored marker pen, ticking each test case that's already covered by a controller test. You can see the result of this process in Figure 3-17.
This leaves the following potential candidates for unit tests—working through Figure 3-17:
Account new(the Account constructor)DispatcherServlet.sendLogin()SingleSignOn-Service.lookup()Account.populateFrom()SingleSignOn-Service.check()Redirect user to the home page
DispatcherServlet.sendRedirect()SingleSignOn-Service.startSession()Account new (another Account constructor call)
LoginPage.login()
Some of these we can discard immediately. "Redirect user to the home page" isn't a method call, so it doesn't need a unit test; SingleSignOn-Service is an external service, and, therefore, outside the scope of the unit tests (however, we would definitely cover it using the requirements and acceptance tests, which are "end-to-end" integration tests).
As we'll explore further in Chapters 5 and 6, it's possible to cover several methods in one test by identifying a point "higher up" in the method chain where the results are returned, and testing just that point—in other words, one "molecular" test instead of several "atomic" tests. (If this sounds to you like exactly what controller tests are about, you win another pork pie.) Looking at Figure 3-16, you identify these points by looking at the boundary object (Login Page) and following its method calls. Login Page makes several calls:
searchAcc = new Account();
searchAcc.validatePasswordSyntax(password)
account = MasterAccountList.find(searchAcc)
account.verifyPassword(password)
SingleSignOn-Service.startSession(username)
DispatcherServlet.sendRedirect()
You can then step through this list, deciding in each case whether the call warrants a unit test. Figure 3-18 illustrates.

As you can see, that apparently leaves no methods whatsoever that require a unit test. The controller tests already have it covered, which is just as you'd hope. However, it's always worth a quick scan through the sequence diagram just in case there are any complex operations buried deep in the method chain. The one method that stands out is Account.populateFrom(xml). The XML document is returned from the SingleSignOn-Service, and could contain any number of oddities and caveats, which we must ensure are covered by this single innocuous populateFrom(xml) method. So let's create a unit test class for that one.
This process should be familiar now from working with the controller test cases. Within the Test Case diagram (see Figure 3-19), first hit Alt+3 to switch on EA's Testing View. Now click the Account populateFrom test case, and add some test scenarios. As with the controller test scenarios, this is where you put on your tester's hat and think about what could possibly go wrong, as well as "normal usage" scenarios that must also be tested. Every possible eventuality (short of external events such as meteors striking the Earth) should get its own test scenario. For this example, we came up with the scenarios in Table 3-3—however, in a real-life project, you'd expect this to be quite a lengthy list.
Table 3-3. Test Scenarios for the Account.populateFrom() Test Case
Test Scenario | Description | Input | Acceptance Criteria |
|---|---|---|---|
Default Run Scenario | A normal, expected XML document is passed in. | see separate file: | Each field in Account is populated from the expected XML element. |
Quotation marks in each element | see separate file: | Correctly parsed. | |
Throw error if expected fields are missing. | The Username, First Name, and Last Name elements must be present. | see separate file: | A parse exception should be thrown. |
Next, let's turn this into a test class: right-click the test case and choose "Transform. . ." In the Model Transformation dialog that pops up, choose ICONIX_JUnit4, make sure the target package is Tests, and click "Transform." The result is the UML test class shown in Figure 3-19.

Our main thought here is that the name of the test class is a bit odd. The name was derived from the populateFrom(xml) operation on the Account object. There's no reason not to rename it here to make it clearer, so we'll rename the test class PopulateAccountFromXmlTest.
Next, right-click the new test class and choose "Generate Code." (Again, as with the controller tests, simply ticking "Generate Code on result" in the Model Transformation Dialog performs this step as part of the previous step.) Here's the result:
public class PopulateAccountFromXmlTest {

    @Before
    public void setUp() throws Exception{

    }

    @After
    public void tearDown() throws Exception{

    }

    /**
     * A normal, expected XML document is passed in.
     *
     * @input see separate file - tests/resources/NormalAccount.xml
     * @AcceptanceCriteria  Each field in Account is populated from the expected XML element.
     */
    @Test
    public void defaultRunScenario() throws Exception{

    }

    /**
    * @input see separate file - tests/resources/AccountWithQuotes.xml
    * @AcceptanceCriteria  Correctly parsed.
    */
   @Test
   public void quotationMarksInEachElement() throws Exception{
}
/**
* The Username, First Name and Last Name elements must be present.
*
* @input see separate file - tests/resources/AccountWithMissingElements.xml
* @AcceptanceCriteria A parse exception should be thrown.
*/
@Test
public void throwErrorIfExpectedFieldsAreMissing() throws Exception{
}
}While we're here, let's also generate the Account class, which this unit test will be operating on:
public class Account {

    private String username;
    private String firstName;
    private String lastName;

    public Account() {
    }

    public Account(String username) {
        this.username = username;
    }


    public void validatePasswordSyntax(String password) {

    }

    public void populateFrom(String userXml) throws XPathParseException {

    }

    public void verifyPassword(String password) {

    }

    // getters and setters for username, firstName and lastName omitted for brevity...

}
Now we're ready to move into the code and implement it, along with the tests. Perhaps not surprisingly, given the preparation, this is the easy part. If you prefer to write the tests before the code, do feel free. . . but note that one of the goals of TDD (interface discovery) is somewhat redundant here, as you'll have already done that bit with the design step.
Now it's time to fill in the test code, using the generated comments as guidance. Of course, this is where TDD pretty much begins; however, it's the last step in DDT, the "slam-dunk" having spent sufficient time lining up the shot. As you'll see in a moment, this step is the easy part because all of the "hard design thinking" has already been done (and the design modeling is most effective when done as a collaborative effort by the team). Let's start with the PopulateAccountFromXmlTest unit test class, as it's fresh in our minds. We'll start with the default run scenario (aka basic course):
public class PopulateAccountFromXmlTest {

    private Account account;

    @Before
    public void setUp() throws Exception{
        account = new Account();
    }

    @After
    public void tearDown() throws Exception{
        account = null;
    }

    /**
     * A normal, expected XML document is passed in.
     *
     * @input see separate file - tests/resources/NormalAccount.xml
     * @AcceptanceCriteria  Each field in Account is populated from the expected XML element.
     */
    @Test
    public void defaultRunScenario() throws Exception{
        String userXml = loadFile("tests/resources/NormalAccount.xml");
        account.populateFrom(userXml);
        assertEquals("jsmith", account.getUsername());
        assertEquals("John", account.getFirstName());
        assertEquals("Smith", account.getLastName());
    }

    //  . . .
As you can see from the code, we first set up an Account text fixture. In the defaultRunScenario() test, we load our sample XML file containing "normal" user data. Then we call the Account.populateFrom(userXml) method (i.e., the method under test). And finally we assert that the fields within Account have been populated as expected. The generated method comments served as a handy reminder of the inputs and expected output (Acceptance Criteria) while writing the test.
Now, of course, we need to write the code to make this test pass. Here's the Account.populateFrom() method:
public void populateFrom(String userXml) throws XPathParseException {
    XPathHelper helper = new XPathHelper(userXml);
    helper.populate(this, "setUserName", "//username");
    helper.populate(this, "setFirstName", "//firstname");
    helper.populate(this, "setLastName", "//lastname");
}
XPathHelper is a general-purpose helper class that we cobbled together (we haven't shown it here as it doesn't lend much to the discussion). It initially parses an XML document (the Account XML in this case). Then with each populate() method call, it populates the target object (Account) using the given setter method name ("setUserName"), and an XPath expression to dig the element out of the XML ("//username").
PopulateAccountFromXmlTest contains another two scenarios, which we'll implement next:
/**
 * @input see separate file - tests/resources/AccountWithQuotes.xml
 * @AcceptanceCriteria  Correctly parsed.
 */
@Test
public void quotationMarksInEachElement() {
    String userXml = loadFile("tests/resources/AccountWithQuotes.xml");
    try {
        account.populateFrom(userXml);
    } catch (XPathParseException e) {
        fail("Parsing should have succeeded: " + e.getMessage());
    }
}
This one simply loads an XML file in which the data contains quotation marks. If a parse exception is thrown, the test fails. The third test scenario is the flipside of this one: we want to see the parsing trip up over some invalid data (missing elements):
/**
 * The Username, First Name and Last Name elements must be present.
 *
 * @input see separate file - tests/resources/AccountWithMissingElements.xml
 * @AcceptanceCriteria  A parse exception should be thrown.
 */
@Test(expected=XPathParseException.class)
public void throwErrorIfExpectedFieldsAreMissing() throws Exception{
    String userXml = loadFile("tests/resources/AccountWithQuotes.xml");
    account.populateFrom(userXml);
}
This one's easy: it uses a nice feature of JUnit to specify that we're expecting an XPathParseException to be thrown. If the exception is thrown, the test passes; otherwise, it fails. Referring back to the populateFrom(userXml) method that we added a few moments ago, there's no specific code there to check for the mandatory fields; however, the helper class, XPathHelper, throws an exception if the element it's looking for is absent.
Let's move on to one of the controller test classes, ValidatePasswordSyntaxTest. First, here is the fixture setup:
public class ValidatePasswordSyntaxTest {

    private Account account;

    @Before
    public void setUp() throws Exception{
        account = new Account();
}
@After
public void tearDown() throws Exception{
account = null;
}The "sunny day scenario" passes in a valid password. No assertXX statement is needed: we simply declare AccountValidationException in the throws clause. If the validation exception is thrown, the test basically fails:
/**
 * The 'sunny day' scenario
 *
 *        @input "MyPassword123"
 *        @AcceptanceCriteria Validation passes.
 */
@Test
public void defaultRunScenario() throws AccountValidationException {
    account.validatePasswordSyntax("MyPassword123");
}
The remaining test scenarios are easy: each one passes in an invalid password, and expects an AccountValidationException to be thrown:
/**
 *     @input "mylowercasepassword"
 *     @AcceptanceCriteria Validation fails.
 */
@Test(expected=AccountValidationException.class)
public void allLowerCaseShouldFail() throws Exception{
    account.validatePasswordSyntax("mylowercasepassword");
}
Note
It's not unknown in test-driven teams to include an empty assert statement so that the test "shows up" and is counted in the code metrics. However, this would be relevant only if you're looking at code coverage as a measure of project success—and, as we hope you'll agree after reading this book, such metrics are entirely spurious (and at worst misleading). It's rather like measuring productivity by the number of lines of code written—rather than something more meaningful, like the number of use cases/user stories completed, or whether the customer is smiling or frowning.
We've omitted the other three scenarios (allUpperCaseShouldFail(), nonNumericShouldFail(), and shortPasswordShouldFail()) as they each follow exactly the same pattern.
The code to make these test scenarios pass is also pretty straightforward. Let's implement the required method on the Account class:
public void validatePasswordSyntax(String password) throws AccountValidationException {
    if (password.toLowerCase().equals(password)
        || password.toUpperCase().equals(password))
{
throw new AccountValidationException(
"Password must be a mixture of upper and lower case");
}
if (password.length() < 6) {
throw new AccountValidationException(
"Password must be at least 6 characters long");
}
if (!containsAtLeastOneDigit(password)) {
throw new AccountValidationException(
"Password must contain at least 1 numeric digit");
}
}
static boolean containsAtLeastOneDigit(String password) {
for (char ch : password.toCharArray()) {
if (Character.isDigit(ch)) return true;
}
return false;
}We could go on, but we hope you get the general idea. Filling in the test methods is a breeze, as the design work has been done so the required fixtures are obvious, and the inputs/acceptance criteria are right there above each test method. Similarly, the coding is pretty much a slam-dunk because the hard thinking went into the detailed design, and all the "rainy day scenarios" were thought through in detail. The result is nicely factored code that's easily unit-tested, with tests in all the right places, and in which "design churn" (where supposedly finished code is rewritten to make way for new functionality) is kept to a minimum.
This brings us to the end of Part 1, in which we've compared and contrasted DDT with its inverse counterpart, TDD. Chapter 2 took us through the looking glass to implement the Login use case using TDD. In this chapter, we've applied up-front design principles along with DDT to the problem, and we've delivered a tested and documented login function. Figure 3-20 contrasts the difference between what we've achieved in Chapter 2 and in this chapter.

Let's sum up a few key points:
DDT gives you much more "bang for the buck" than TDD does. Figure 3-20 makes this pretty obvious: you can get more accomplished when your process isn't Too Damn Difficult. We spent most of Chapter 2 refactoring our unit tests, with the end result being that we developed the
checkPasswordmethod. By contrast, with considerably less effort following the DDT approach, we've designed the entire Login use case in this chapter.We haven't covered customer requirement tests or scenario tests (collectively known as acceptance tests) in this chapter, but we'll have a chapter on each topic in Part 2. But it's worth noting here that we've already identified requirement test cases (Figure 3-8), and we'll be driving the acceptance testing from the text of the use case.
In Chapter 2, the TDD design led to an interface called
AccountValidator, while the "behavior allocation" techniques using ICONIX/DDT put a validate method on theAccountclass. You'll find that this approach results in a more domain-driven design.[18]We've actually realized more of the intent behind TDD following this approach than we realized by applying TDD in Chapter 2. With the DDT approach, we found ourselves thinking much more along the lines of "What could possibly go wrong?" and "What else could go wrong?" and creating test scenarios to cover each of these possibilities. The result is a much more rigorously designed system, where "rainy day scenarios" are accounted for and tested right from the get-go, rather than refactored into the design later.
[15] Actually, just to see if you're awake (and to show you why we put requirements onto robustness diagrams), we forgot one, as you'll see in a few pages. You win a pork pie if you caught it. If you missed it, time for a cup of coffee.
[16] Regarding the molecule picture, for you chemists, that's dichlorodiphenyltrichloroethane, of course.
[17] For those interested in the "behind-the-scenes" details, EA marks each method with a tagged value to represent the @Test annotation. A tagged value is simply a name/value pair that you can associate with pretty much anything in your UML model. You can see the tagged values for each operation by activating the Tagged Values view from the View menu (or press Ctrl+Shift+6).
[18] We suspect that we're preaching to the converted in this instance, but it's worth checking out Eric Evans's book Domain Driven Design: Tackling Complexity in the Heart of Software, for an in-depth treatment of the subject.