
11
Special Usages of TLS
In Chapter 9, Establishing TLS Connections and Sending Data over Them, we learned about the Transport Layer Security (TLS) protocol and how to establish TLS connections straightforwardly. In this chapter, we will learn about the advanced usage of TLS and special use cases.
We are going to cover the following topics in this chapter:
- Understanding TLS certificate pinning
- Using TLS certificate pinning
- Understanding blocking and non-blocking sockets
- Using TLS on non-blocking sockets
- Understanding TLS on non-standard sockets
- Using TLS on non-standard sockets
Technical requirements
This chapter will contain commands that you can run on a command line and C source code that you can build and run. For the command- line commands, you will need the openssl command-line tool with OpenSSL dynamic libraries. To build the C code, you will need OpenSSL dynamic or static libraries, library headers, a C compiler, and a linker.
The source code for this chapter can be found here: https://github.com/PacktPublishing/Demystifying-Cryptography-with-OpenSSL-3/tree/main/Chapter11
Understanding TLS certificate pinning
Sometimes certificate verification is not done using traditional Public Key Infrastructure (PKI) rules with a certificate store, trusted certificates, and certificate verification chains. One of the non-standard certificate verification methods is TLS certificate pinning. The TLS client pins a particular certificate to a server, meaning that it expects the server to have that exact certificate. There are variations of certificate pinning, such as pinning a few possible certificates instead of just one, pinning a certificate public key instead of the certificate itself, or pinning a particular issuer certificate. It is possible to use TLS certificate pinning both as an addition to the standard certificate verification and as a replacement for it.
Certificate pinning is not a very popular certificate verification method for HTTPS servers on the public internet. However, while you might have never thought about it, public key pinning is actually the main public key verification method in the SSH protocol. An SSH server public key is pinned on the clients in the known_hosts file, either in advance or on the first connection. SSH user public keys are pinned on the server in the authorized_keys file.
When it comes to the TLS protocol, certificate pinning is used in some applications that communicate over the internet with only one server. It is especially popular in mobile banking applications.
Why do people choose certificate pinning? To understand that, let us examine the current situation with the PKI model based on certificate chains, trusted certificates, and the certificate store used in most TLS-capable software.
The default PKI model used for TLS allows any Certificate Authority (CA) from the trusted certificate store to sign a certificate for any server. A typical Operating System (OS) or browser certificate store contains more than 100 trusted CA certificates. This means that we are relying on the assumption that none of those CAs will issue a rogue certificate that can be used for a Man in the Middle (MITM) attack. But sometimes CAs issue rogue certificates because sometimes CAs are hacked, as happened with the DigiNotar, GlobalSign, and Comodo CAs. Equally, sometimes, CAs issue intermediate certificates for MITM boxes used by law enforcement agencies. These kinds of MITM boxes are placed at the ISP of a suspected criminal. The suspect’s TLS connections are routed through the MITM box. The MITM box mounts a MITM attack against the suspect by issuing certificates in real time for any server that is accessed through the MITM box. This kind of MITM attack allows the MITM box to intercept and decrypt the TLS connections of the suspect.
There is also another kind of MITM box – commercial MITM boxes. They are installed in organizations by system administrators of those organizations to inspect TLS traffic for viruses and trojans. In such a case, the CA certificate in the MITM box is not issued by a publicly known CA – it is issued by a CA of that organization instead. Then, the organization makes sure that the root CA certificate of the organization’s CA is installed as a trusted certificate into the certificate stores on all employee machines.
Yet another way to attack the default PKI model is to install a rogue root CA certificate in the user’s certificate store. This can be done by hacking into the user’s machine or using social engineering methods.
Do the three described scenarios pose an acceptable risk? Everyone decides for themselves. But many banks decided to use TLS certificate pinning in their applications to mitigate the risk of MITM attacks.
In addition to increased security, TLS certificate pinning may also save some costs. Instead of buying a server certificate from a commercial CA, you can generate the certificate yourself. You can even use a self-signed certificate to reduce maintenance. When checking the pinned server certificate in a TLS client, you can drop many checks on the certificate that are usually done during certificate verification. If you have pinned a certificate, that means that it is pre-verified and is known to be good.
There are also some drawbacks associated with TLS certificate pinning. The usual way to pin certificates is to supply the certificates or their digests to the client application. If you trust just one pinned certificate supplied to the application, you can only update the pinned certificate through the application update. Also, in such cases, you have to synchronize the update of the certificate on the server with the update of the application. This is not very practical, but there are several solutions to the issue. One is to pin several allowed certificates to the server in the application – for example, the current and the planned next certificate. If the lifetime of a server certificate is a year or longer, it is reasonable to ask the users to update the application often in order to also update the certificate. Another solution is to implement your own automatic update mechanism in the application that will fetch the next certificate through the connection protected by the current certificate. Yet another solution is to pin the issuer (CA) certificate instead of or in addition to the server certificate. This solution provides less security than pinning the server certificate, but still more security than no pinning. But then we get the same issue with updating the pinned issuer certificate. We have to either update it through the application update or implement an update mechanism within the application.
Another drawback of using TLS certificate pinning as a replacement for the default PKI is that you have to implement revocation yourself. Implementing it is not impossible though. Also, it is worth remembering that when a MITM attack against the default PKI model is performed, the attacker can very easily block the TLS client’s connections to Certificate Revocation List (CRL) distribution servers and Online Certificate Status Protocol (OCSP) servers, as well as omitting OCSP stapling on the client-facing side. Hence, the argument for revocation is not very strong.
To summarize, TLS certificate pinning, when used instead of the default PKI model, has the following pros and cons:
Pros:
- Increased security – lower risk of a MITM attack.
- It’s possible to use a home-generated certificate instead of buying a certificate from a commercial CA.
- Reduced maintenance because you don’t need to make a Certificate Signing Request (CSR) and communicate with a CA. You can even use a self-signed certificate.
Cons:
- Increased maintenance because you have to organize pinning updates yourself.
- Increased maintenance because you have to organize revocation yourself.
In the next section, we will learn how to implement simple TLS certificate pinning on the client side programmatically.
Using TLS certificate pinning
To learn how to use TLS certificate pinning in C code, we are going to write a small tls-cert-pinning program. We are going to use a simple variant of TLS certificate pinning: we will pin just one server certificate and will use TLS certificate pinning instead of the default PKI model, not in addition to it.
We are going to use the “big” certificate verification callback set with the SSL_CTX_set_cert_verify_callback() function, as opposed to the “small” callback set with the SSL_CTX_set_verify() function, in order to learn another type of callback.
The SSL_CTX_set_cert_verify_callback() function sets a callback function that is supposed to perform the whole certificate verification procedure. The default OpenSSL implementation of that function builds the certificate verification chain, verifies certificate signatures, and the validity dates, and, among other things, calls the callback function set by the SSL_CTX_set_verify() function, if there is one. It’s important to understand that setting a callback using the SSL_CTX_set_cert_verify_callback() function overrides this whole default verification process. Therefore, the SSL_CTX_set_cert_verify_callback() function must be used with great care. The wrong implementation of the “big” callback may have terrible consequences. If you are unsure, better set a “small” verification callback by the SSL_CTX_set_verify() function, which we reviewed in Chapter 10, Using X.509 Certificates in TLS.
We consider our pinned certificate to already be verified. Thus, we don’t even need to build the certificate verification chain when checking the server certificate; our callback function will just check that the server certificate matches the pinned certificate.
As with many other OpenSSL functions, the SSL_CTX_set_cert_verify_callback() function has a man page:
$ man SSL_CTX_set_cert_verify_callback
Our tls-cert-pinning program will be based on the tls-client program from Chapter 9, Establishing TLS Connections and Sending Data over Them. We are going to take the tls-client program source code and add TLS certificate pinning functionality.
The tls-cert-pinning program will take the following command-line arguments:
- Server hostname
- Server port
- Pinned server certificate
Unlike in the tls-client program, in our tls-cert-pinning program, the third command-line argument is mandatory.
Let’s start the tls-client program implementation.
Changing the run_tls_client() function
In this section, we will add the certificate verification callback declaration and make changes to the run_tls_client function:
- First, we have to declare our certificate verification callback:
int cert_verify_callback(
X509_STORE_CTX* x509_store_ctx, void* arg);
As we can see, it takes two arguments:
- x509_store_ctx – X.509 certificate verification context
- arg – An arbitrary void pointer with user data
The certificate verification context is created by OpenSSL. The user data argument is set by the SSL_CTX_set_cert_verify_callback() function at the same time that the certificate verification callback is set. The callback function must return either 1 to indicate certificate verification success or 0 to indicate verification failure.
- Our next implementation step is to load the pinned certificate from the file supplied as the third command-line argument. To do that, we have to replace some code from the tls-client program. We will replace the following code:
const char* trusted_cert_fname = argv[3];
if (trusted_cert_fname)
err = SSL_CTX_load_verify_locations(
ctx, trusted_cert_fname, NULL);
else
err = SSL_CTX_set_default_verify_paths(ctx);
if (err <= 0) {
if (error_stream)
fprintf(
error_stream,
"Could not load trusted certificates ");
goto failure;
}
The following is what we will replace it with:
const char* pinned_server_cert_fname = argv[3];
FILE* pinned_server_cert_file = NULL;
X509* pinned_server_cert = NULL;
pinned_server_cert_file = fopen(
pinned_server_cert_fname, "rb");
if (pinned_server_cert_file)
pinned_server_cert = PEM_read_X509(
pinned_server_cert_file, NULL, NULL, NULL);
if (!pinned_server_cert) {
if (error_stream)
fprintf(
error_stream,
"Could not load pinned server certificate ");
goto failure;
}
- The next step is to set the certificate verification callback:
SSL_CTX_set_cert_verify_callback(
ctx, cert_verify_callback, pinned_server_cert);
Note that we have set pinned_server_cert as the user data for the callback.
- In the callback function, we will also need another pointer, error_stream. We could combine pinned_server_cert and error_stream into a C structure, make an object out of that structure, and set it as the user data argument for the SSL_CTX_set_cert_verify_callback() function. But we can pass the error_stream pointer to the callback more easily, in the same way as we did in Chapter 10, Using X.509 Certificates in TLS, with the help of the SSL_set_app_data() function:
SSL_set_app_data(ssl, error_stream);
That’s almost everything that we have to do in the run_tls_client() function of our program.
- We also have to free some newly used objects at the end of the run_tls_client() function:
if (pinned_server_cert)
X509_free(pinned_server_cert);
if (pinned_server_cert_file)
fclose(pinned_server_cert_file);
With that, we are done with making changes to the run_tls_client() function.
Implementing the cert_verify_callback() function
Now, let’s implement the cert_verify_callback() function:
- We will start the implementation of the cert_verify_callback() function by getting the error_stream and pinned_server_cert pointers that we sent to the callback function from the run_tls_client() function:
int ssl_ex_data_idx = SSL_get_ex_data_X509_STORE_CTX_idx();
SSL* ssl = X509_STORE_CTX_get_ex_data(
x509_store_ctx, ssl_ex_data_idx);
FILE* error_stream = SSL_get_app_data(ssl);
X509* pinned_server_cert = arg;
- Our next step is to get the actual server certificate:
X509* actual_server_cert =
X509_STORE_CTX_get0_cert(x509_store_ctx);
Note that the X509_STORE_CTX_get_current_cert() function would not give you the server certificate this time. When the “big” certificate verification callback function is called, very few data elements in the x509_store_ctx object are set. The current certificate is not set. It is actually the job of the “big” callback to set the current certificate, its depth, and its verification status.
- After we get the server certificate, let’s print some diagnostic information:
if (error_stream) {
X509_NAME* pinned_cert_subject =
X509_get_subject_name(pinned_server_cert);
X509_NAME* actual_cert_subject =
X509_get_subject_name(actual_server_cert);
fprintf(
error_stream,
"cert_verify_callback() called with the following "
"pinned certificate: ");
X509_NAME_print_ex_fp(
error_stream,
pinned_cert_subject,
2,
XN_FLAG_ONELINE & ~ASN1_STRFLGS_ESC_MSB);
fprintf(error_stream, " ");
fprintf(
error_stream,
"The server presented the following certificate: ");
X509_NAME_print_ex_fp(
error_stream,
actual_cert_subject,
2,
XN_FLAG_ONELINE & ~ASN1_STRFLGS_ESC_MSB);
fprintf(error_stream, " ");
}
- The next step is to compare the pinned and the actual certificates:
int cmp = X509_cmp(pinned_server_cert, actual_server_cert);
- Before checking the comparison result and returning from the function, let us also set the current certificate and its depth to the verification context:
X509_STORE_CTX_set_current_cert(
x509_store_ctx, actual_server_cert);
X509_STORE_CTX_set_depth(x509_store_ctx, 0);
- Finally, let’s check the certificate comparison result, set the correct verification error code, and return the correct result from the callback function:
if (cmp == 0) {
if (error_stream)
fprintf(
error_stream,
"The certificates match. "
"Proceeding with the TLS connection. ");
X509_STORE_CTX_set_error(x509_store_ctx, X509_V_OK);
return 1;
} else {
if (error_stream)
fprintf(
error_stream,
"The certificates do not match. "
"Aborting the TLS connection. ");
X509_STORE_CTX_set_error(
x509_store_ctx, X509_V_ERR_APPLICATION_VERIFICATION);
return 0;
}
That’s the end of the cert_verify_callback() function and the end of the program implementation.
The complete source code for our tls-cert-pinning program can be found on GitHub as the tls-cert-pinning.c file: https://github.com/PacktPublishing/Demystifying-Cryptography-with-OpenSSL-3/blob/main/Chapter11/tls-cert-pinning.c.
Running the tls-cert-pinning program
Let’s run our tls-cert-pinning program and see how it works. We will need the tls-server program from Chapter 9, Establishing TLS Connections and Sending Data over Them. We will also need the server certificate file as the pinned certificate for our tls-cert-pinning program.
This is how we will test that our tls-cert-pinning program works:
- Let’s open two terminal windows.
- In the first window, we will start the tls-server program:
$ ./tls-server 4433 server_keypair.pem server_cert.pem
*** Listening on port 4433
- In the second window, we will run our tls-cert-pinning program:
$ ./tls-cert-pinning localhost 4433 server_cert.pem
* cert_verify_callback() called with the following pinned certificate:
CN = localhost
The server presented the following certificate:
CN = localhost
The certificates match. Proceeding with the TLS connection.
*** Sending to the server:
GET / HTTP/1.1
Host: localhost
Connection: close
User-Agent: Example TLS client
*** Sending to the server finished
*** Receiving from the server:
HTTP/1.0 200 OK
Content-type: text/plain
Connection: close
Server: Example TLS server
Hello from the TLS server!
*** Receiving from the server finished
TLS communication succeeded
As we can observe, the server certificate matched the pinned certificate, and the TLS communication has succeeded.
- Next, let us also check what happens if the certificates do not match:
$ ./tls-cert-pinning www.example.org 443 server_cert.pem
* cert_verify_callback() called with the following pinned certificate:
CN = localhost
The server presented the following certificate:
C = US, ST = California, L = Los Angeles, O = Internet Corporation for Assigned Names and Numbers, CN = www.example.org
The certificates do not match. Aborting the TLS connection.
Could not connect to server www.example.org on port 443
Errors from the OpenSSL error queue:
4017BA4F1B7F0000:error:0A000086
:SSL routines:tls_post_process_server_certificate
:certificate verify failed
:../ssl/statem/statem_clnt.c:1883:
4017BA4F1B7F0000:error:0A000197
:SSL routines:SSL_shutdown
:shutdown while In init
:../ssl/ssl_lib.c:2244:
TLS communication failed
As we can see, this time, the server certificate did not match the pinned certificate – therefore, the TLS connection was aborted. From our observations, we can conclude that our simple implementation of TLS certificate pinning works correctly.
We have now learned how to use TLS certificate pinning, which is one of the advanced TLS use cases. In the next two sections, we will learn about another advanced TLS use case: using TLS connections on non-blocking sockets. Non-blocking sockets can help your application become more responsive or handle more connections simultaneously.
Understanding blocking and non-blocking sockets
Network connections can be established on blocking sockets or non-blocking sockets. The default mode depends on the OS, but for most OSes, it is blocking mode.
In blocking mode, if a program requests an Input/Output (I/O) operation on a socket, the operation must be performed, at least partially, or an error must occur, before the control returns to the program. How can an operation be performed partially? For example, if a program tries to read 100 bytes from a blocking socket, the reading function (for instance, recv()) will only return when it is possible to read at least one byte from the socket – otherwise, an error occurs. If no data is coming from the network, the execution of the current thread of the program will be blocked, meaning that the current thread will wait until some data comes. In some cases, a thread may wait on a blocking socket indefinitely. When attempting to send data, the current thread may block if the OS network sending buffers is full. In this case, the sending function (for instance, send()) will wait until the OS sends the buffered data to the network, free its sending buffers, and copy the data that the program wants to send to the network to those buffers. The send() function will only return if the program data was fully or partially (depending on the OS) copied to the OS buffers, or if an error occurred.
Unlike blocking sockets, non-blocking sockets do not block the program execution. If an I/O operation cannot be performed, the corresponding I/O function, such as send() or recv(), will return immediately with the would block error. The program is then supposed to retry the I/O operation after some time. In the meantime, the program can do other things on the same thread – for example, process some data, send or receive data on another network connection, update progress indicators, or react to the program’s User Interface (UI). The program can also check whether the socket is ready to send or receive data or wait for socket readiness. Most OSes provide functions that can wait with a timeout for I/O readiness on several sockets simultaneously. Examples of such functions are select() and poll(). OpenSSL provides its own functions for the same purpose, such as BIO_wait() and BIO_socket_wait(), but those functions are limited to one Basic Input/Output (BIO) object. However, if simultaneous waiting on several BIOs is needed, it is possible to get socket descriptors from the needed BIOs using the BIO_get_fd() function and supply a collection of those socket descriptors to select(), poll(), epoll_wait(), kevent(), WSAEventSelect(), WSAPoll(), or whichever function your OS provides.
Using non-blocking sockets, a program can retain a responsive UI even on slow network connections without detaching networking into separate threads. Another popular usage of non-blocking sockets is on the server side. A server can serve several network connections on one thread without being blocked by slow connections. This kind of strategy uses fewer system resources than serving each connection on a separate thread or in a separate process.
All our previous code examples used blocking sockets. In the next section, we will learn how to programmatically use TLS on a non-blocking socket.
Using TLS on non-blocking sockets
In order to learn how to use TLS on a non-blocking socket, we are going to write a small tls-client-non-blocking program.
We are going to use some OpenSSL functions that we have not used before. Here are their man pages:
$ man BIO_set_nbio
$ man BIO_should_retry
$ man BIO_wait
Our tls-client-non-blocking program will be based on the tls-client program from Chapter 9, Establishing TLS Connections and Sending Data over Them. We are going to take the tls-client program source code and change it to use a non-blocking socket instead of a blocking socket. Or, rather, a non-blocking BIO instead of a blocking BIO.
We will only need to change the run_tls_client() function to accomplish this.
Changing the run_tls_client() function
Here is what we are going to change:
- The first thing that we are going to do is to switch the BIO to the non-blocking mode. To accomplish this, we need to add the following lines:
BIO_set_nbio(ssl_bio, 1);
if (err <= 0) {
if (error_stream)
fprintf(
error_stream,
"Could not enable non-blocking mode ");
goto failure;
}
It’s important to switch the BIO to the non-blocking mode before the connection attempt – otherwise, the switching will fail, and the BIO will remain in the blocking mode. In our case, it means that BIO_set_nbio() must be called before BIO_do_connect().
- The next thing that we need to do is to define timeout variables that will later be used in BIO_wait() calls:
const time_t TIMEOUT_SECONDS = 10;
const unsigned int NAP_MILLISECONDS = 100;
time_t deadline = time(NULL) + TIMEOUT_SECONDS;
In our example program, for simplicity, we will use a 10-second timeout for the whole TLS connection. This should be okay because the whole program usually takes less than 1 second to run.
- The next step is to update the connection-establishing code to be non-blocking-aware. The original connection-establishing code from the tls-client program looks as follows:
err = BIO_do_connect(ssl_bio);
if (err <= 0) {
if (error_stream)
fprintf(
error_stream,
"Could not connect to server %s on port %s ",
hostname,
port);
goto failure;
}
We will need to add a retrying loop and change the connection-establishing code to the following:
err = BIO_do_connect(ssl_bio);
while (err <= 0 && BIO_should_retry(ssl_bio)) {
int wait_err = BIO_wait(
ssl_bio,
deadline,
NAP_MILLISECONDS);
if (wait_err != 1)
break;
err = BIO_do_connect(ssl_bio);
}
if (err <= 0) {
if (error_stream)
fprintf(
error_stream,
"Could not connect to server %s on port %s ",
hostname,
port);
goto failure;
}
In the retrying loop, we are calling the BIO_should_retry() function to check whether the last I/O error was would block and we should retry the connection attempt. If we should retry, then we wait for activity on the BIO using the BIO_wait() function and retry it.
As you can see, we are supplying the deadline and NAP_MILLISECONDS arguments to the BIO_wait() function. The deadline argument is the maximum time point until which the BIO_wait() function will wait. The NAP_MILLISECONDS argument will only be used if OpenSSL was compiled without socket support. Compilation of OpenSSL without socket support is needed if the OS does not support standard Berkeley sockets and uses its own non-standard sockets instead. Those kinds of OSs can usually be found on embedded devices. If OpenSSL is compiled without socket support, BIO_wait() will not be able to check network activity on a socket and will just sleep at NAP_MILLISECONDS and return. If the current OS supports standard sockets, which is the most common case, the NAP_MILLISECONDS argument will be ignored and BIO_wait() will return when either the socket is available to retry the I/O operation, the deadline time point has been reached, or an error has occurred.
BIO_wait() is a convenient function because it takes a BIO (not a socket) as a parameter, has a simple signature, and abstracts the complexity of low-level OS functions away from a developer. However, it is important to be aware that BIO_wait() is much less flexible compared to low-level OS functions, such as select() and poll:
- As already mentioned, BIO_wait() can wait for only one BIO, whereas the low-level OS functions can wait for many sockets simultaneously.
- The deadline time given to BIO_wait() is measured in whole seconds, which is not very granular. Low-level OS functions take timeouts with milliseconds of precision at least.
- BIO_wait() can only wait for the resolution of the previous I/O error on a BIO. Low-level OS functions can wait for different types of events on any socket passed to them. However, BIO_wait() automatically resolves which type of event to wait for, and that is an advantage.
If you need more flexibility than BIO_wait() can offer, you can extract the BIO’s underlying file descriptor using the BIO_get_fd() function and use the low-level OS functions on it.
When your program exchanges data via TLS, the TLS protocol may want to read from the network when your program wants to write to the network, and vice versa, the TLS protocol may want to write when your program wants to read. For example, any side of the TLS connection during the communication may decide to refresh the session keys at any time. In our tls-client-non-blocking program, these situations are handled automatically using the BIO_should_retry() and BIO_wait() functions. In another program, a developer may use OS sockets directly and wait on them using a low-level OS function, such as select() or poll(), instead of BIO_wait(). In such a case, the developer has to know what to wait for, whether reading or writing. It can be determined by such functions as BIO_should_read(), BIO_should_write(), BIO_should_io_special(), and BIO_retry_type(). It is also possible to use the SSL_get_error() function and analyze its returned error code, which can be SSL_ERROR_WANT_READ or SSL_ERROR_WANT_WRITE. Let’s suppose that our program wants to read, using the BIO_read() function, but the TLS protocol wants to write, and we have determined it by receiving true from the BIO_should_write() function. What do we do? Do we need to write something to the TLS connection using the BIO_write() function? But what do we write if we have nothing to write – call BIO_write() for writing zero bytes? No. We don’t need to write anything. Instead, we have to wait on the OS socket until it is possible to write to that socket. After that, we have to retry the reading operation that we wanted to perform in the first place, such as BIO_read(). It may sound counter-intuitive, but yes, we should retry reading even though the TLS protocol wants to write. The OpenSSL library will take care of the needed reading and writing operations to satisfy the TLS protocol. OpenSSL will read and write the service data as needed and will then read the application data from the TLS connection and provide it to us.
Now, let’s continue with changing the run_tls_client() function:
- Our next step is to update the data-sending code for the non-blocking mode. The original code from the tls-client program looks as follows:
int nbytes_written = BIO_write(
ssl_bio, out_buf, request_length);
if (nbytes_written != request_length) {
if (error_stream)
fprintf(
error_stream,
"Could not send all data to the server ");
goto failure;
}
Note that the preceding code is a bit simplified, even for the blocking mode, for the sake of showing simpler example code. The code suggests that BIO_write() in a successful case will only return after sending the whole request. In most cases, this will be true, because our request is rather small, and we have not filled the OS network buffers with the previous data sent. But it would be more robust if there was a sending loop that would check whether the request was only partially sent, and the sending must be resumed from the correct offset. In our sending code for the non-blocking mode, we will introduce such a loop. We will also use the BIO_should_retry() and BIO_wait() functions to determine when the BIO is ready for writing. Here is how the sending code for the non-blocking mode will look:
int nbytes_written_total = 0;
while (nbytes_written_total < request_length) {
int nbytes_written = BIO_write(
ssl_bio,
out_buf + nbytes_written_total,
request_length – nbytes_written_total);
if (nbytes_written > 0) {
nbytes_written_total += nbytes_written;
continue;
}
if (BIO_should_retry(ssl_bio)) {
BIO_wait(
ssl_bio,
deadline,
NAP_MILLISECONDS);
continue;
}
if (error_stream)
fprintf(
error_stream,
"Could not send all data to the server ");
goto failure;
}
- The next step is to update the data-receiving code from the tls-client program for the non-blocking mode. This is how it looks:
while ((SSL_get_shutdown(ssl) & SSL_RECEIVED_SHUTDOWN)
!= SSL_RECEIVED_SHUTDOWN) {
int nbytes_read = BIO_read(ssl_bio, in_buf, BUF_SIZE);
if (nbytes_read <= 0) {
int ssl_error = SSL_get_error(ssl, nbytes_read);
if (ssl_error == SSL_ERROR_ZERO_RETURN)
break;
if (error_stream)
fprintf(
error_stream,
"Error %i while reading data "
"from the server ",
ssl_error);
goto failure;
}
fwrite(in_buf, 1, nbytes_read, stdout);
}
As we can see, the original code already has a receiving loop. We will add the retry code for the non-blocking mode and will update the receiving code as follows:
while ((SSL_get_shutdown(ssl) & SSL_RECEIVED_SHUTDOWN)
!= SSL_RECEIVED_SHUTDOWN) {
int nbytes_read = BIO_read(ssl_bio, in_buf, BUF_SIZE);
if (nbytes_read > 0) {
fwrite(in_buf, 1, nbytes_read, stdout);
continue;
}
if (BIO_should_retry(ssl_bio)) {
err = BIO_wait(
ssl_bio,
deadline,
NAP_MILLISECONDS);
continue;
}
int ssl_error = SSL_get_error(ssl, nbytes_read);
if (ssl_error == SSL_ERROR_ZERO_RETURN)
break;
if (error_stream)
fprintf(
error_stream,
"Error %i while reading data "
"from the server ",
ssl_error);
goto failure;
}
Those were all the changes that we had to make in order to use TLS on a non-blocking socket.
The complete source code of our tls-client-non-blocking program can be found on GitHub in the tls-client-non-blocking.c file: https://github.com/PacktPublishing/Demystifying-Cryptography-with-OpenSSL-3/blob/main/Chapter11/tls-client-non-blocking.c
Running the tls-client-non-blocking program
Let’s run our tls-client-non-blocking program and see how it works. As with the previous example, we will need the tls-server program from Chapter 9, Establishing TLS Connections and Sending Data over Them. We will also need the ca_cert.pem CA certificate file to verify the server certificate by the tls-client-non-blocking program.
This’s how we will test that our tls-client-non-blocking program works:
- Let’s open two terminal windows.
- In the first window, we will start the tls-server program:
$ ./tls-server 4433 server_keypair.pem server_cert.pem
*** Listening on port 4433
- In the second window, we will run our tls-client-non-blocking program:
$ ./tls-client-non-blocking localhost 4433 ca_cert.pem
*** Sending to the server:
GET / HTTP/1.1
Host: localhost
Connection: close
User-Agent: Example TLS client
*** Sending to the server finished
*** Receiving from the server:
HTTP/1.0 200 OK
Content-type: text/plain
Connection: close
Server: Example TLS server
Hello from the TLS server!
*** Receiving from the server finished
TLS communication succeeded
As we can observe, TLS communication with localhost on a non-blocking socket has succeeded, and we could both send and receive data from the server. But will it work over the internet?
- We can try communicating with the www.example.org server and find out:
$ ./tls-client-non-blocking www.example.org 443
*** Sending to the server:
GET / HTTP/1.1
Host: localhost
Connection: close
User-Agent: Example TLS client
*** Sending to the server finished
*** Receiving from the server:
… much text …
*** Receiving from the server finished
TLS communication succeeded
As we can see, communication with www.example.org also works flawlessly. We can conclude that our non-blocking code works as expected.
Using TLS on non-blocking sockets is quite an important use case. In the next two sections, we will learn about another advanced TLS use case: using TLS connections on non-standard sockets using memory BIOs. You may need it if your target OS does not support standard sockets.
Understanding TLS on non-standard sockets
Standard Berkeley network sockets are supported by most OSes. But there are some OSes, especially embedded ones, that only support their own non-standard sockets or connection handlers. How can we use OpenSSL on these kinds of OSes? It is possible with the help of OpenSSL memory BIOs. OpenSSL can establish TLS connections purely in memory.
The following diagram shows how the data flows to and from the non-standard socket via memory BIOs:
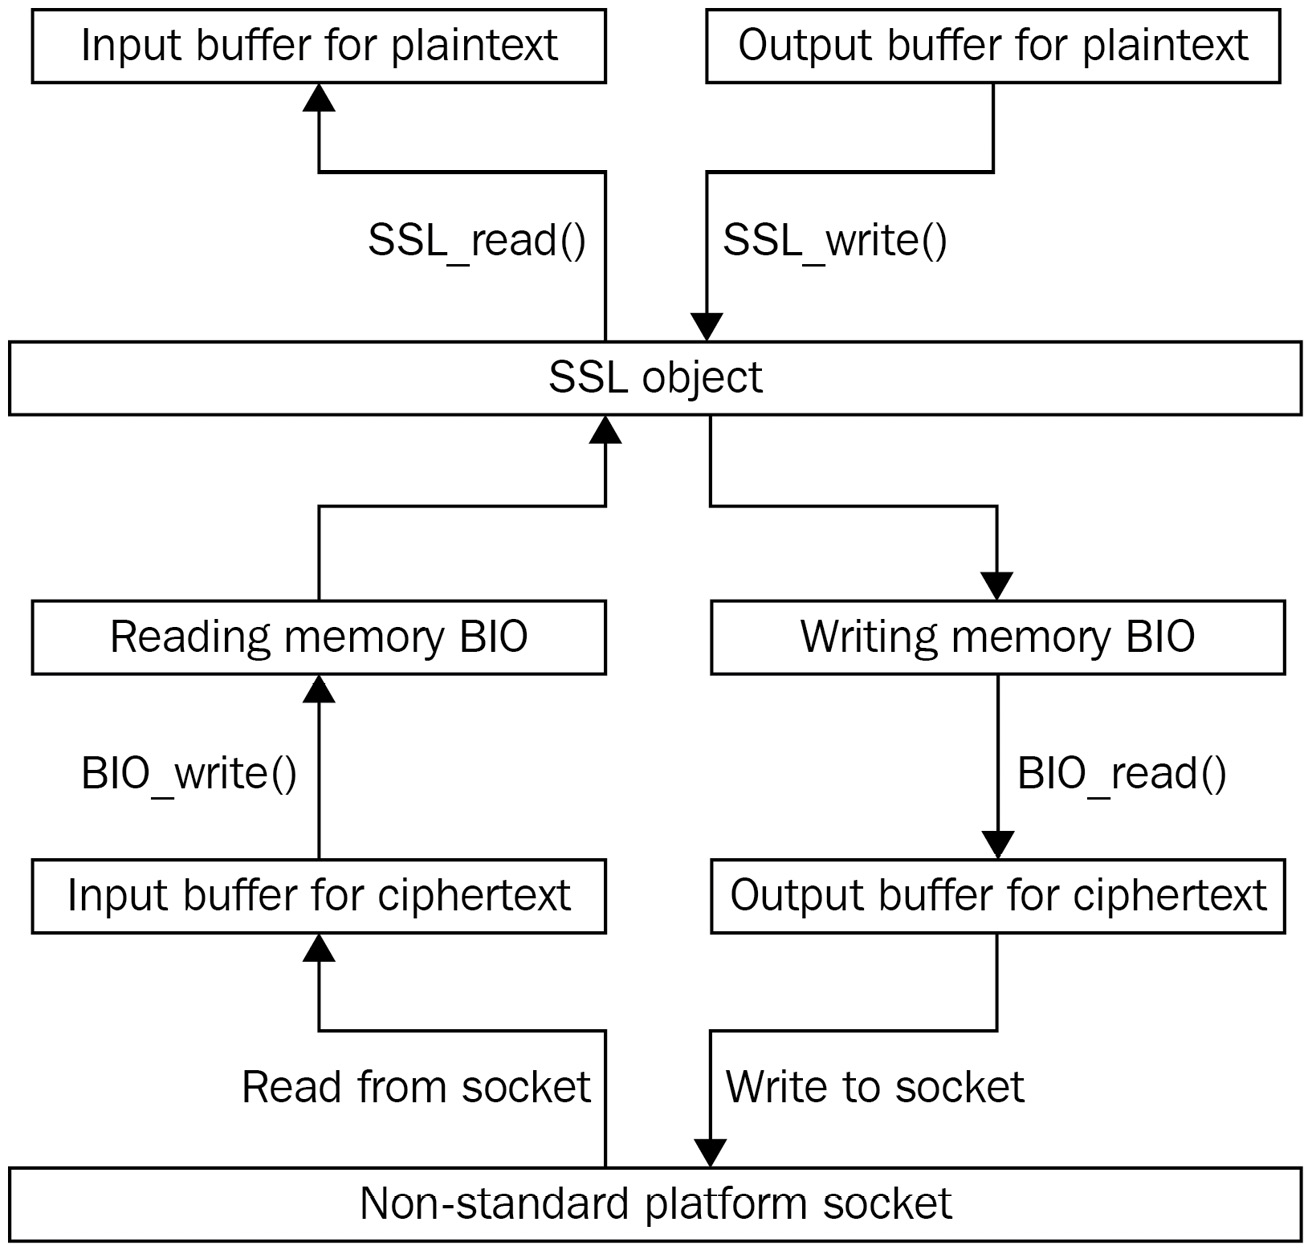
Figure 11.1 – The TLS data flow to and from the non-standard socket via memory BIOs
This way, when a program wants to receive plaintext from the TLS connection, the following happens:
- The program receives some ciphertext from the non-standard socket to the ciphertext input buffer.
- The program writes the ciphertext into the reading memory BIO.
- OpenSSL decrypts the ciphertext from the reading memory BIO and puts the resulting plaintext into the plaintext input buffer.
- The program gets the plaintext received on the TLS connection from the plaintext input buffer.
When a program wants to send plaintext on the TLS connection, the data is processed in the opposite direction:
- The program puts the plaintext to be sent on the TLS connection into the plaintext output buffer.
- OpenSSL encrypts the plaintext according to the TLS protocol and puts the resulting ciphertext into the writing memory BIO.
- The program reads the ciphertext from the writing memory BIO into the ciphertext output buffer.
- The program sends the ciphertext to the non-standard platform socket.
In the next section, we will learn how to accomplish TLS on non-standard sockets programmatically.
Using TLS on non-standard sockets
To learn how to use TLS on a non-standard socket, we are going to write a small tls-client-memory-bio program.
Our tls-client-memory-bio program will be based on the tls-client program from Chapter 9, Establishing TLS Connections and Sending Data over Them. We are going to take the tls-client program source code and change it to work via memory BIOs.
We are going to change quite a lot in the tls-client source code. For instance, we are not going to use an SSL BIO this time. An SSL BIO is a wrapper around an SSL object. In the previous example programs, it was convenient to use an SSL BIO, which was automatically chained with a connect BIO. This time, we are not going to automatically chain with a connect BIO. Instead, we will use I/O directly on an SSL object, using functions such as SSL_read() and SSL_write() instead of BIO_read() and BIO_write(). Using I/O directly on the SSL object will not only simplify the code but will also demonstrate the usage of some new functions.
As we are going to use new OpenSSL functions, it makes sense to read their man pages:
$ man SSL_new
$ man SSL_set_bio
$ man SSL_connect
$ man SSL_want_read
$ man SSL_read
$ man SSL_write
$ man SSL_shutdown
$ man SSL_free
$ man BIO_new_connect
$ man BIO_set_mem_eof_return
$ man BIO_pending
We will need to attach two underlying memory BIOs to the SSL object. One memory BIO will be used for reading ciphertext and another one for writing ciphertext. The SSL object will read and write ciphertext to those BIOs automatically. There will be no BIOs for plaintext attached to the SSL object. Instead, the SSL_read() and SSL_write() functions will be used for reading and writing plaintext.
A non-standard network socket will be represented by an OpenSSL connect BIO. A connect BIO is not really a non-standard socket, but it will be good enough to demonstrate how to transfer data between memory BIOs and the network connection. Also, unlike real non-standard sockets, connect BIOs work on a usual PC, which is where we are going to run our example program.
Let’s start the tls-client-memory-bio program implementation.
Implementing the service_bios() function
First, we are going to implement a function for transferring data between memory BIOs that the SSL object uses and the network socket, represented by a connect BIO:
- The function will be called before SSL_read() or after other SSL_*() I/O functions. As the function services three BIOs, we will call it service_bios():
int service_bios(
BIO* mem_rbio,
BIO* mem_wbio,
BIO* tcp_bio,
int want_read);
The function takes the following parameters:
- mem_rbio – The memory BIO from which the SSL object reads ciphertext.
- mem_wbio – The memory BIO to which the SSL object writes ciphertext.
- tcp_bio – The connect BIO that reads and writes to the network.
- want_read – The Boolean flag. If true, then the service_bios() function is requested not only to write pending data to the network but also to read from the network. If false, then the service_bios() function will only write to the network.
The service_bios() function returns 1 on success or -1 on failure.
The function starts with the definition of the default return code and allocates some buffers:
int err = 1;
const size_t BUF_SIZE = 16 * 1024;
char* in_buf = malloc(BUF_SIZE);
char* out_buf = malloc(BUF_SIZE);
- The next thing is to write the pending data to the network:
while (BIO_pending(mem_wbio)) {
int nbytes_read =
BIO_read(mem_wbio, out_buf, BUF_SIZE);
int nbytes_written_total = 0;
while (nbytes_written_total < nbytes_read) {
int nbytes_written =
BIO_write(tcp_bio, out_buf, nbytes_read);
if (nbytes_written > 0) {
nbytes_written_total += nbytes_written;
continue;
} else {
goto failure;
}
}
}
As you can see, we are just reading data from mem_wbio and writing it to tcp_bio.
- The next step is to read data from the network if it was requested:
if (want_read) {
int nbytes_read =
BIO_read(tcp_bio, in_buf, BUF_SIZE);
if (nbytes_read > 0) {
BIO_write(mem_rbio, in_buf, nbytes_read);
} else {
goto failure;
}
}
This time, we are reading data from tcp_bio and writing it to mem_rbio for further consumption by the SSL object.
- The function is finished by cleaning up and returning the error code:
goto cleanup;
failure:
err = -1;
cleanup:
free(out_buf);
free(in_buf);
return err;
That’s all for the service_bios() function.
Reimplementing the run_tls_client() function
Now let’s reimplement the run_tls_client() function that contains most of the code:
- The run_tls_client() function starts by defining variables and allocating buffers:
int exit_code = 0;
int err = 1;
SSL_CTX* ctx = NULL;
BIO* tcp_bio = NULL;
BIO* mem_rbio = NULL;
BIO* mem_wbio = NULL;
SSL* ssl = NULL;
const size_t BUF_SIZE = 16 * 1024;
char* in_buf = malloc(BUF_SIZE);
char* out_buf = malloc(BUF_SIZE);
- The next step is creating the SSL_CTX object, loading trusted certificates, and enabling peer certificate verification. It is the same code as in the original tls-client program:
ERR_clear_error();
ctx = SSL_CTX_new(TLS_client_method());
if (trusted_cert_fname)
err = SSL_CTX_load_verify_locations(
ctx, trusted_cert_fname, NULL);
else
err = SSL_CTX_set_default_verify_paths(ctx);
if (err <= 0) {
if (error_stream)
fprintf(
error_stream,
"Could not load trusted certificates ");
goto failure;
}
SSL_CTX_set_verify(ctx, SSL_VERIFY_PEER, NULL);
- The next step is establishing a TCP (not a TLS) connection to the server. We will establish a TLS connection in a later step. As mentioned, a connect BIO is used to emulate a non-standard socket:
tcp_bio = BIO_new_connect(hostname);
BIO_set_conn_port(tcp_bio, port);
err = BIO_do_connect(tcp_bio);
if (err <= 0) {
if (error_stream)
fprintf(
error_stream,
"Could not connect to server %s on port %s ",
hostname,
port);
goto failure;
}
- The next step is to create and set up reading and writing memory BIOs for the SSL object:
mem_rbio = BIO_new(BIO_s_mem());
BIO_set_mem_eof_return(mem_rbio, -1);
mem_wbio = BIO_new(BIO_s_mem());
BIO_set_mem_eof_return(mem_wbio, -1);
The BIO_set_mem_eof_return() call is needed to avoid an end-of-file error if the BIO is empty.
- Next, create the SSL object representing the TLS connection, and attach the newly created reading and writing memory BIOs to it:
ssl = SSL_new(ctx);
SSL_set_bio(ssl, mem_rbio, mem_wbio);
Note that after the SSL_set_bio() call, the SSL object owns the attached BIOs. When the SSL object is freed with the SSL_free() function, the BIOs will be deallocated with the BIO_free_all() function.
- The next step is setting the hostname for the Server Name Indication (SNI) TLS extension and the certificate hostname verification. It is the same code as in the tls-client program:
SSL_set_tlsext_host_name(ssl, hostname);
SSL_set1_host(ssl, hostname);
- The next step is the TLS handshake:
while (1) {
err = SSL_connect(ssl);
int ssl_error = SSL_get_error(ssl, err);
if (ssl_error == SSL_ERROR_WANT_READ
|| ssl_error == SSL_ERROR_WANT_WRITE
|| BIO_pending(mem_wbio)) {
int service_bios_err = service_bios(
mem_rbio, mem_wbio, tcp_bio, SSL_want_read(ssl));
if (service_bios_err != 1) {
if (error_stream)
fprintf(
error_stream,
"Socket error during TLS handshake ");
goto failure;
}
continue;
}
break;
}
if (err <= 0) {
if (error_stream)
fprintf(
error_stream,
"TLS error %i during TLS handshake ",
SSL_get_error(ssl, err));
goto failure;
}
Note that we are repeatedly calling SSL_connect() and service_bios() until the TLS handshake is finished. Here, during the handshake, and later during writing and reading, we are checking for both SSL_ERROR_WANT_READ and SSL_ERROR_WANT_WRITE. We do so because, as explained before, the TLS protocol may want to read or write its service data at any time. A TLS handshake, depending on the TLS version and whether any cached session data from the previous connections exists, requires up to two network data round trips. Therefore, we may need to both read and write on the OS socket in the service_bios() function a couple of times during the handshake.
- Next, create the HTTP request that will be sent to the server. It is the same code as in the tls-client program:
snprintf(
out_buf,
BUF_SIZE,
"GET / HTTP/1.1 "
"Host: %s "
"Connection: close "
"User-Agent: Example TLS client "
" ",
hostname);
int request_length = strlen(out_buf);
- The next step is sending the newly created request to the server:
printf("*** Sending to the server: ");
printf("%s", out_buf);
int nbytes_written_total = 0;
while (nbytes_written_total < request_length) {
int nbytes_written = SSL_write(
ssl,
out_buf + nbytes_written_total,
request_length – nbytes_written_total);
if (nbytes_written > 0) {
nbytes_written_total += nbytes_written;
continue;
}
int ssl_error = SSL_get_error(ssl, err);
if (ssl_error == SSL_ERROR_WANT_READ
|| ssl_error == SSL_ERROR_WANT_WRITE
|| BIO_pending(mem_wbio)) {
int service_bios_err = service_bios(
mem_rbio, mem_wbio, tcp_bio, SSL_want_read(ssl));
if (service_bios_err != 1) {
if (error_stream)
fprintf(
error_stream,
"Socket error while sending data "
"to the server ");
goto failure;
}
continue;
}
if (error_stream)
fprintf(
error_stream,
"TLS error %i while reading data "
"to the server ",
ssl_error);
}
printf("*** Sending to the server finished ");
Similar to the previous code, we are repeatedly calling SSL_write() and service_bios() until the whole request is sent. Even though we are only writing the request to the TLS connection, we are checking for both SSL_ERROR_WANT_READ and SSL_ERROR_WANT_WRITE, because the TLS protocol may want to both read and write the protocol service data, and we have to satisfy those reading and writing requests in the service_bios() function.
- After the request is sent, we should read the server response:
printf("*** Receiving from the server: ");
while ((SSL_get_shutdown(ssl) & SSL_RECEIVED_SHUTDOWN)
!= SSL_RECEIVED_SHUTDOWN) {
int service_bios_err = 1;
if (!BIO_pending(mem_rbio))
service_bios_err = service_bios(
mem_rbio, mem_wbio, tcp_bio, 1);
if (service_bios_err != 1) {
if (error_stream)
fprintf(
error_stream,
"Socket error while reading data "
"from the server ");
goto failure;
}
int nbytes_read = SSL_read(ssl, in_buf, BUF_SIZE);
if (nbytes_read > 0) {
fwrite(in_buf, 1, nbytes_read, stdout);
continue;
}
int ssl_error = SSL_get_error(ssl, err);
if (ssl_error == SSL_ERROR_NONE
|| ssl_error == SSL_ERROR_WANT_READ
|| ssl_error == SSL_ERROR_WANT_WRITE
|| BIO_pending(mem_wbio))
continue;
if (ssl_error == SSL_ERROR_ZERO_RETURN)
break;
if (error_stream)
fprintf(
error_stream,
"TLS error %i while reading data "
"from the server ",
ssl_error);
}
printf("*** Receiving from the server finished ");
Similar to the previous code, we are repeatedly calling SSL_read() and service_bios() until we get the whole server response. But note that we are calling service_bios() before the SSL I/O function this time. We also check whether any pending data already exists in the reading BIO, mem_rbio. This kind of function call order makes sense because, first, we have to read from the network, and only after that can we process the received ciphertext using the SSL_read() function. As before, we have to process both the SSL_ERROR_WANT_READ and SSL_ERROR_WANT_WRITE errors, even though we are only reading the application data.
- After the server response is read, we can shut down the TLS connection:
while (1) {
err = SSL_shutdown(ssl);
int ssl_error = SSL_get_error(ssl, err);
if (ssl_error == SSL_ERROR_WANT_READ
|| ssl_error == SSL_ERROR_WANT_WRITE
|| BIO_pending(mem_wbio)) {
int service_bios_err = service_bios(
mem_rbio, mem_wbio, tcp_bio, SSL_want_read(ssl));
if (service_bios_err != 1) {
if (error_stream)
fprintf(
error_stream,
"Socket error during TLS shutdown ");
goto failure;
}
continue;
}
break;
}
if (err != 1) {
if (error_stream)
fprintf(
error_stream,
"TLS error during TLS shutdown ");
goto failure;
}
- We finish the run_tls_client() function with cleanups, error reporting, and by returning the exit code:
failure:
exit_code = 1;
cleanup:
if (ssl)
SSL_free(ssl);
if (tcp_bio)
BIO_free_all(tcp_bio);
if (ctx)
SSL_CTX_free(ctx);
free(out_buf);
free(in_buf);
if (ERR_peek_error()) {
exit_code = 1;
if (error_stream) {
fprintf(
error_stream,
"Errors from the OpenSSL error queue: ");
ERR_print_errors_fp(error_stream);
}
ERR_clear_error();
}
return exit_code;
The complete source code of our tls-client-memory-bio program can be found on GitHub as the tls-client-memory-bio.c file: https://github.com/PacktPublishing/Demystifying-Cryptography-with-OpenSSL-3/blob/main/Chapter11/tls-client-memory-bio.c
Running the tls-client-memory-bio program
Let’s run our tls-client-memory-bio program and see how it works.
As with the previous example, we will need the tls-server program from Chapter 9, Establishing TLS Connections and Sending Data over Them. We will also need the CA certificate file ca_cert.pem to verify the server certificate.
This is how we will test that our tls-client-memory-bio program works:
- Let’s open two terminal windows.
- In the first window, we will start the tls-server program:
$ ./tls-server 4433 server_keypair.pem server_cert.pem
*** Listening on port 4433
- In the second window, we will run our tls-client-memory-bio program:
$ ./tls-client-memory-bio localhost 4433 ca_cert.pem
*** Sending to the server:
GET / HTTP/1.1
Host: localhost
Connection: close
User-Agent: Example TLS client
*** Sending to the server finished
*** Receiving from the server:
HTTP/1.0 200 OK
Content-type: text/plain
Connection: close
Server: Example TLS server
Hello from the TLS server!
*** Receiving from the server finished
TLS communication succeeded
As we can observe, TLS communication with localhost via memory BIOs and non-standard socket emulation has succeeded.
- We can also try communicating with the www.example.org server to test that our tls-client-memory-bio program also works with internet servers:
$ ./tls-client-memory-bio www.example.org 443
*** Sending to the server:
GET / HTTP/1.1
Host: localhost
Connection: close
User-Agent: Example TLS client
*** Sending to the server finished
*** Receiving from the server:
… much text …
*** Receiving from the server finished
TLS communication succeeded
As we can see, communication with www.example.org also works very well. We can conclude that our tls-client-memory-bio program works as expected.
This brings us to the end of this chapter. Now, we’ll summarize everything we learned here.
Summary
In this chapter, we learned about what TLS certificate pinning is and in which situations it can be helpful. We also learned how to implement TLS certificate pinning with the help of a certificate verification callback. Then, we learned about the differences between blocking and non-blocking sockets and how to use non-blocking network connections. After that, we learned how to use OpenSSL memory BIOs to establish TLS connections over non-standard sockets. This knowledge can help you to write more secure, responsive, and performant applications, as well as to adapt your programs to embedded OSes.
In the next chapter, we will learn how to run a mini-CA that can issue certificates for internal usage within an organization.