Chapter 12
Wireless Networking
The Following CompTIA Network+ Exam Objectives Are Covered in This Chapter:
- 3.3 Compare and contrast different wireless standards.
- 802.11 a/b/g/n standards
- Distance
- Speed
- Latency
- Frequency
- Channels
- MIMO
- Channel bonding
- 3.7 Compare and contrast different LAN technologies.
- Properties:
- CSMA/CA
- 2.2 Given a scenario, install and configure a wireless network.
- WAP placement
- Antenna types
- Interference
- Frequencies
- Channels
- Wireless standards
- SSID (enable/disable)
- Compatibility (802.11 a/b/g/n)
- 5.1 Given a scenario, implement appropriate wireless security measures.
- Encryption protocols:
- WEP
- WPA
- WPA2
- WPA Enterprise
- MAC address filtering
- Device placement
- Signal strength
While you’re sipping coffee at a café or hanging out in an airport until they finally fix the plane you’re waiting to board, you are no longer limited to just reading actual papers and magazines. Now, you have the option to connect to the local wireless network and catch up on your emails, blog, do a little gaming—maybe even get some work done! It’s come to the point that many of us wouldn’t even think of checking into a hotel that doesn’t offer this important little amenity. So clearly, those of us already in or wishing to enter the IT field better have our chops down regarding wireless network components and their associated installation factors, right? (Answer: a resounding YES!)
With that established, here’s a great starting point…If you want to understand the basic wireless LANs (WLANs) most commonly used today, just think 10BaseT Ethernet with hubs. What this means is that our WLANs typically run half-duplex communication—everyone is sharing the same bandwidth, and only one user is communicating at a time. This isn’t necessarily bad; it’s just not good enough. Because most people rely upon wireless networks today, it’s critical that they evolve faster than greased lightening to keep up with our rapidly escalating needs. The good news is that this is actually happening—and it even works securely!
The goal in this chapter is to introduce you to wireless networks and the technologies in use today. I’ll also cover the various components used, the IEEE 802.11 standards, wireless installation, and of course, wireless security.
To find up-to-the-minute updates for this chapter, please see www.lammle.com/forum or the book’s web site at www.sybex.com/go/netplus2e.
Introduction to Wireless Technology
Transmitting a signal using the typical 802.11 specifications works a lot like it does with a basic Ethernet hub: They’re both two-way forms of communication, and they both use the same frequency to both transmit and receive, often referred to as half-duplex as mentioned in the chapter introduction. Wireless LANs (WLANs) use radio frequencies (RFs) that are radiated into the air from an antenna that creates radio waves. These waves can be absorbed, refracted, or reflected by walls, water, and metal surfaces, resulting in low signal strength. So because of this innate vulnerability to surrounding environmental factors, it’s pretty apparent that wireless will never offer us the same robustness as a wired network can, but that still doesn’t mean we’re not going to run wireless. Believe me, we definitely will!
We can increase the transmitting power and we’d be able to gain a greater transmitting distance, but doing so can create some nasty distortion, so it has to be done carefully. By using higher frequencies, we can attain higher data rates, but this is, unfortunately, at the cost of decreased transmitting distances. And if we use lower frequencies, we get to transmit greater distances but at lower data rates. This should make it pretty clear to you that understanding all the various types of WLANs you can implement is imperative to creating the LAN solution that best meets the specific requirements of the unique situation you’re dealing with.
Also important to note is the fact that the 802.11 specifications were developed so that there would be no licensing required in most countries—to ensure the user the freedom to install and operate without any licensing or operating fees. This means that any manufacturer can create wireless networking products and sell them at a local computer store or wherever. It also means that all our computers should be able to communicate wirelessly without configuring much, if anything at all.
Various agencies have been around for a very long time to help govern the use of wireless devices, frequencies, standards, and how the frequency spectrums are used. Table 12-1 shows the current agencies that help create, maintain, and even enforce wireless standards worldwide.
Table 12-1: Wireless agencies and standards
| Agency | Purpose | Website |
| Institute of Electrical and Electronics Engineers (IEEE) | Creates and maintains operational standards | www.ieee.org |
| Federal Communications Commission (FCC) | Regulates the use of wireless devices in the US | www.fcc.gov |
| European Telecommunications Standards Institute (ETSi) | Chartered to produce common standards in Europe | www.etsi.org |
| Wi-Fi Alliance | Promotes and tests for WLAN interoperability | www.wi-fi.com |
| WLAN Association (WLANA) | Educates and raises consumer awareness regarding WLANs | www.wlana.org |
Because WLANs transmit over radio frequencies, they’re regulated by the same types of laws used to govern things like AM/FM radios. In the United States, it’s the Federal Communications Commission (FCC) that regulates the use of wireless LAN devices, and the Institute of Electrical and Electronics Engineers (IEEE) takes it from there and creates standards based on what frequencies the FCC releases for public use.
The FCC has released three unlicensed bands for public use: 900MHz, 2.4GHz, and 5GHz. The 900MHz and 2.4GHz bands are referred to as the Industrial, Scientific, and Medical (ISM) bands, and the 5GHz band is known as the Unlicensed National Information Infrastructure (UNII) band. Figure 12-1 shows where the unlicensed bands sit within the RF spectrum.
Figure 12-1: Unlicensed frequencies

So it follows that if you opt to deploy wireless in a range outside of the three public bands shown in Figure 12-1, you need to get a specific license from the FCC to do so. Once the FCC opened the three frequency ranges for public use, many manufacturers were able to start offering myriad products that flooded the market, with 802.11b/g/n being the most widely used wireless network found today.
Figure 12-2 shows the WLAN history that is important to us. Although wireless transmissions date back many, many years, the type we really care about is wireless as related to WLANs starting in the 1990s. Use of the ISM band started in early 1990, and it’s deployed today in multiple environments, including outdoor links, mesh networks, office buildings, healthcare facilities, warehouses, and homes.
Figure 12-2: Wireless LAN history
The Wi-Fi Alliance grants certification for interoperability among 802.11 products offered by various vendors. This certification provides a sort of comfort zone for the users purchasing the many types of products, although in my personal experience, it’s just a whole lot easier if you buy all your access points from the same manufacturer.
In the current US WLAN market, there are several accepted operational standards and drafts created and maintained by the IEEE. We’ll now take a look at these standards and then talk about how the most commonly used standards work.
Taking off from what you learned in Chapter 1, “Introduction to Networks,” wireless networking has its own 802 standards group—remember, Ethernet’s committee is 802.3. Wireless starts with 802.11, and there are various other up-and-coming standard groups as well, like 802.16 and 802.20. And even cellular networks are becoming huge players in our wireless experience. But for now, we’re going to concentrate on the 802.11 standards committee and subcommittees.
IEEE 802.11 was the first, original standardized WLAN at 1Mbps and 2Mbps. It runs in the 2.4GHz radio frequency. It was ratified in 1997, although we didn’t see many products pop up until around 1999 when 802.11b was introduced. All the committees listed in Table 12-2 made amendments to the original 802.11 standard except for 802.11f and 802.11t, which produced stand-alone documents.
Table 12-2: 802.11 committees and subcommittees
| Committee | Purpose |
| IEEE 802.11a | 54Mbps, 5GHz standard |
| IEEE 802.11b | Enhancements to 802.11 to support 5.5Mbps and 11Mbps |
| IEEE 802.11c | Bridge operation procedures; included in the IEEE 802.1d standard |
| IEEE 802.11d | International roaming extensions |
| IEEE 802.11e | Quality of service |
| IEEE 802.11f | Inter-Access Point Protocol |
| IEEE 802.11g | 54Mbps, 2.4GHz standard (backward compatible with 802.11b) |
| IEEE 802.11h | Dynamic Frequency Selection (DFS) and Transmit Power Control (TPC) at 5GHz |
| IEEE 802.11i | Enhanced security |
| IEEE 802.11j | Extensions for Japan and US public safety |
| IEEE 802.11k | Radio resource measurement enhancements |
| IEEE 802.11m | Maintenance of the standard; odds and ends |
| IEEE 802.11n | Higher throughput improvements using multiple-input, multiple-output (MIMO) antennas |
| IEEE 802.11p | Wireless Access for the Vehicular Environment (WAVE) |
| IEEE 802.11r | Fast roaming |
| IEEE 802.11s | ESS Extended Service Set Mesh Networking |
| IEEE 802.11t | Wireless Performance Prediction (WPP) |
| IEEE 802.11u | Internetworking with non-802 networks (cellular, for example) |
| IEEE 802.11v | Wireless network management |
| IEEE 802.11w | Protected management frames |
| IEEE 802.11y | 3650–3700 operation in the US |
One type of wireless networking that doesn’t get a whole lot of attention is infrared wireless. Infrared wireless uses the same basic transmission method as many television remote controls—that’s right, infrared technology. Infrared is used primarily for short-distance, point-to-point communications, like those between a peripheral and a PC, with the most widely used for peripherals being the IrDA standard.
Okay, now let’s discuss some important specifics of the most popular 802.11 WLANs.
2.4GHz (802.11b)
First on the menu is the 802.11b standard. It was the most widely deployed wireless standard, and it operates in the 2.4GHz unlicensed radio band that delivers a maximum data rate of 11Mbps. The 802.11b standard has been widely adopted by both vendors and customers who found that its 11Mbps data rate worked pretty well for most applications. But now that 802.11b has a big brother (802.11g), no one goes out and just buys an 802.11b card or access point anymore—why would you buy a 10Mbps Ethernet card when you can score a 10/100 Ethernet card for the same price?
An interesting thing about all 802.11 WLAN products is that they have the ability to data-rate-shift while moving. This allows the person operating at 11Mbps to shift to 5.5Mbps, then 2Mbps, and finally still communicate farthest from the access point at 1Mbps. And furthermore, this rate shifting happens without losing the connection and with no interaction from the user. Rate shifting also occurs on a transmission-by-transmission basis. This is important because it means that the access point can support multiple clients at varying speeds depending upon the location of each client.
The problem with all 802.11b communication lies in how the Data Link layer is dealt with. In order to solve problems in the RF spectrum, a type of Ethernet collision detection was created called Carrier Sense Multiple Access with Collision Avoidance (CSMA/CA).
CSMA/CA also has an optional implementation called a Request to Send, Clear to Send (RTS/CTS) because of the way that hosts must communicate with the access point (AP). For every packet sent, an RTS/CTS and acknowledgment must be received, and because of this rather cumbersome process, it’s kind of hard to believe it all actually works when you use this!
To get a clear picture of this, check out Figure 12-3.
Figure 12-3: 802.11b CSMA/CA
2.4GHz (802.11g)
The 802.11g standard was ratified in June 2003 and is backward compatible to 802.11b. The 802.11g standard delivers the same 54Mbps maximum data rate as you’ll find in the 802.11a range but runs in the 2.4GHz range—the same as 802.11b.
Because 802.11b/g operates in the same 2.4GHz unlicensed band, migrating to 802.11g is an affordable choice for organizations with existing 802.11b wireless infrastructures. Just keep in mind that 802.11b products can’t be “software upgraded” to 802.11g. This limitation is because 802.11g radios use a different chipset in order to deliver the higher data rate.
But still, much like Ethernet and Fast Ethernet, 802.11g products can be commingled with 802.11b products in the same network. Yet, for example, and completely unlike Ethernet, if you have four users running 802.11g cards and one user starts using an 802.11b card, everyone connected to the same access point is then forced to run the 802.11b CSMA/CA method—an ugly fact that really makes throughput suffer badly. So to optimize performance, it’s recommended that you disable the 802.11b-only modes on all your access points.
To explain this further, 802.11b uses a modulation technique called Direct Sequence Spread Spectrum (DSSS) that’s just not as robust as the Orthogonal Frequency Division Multiplexing (OFDM) modulation used by both 802.11g and 802.11a (modulation techniques will be discussed later in this chapter). 802.11g clients using OFDM enjoy much better performance at the same ranges as 802.11b clients do, but—and remember this—when 802.11g clients are operating at the 802.11b rates (11Mbps, 5.5Mbps, 2Mbps, and 1Mbps), they’re actually using the same modulation 802.11b uses.
Figure 12-4 shows the 14 different channels (each 22Mhz wide) that the FCC released in the 2.4GHz range.
Figure 12-4: ISM 2.4GHz channels
In the United States, only 11 channels are configurable, with channels 1, 6, and 11 being non-overlapping. This allows you to have three access points in the same area without experiencing interference. You must be aware of the channels when installing APs in a large environment so you do not overlap channels. Make sure that each channel is not overlapping the same channel number! If you configure one AP with channel 1, then the next AP would be configured in channel 11, the channel farthest from that configured on the first AP.
5GHz (802.11a)
The IEEE ratified the 802.11a standard in 1999, but the first 802.11a products didn’t begin appearing on the market until late 2001—and boy, were they pricey! The 802.11a standard delivers a maximum data rate of 54Mbps with 12 non-overlapping frequency channels. Figure 12-5 shows the UNII bands.
Figure 12-5: UNII 5GHz band has 12 non-overlapping channels (U.S.).
Operating in the 5GHz radio band, 802.11a is also immune to interference from devices that operate in the 2.4GHz band, like microwave ovens, cordless phones, and Bluetooth devices. 802.11a isn’t backward compatible with 802.11b because they are different frequencies, so you don’t get to just “upgrade” part of your network and expect everything to work together in perfect harmony. But no worries—there are plenty of dual-radio devices that will work in both types of networks. A definite plus for 802.11a is that it can work in the same physical environment without interference from 802.11b users.
Similar to the 802.11b radios, all 802.11a products also have the ability to data-rate-shift while moving. The 802.11a products allow the person operating at 54Mbps to shift to 48Mbps, 36Mbps, 24Mbps, 18Mbps, 12Mbps, and 9Mbps, and finally, still communicate farthest from the AP at 6Mbps.
There’s also an extension to the 802.11a specification called 802.11h, which is described next.
5GHz (802.11h)
The FCC added 11 new channels in February 2004, and in 2008, we were finally able to begin using these channels based on manufacturers’ releases of more 802.11a 5GHz products. This means that we gained access to up to 23 non-overlapping channels! And there are even two new features to the 5GHz radio that are part of the 802.11h specification: Dynamic Frequency Selection (DFS) and Transmit Power Control (TPC).
Dynamic Frequency Selection (DFS) This cool feature continuously monitors a device’s operating range for any radar signals that are allowed to operate in portions of the 5GHz band as well as 802.11a before transmitting. If DFS discovers any radar signals, it’ll either abandon the occupied channel or mark it as unavailable to prevent interference from occurring on the WLAN.
Transmit Power Control (TPC) Even though it’s been employed by the mobile phone industry for a long time, this technology has some handy new uses. You can set the client machine’s adapter and the access point’s transmit power to cover various size ranges—a feature that’s useful for many reasons. For one, setting the access point’s transmit power to 5mW reduces cell range, which works great if you’ve got a compact area with high-density usage.
Further advantages include the fact that TPC enables the client and the access point to communicate. This means the client machine can fine-tune its transmit power dynamically so it uses just enough energy to preserve its connection to the access point and conserve its battery power plus reduce interference on the neighboring WLAN cells—sweet!
2.4GHz/5GHz (802.11n)
802.11n builds on previous 802.11 standards by adding multiple-input multiple-output (MIMO), which employs multiple transmitters and receiver antennas to increase data throughput. 802.11n can have up to eight antennas, but most of today’s access points use four. These are sometimes referred to as smart antennas, and if you did have four of them, two would be used for transmitting simultaneously with the other two receiving simultaneously. This setup would allow for much higher data rates than 802.11a/b/g. In fact, the marketing people claim it will provide about 250Mbps, but personally, I’m not buying it. I just don’t believe that’s what our actual throughput levels can be, and even if what they’re saying is true, exactly how would that help if all you’ve got is a 1Mbps or 2Mbps cable or DSL connection to the Internet?
This means that the products on the shelf today are proprietary, and they are called pre-N products. In some large, outdoor Cisco-proprietary networks that I’m currently working on, the Cisco “N” products work great. But keep in mind that all the devices are Cisco and the network won’t tolerate other vendors’ products working within it—at least, not today.
802.11n allows for communication at both the 2.4Ghz and 5Ghz frequencies by using channel bonding.
Unlike 802.11a and 802.11 g, which are locked into using the 5.0 and 2.4 GHZ spectrums respectively, with 802.11n you can control which of the spectrums (or both) that you want to allow in your WLAN! Listed next are some additional components of 802.11n that give people reason to say 802.11n has greater reliability and predictability:
40Mhz channels 802.11g and 802.11a use 20Mhz channels, and tones on the sides of each channel are not used to protect the main carrier, which means that 11Mbps are unused or wasted. 802.11n aggregates two carriers to double the speed from 54Mbps to 108. Add the 11Mbps that we gain from not wasting the side tones and we have 119Mbps.
MAC Efficiency 802.11 protocols require acknowledgment of each and every frame. 802.11n can pass many packets before an acknowledgment is required, which saves you on overhead. This is called block acknowledgment.
So What Is Wi-Fi?
You may have seen products that are 802.11-compliant with a small sticker on them that says “Wi-Fi.” You might be able to guess that this rather odd phrase stands for Wireless Fidelity, but you may not know what its implications are. Simply put, that sticker indicates that the product in question has passed certification testing for 802.11 interoperability by the Wi-Fi Alliance. This nonprofit group was formed to ensure that all 802.11a/b/g/n wireless devices would communicate seamlessly. So, Wi-Fi is a good thing.
Multiple-input, multiple-output (MIMO) Several frames are sent by several antennae over several paths and are then recombined by another set of antennae to optimize throughput and multipath resistance. This is called spatial multiplexing.
Okay—before I move on to wireless installations, take at look at Figure 12-6, which lists, for each of the IEEE standards in use today, the year or ratification as well as the frequency, number of non-overlapping channels, physical layer transmission technique, and data rates.
Figure 12-6: Standards for spectrums and speeds

I mentioned earlier that 802.11b runs DSSS, whereas 802.11g and 802.11a both run the OFDM modulation technique. Let’s take a closer look at these different modulation techniques used in today’s networks.
Range Comparisons
Now let’s take a look at Figure 12-7, which delimits the range comparisons of each 802.11 standard and shows these different ranges using an indoor open-office environment as a factor. (We’ll be using default power settings.)
You can see that to get the full 54Mbps benefit of both 802.11a and 802.11g, you need to be between 50 feet and 100 feet (at the furthest) away and likely even less if there happen to be any obstructions between the client and the access point.
Figure 12-7: Range comparisons of 802.11 standards

Though it might not seem this way to you right now, wireless networks are less complex than their wired cousins because they require fewer components. To make a wireless network work properly, all you really need are two main devices: a wireless access point and a wireless NIC. This also makes it a lot easier to install a wireless network because, basically, you just need an understanding of these two components in order to do so.
Wireless Access Points
You’ll find a central component—like a hub or switch—in the vast majority of wired networks that serves to connect hosts together and allow them to communicate with each other. It’s the same idea with wireless networks. They also have a component that connects all wireless devices together, only that device is known as a wireless access point (WAP), or just AP. Wireless access points have at least one antenna (sometimes two for better reception—a solution called diversity) and a port to connect them to a wired network. Figure 12-8 shows an example of a typical wireless access point.
You can even think of an AP as a bridge between the wireless clients and the wired network. In fact, an AP can be used as a wireless bridge (depending on the settings) to bridge two wired network segments together.
In addition to the stand-alone AP, there is another type of AP that includes a built-in router, which you can use to connect both wired and wireless clients to the Internet (the most popular home brand being Linksys). In summation, an AP can operate as a repeater, bridge (switch) or router, depending on its hardware and its implementation.
Figure 12-8: A wireless access point

These devices are usually known as (surprise) wireless routers. They’re usually employed as Network Address Translation (NAT) servers by using the one ISP-provided global IP address to multiplex numerous local IP addresses that are generally doled out to inside clients by the wireless router from a pool within the 192.168.x.x range.
Wireless Network Interface Card
Every host that wants to connect to a wireless network needs a wireless network interface card (NIC) to do so. Basically, a wireless NIC does the same job as a traditional NIC, but instead of having a socket to plug some cable into, the wireless NIC has a radio antenna. In addition to the different types of wireless networking (I’ll talk about those in a minute), wireless NICs (like other NICs) can also differ in the type of connection they use to connect to the host computer.
Figure 12-9 shows an example of a wireless NIC.
The wireless card shown in Figure 12-9 is used in a desktop PC. There are various options for laptops as well. Most new laptops have wireless cards built into the motherboard.
These days, it’s pretty rare to use an external wireless client card because all laptops come with them built in, and desktops can be ordered with them too. But it’s good to know that you can still buy the client card shown in Figure 12-9. Typically, you would use cards like the one shown in the figure for areas of poor reception because they can have a better range—depending on the antenna you use.
Figure 12-9: A wireless NIC

Wireless Antennas
Wireless antennas act as both transmitters and receivers. There are two broad classes of antennas on the market today: Omni directional (or point-to-multipoint) and directional, or Yagi (point-to-point). Yagi antennas usually provide greater range than Omni antennas of equivalent gain. Why? Because Yagis focus all their power in a single direction, whereas Omnis must disperse the same amount of power in all directions at the same time. A downside to using a directional antenna is that you’ve got to be much more precise when aligning communication points. This is why a Yagi is really only a good choice for point-to-point bridging of access points. It’s also why most APs use Omnis, because often, clients and other APs could be located in any direction at any given moment.
To get a picture of this, think of the antenna on your car. Yes, it’s a non-networking example, but it’s still a good one because it clarifies the fact that your car’s particular orientation doesn’t affect the signal reception of whatever radio station you happen to be listening to. Well, most of the time, anyway. If you’re in the boonies, you’re out of range—something that also applies to the networking version of Omnis.
The television aerials that some of us are old enough to remember rotating into a specific direction for a certain channel are examples of Yagi antennas. (How many of you labeled your set-top antenna dial for the actual TV stations you could receive?) Believe it or not, they still look the same to this day!
Both Omnis and Yagis are rated according to their signal gain with respect to an actual or theoretical laboratory reference antenna. These ratings are relative indicators of the corresponding production antenna’s range. Range is also affected by the bit rate of the underlying technology, with higher bit rates extending shorter distances. Remember, a Yagi will always have a longer range than an equivalently rated Omni, but as I said, the straight-line Yagi will be very limited in its coverage area.
Both antennas are also rated in units of decibel isotropic (dBi) or decibel dipole (dBd), based on the type of reference antenna (isotropic or dipole) of equivalent frequency that was initially used to rate the production antenna. A positive value for either unit of measure represents a gain in signal strength with respect to the reference antenna. Webster’s defines isotropic as “exhibiting properties (as velocity of light transmission) with the same values when measured along axes in all directions.” Isotropic antennas are not able to be produced in reality, but their properties can be engineered from antenna theory for reference purposes.
As a practical example, I’m going to use the Cisco Systems series of Aironet Access Point (indoor) and Bridge (outdoor) antennas. Table 12-3 describes the effect that gain ratings and attempted bit rates have on range limitations.
Table 12-3: Wireless antenna types and ranges

It’s pretty much a given that antennas operating with frequencies below 1GHz are measured in dBd while those operating above 1GHz are measured in dBi. But because this rule doesn’t always work definitively, sometimes we have to compare the strength of one antenna measured in dBd with another measured in numerically equivalent dBi in order to determine which one is stronger. This is exactly why it’s important to know that a particular numerical magnitude of dBd is more powerful than the same numerical magnitude of dBi.
I know this sounds pretty complicated, but because the relationship between these two values is linear, it really makes the conversion a lot easier than you might think. Here’s how it works: At the same operating frequency, a dipole antenna has about 2.2dB gain over a 0dBi theoretical isotropic antenna, which means you can easily convert from dBd to dBi by adding 2.2 to the dBd rating. Conversely, subtract 2.2 from the dBi rating and you get the equivalent dBd rating.
Armed with what you’ve learned about the difference between Omni and Yagi antennas and the difference between dBd and dBi gain ratings, you should be able to compare the relative range of transmission of one antenna with respect to another based on a combination of these characteristics. For example, the following four antenna ratings are given in relative order from greatest to least range:
- 7dBd Yagi (equivalent to a 9.2dBi Yagi)
- 7dBi Yagi (longer range than 7dBi Omni)
- 4.8dBd Omni (equivalent to a 7dBi Omni)
- 4.8dBi Omni (equivalent to a 2.6dBd Omni)
If you are having an intermittent problem with hosts connecting to the wireless network and varying signal strengthens at different locations, check your antennae location in the office or warehouse to make sure you are getting the best coverage possible.
So now that you understand the basic components involved in a wireless network, it’s time to use what you learned about the standards we use in our everyday home and corporate wireless networks and the different ways that they’re actually installed.
Let’s say you just bought a wireless NIC and a WAP for your laptop. What’s next? Well, that all depends on the type of installation you want to create with your new toys. There are two main installation types, ad hoc and infrastructure mode, and each 802.11 wireless network device can be installed in one of these two modes, also called service sets.
Ad Hoc Mode: Independent Basic Service Set
This is the easiest way to install wireless 802.11 devices. In this mode, the wireless NICs (or other devices) can communicate directly without the need for an AP. A good example of this is two laptops with wireless NICs installed. If both cards were set up to operate in ad hoc mode, they could connect and transfer files as long as the other network settings, like protocols, were set up to enable this as well. We’ll also call this an independent basic service set (IBSS), which is created as soon as two wireless devices communicate.
Okay—to set up a basic ad hoc wireless network, all you need are two wireless NICs and two computers. First (assuming they aren’t built in), install the cards into the computers according to the manufacturer’s directions. During the software installation, you’ll be asked if you want to set up the NIC in ad hoc mode or infrastructure mode. For an ad hoc network, you would obviously go with the ad hoc mode setting. Once that’s done, all you’ve got to do is bring the computers within range (90m–100m) of each other, and voilà—they’ll “see” each other and be able to connect to each other.
Figure 12-10 shows an example of an ad hoc wireless network. (Note the absence of an access point.)
Figure 12-10: A wireless network in ad hoc mode

An ad hoc network would not scale well and really is not recommended due to collision and organization issues. With the low costs of APs, this type of network is just not needed today.
Infrastructure Mode: Basic Service Set
The most common use of wireless networking equipment is to give us the wireless equivalent of a wired network. To do this, all 802.11 wireless equipment has the ability to operate in what’s known as infrastructure mode, also referred to as a basic service set (BSS), which is provided by an AP. The term basic service area (BSA) is also used at times to define the area managed by the AP, but BSS is the most common term used to define the cell area.
In infrastructure mode, NICs communicate only with an access point instead of directly with each other as they do when they’re in ad hoc mode. All communication between hosts, plus with any wired portion of the network, must go through the access point. A really important fact to remember is that in this mode, wireless clients actually appear to the rest of the network as though they were standard, wired hosts.
Figure 12-11 shows a typical infrastructure mode wireless network. Pay special attention to the access point and the fact that it’s also connected to the wired network. This connection from the access point to the wired network is called the distribution system (DS).
Figure 12-11: A wireless network in infrastructure mode

When you configure a client to operate in wireless infrastructure mode, you need to understand a couple of basic wireless concepts—namely, SSID and security. The Security Set Identifier (SSID) refers to the unique 32-character identifier that represents a particular wireless network and defines the basic service set. (By the way, a lot of people use the terms SSID and BSS interchangeably, so don’t let that confuse you!) All devices involved in a particular wireless network must be configured with the same SSID.
Good to know is that if you set all your access points to the same SSID, mobile wireless clients can roam around freely within the same network. Doing this creates an extended service set (ESS) and provides more coverage than a single access point. Figure 12-12 shows two APs configured with the same SSID in an office, thereby creating the ESS network.
For users to be able to roam throughout the wireless network—from AP to AP without losing their connection to the network—all APs must overlap by 10 percent of their signal or more. To make this happen, be sure the channels on each AP are set differently. And remember, in an 802.11b/g network, there are only three non-overlapping channels (1, 6, 11), so careful design is super important here!
Figure 12-12: Extended service set (ESS)
Signal Degradation
Something that’s really important to consider when installing a wireless network is signal degradation. Because the 802.11 wireless protocols use radio frequencies, the signal strength varies according to many factors. The weaker the signal, the less reliable the network connection will be, and so the less usable as well. (Think dropped calls!) There are several key factors that affect signal strength:
Distance This one is definitely on the obvious side—the farther away from the WAP you get, the weaker the signal you get. Most APs have a very limited maximum range that equals less than 100m for most systems. You can extend this range to some degree using amplifiers or repeaters or even by using different antennas.
Walls and other barriers Also easy to imagine is the fact that the more walls and other office barriers a wireless signal has to pass through, the more attenuated (reduced) the signal becomes. Also, the thicker the wall, the more it interrupts the signal. So in an indoor office area with lots of walls, the range of your wireless network could be as low as 25 feet!
Protocols used This one isn’t so apparent, but it certainly is a factor that affects, and can even determine, the range of a wireless LAN. The various wireless 802.11 protocols have different maximum ranges. As discussed earlier, and illustrated in Figure 12-7, the maximum effective range varies quite a bit depending on the 802.11 protocol used. For example, if you have a client running the 802.11g protocol but it connects to an AP running only the 802.11b protocol, you’ll only get a throughput of 11Mbps to the client.
Interference The final factor that affects wireless performance is outside interference. Because 802.11 wireless protocols operate in the 900MHz, 2.4GHz, and 5GHz ranges, interference can come from many sources. These include other wireless devices like Bluetooth, cordless telephones, cell phones, other wireless LANs, and any other device that transmits a radio frequency (RF) near the frequency bands that 802.11 protocols use. Even microwave ovens—a huge adversary of 802.11b and 802.11g—can be serious culprits!
Installing and Configuring Hardware
As I said earlier, installing 802.11 equipment is actually fairly simple—remember that there are really only two main types of components in 802.11 networks: APs and NICs. Wireless NIC installation is just like installing any other network card, but nowadays most, if not all, laptops have wireless cards preinstalled, and that’s as easy as it gets! And just as with connecting an Ethernet card to a LAN switch, you need the wireless network card to connect to an access point.
The AP installation can be fairly simple as well. Take it out of the box, connect the antenna(e) if necessary, connect the power, and then place the AP where it can reach the highest number of clients. This last part is probably the trickiest, but it really just involves a little common sense and maybe a bit of trial and error. Knowing that walls obstruct the signal means that putting the AP out in the open—even indoors—works better. And you also know it should be placed away from sources of RF interference, so putting it next to the microwave or phone system is probably a really bad idea too. Near a metal filing cabinet is also not so good. So just experiment and move your AP around to find the spot that gives you the best signal strength for all the clients that need to use it.
Okay—now that you have the hardware installed, it’s time to configure it, right? Let’s get started.
No worries—configuring your AP and NIC to work together isn’t as tricky as it sounds. Most wireless equipment is designed to work almost without configuration, so by default, you can pretty much turn things on and start working. The only things you need to configure are customization settings (name, network address, and so on) and security settings, and even these aren’t required. But because I do highly recommend configuring them, I’ll take you through that now.
NIC Configuration
Windows XP, Vista, and Windows 7 (as well as Windows Server 2003/2008) include software to automatically configure a wireless connection, and they do so automatically when you install a wireless NIC. Let’s discuss both XP and Windows 7 installations. First, here are the steps for XP:
1. The first time you reboot an XP machine after the installation of the NIC, you’ll see a screen like the one shown in Figure 12-13. (This is the Windows wireless configuration screen.) From this screen, you can see any available wireless networks and configure how a computer connects to them.
Figure 12-13: Windows XP wireless configuration screen
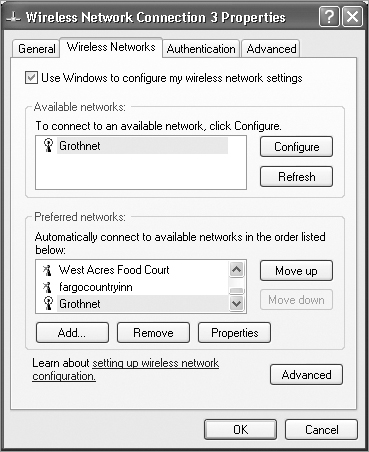
2. You can then configure several of the properties for how this wireless NIC connects to a particular wireless network, using the following options as shown on the wireless network configuration screen:
Use Windows to Configure My Wireless Network Settings This check box determines whether Windows XP will configure the wireless settings. When it’s unchecked, Windows XP will need an external program to configure how it connects to a wireless network, as is the case with some wireless NICs that have their own software program for this purpose. It is usually best to let Windows XP manage your wireless settings.
Available Networks This list shows all of the wireless networks within range, with each network listed by its SSID. From this list, you can choose which network you wish to connect to, and you can then configure how your workstation connects by clicking the Configure button. If you don’t see the wireless network you are looking for and you are in range, try clicking the Refresh button.
Preferred Networks This list details any wireless networks you have connected to before and want to connect to again automatically. If there is more than one wireless network in range, this list determines the order in which the workstation will try to connect to them. You can change this order using the Move Up and Move Down buttons.
3. In addition to the general configuration, you may have to configure the encryption for the connection (if the wireless connection you are using requires it). To set up how your workstation uses encryption for a particular connection, from the screen shown in Figure 12-13, click the SSID of the wireless network you want to configure, and then click Configure. You will then see the screen shown in Figure 12-14.
Figure 12-14: Configuring encryption

Proceeding from this screen, you can configure several parameters for the specific connection:
Network Name (SSID) If for some reason the SSID of the AP changes, you can change the name of the AP you’re connecting to in this field. All you need to do is delete the old one and type in the new name. This is also the area where you add an SSID name if the AP is not broadcasting the name, so the client can find the AP.
Wireless Network Key (WEP) This section contains all the parameters for configuring encryption for this particular connection. If the network you are connecting to uses Wired Equivalent Privacy (WEP) encryption, this is the section where you will click the check boxes and configure how the wireless connection uses WEP, the key it uses, and what type of key it is (I’ll cover WEP in the section on security at the end of this chapter). The following parameters are in this section:
Data Encryption (WEP Enabled) If a key is used to encrypt data sent over the network, you should definitely make sure this box is checked (even though it is by default). You’ll then need to specify the key in the box labeled Network Key as well as specify what type of key it is (ASCII or hex) by selecting the appropriate item from the drop-down list.
Network Authentication (Shared Mode) If your AP uses shared mode authentication, you’ve got to check this box to ensure that your workstation will authenticate to the AP using the shared key. The key can be provided automatically by the AP during the response to the initial request. If this is the case, you simply check the box labeled The Key Is Provided for Me Automatically, which happens to be the default. Otherwise, just uncheck it and enter the key and related information in the appropriate boxes.
This Is a Computer-to-Computer (Ad Hoc) Network Check this check box if you’re connecting to another computer instead of an access point (not recommended, remember?).
4. Once you have changed any settings you need to, click OK to save the changes and finish the configuration.
Configuring a Windows 7 client is pretty simple unless, well, it doesn’t work. Should this happen, you can indeed spend a long time searching for the answer!
1. To find a wireless network, in Control Panel, choose Network and Internet, then choose Network and Sharing Center, and finally, Connect to a network. If all is well, you’ll get a screen similar to this one.
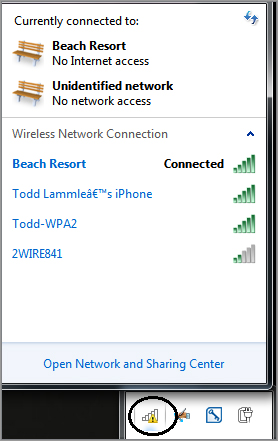
Now that was the long way around to get where we wanted to go. If you just go to the lower-right corner of your screen, click the signal strength bars with the yellow caution sign that I circled in the screen shot; you will receive the same results.
2. Double-click the network you want to join, and click Connect Anyway if it is an unsecured network. You’ll then get a screen showing that it’s trying to connect:

3. If you’re using security, the AP will ask you for your credentials.
4. Check your TCP/IP settings to troubleshoot if you are not connected to the Internet.
AP Configuration
Once you’ve successfully configured your workstation(s), it’s time to move on and configure the AP. There are literally hundreds of different APs out there, and of course, each uses a different method to configure its internal software. The good news is that for the most part, they all follow the same general patterns:
1. First of all, out of the box, the AP should come configured with an IP address that’s usually something similar to 192.168.1.1. But check the documentation that comes with the AP to be sure. You can just take the AP out of its box, plug it into a power outlet, and connect it to your network, but in order to manage the AP, you’ve got to configure the AP’s IP address scheme to match your network’s.
2. Start by configuring a workstation on the wired network with an IP address (192.168.1.2 or similar) and subnet mask on the same subnet as the AP’s. You should then be able to connect to the AP to begin the configuration progress. Usually, you do this via a web browser or with a manufacturer-supplied configuration program.
3. Once you have successfully connected to the AP, you then get to configure its parameters.
Following are the minimum parameters common to APs that you should configure for your AP to work properly (remember, typically, an AP works right out of the box, but it is insecure too!).
SSID As I talked about earlier, this is the name of the wireless network that your AP will advertise. If this new AP is to be part of an existing wireless network, it needs to be configured with the same SSID as the existing network. In a network with only one AP, you can think of the SSID as the “name” of the AP.
AP IP addresses Remember, even though most APs come preconfigured with an IP address, it may not be one that matches the wired network’s IP addressing scheme. So it follows that you should configure the AP’s IP addresses (including the address, subnet mask, and default gateway addresses) to match the wired network you want it connected to. An AP does not need an IP address to work in your network. The IP address of the AP is used only to manage the AP.
Operating mode (Access Point or Bridging) Access points can operate in one of two main modes: Access Point mode or Bridging mode. Access Point mode allows the AP to operate as a traditional access point to allow a wireless client transparent access to a wired network. Alternatively, two APs set to Bridging mode provide a wireless bridge between two wired network segments.
Password Every access point has some kind of default password that’s used to access the AP’s configuration. For security reasons, it’s a good idea to change this as soon as you can to connect to and configure the AP.
Wireless channel 802.11 wireless networks can operate on different channels to avoid interference. Most wireless APs come set to work on a particular channel from the factory and you can change it if other networks in the area are using that channel but be aware that no particular channel is any more secure than another. Wireless stations do NOT use channel number as a faker when seeking a connection. They only pay attention to SSIDs!
WEP/WPA Although it isn’t a requirement per se, I definitely recommend enabling security right from the start as soon as you turn on the AP. WEP and Wi-Fi Protected Access (WPA) allow data to be encrypted before it’s sent over the wireless connection, and all configuring it entails is to enable it and pick a key to be used for the connections. Simple, easy-to-configure security is certainly worth your time!
So here’s what you do: First, you’ll be asked to enter one or more human-readable passphrases called shared keys—secret passwords that won’t ever be sent over the wire. After entering each one, you’ll generally click a button to initiate a one-way hash to produce a WEP key of a size related to the number of bits of WEP encryption you want. Entering the same passphrase on a wireless client causes the hash (not the passphrase) to be sent from the wireless client to the AP during a connection attempt. Most configuration utilities allow you to create multiple keys in case you want to grant someone temporary access to the network, but you still want to keep the primary passphrase a secret. You can just delete the key you enabled to permit temporary access after you don’t need it anymore without affecting access by any primary LAN participants.
Here’s an example of connecting to a Linksys access point (not a Linksys wireless router, which is a different device):
1. The first screen shows that I’ve connected using HTTP to configure the device. The IP address of the Linksys AP is 192.168.1.245. If it was a Linksys wireless router instead—the typical home DSL/cable modem wireless connection device around today—than the address would be 192.168.1.1.
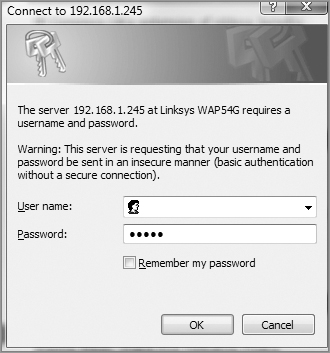
2. As you can see, there’s no username required, and the password is just admin. As I mentioned, be sure not to leave this login configuration as the default! Once I click OK, I get taken to a screen where I can change my IP address.

3. It is not vitally important that an AP have an IP address, but it comes in handy for management purposes. But you can change the IP address as well as the device name from this screen if you want to. I clicked the Wireless tab on top and received this screen.
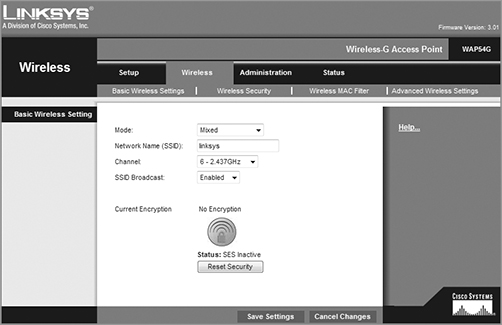
4. From here, you can set the device to run b/g or just g—even Mixed mode, which happens to be the default. You can also change the SSID from Linksys to another name, and I highly recommend doing this. The AP channel can be also be changed, and you can turn off the AP beacons as well—which, again, is recommended (if you do this, you have to set the new SSID name in each of your clients!). Last, you can see that by default, there’s no encryption. Click the Wireless Security tab, and you’ll get this screen.

5. You can see from the pull-down menu that security is set to Disabled by default, but you can choose from various wireless security options.
I’ll talk about security next.
Okay, so wireless security is basically nonexistent on access points and clients. The original 802.11 committee just didn’t imagine that wireless hosts would one day outnumber bounded media hosts, but that’s actually where we’re headed now. Also, unfortunately, just as with the IPv4 routed protocol, engineers and scientists didn’t include security standards that are robust enough to work in a corporate environment. So we’re left with proprietary solution add-ons to aid us in our quest to create a secure wireless network. And no—I’m not sitting here bashing the standards committees, because the security problems we’re experiencing were also created by the US government because of export issues with its own security standards. Our world is a complicated place, so it follows that our security solutions would have to be as well.
War Driving
It’s a fact—wireless networks are pretty much everywhere these days. You can get your hands on a wireless access point for less than $100.00, and they’re flying off the shelves. You can find APs in public places like shopping malls, coffee shops, airports, and hotels, and in some cities, you can just hang out in a downtown area and zero in on a veritable menu of APs operating in almost every nearby business.
Predictably, this proliferation of APs has led to a new hobby for those with enough skill: It’s called war driving. Not for the technologically challenged, war driving involves driving around in a car with a laptop, a wireless NIC, and a high-gain antenna, trying to locate open APs. If one with high-speed Internet access is found, it’s like hitting the jackpot. People do this aided by various software programs and Global Positioning Systems (GPSs) to make their game even easier. But it’s not always innocent—war drivers can be a serious security threat because they can potentially access anything on your wireless LAN as well as anything it’s attached to! Even though they’re not a sinister threat most of the time, realize that in the very least, they’re consuming precious resources from your network. So, if you happen to notice unusually slow-moving vehicles outside your home or business—especially those with computer equipment inside—know that you’re the potential target of a war driver.
A good place to start discussing Wi-Fi security is by talking about the standard basic security that was incorporated into the original 802.11 standards and why those standards are still way too flimsy and incomplete to help us create a secure wireless network relevant to today’s challenges.
Open Access
All Wi-Fi Certified wireless LAN products are shipped in “open-access” mode, with their security features turned off. Although open access or no security may be appropriate and acceptable for public hot spots such as coffee shops, college campuses, and maybe airports, it’s definitely not an option for an enterprise organization, and it’s probably not even adequate for your private home network.
With what I’ve told you so far, I’m sure you agree that security needs to be enabled on wireless devices during their installation in enterprise environments. Yet surprisingly, many companies actually don’t enable any WLAN security features. Obviously, the companies that do this are exposing their networks to tremendous risk.
The reason that the products are shipped with open access is so that any person who knows absolutely nothing about computers can just buy an access point, plug it into their cable or DSL modem, and voilà—they’re up and running. It’s marketing, plain and simple, and simplicity sells.
Service Set Identifiers, Wired Equivalent Privacy, and Media Access Control Address Authentication
What the original designers of 802.11 did to create basic security was to include the use of SSIDs, open or shared-key authentication, static WEP, and optional Media Access Control (MAC) authentication. Sounds like a lot, but none of these really offer any type of serious security solution—all they may be close to adequate for is use on a common home network. But we’ll go over them anyway.
SSID is a common network name for the devices in a WLAN system that create the wireless LAN. An SSID prevents access by any client device that doesn’t have the SSID. The thing is, by default, an access point broadcasts its SSID in its beacon many times a second. And even if SSID broadcasting is turned off, a bad guy can discover the SSID by monitoring the network and just waiting for a client response to the access point. Why? Because, believe it or not, that information, as regulated in the original 802.11 specifications, must be sent in the clear—how secure!
If you cannot see an AP when trying to perform a site survey, verify that the AP has SSID beaconing enabled.
Two types of authentication were specified by the IEEE 802.11 committee: open and shared-key authentication. Open authentication involves little more than supplying the correct SSID—but it’s the most common method in use today. With shared-key authentication, the access point sends the client device a challenge-text packet that the client must then encrypt with the correct WEP key and return to the access point. Without the correct key, authentication will fail and the client won’t be allowed to associate with the access point. But shared-key authentication is still not considered secure because all an intruder has to do to get around this is detect both the clear-text challenge and the same challenge encrypted with a WEP key and then decipher the WEP key. Surprise—shared key isn’t used in today’s WLANs because of clear-text challenge.
With open authentication, even if a client can complete authentication and associate with an access point, the use of WEP prevents the client from sending and receiving data from the access point unless the client has the correct WEP key. A WEP key is composed of either 40 or 128 bits, and in its basic form, it’s usually statically defined by the network administrator on the access point and all clients that communicate with that access point. When static WEP keys are used, a network administrator must perform the time-consuming task of entering the same keys on every device in the WLAN. Obviously, we now have fixes for this because tackling this would be administratively impossible in today’s huge corporate wireless networks!
Last, client MAC addresses can be statically typed into each access point, and any of them that show up without that MAC address in the filter table will be denied access. Sounds good, but of course all MAC layer information must be sent in the clear—anyone equipped with a free wireless sniffer can just read the client packets sent to the access point and spoof their MAC address. If you have a small number of wireless clients and you don’t want to deploy an encryption based access method, MAC address filters may be sufficient.
If you cannot connect to an AP and you’ve verified that your DHCP configuration and WEP key are correct, check the MAC address filtering on the AP.
WEP can actually work if administered correctly. But basic static WEP keys are no longer a viable option in today’s corporate networks without some of the proprietary fixes that run on top of it.
So, what should you use today? The answer lies in the size of your wireless network and how tight your security needs to be. Let’s discuss this further now.
Remote Authentication Dial In User Service
Remote Authentication Dial In User Service (RADIUS) is a networking protocol that offers us several security benefits: authorization, centralized access, and accounting supervision regarding the users and/or computers that connect to and access our network’s services. Once RADIUS has authenticated the user, it allows us to specify the type of rights a user or workstation has plus control what it, or they, can do within the network. It also creates a record of all access attempts and actions. The provision of Authentication, Authorization, and Accounting is called AAA (spoken just like the automobile insurance company: Triple A).
RADIUS has risen to stardom because of its AAA features and is often employed by ISPs, web servers, wireless networks, and APs as well as network ports—basically, by anybody who wants or needs a AAA server. And these servers are only becoming more critically important in large corporate environments because they offer security for wireless networks. From the Linksys security screen shown earlier, you can see that RADIUS is an available option. If you choose it, you’ll be asked for the IP address of the RADIUS server so the AP can send authentication packets.
Figure 12-15 shows how the AP becomes an authenticator when you choose the RADIUS authentication method.
Now, packets must pass through the AP until the user and/or host gets authenticated by the RADIUS server.
Figure 12-15: RADIUS authentication server
Temporal Key Integrity Protocol
Put up a fence, and it’s only a matter of time until bad guys find a way over, around, and through it. And true to form, they indeed found ways to get through WEP’s defenses, leaving our Wi-Fi networks vulnerable—stripped of their Data Link layer security! So someone had to come to the rescue. In this case, it happened to be the IEEE 802.11i task group and the Wi-Fi Alliance, joining forces for the cause. They came up with a solution called Temporal Key Integrity Protocol (TKIP). The Wi-Fi Alliance unveiled it back in late 2002 and introduced it as Wi-Fi Protected Access (WPA). This little beauty even saved us lots of money because TKIP—say this like, “tee kip”—didn’t make us upgrade all our legacy hardware equipment in order to use it. Then, in the summer of 2004, the IEEE put their seal of approval on its final version and added even more defensive muscle with goodies like 802.1x and AES-CCMP (AES-Counter Mode CBC-MAC Protocol) upon publishing IEEE 802.11i-2004. The Wi-Fi Alliance responded positively by embracing the now-complete specification and dubbing it WPA2 for marketing purposes.
A big reason that TKIP doesn’t require buying new hardware to run is because it really just kind of wraps around the preexisting WEP encryption key (which was way too short) and upgrades it a whole lot to a much more impenetrable 128-bit encryption. Another reason for TKIP’s innate compatibility is that both its encryption mechanism and the RC4 algorithm used to power and define WEP, respectively, remained the same.
But there are still significant differences that help make it the seriously tough shield it is, one of them being that it actually changes each packet’s key. Let me explain…Packet keys are made up of three things: a base key, the transmitting device’s MAC address, and the packet’s serial number. It’s an elegant design because, although it doesn’t place a ton of stress on workstations and APs, it serves up some truly formidable cryptographic force. Here’s how it works: Remember the packet serial number part of the transmission key? Well, it’s not just your average serial number; it’s special—very special.
TKIP-governed transmission ensures that each packet gets its very own 48-bit serial number, which is augmented with a sequence number whenever a new packet gets sent out and which not only serves as part of the key, but also acts as the initialization vector. And the good news doesn’t end there—because each packet is now uniquely identified, the collision attacks that used to happen using WEP are also history. Plus, the fact that part of the packet’s serial number is also the initialization vector prevents something called replay attacks. It takes an ice age for a 48-bit to repeat, so replaying packets from some past wireless connection is just not going to happen; those “recycled” packets won’t be in sequence, but they will be identified, thus preventing the attack.
Now for what may be the truly coolest thing about TKIP keys: the base key. Because each base key that TKIP creates is unique, no one can recycle a commonly known key over and over again to gain access to a formerly vulnerable WEP wireless LAN. This is because TKIP throws the base key into the mix when it assembles each packet’s unique key, meaning that even if a device has connected to a particular access point a bunch of times, it won’t be permitted access again unless it has a completely new key granting it permission.
Even the base key itself is a fusion of something called nonces—an assortment of random numbers gleaned from the workstation, the access point, and each of these devices’ MAC addresses, so this should also be referred to as a session secret. So basically, if you’ve got IEEE 802.1x authentication working for you, rest assured that a session secret absolutely will be transmitted securely to each machine every time it initiates a connection to the wireless LAN by the authentication server—unless you’re using pre-shared keys, that is, because if you happen to be using them, that important session secret always remains the same. Using TKIP with pre-shared keys is kind of like closing an automatically locking security door but not enabling its security settings and alarm—anyone who knows where the secret latch is can get right in!
Wi-Fi Protected Access or WPA 2 Pre-Shared Key
These are both essentially another form of basic security that’s really just an add-on to the specifications. Even though you can totally lock the vault, as I mentioned in the previous section, WPA/WPA2 Pre-Shared Key (PSK) is a better form of wireless security than any other basic wireless security method I’ve talked about so far. And note that I did say basic! But if you are using only MAC address filters and/or WEP and you find that interlopers are still using your network and dragging down the performance, adding this layer of security should help tremendously since it’s a better form of access control than either of those measures.
Wi-Fi Protected Access (WPA) is a standard developed by the Wi-Fi Alliance, formerly known as Wireless Ethernet Compatibility Alliance (WECA). WPA provides a standard for authentication and encryption of WLANs that’s intended to solve known security problems. The standard takes into account the well-publicized AirSnort and man-in-the-middle WLAN attacks. So of course we use WPA2 to help us with today’s security issues.
The PSK verifies users via a password or identifying code (also called a passphrase) on both the client machine and the access point. A client gains access to the network only if its password matches the access point’s password. The PSK also provides keying material that TKIP or Advanced Encryption Standard (AES) uses to generate an encryption key for each packet of transmitted data.
Although more secure than static WEP, PSK still has a lot in common with static WEP in that the PSK is stored on the client station and can be compromised if the client station is lost or stolen (even though finding this key isn’t all that easy to do). It’s a definite recommendation to use a strong PSK passphrase that includes a mixture of letters, numbers, and non-alphanumeric characters. With WPA, it’s still actually possible to specify the use of dynamic encryption keys that change each time a client establishes a connection.
The benefit of WPA over a static WEP key is that WPA can change dynamically while the system is used.
WPA is a step toward the IEEE 802.11i standard and uses many of the same components, with the exception of encryption—802.11i (WPA2) uses AES-CCMP encryption. The IEEE 802.11i standard replaced WEP with a specific mode of AES known as the CCMP, as mentioned earlier. This allows AES-CCMP to provide both data confidentiality (encryption) and data integrity.
The highest level of wireless encryption you can run is WPA2-AES.
The following screen shows that if you choose WPA-2 Personal on the Linksys AP, you can then enter your passphrase—it’s really called WPA2-Pre-Shared Key, but whatever.
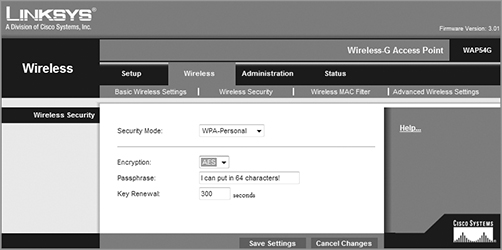
You have a choice of TKIP or AES as the encryption, and by the way, you can choose up to a 64-character key—pretty tight!
WPA’s mechanisms are designed to be implementable by current hardware vendors, meaning that users should be able to implement WPA on their systems with only a firmware/software modification.
The IEEE 802.11i standard has been sanctioned by WPA and is called WPA version 2.
Like rock ’n’ roll, wireless technologies are here to stay. And for those of us who have come to depend on wireless technologies, it’s actually pretty hard to imagine a world without wireless networks—what did we do before cell phones?
So we began this chapter by exploring the essentials and fundamentals of how wireless networks function.
Springing off that foundation, I then introduced you to the basics of wireless radio frequencies (RF) and the IEEE standards. We discussed 802.11 from its inception through its evolution to current and near future standards and talked about the subcommittees who create these standards.
All of this led into a discussion of wireless security—or, rather non-security for the most part—which we went over in detail.
We finished the chapter by bringing you up to speed on TKIP and WPA/WPA 2 security solutions—important tools used to protect the wireless LANs of today.
Understand the IEEE 802.11a specification. 802.11a runs in the 5GHz spectrum, and if you use the 802.11h extensions, you have 23 non-overlapping channels. 802.11a can run up to 54Mbps, but only if you are less than 50 feet from an access point.
Understand the IEEE 802.11b specification. IEEE 802.11b runs in the 2.4GHz range and has three non-overlapping channels. It can handle long distances but with a maximum data rate of up to 11Mpbs.
Understand the IEEE 802.11g specification. IEEE 802.11g is 802.11b’s big brother and runs in the same 2.4GHz range, but it has a higher data rate of 54Mbps if you are less than 100 feet from an access point.
Remember the Wireless LAN modulation techniques. Direct-Sequence Spread Spectrum (DSSS) is the most widely used modulation technique, but it has speeds only to 11Mbps. Frequency-Hopping Spread Spectrum (FHSS), although it is used in wireless devices like Bluetooth, isn’t the technique of choice for either vendors or the 802.11 working group. To get the higher speeds needed in today’s WLANs, we use Orthogonal Frequency Division Multiplexing (OFDM) in 802.11g and 802.11a networks.
Understand how WPA works in a WLAN. Wi-Fi Protected Access (WPA) is the security of choice in today’s home and corporate networks. It provides both authentication and encryption (either TKIP or AES); the latest version is WPA2.
Write the answers to the following wireless questions:
1. What is the maximum data rate of IEEE 802.11b?
2. What is the maximum data rate of IEEE 802.11g?
3. What is the maximum data rate of IEEE 802.11a?
4. What is the frequency range of IEEE 802.11b?
5. What is the frequency range of IEEE 802.11g?
6. What is the frequency range of IEEE 802.11a?
7. APs come set up with what type of security enabled by default?
8. Why would we use WPA instead of basic WEP?
9. Which IEEE committee has been sanctioned by WPA and is called WPA2?
10. The IEEE 802.11b/g basic standard has how many non-overlapping channels?
You can find the answers to in Appendix B.
You can find the answers in Appendix A.
1. You need to install wireless Internet access in an open warehouse environment. After installing the equipment, the technician notices varying signal strengths throughout the warehouse. How do you make sure there is full coverage?
A. Turn on broadcast key rotation.
B. Change the encryption method used on all the APs.
C. Change the antenna placement.
D. Use channel bonding.
E. Use channel shaping.
2. What is the frequency range of the IEEE 802.11a standard?
A. 2.4Gbps
B. 5Gbps
C. 2.4GHz
D. 5GHz
3. What is the frequency range of the IEEE 802.11g standard?
A. 2.4Gbps
B. 5Gbps
C. 2.4GHz
D. 5GHz
4. Which devices can interfere with the operation of a wireless network because they operate on similar frequencies? (Choose two.)
A. Copier
B. Microwave oven
C. Toaster
D. Cordless phone
E. IP phone
F. AM radio
5. Which wireless standard allows you to channel-bond to increase bandwidth and uses both the 2.4Ghz and 5Ghz frequencies?
A. 802.11b
B. 802.11g
C. 802.11a
D. 802.11n
6. How many non-overlapping channels are available with 802.11b?
A. 3
B. 12
C. 23
D. 40
7. How many non-overlapping channels are available with 802.11a?
A. 3
B. 12
C. 23
D. 40
8. What is the maximum data rate for the 802.11a standard?
A. 6Mbps
B. 11Mbps
C. 22Mbps
D. 54Mbps
9. You need to install wireless on multiple floors of a large building and maintenance area. What is your first concern before installing the APs?
A. Authentication
B. Encryption
C. Channel overlap
D. AP configuration
10. What is the maximum data rate for the 802.11b standard?
A. 6Mbps
B. 11Mbps
C. 22Mbps
D. 54Mbps
11. You connect a new host to your company’s wireless network. The host is set to receive a DHCP address and the WEP key is entered correctly. However, the host cannot connect to the network. What can the problem be?
A. DNS is not configured on the host.
B. MAC filtering is enabled on the AP.
C. The network has run out of wireless connections.
D. The host is enabled to run 802.11b and 802.11g.
12. Which is the highest encryption that WPA2 can use?
A. AES-CCMP
B. PPK via IV
C. PSK
D. TKIP/MIC
13. Which additional configuration step is necessary in order to connect to an access point that has SSID broadcasting disabled?
A. Set the SSID value in the client software to public.
B. Configure open authentication on the AP and the client.
C. Set the SSID value on the client to the SSID configured on the AP.
D. Configure MAC address filtering to permit the client to connect to the AP.
14. Which spread-spectrum technology does the 802.11b standard define for operation?
A. IR
B. DSSS
C. FHSS
D. DSSS and FHSS
E. IR, FHSS, and DSSS
15. Which wireless LAN design ensures that a mobile wireless client will not lose connectivity when moving from one access point to another?
A. Using adapters and access points manufactured by the same company
B. Overlapping the wireless cell coverage by at least 10 percent
C. Configuring all access points to use the same channel
D. Utilizing MAC address filtering to allow the client MAC address to authenticate with the surrounding APs
16. You have installed a point-to-point connection using wireless bridges and Omni-directional antennas between two buildings. The throughput is low. What can you do to improve the link?
A. Replace the bridges with APs.
B. Replace the Omni-directional antennas with Yagis.
C. ConFigure 802-11a on the links.
D. Install amps to boost the signal.
17. What does extended service set (ESS) ID mean?
A. That you have more than one access point, and they are in the same SSID connected by a distribution system
B. That you have more than one access point, and they are in separate SSIDs connected by a distribution system
C. That you have multiple access points, but they are placed physically in different buildings
D. That you have multiple access points, but one is a repeater access point
18. What is one reason that WPA encryption is preferred over WEP?
A. A WPA key is longer and requires more special characters than the WEP key.
B. The access point and the client are manually configured with different WPA key values.
C. WPA key values remain the same until the client configuration is changed.
D. The values of WPA keys can change dynamically while the system is used.
19. How wide are the channels used in 802.11n in order to gain the large bandwidth that the specification provides?
A. 22MHz
B. 20Mhz
C. 40Mhz
D. 100Mhz
20. 802.11n uses MIMO. How does this optimize throughput to gain the high speed advantage that 802.11n provides?
A. By specifying an acknowledgment of each and every frame, 802.11n provides better overhead.
B. Several frames are sent by several antennae over several paths and are then recombined by another set of antennae.
C. One frame at a time is sent, but faster than in 802.11g because multiple antennas are used (multiple-in, multiple-out).
D. MIMO packs smaller packets into a single unit, which improves throughput.