
Chapter 9. Distributed Computation
9.0. Introduction
With the advent of cheaper and cheaper storage, we’re inclined to store more and more data. As this data grows larger and larger, it becomes increasingly difficult to utilize to its full potential. In response, numerous new techniques have emerged in the last decade or so for dealing with such quantities of data.
The primary focus of this chapter is one such technique,
MapReduce,
developed at Google in the early 2000s. Functional even in name, this
technique uses map and reduce in parallel across multiple machines at
tremendous scale to process data at phenomenal speeds. In this chapter,
we’ll be covering Cascalog, a data-processing
library built on top of Hadoop, which is an open source MapReduce
implementation.
We’ll also briefly cover Storm, a real-time stream-processing library in use at several tech giants such as Twitter, Groupon, and Yahoo!.
Cascalog
Cascalog defines a DSL based on Datalog, the same query language that backs Datomic. It might seem strange at first, but you will be thinking in Datalog in no time. Once you’ve wet your feet with these recipes, visit the Cascalog wiki for more information on writing your own queries.
Cascalog provides a concise syntax for describing data-processing jobs. Transformations and aggregates are easy to express in Cascalog. Joins are particularly simple. You might like the Cascalog syntax so much that you use it even for local jobs.
You can run your Cascalog jobs in a number of different ways. The easiest way is to run jobs locally. When running jobs locally, Cascalog uses Hadoop’s local mode, completing the entire job on your own computer. You get the benefit of parallelism, without the hassle of setting up a cluster.
Once your jobs outgrow local mode, you’ll need to start running them on a Hadoop cluster. Having your own cluster is a lot of fun, but it can take a fair amount of work (and money!) to set up and maintain. If you don’t need a cluster very often, you might consider running your job on link to Amazon Elastic MapReduce (EMR). EMR provides on-demand Hadoop clusters the same way EC2 provides on-demand servers. You’ll need an Amazon Web Services account to run the job, but it isn’t difficult. You can read exactly how to do it later, in Recipe 9.7, “Running a Cascalog Job on Elastic MapReduce”. Whether you run your job on EMR or on your own cluster, you will package up your code into an uberjar (see Recipe 8.2, “Packaging a Project into a JAR File”), then send it to Hadoop for execution. It is surprisingly simple to get hundreds of computers working on your task.
9.1. Building an Activity Feed System with Storm
Problem
You want to build an activity stream processing system to filter and aggregate the raw event data generated by the users of your application.
Solution
Streams are a dominant metaphor for presenting information to users of the modern Internet. Used on sites like Facebook and Twitter and mobile apps like Instagram and Tinder, streams are an elegant tool for giving users a window into the deluge of information generated by the applications they use every day.
As a developer of these applications, you want tools to process the firehose of raw event data generated by user actions. They must offer powerful capabilities for filtering and aggregating data and must be arbitrarily scalable to serve ever-growing user bases. Ideally they should provide high-level abstractions that help you organize and grow the complexity of your stream-processing logic to accommodate new features and a complex world.
Clojure offers just such a tool in Storm, a distributed real-time computation system that aims to be for real-time computation what Hadoop is for batch computation. In this section, you’ll build a simple activity stream processing system that can be easily extended to solve real-world problems.
First, create a new Storm project using its Leiningen template:
$ lein new cookbook-storm-project feedsIn the project directory, run the default Storm topology (which the
lein template has generated for you):
$ cd feeds$ lein run -m feeds.topology/run!Compiling feeds.TopologySubmitter...Emitting: spout default [:bizarro]Processing received message source: spout:4, stream: default, id: {}, [:bizarro]Emitting: stormy-bolt default ["I'm bizarro Stormy!"]Processing received message source: stormy-bolt:5,stream: default, id: {}, [I'm bizarro Stormy!]Emitting: feeds-bolt default ["feeds produced: I'm bizarro Stormy!"]
This generated example topology just babbles example messages incoherently, which probably isn’t what you want, so begin by modifying the “spout” to produce realistic events.
In Storm parlance,
the “spout” is the component that inserts data into the processing system
and creates a data stream. Open src/feeds/spouts.clj and replace the
defspout form with a new spout that will periodically produce random
user events such as one might see in an online marketplace (in a real
application, of course, you’d hook this up to some source of real
data rather than a random data generator):
(defspoutevent-spout["event"][confcontextcollector](let[events[{:action:commented,:user:travis,:listing:red-shoes}{:action:liked,:user:jim,:listing:red-shoes}{:action:liked,:user:karen,:listing:green-hat}{:action:liked,:user:rob,:listing:green-hat}{:action:commented,:user:emma,:listing:green-hat}]](spout(nextTuple[](Thread/sleep1000)(emit-spout!collector[(rand-nthevents)])))))
Next, open src/feeds/bolts/clj. Add a bolt that accepts a user and
an event and produces a tuple of (user, event) for each user in the
system. A bolt consumes a stream, does some processing, and emits a
new stream:
(defboltactive-user-bolt["user""event"][{event"event":astuple}collector](doseq[user[:jim:rob:karen:kaitlyn:emma:travis]](emit-bolt!collector[userevent]))(ack!collectortuple))
Now add a bolt that accepts a user and an event and emits a tuple if and only if the user is following the user who triggered the event:
(defboltfollow-bolt["user""event"]{:preparetrue}[confcontextcollector](let[follows{:jim#{:rob:emma}:rob#{:karen:kaitlyn:jim}:karen#{:kaitlyn:emma}:kaitlyn#{:jim:rob:karen:kaitlyn:emma:travis}:emma#{:karen}:travis#{:kaitlyn:emma:karen:rob}}](bolt(execute[{user"user"event"event":astuple}](when((followsuser)(:userevent))(emit-bolt!collector[userevent]))(ack!collectortuple)))))
Finally, add a bolt that accepts a user and an event and stores the event
in a hash of sets like {:user1 #{event1 event2} :user2 #{event1 event2}}—these are the activity streams you’ll present to users:
(defboltfeed-bolt["user""event"]{:preparetrue}[confcontextcollector](let[feeds(atom{})](bolt(execute[{user"user"event"event":astuple}](swap!feeds#(update-in%[user]conjevent))(println"Current feeds:")(clojure.pprint/pprint@feeds)(ack!collectortuple)))))
This gives you all the pieces you’ll need, but you’ll still need to assemble them into a computational topology. Open up src/feeds/topology.clj and use the topology DSL to wire the spouts and bolts together:
(defnstorm-topology[](topology{"events"(spout-specevent-spout)}{"active users"(bolt-spec{"events":shuffle}active-user-bolt:p2)"follows"(bolt-spec{"active users":shuffle}follow-bolt:p2)"feeds"(bolt-spec{"follows"["user"]}feed-bolt:p2)}))
You’ll also need to update the :require statement in that file:
(:require[feeds[spouts:refer[event-spout]][bolts:refer[active-user-boltfollow-boltfeed-bolt]]][backtype.storm[clojure:refer[topologyspout-specbolt-spec]][config:refer:all]])
Run the topology again. Feeds will be printed to the console by the final bolts in the topology:
$ lein run -m feeds.topology/run!Discussion
Storm’s Clojure DSL doesn’t look like standard Clojure. Instead, it uses Clojure’s macros to extend the language to the domain of stream processing. Storm’s stream processing abstraction consists of four core primitives:
- Tuples
- Allow programmers to provide names for values. Tuples are dynamically typed lists of values.
- Spouts
- Produce tuples, often by reading from a distributed queue.
- Bolts
- Accept tuples as input and produce new tuples—these are the core computational units of a Storm topology.
- Streams
- Used to wire spouts to bolts and bolts to other bolts, creating a computational topology. Streams can be configured with rules for routing certain types of tuples to specific instances of bolts.
The following subsections review the components of our system to give a better picture of how these primitives work together.
event-spout
defspout looks much like Clojure’s standard defn, with one
difference—the second argument to defspout is a list of names that
will be assigned to elements of each tuple this spout produces. This
lets you use tuples like vectors or maps interchangeably. The third
argument to defspout is a list of arguments that will be bound
various components of Storm’s operational infrastructure.
In the case of the event-spout spout, only collector is used:
(defspoutevent-spout["event"][confcontextcollector]
defspout’s body will be evaluated once, when the spout instance is
created, which gives you an opportunity to create in-memory state. Usually this will be a connection to a database or distributed queue, but in this case you’ll create a list of events this spout will produce:
(let[events[{:action:commented,:user:travis,:listing:red-shoes}{:action:liked,:user:jim,:listing:red-shoes}{:action:liked,:user:karen,:listing:green-hat}{:action:liked,:user:rob,:listing:green-hat}{:action:commented,:user:emma,:listing:green-hat}]]
This call to spout creates an instance of a spout with the given
implementation of nextTuple. This implementation simply sleeps for
one second and then uses emit-spout! to emit a one-element tuple
consisting of a random event from the preceding list:
(spout(nextTuple[](Thread/sleep1000)(emit-spout!collector[(rand-nthevents)])))))
nextTuple will be
called repeatedly in a tight loop, so if you create a spout that polls
an external resource, you may need to provide your own backoff
algorithm to avoid excess load on that resource.
You can also implement the spout’s ack method to implement a
“reliable” spout that will provide message-processing guarantees. For
more information on reliable spouts, see Storm’s spout implementation
for the Kestrel queueing system, storm-kestrel.
active-user-bolt
Every time a user takes an action in this system, the system needs to determine whether each other user in the system will be interested in it. Given a simple interest system like Twitter, where users express interest in a single way (i.e., user follows), you could simply look at the follower list of the user who took the action and update feeds accordingly. In a more complex system, however, interest might be expressed by having liked the item the action was taken against, following a collection that the item has been added to, or following the seller of the item. In this world, you need to consider a variety of factors for each user in the system for every event and determine whether the event should be added to that user’s feed.
The first bolt starts this process by generating a tuple of (user,
event) for each user in the system every time an event is generated
by the event-spout:
(defboltactive-user-bolt["user""event"][{event"event":astuple}collector](doseq[user[:jim:rob:karen:kaitlyn:emma:travis]](emit-bolt!collector[userevent]))(ack!collectortuple))
defbolt’s signature looks very similar to defspout. The second
argument is a list of names that will be assigned to tuples generated
by this bolt, and the third argument is a list of parameters. The
first parameter will be bound to the input tuple, and may be
destructured as a map or a vector.
The body of this bolt iterates through a list of users in the system
and emits a tuple for each of them. The last line of the body calls ack!
on this tuple, which allows Storm to track message processing and restart
processing when appropriate.
follow-bolt
The next bolt is a prepared bolt; that is, one that maintains in-memory state. In many cases, this would mean maintaining a connection to a database or a queue, or a data structure aggregating some aspect of the tuples it processes, but this example maintains a complete list of the followers in the system in memory.
This bolt looks more like the spout definition. The second argument
is a list of names, the third argument is a map of bolt configuration
options (importantly, these set :prepare to true), and the fourth
argument is the same set of operational arguments received in
defspout:
(defboltfollow-bolt["user""event"]{:preparetrue}[confcontextcollector]
The body of the bolt first defines the list of followers, and then
provides the actual bolt definition inside a call to bolt:
(let[follows{:jim#{:rob:emma}:rob#{:karen:kaitlyn:jim}:karen#{:kaitlyn:emma}:kaitlyn#{:jim:rob:karen:kaitlyn:emma:travis}:emma#{:karen}:travis#{:kaitlyn:emma:karen:rob}}](bolt(execute[{user"user"event"event":astuple}](when((followsuser)(:userevent))(emit-bolt!collector[userevent]))(ack!collectortuple)))))
Note that the tuple argument is inside the bolt’s definition of
execute in this case and may be destructured as usual. In cases
where the event’s user is not following the user in the tuple, it does
not emit a new tuple and simply acknowledges that it received the
input.
As noted earlier, this particular system could be implemented much
more simply by querying whatever datastore tracks follows and simply
adding a story to the feed of each follower. Anticipating a more
complicated system, however, provides a massively extensible
architecture. This bolt could easily be expanded to a collection of
scoring bolts, each of which would evaluate a user/event pair based on
its own criteria and emit a tuple of (user, event, score). A
score aggregation bolt would receive scores from each scoring bolt and
choose to emit a tuple once it received scores from each type of
scoring bolt in the system. In this world, adjusting the factors
determining the makeup of a user’s feed and their relative weights
would be trivial—indeed, production experience with just such a
system was, in the opinion of the authors, delightful (see the
Rising Tide project page on GitHub).
feed-bolt
The final bolt aggregates events into feeds. Since it only receives
(user, event) tuples that the “scoring system” has approved, it
needs only add the event to the existing list of events it has
received for the given user:
(let[feeds(atom{})](bolt(execute[{user"user"event"event":astuple}](swap!feeds#(update-in%[user]conjevent))(println"Current feeds:")(clojure.pprint/pprint@feeds)(ack!collectortuple))))
This toy topology simply prints the current feeds every time it receives a new event, but in the real world it would persist feeds to a durable datastore or a cache that could efficiently serve the feeds to users.
Note that this design can be easily extended to support event digesting; rather than storing each event separately, it could aggregate an incoming event with other similar events for the user’s convenience.
As described, this system has one enormous flaw: by default,
Storm tuples are delivered to exactly one instance of each bolt, and
the number of instances in existence is not defined in the bolt
implementation. If the topology operator adds more than one
feed-bolt, we may have events for the same user delivered to
different bolt instances, giving each bolt a different feed for the
same user.
Happily, this flaw is addressed by Storm’s support for stream grouping, which is defined in the Storm topology definition.
Topology
The topology definition is where the rubber meets the road. Spouts are wired to bolts, which are wired to other bolts, and the flow of tuples between them can be configured to give useful properties to the computation.
This is also where you define the component-level parallelism of the topology, which provides a rough sketch of the true operational parallelism of the system.
A topology definition consists of spout specifications and bolt specifications, each of which is a map from names to specifications.
Spout specifications simply give a name to a spout implementation:
{"events"(spout-specevent-spout)}
Multiple spouts can be configured, and the specification may define the parallelism of the spout:
{"events"(spout-specevent-spout)"parallel-spout"(spout-speca-different-more-parallel-spout:p2)}
This definition means the topology will have one instance of
event-spout and two instances of a-different-more-parallel-spout.
Bolt definitions get a bit more complicated:
"active users"(bolt-spec{"events":shuffle}active-user-bolt:p2)"follows"(bolt-spec{"active users":shuffle}follow-bolt:p2)
As with the spout spec, you must provide a name for the bolt and
specify its parallelism. In addition, bolts require specifying a
stream grouping, which defines (a) from which component the bolt
receives tuples and (b) how the system chooses which in-memory
instance of the bolt to send tuples to. Both of these cases specify
:shuffle, which means tuples from “events” will be sent to a random
instance of active-user-bolt, and tuples from “active users” will be
sent to a random instance of follow-bolt.
As noted, feed-bolt needs to be more careful:
"feeds"(bolt-spec{"follows"["user"]}feed-bolt:p2)
This bolt spec specifies a fields grouping on “user”. This means
that all tuples with the same “user” value will be sent to the
same instance of feed-bolt. This stream grouping is configured with
a list of field names, so field groupings may consider the equality
of multiple field values when determining which bolt instance should
process a given tuple.
Storm also supports stream groupings that send tuples to all instances and groupings that let the bolt producing a tuple determine where to send it. Combined with the groupings already seen, these provide an enormous amount of flexibility in determining how data flows through your topology.
Each of these component specifications supports a parallelism option. Because the topology does not specify the physical hardware upon which it will run, these hints cannot be used to determine the true parallelism of the system, but they are used by the cluster to determine how many in-memory instances of the specified components to create.
Deployment
The real magic of Storm comes out in deployment. Storm gives you the tools to build small, independent components that make no assumptions about how many identical instances are running in the same topology. This means that the topology itself is essentially infinitely scalable. The edges of the system, which receive data from and send data to external components like queues and databases, are not necessarily as scalable, but in many cases, strategies for scaling these services are well understood.
A simple deployment strategy is built into the Storm library:
(doto(LocalCluster.)(.submitTopology"my first topology"{TOPOLOGY-DEBUG(Boolean/parseBooleandebug)TOPOLOGY-WORKERS(Integer/parseIntworkers)}(storm-topology)))
LocalCluster is an in-memory implementation of a Storm cluster. You can
specify the number of workers it will use to execute the
components of your topology and submit the topology itself, at which
point it begins polling the nextTuple methods of the topology’s
spouts. As spouts emit tuples, they are propagated through the system
to complete the topology’s computation.
Submitting the topology to a configured cluster is nearly as simple, as you can see in src/feeds/TopologySubmitter.clj:
(defn-main[&{debug"debug"workers"workers":or{debug"false"workers"4"}}](StormSubmitter/submitTopology"feeds topology"{TOPOLOGY-DEBUG(Boolean/parseBooleandebug)TOPOLOGY-WORKERS(Integer/parseIntworkers)}(storm-topology)))
This file uses Clojure’s Java interop to generate a Java class with a
main method. Because the project.clj file specifies that this file
should be ahead-of-time compiled, when you use lein uberjar to build
a JAR suitable for submission to the cluster, this file will be
compiled to look like a normal Java class file. You can upload this JAR
to the machine running Storm’s Nimbus daemon and submit it for
execution using the storm command:
$ storm jar path/to/thejariuploaded.jar feeds.TopologySubmitter "workers" 5This command will tell the cluster to allocate five dedicated workers for
this topology and begin polling nextTuple on all of its spouts, as
it did when you used LocalCluster. A cluster may run any number of
topologies simultaneously—each worker is a physical JVM and may end
up running instances of many different bolts and spouts.
The full details of setting up and running a Storm cluster are out of the scope of this recipe, but they are documented extensively on Storm’s wiki.
Conclusion
We’ve only touched on a fraction of the functionality Storm has to offer. Built-in distributed remote procedure calls allow users to harness the power of a Storm cluster to make synchronous requests that trigger a flurry of activity across hundreds or thousands of machines. Guaranteed data-processing semantics allow users to build extremely robust systems. Trident, a higher-level abstraction over Storm’s primitives, provides breathtakingly simple solutions to complicated real-time computing problems. A detailed runtime console provides crucial insight into the runtime characteristics of a fully operational Storm cluster. The power provided by this system is truly remarkable.
Storm is also a fantastic example of Clojure’s ability to be extended to a problem domain. Its constructs idiomatically extend Clojure syntax and allow the programmer to stay within the domain of real-time processing, without needing to deal with low-level language formalities. This allows Storm to truly get out of the way. The majority of the code in a well-written Storm topology’s code base is focused on the problem at hand. The result is concise, maintainable code and happy programmers.
See Also
- Storm’s website
- The Storm project template
-
storm-deploy, a tool for easy Storm deployment - Rising Tide, the feed generation service on which this recipe is based
9.2. Processing Data with an Extract Transform Load (ETL) Pipeline
Problem
You need to change the format of large amounts of data from JSON lists to CSV for later processing. For example, you want to turn this input:
{"name":"Clojure Programming","authors":["Chas Emerick","Brian Carper","Christophe Grand"]}{"name":"The Joy of Clojure","authors":["Michael Fogus","Chris Houser"]}
into this output:
Chas Emerick,Brian Carper,Christophe Grand
Michael Fogus,Chris Houser
Solution
Cascalog allows you to write distributed processing jobs that can run locally for small jobs or on a Hadoop cluster for larger jobs.
To follow along with this recipe, create a new Leiningen project:
$ lein new cookbookModify your new project’s project.clj file by adding the cascalog
dependency, setting up the :dev profile, and enabling
AOT compilation for the cookbook.etl namespace. Your project.clj
file should now look like this:
(defprojectcookbook"0.1.0-SNAPSHOT":description"FIXME: write description":url"http://example.com/FIXME":license{:name"Eclipse Public License":url"http://www.eclipse.org/legal/epl-v10.html"}:dependencies[[org.clojure/clojure"1.5.1"][cascalog"1.10.2"][org.clojure/data.json"0.2.2"]]:profiles{:dev{:dependencies[[org.apache.hadoop/hadoop-core"1.1.2"]]}}:aot[cookbook.etl])
Create the file src/cookbook/etl.clj and add a query to it:
(nscookbook.etl(:require[cascalog.api:refer:all][clojure.data.json:asjson]))(defnget-vec"Wrap the result in a vector for Cascalog to consume."[mk](vector(getmk)))(defnvec->csv"Turn a vector into a CSV string. (Not production quality)."[v](apply str(interpose","v)))(defmainMain[inout&args](?<-(hfs-textlineout:sinkmode:replace)[?out-csv]((hfs-textlinein)?in-json)(json/read-str?in-json:>?book-map)(get-vec?book-map"authors":>?authors)(vec->csv?authors:>?out-csv)))
Create a file with input data in samples/books/books.json:
{"name":"Clojure Cookbook","authors":["Ryan","Luke"]}
Note
The full contents of this solution are available on GitHub in the Cascalog samples repository.
To retrieve a copy of the working project, clone the project from
GitHub and check out the etl-sample branch:
$ git clone https://github.com/clojure-cookbook/cascalog-samples.git$ cd cascalog-samples$ git checkout etl-sample
You can now execute the job locally with lein run, providing an
input and output file:
$ lein run -m cookbook.etl.Main samples/books/books.json samples/books/output# Or, on a Hadoop cluster$ lein uberjar$ hadoop jar target/cookbook-standalone.jar cookbook.etl.Mainbooks.json books.csv
The results in samples/books/output/part-00000 are as follows:
Ryan,Luke
Discussion
While it would be easy to write a script that converted JSON to CSV, it would be a lot of work to convert the script to run across many computers. Writing the transform script using Cascalog allows it to run in local mode or distributed mode with almost no modification.
There are a lot of new concepts and syntax in the preceding small example, so let’s break it down piece by piece.
In this recipe, the data flows through the functions roughly in order.
The first line uses the defmain macro (from Cascalog)
to define a class with a -main function that lets you run the query
over Hadoop. In this case, the class with a -main function is called
Main, but that is not required. defmain allows you to create
several Hadoop-enabled queries in the same file:
(defmainMain[inout&args]
Inside the Main function is a Cascalog operator, ?<-,[34] that defines and executes a query:
(?<-
This operator takes an output location (called a “tap” in Cascalog), a result vector, and a series of logic predicates. The next line is the destination, the place the output will be written to. The same functions are used to create input and output taps:
(hfs-textlineout:sinkmode:replace)
This example uses
hfs-textline, but many other taps exist. You can even write your
own.
Tip
Use :sinkmode :replace in your output tap, and Cascalog will replace
any existing output. This helps while you are rerunning the query to
debug it. Otherwise, you will have to remove the output file every time
you want to rerun.
This is a list of all the logic variables that should be returned from this query:
[?out-csv]
In this case, these are the logic variables that will be
dumped into the output location. Cascalog knows these are special
logic variables because their names begin with a ? or a !.
Warning
When thinking about logic variables, it helps to think of them as containing all possible valid values. As you add predicates, you either introduce new logic variables that are (hopefully) linked to existing variables, or you add constraints to existing logic variables.
The next line defines the input tap. The JSON data structures will be read
in one line at a time from the location specified by in. Each line
will be stored into the ?in-json logic var, which will flow through
the rest of the logic predicates:
((hfs-textlinein)?in-json)
read-str parses the JSON string found in ?in-json into a hash map,
which is stored into ?book-map:
(json/read-str?in-json?book-map)
Now you pull the authors out of the map and store the vector into its own logic variable. Cascalog assumes vector output means binding multiple logic vars. To outsmart Cascalog, wrap the output in an extra vector for Cascalog to consume:
(get-vec?book-map"authors"?authors)
Finally, you convert the vector of authors into valid CSV using the
vec->csv function. Since this line produces values for the
?out-csv logic variable, which is named in the output line earlier,
the query will produce the output:
(vec->csv?authors?out-csv)))
Cascalog is a great tool for building an extract transform load (ETL) pipeline. It allows you to spend more time thinking about your data and less time thinking about the mechanics of reading files, distributing work, or managing dependencies. When writing your own ETL pipelines, it might help to follow this process:
- Finalize the input format(s).
- Finalize the output format(s).
- Start working from the input format, keeping track of the current format for each step.
See Also
- Ian Rumford’s blog post “Using Cascalog for Extract Transform and Load”
-
core.logic, a logic programming library for Clojure
9.3. Aggregating Large Files
Problem
You need to generate aggregate statistics from terabytes of log files.
For example, for a simple input log file (<date>,<URL>,<USER-ID>):
20130512020202,/,11
20130512020412,/,23
20130512030143,/post/clojure,11
20130512040256,/post/datomic,23
20130512050910,/post/clojure,11
20130512051012,/post/clojure,14
you want to output aggregate statistics like this:
{
"URL"  {"/"              2
        "/post/datomic"  1
        "/post/clojure"  3}
"User" {"23" 2
        "11" 3
        "14" 1}
"Day"  {"20130512" 6}
}
Solution
Cascalog allows you to write distributed processing jobs that run locally or on a Hadoop cluster.
To follow along with this recipe, clone the
Cascalog samples
GitHub repository and check out the aggregation-begin branch. This
will give you a basic Cascalog project as created in
Recipe 9.2, “Processing Data with an Extract Transform Load (ETL) Pipeline”:
$ git clone https://github.com/clojure-cookbook/cascalog-samples.git$ cd cascalog-samples$ git checkout aggregation-begin
Now add [cascalog/cascalog-more-taps "2.0.0"] to the project’s
dependencies and set the cookbook.aggregation namespace to be
AOT-compiled. project.clj should look like this:
(defprojectcookbook"0.1.0-SNAPSHOT":description"FIXME: write description":url"http://example.com/FIXME":license{:name"Eclipse Public License":url"http://www.eclipse.org/legal/epl-v10.html"}:dependencies[[org.clojure/clojure"1.5.1"][cascalog"2.0.0"][cascalog/cascalog-more-taps"2.0.0"][org.clojure/data.json"0.2.2"]]:profiles{:dev{:dependencies[[org.apache.hadoop/hadoop-core"1.1.2"]]}}:aot[cookbook.etlcookbook.aggregation])
Create the file src/cookbook/aggregation.clj and add an aggregation query to it:
(nscookbook.aggregation(:require[cascalog.api:refer:all][cascalog.more-taps:refer[hfs-delimited]]))(defninit-aggregate-stats[dateurluser](let[day(.substringdate08)]{"URL"{url1}"User"{user1}"Day"{date1}}))(defcombine-aggregate-stats(partial merge-with(partial merge-with+)))(defparallelaggaggregate-stats:init-var#'init-aggregate-stats:combine-var#'combine-aggregate-stats)(defmainMain[inout&args](?<-(hfs-textlineout:sinkmode:replace)[?out]((hfs-delimitedin:delimiter",")?date?url?user)(aggregate-stats?date?url?user:>?out)))
Add some sample data to the file samples/posts/posts.csv:
20130512020202,/,11
20130512020412,/,23
20130512030143,/post/clojure,11
20130512040256,/post/datomic,23
20130512050910,/post/clojure,11
20130512051012,/post/clojure,14
Note
The full contents of this solution are available in the
aggregation-complete branch of the
Cascalog samples
repository.
Check out that branch to retrieve a full working copy with sample data:
$ git checkout aggregation-completeYou can now execute the job locally:
$ lein run -m cookbook.aggregation.Mainsamples/posts/posts.csv samples/posts/output# Or, on a Hadoop cluster$ lein uberjar$ hadoop jar target/cookbook-standalone.jarcookbook.aggregation.Mainsamples/posts/posts.csv samples/posts/output
The results in samples/posts/output/part-00000, formatted for readability, are as follows:
{
"URL"  {"/"              2
        "/post/datomic"  1
        "/post/clojure"  3}
"User" {"23" 2
        "11" 3
        "14" 1}
"Day"  {"20130512" 6}
}
Discussion
Cascalog makes it easy to quickly generate aggregate statistics. Aggregate statistics can be tricky on some MapReduce frameworks. In general, the map phase of a MapReduce job is well distributed across the cluster. The reduce phase is often less well distributed. For instance, a naive implementation of the aggregation algorithm would end up doing all of the aggregation work on a single reducer. A 2,000-computer cluster would be as slow as a 1-computer cluster during the reduce phase if all the aggregation happened on one node.
Before you start writing your own aggregator, check through the source
of cascalog.logic.ops. This namespace has many useful functions and
probably already does what you want to do.
In our example, the goal is to count occurrences of each URL. To create the final map, all of the URLs need to end up in one reducer. A naive MapReduce program implementation would use an aggregation over all the tuples. That means you’d be doing all the work on only one node, with the computation taking just as long as it would on a single computer.
The solution is to use Hadoop’s combiner function. Combiners run on
the result of the map phase, before the output is sent to the
reducers. Most importantly, the combiner runs on the mapper
nodes. That means combiner work is spread across the entire cluster,
like map work. When the majority of the work is done during the map
and combiner phases, the reduce phase can run almost
instantly. Cascalog makes this very easy. Many of the built-in
Cascalog functions use combiners under the covers, so you’ll be
writing highly optimized queries without even trying. You can even
write your own functions to use combiners using the defparallelagg
macro.
Tip
Cascalog often works with vars instead of the values of those
vars. For example, the call to defparallelagg takes quoted
arguments. The #' syntax means that the var is being passed, not the
value that the var refers to. Cascalog passes the vars around instead
of values so that it doesn’t have to serialize functions to pass them
to the mappers and reducers. It just passes the name of the var, which
is looked up in the remote execution environment. This means you won’t
be able to dynamically construct functions for some parts of the
Cascalog workflow. Most functions need to be bound to a var.
defparallelagg is kind of confusing at first, but the power to write
queries that leverage combiners makes it worth learning. You need to
provide two vars that point to functions to the defparallelagg
call: init-var and combine-var. Note that both arguments are being
passed as vars, not function values, so you need to prepend a #' to
the names. The init-var function needs to take the input data and
change it into a format that can be easily processed by the
combine-var function. In this case, the recipe changes the data into
a map of maps that can easily be merged. Merging maps is an easy way
to write parallel aggregators. The combine-var function needs to be
commutative and associative. The function is called with two instances
of the output of the init-var function. The return value will be
passed as an argument to later invocations of the combine-var
function. Pairs of output will be combined until there is only one
output left, which is the final output.
What follows is an explanation of the query, bit by bit.
First, require the Cascalog functions you’ll need:
(nscookbook.aggregation(:require[cascalog.api:refer:all][cascalog.more-taps:refer[hfs-delimited]]))
Then define a function, init-aggregate-stats, that takes a date, URL, and
user and returns a map of maps. The second level of maps has keys that
correspond to the observed values. This is the init function, which
takes each row and prepares it for aggregation:
(defninit-aggregate-stats[dateurluser](let[day(.substringdate08)]{"URL"{url1}"User"{user1}"Day"{date1}}))
The combine-aggregate-stats function takes the output of invoking
the init-aggregate-stats function on all the inputs and combines
it. This function will be called over and over, combining the output
of init-aggregate-stats function calls and the output of other
invocations of itself. Its output should be of the same form as its
input, since this function will be called on pairs of output until
there is only one piece of data left. This function merges the nested
maps, adding the values together when they are in the same key:
(defcombine-aggregate-stats(partial merge-with(partial merge-with+)))
aggregate-stats takes the two previous functions and turns them into
a Cascalog parallel-aggregation operation. Note that you pass the
vars, not the functions themselves:
(defparallelaggaggregate-stats:init-var#'init-aggregate-stats:combine-var#'combine-aggregate-stats)
Finally, set up Main to define and execute a query that invokes the
aggregate-stats operation across input from in, writing it to
out:
(defmainMain[inout&args];; This defines and executes a Cascalog query.(?<-;; Set up the output path.(hfs-textlineout:sinkmode:replace);; Define which logic variables will be output.[?out];; Set up the input path, and define the logic vars to bind to input.((hfs-delimitedin)?date?url?user);; Run the aggregation operation.(aggregate-stats?date?url?user:>?out)))
If the aggregate you want to calculate can’t be defined using
defparallelagg, Cascalog provides some other options for defining
aggregates. However, many of them don’t use combiners and could leave
you with almost all the computation happening in a small number of
reducers. The computation will probably finish, but you are losing a
lot of the benefit of distributed computation. Check out the source
of cascalog.logic.ops to see what the different options are and how you
can use them.
See Also
-
The source of
cascalog.logic.ops, a namespace with many predefined operations (including aggregators)
9.4. Testing Cascalog Workflows
Problem
You love testing your code. You love writing Cascalog jobs. You hate trying to test your Cascalog jobs.
Solution
Midje-Cascalog provides a small amount of extra functionality that
makes writing tests for Cascalog jobs quite easy. To follow along with this recipe, clone the
Cascalog samples
GitHub repository and check out the testing-begin branch. This will
give you a basic Cascalog project as created in Recipe 9.2, “Processing Data with an Extract Transform Load (ETL) Pipeline”.
Now add the Midje plug-in and Midje-Cascalog dependency to the :dev
profile in your project.clj. The :profiles key should now look
like this:
(defprojectcookbook"0.1.0-SNAPSHOT";; ...:profiles{:dev{:dependencies[[org.apache.hadoop/hadoop-core"1.1.2"][cascalog/midje-cascalog"2.0.0"]]:plugins[[lein-midje"3.1.1"]]}})
Create a simple query in src/cookbook/test_me.clj to write a test against:
(nscookbook.test-me(:require[cascalog.api:refer:all]))(defncapitalize[s](.toUpperCases))(defncapitalize-authors-query[author-path](<-[?capitalized-author]((hfs-textlineauthor-path)?author)(capitalize?author:>?capitalized-author)))
You can now write a test for this query in test/cookbook/test_me_test.clj:
(nscookbook.test-me-test(:require[cookbook.midje-cascalog:refer:all][midje[sweet:refer:all][cascalog:refer:all]]))(fact"Query should return capitalized versions of the input names."(capitalize-authors-query:author-path)=>(produces[["LUKE VANDERHART"]["RYAN NEUFELD"]])(provided(hfs-textline:author-path)=>[["Luke Vanderhart"]["Ryan Neufeld"]]))
Note
The full contents of this solution are available in the
testing-complete branch of the
Cascalog samples
repository.
Check out that branch to retrieve a full working copy with sample data:
$ git checkout testing-completeFinally, run the tests with lein midje:
$ lein midje2013-11-09 12:19:27.844 java[3620:1703] Unable to load realm info fromSCDynamicStoreAll checks (1) succeeded.
Discussion
Unit testing is an important aspect of software craftsmanship. However, unit testing Hadoop workflows is difficult, to say the least. Most distributed computing development is done using trial and error, with only limited manual testing happening before the workflow is considered “good enough” and put into production use. You shouldn’t let your code quality slip, but testing distributed code can be difficult. Midje-Cascalog makes it easy to test different parts of your Cascalog workflow by making it dead simple to mock out the results of subqueries.
In the solution outlined, you are testing a simple query. It
reads lines from the input path, capitalizes them, and outputs them.
Normally, you’d need to make sure part of the test wrote some test
data into a file, reference that file in the test, then clean up
and delete the file. Instead, using Midje-Cascalog, you mock the
hfs-textline call.
fact is provided by the Midje library, which is well worth
learning on its own. It is an alternative to deftest from
clojure.test. Here, you state the test as a call, followed by an arrow and then
the produces function. produces lets you write out the results of
a query as a vector of vectors. Having established the test, you use
provided to outline the functions you want to mock. This lets you
test only the function in question, and not the functions it depends
on. Testing your Cascalog workflows is as important as testing any other
part of your application. With Midje-Cascalog, this is actually
possible.
See Also
9.5. Checkpointing Cascalog Jobs
Problem
Your long-running Cascalog jobs throw errors, then need to be completely restarted. You waste time waiting for steps to rerun when the problem was later in the workflow.
Solution
Cascalog Checkpoint is an excellent library that provides the ability to add checkpoints to your Cascalog job. If a step fails, the job is restarted at that step, instead of restarting from the beginning.
In an existing Cascalog project, such as the one generated by
Recipe 9.2, “Processing Data with an Extract Transform Load (ETL) Pipeline”, add [cascalog/cascalog-checkpoint "1.10.2"] to
your project’s dependencies and set the cookbook.checkpoint
namespace to be AOT-compiled.
Then use Cascalog Checkpoint’s workflow macro to set up your job. A
hypothetical four-step job would look something like this:
(nscookbook.checkpoint(:require[cascalog.api:refer:all][cascalog.checkpoint:refer[workflow]]))(defmainMain[in-pathout-path&args](workflow["/tmp/log-parsing"]step-1([:temp-dirsparsed-logs-path](parse-logsin-pathparsed-logs-path))step-2([:temp-dirs[min-pathmax-path]](get-minparsed-logs-pathmin-path)(get-maxparsed-logs-pathmax-path))step-3([:depsstep-1:temp-dirslog-sample-path](sample-logsparsed-logs-pathlog-sample-path))step-4([:deps:all](summaryparsed-logs-pathmin-pathmax-pathlog-sample-pathout-path))))
Discussion
Cascalog jobs often take hours to run. There are few things more
frustrating than a typo in the last step breaking a job that has been
running all weekend. Cascalog Checkpoint provides the workflow
macro, which allows you to restart a job from the last step that
successfully completed.
The workflow macro expects its first argument, checkpoint-dir, to
be a vector with a path for temporary files. The output of each step
is temporarily stored in folders inside this path, along with some
files to keep track of what steps have successfully completed.
After the first argument, workflow expects pairs of step names and
step definitions. A step definitions is a vector of options, followed
by as many Cascalog queries as desired for that step. For example:
step-3([:depsstep-1:temp-dirs[log-sample-pathlog-other-sample-path]](sample-logsparsed-logs-pathlog-sample-path)(other-sample-logsparsed-logs-pathlog-other-sample-path))
This step definition defines step-3. It depends on step-1, so it
won’t run until step-1 has completed. This step creates two temporary
directories for its queries. Both :deps and :temp-dirs can be
either a symbol or a vector of symbols, or can be omitted. After the
options vector, you can include one or many Cascalog queries; in this
case, there are two queries.
:deps can take several different values. :last, which is
the default value, makes the step depend on the step before
it. :all makes the step depend on all previously defined steps. Providing a
symbol, or vector of symbols, makes that step depend on that particular step or steps. A step won’t run until everything it depends upon has
completed. If several steps have their dependencies met, they will all
run in parallel.
Every symbol provided to :temp-dirs is turned into a directory
within the temp directory. Later steps can use these directories to
read data output by earlier steps. These directories are cleaned up
once the workflow successfully runs all the way through. Until then,
these directories hold the output from the different steps so the
workflow can resume from the last incomplete step.
Note
If you want to restart a step that successfully completed, delete the
file at <checkpoint-dir>/<step-name>. The :temp-dirs from the step
definitions can be found in <checkpoint-dir>/data/<temp-dir>, in case
you need to delete or modify the data there.
Another method for dealing with errors is providing error taps for your Cascalog queries. Cascalog will put the input tuples that cause errors in a query into the error tap (for different processing or to dump for manual inspection). With error taps in place, a couple of malformed inputs won’t bring down your entire workflow.
Checkpointing your Cascalog jobs is a little bit of extra work initially, but it’ll save you a lot of time. Things will go wrong. The cluster will go down. You’ll discover typos and edge cases. It is wonderful to be able to restart your job from the last step that worked, instead of waiting for the entire thing to rerun every time.
See Also
-
The
cascalog.checkpointproject page on GitHub
9.6. Explaining a Cascalog Query
Solution
Use the cascalog.api/explain function to print out a DOT file of
your query. You can follow along by launching a REPL in an existing
project, like that created in Recipe 9.2, “Processing Data with an Extract Transform Load (ETL) Pipeline”:
(require'[cascalog.api:refer[explain<-]])(explain"slow-query.dot"(<-[?a?b]([[12]]?a?b)))
Next, you’ll want to view the DOT file. There are many ways to do that,
but the easiest is probably by using dot, one of the Graphviz tools,
to convert a DOT file to a PNG or GIF:
$ dot -Tpng -oslow-query.png slow-query.dotNow open slow-query.png (shown in Figure 9-1) to see a diagram of your query.

Discussion
Cascalog workflows compile into Cascading workflows. Cascading is a Java library that wraps Hadoop, providing a flow-based plumbing abstraction. The query graph in the DOT file will have different Cascading elements as nodes.
The explain function here is analogous to the EXPLAIN command in
many SQL implementations. explain causes Cascalog to print out the
query plan. And as with the output from an SQL EXPLAIN, you might have
to work to understand exactly what you are seeing.
The biggest thing to look for is that the basic flow of the query is what you expected. Make sure that you aren’t rerunning some parts of your query. Cascalog makes it easy to reuse queries, but often you want to run the query, save the results, then reference the saved results from other queries instead of running it once for every time its output is used.
You can also work to match up the phases from your query plan to a job as it is running. This is tricky, because the phases won’t correspond exactly to your output map. However, when you succeed, you’ll be able be able to track down the slow phases.
In general, to keep your Cascalog queries fast, make sure you are using all of the nodes in your cluster. That means keeping the work in small, evenly sized units. If one map input takes 1,000 times as long to run as the other 40 inputs, your whole job will wait on the one mapper to finish. Working to split the long map job into 1,000 smaller jobs would make the job run much faster, since it could be distributed across the entire cluster instead of running on a single node. It is particularly easy to accidentally have nearly the entire job end up in one reducer. This is easy to see happening in the Hadoop job tracker, when nearly all the reducers are done and the job is waiting on one or two reducers to finish. To fix this, do as much reduce work as possible during the map phase using aggregators, and then make sure that the remaining reduce work isn’t all piling up into a small number of reducers.
See Also
- Recipe 9.3, “Aggregating Large Files”
- “Cascading Flow Visualization” on Cascalog wiki
9.7. Running a Cascalog Job on Elastic MapReduce
Solution
Amazon’s Elastic MapReduce (EMR) provides on-demand Hadoop clusters. You’ll need an Amazon Web Services account to use EMR.
First, write a Cascalog job as you normally would. There are a number of recipes in this chapter that can help you create a complete Cascalog job. If you don’t have your own, you can clone Recipe 9.2, “Processing Data with an Extract Transform Load (ETL) Pipeline”:
$ git clone https://github.com/clojure-cookbook/cascalog-samples.git$ cd cascalog-samples$ git checkout etl-sample
Once you have a Cascalog project, package it into an uberjar:
$ lein compile$ lein uberjar
Next, upload the generated JAR (target/cookbook-0.1.0-SNAPSHOT-standalone.jar if you’re following along with the ETL sample) to S3. If you haven’t ever uploaded a file to S3, follow the S3 documentation to “Create a Bucket” and for “Adding an Object to a Bucket”. Repeat this process to upload your input data. Take note of the path to the JAR and the input data location.
To create your MapReduce job, visit
https://console.aws.amazon.com/elasticmapreduce/ and select “Create
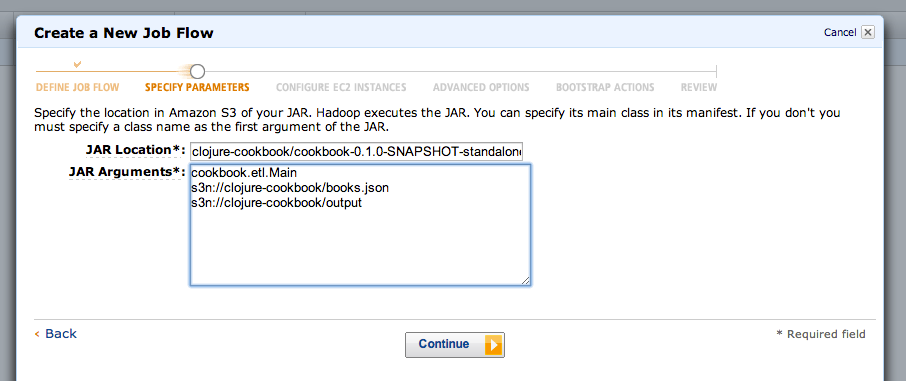
New Job Flow” (Figure 9-2). Once you’re in the new job flow wizard, choose the
“Custom JAR” job type. Select “Continue” and enter your JAR’s location and arguments. “JAR
Location” is the S3 path you noted earlier. “JAR Arguments” are
all of the arguments you would normally pass when executing your JAR.
For example, using the Cascalog samples repository, the arguments
would be the fully qualified class name to execute,
cookbook.etl.Main, an s3n:// URI for input data, and an s3n://
URI for the output.
The next few wizard windows allow you to specify additional configuration options for the job. Select “Continue” until you reach the review phase and start your job.
After your job has run, you should be able to retrieve the results from S3. Elastic MapReduce also allows you to set up a logging path to help with debugging if your job doesn’t complete like you expect.
Discussion
Amazon’s EMR is a great solution if you have big Cascalog jobs but you don’t have to run them very often. Maintaining your own Hadoop cluster can take a fair amount of time and money. If you can keep the cluster busy, it is a great investment. If you only need it a couple of times a month, you might be better off using EMR for on-demand Hadoop clusters.
See Also
- Recipe 9.2, “Processing Data with an Extract Transform Load (ETL) Pipeline”, to learn about building a simple Cascalog job
- Amazon’s “Launch a Custom JAR Cluster” documentation
[34] While queries look like regular Clojure, they are in fact a DSL. If you’re not familiar with Cascalog queries, learn more in Nathan Marz’s “Introducing Cascalog” article.