Chapter 15. Troubleshooting Cisco NAC Appliance
This chapter covers the following topics:
- Licensing Issues
- Adding NAS to NAM
- Policy Issues
- Agent Issues
- Out-of-Band Issues
- Single Sign-On Issues
- High Availability Issues
- Useful Logs
- Common Issues Encountered by the Help Desk in the First 30 Days
This chapter goes through some common troubleshooting scenarios when deploying and working with NAC Appliance. You will learn general troubleshooting techniques and questions to ask when you see a problem with the operation of NAC Appliance.
Licensing Issues
License issues with the NAC Appliance are some of the most common reasons Technical Assistance Center (TAC) cases are opened. Most of the TAC cases are due to customer confusion on what is required to generate a valid license. Licensing with NAC Appliance has changed a few times over the past 2–3 years, and this has added to the confusion.
Prior to acquisition by Cisco, licenses were in the form of license keys, which were strings of letters and numbers. One key covered the license for NAC Appliance Manager (NAM) and NAC Appliance Servers (NAS). Failover capability, if required, was included in the same key.
After the acquisition by Cisco, licenses were put in the form of FlexLM license files. There are separate licenses for NAC Appliance Manager, NAC Appliance Server, and failover capability.
Also, for a short time, Cisco had separate licenses for in-band and out-of-band. Starting from release 3.6(1) (December 2005) onward, there is just one license for both in-band and out-of-band.
Customers receive a product authorization key when they receive the appliances. When requesting license files, the customers have to give the MAC addresses, and this is usually a large source of confusion.
The NAC Appliance Manager license is generated using the MAC address of the eth0 interface of NAC Appliance Manager. If a failover NAM license is required, the MAC addresses of the eth0 interfaces of both the primary and secondary NAMs are required.
The NAC Appliance Server license is generated using the MAC address of the eth0 interface of the NAM. Generating a failover license for NAS still requires the MAC address of the eth0 interface of NAM. This is the most common mistake people make when requesting licenses. They usually request NAS licenses using the eth0 MAC address from NAS itself. Also, with the FlexLM licenses, separate license files are required for each NAS. Therefore, if you have 40 NAS instances, you require 40 NAS license files.
If you have the older license keys and are adding more NASs, you will have to convert the license keys to the new FlexLM license files. Open a TAC case with the Cisco licensing team, and its members will convert the licenses for you.
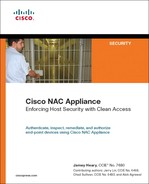
The license page on NAC Appliance Manager has a Remove All Licenses button, as shown in Figure 15-1. In case you install an incorrect license file, you can remove all licenses and reinstall from scratch.
Figure 15-1. NAC Appliance License Page
Adding NAS to NAM
One of the initial steps in setting up NAC Appliance is adding NAS to NAM. The following are a few things to check if you are not successful in doing so:
Step 1. Make sure that NAM and NAS can reach each other. Go to the command-line interface (CLI) of NAM and see whether you can ping the eth0 IP address of NAS. Similarly, go to the CLI of NAS and see whether you can ping NAM. If this step fails, check the IP address, the subnet mask, the default gateway of the NAM and NAS, and other switch configuration to make sure that routing and switching are configured correctly.
Step 2. From the CLI of NAM, use Secure Shell (SSH) to log in to NAS and see whether any error messages come up. Similarly, from the CLI of NAS, use SSH to log in to the NAM and see whether you are successful.
Step 3. Make sure that the shared secret key on NAM and NAS are the same. You can check this on the NAM and NAS by looking at the .secret file in the root directory, such as cat /root/.secret.
The shared secret key will be a hashed value. However, if this hashed value matches on NAM and NAS, you can assume that the shared secret key has been correctly configured.
Step 4. Check the Secure Sockets Layer (SSL) certificate. For a temporary certificate, make sure that you use the eth0 IP address of NAM when generating the certificate for the NAM, and use the eth0 IP address of NAS when generating the certificate for NAS.
If using certificates based on the DNS name, make sure that NAM and NAS can resolve the Domain Name System (DNS) name to an IP. If NAM and NAS are unable to resolve the IP, you will not be able to add NAS to NAM.
Step 5. Check the licenses on NAM. Make sure that you have the NAS licenses installed for the number of NAS instances that you want to support using NAM.
Step 6. Check the date on both NAM and NAS. The date and time difference should not be more than 5 minutes.
To check the date and time on the NAM and NAS, the command is date.
To change the time on the NAM and NAS, the command is service perfigo time.
Step 7. If you're adding NAS in Virtual Gateway mode and NAS is connected in Central Deployment, make sure that you disable the eth1 interface before adding NAS to NAM. This is because when you add NAS to NAM, VLAN mapping is not configured yet and can cause a Layer 2 loop to occur in the network. Disable the eth1 interface, add NAS to NAM, configure VLAN mapping, and then you can enable the eth1 interface back up.
Step 8. If you're adding NAS in Virtual Gateway mode, NAM and NAS have to be on different subnets; otherwise, you will not be able to add NAS to NAM.
Step 9. If there is a firewall between NAS and NAM, you have to open up the following ports to allow communication between NAM and NAS:
For 3.6(x), 4.x: TCP 80, 443, 1099, 8995-8996
For 3.5(x) and earlier: TCP 80, 443, 1099, 32768-61000
Step 10. Check the event log on the NAM. This might give the reason NAS is not added to NAM.
Policy Issues
Everything on NAC Appliance is based on user roles. Each user role has a set of access control lists (ACLs) configured. These ACLs are called policies in NAC terminology. These policies define what privileges the user has on the network; for example, whether the user has restricted access, Internet access only, or full access. These policies are fully configurable by the network administrator.
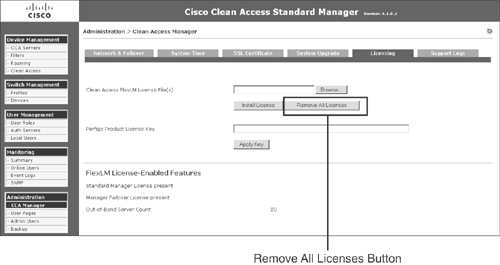
When troubleshooting multiple different issues with NAC Appliance, many times you might suspect that NAS might be incorrectly dropping the packet. To quickly isolate the issue in these circumstances, you can configure the policies to allow all traffic to go through for all the user roles, as shown in Figure 15-2.
Figure 15-2. Traffic Policies Page
If this is done, NAS will act as a bypass and will not drop traffic.
In the Unauthenticated role, many times you might have to poke holes and allow some traffic type to go through. Some examples are Windows Single Sign-On (SSO) and traffic for patch management applications. Many times you open up the ports for the correct protocols, but still the application doesn't work and you suspect that the NAS might be dropping packets incorrectly. To isolate the issue, you can open up the Unauthenticated role and allow all traffic to go through. If doing this fixes the issue, you know that you have to open up additional ports to make the application work correctly. At this point, you can capture a sniffer trace from the host and see what additional protocol traffic is being sent and open up additional ports on the NAS accordingly.
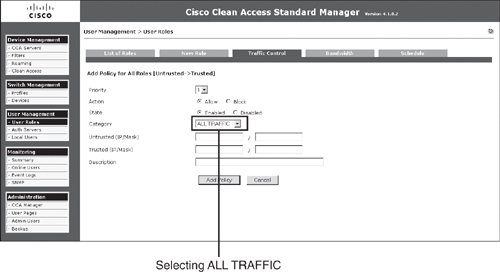
The NAS, by default, drops all IP fragmented traffic. In an Active Directory environment, some user profiles have additional attributes; therefore, when the Windows host is sending traffic out for authentication, it fragments the packets before sending it to the Active Directory (AD) server. By default, these packets are dropped by the NAS. Therefore, if this occurs, you need to configure a traffic policy to allow IP fragments to go through, as shown in Figure 15-3.
Figure 15-3. Allowing IP Fragmented Traffic in the Unauthenticated Role
Agent Issues
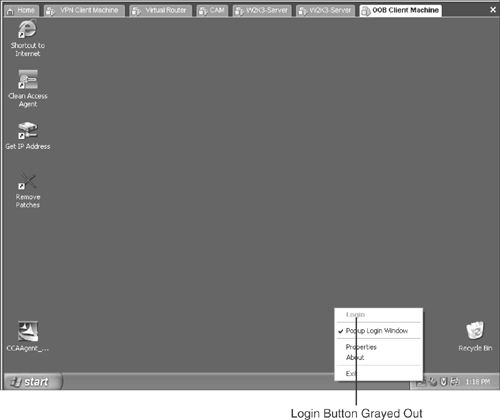
One of the most common issues customers hit when deploying NAC Appliance is that NAC Appliance Agent does not pop up. On right-clicking the Agent icon on the taskbar, the Login button is grayed out, as shown in Figure 15-4.
Figure 15-4. Login Prompt Grayed Out
To troubleshoot this issue, it is important to first understand how the agent communicates with the NAS.
The NAC Appliance Agent sends unicast packets every 5 seconds on User Datagram Protocol (UDP) ports 8905 and 8906. The packets on UDP 8905 are destined for the default gateway of the end-user device. The packets on UDP 8906 are destined for the IP address configured in the Discovery Host field. The discovery host configuration can be found at Device Management > Clean Access > Clean Access Agent > Distribution. By default, you populate the Discovery Host configuration with the IP address of NAM.
The agent discovery process takes place as follows:
- The end user connects to the network and gets an IP address. The agent starts sending UDP packets on ports 8905 and 8906.
- If the end user is L2 adjacent to NAS, the UDP 8905 packets sent to the default gateway IP will hit NAS before it is able to reach the default gateway. NAS uses these packets to discover the NAC Appliance Agent and instructs the NAC Appliance Agent to pop up on the end-user device. NAS doesn't forward these packets to the default gateway.
- If the end user is one or multiple hops away (L3), and if NAC Appliance and networking has been configured correctly, for the UDP 8906 packets (from the untrusted side) to reach the NAM (which is on the trusted side), the packets will have to hit the NAS first and the NAS will discover the NAC Appliance Agent.
The discovery host can be configured to be any IP that exists on the trusted side of the network and is reachable and routable. By default, you prepopulate this with the NAM IP because you know that NAM exists on the trusted side of the network, and it has to exist for NAC Appliance to work.
This is also the reason that NAC Appliance Agent has to be downloaded from NAS and cannot be downloaded from Cisco.com to use for end users if the end users are L3 hops away. The NAC Appliance Agent file from Cisco.com will not have the discovery host configuration; therefore, NAC Appliance Agent will not know which destination IP to use for the UDP 8906 packets. You can view the discovery host IP by right-clicking the NAC Appliance Agent icon on the client taskbar and selecting Properties.
The key points to be noted here are that for NAC Appliance Agent to pop up, the NAC Appliance Agent discovery packets have to reach the NAS, and the NAS should be able to send packets back to the end-user device. The following are a few things to check if NAC Appliance Agent is not popping up:
Step 1. Check whether the user device is sending packets on UDP ports 8905 and 8906. You can take a quick sniffer trace using Ethereal or any other packet capture utility.
Step 2. Check whether there is a personal firewall on the user's device that might be blocking the NAC Appliance Agent discovery packets on UDP ports 8905 and 8906.
Step 3. Check whether the NAC Appliance Agent discovery packets are hitting the untrusted port of NAS. You can capture a sniffer trace on the switch port connecting the untrusted port of the NAS. This will show you if the NAC Appliance Agent discovery packets are actually sent toward NAS. Another way of checking this is to use the tcpdump utility on the NAS untrusted port. The tcpdump utility on NAS does not display any traffic that is sent through NAS. The agent discovery packets sent on UDP 8905 can be seen using the tcpdump utility, as shown in Example 15-1; however, the discovery packets on UDP 8906 cannot be seen with the tcpdump utility. Therefore, if NAS is L2 adjacent to the user, you can also use the tcpdump utility on NAS to check whether NAS is receiving the NAC Appliance Agent discovery packets.
Example 15-1. TCPDump Showing UDP 8905 Packets
[root@CAS_OOB ~]# tcpdump -i eth1 -vv
tcpdump: listening on eth1, link-type EN10MB (Ethernet), capture size 96 bytes
03:09:53.445063 IP (tos 0x0, ttl 128, id 9459, offset 0, flags [none], proto 17,
length: 99)
10.60.60.6.1990 > 10.60.60.2.8905: UDP, length 71
03:09:58.500124 IP (tos 0x0, ttl 128, id 9474, offset 0, flags [none], proto 17,
length: 103)
10.60.60.6.1991 > 10.60.60.2.8905: UDP, length 75
Step 4. If you don't see NAC Appliance Agent discovery packets hitting the untrusted port of NAS, you need to track down the path of these packets from the user and find out whether there is any network misconfiguration.
Step 5. If the user is L2 adjacent to the NAS, check whether managed subnets have been configured for the users subnet. Make sure that the managed subnet section has an IP address configured and not a subnet address. This is so that NAS has a virtual IP in that subnet to facilitate NAS getting an Address Resolution Protocol (ARP) entry for the user device. If managed subnets are not configured, NAS will not be able to determine the IP address-to-MAC address mapping of the user and will not be able to send return traffic back to the user.
Step 6. If the user is multiple hops (L3) away from the NAS, make sure that the user's subnet is not configured in the managed subnet section. However, you should configure static routes for the user subnet.
Step 7. Get a sniffer trace on the user's switch port and check whether return traffic from the NAS is reaching the user.
Step 8. If all else fails, the last thing to check is the Clean Access Agent debug logs.
The Clean Access Agent debug logs can be enabled and captured using the following procedure:
Step 1. Exit Clean Access Agent on the client by right-clicking the taskbar icon and selecting Exit.
Step 2. Edit the registry of the client by going to Start > Run and typing regedit in the Open: field of the Run dialog. The Registry Editor opens.
Step 3. Navigate to HKEY_CURRENT_USERSoftwareCiscoClean Access Agent in the Registry Editor.
Note that for 3.6.0.0/3.6.0.1, and 3.5.10 and earlier, HKEY_LOCAL_MACHINESoftwareCiscoClean Access Agent is the correct location.
Step 4. If LogLevel is not already present in the directory, go to Edit > New > String Value and add a string to the Clean Access Agent key called LogLevel.
Step 5. Right-click LogLevel and select Modify. The Edit String dialog appears.
Step 6. Type debug in the Value data field and click OK. (This sets the value of the LogLevel string to "debug.")
Step 7. Restart Clean Access Agent by double-clicking the desktop shortcut.
Step 8. Re-log in to the Clean Access Agent.
Step 9. When a requirement fails, click the Cancel button in Clean Access Agent.
Step 10. Take the resulting event.log file from the home directory of the current user (for example, C:Documents and Settings<username>Application DataCiscoCAAevent.log) and send it to TAC customer support.
Note
For 3.6.0.0/3.6.0.1 and 3.5.10 and earlier, the event.log file is located in the Agent installation directory (for example, C:Program FilesCisco SystemsClean Access Agent).
For 3.5.0 and earlier, the Agent installation directory is C:Program FilesCiscoClean Access.
The debug file is not in readable format and can be decoded only by Cisco TAC.
For any other issues involving Windows Single Sign-On, posture assessment, or remediation carried out by the agent, TAC will always request that you enable agent debug logs and send them. Therefore, knowing the procedure to enable the debug logs is important.
Out-of-Band Issues
When troubleshooting out-of-band issues, looking at the out-of-band (OOB) process and finding out what process or phase of OOB is failing is recommended. Doing so will help you isolate the issue quickly and attack the problem.
Step 1. Check whether the user's switch port is moved to the authentication VLAN when the user first connected to the switch port. If the user is not being moved to the authentication VLAN, do the following:
a. Check whether the switch is generating a Simple Network Management Protocol (SNMP) linkup or MAC-notification trap. This can be done by running SNMP debugs on the switch:
debug snmp header
debug snmp packet
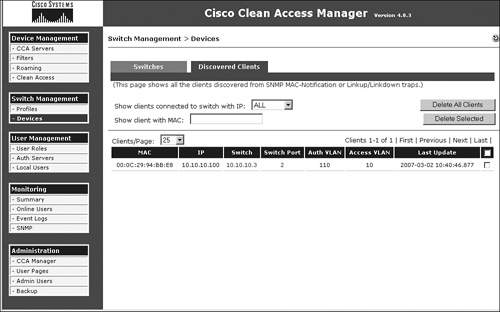
— Check whether the trap is being received by NAM. This can be done by capturing a sniffer trace or by using tcpdump on NAM. If NAM correctly receives the SNMP trap from the switch, the device immediately shows up in the discovered clients list, as shown in Figure 15-5, which is located at Switch Management > Devices > Discovered Clients.
Figure 15-5. Discovered Clients List Page
— Look at the support logs on NAM. For OOB, the main log file to look at is located at /perfigo/logs/perfigo-log0.log.0. This log file will give information on what happens if the SNMP trap is received by NAM.
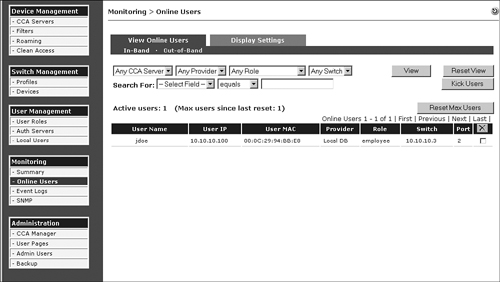
— Check whether the user device already exists in the online user list. If the user already exists in the online user list, as shown in Figure 15-6, NAM will not instruct the switch port to be moved to the authentication VLAN.
Figure 15-6. Online User List
— Next, check whether NAM sends SNMP set messages to the switch to move the user to the authentication VLAN. Again, run SNMP debugs on the switch to see whether the switch is receiving these SNMP sets from NAM and if the switch processes these packets.
If the switch port VLAN is being changed to the authentication VLAN, go to the next step.
Step 2. Check whether the traffic from the user in the authentication VLAN is reaching the untrusted port of NAS.
The simplest way to check this is to get a sniffer trace on the switch port connecting the untrusted port of the NAS. To troubleshoot any networking misconfigurations, determine the IP and MAC of the end user device and then check the ARP and MAC address tables on the L2 and L3 switches to make sure that the entries look correct.
If you determine that traffic from the user in the authentication VLAN is hitting the untrusted port of the NAS, go to the next step.
Step 3. Ensure that managed subnet is configured for user subnets that are Layer 2 adjacent to NAS and static routes are configured for user subnets that are multiple hops away from the NAS. Check whether you can ping from the NAS to the host in the authentication VLAN.
Step 4. On the user device, open a browser and check whether you are redirected to a web login page. If HTTP or HTTPS packets from the user device reach NAS, it will be automatically redirected to the web login page. If NAS does not redirect you, check for the following:
a. Check whether you have the right DNS server settings. Check whether the user device is able to resolve the URL to which it is trying to go. If the user device is unable to resolve the URL, it will not send HTTP/HTTPS packets out and will display a Page Not Found page, giving the impression that page redirect has failed.
— Also check the log file located at /perfig/access/apache/logs/error_log. If the certificate on the NAS is not valid, you will see an error message in the logs.
— Check whether the httpd service has been started on the NAS. You can check this by the command netstat –al | grep http on NAS.
netstat -al | grep http
tcp 0 0 *:http *:* LISTEN
tcp 0 0 *:https *:* LISTEN
— Check whether a user page has been configured on the NAM.
— Connect a test PC directly into the untrusted port of the NAS and check whether redirect to the web login page occurs. This will bypass any network issues and immediately prove whether it is a networking issue or an issue with NAS.
— Check whether the user device has multiple network interface cards (NICs) enabled. At the time of writing this chapter, NAC Appliance did not have support for enabling multiple NICs on the user device.
Step 5. If the Agent does pop up or you are redirected to a web login page, the next step is to check whether the user is able to authenticate.
Step 6. The next step is to check whether the user shows up in the online user list and if the user shows up in the correct user role.
Step 7. Check the reports to get information regarding the posture of the end-user device, as shown in Figure 15-7.
Figure 15-7. User Reports Page
Step 8. Check whether the user has been moved to the correct access VLAN based on either port-based VLAN or user role–based VLAN mapping.
If you follow these troubleshooting steps, you will be able to isolate the issue in a logical manner and focus your attention on that particular phase of the out-of-band process. Later you will cover certain error conditions that occur with out-of-band.
The error message in Figure 15-8 shows up if the community string on the NAM configuration does not match the configuration on the switch.
Figure 15-8. Error Message If Unable to Add Switch to NAC Appliance Manager
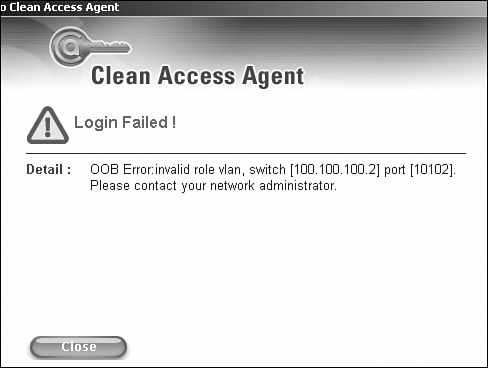
Another error that shows up is displayed in Figure 15-9. This occurs if user role–based VLAN assignment is being used with OOB.
Figure 15-9. Error Message If OOB VLAN in the User Role Is Not Configured
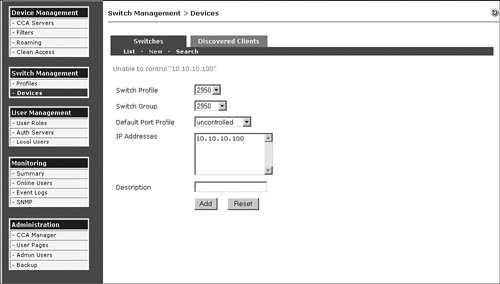
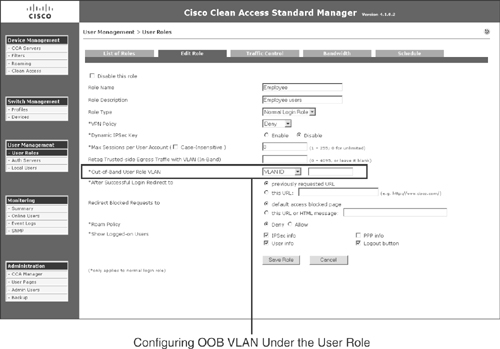
This message shows up if there is no OOB VLAN configured under the user role as shown in Figure 15-10.
Figure 15-10. OOB VLAN Configuration on the User Role Page
Single Sign-On Issues
This section covers single sign-on issues when configuring Windows Single Sign-On and virtual private networking (VPN) or Wireless Single Sign-On.
AD SSO
When configuring AD SSO, the most common mistake is not having the correct ktpass command.
Figure 15-11 shows a sample ktpass command. It shows you where the relevant information should be taken from. The computer name that is between the / and the @ should match case-by-case with the full computer name, as shown in Figure 15-11. The Realm Name, which is after the @ sign, should always be in capital letters.
Figure 15-11. Sample ktpass Command
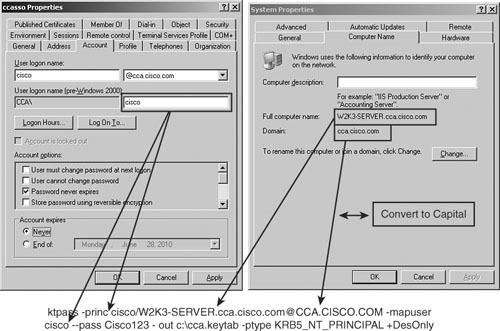
In case any mistake is made in the ktpass command, the generated keytab file (cca.keytab, in this case) should be deleted before running the command again.
When configuring NAS for AD SSO, you might find that the AD service does not start. The error message in Figure 15-12 can show up due to several reasons.
Figure 15-12. SSO Service Unable to Start on NAC Appliance Server
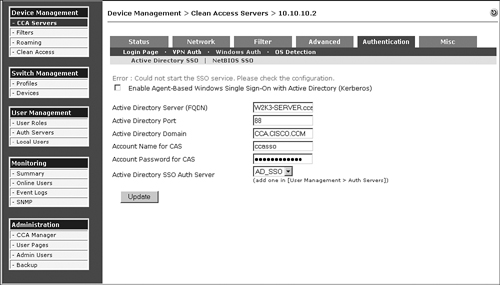
The following are a few of the things that you will check if you see the error message in Figure 15-12:
- If the ktpass command was not run correctly on the domain controller, or the configuration parameters on NAS have been entered incorrectly, it will prevent the AD SSO service from starting on the NAS.
- The Active Directory has to be in capital letters.
- The Active Directory Server (fully qualified domain name [FQDN]) should match case-by-case as it appears on the Active Directory server.
- The FQDN cannot be an IP address. It has to be a DNS host name and should be resolvable by the NAS. Ping the DNS host name from the NAS and ensure that the NAS is able to resolve it and reach the AD server.
- Make sure that the time between NAS and the AD server is synchronized within 5 minutes.
- On the NAS support log page, increase the logging level for AD communication logging to the info level. Then re-create the issue and check the log file located at /perfigo/logs/perfigo-redirect-log0.log.0. This log file should give useful information regarding why the SSO service is not starting on the NAS.
Another issue that you might run into is on the user side. Assume that everything is configured correctly. However, on the agent PC, NAC Appliance Agent still asks for a manual login instead of using Single Sign-On. The following are some things to check if this happens:
- If there is some communication problem between the user's PC and the AD server, or between the NAS and the AD server, this issue can occur. Check whether there is connectivity between these devices.
- Confirm if you are logged in to the domain and the user has the correct Kerberos keys.
- On the NAC Appliance Unauthenticated user role, make sure that the correct ports are open to the AD server. Most AD servers use the standard ports; however, in some installations, custom ports might be used. Therefore, you might have to open ports in addition to the standard ports that Cisco recommends. The ports to be opened can be determined by taking a sniffer trace on the user's PC and checking what ports are being used for the authentication purposes.
- Capture the Agent debug logs.
- On NAS, check whether it is listening on port 8910.
- Check the TCP and UDP ports necessary for SSO to work in the Unauthenticated user role.
VPN and Wireless SSO
VPN and wireless SSO rely on NAS receiving RADIUS accounting packets. If SSO fails, the following are a few of the things that you can check:
- Check whether there is connectivity between the VPN or wireless device and NAS.
- Check whether the RADIUS accounting packet is reaching the NAS trusted port. This can be checked by capturing a sniffer trace. You can also check the /perfigo/logs/perfigo-redirect-log0.log.0 log file to see whether NAS received the RADIUS accounting packet.
- Check whether the shared secret settings match between the NAS and the VPN or wireless device. If they don't match, you will see an error message in the /perfigo/logs/perfigo-redirect-log0.log.0 log file.
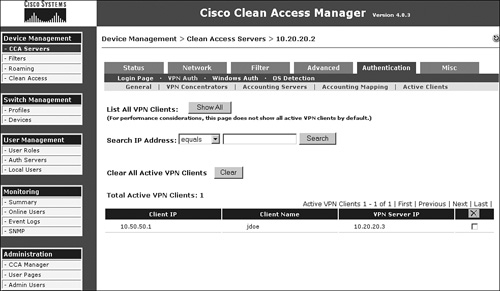
- If NAS has successfully received RADIUS accounting information from the VPN or wireless device, it will add the user's information in a temporary table that it uses to determine whether it should do SSO for a subsequent user with that particular IP address. This table can be viewed at Device Management > CCA Servers > Manage > Authentication > VPN Auth > Active Clients > Show All, as shown in Figure 15-13.
Figure 15-13. Active Clients Table
High Availability Issues
NAM and NAS rely on heartbeat packets for the high availability solution. Most issues occur due to heartbeat packets not reliably reaching the peers.
NAM GUIs on both the primary and the secondary NAM don't directly tell you whether they have the correct status of each other from an active/standby point of view. The GUI on the standby NAM does not show all the tabs on the left side of the page; therefore, you can deduce that it is the standby NAM.
You can look up the high availability configuration on the NAM by looking at the following files:
- /etc/ha.d/perfigo/conf
- /etc/ha.d/ha.cf
You can look up the HA status of a NAM from the CLI as follows:
Step 1. Go to the /store directory.
Step 2. Check whether there is an upgrade folder present, such as cca_upgrade-4.1.0.2.
Step 3. Inside the upgrade folder, you will find a script called fostate.sh. Run that script.
The active NAM will show the following output:
[root@cam1 cca_upgrade-4.1.0.2]# ./fostate.sh
My node is active, peer node is standby
The standby NAM will show the following output:
[root@cam2 cca_upgrade-4.1.0.2]# ./fostate.sh
My node is standby, peer node is active
If you have installed NAM using an ISO image and have not done any upgrades, you will not find an upgrade folder in the /store folder. In that case, you can find the HA status of the NAM as follows:
Step 1. Find the host names of the NAMs (nodes) from the /etc/ha.d/ha.cf file:
[root@cam1 ha.d]# more ha.cf
#Generated by make-hacf.pl
udpport         694
bcast           eth1
auto_failback   off
apiauth         default uid=root
log_badpack     false
debug           0
debugfile       /var/log/ha-debug
logfile         /var/log/ha-log
#logfacility    local0
watchdog        /dev/watchdog
keepalive       2
warntime        10
deadtime        15
node            cam1
node            cam2
Step 2. Run the command /perfigo/control/bin/check-ha node and see whether the output shows up as "active":
[root@cam1 ~]# /perfigo/control/bin/check-ha cam1
active
[root@cam1 ~]# /perfigo/control/bin/check-ha cam2
active
Step 3. Go to /perfigo/contro/tomcat and type ls -la.
Step 4. If "webapps" is pointing to "normal-webapps," it is the primary NAM:
[root@cam1 tomcat]# ls -la
total 216
drwxr-xr-x  12 root root  4096 Sep 14 23:28 .
drwxr-xr-x   8 root root  4096 Aug 28 22:12 ..
drwxr-xr-x   4 root root  4096 Aug 28 22:12 admin-webapps
<output cut.....>
drwxr-xr-x   2 root root  4096 Aug 28 22:12 temp
lrwxrwxrwx   1 root root   38 Sep 14 23:28 webapps -> /perfigo/control/
tomcat/normal-webapps
drwxr-xr-x   3 root root  4096 Aug 28 15:15 work
Step 5. If "webapps" is pointing to "admin-webapps," it is the secondary NAM:
[root@cam2 tomcat]# ls -la
total 216
drwxr-xr-x  12 root root  4096 Sep 14 23:33 .
drwxr-xr-x   8 root root  4096 Sep 15  2006 ..
drwxr-xr-x   4 root root  4096 Sep 15  2006 admin-webapps
<output cut ...>
drwxr-xr-x   2 root root  4096 Sep 15  2006 temp
lrwxrwxrwx   1 root root   37 Sep 14 23:33webapps -> /perfigo/control/
tomcat/admin-webapps
drwxr-xr-x   3 root root  4096 Sep 14 23:25 work
If you determine that NAMs are not detecting each other in correct status, the following logs files will help you isolate the issue further:
- /var/log/ha-log
- /var/log/ha-debug
For NAC Appliance Server, the GUI shows the HA status on the NASs themselves. You can look up the HA config on the NAS CLI using the /etc/ha.d/perfigo.conf and /etc/ha.dha.cf files, as shown in Example 15-2.
Example 15-2. HA Configuration as Seen via CLI
[root@cas1 ha.d]# more perfigo.conf
#linux-ha
#Mon Jan 16 18:50:15 PDT 2007
WIRELESS_SERVICEIP=10.10.20.4
PING_DEAD=25
HOSTNAME=cas1
HA_DEAD=15
PEERGUSSK=
PEERMAC=00:16:35:BF:FE:67
PEERHOSTNAME=cas2
TRUSTED_PINGNODE=10.10.40.100
UNTRUSTED_PINGNODE=10.10.20.100
HAMODE=PRIMARY
PEERMAC0=00:16:35:BF:FE:66
PEERHOSTIP=10.10.50.2
HA_FAILBACK=off
HA_UDP=eth2
WIRED_SERVICEIP=10.10.20.4
HA_SERIAL=ttyS0
[root@cas1 ha.d]# more ha.cf
# Generated by make-hacf-ss.pl
udpport 694
ucast eth2 10.10.50.2
baud 19200
serial /dev/ttyS0
keepalive 2
deadtime 15
deadping 25
auto_failback off
apiauth default uid=root
respawn hacluster /usr/lib64/heartbeat/ipfail
ping 10.10.20.100
ping 10.10.40.100
log_badpack false
warntime 10
debug 0
debugfile /var/log/ha-debug
logfile /var/log/ha-log
watchdog /dev/watchdog
node cas1
node cas2
The HA status on the NAS CLI can be viewed similar to the way it is for NAM:
[root@cas1 cca_upgrade-4.1.0.2]# ./fostate.sh
My node is active, peer node is standby
[root@cas2 cca_upgrade-4.1.0.2]# ./fostate.sh
My node is standby, peer node is active
For further troubleshooting purposes, the following two files give important information:
- /var/log/ha-log
- /var/log/ha-debug
Useful Logs
This section lists some of the log on NAM and NAS that are useful for troubleshooting purposes.
NAM Logs
The following two logs files can be seen on NAM:
- /var/log/messages This is a general log file and has information regarding driver- and system-level errors, messages seen during reboots, and kernel panic messages.
- /perfigo/logs/perfigo-log0.log.0 This is an important log file and shows whether there are any errors in NAM and NAS communication, all errors related to OOB, switch communication, and authentication.
NAS Logs
The following log files can be seen on NAS:
- /var/log/messages This log file consists of the same information as the NAM log file.
- /perfigo/logs/perfigo-redirect-log0.log.0 This log file shows information regarding errors in NAM and NAS communication, errors related to single sign-on using RADIUS and for Windows Single Sign-On, user authentication errors, and certificate errors.
- /perfigo/access/apache/logs/access_log This log file shows users accessing the web login page on NAS. If an end user is not getting redirected to a web login page, you can view this log to see whether NAS is receiving the user's HTTP or HTTPS traffic.
- /var/log/dhcplog This log file shows all the DHCP events when NAS is configured in Real-IP Gateway mode and is configured to be the DHCP server. This log is good to see whether you're troubleshooting why a user is not getting an IP address.
- /etc/sysconfig/network-scripts/ifcfg-eth0 or eth1 This log file shows the configuration for the eth0 and the eth1 interfaces.
- /proc/click/intern_arpq/table This log has the ARP entries for devices on the untrusted network, which are Layer 2 adjacent to NAS.
- /proc/click/extern_arpq/table This log has the ARP entries for devices on the trusted network.
- /proc/click/real_routing_table/table This log shows the routing table on NAS.
Additional Logs
The following are some additional logs that can be viewed on NAM and NAS for troubleshooting purposes:
- netstat -an This command shows all active services running on NAM or NAS.
- ifconfig This command shows information regarding the interfaces.
- mii-tool This command gives the status of the interfaces.
- top This command gives information regarding memory and CPU usage.
- /var/log/ha-log and /var/log/ha-debug This log gives information regarding high availability.
Common Issues Encountered by the Help Desk in the First 30 Days
After NAC Appliance has been installed, configured, and deployed across your user base, the most common issues that come to your help desk will be related to the following:
- Users not being able to get a web login page or the NAC Appliance Agent not popping up
- Users not being able to authenticate
- Users getting stuck in the Quarantine or Temporary role
- Users not being put in the correct VLAN or not getting access to certain resources
The following sections discuss each of these common issues.
Users Not Being Able to Get a Web Login Page, or the NAC Appliance Agent Not Popping
When a user connects to the network and opens the browser, it should be redirected to a web login page hosted by the NAS. If a user calls in saying that he is not being redirected, the following are a few things to check:
- Check whether the user has the correct IP address and default gateway information.
- Check the switch port the user is connected to and see whether the user is in the correct VLAN.
- Ask the user to browse to an IP address that exists on the trusted network and see whether the user gets redirected to a web login page. Most times, users have a DNS name as the default home page when they open a browser. If the user has incorrect DNS server settings or is unable to resolve the DNS name for any reason, the user's device will not send out any HTTP or HTTPS packets; therefore, the NAS is unable to redirect the user to the web login page. Browsing to an IP instead of a DNS name forces the user's device to send out HTTP or HTTPS packets. If this fixes the issue, you know that the user has some DNS issues.
- Check the perfigo/access/apache/logs/access_log log file on NAS to see whether NAS is seeing HTTP or HTTPS packets from the user.
- Check whether user pages have been configured on the NAM GUI at Administration > User Pages.
- If no HTTP or HTTPS packets are reaching NAS, you must further troubleshoot the network to see the path of the packet from the user to the network and the NAS, and see whether the user's packets might be getting forwarded through some other route.
For a scenario in which users have NAC Appliance Agent and it is not popping up, follow the troubleshooting steps listed in the "Agent Issues" section of this chapter.
Users Not Being Able to Authenticate
If a user is successful in getting a web login page or the NAC Appliance Agent does pop up but is unable to authenticate, you can check the following:
- Check whether the user is choosing the correct provider from the drop-down menu. Sometimes you might have multiple authentication providers and users might have to choose an authentication provider specific for themselves.
- On the NAM GUI, you can go to User Management > Auth Servers > Auth Test and do an authentication test for the user's username and password, as shown in Figure 15-14.
Figure 15-14. Authentication Test Page
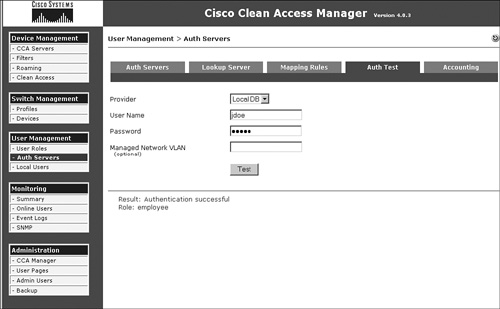
- Check the /perfigo/logs/perfigo-redirect-log-.log.0 log file on NAS and the /perfigo/logs/perfigo-logs0.log.0 file on NAM for any error messages.
Users Getting Stuck in the Quarantine or Temporary Role
If a user is stuck in the Quarantine or Temporary role, it's most likely because that user does not meet a requirement and is unable to remediate. The following is what the help desk professional should do:
- Ask the user to exit out of the agent. As long as the user has the agent up, no report will be generated on the NAM GUI.
- Go to Device Management > Clean Access > Clean Access Agent > Reports. Find the report for the particular user and see what checks the user is failing.
- Find out exactly what that particular check is checking for, whether it is registry key, file, application, or service. Accordingly, you can ask the user to check for the missing piece and troubleshoot why the user is not able to remediate.
- Check the policies in the quarantine or temporary role to ensure that you are allowing access to the remediation resources.
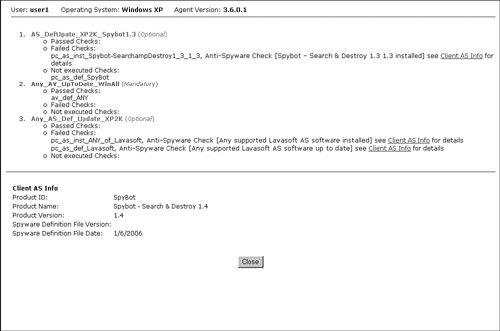
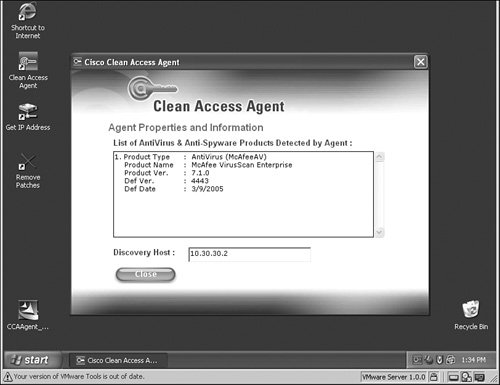
- If the user is stuck due to issues with an antivirus or antispyware application, ask the user to right-click the Agent icon on the taskbar and then click Properties. The agent window will show what antivirus and antispyware application it detects, as shown in Figure 15-15.
Figure 15-15. Agent Properties Page
- If you're getting some other error messages on the agent window, capture agent debug logs and open a TAC case so that TAC can decode the log file and isolate the issue.
Users Not Being Put in the Correct VLAN or Not Getting Access to Certain Resources
If a user is able to authenticate, is compliant, and is still not able to get access to resources on the trusted network, you can check for the following:
- Check the online user list and make sure that the user shows up there and has the correct user role.
- Check the VLAN on the switch port and see whether the user is moved to the correct VLAN (if this is OOB mode).
- Check the policies on the user's user role and make sure that the correct ACLs have been configured.
- Check the user device's IP address and make sure that the user has the correct IP address in the access VLAN.
- If everything looks correct, further troubleshooting on the network will be needed to track the path of the packet and to see where the packet might be getting dropped.
Summary
Always follow a logical troubleshooting path when troubleshooting any NAC Appliance issues. Many times the symptoms may point to the NAC Appliance being the issue; however, it is important to always follow the process that NAC Appliance takes after a user has connected to the network. Follow the process the user has to go through during authentication, posture assessment, remediation, and when NAC Appliance puts the user into the correct user role VLAN. Step-by-step troubleshooting at each stage of the process is critical. This will help you isolate the issue faster and focusing on the problem at hand. The content in this chapter gave you some idea of what questions to ask, what steps to take, and some logs to investigate when troubleshooting the different scenarios with NAC Appliance.