
Chapter 2. Enumeration and Vulnerability Scanning
This chapter covers the following exam objectives:
• Port scanning
• Network enumeration
• Vulnerability assessment
The goals of scanning and enumerating are essentially the same: to find out information about the target host. There is no passive way to perform vulnerability scanning, port scanning, or network enumeration. The target will most likely have some indication of the process—or at least it should if it has adequate security measures.
Scanning
We discussed some scanning techniques in Chapter 1, “Reconnaissance and Scanning.” In this chapter we will go a bit deeper and include network enumeration in our discussion of scanning.
TCP Scanning
There are a number of tools you can use to perform packet scans. In Chapter 1 you saw Nmap and hping used in that manner. Additional tools include:
• Omnipeek: https://www.liveaction.com/products/omnipeek-network-protocol-analyzer/
• MiTeC Network Scanner: http://www.mitec.cz
• NEWT Professional: http://www.komodolabs.com
• MegaPing: http://www.magnetosoft.com
• Superscan: https://sectools.org/tool/superscan/
You can also run some tools from a mobile device.
Recall from Chapter 1 that we discussed packet flags as well as the three-way handshake. One way to perform scanning is to create your own packets. There are quite a few tools that will do this. A few are listed here:
• Packeth: http://packeth.sourceforge.net
• NetScanTools Pro: https://www.netscantools.com
• ColasoftPacket Builder: https://www.colasoft.com/packet_builder/
Colasoft has a pro version for sale, as well as a free edition. Because Colasoft has a free version, it is worth looking at a bit closer. The main screen is shown in Figure 2.1.

Figure 2.1 Colasoft Main Screen
As you can see, you can select several different packet types. Figure 2.2 shows that you can edit any aspect of this packet.

Figure 2.2 Colasoft Packet Editing
When running scans with any tool (Nmap, Colasoft, etc.), you do not want to simply depend on the results from the tool. You want to understand what they mean. One approach that many tools use is to send a packet with a particular flag and see what the response is. The appropriate responses from the various flag scans are shown here:
• FIN scan
• Port closed: Response is RST.
• Port open: No response.
• Windows PCs do not comply with RFC 793; therefore, they do not provide accurate results with this type of scan.
• Xmas scan
• Port closed: Response is RST.
• Port open: No response.
• SYN scan
• Port closed: Response is RST.
• Port open: The target responds with a SYN-ACK.
• NULL scan (all flags off)
• RFC 793 states that if a TCP segment arrives with no flags set, the receiving host should drop the segment and send an RST.
• ACK scan
• Port closed: No response.
• Port open: Response is RST.
Exam Alert
Objective Expect the CEH exam to ask you about the various packets and the appropriate responses.
ICMP Scanning
ICMP (Internet Control Message Protocol) is the protocol used by utilities such as ping and tracert. You can send ICMP packets, and the error messages you receive in response can tell you quite a bit about the target.
These are the most common ICMP message types:
• 0: Echo reply (used with ping)
• 1 and 2: Reserved
• 3: Destination unreachable
• 5: Redirect
• 6: Alternate host request
• 7: Reserved
• 8: Echo request (used with ping)
• 9: Router advertisement
• 10: Router solicitation
• 11: Time exceeded
• 12: Bad IP header
• 13: Time stamp
• 14: Time stamp reply
Message type 3 is rather important on the CEH exam. When a destination is unreachable, you want to know why. The specific message codes for message type 3 are shown here:
• 0: Destination network unreachable.
• 1: Destination host unreachable.
• 2: Destination protocol unreachable.
• 3: Destination port unreachable.
• 6: Destination network unknown.
• 7: Destination host unknown.
• 9: Network administratively prohibited.
• 10: Host administratively prohibited.
• 11: Network unreachable for TOS (Type of Service).
• 12: Host unreachable for TOS.
• 13: Communication administratively prohibited.
ICMP can be used in a number of ways. The simplest way is to simple ping a target to see if it is present. This is shown in Figure 2.3.

Figure 2.3 Ping Scan
There are a number of flags you can use to modify a ping scan. These are shown in Table 2.1.
Table 2.1 ping Command Flags

Exam Alert
Objective Whenever you see commands for which flags are provided, assume that you need to know the flags for the CEH exam. You should know ping flags as well as the flags for tracert and other network commands.
It can also be interesting to see the return messages. Many of the tools we have already discussed will allow you to do a ping sweep. Network Pinger is a tool that allows you to do a lot of different things with ICMP scans. This tool is a free download from http://www.networkpinger.com/en/downloads/. The main screen is shown in Figure 2.4.

Figure 2.4 Network Pinger Main Screen
This is a versatile tool, and you should spend some time learning it. A basic ping scan result is shown in Figure 2.5.

Figure 2.5 Network Pinger Results
There are quite few tools to facilitate ping sweeps, including:
• SolarWinds Engineer’s Toolset: https://www.solarwinds.com/engineers-toolset
• Advanced IP Scanner: https://www.advanced-ip-scanner.com
• Angry IP Scanner: https://angryip.org/about/
• PingPlotter: https://www.pingplotter.com
Scanning Process
The CEH exam does not simply cover techniques and tools. It also covers a methodology. Figure 2.6 shows a process for scanning.
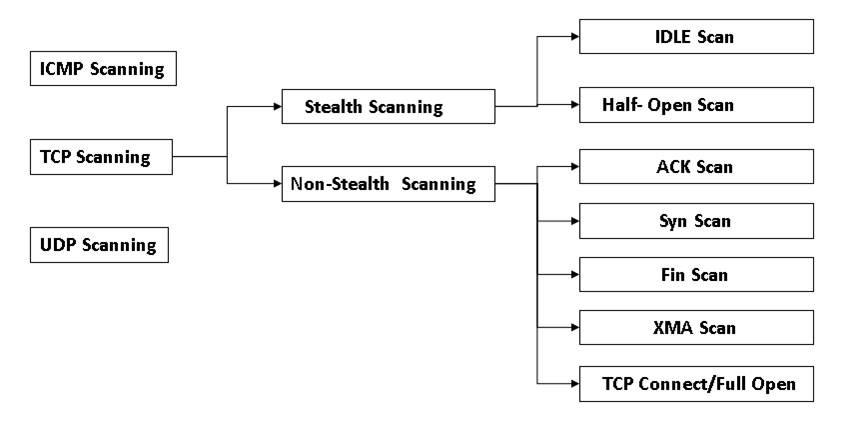
Figure 2.6 Scanning Process
It is important to think and plan before scanning. Don’t just start using random tools and hope to gather the information you need. That will almost never be successful. Having a plan and a specific process is the appropriate approach.
As you can see in Figure 2.6, scans can be done with any type of packet. UDP packets are useful in that they don’t have the three-way handshake. When a UDP packet is sent, if the port is open, there is no response. If the port is closed, an ICMP port unreachable message is sent back. Thus, you can use UDP to perform port scans.
You can also use a technique called source routing, which refers to sending a packet to the intended destination with a partially or completely specified route (without firewall-/IDS-configured routers) in order to evade an IDS/firewall. With source routing, as a packet travels through a network, each router examines the destination IP address and chooses the next hop to send the packet to the destination.
Netcat is a versatile tool that can do many different types of scan. You can get it from http://netcat.sourceforge.net. You can get Netcat for Windows at http://joncraton.org/blog/netcat-for-windows. Basic uses of Netcat are shown here:
• Listen on a given port: nc -l 3333
• Connect to a listening port: nc 132.22.15.43 3333
• Connect to a mail server: nc mail.server.net 25
• Turn Netcat into a proxy server: nc -l 3333| nc www.google.com 80
Network Mapping
In addition to being able to scan ports, an ethical hacker needs to have a map of the network—or at least a map of as much of the network as can be mapped. Here are a few tools that can be used for this purpose:
• OpManager: https://www.manageengine.com/network-monitoring/free-edition.html
• NetSurveyor: http://nutsaboutnets.com/archives/netsurveyor-wifi-scanner/
• Spiceworks Inventory: https://www.spiceworks.com
There are also mobile tools that will allow you to perform network mapping:
• PortDroid Network Analysis: https://play.google.com/store/apps/details?id=com.stealthcopter.portdroid&hl=en_US&gl=US
• Network Mapper: https://play.google.com
• Fing: https://www.fing.io
LanHelper is tool is an inexpensive network mapper/scanner that you can download from https://www.majorgeeks.com/files/details/lanhelper.html. It installs rather quickly, and then you simply tell it to scan by clicking Network on the drop-down menu and then select one of the following:
• Scan Lan
• Scan IP
• Scan Workgroups
When the scan is done, you see a list of all devices on the network, and you can click on any one of them to get more details. You can see this tool in Figure 2.7.

Figure 2.7 Lan Helper
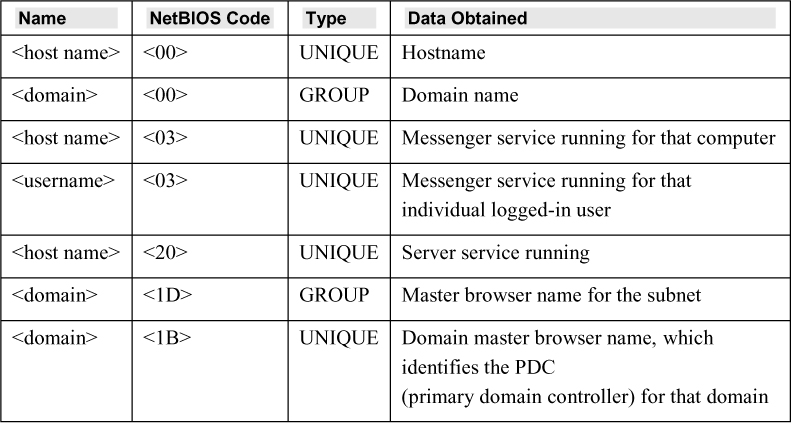
The NetBIOS protocol can also help in enumerating Windows systems and networks. NetBIOS is an older protocol used by Microsoft and still present in Microsoft networks. A NetBIOS name is a string of 16 ASCII characters that is used to identify a network device. Table 2.2 shows NetBIOS messages and responses.
Table 2.2 NetBIOS Messages and Responses
In Windows, there is a utility named nbtstat that retrieves NetBIOS information. You can see nbtstat in Figure 2.8.

Figure 2.8 nbtstat
There are many tools that can perform nbtstat scans for you. A few of them are listed here:
• Nsauditor Network Security Auditor: https://www.nsauditor.com
• Superscan: https://sectools.org/tool/superscan/
• NetBIOS Enumerator: http://nbtenum.sourceforge.net
In a Windows system, the net view command can also provide information on connected systems and their names. You can see net view in use in Figure 2.9.

Figure 2.9 net view
SNMP (Simple Network Management Protocol) can also assist in mapping a network. As its name suggests, SNMP was created to help manage networks. SNMP works on ports 161 nd 162.
An SNMP-managed network consists of three key components:
• Managed device
• Agent (software that runs on managed devices)
• NMS (network management station; software that runs on the manager)
The agents are in regular communication with the NMS. This means that such messages can potentially be intercepted to learn about the target network. The MIB (Management Information Base) in SNMP is a database containing formal description of all the network objects that can be managed using SNMP. The MIB is hierarchical, and each managed object in a MIB is addressed through an OID (object identifier). There are two types of managed objects in SNMP: scalar and tabular. A scalar object defines a single object instance. A tabular object defines multiple related object instances that are grouped in MIB tables.
There are tools that can analyze SNMP messages for you. A few of them are listed here:
• SNMP Informant: https://www.snmp-informant.com
• snmpcheck: http://www.nothink.org/codes/snmpcheck/
• NetScanTools Pro: https://www.netscantools.com
• Nsauditor Network Security Auditor: https://www.nsauditor.com
Much as you can manipulate SNMP for data, you can get information from LDAP (Lightweight Directory Access Protocol). LDAP has been described as a phone book for a network—and that is an apt description. LDAP contains information about the machines, services, users, etc. on a given network. This makes it a great resource for network mapping. LDAP uses port 389. Secure LDAP uses port 636.
A client begins a LDAP session by connecting to a DSA (directory system agent). Then the client sends an operation request to the DSA. Information is transmitted between the client and the server using BER (basic encoding rules).
As you can probably guess, there are a number of LDAP enumeration tools available. A few are listed here:
• LDAP Account Manager: https://www.ldap-account-manager.org
• LDAP Search: https://securityxploded.com/ldapsearch.php
• ad-ldap-enum: https://github.com/CroweCybersecurity/ad-ldap-enum
While not as common as LDAP or SNMP mapping, NTP (Network Time Protocol) can also be used to map a network. NTP is used to ensure that the computers on a network have synchronized time. Windows does not have any default commands for NTP, but Linux does. The three most important of them are:
• ntptrace: Traces a chain of NTP servers back to the primary source.
• ntpdc: Monitors operation of ntpd, the NTP daemon.
• ntpq: Monitors ntpd operations and determines performance.
Virtually any protocol used on a network can be useful for enumerating the network, including SMTP (Simple Mail Transfer Protocol), RPC (Remote Procedure Call), and so on.
Linux also has commands for enumerating users. The three most commonly used are:
• rusers: Displays a list of users who are logged on to remote machines or machines on the local network. Syntax: /usr/bin/rusers [-a] [-l] [-u| -h| -i] [Host ...].
• rwho: Displays a list of users who are logged in to hosts on the local network. Syntax: rwho [ -a].
• finger: Displays information about system users, such as user’s login name, real name, terminal name, idle time, login time, office location, and office phone numbers. Syntax: finger [-l] [-m] [-p] [-s] [user ...] [user@host ... ].
DNS zone transfers can be used on Windows or Linux. A zone transfer is an attempt to get DNS information from a server. The purpose is to allow backup DNS servers to synchronize with their primary servers. This can be done manually or with tools such as these:
• Quick and Easy Online Tool: http://www.digitalpoint.com/tools/zone-transfer/
• Zone File Dump: http://www.dnsstuff.com/docs/zonetransfer/
DNS zone transfer is actually a rather simple process to do manually. You can see an attempt to manually do a zone transfer in Figure 2.10.
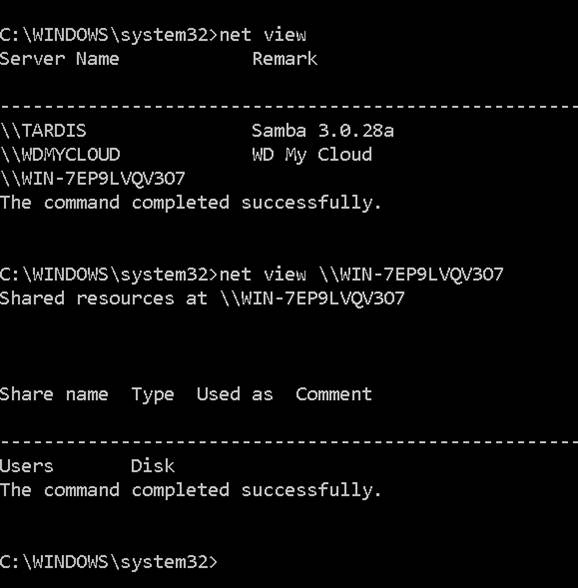
Figure 2.10 Zone Transfer
In any secure network, you will get the response shown in Figure 2.10. However, if it is successful, you will have all the information the DNS server has, including information on every machine in that network that has a DNS entry.
Network Packet Capture
Network packet capture is primarily useful if you have some connection to the target network. There are several tools that can do this.
tcpdump
tcpdump is a free command line tool. It was meant for Linux but can also work in Windows. It is fairly simple to use. To start it, you have to indicate which interface to capture packets on, such as:
tcpdump -i eth0
This command causes tcpdump to capture the network traffic for the network card, eth0. You can also alter tcpdump’s behavior with a variety of command flags. For example, this command tells tcpdump to capture only the first 500 packets on interface eth0 and then stop:
tcpdump -c 500 -i eth0
This command displays all the interfaces on the computer so you can select which one to use:
tcpdump -D
You can see the basic use of tcpdump in Figure 2.11.
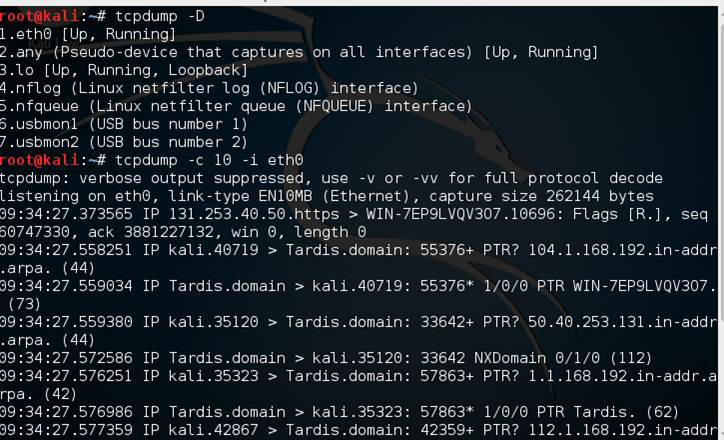
Figure 2.11 tcpdump
Here are some examples using tcpdump:
• tcpdump host 192.168.1.45: Shows traffic going to or from 192.168.2.3.
• tcpdump -i any: Gets traffic to and from any interface on your computer.
• tcpdump -i eth0: Gets traffic for the interface eth0.
• tcpdump port 443: Shows traffic for port 443.
Wireshark
Wireshark is the most widely known network packet scanner. Penetration testers can often learn a great deal from simply sniffing the network traffic on a target network. Wireshark provides a convenient GUI (graphical user interface) for examining network traffic. It is available as a free download from https://www.wireshark.org. The tool can be downloaded for Windows or macOS. Figure 2.12 shows a screenshot of a Wireshark packet capture.

Figure 2.12 Wireshark Main Screen
Wireshark uses colors to help you identify the types of traffic at a glance. By default, green indicates TCP traffic, dark blue indicates DNS traffic, light blue indicates UDP traffic, and black identifies TCP packets with problems. Even if you are reading a black-and-white version of this book, you can get an idea of this color coding in Figure 2.13.
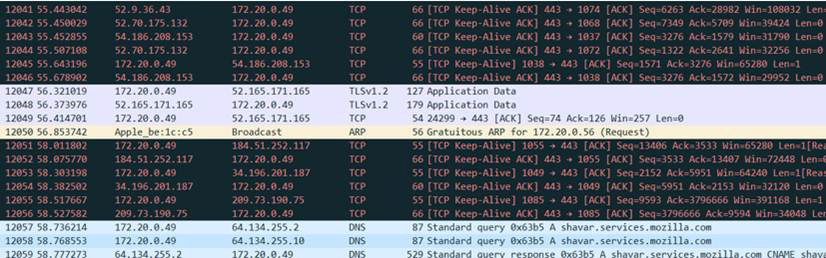
Figure 2.13 Wireshark Color Coding
Wireshark allows you to filter what you capture or to capture everything then just filter what is displayed. I always recommend the latter. Display filters (also called post-filters) only filter the view of what you are seeing. All packets in the capture still exist in the trace. Display filters use their own format and are much more powerful then capture filters. Here are a few exemplary filters:
Display filter examples (note the double = sign ==)
Only get packets from a specific subnet:
ip.src==10.2.21.00/24
Get packets for either of two IP addresses:
ip.addr==192.168.1.20 || ip.addr==192.168.1.30
Only get packets for port 80 or port 443:
tcp.port==80 || tcp.port==443
You can also click on a packet, you can select to follow that particular TCP or UDP stream, this makes it easier to view the packets in that specific conversation. This will also be color coded. The packets you sent will be in read and the once received will be in blue.
Wireshark is a complex tool, and entire books have been written about it. For the CEH exam, you just need to have a general understanding of the tool. However, in your career as an ethical hacker, you should absolutely spend time getting more familiar with this tool. (Frankly, an ethical hacker should spend time getting very comfortable with every tool mentioned in this book.)
Vulnerability Scanning
It is important to understand that vulnerability scanning is not penetration testing. However, vulnerability scanning can help you identify targets for a penetration test. If all you do is a vulnerability scan, that simply is not hacking. However, it is rare for professional ethical hackers to start a penetration test without first identifying vulnerabilities.
Vulnerabilities can include many different subcategories, such as default credentials, misconfigurations, unpatched systems, etc.
You always want to check whether the target network is using default passwords. You can find lists of default passwords for various systems at sites like these:
• http://www.routerpasswords.com
• http://www.default-password.info
You need to know the following terms associated with vulnerability scanning:
• Active assessment: An assessment that uses a network scanner to find hosts, services, and vulnerabilities. Tools like Nessus and SAINT are active assessment tools.
• Passive assessment: A technique used to sniff network traffic to find active systems, network services, applications, and vulnerabilities present. Tools like tcpdump and Wireshark are passive assessment tools.
• Internal/external assessment: An assessment done from within/outside a network.
• Host/network assessment: An assessment of a single host/an entire network.
• Tree-based assessment: An assessment in which an ethical hacker uses different strategies for each machine or component of the information system.
• Inference-based assessment: An assessment in which an ethical hacker scans to learn protocols and ports and then selects vulnerabilities based on the protocols and ports found.
Scoring Vulnerabilities
There are a number of ways to evaluate vulnerabilities. Scoring them with specific methodologies is one. Scoring provides a quantitative measure of vulnerabilities.
CVSS
CVSS (Common Vulnerability Scoring System) provides a quantitative mechanism to reference information security vulnerabilities. The three main groups of metrics are Base, Temporal, and Environmental. To get a sense of how CVSS works, consider the Access Vector metric, which is part of the Base metrics. This metric can be Network (N), Adjacent (A), Local (L), Physical (P). Attack Complexity can be: None (N), Low (L), or High (H). The User Interaction metric can be None (N) or Required (R). The Scope metric captures whether a vulnerability in one vulnerable component impacts resources in components beyond its security scope. Its values can be Unchanged (U) or Changed (C). The Impact metrics (Confidentiality, Availability, or Integrity) are all rated High (H), Low (L), or None (N).
The Temporal Metric Group has three metrics: Exploit Code Maturity, Remediation Level, and Report Confidence. The Environmental Metric Group has four metrics: Modified Base Metrics, Confidentiality Requirement, Integrity Requirement, and Availability Requirement.
Exploit Code Maturity measures the likelihood of a vulnerability being attacked and is typically based on the current state of exploit techniques, exploit code availability, or active, “in-the-wild” exploitation. The possible ratings are Not Defined (X), High (H), Functional (F), Proof of Concept (P), and Unproven (U).
The Remediation Level metric can be Not Defined (X), Unavailable (U), Workaround (W), Temporary Fix (T), or Official Fix (O). The Report Confidence metric indicates the level of confidence in the details of the vulnerability. Its values can be Not Defined (X), Confirmed (C), Reasonable (R), or Unknown (U).
CVE
CVE (Common Vulnerabilities and Exposures) is a list maintained by the Mitre Corporation at https://cve.mitre.org. It is perhaps the most comprehensive vulnerability list. The CVE was designed to provide common names and descriptions for a vulnerabilities, which allows security professionals to communicate effectively about vulnerabilities. A traditional CVE ID has the format CVE-YYYY-NNNN. This format only allows 9999 unique identifiers per year. There is a newer format, which allows for any number of digits: It is similar to the traditional format but includes a CVE prefix and any number of digits following the year. For example, CVN CVE-2021-3463 is a Windows 10 vulnerability.
Exam Alert
Objective A general knowledge of CVE and CVSS is important for the CEH exam. You should also know at least the names of many vulnerability scanners and basically what they do.
Nessus
Nessus is a well-known vulnerability scanner that has been used for many years. Unfortunately, it is not free. A Nessus license costs over $2100 per year and can be obtained from https://www.tenable.com/products/nessus. Its price has been a barrier for many penetration testers. The primary advantage of Nessus is that it can scan for a wide range of vulnerabilities, and the vendor is constantly updating the vulnerabilities. The main screen for Nessus is shown in Figure 2.14.

Figure 2.14 Nessus Main Screen
You have the option of running a scan immediately or running it at a preset time. Nessus scans can take some time to run because they are quite thorough. The results of a test scan are shown in Figure 2.15.
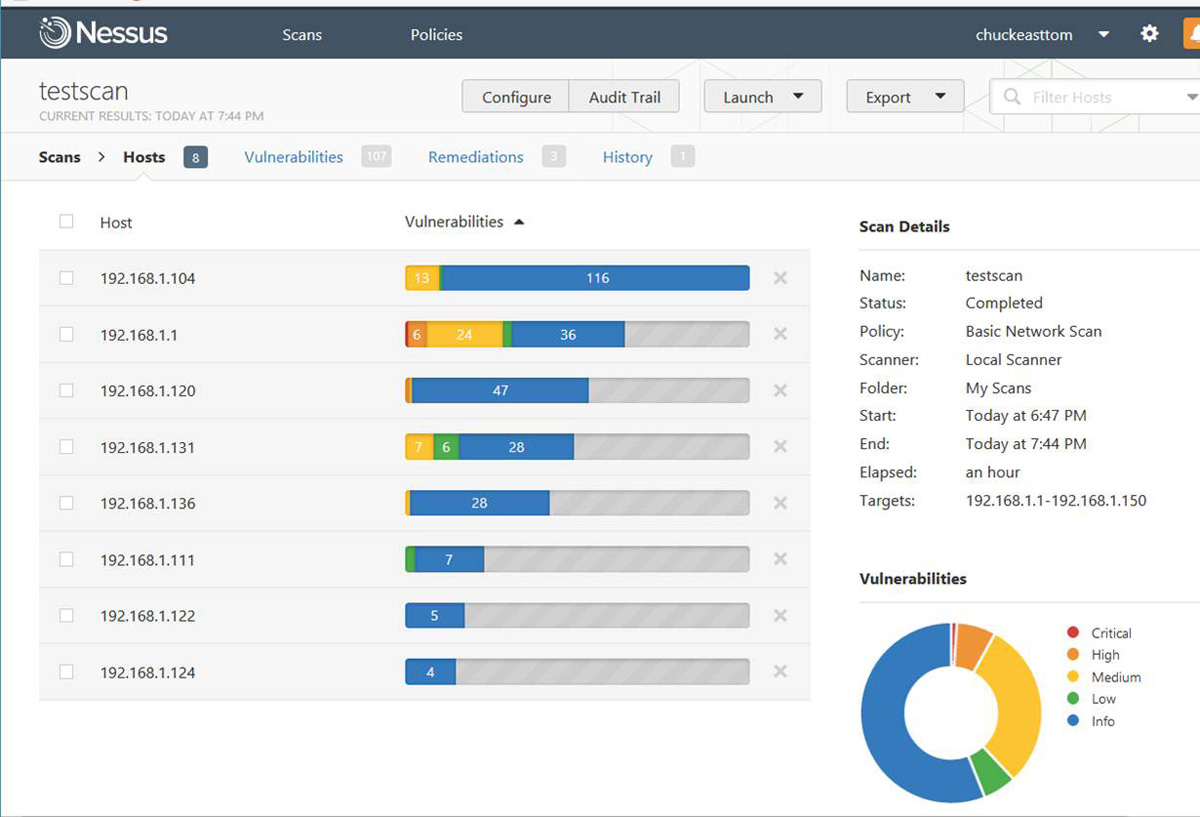
Figure 2.15 Nessus Scan Results
Nexpose
Nexpose is a commercial product from Rapid 7, which also distributes Metasploit. You can find Nexpose at https://www.rapid7.com/products/nexpose/. There is a free trial version that you can download and experiment with. This tool is a Linux virtual machine and takes some effort to learn. Given that it is distributed by the same group that distributes Metasploit, it has received significant market attention.
SAINT
SAINT is a widely used vulnerability scanner that is available at http://www.saintcorporation.com. While it is a commercial product, you can request a free trial version. SAINT can scan a network for any active TCP or UDP services and then scan those machines for any vulnerabilities. It uses CVE as well as CERT advisories as references.
Additional Vulnerability Assessment Tools
Additional tools are available for vulnerability assessment. A few of them are listed here:
• Nikto: A Linux-based web server vulnerability assessment tool.
• Retina CS: A commercial vulnerability management suite. There is also a mobile version.
• OpenVAS: The most widely known open-source vulnerability scanner.
• Net Scan: A vulnerability scanner than runs on mobile devices.
What Next?
If you want more practice on this chapter's exam objectives before you move on, remember that you can access all of the Cram Quiz questions on the book web page. The next chapter covers several topics, including rootkits, CEH methodology, password attacks, and steganography.