Chapter 13. Security
Making data accessible has been one of the key tenets of the Big Data movement, enabling huge strides in data analytics and bringing tangible benefits to business, academia, and the general public. At the same time, this data accessibility is held in tension with growing security and privacy demands. Internet scale systems are exposed to an ever-changing collection of attacks, with the data held by these systems being the most common target. We’re all aware of multiple high-profile breaches resulting in significant losses of data, including personal data, payment information, military intelligence, and corporate trade secrets. And these are just the breaches that have made the news.
One result of this heightened threat environment has been increased regulatory and compliance regimens in many industries:
- The U.S. Health Insurance Portability and Accountability Act (HIPAA) of 1996 prescribes controls for the protection and handling of individual health information.
- Germany’s Federal Data Protection Act (known as Bundesdatenschutzgesetz or BDSG) was revised in 2009 to regulate the collection and transfer of personally identifiable information (PII), including restrictions on movement of such data outside of Germany and the European Union.
- The Payment Card Industry Data Security Standard (PCI DSS), first released in 2006, is an industry-defined set of standards for the secure handling of payment card data.
- The U.S. Sarbanes-Oxley Act of 2002 regulates corporate auditing and reporting, including data retention, protection, and auditing.
These are just a few examples of regulatory and compliance standards. Even if none of these examples apply directly to your application, chances are there are regulatory guidelines of some kind that impact your system.
All of this publicity and regulatory rigor has resulted in a much increased level of visibility on enterprise application security in general, and more pertinently for our discussions, on NoSQL database security. Although a database is by definition only a part of an application, it certainly forms a vital part of the attack surface of the application, because it serves as the repository of the application’s data.
Is Security a Weakness of NoSQL?
A 2012 Information Week report took the NoSQL community to task for a perceived complacency and lack of prioritization of security features in NoSQL databases. While the security of many NoSQL technologies, including Cassandra, has improved significantly since then, the paper serves as a healthy reminder of our responsibilities and the need for continued vigilance.
Fortunately, the Cassandra community has demonstrated a commitment to continuous improvement in security over its relatively short lifespan, as we’ve seen already in the release history in Chapter 2.
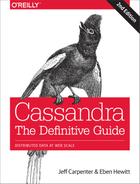
Cassandra’s security features include authentication, role-based authorization, and encryption, as shown in Figure 13-1.

Figure 13-1. Cassandra’s security features
In this chapter, we’ll explore these security features and how to access them via cqlsh and other clients, with some thoughts along the way for how Cassandra fits into a broader application security strategy.
Authentication and Authorization
Let’s take a look at Cassandra’s authentication and authorization features.
Password Authenticator
By default, Cassandra allows any client on your network to connect to your cluster. This does not mean that no security is set up out of the box, but rather that Cassandra is configured to use an authentication mechanism that allows all clients, without requiring that they provide credentials. The security mechanism is pluggable, which means that you can easily swap out one authentication method for another, or write your own.
The authenticator that’s plugged in by default is the org.apache.cassandra.auth.AllowAllAuthenticator. If you want to force clients to provide credentials, another alternative ships with Cassandra, the org.apache.cassandra.auth.PasswordAuthenticator. In this section, we see how to use this second authenticator.
Configuring the authenticator
First, let’s shut down our cluster so that we can change the security configuration. We’ll open the cassandra.yaml file and search for “authenticator”. You’ll find the following line:
authenticator: AllowAllAuthenticator
Let’s change this line to use the PasswordAuthenticator:
authenticator: PasswordAuthenticator
If you’re using Cassandra 2.2 or later, you’ll see a note in the cassandra.yaml file indicating that the CassandraRoleManager must be used if the PasswordAuthenticator is used. The CassandraRoleManager is part of Cassandra’s authorization capability and we’ll discuss it in more depth momentarily.
Additional authentication providers
You can provide your own method of authenticating to Cassandra, such as a Kerberos ticket, or if you want to store passwords in a different location, such as an LDAP directory. In order to create your own authentication scheme, simply implement the IAuthenticator interface. DataStax Enterprise Edition provides additional authentication integrations.
Cassandra also supports pluggable authentication between nodes via the IInternodeAuthenticator interface. The default implementation AllowAllInternodeAuthenticator performs no authentication, but you are free to implement your own authenticator as a way to protect a node from making connections to untrusted nodes.
Adding users
Now we’ll save the cassandra.yaml file and restart our node or cluster, and try logging in with cqlsh. Immediately we run into a problem:
$ bin/cqlsh
Connection error: ('Unable to connect to any servers',
  {'127.0.0.1': AuthenticationFailed('Remote end requires
  authentication.',)})
Prior versions of Cassandra might allow login, but would not allow any access. Versions of Cassandra 2.2 and later require a password even to log in. Cassandra comes with a default user known as cassandra, with “cassandra” as the password. Let’s try logging in again with these credentials:
$ bin/cqlsh -u cassandra -p cassandra
Connected to Test Cluster at 127.0.0.1:9042.
[cqlsh 5.0.1 | Cassandra 3.0.0-rc1 | CQL spec 3.3.1 |
  Native protocol v4]
Use HELP for help.
cassandra@cqlsh>
Once we’ve logged in successfully, we see that the prompt indicates that we are logged in as the user cassandra. One of the first things we’ll want to do to begin securing our installation is to change the password for this very important user. We’ve used a random password generator here as an example:
cassandra@cqlsh> ALTER USER cassandra WITH PASSWORD 'Kxl0*nGpB6'
Make sure to store the cassandra user’s password in a secure location.
Now, let’s create a new user account. We’ll specify a username and password. The password is optional, but of course recommended.
cassandra@cqlsh> CREATE USER jeff WITH PASSWORD 'i6XJsj!k#9';
The CREATE USER command also supports the IF NOT EXISTS syntax to avoid errors on multiple attempts to create a user. Now, we’ll check to see that we’ve created the user successfully by using the LIST USERS command:
cassandra@cqlsh> LIST USERS;

 name      | super
-----------+-------
 cassandra |  True
      jeff | False

(2 rows)
You’ll note that the user cassandra is listed as being a superuser. The superuser designates the ability to perform all supported actions. Only a superuser can create other users. We’ve already changed the password for the built-in user cassandra. You may also want to create another superuser and remove the cassandra account’s superuser status for additional security.
Configuring Automatic Login
To avoid having to enter a username and password on every login to cqlsh, create a file in your home directory called .cqlshrc. You can enter login credentials through lines like this:
; Sample ~/.cqlshrc file.
[authentication]
username = jeff
password = i6XJsj!k#9
Obviously, you’ll want to make sure this file is secure so that only authorized users (such as your account) have access to the password.
Other operations on users include the ALTER USER command, which allows us to change a user’s password or superuser status, as well as the DROP USER command, which we use to delete a user. A non-superuser can alter their own password using the ALTER USER command, but all other operations require superuser status.
We can use the LOGIN command to switch users within cqlsh without restart:
cassandra@cqlsh> login jeff 'i6XJsj!k#9'
jeff@cqlsh>
You may choose to omit the password from the command, in which case cqlsh will prompt you to enter the password. It’s preferable to enter passwords at the shell prompt, rather than the command line, as cqlsh saves all of your commands to a file called .cassandra/cqlsh_history under your home directory, including any passwords you include on the command line when using the LOGIN command.
Authenticating via the DataStax Java driver
Of course, your applications don’t use cqlsh to access Cassandra, so it will be helpful for us to learn how to authenticate to the client using the DataStax client drivers. Building on the simple Java driver example from Chapter 8, let’s use the Cluster.Builder.withCredentials() operation to provide the user name and password when we construct our Cluster instance:
 Cluster cluster = Cluster.builder().addContactPoint("127.0.0.1").
   withCredentials("jeff", "i6XJsj!k#9").
   build();
This is a simple example that hardcodes the login credentials, but you could just as easily use values stored in a secure configuration file or provided by an application user. The login syntax is quite similar for the other DataStax drivers.
If you’ve configured an authenticator on your nodes other than the default, you’ll also need to configure a compatible authenticator in your clients as well. Client authentication providers implement the com.datastax.driver.core.AuthProvider interface. The default implementation is the PlainTextAuthProvider class, an instance of which is registered when we call the Cluster.Builder.withCredentials() operation.
Other implementations provided with the driver are found in the com.datastax.driver.auth package. These include the DseAuthProvider for connecting to DataStax Enterprise clusters, and the KerberosAuthenticator.
You select these providers when constructing your Cluster object by calling the Cluster.Builder.withAuthProvider() operation.
Using CassandraAuthorizer
It is certainly possible to only use authentication, although in most cases you’ll want to make use of Cassandra’s authorization capabilities as well. Cassandra’s out-of-the-box configuration authorizes all clients to access all keyspaces and tables in your cluster. As with authentication, the authentication mechanism is pluggable.
The authorizer that’s plugged in by default is the org.apache.cassandra.auth.AllowAllAuthorizer. To enable Cassandra’s role-based access control, we’ll need to configure the org.apache.cassandra.auth.CassandraAuthorizer.
Again, we’ll shut down the cluster to enable us to change the authorizer. In the cassandra.yaml file, we’ll search for “authorizer”. We’ll find the line:
authorizer: AllowAllAuthorizer
and change it to:
authorizer: CassandraAuthorizer
Once we restart our cluster, we can log into cqlsh again as our regular user to see what we can access, making use of the hotel data we’ve stored in our cluster in previous chapters:
$ cqlsh -u jeff –p 'i6XJsj!k#9'
...
jeff@cqlsh> DESCRIBE KEYSPACES;

hotel  system_schema  system_auth  system  system_distributed
  system_traces

jeff@cqlsh> USE hotel;
jeff@cqlsh:hotel> DESCRIBE TABLES;

hotels

jeff@cqlsh:hotel> select * from hotels;
Unauthorized: code=2100 [Unauthorized] message="User jeff has no
  SELECT permission on <table hotel.hotels> or any of its parents"
As you can see, we are able to navigate through cqlsh to view the names of the various keyspaces and tables, but once we attempt to access data, we are denied access.
To fix this, we’ll need to switch back into a superuser role and grant our user some permissions. For example, let’s allow our user to access the hotels table:
cassandra@cqlsh> GRANT SELECT ON hotel.hotels TO jeff;
Now, if we log back in as our regular user and run our SELECT command again, we’ll see the data we’ve stored in our hotel table previously.
Getting Help with Permissions
Use the cqlsh commands HELP GRANT and HELP PERMISSIONS to get additional information on configuring permissions.
Role-Based Access Control
In a large Cassandra cluster, there might be a lot of different keyspaces and tables, with many different potential users. It would be difficult to keep track of the permissions assigned to many different users. While it’s tempting to share login information with multiple support staff, there is a better way.
Starting with the 2.2 release, Cassandra provides a role-based access control (RBAC) capability. This allows us to create roles and assign permissions to these roles. Roles can be granted to individual users in any combination. Roles can themselves contain other roles.
To see how this works, let’s create a hotel management role and grant it all permissions to all of the tables in the hotel keyspace:
cassandra@cqlsh> CREATE ROLE hotel_management;
cassandra@cqlsh> GRANT ALL ON KEYSPACE hotel TO hotel_management;
We’ve created a simple role here to which you can’t log in to directly. You can also create roles that have superuser privileges, and roles that support login and take a password.
Now we’ll apply this role to our regular user:
cassandra@cqlsh> GRANT hotel_management TO jeff;
Roles are additive in Cassandra, meaning that if any of the roles granted to a user have a specific permission granted, then that permission is granted to the user.
Behind the scenes, Cassandra stores users and roles in the system_auth keyspace. If we’ve configured authorization for our cluster, only administrative users can access this keyspace, so let’s examine its contents in cqlsh using our administrator login:
cassandra@cqlsh> DESCRIBE KEYSPACE system_auth

CREATE KEYSPACE system_auth WITH replication = {'class': 'SimpleStrategy',
  'replication_factor': '1'}  AND durable_writes = true;

...
We’ve truncated the output, but if you run this command, you’ll see the tables that store the roles, their permissions, and role assignments. There is actually no separate concept of a user at the database level—Cassandra uses the role concept to track both users and roles.
Changing the system_auth replication Factor
It’s important to note that the system_auth keyspace is configured out of the box to use the SimpleStrategy with a replication factor of one.
This means that by default, any users, roles, and permissions we configure will not be distributed across the cluster until we reconfigure the replication strategy of the system_auth keyspace to match our cluster topology.
Encryption
Protecting user privacy is an important aspect of many systems, especially with respect to health, financial, and other personal data. Typically we protect privacy by encrypting data, so that if the data is intercepted, it is unusable to an attacker who does not have the encryption key. Data can be encrypted as it moves around the public Internet and within our internal systems, also known as data in motion, or it can be encrypted on systems where it is persisted. This is known as data at rest.
As of the 3.0 release, Cassandra secures data in motion via encryption between clients and servers (nodes) and encryption between nodes. As of Cassandra 3.0, encryption of data files (data at rest) is only supported in DataStax Enterprise releases of Cassandra.
Data File Encryption Roadmap
There are several Cassandra JIRA requests targeted for the 3.X release series that provide encryption features. For example, the following were added in the 3.4 release:
See also CASSANDRA-9633 on encryption of SSTables, and CASSANDRA-7922, which serves as an umbrella ticket for file-level encryption requests.
Before we start configuring nodes to enable encryption, we have some preparation work to do to create security certificates that are a key part of the machinery.
SSL, TLS, and Certificates
Cassandra uses Transport Layer Security (TLS) for encrypting data in motion. TLS is often referenced by the name of its predecessor, Secure Sockets Layer (SSL). TLS is a cryptographic protocol for securing communications between computers to prevent eavesdropping and tampering. More specifically, TLS makes use of public key cryptography (also known as asymmetric cryptography), in which a pair of keys is used to encrypt and decrypt messages between two endpoints: a client and a server.
Prior to establishing a connection, each endpoint must possess a certificate containing a public and private key pair. Public keys are exchanged with communication partners, while private keys are not shared with anyone.
To establish a connection, the client sends a request to the server indicating the cipher suites it supports. The server selects a cipher suite from the list that it also supports and replies with a certificate that contains its public key. The client optionally validates the server’s public key. The server may also require that the client provide its public key in order to perform two-way validation. The client uses the server’s public key to encrypt a message to the server in order to negotiate a session key. The session key is a symmetric key generated by the selected cipher suite which is used for subsequent communications.
For many applications of public key cryptography, the certificates are obtained from a certificate authority, but because we typically control both the clients and our Cassandra nodes, we don’t need quite that level of validation. For our purposes, we can generate our certificates with a simple tool that is provided with Java, the keytool.
The following command gives an example of how we can use the -genkey switch on keytool to generate a public/private key pair:
$ keytool -genkey -keyalg RSA -alias node1 -keystore node1.keystore
  -storepass cassandra -keypass cassandra
  -dname "CN=Jeff Carpenter, OU=None, O=None, L=Scottsdale, C=USA"
This command generates the keypair for one of our Cassandra nodes, which we’ll call “node1”, and places the keypair in a file called a keystore. We call our keystore node1.keystore. We provide passwords for the keystore and for the keypair, and a distinguished name specified according to the Lightweight Directory Access Prototol (LDAP) format.
The example command we’ve shown here provides the bare minimum set of attributes for generating a key. We could also provide fewer attributes on the command line and allow keytool to prompt us for the remaining ones, which is more secure for entering passwords.
Then we export the public key of each certificate to a separate file that we can share with others:
$ keytool -export -alias node1 -file node0.cer -keystore node1.keystore
Enter keystore password:
Certificate stored in file <node0.cer>
We identify the key we want to export from the keystore via the same alias as before, and provide the name of the output file. keytool prompts us for the keystore password and generates the certificate file.
We repeat this procedure to generate keys for each node and client.
Node-to-Node Encryption
Now that we have keys for each of our Cassandra nodes, we are ready to enable node-to-node configuration by setting the server_encryption_options in the cassandra.yaml file:
server_encryption_options:
    internode_encryption: none
    keystore: conf/.keystore
    keystore_password: cassandra
    truststore: conf/.truststore
    truststore_password: cassandra
    # More advanced defaults below:
    # protocol: TLS
    # algorithm: SunX509
    # store_type: JKS
    # cipher_suites: [TLS_RSA_WITH_AES_128_CBC_SHA,...]
    # require_client_auth: false
First, we set the internode_encryption option. We can select all to encrypt all inter-node communications, dc to encrypt between data centers, and rack to encrypt between racks. We provide the password for the keystore and set its path, or we can place the keystore file we created earlier at the default locations in the conf directory.
Next, we configure options for a file similar to the keystore called the truststore. We generate a truststore for each node containing the public keys of all the other nodes in our cluster. For example, to add the certificate for node 1 to the keystore for node two, we would use the command:
$ keytool -import -v -trustcacerts -alias node1 -file node1.cer
  -keystore node2.truststore
Enter keystore password:
Re-enter new password:
Owner: CN=Jeff Carpenter, OU=None, O=None, L=Scottsdale, C=USA
Issuer: CN=Jeff Carpenter, OU=None, O=None, L=Scottsdale, C=USA
Serial number: 52cf9209
Valid from: Thu Dec 17 17:01:03 MST 2015 until: Wed Mar 16 17:01:03 MST 2016
Certificate fingerprints:
         MD5:  E2:B6:07:C0:AA:BB:71:E8:47:8A:2A:81:FE:48:2F:AB
         SHA1: 42:3E:9F:85:0D:87:02:50:A7:CD:C5:EF:DD:D1:6B:C2:78:2F:B0:E7
         SHA256: C1:F0:51:5B:B6:C7:B5:8A:57:7F:D0:F2:F7:89:C7:34:30:79:30:
           98:0B:65:75:CE:03:AB:AA:A6:E5:F5:6E:C0
         Signature algorithm name: SHA256withRSA
         Version: 3

Extensions:

#1: ObjectId: 2.5.29.14 Criticality=false
SubjectKeyIdentifier [
KeyIdentifier [
0000: C2 32 58 D0 55 27 5C D2   FB 1E 50 C9 76 21 30 5C  .2X.U'...P.v!0
0010: E6 1A 7D CF                                        ....
]
]

Trust this certificate? [no]:  y
Certificate was added to keystore
[Storing truststore.node1]
keytool prompts us to enter a password for the new truststore and then prints out summary information about the key we’re importing.
The cassandra.yaml file also presents us with a series of “advanced” options to configure the cryptography. These options provide you the ability to select from Java’s menu of supported cryptographic algorithms and libraries. For example, for Java 8, you can find the descriptions of these items at http://docs.oracle.com/javase/8/docs/technotes/guides/security/StandardNames.html.
The defaults will be sufficient in most cases, but it’s helpful to understand what options are available. We can see how these options are used in Cassandra by examining the class org.apache.cassandra.security.SSLFactory, which Cassandra uses to generate secure sockets.
The protocol option specifies the protocol suite that will be used to instantiate a javax.net.ssl.SSLContext. As of Java 8, the supported values include SSLv2, SSLv3, TLSv1, TLSv1.1, or TLSv1.2. You can also use the shortcuts SSL or TLS to get the latest supported version of either suite.
The algorithm option specifies the setting provided to obtain an instance of javax.net.ssl.TrustManagerFactory. This defaults to the X.509 certificate.
The store_type option specifies the setting provided to obtain an instance of java.security.KeyStore. The default value jks indicates a keystore built by keytool, which is exactly what we have.
The cipher_suites option is a list of encryption algorithms in order of preference. The cipher suite to use is determined by the client and server in negotiating their connection, based on the priority specified in this list. The same technique is used by your browser in negotiating with web servers when you visit websites using https: URLs. As demonstrated by the defaults, you’ll typically want to prefer stronger cipher suites by placing them at the front of the list. If you don’t have total control over your clients, you may even wish to remove weaker suites entirely to eliminate the threat of a downgrade attack.
Finally, we can also enable two-way certificate authentication in which the client authenticates the server as well by setting require_client_auth to true.
Client-to-Node Encryption
Client-to-node encryption protects data as it moves from client machines to nodes in the cluster. The client_encryption_options in the cassandra.yaml file are quite similar to the node-to-node options:
# enable or disable client/server encryption.
client_encryption_options:
    enabled: false
    optional: false
    keystore: conf/.keystore
    keystore_password: cassandra
    # require_client_auth: false
    # Set truststore and truststore_password if require_client_auth is true
    # truststore: conf/.truststore
    # truststore_password: cassandra
    # More advanced defaults below:
    # protocol: TLS
    # algorithm: SunX509
    # store_type: JKS
    # cipher_suites: [TLS_RSA_WITH_AES_128_CBC_SHA,...]
The primary differences from the server_encryption_options are the enabled option, which serves as the on/off switch for client-to-node encryption, and the optional option, which indicates whether clients may choose either encrypted or unencrypted connections.
The keystore and truststore settings will typically be the same as those in the server_encryption_options, although it is possible to have separate files for the client options.
Note that setting require_client_auth for clients means that the truststore for each node will need to have a public key for each client that will be using a encrypted connection.
JMX Security
We learned how Cassandra exposes a monitoring and management capability via JMX in Chapter 10. In this section, we’ll learn how to make that management interface secure, and what security-related options we can configure using JMX.
Securing JMX Access
By default, Cassandra only makes JMX accessible from localhost. This is fine for situations where you have direct machine access, but if you’re running a large cluster, it may not be practical to log in to the machine hosting each node in order to access with tools such as nodetool or OpsCenter.
For this reason, Cassandra provides the ability to expose its JMX interface for remote access. Of course, it would be a waste to invest our efforts in securing access to Cassandra via the native transport, and leave a major attack surface like JMX vulnerable. So let’s see how to enable remote JMX access in a way that is secure.
First, we’ll stop our node or cluster and edit the conf/cassandra-env.sh file (or cassandra-env.ps1 on Windows). Look for the setting LOCAL_JMX, and change it as follows:
LOCAL_JMX=no
Setting this value to anything other than “yes” causes several additional properties to be set, including properties that enable the JMX port to be accessed remotely:
JVM_OPTS="$JVM_OPTS -Dcom.sun.management.jmxremote.port=$JMX_PORT"
JVM_OPTS="$JVM_OPTS -Dcom.sun.management.jmxremote.rmi.port=$JMX_PORT"
Next, there is a property that configures whether SSL is used to encrypt JMX connections (we’ll discuss it in more depth momentarily):
JVM_OPTS="$JVM_OPTS -Dcom.sun.management.jmxremote.ssl=false"
Finally, there are properties that configure remote authentication for JMX:
JVM_OPTS="$JVM_OPTS -Dcom.sun.management.jmxremote.authenticate=true"
JVM_OPTS="$JVM_OPTS -Dcom.sun.management.jmxremote.password.file=
  /etc/cassandra/jmxremote.password"
The location of the jmxremote.password file is entirely up to you. Keep in mind that you’ll want to specify a location for the file that is accessible only to users that you intend to have access. We’ll configure the jmxremote.password file in just a minute, but first let’s finish up our configuration edits by saving the cassandra-env.sh file.
Your JRE installation comes with a template jmxremote.password file under the jre/lib/management directory. Typically you will find installed JREs under C:Program FilesJava on Windows, /Library/Java/JavaVirtualMachines on Mac OS, and /usr/lib/java on Linux. Copy the jmxremote.password file to the location you set previously in cassandra-env.sh and edit the file, adding a line with our administrator username and password, as shown in bold here:
...
# monitorRole  QED
# controlRole   R&D
cassandra cassandra
We’ll also edit the jmxremote.access file under the jre/lib/management directory to add read and write MBean access for our administrative user:
monitorRole readonly
controlRole readwrite
            create javax.management.monitor.*,javax.management.timer.*
            unregister
cassandra readwrite
Configure the permissions on the jmxremote.password and jmxremote.access. Ideally, the account under which you run Cassandra should have read-only access to this file, and other non-administrative users should have no access.
Finally, we restart Cassandra and test that we’ve configured secure access correctly by calling nodetool:
$ nodetool status -u cassandra -pw cassandra
We can also configure SSL for our JMX connection. To do this, we need to add a few more JVM options in the cassandra-env file:
JVM_OPTS="${JVM_OPTS} -Dcom.sun.management.jmxremote.ssl=true"
JVM_OPTS="${JVM_OPTS} -Djavax.net.ssl.keyStore=conf/node1.keystore"
JVM_OPTS="${JVM_OPTS} -Djavax.net.ssl.keyStorePassword=cassandra"
JVM_OPTS="${JVM_OPTS} -Djavax.net.ssl.trustStore=conf/node1.truststore"
JVM_OPTS="${JVM_OPTS} -Djavax.net.ssl.trustStorePassword=cassandra"
JVM_OPTS="${JVM_OPTS} -Dcom.sun.management.jmxremote.ssl.need.client.auth=true"
Security MBeans
We learned about the various MBeans exposed by Cassandra in Chapter 10. For understandable reasons, there are not many security-related configuration parameters that are accessible remotely via JMX, but there are some capabilities exposed via the org.apache.cassandra.auth domain.
PermissionsCacheMBean
By default, Cassandra caches information about roles and permissions as a performance optimization. The amount of time permissions are cached is set in the cassandra.yaml file by the permissions_validity_in_ms property, defaulting to 2 seconds. The PermissionsCacheMBean allows you to override this value to extend or shorten the cache time, and also provides a command to invalidate all of the permissions in cache. This could be a useful operation if you need to change permissions in your cluster and need them to take effect immediately.
Summary
Cassandra is just one part of an enterprise application, but performs an important part nonetheless. In this chapter, we learned how to configure Cassandra’s pluggable authentication and authorization capabilities, and how to manage and grant permissions to users and roles. We enabled encryption between clients and nodes and learned how to secure the JMX interface for remote access.