14. Extended Topics
This, the final chapter in the book, is a hodge-podge of topics that have in common the fact that they did not fit in nicely elsewhere! This is not to say that these topics aren’t important, just that you won’t find the same level of homogenous material in this chapter as you’ve seen in the past. Feel free to pick and choose among the sections of this chapter as you have the need. Also, to keep the chapter concise and moving, none of the examples will use object-oriented programming, but as a good exercise, you could always rewrite any of the code using classes.
The chapter begins by going a little bit deeper into the string data type. We’ve actually glossed over what a string really is, so revisiting this useful type is worth the while. Next up is the topic of binary files: how to write to them, read from them, and access them non-sequentially. The chapter concludes with a demonstration of how to take command-line arguments in your programs.
Strings Revisited
You may be wondering why the string data type is being given more coverage here, when it has already been discussed and used many times over. The reason is that there is more to strings than what you have seen so far. The std::string type in C++ is actually an object, defined in the standard library, with loads of built-in features. We’ll look at the most useful of those here.
The primary focus is on the many string functions, each of which does something useful. Most of these are overloaded in many ways, so we’ll often demonstrate one or two useful invocations of the method without going through all of the possible permutations. It’s important that you remember that these functions may be overloaded and that you remember what that means, as the same function may behave quite differently if provided two arguments instead of three or if given a different type of argument.
As a reminder, you’ve already seen one string function—size()—which returns the number of characters in a string:
std::string title = "C++ Programming: Visual QuickStart Guide";
unsigned int strSize = title.size();
The size() function is a synonym for length(), which you may also see in other resources.
Generating substrings
The first method that we’ll discuss is substr(). This function returns a part of the current string. In one definition of the function, it takes as its first argument the position in the string where it should start. This is an integer value, starting at 0 (every character in a string has a numeric position, starting at 0, Figure 14.1). The second argument is the number of characters to return.
Figure 14.1. The characters in a string are positioned starting at 0 (just like array elements).

Some examples:
std::string s1 = "catalog";
std::string s2 = s1.substr (0, 3);
// s2 now has a value of "cat".
s2 = s1.substr (4, 3);
// s2 now has a value of "log";
To demonstrate this concept, this next application will break a filename into its respective parts: the file’s basename and its extension (which is customarily three letters long).
To create substrings
- Create a new, blank text document in your text editor or IDE (Script 14.1).
// substring.cpp - Script 14.1
#include <iostream>
#include <string>The
stringheader file is obviously necessary, as the program will deal extensively with strings. - Begin the
main()function.int main() {
- Take a user-submitted filename.
std::string filename;
std::cout << "Enter the file's name: [filename.ext] ";
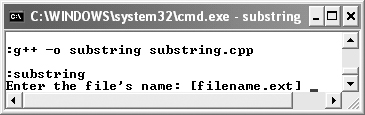
std::getline(std::cin, filename);For demonstration purposes, this program takes the full name of a file from the user. The user is prompted for this information (Figure 14.2), which is read in and associated with
filename.Figure 14.2. The user is prompted to enter the full name of a file.
- Determine the length of the full filename.
unsigned short length = filename.size();
To ascertain the file’s extension, we first need to know how many characters are in the string.
- Determine the file’s extension.
std::string ext = filename.substr( (length - 3), 3);
To find the extension, which is assigned to the
extstring, thesubstr()function must start three letters from the end of the filename and go to the end. To do so, the first argument is the length of the string minus 3 and the second is just 3. If the user enters chapter14.doc, this code assigns doc toext.Script 14.1. The
substr()function is used to break a string into subparts. Here it takes text in the form of filename.ext and breaks it down into filename and ext.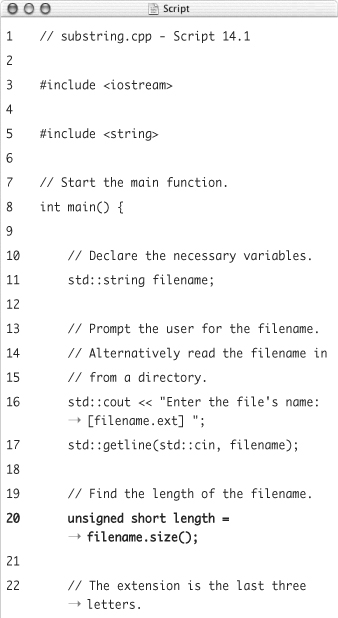
You’ll notice that we’re assuming here that all files use a three-letter extension. This is fine for now, but later in the chapter you’ll learn how to base the extension on the location of the period.
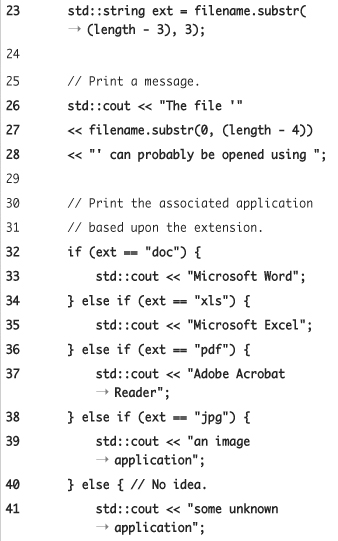
- Begin printing the feedback.
std::cout << "The file '"
<< filename.substr(0, (length - 4))
<< "' can probably be opened using ";This program will use the extension to tell the user what application they’ll probably want to open the file in. That message begins here, which also prints the basename of the file (so chapter14.doc prints as chapter14). To find the basename, the
substr()function is called with0as the first argument (to start at the initial position) and(length - 4)as the second (include all but the last four letters: .doc). - Print what application should be used to handle the file.
if (ext == "doc") {
std::cout << "Microsoft Word";
} else if (ext == "xls") {
std::cout << "Microsoft Excel";
} else if (ext == "pdf") {
std::cout << "Adobe Acrobat Reader";
} else if (ext == "jpg") {
std::cout << "an image application";
} else {
std::cout << "some unknown application";
}The program uses a long
if-else if-elseconditional, which checks the extension against some set values. You cannot use aswitchwith a string, so you’re stuck with this conditional. - Complete the message and the
main()function.std::cout << ". ";
std::cout << "Press Enter or
Return to continue. ";
std::cin.get();
return 0;
} - Save the file as
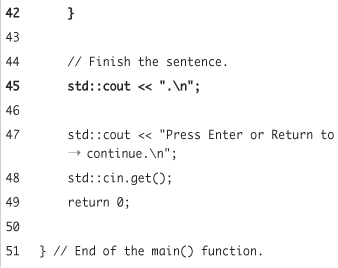
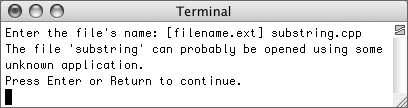
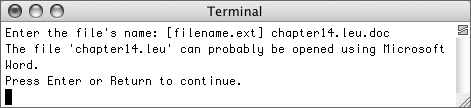
substring.cpp, compile, and run the application (Figures 14.3 and 14.4).Figure 14.3. The file’s full name is broken down into its parts, and the associated application is indicated.
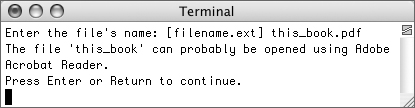
Figure 14.4. If the program does not have an association for the file’s extension (which could also apply if the submitted filename did not have an extension), a generic message is printed.
 Tips
Tips
• In this program, an entire line is read into filename, in case the filename contains a space. You could also use
std::cin >> filename;
In that case, make sure that you discard any extraneous input afterward, as the final newline character will remain in the buffer. See Chapter 4, “Input, Output, and Files,” for a refresher on this.
• When using the second argument in the substr() function (to establish how many characters should be retrieved), either that many characters or all the characters up to the end of the string will be copied. This is perfectly valid:
std::string s1 = "catalog";
std::string s2 = s1.substr (4, 20);
• You can use array notation to also access individual string characters:
std::string s = "catalog";
char c = s[0];
// c has a value of 'c'.
s[0] = 'C';
// s is now 'Catalog'.
• The empty() function returns the value true if a string has nothing in it.
Adding to strings
Once you have an existing string, you can add to it in any number of ways. One easy solution is to use concatenation:
std::string s1 = "Please ";
s1 = s1 + "don't";
s1 += ' ';
std::string s2 = "string ";
s1 += s2;
s1 += "me along.";
You’ll notice that you can use concatenation to add another literal string to an existing one (as in the second line), to add just another character (as in the third line), or to add another string. With concatenation, as with assignments involving arithmetic, it doesn’t matter whether you code s1 = s1 + s2 or shorten that to just s1 += s2.
Concatenation adds the new text to the end of the string, as does the append() function:
std::string s = "Hello";
s.append(", World");
// s has a value of "Hello, World".
This function can also be used so that it adds a repeating number of the same character (or the same string) to an existing string:
s.append(3, '!'),
// s has a value of "Hello, World!!!".
If you would like to add text to a string but not at the end, use the insert() function. This function takes the starting point as its first argument and the string to be inserted as its second.
std::string pun = "middle";
pun.insert (3, "STUCK");
The result of the previous code is the string midSTUCKdle. (Remember that indexing begins at 0, so 3 is the fourth position in a string.)
If what you want is to replace part of an existing string, you can do that too, using replace(). The first argument is where in the string to begin, the second is an indication of how many characters should be replaced, and the third is the replacement string. Note that the number of characters being replaced does not need to match the number of characters in the replacement string.
std::string name = "Percy Shelley";
name.replace(5, 1, " Bysshe ");
This code turns the value of name into Percy Bysshe Shelley (one of the great names, literally, in poetry).
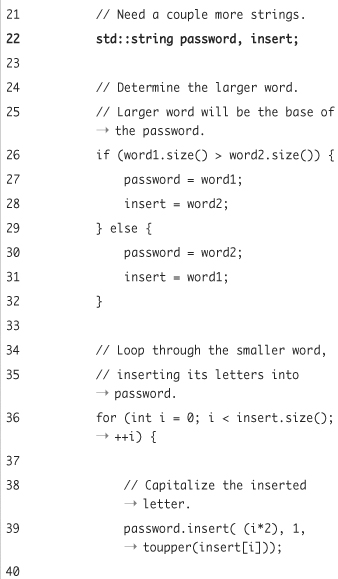
In this next program, the user will be prompted for two strings and a character. The program will then use this information to generate a password. To do so, it will:
• Insert each letter from the smaller word into the larger.
• Capitalize the inserted letters.
• Replace the password’s middle character with two of the submitted characters.
For example, the input big, little, ? will be turned into BlIi??ttle.
To add to a string
- Create a new, blank text document in your text editor or IDE (Script 14.2).
// password.cpp - Script 14.2
#include <iostream>
#include <string>
#include <cctype>A third header file is included here, which is the C
ctype.hfile. It defines, among other things, thetoupper()function, which will be used to capitalize a letter. As with any C header file, you can include it in a C++ program by adding a c to the beginning of the file’s name and dropping the .h (soctype.hbecomescctype).Script 14.2. In this program, many string functions are used to create a new password out of the combination of two words and an extra character. The C function
toupper()is also used to capitalize some of the letters.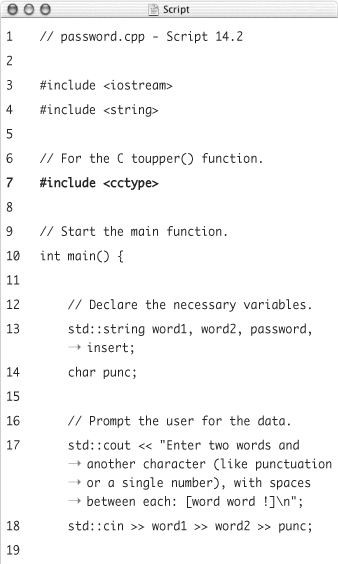
- Begin the
main()function and declare the necessary variables.int main() {
std::string word1, word2, password, insert;
char punc;The application uses five variables, four of type
stringand one character. Three of these will be for user input. The other two will be used for the actual password generation. - Prompt for, and read in, the user-submitted data.
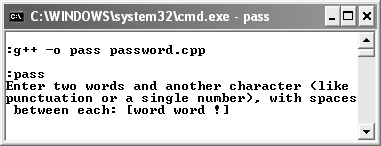
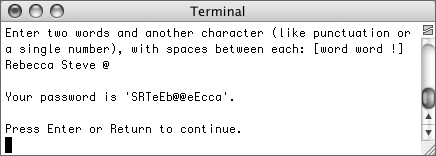
std::cout << "Enter two words and another character (like punctuation or a single number), with spaces between each: [word word !] ";
std::cin >> word1 >> word2 >> punc;
std::cin.ignore(100, ' '),The user is explicitly prompted for the type of information required (Figure 14.5). After reading in the input, you could also validate the individual items, if you want.
Figure 14.5. The initial prompt.
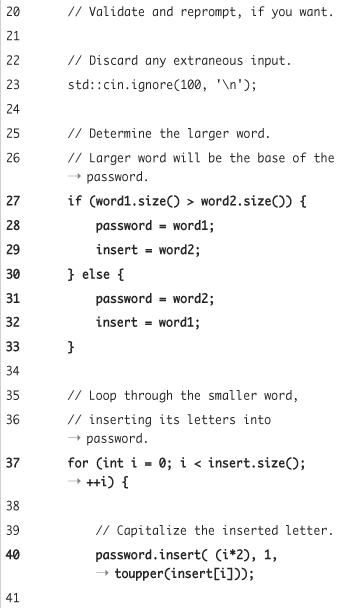
- Determine the larger of the two words.
if (word1.size() > word2.size()) {
password = word1;
insert = word2;
} else {
password = word2;
insert = word1;
}It’s important that we insert the smaller word’s letters into the larger word and not vice versa (or the inserts will eventually fail). This conditional determines which is the larger of the two words and assigns that string to the
passwordvariable. Theinsertvariable will store the other string, which will be inserted intopassword.If both strings happen to be of the same size, it really doesn’t matter which is inserted into the other.
- Insert the
insertword’s letters intopassword.for (int i = 0; i < insert.size(); ++i) {
password.insert( (i*2), 1, toupper(insert[i]));
}The
forloop will access every letter ininsert, from the first (0) to the last (whereiis one less than the value returned bysize()). The insertion itself states that at positioni*2(which will be every other position), one character should be inserted. The character itself will be a capitalized version ofinsert[i]. - Replace a character with two copies of the submitted character.
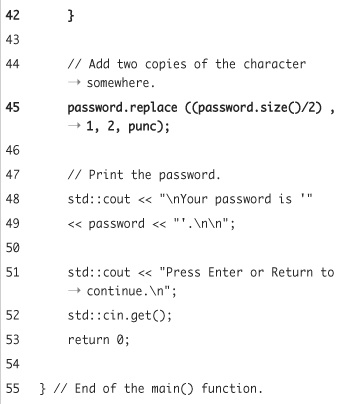
password.replace ((password.size()/2) , 1, 2, punc);
The first argument says that the replacement should take place at approximately the middle of the password (found by dividing the number of letters in the string by 2, which will always return an integer because both numbers involved are integers). The second argument indicates that one letter found at that spot should be replaced. The third argument says that you want two copies of the following replacement text to be inserted. And the fourth argument is the replacement text itself, which happens to be a single character in this case.
- Print the password and complete the
main()function.std::cout << " Your password is '"
<< password << "'. ";
std::cout << "Press Enter or Return to continue. ";
std::cin.get();
return 0;
} - Save the file as
password.cpp, compile, and run the application (Figures 14.6 and 14.7).Figure 14.6. The new password is generated by combining the user-submitted values.
Tips
• As we stated in the introduction, many of these functions are overloaded in several ways, meaning that they can be called with different types and numbers of arguments. It’s easy to get the syntax wrong, though, so pay attention to what the compiler says if an error occurs and do a search online for a function’s full range of definitions when the need arises.
• If you need to replace a certain character or string (not just a randomly selected one), you’ll want to do a find() on the string—see the next section—before doing the replace().
Figure 14.7. Different input will create a different password, even including a single digit.

Searching through strings
One of the really cool features built into strings is the ability to do searches within them. The most obvious function for searching through a string is find(). It returns the starting position for the first occurrence of the found character or string.
std::string quote = "Only two things are infinite, the universe and human stupidity, and I'm not sure about the former. (Albert Einstein)";
unsigned start = quote.find("stupid");
This function takes an optional second parameter, indicating where in the string to begin searching (0 is the default).
On the other hand, rfind() does the same thing as find() but starts searching from the end of the string. It still returns the found item’s position from the start of the string, if a match was made.
You can find one of a group of characters using the find_first_of() function. It looks for the first position of any in a list of characters:
std::string name = "Robert";
unsigned location = name.find_first_of("aeiou");
// location has a value of 1 (for the o).
There’s also the find_last_of() function, which does the same thing but in reverse (it finds the last occurrence). Similarly, find_first_not_of() and find_last_not_of() locate the first or last character that is not in the group.
Before running through an example to use this information, two final points should be made. First of all, these searches are case-sensitive, so you’ll never be able to find Dog in doggerel. If you want to perform a case-insensitive search, you must use the C toupper() or tolower() functions to normalize the case of the strings involved.
Second, all of the find functions return the constant value string::npos if it cannot find a match. You can use this in a conditional to confirm whether or not a match was made:
std::string stringName = "Hedberg";
if (stringName.find("Mitch") != std::string::npos) {
// Match!
} else {
// No match.
}
To demonstrate how to use find(), the substring example will be rewritten, as previously suggested.
To search with strings
- Open
substring.cpp(Script 14.1) in your text editor or IDE. - After reading in the filename, use a
whileloop and thefind()function to validate its format (Script 14.3).while (filename.find('.') == std::string::npos) {
std::cout << "Please enter the file's name, including its extension: [filename.ext] ";
std::getline(std::cin, filename);
}The
whileloop’s condition checks if a period can be found in the file’s name. If no period is found, the function returns the valuestd::string::npos. This indicates that the user did not submit the full filename, so they should be prompted again (Figure 14.8).Script 14.3. This modified version of the
substring.cppprogram (Script 14.1) actually searches for a period in order to locate the file’s extension.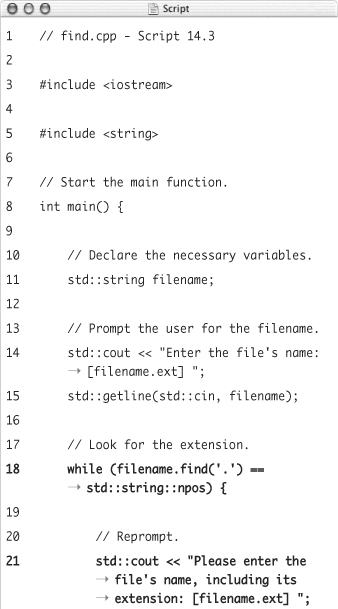
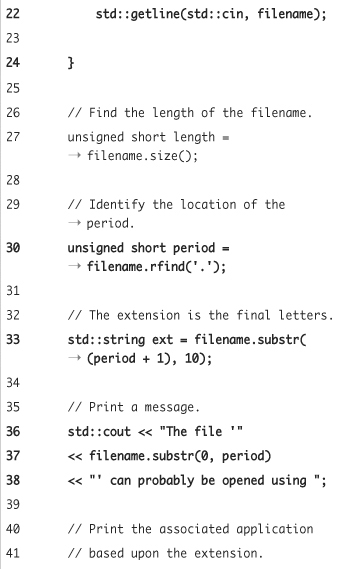
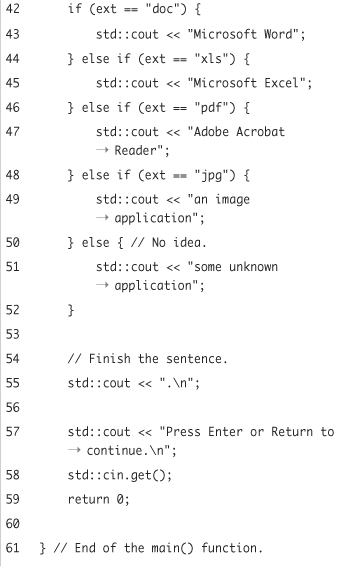
Figure 14.8. If the user does not submit the filename with its extension, they will be re-prompted until they do.
- After the
whileloop, find the file’s extension.unsigned short period = filename.rfind('.'),
std::string ext = filename.substr ((period + 1), 10);To determine where the extension starts, another call to
find()will look for the period and return its location. This time, though, the hunt will start at the end of the full filename, so that it will find the right extension in cases like virus.txt.vbs. After finding the final period, the extension is determined by starting at the next position and going for either ten characters or until the end of the string.You should also delete the code that determined the file’s extension in the original version of this program.
- Change the printing of the file’s name to use the period’s location.
std::cout << "The file '"
<< filename.substr(0, period)
<< "' can probably be opened using ";This more exact method assumes that the file’s basename is from the first letter (0) until the final period.
- Save the file as
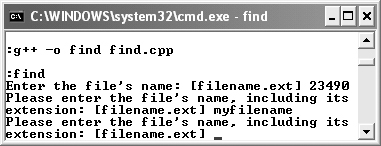
find.cpp, compile, and run the application (Figures 14.9 and 14.10).Figure 14.9. The program will now work more precisely than it did before.
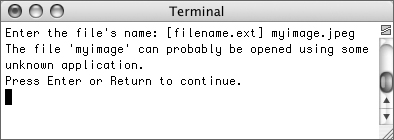
Figure 14.10. If a filename contains multiple periods, only the final one is used as the extension (which is what computers do as well).
Tips
• Although the string type will manage the memory requirements for you, you can actually delve into that capability yourself. The capacity() method returns the currently allotted space for the string, i.e., how many characters it can hold right now. The reserve() function then asks for more storage space.
• To remove a character from a string, you can use erase(). Its first argument is (of course) the position in the string where it should start erasing. The second argument is the number of characters to be removed.
std::string s = "catalog";
s.erase(3, 4);
// s is now just "cat";
Just like substr(), this method will continue erasing for the number of specified characters or until the end of the string, whichever comes first.
Working with Binary Files
In Chapter 4, “Input, Output, and Files,” you learned, among other things, how to read from and write to plain text files. But there is actually another type of file you could interact with: binary (see the sidebar for the differences). While the Unix and Mac OS X line of operating systems does not distinguish between binary and non-binary files, on Windows there is a distinction.
Over the next few pages you’ll learn how to work with files in binary mode. Much of the process is the same as working with non-binary files, but there are some key differences. One of the biggest benefits of using binary files is that by writing binary data you can store complex types like structures or objects (as opposed to just writing plain text). You’ll see this in the following sequence of examples.
Writing to binary files
The process of writing to a binary file starts like writing to any file. You first include the iostream header file, and then you create an object of the ofstream (output file stream) type. To write to a binary file, a flag must be passed to the ofstream constructor. The syntax is
std::ofstream fileOutput ("filename",
std::ios::binary);
Because you probably want to append the new data to the existing data, you’ll also want to use std::ios::app, as discussed in Chapter 4:
std::ofstream fileOutput ("filename",
(std::ios::binary) | (std::ios::app));
To write binary data to a file, you cannot use <<, as you can when writing plain text. Instead the write() function should be called. This function takes two arguments. The first is the address in memory where the value to be written can be found. This value must be type cast as a pointer to char. The second argument is the size, in bytes, to be written. This should correspond to the size of the value, so the most accurate method for calculating this is to use the sizeof operator.
As a simple example, if you just wanted to write a number to the file (in binary format), you would code
int number = 230948;
fileOutput.write(reinterpret_cast<char *>(&number), sizeof(number));
If you are confused by the use of reinterpret_cast here, see Chapter 6, “Complex Data Types.”
Once you have written all the data to the file, you should close it:
fileOutput.close();
To demonstrate the process of writing binary data to a file, the following program will create a structure that represents a car: make, model, and year. This data will be taken as user input and then stored in the file. Sadly, this program will have to make use of C-style strings, as the binary data must be stored in a fixed blocks of memory (and the string type does not have a set memory size). See the sidebar for some of the important syntax regarding C-style strings.
To write to a binary file
- Create a new, blank text document in your text editor or IDE (Script 14.4).
// cars_in.cpp - Script 14.4
#include <iostream>
#include <string>
#include <fstream>The
fstreamheader file is necessary here as well, as it always is when working with files. - Define the structure.
struct car {
char make[20];
char model[20];
unsigned short year;
};The
carstructure has three members: two C-style strings (see the sidebar) and an unsigned short integer. Don’t forget to include the semicolon after the closing curly bracket. - Begin the
main()function and create theofstreamvariable.int main() {
std::ofstream fileOutput("cars.dat", (std::ios::app) | (std::ios::binary));The data file is called cars and uses a generic
.datextension (as opposed to.txt). Thecars.datfile will be in the same directory as this program (and this program will create it, if it doesn’t already exist).The file is opened in an appended, binary mode.
- Confirm that the file was opened.
if (fileOutput.is_open()) {
You never want to assume that a file could be opened; instead, check using the
is_open()function.Script 14.4. An entire structure at a time is written to a binary file in this program. By using a
whileloop to take input, multiple records can be inputted and written in one execution of the program.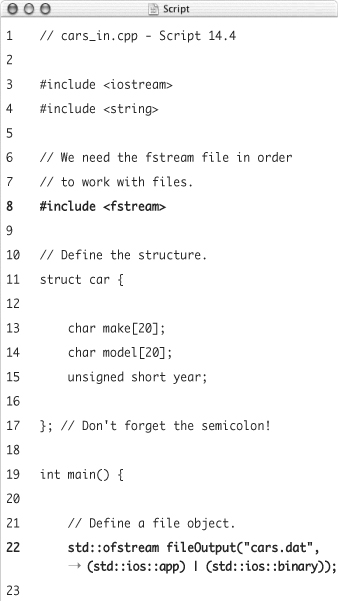
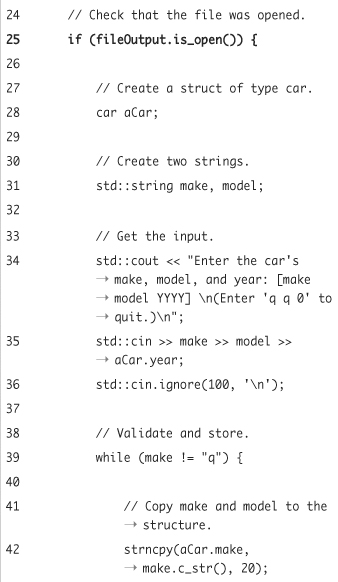
- Create the necessary variables and take the input.
car aCar;
std::string make, model;
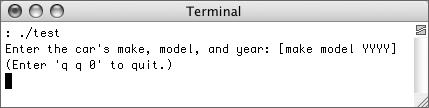
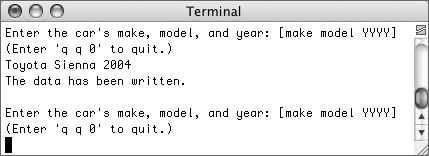
std::cout << "Enter the car's make, model, and year: [make model YYYY] (Enter 'q q 0' to quit.) ";
std::cin >> make >> model >> aCar.year;
std::cin.ignore(100, ' '),Three variables are required, one a structure of type
car, and two C++ strings. Then the program prompts the user for the input and reads it in (Figure 14.11). Because awhileloop will be used to accept and write multiple records without restarting the program, a parenthetical tells the user how to quit entering records.Figure 14.11. The user is prompted to enter three pieces of information. Instructions also indicate how to exit the application, as the program will accept multiple record submissions.
Notice that the two strings are read into the C++ strings, not directly into the structure. The year, however, is read immediately into the structure’s
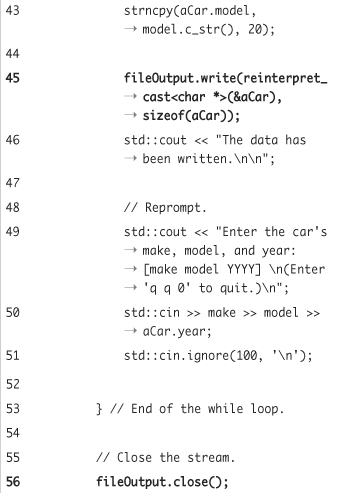
yearmember. - Write the data to the file, if appropriate.
while (make != "q") {
strncpy(aCar.make, make.c_str(), 20);
strncpy(aCar.model, model.c_str(), 20);
fileOutput.write(reinterpret_cast<char *>(&aCar), sizeof(aCar));
std::cout << "The data has been written. ";If the submitted
makehas a value of q, then the user has no more records to enter and thewhileloop, where the data is written, should not be entered (you could also check the values of model and year, but that’s not really necessary). Within the loop, the entire structure is written to the file. To do so, the C++ strings must first be copied into the structure’s C-style strings. This is discussed in the sidebar. Then the actual writing of the data happens. The first argument is a type cast of the structure’s address, and the second argument is the amount of data to be written. You can use eithersizeof(car)orsizeof(aCar)here, as their sizes will be the same. - Re-prompt the user for the input and complete the loop.
std::cout << "Enter the car's make, model, and year: [make model YYYY] (Enter 'q q 0' to quit.) ";
std::cin >> make >> model >> aCar.year;
std::cin.ignore(100, ' '),
}The same prompt is provided, and the information accepted again (Figure 14.12).
Figure 14.12. After requesting and writing one record, another is accepted.
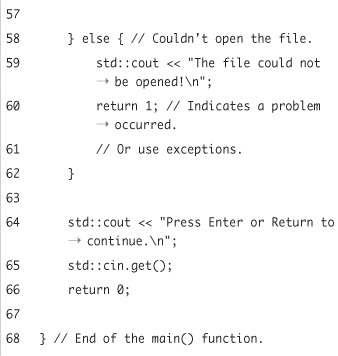
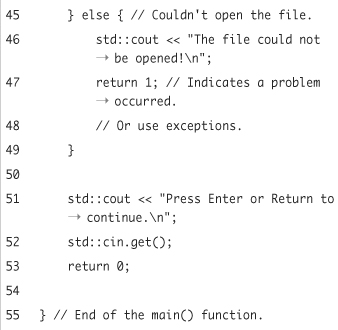
- Close the file and complete the main conditional.
fileOutput.close();
} else {
std::cout << "The file could not be opened! ";
return 1;
}The
elseclause takes effect if the file could not be opened for some reason. You could also change this program so that it uses exceptions, as discussed in Chapter 10, “Error Handling and Debugging.” - Complete the
main()function.std::cout << "Press Enter or Return to continue. ";
std::cin.get();
return 0;
} - Save the file as
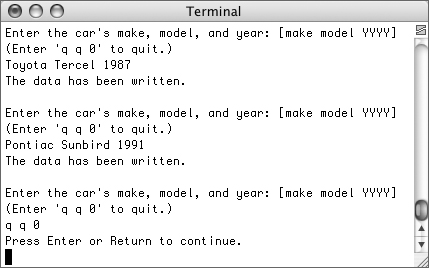
cars_in.cpp, compile, and run the application (Figure 14.13).Figure 14.13. The program will take a nearly limitless number of record submissions, quitting once the user enters q for the make.
For the purposes of the following programs, you’ll want to make sure that several records are stored in the data file.
Tips
• Whereas << writes text to a text file, the write() function copies data stored in memory—which is always binary—to a file. This is why the first argument is a pointer (the address of a memory block), not a simple variable.
• When working with files you could, as an alternative, create a variable of fstream type. Then you would also use std::ios::out as one of the flags to indicate that you want to write to this stream. Use std::ios::in to open a file for reading.
• Some systems, which do not distinguish between binary and non-binary files, will actually have problems if you include std::ios::binary. If you see any errors about this, just omit that flag.
Reading from binary files
Reading from binary files is almost exactly the same as writing to them, but uses the read() function (as you might imagine). This function looks much like write(), taking an address as its first argument (again type cast as a pointer to char) and the size to be read as its second. Thus your reading syntax will be
std::ifstream fileInput ("filename", std::ios::binary);
fileInput.read(reinterpret_cast<char *>(&var), sizeof(var);
Now you can refer to var to access the retrieved data.
Naturally you’ll want to use this code in a loop to access the entire file’s contents:
while (fileInput.read(reinterpret_cast<char *>(&var), sizeof(var)) {
// Do whatever with var.
}
Finally, you close the file:
fileInput.close();
This is pretty simple, so let’s quickly write a program that reads the data already stored in the cars.dat file.
To read from a binary file
- Create a new, blank text document in your text editor or IDE (Script 14.5).
// cars_out.cpp - Script 14.5
#include <iostream>
#include <string>
#include <fstream>Script 14.5. The stored records are retrieved and displayed using this program.
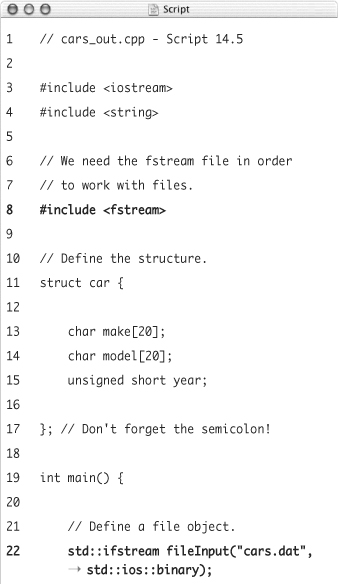
- Define the structure.
struct car {
char make[20];
char model[20];
unsigned short year;
};The structure definition is the same as it is in the
cars_in.cppfile, which is important. - Begin the
main()function and create the file object.int main() {
std::ifstream
fileInput("cars.dat",
std::ios::binary);A variable of type
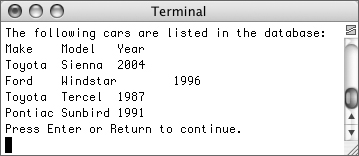
ifstreamis created, still referring to the same file (cars.dat) and still opening it in binary mode. - Confirm that the file was opened, create a structure, and print a header.
if (fileInput.is_open()) {
car aCar;
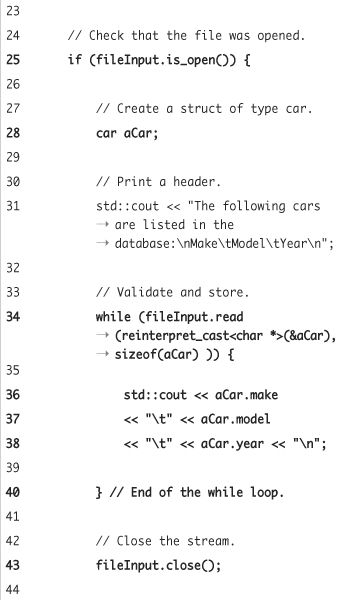
std::cout << "The following cars are listed in the database: Make Model Year ";The header creates faux-columns using tabs to display the list of cars in a pseudo-table format.
- Retrieve and display each car.
while (fileInput.read(reinterpret_cast<char v*>(&aCar), sizeof(aCar) )) {std::cout << aCar.make
<< " " << aCar.model
<< " " << aCar.year << " ";
}This process is simple. The loop will retrieve one structure at a time from the file. Then, using the
structureName.memberNamesyntax, each item is printed. - Complete the main conditional.
fileInput.close();
} else {
std::cout << "The file could not be opened! ";
return 1;
} - Complete the
main()function.std::cout << "Press Enter or Return to continue. ";
std::cin.get();
return 0;
} - Save the file as
cars_out.cpp, compile, and run the application (Figure 14.14).Figure 14.14. The list of previously recorded cars is retrieved from the binary file and displayed.
Tips
• In these programs, where the same structure definition must be used by each application, you could put that definition in a header file and then include it. By doing so you’ll ensure consistency and limit how much typing you have to do. See Chapter 12, “Namespaces and Modularization,” for information on creating your own header file.
• If you were feeling particularly brave (and comfortable with C++), you could tie all of these binary-related programs into one. The easiest method would be to define each program as its own function, and then have the main() function ask the user what they want to do (1 = Insert Records, 2 = View Records). Depending upon the inputted value, call the appropriate function.
Randomly accessing binary files
The final subject to discuss when it comes to binary files is how to access their contents in non-sequential order. Because binary data is one long stream of information, you can access the data at any point in this stream, without going sequentially from beginning to end.
Every input or output stream has at least one pointer that indicates where you are in the stream. These aren’t pointers in the sense of storing the address of a block of memory, but rather more like “You are here” arrows on a map. Or maybe it helps to think of them as “cursors.” In any case, “pointers” is the common—and potentially confusing—term.
For starters, ifstream has a pointer called get that points to the next item to be read. ofstream has a pointer called put that points to the location where the next element will be written. Finally, fstream has both: get and put.
You can see where each pointer currently is using the tellg() and tellp() functions. Each returns a value of type pos_type, which is essentially a large integer indicating how many bytes into the file the pointer is.
unsigned long here = fileInput.tellp();
The pointers can be moved using the special member functions seekg() and seekp(). Both functions take one argument, which is how many bytes to move to, starting from the beginning of the file (not from the pointer’s current position).
fileInput.seekp(1); // Move 1 byte.
fileOutput.seekg(12); // Move 12 bytes.
Both functions are also overloaded so that they can take two arguments. In this case the first argument is the distance to move and the second indicates from where the pointer should start moving. The options for the second argument are ios::begin (the beginning of the file), ios::end (the end of the file), and ios::cur (the pointer’s current location). These are all in the std namespace, so you’ll use std::ios::begin to be formal.
fileInput.seekp(1, std::ios::cur);
// Move 1 byte from current location.
fileOutput.seekg(12, std::ios::end);
// Move 12 bytes back from the end
// of the file.
Using these functions, there is a lot you can do with a binary file. For starters, the size of the file is the difference between tellg() when the pointer is at the file’s end and tellg() when the pointer is at the file’s beginning. Secondarily, you can move randomly through the file to read or write wherever you need. To maintain the integrity of the data, though, you should always move in increments corresponding to the type of data stored. If the file holds one-byte characters, you could move to any single byte and insert another character. If the file stores four-byte integers, you should only move to any multiple of four bytes and then read or write. If you don’t follow this rule, you could end up reading from (or writing to) the middle of a stored integer.
In this next example, most of these ideas will be put to use. The application will determine how many cars are listed in the data file, then let the user choose a number, and then show them which car they have selected. It may seem a little complex, so we’ll break it down slowly.
To randomly access data in a binary file
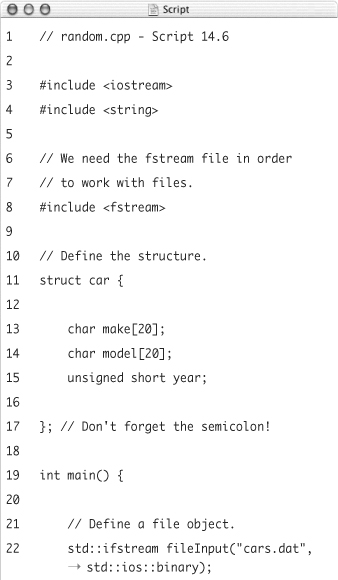
- Create a new, blank text document in your text editor or IDE (Script 14.6).
// random.cpp - Script 14.6
#include <iostream>
#include <string>
#include <fstream> - Define the structure.
struct car {
char make[20];
char model[20];
unsigned short year;
};The structure is exactly the same as it has been.
- Begin the
main()function and open the file.int main() fixed{
std::ifstream fileInput("cars.dat", std::ios::binary);
if (fileInput.is_open()) { - Create two long, unsigned integers and then record the initial position of the pointer.
unsigned long start, end;
start = fileInput.tellg();When the program starts, the file’s pointer will be at the beginning of the file. This value is stored in the
startvariable. You could assume thatstartwould always have a value of0, but it’s best to err on the side of safety.Script 14.6. This application grabs a user-selected structure from the binary file. To do so, it first moves the pointer around to determine the file’s size, then calculates how many cars (i.e., structures) are in the file, and then retrieves a specific record.
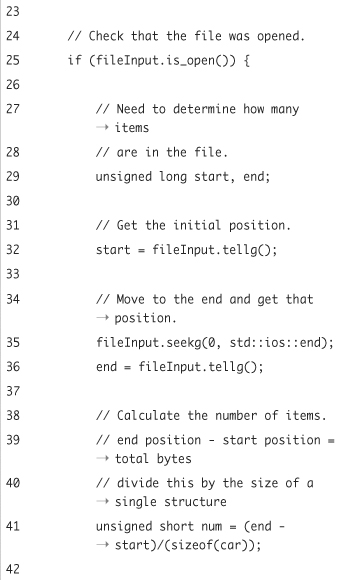

- Move to the end of the file and note that location.
fileInput.seekg(0, std::ios::end);
end = fileInput.tellg();To move to the end of the file, the
seekg()function is used, passing it two arguments. The first is the number of bytes to move, and the second is the starting point. With this line, the pointer is moved 0 bytes from the end of the file, which is to say it’s moved to the end of the file.The value returned by
tellg()at this location is then assigned toend. - Calculate the number of items in the file.
unsigned short num = (end - start)/(sizeof(car));
The size of the file is
end - start. This is a value in bytes. To determine how many structures (or cars) this is, divide that number by the size of a single structure. You can find the size of a single structure by using thesizeofoperator oncar.In this example, a structure will most likely be 42 or 44 bytes, depending upon the computer it is running on (20 characters plus 20 characters plus either 2 or 4 bytes for the one short integer). If the file’s size is 210 bytes, there must be five structures (210/42 = 5).
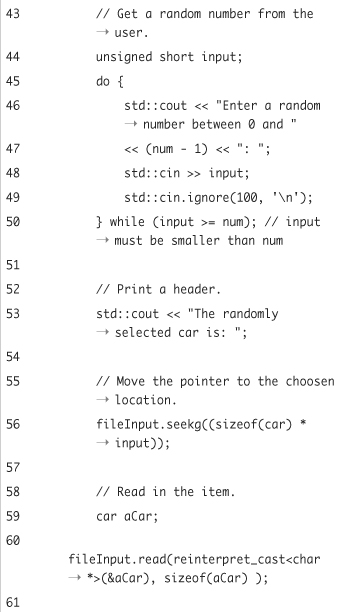
- Let the user select a random number.
unsigned short input;
do {
std::cout << "Enter a random number between 0 and "
<< (num - 1) << ": ";
std::cin >> input;
std::cin.ignore(100, ' '),
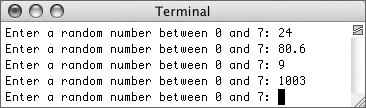
} while (input >= num);The user is prompted for a number, which is then read in. This number should be between 0 and
num - 1. These values correspond to where in the file we’ll want to move the pointer: to the first item (found at 0), to the last item (which starts atnum - 1), or somewhere in between.Using a
do...whileloop, the program will repeatedly prompt for this value until an acceptable number is entered (Figure 14.15).Figure 14.15. The program first determines how many items are in the data file and then forces the user to choose an appropriate number in that range.
- Print some text and move the pointer to the selected spot.
std::cout << "The randomly selected car is: ";
fileInput.seekg((sizeof(car) * input));To move to the right location, you’ll want to move a set number of bytes. This should be the user-submitted number times the size of a single structure. So if the user entered
2and the size of a structure is 42 bytes, we’ll move 84 bytes into the file. - Read in and display the car.
car aCar;
fileInput.read(reinterpret_cast<char *>(&aCar), sizeof(aCar) );
std::cout << aCar.year
<< " " << aCar.make
<< " " << aCar.model << " ";Once the pointer is located at the right spot, you can just read in a single structure and then print out its members.
- Complete the conditional and the
main()function.fileInput.close();
} else {
std::cout << "The file could not be opened! ";
return 1;
}
std::cin.ignore(100, ' '),
std::cout << "Press Enter or Return to continue. ";
std::cin.get();
return 0;
} - Save the file as
random.cpp, compile, and run the application (Figures 14.16 and 14.17).Figure 14.16. One user-selected item is taken from the file and displayed.
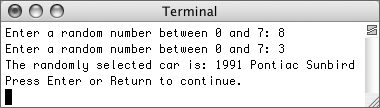
Figure 14.17. Another item is displayed.

Tip
• This program will actually go haywire if a character, string, or negative number is submitted (it will enter an infinite loop). To fix this, apply the input-validation information covered in Chapter 4.
Taking Command-Line Arguments
One of the other important topics that has not yet been discussed is how to use command-line arguments in a program. Applications that are invoked from a command-line interface often take arguments: information passed to the application when you start it. These arguments are each separated by a blank space, following the application’s name (Figure 14.18).
Figure 14.18. Arguments are sometimes provided when an application is invoked from a command-line interface.
There’s a special trick to accessing these command-line arguments. To start, the main() function, which is automatically called when a program runs, can be defined so that it receives two arguments. The first is an integer representing the number of command-line arguments entered. The second is an array of pointers to where those arguments have been stored in memory. By convention, the first parameter is named argc (for argument count) and the second one argv (for argument vector, where vector is another word for array). The definition of main() can therefore be
int main (int argc, char *argv[]) { ...
This may already look familiar to you, as Xcode and Dev-C++ insert these arguments in main() by default (Xcode actually uses char * const argv[]).
Since argv is an array of pointers (each pointer points to an array of characters, but don’t get hung up on that), each individual argument can be accessed by referring to argv[x], where x is a number between 0 and argc minus one. (Review the information on arrays in Chapter 6, “Complex Data Types,” if any of this is confusing.)
You can access all of the command-line arguments using a loop:
for (int i = 0; i < argc; ++i) {
std::cout << "Argument #" << i
<< " is "<< argv[i] << "
";
}
One more catch is that the first value in the list of arguments is actually the program’s name. If you don’t need to access that, you can change your for loop to initialize i as 1.
Let’s apply this new knowledge by changing the password-generating script so that it works using command-line arguments.
To accept command-line arguments
- Open
password.cpp(Script 14.2) in your text editor or IDE. - Change the definition of the
main()function so that it takes two arguments (Script 14.7).int main(int argc, char *argv[]) {
- Immediately within the
main()function, begin a conditional that checks for the right number of arguments.if (argc == 4) {
The number of arguments provided when the program is called will be assigned to
argc. If this value is4—for the program name, two words, and a character—the password should be generated.Script 14.7. This modified version of the password generation program takes its input as command-line arguments.
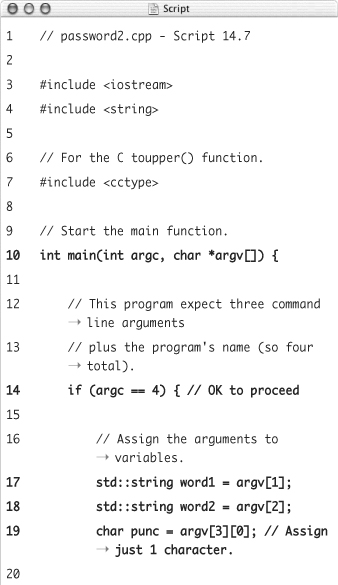
- Assign the arguments to variables.
std::string word1 = argv[1];
std::string word2 = argv[2];
char punc = argv[3][0];The two words will be assigned the values of the second and third arguments (the program name is first, indexed at 0). The character variable
puncwill be assigned just the first character of the final argument. To accomplish this, the final argument is accessed asargv[3]. Since this is an array of characters,argv[3][0]is the first character in that array.Obviously, you should also remove the previous declarations of these three variables and the code where they are taken as user input (see the corresponding script).
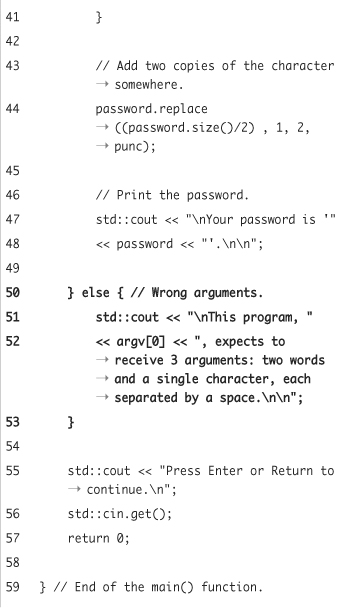
- After the password has been generated and printed, complete the main conditional.
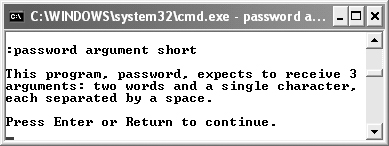
} else {
std::cout << " This program, "
<< argv[0] << ", expects to receive 3 arguments: two words and a single character, each separated by a space. ";
}This
elsetakes effect if anything other than exactly four arguments (including the program’s name) were used when running the application. The message lets the user know the program was invoked incorrectly (Figure 14.19).Figure 14.19. If the program is not started with the right number of command-line arguments, an error message says as much, including the name of the application in the text.
- Save the file as
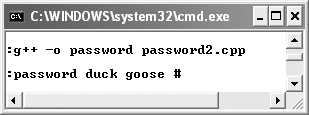
password2.cpp, compile, and run the application (Figure 14.20).Figure 14.20. The result of correctly running the program.

Tips
• Some characters have special meaning in the command line, like the period and the asterisk. To use them as arguments, surround them with single quotation marks:
./pass myWord1 another '*'
• Any time you need to pass an array to a function, as this program does, you need to pass both a pointer to the array and the number of elements in the array.
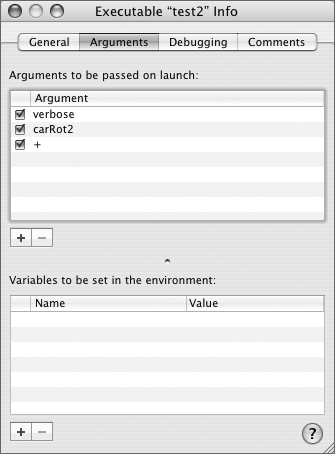
• Most graphical programming environments do not run applications from a command line. In such cases, you have to find out how to pass arguments to your program when starting it. In Apple’s Xcode, for example, after successful compilation, click the compiled program’s name in the Executables folder. Then, select File > Get Info. There under the Arguments tab you can add the arguments (Figure 14.21) that will take effect the next time you run the application. (This works on version 2.1 of Xcode but could be different in other versions.)
Figure 14.21. Specifying command-line arguments in Xcode.
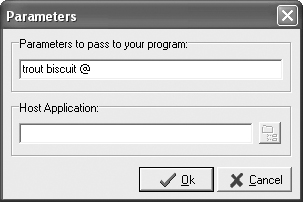
• In Dev-C++ on Windows, first compile the application. Then select Execute > Parameters to display the parameters box. Type any arguments there (Figure 14.22) and then click OK. Finally, select Execute > Run to run the program using those arguments. (This works on version 4.9.9.2 but could be different in other versions of Dev-C++.)
Figure 14.22. Specifying command-line arguments in Dev-C++.