
Chapter 3
Customizing Visual Studio
IN THIS CHAPTER
![]() Setting environment options
Setting environment options
![]() Changing menus and commands
Changing menus and commands
![]() Developing project template
Developing project template
In Chapters 1 and 2 of this minibook, you see how to install Visual Studio and make a new project. You also see the bits that the user interface gives you. The fun's over. Now you get to make it work for you.
Visual Studio offers a dizzying array of options for customization. Used poorly, these options have the real potential to make the lives of you and your coworkers miserable. Used correctly, they have the potential to double your productivity.
At its most basic, customization involves setting options to better match your environment, style, and work patterns. These options include everything from your code visibility to source control. The idea is to configure Visual Studio’s options to your exact specifications.
The next step is to improve the usability of the application to match your day-to-day operations. One of the best overall ways to accomplish this is to change the button toolbar and the menus to make what you use every day more available.
Finally, you take a short deep dive into the Project and File templates of Visual Studio. Did you know that when you create a new XAML file (for example) or C# Class file that the contents of that file are controlled by a template and are editable? No? Well, you do now!
All these things put together amount to a rather flexible Integrated Development Environment (IDE). Although the flexibility is nice, the goal is to set a configuration that matches your style. Only you know what that configuration is. This chapter tells you what the software can do and gives you the tools to make the changes.
 You don’t have to type the source code for this chapter manually. In fact, using the downloadable source is a lot easier. You can find the source for this chapter in the
 CSAIO4D2EBK04CH03 folder of the downloadable source. See the Introduction for details on how to find these source files.
Setting Options
Choose the Tools ⇒ Options menu item to open the Options dialog box, which looks like Figure 3-1 (the number of pages you see depends on the Visual Studio features you have installed). (The Environment section may be opened to show its content when you open the dialog box; click the arrow next to the section header to see other entries.) It is generally designed to set Boolean type options like Show This or Provide That or to change paths to resources where Visual Studio will store certain files.

FIGURE 3-1: The default Options screen.
Those details are all well and good, but the goal of this chapter is to introduce the other things that the options provide. The following sections start with adjustments to your environment, describe the remarkable language options, and then explore some neat stuff.
Environment
The Environment section is where you begin in the Options dialog box. Sections here include the font details of code-editing screens, key mappings, and the Really Simple Syndication (RSS) feed settings for the Start window.
The EnvironmentFonts and Colors settings will probably be of interest only when you need them for a presentation or you have a special visual need (such as color blindness or an inability to see small type). Sixteen points is the size of choice for most developers. There are a number of “code friendly” fonts out there, and this is where you select them.
Defining the Start window
The Start window is the first graphical element you see when you start Visual Studio. You find this setting in the EnvironmentGeneral page. The On Startup, Open drop-down list box contains these options:
- Start Window: The default option is to open the Start window so that you can open a recent solution, create a new solution, obtain code from an online repository, or open either a remote or local project or solution that you haven't opened recently (or perhaps at all).
- Most Recent Solution: This option ignores the Start window completely and gets you right to work. If you want, you can still view the Start window by closing the solution (use File⇒ Close Solution). Use this option if you tend not to view the Start window content.
- Empty Environment: This option opens Visual Studio without doing anything at all. Use this option when you don’t know how you’d like to start your session but find it annoying when Visual Studio tries to make the decision for you.
Keyboard commands
The most useful settings in the Options dialog box are the EnvironmentKeyboard settings. This is where you make Visual Studio feel like Visual C# 2005 through the use of keyboard mappings.
 Keyboard mappings are key combinations you set to run commands from the keyboard rather than by clicking your mouse. For example, one commonly used mapping is Ctrl+C, which copies material in the same way that clicking the Edit menu and then clicking Copy does. Many developers feel that using keyboard mapped commands makes the development experience faster and easier.
The keyboard settings essentially enable you to set keyboard commands for any menu selection in Visual Studio. The Apply the Following Additional Keyboard Mapping Scheme drop-down list enables the key mappings to be different, if you happen to like the mappings of other development environments.
Language
The term language doesn’t mean the EnvironmentInternational Settings page settings that enable you to change the display language of Visual Studio if you have additional language packs installed (although that is neat). It refers to the programming languages you work in with Visual Studio. The Text Editor section is where you can provide settings for each of these programming languages.
The Text Editor options change the way the Code Editor behaves. All the languages that Visual Studio supports out of the box appear in the tree view under the main heading and allow you to alter general options, tabbing, formatting, sometimes advanced options, and miscellaneous features of the text editor.
For instance, look at Text EditorC#. To open the C# section, click the right-pointing arrow next to Text Editor and then the right-pointing arrow next to C#. The first view in the Options panel is the General view. Here you can change the default options for statement completion, various behavior settings, and what the Code Editor should display aside from the code. The other panels you can use are
- Scroll Bars: This section contains options for how and when Visual Studio displays scroll bars. You have individual settings for horizontal and vertical scroll bars. All the annotation options also appear on this page.
- Tabs: This section is for people who are obsessive about the tabbing of their source code. The Tabs panel determines how many spaces make up a tab, and whether Visual Studio should insert them automatically.
- Advanced: This section should probably be called Miscellaneous. Everything that doesn’t fit into other categories is here. In this section, handling comments, interface implementation, and refactoring details all have a check box that basically says, “If you don’t like it when Visual Studio does this, click here.”
- Code Style: This section has a number of subsections that all define how Visual Studio presents and formats code.
- General: Contains all the options for defining how Visual Studio presents
thisobject entries. - Formatting: Formatting in C# is very in-depth. Generally, C# coders are a little persnickety about the look of their code. Visual Studio does a lot of work to help make your code look the way you want it, but you have to tell it what to do. Options for formatting include: General (automatic formatting features); Indentation; Newlines; Spacing; and Wrapping.
- Naming: This page contains options for determining when and how Visual Studio alerts you to potential naming issues in your code. For example, there is an option for ensuring that you start all interface names with the letter I. If you create an interface that doesn’t have a name that begins with I, the compiler reports it as a Required Style error at the Severity Level you prefer.
- General: Contains all the options for defining how Visual Studio presents
- IntelliSense: This section determines how IntelliSense works within the editor. For example, you can determine whether to include completion lists as part of the IntelliSense selections.
Neat stuff
Here’s a short list of rarely used features. Right now, they probably won’t make a lot of sense, but you will remember them when you need them later.
- To implement a new source control provider, first install the package (for instance, Turtle for CodePlex’s SVN implementation, or Team System) and then go to Source Control in Options to pick the one you want to use.
- Many people recommend that you store your projects in a short file path, like
C:Projects. You can change where you store projects in the Projects and SolutionsLocations section in the Options dialog box. - The NuGet Package Manager is an essential part of Visual Studio because it lets you add specialized functionality. Visual Studio ships with just one source (albeit an extensive one). However, you can add more sources as needed in the NuGet Package ManagerPackage Sources section. For an example of another source you might want to use, check out the article at
https://www.grapecity.com/componentone/docs/uwp/online-getting-started/config-nugetpackage.html. - You can teach Visual Studio to open a file with a given extension in a certain file editor using the Text Editor / File Extension section of the Options panel.
Creating Your Own Templates
Older versions of Visual Studio required that you rely on various hacks to create custom templates. Visual Studio 2019 and above provide a much better, much easier approach to working with custom templates using the Visual Studio IDE so that you don't have to worry about hacking into anything. The following sections provide quick methods for creating both project and item templates of your own.
Developing a project template
Just setting up a project can take a while. If you commonly use a particular project configuration, performing all the required work just once makes more sense than doing it every time you create a new project. The following steps help you create a custom project template that contains both a console application and a class file. However, you can use this approach for creating any sort of custom project template that you require.
Click Create a New Project.
You see a selection of project templates.
Highlight the Console App (.NET Framework) entry and click Next.
You see the Configure Your New Project page of the wizard.
Type ConsoleAndClass in the Project Name field, select a location for this project, check Place Solution and Project in the Same Directory, and choose a .NET Framework version. Click Create.
Visual Studio creates a new project for you. At this point, you can provide any generic project-specific changes you need to include. However, remember that you’re not creating a full-fledged application — you’re creating a template, a sort of a blank.
Right-click the ConsoleAndClass project in Solution Explorer and choose Add ⇒ New ⇒ Item from the context menu.
Visual Studio displays the Add New Item dialog box.
Select the Class Entry and click Add.
There is no need to give the class a specific name because you’ll rename it when you use the template.
Perform any required class configuration.
If you configure your classes in a certain way every time, this is the time to make the required changes. The goal is to save time.
Choose File ⇒ Save All.
The reason you don’t bother to compile your template is that it really shouldn’t contain anything to compile — just the configuration for an application you want to create later.
Choose Project ⇒ Export Template.
You see the Choose Template Type page, shown in Figure 3-2. This is where you choose between a project and an item template, and which elements you want to appear in the template.
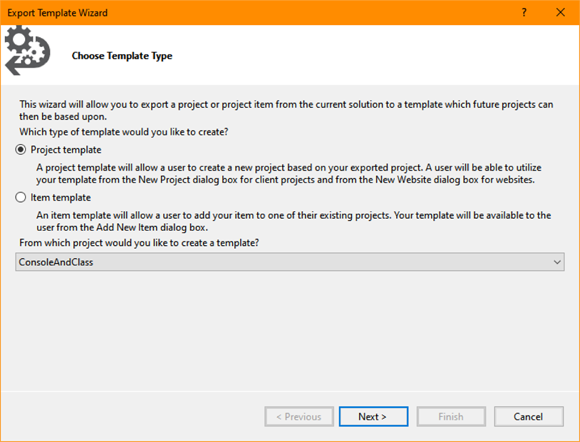
FIGURE 3-2: Determine whether you want to create a project or item template.
Select Project Template and click Next.
The wizard presents the Select Template Options page, shown in Figure 3-3. This is where you provide definitions for the template name, how to use it, and any graphics you want associated with the template. Note that the Output Location field is automatically defined for you, and you can’t change it. Your template will appear in a
.zipfile, but you’ll be able to access it like any other template. Here are some suggestions for the various field entries:- Choose a name that defines precisely what the template will do, such as Console and Class Combined.
- Provide a template description that adds to the class name, such as “This template creates a .NET Framework console application with a class added.”
- Make sure that the icon image is distinctive so that your template sticks out in the list. The example uses a red clock icon to signify that the template will save time.
- Create a screenshot for the preview image field if your template is graphical in nature. Otherwise, you really don’t need an entry in this field.

FIGURE 3-3: Provide enough information for others to use your template.
Fill out the template information and click Finish.
The wizard opens a copy of Explorer for you to the folder containing your template, such as C:Users<User Name>DocumentsVisual Studio 2022My Exported Templates. You can copy the template to the Clipboard and store it in another location if you plan to share it with others. It's also possible to make template modifications by hacking into the files, something you should probably avoid unless you really do need to make changes.
Make sure to close any projects and restart Visual Studio after creating a new project template. At this point, you can use your template to create new projects. However, template filtering doesn’t work with user-defined templates, so you must set the filters to All Languages, All Platforms, and All Project Types to see your template, which will normally appear at the top of the list, as shown in Figure 3-4. If you don’t see your template, you can search for it using the Search for Templates field at the top of the Create a New Project dialog box.
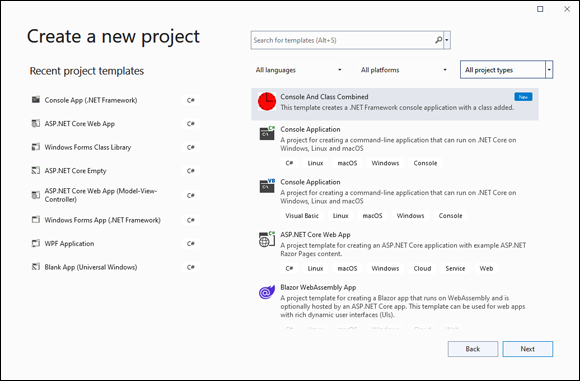
FIGURE 3-4: Your template will normally appear first in the list after you remove all filtering.
Developing an item template
Creating an item template is similar to creating a project template. You begin by creating a project, just as you do in the previous section. Follow these steps to create an item template (which differs from a project template):
Choose Project⇒ Export Template.
You see the Choose Template Type page of the Export Template Wizard, shown previously in Figure 3-2.
Select Item Template and choose a project, if necessary; then click Next.
The wizard displays the Select Item to Export page, shown in Figure 3-5.
Select one of the items to export, such as AssemblyInfo.cs if you have a common set of configuration items you add to a project; then click Next.
You see the Select Item References page, shown in Figure 3-6. This is where you ensure that the item template will have the specific references needed to perform correctly.
 In some cases, you can avoid potential future conflicts by not selecting any of the references at all, but doing so would mean that the item would have to work with literally any version of the .NET Framework. Many items you export will require a reference to
 Systemas a minimum. If you have any doubts, check the actual code files for the item you want to export to determine when a specific reference version is needed.
FIGURE 3-5: Determine which item to export from the project.

FIGURE 3-6: Select the references needed to use your item successfully.
Select any required references and then click Next.
You see the Select Template Options page, shown in Figure 3-3.
Fill out the required information for each field and then click Finish.
The wizard opens a copy of Explorer to the folder containing your template, such as
C:Users<User Name>DocumentsVisual Studio 2022My Exported Templates. The template will appear in a.zipfile.
Make sure that you close any projects and restart Visual Studio after creating a new item template. At this point, you can right-click the project entry in Solution Explorer and choose Add⇒ New Item from the context menu. You’ll see the new item templates you created in the Add New Item dialog box.