
Chapter 6. Metering and Chargeback in Enterprise Manager 12c
The previous few chapters covered setting up Schema as a Service, using the self-service portal with schema as a service, setting up Pluggable Database as a Service (PDBaaS), and using the self-service portal with PDBaaS, all of these using Oracle Enterprise Manager Cloud Control 12c. Now let’s move on to an area where you start to get more back from all of this work—metering and chargeback.
Metering is something that Enterprise Manager has done since its very first release. It’s a measurement of some form of resource—obviously in the case of Enterprise Manager, it’s a measurement of how much computing resources, such as CPU, I/O, memory, and storage, have been used by an object. When I think way back when to the very first release of Enterprise Manager I ever saw—the 0.76 release, whenever that was!—the thing that comes to mind most is that it had this remarkably pretty tablespace map that showed you diagrammatically just where every block in an object was in a particular tablespace. Remarkably pretty, as I said—but virtually useless because all you could do was look at the pretty colors!
Clearly, metering has come a long, long way since that time, and if you have had Enterprise Manager up and running for some time, you now have at your fingertips metrics on so many different things that you may be lost trying to work out what you can do with it all. Well, that’s where chargeback comes into play. In simple terms, chargeback is (as the name implies) an accounting tool. In Enterprise Manager terms, it has three main functions:
• It provides a way of aggregating the enormous amount of metrics data that Enterprise Manager collects.
• It provides reports to the consumers of those metrics of how much they have used of those particular metrics.
• If you have set it up to do so, it provides a way for the IT department to charge those consumers for the resources they have used.
Let’s expand on that last point a little further. Within the Chargeback application, the cloud administrator can set specific charges for specific resources. As an example, you might decide to charge $1 a month per gigabyte of memory used for a database. Those charges can be transferred to some form of billing application, such as Oracle’s Self-Service E-Billing application, and end up being charged as a real cost to the end user. However, only a small number of people are actually using it to charge a cost to the end user. There are two reasons for that:
• First, most end users are still not in the mindset of paying for computing power in the same way as they pay for other utilities—that is, paying for the amount of computing power that is actually consumed, as we do with our gas, electricity, and phone bills.
• Second, most people have difficulty deciding just how much to charge for a “unit” (whatever that might be) of computing power. In fact, arguments over just what to charge for a unit of computing power have been known to last much longer than any meetings held to decide to actually implement chargeback!
The end result is that customers often choose to implement showback rather than chargeback. Showback is in many ways similar to chargeback. It’s the ability to provide reports to end users that show how much computing resource they have used and to show them how much it would have cost the end users if the IT department had decided to actually charge for it. In some ways, this information is just as beneficial to the IT department as to the end users because it allows them to have a much better grasp on what they need to know for budgeting purposes, and it avoids the endless arguments about whether end users are being charged too much.
Terminology
Okay, let’s talk about some of the new terminology you need to understand before we implement chargeback (from now on, we use the term chargeback to cover both chargeback and showback for simplicity’s sake, and because the feature is actually called chargeback in the Enterprise Manager Cloud Control product).
Chargeback Entities
The first concept you need to understand is that of a chargeback entity. In Enterprise Manager terms, a target typically uses some form of resource, and the chargeback application calculates the cost of that resource usage. In releases prior to Enterprise Manager 12.1.0.4, the chargeback application collected configuration information and metrics for a subset of Enterprise Manager targets. In the 12.1.0.4 release, you can add chargeback support for Enterprise Manager target types for which there is no current out-of-the-box chargeback support via the use of Enterprise Manager command-line interface (EMCLI) verbs. These chargeback targets, both out-of-the-box and custom types, are collectively known as entities.
You can get a complete list of all the items that we can set up chargeback for by clicking on Charge Plans, then Charge Item Library (see Figure 6.1).
Figure 6.1. Accessing the charge item library

You will then see a list of all the charge items, including a brief description of each item (see Figure 6.2).
Figure 6.2. Available charge items

Charge Plans
A charge plan is what Enterprise Manager uses to associate the resources being charged for and the rates at which they are charged. Two types of charge plans are available:
• Universal charge plan: The universal charge plan contains the rates for CPU, storage, and memory. Although it is called the “universal” charge plan, it isn’t really universal because it doesn’t apply to all entity types. For example, it is not applicable to J2EE applications.
• Extended charge plans: The universal charge plan is an obvious starting point, but there are many situations where entity-specific charges are required. Let’s say you have a lot of people who understand Linux, but there is a new environment being added to your data center that requires Windows knowledge. If you had to pay a contractor to come in to look after that environment because it was outside your knowledge zone, it would be fair to charge usage of the Windows environment at a higher rate. As another example, let’s say your standard environments did not use Real Application Clusters (RAC), and a new environment has come in that requires the high availability you can get from a RAC environment. RAC is, of course, a database option that you need to pay an additional license fee for, so that should be charged at a higher rate. An extended charge plan can be used to meet these sorts of requirements, as it provides greater flexibility to chargeback administrators. Extended charge plans allow you to do the following:
• Set up specific charges for specific entities
• Define rates based on configuration and usage
• Assign a flat rate regardless of configuration or usage
• Override the rates set for the universal plan
An out-of-the-box extended plan is provided that you can use as a basis for creating your own extended plans. This plan defines charges based on machine sizes for the Oracle Virtual Machine Guest entity.
Cost Centers
Obviously, when charges for resource usage are implemented, these charges must be assigned to something. In the chargeback application, the costs are assigned to a cost center. Cost centers are typically organized in a hierarchy and may correspond to different parts of an organization—for example, sales, development, human resources, and so forth—or they may correspond to different customers—for example, where you are a hosting company and host multiple customer environments. In either case, cost centers are defined as a hierarchy within the chargeback application. You can also import cost centers that have been implemented in your Lightweight Directory Access Protocol (LDAP) server if you want to use those.
Reports
The main benefit you get from using chargeback is the vast amount of information it puts at your fingertips. This information can be reported on by administrators in a variety of formats available via the Oracle BI Publisher tool, including pie charts and bar graphs, and you can drill down to charges based on a specific cost center, entity type, or resource. You can also make use of trending reports over time and can use this information to aid you in your IT budget planning. Outside the chargeback application itself, self-service users can view chargeback information related to the resources they have used within the self-service portal.
Setting Up Chargeback
Now you have an understanding of the capabilities of the chargeback application in the Enterprise Manager product suite. The next step, of course, is to set it up. Chargeback can be set up in Enterprise Manager 12c by any user with the EM_CBA_ADMIN role or, of course, as SYSMAN.
1. Once you are logged in as a user with the relevant privileges, follow the path Enterprise → Chargeback (see Figure 6.3).
Figure 6.3. Setting up chargeback, step 1

2. The default currency symbol displayed in the chargeback application is the dollar sign ($). Note that this is just a symbol and does not have any impact on chargeback calculations, but you can change it if you want by clicking on the Settings tab (see Figure 6.4).
Figure 6.4. Setting up chargeback, step 2

3. You can enter a new currency symbol here, but for this environment, leave it at the default and click Change Plans (see Figure 6.5).
Figure 6.5. Setting up chargeback, step 3

4. The first thing to do is set rates for the universal charge plan, which covers the CPU usage, memory allocation, and storage allocation metrics. Click Set Rates (see Figure 6.6).
Figure 6.6. Setting up chargeback, step 4

5. Set the rates appropriately, and click Save (see Figure 6.7).
Figure 6.7. Setting up chargeback, step 5

6. The universal charge plan is useful, but in some situations, you may want to apply charges on other entities. That’s where an extended charge plan can be used. To create an extended charge plan, click Create, then click Plan (see Figure 6.8).
Figure 6.8. Setting up chargeback, step 6

7. Provide a meaningful name for the charge plan, then click Add to select an entity type for which you can set rates (see Figure 6.9).
Figure 6.9. Setting up chargeback, step 7

8. You can add multiple entity types to the charge plan at once, so choose Host and Oracle Pluggable Database, then click OK (see Figure 6.10).
Figure 6.10. Setting up chargeback, step 8

9. You can now set up specific configurations for each entity type by selecting the entity and then clicking Setup Configurations (see Figure 6.11).
Figure 6.11. Setting up chargeback, step 9

10. Click the Add button (see Figure 6.12).
Figure 6.12. Setting up chargeback, step 10

11. In this example, different rates are charged for different machine architectures. This is the sort of thing you would do if you wanted to charge more for maintaining machines that are either outdated or for which you have less skill and may need to bring in consultants. To do this, you can set the Condition Item to Machine Architecture, then click the Search button to search for different values you can choose (see Figure 6.13).
Figure 6.13. Setting up chargeback, step 11

12. In this scenario, we want to set up three different configurations:
• Intel x86_64 as our default
• Intel i686 as more expensive because it’s outdated
• PA-RISC 64-bit as more expensive because we have less skills in that area
You can select each in turn from the list, and click OK, as in Figure 6.14.
Figure 6.14. Setting up chargeback, step 12

13. Click OK (see Figure 6.15).
Figure 6.15. Setting up chargeback, step 13

14. On the Setup Configurations pop-up, click OK again (see Figure 6.16).
Figure 6.16. Setting up chargeback, step 14

15. You can now specify multipliers for each architecture. In this example, the preferred architecture (Intel x86-64) is set at 1, Intel i686 is set to 2x, PA-RISC 64 bit is set to 1.5x, and other architectures is set to 3x. Next, can click Oracle Pluggable Database to set up configurations for it (see Figure 6.17).
Figure 6.17. Setting up chargeback, step 15

16. Click Setup Configurations (see Figure 6.18).
Figure 6.18. Setting up chargeback, step 16

17. Click Add (see Figure 6.19).
Figure 6.19. Setting up chargeback, step 17

18. On the Add Configuration pop-up, select Version for the Condition Item (see Figure 6.20).
Figure 6.20. Setting up chargeback, step 18

19. In this scenario, clients who have not switched to the latest version of the database are charged more as a way of encouraging migration, so the Condition Operator and Condition Value are set to validate that. The option to charge more when using paid options such as partitioning and so on is also available. Click OK (see Figure 6.21).
Figure 6.21. Setting up chargeback, step 19

20. On the Setup Configurations pop-up, click OK (see Figure 6.22).
Figure 6.22. Setting up chargeback, step 20

21. Back on the Create Plan: HR Chargeback Plan page, you can increase the multiplier for configurations that aren’t on the latest version, and click Save (see Figure 6.23).
Figure 6.23. Setting up chargeback, step 21

22. Once the charge plans are configured satisfactorily, you can also define cost centers that the charges will be assigned to. Cost centers are normally configured in a business hierarchy, so let’s walk through the process of building that. Start by clicking the Cost Centers tab (see Figure 6.24).
Figure 6.24. Setting up chargeback, step 22

23. Cost centers can either be imported from an existing LDAP configuration (done via the Action menu) or defined in the chargeback application. In this example, they are added to the chargeback application. To do this, click Add (see Figure 6.25).
Figure 6.25. Setting up chargeback, step 23

24. On the New Cost Center pop-up, enter a cost center name and display name, then click OK (see Figure 6.26).
Figure 6.26. Setting up chargeback, step 24

25. You can do this as many times as you like. To add a cost center in a business hierarchy, first create a cost center at the top level (as shown previously), then create a cost center using the Member of radio button, and select the relevant top-level cost center, as shown here (see Figure 6.27).
Figure 6.27. Setting up chargeback, step 25

26. Once you have defined all the cost centers you need, the next step is to add the relevant entities. An entity is either a target in Enterprise Manager or a custom resource that has been added to Enterprise Manager. Custom resources can include target types for which there is no current out-of-the-box chargeback support (covered in more detail in the documentation). To add entities, click the Entities tab (see Figure 6.28).
Figure 6.28. Setting up chargeback, step 26

27. Click Add Entities (see Figure 6.29).
Figure 6.29. Setting up chargeback, step 27

28. This will start the Add Entities wizard. Click Add to select targets for chargeback (see Figure 6.30).
Figure 6.30. Setting up chargeback, step 28

29. Now it is time to add hosts. To search for hosts to add, deselect All, and select Host from the Target Type dropdown (see Figure 6.31).
Figure 6.31. Setting up chargeback, step 29

30. From the list of hosts, select one or more hosts to add as an entity, and click Select (see Figure 6.32).
Figure 6.32. Setting up chargeback, step 30

31. On the Make Assignments wizard step, select the entity name, and click Assign Plan (see Figure 6.33).
Figure 6.33. Setting up chargeback, step 31

32. Select HR Chargeback Plan, and click OK to add the chargeback plan to this host (see Figure 6.34).
Figure 6.34. Setting up chargeback, step 32

33. To add a cost center to this host, click Assign Cost Center (see Figure 6.35).
Figure 6.35. Setting up chargeback, step 33

34. Select the relevant cost center, and click OK (see Figure 6.36).
Figure 6.36. Setting up chargeback, step 34

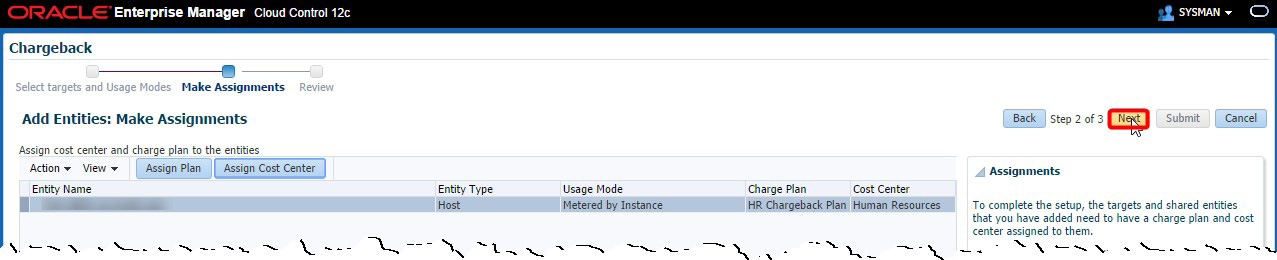
35. Back on the Make Assignments step, click Next (see Figure 6.37).
Figure 6.37. Setting up chargeback, step 35
36. Review the settings, and if they are correct, click Submit (see Figure 6.38).
Figure 6.38. Setting up chargeback, step 36

37. You can walk through the same process to add one of the container databases and a platform as a service (PaaS) infrastructure zone as well. Once that has been done, you can schedule an on-demand data collection to start seeing the information for these entities in the chargeback application. To do that, select On-demand data collection from the Action dropdown menu (see Figure 6.39).
Figure 6.39. Setting up chargeback, step 37

38. Click Yes on the Confirmation pop-up (see Figure 6.40).
Figure 6.40. Setting up chargeback, step 38

39. In the Information message, click here to view the job status (see Figure 6.41).
Figure 6.41. Setting up chargeback, step 39

40. Once the job status changes to 1 Succeeded, click Enterprise, then Chargeback (see Figure 6.42).
Figure 6.42. Setting up chargeback, step 40

41. You should see information being collected both in the Summary and Usage Trends regions (see Figure 6.43).
Figure 6.43. Setting up chargeback, step 41

It might seem like a very long-winded setup, but in reality, chargeback takes only a short time to configure. Of course, once it’s configured, you then have all the joys of getting money out of the end clients for their resource usage—good luck with that one, I can’t help you there!
Summary
The metering functionality that has been part of the Enterprise Manager product since its very early days allows us to both collate and report on the resource usage of particular targets within the Enterprise Manager environment. In combination with the chargeback application that was introduced with the 12c version of Enterprise Manager, you can now show business units the real cost of providing computing power. You can even charge the end users for the costs of their resource usage.