
C H A P T E R 8
![]()
Using Web Helper Packages
As we saw in Chapter 4, WebMatrix helpers are self-contained packages of code and markup designed to enable and encourage reuse and rapid development. So far, we have worked with two of the three types of WebMatrix helpers. We have used built-in, native helpers, such as WebMail and WebSecurity, and created our own custom helpers. In this chapter, we will look at the third type: web helpers.
Web helpers are third-party helpers, downloaded from the Internet and “plugged in” to your site, usually in order to facilitate some sort of interaction with a third-party service. There are many examples of these helpers, some of which we will look at in this chapter, including Amazon, Twitter, Facebook, Gravatar, Google, Bing, PayPal, and Windows Azure.
The WebMatrix IDE includes an integrated Package Manager that simplifies the process of finding and installing web helper packages, which we will look at in the first part of the chapter. The latter part of the chapter will focus on the implementation of one of the more popular packages: the ASP.NET Web Helpers Library.
Accessing the Package Manager
The Package Manager is accessed via the ASP.NET Web Pages Administration button in the Content Pane of the Site Workspace (see Figure 8-1). In order for this button to be available, there must be at least one Razor file in the project. To this end, create a new WebMatrix project based on the Empty Web Site template and add a new file to the root of the site called Default.cshtml. Navigate to the Site Workspace, using the Workspace Selector and click the ASP.NET Web Pages Administration button.
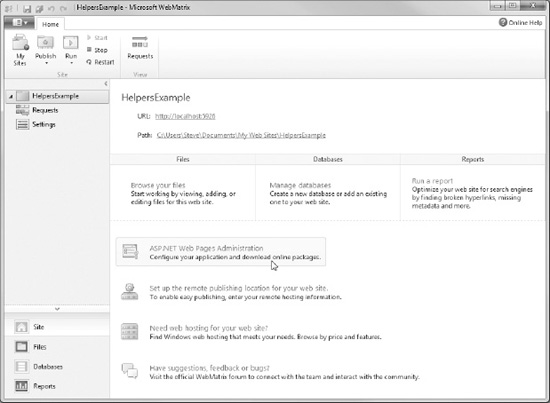
Figure 8-1. The ASP.NET Web Pages Administration button
The ASP.NET Web Pages Administration site opens in the default browser, as shown in Figure 8-2. The first time this site is accessed, you must create a password. Enter a suitably secure password—I would suggest a password of no fewer than eight characters that includes a combination of letters, numbers, and symbols—then click the Create Password button.

Figure 8-2. The first time the ASP.NET Web Pages Administration site is accessed, a password must be created.
Once the password has been created, the following message will be displayed (see Figure 8-3).

Figure 8-3. The security check message is presented after a new password has been created.
In order to prevent unwanted parties gaining access to your site's administration pages, whenever a new password is created, a new _Password.config file is created in the /App_Data/Admin folder containing the password hash. Before you can gain access to the administration pages via the browser you must rename this file to Password.config by removing the leading underscore (see Figure 8-4). This step ensures that the password cannot be set or changed by someone who does not have full access to your web server, as only users with administrative rights to the server's file system are able to rename the _Password.config file.
![]() Note You may need to refresh the Navigation Pane in the Files workspace before you can see the /App_Data/Admin folder. You can do this by right-clicking the root folder and choosing Refresh from the context menu.
Note You may need to refresh the Navigation Pane in the Files workspace before you can see the /App_Data/Admin folder. You can do this by right-clicking the root folder and choosing Refresh from the context menu.
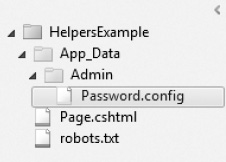
Figure 8-4. The _Password.config file must be renamed to Password.config to prove you have administrative rights to the web server before you can gain access to the ASP.NET Web Pages Administration site.
Once you have successfully renamed the file, click the “Click here” link at the bottom of the Security Check page in the browser (see Figure 8-3), and enter the password you just created into the password textbox. When you click the Login button you will be taken directly to the Package Manager (see Figure 8-5).
From this screen, you can scroll through and search the directory of available packages. As you browse through the list, you will see the vast array of web helper packages available. All the packages are listed with some descriptive text outlining the content of each package and its functionality.
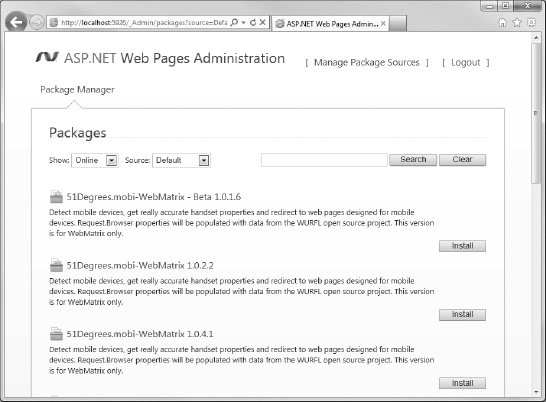
Figure 8-5. The WebMatrix Package Manager
Installing a Package
Later in the chapter, we will look at the ASP.NET Web Helpers Library package. This package contains some useful helpers to aid you in implementing some simple social networking features from platforms such as Twitter, Facebook, Bing, and Gravatar.
Search or browse the list to find the ASP.NET Web Helpers Library 1.15 package. Once you have located it, click the Install button, read the information presented, and click Install again to accept the license terms for the package.
The Package Manager will now automatically download the relevant package and install the necessary files and folders in your site. In the case of this package, a file called Microsoft.Web.Helpers.dll will be installed within a bin folder in the root of the site.
Once the package has been successfully downloaded and installed, the Package Manager will display a notification similar to that seen in Figure 8-6.
Figure 8-6. Notification of a successful package installation
The Package Manager can also remove previously installed packages from your site. If you search again for the package we just installed, you will notice that an Uninstall button is now available.
Close the browser instance containing the Package Manager and return to the IDE. Again, you may need to refresh the Navigation Pane within the Files workspace to see the changes made to the site file structure (see Figure 8-7).
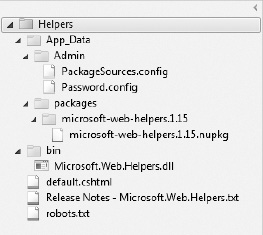
Figure 8-7. The site file structure following installation of the ASP.NET Web Helpers Library 1.15 package
Now that we have installed the ASP.NET Web Helpers Library to our site, we will spend the rest of the chapter exploring how it can be used to implement some useful social networking and other features.
The ASP.NET Web Helpers Library
The ASP.NET Web Helpers Library is a package of web helpers which enables you to easily add commonly used social networking functions from a number of providers, such as Facebook, Twitter, Bing, and Gravatar, into your site. The package is maintained by Microsoft. In this section, we will look at some of the most useful helpers included in the package.
Adding Search with Bing
The Bing helper makes it easy to add elementary web search capabilities to your site. The helper displays a simple interface, allowing the user to search for keywords both within your site and across the Internet as a whole, displaying results from the Microsoft Bing search engine.
To display a Bing Search Box we simply need to call the Bing.Searchbox() method. The helper method has two parameters, SiteTitle and SiteUrl, for which we will need to provide values. Setting the SiteTitle property sets the title of the search tab. The SiteUrl property contains the URL of the site to be searched.
We will set the values of the two properties in a code block at the top of the page and call the Bing.Searchbox() helper method at the relevant place in the page body. Amend the contents of the Default.cshtml file we added earlier to look like the following:
@{

    Bing.SiteTitle = "My Blog";

    Bing.SiteUrl = "http://blog.stevelydford.com";

}


<!DOCTYPE html>


<html lang="en">

    <head>

        <meta charset="utf-8" />

        <title></title>

    </head>

    <body>

        @Bing.SearchBox()

    </body>

</html>
Run this page from the WebMatrix IDE. A Bing search box is rendered in the page, like the one seen here in Figure 8-8.

Figure 8-8. The Bing search box rendered in the browser
When the user enters one or more keywords and clicks the search button, they are taken to a list of results on the Bing web site, which is opened in a new browser tab (see Figure 8-9).

Figure 8-9. The search results returned from the Bing site
The helper can only return results for pages that have been indexed by the Bing search engine; these results are displayed on the Bing web site in a way that does not allow customization. Clearly, implementation of this is not appropriate for every application; however, when it is used in a suitable context, it does provide some useful functionality, particularly on sites with reasonably static content.
![]() Note We will create our own internal search helper in Chapter 10, during the creation of our full e-commerce application, which will produce search results from a database.
Note We will create our own internal search helper in Chapter 10, during the creation of our full e-commerce application, which will produce search results from a database.
The hugely popular online social networking service, Twitter, allows users to send and receive text-based messages of up to 140 characters, known as Tweets. Tweets are by default publicly visible, but can be restricted to an individual follower or group of followers. Users can search for individual tweets using a particular keyword, or “Follow” other Twitter users to receive all their public Tweets. When a user logs in to the Twitter.com web site, they see all the public Tweets posted by the users they follow displayed in reverse-chronological order; this display is known as the timeline.
The ASP.NET Web Helpers Library contains a Twitter helper that explains a number of methods that can be used to facilitate interaction and integration with the Twitter.com application programming interface (API).
Displaying Tweets
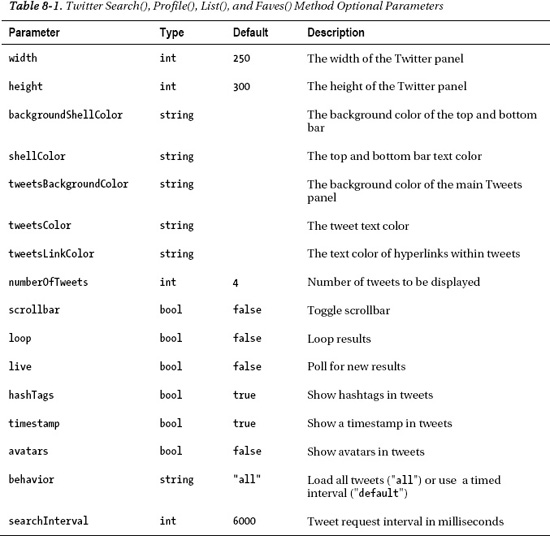
There are four methods that can be used to display formatted Twitter data in a page: Twitter.Search(), Twitter.Profile(), Twitter.List(), and Twitter.Faves(). All four methods have a set of optional parameters, as described in Table 8-1.
To use the helpers, it is simply a matter of calling the methods and setting any of the optional parameters as desired.
The Twitter helper also provides a Search() method to enable you to display Tweets about a particular subject, based on a keyword search. To use the Search() method, we pass in the search term as a string. In this example, we will also set the tweetsBackgroundColor parameter to be light grey:
@Twitter.Search("Football", tweetsBackgroundColor: "#eeeeee")
This method call will display a Twitter search widget similar to that seen in Figure 8-10.

Figure 8-10. Output from the Twitter.Search() helper
The Twitter.Profile() and Twitter.Faves() methods require a Twitter username to be passed as a parameter, as can be seen in the following:
@Twitter.Profile("stevelydford")

@Twitter.Faves("stevelydford")
The Twitter.List() method requires that you pass in a Twitter username and the name of a public list associated to that user.
@Twitter.List("stevelydford", "web-development")
Twitter Buttons
Twitter buttons can be added to your web site to let users share content via Twitter, without having to leave the page. Two methods exist within the Twitter helper for displaying Twitter buttons. The first, FollowButton(), displays a button which, when clicked, sets the user's Twitter account to follow the specified Twitter profile.
The method has one required parameter, username, which is the Twitter username of the account to be followed.
@Twitter.FollowButton("stevelydford")
This displays the default Follow Me button, seen here in Figure 8-11.

Figure 8-11. The default Follow Me button
Six button designs are available and can be specified using the optional followStyle parameter. The accepted values for the followStyle parameter are: follow_me, follow_us, twitter, t_logo, t_small and t_mini. The following code example shows each design, with the output shown in Figure 8-12:
@Twitter.FollowButton("stevelydford", followStyle: "follow_me")

@Twitter.FollowButton("stevelydford", followStyle: "follow_us")

@Twitter.FollowButton("stevelydford", followStyle: "twitter")

@Twitter.FollowButton("stevelydford", followStyle: "t_logo")

@Twitter.FollowButton("stevelydford", followStyle: "t_small")

@Twitter.FollowButton("stevelydford", followStyle: "t_mini")
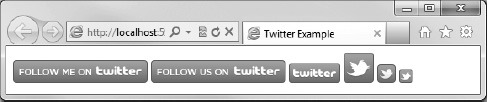
Figure 8-12. The six Twitter Follow button styles
Each button can also be displayed in one of three color schemes: the default blue scheme “a,” a light grey scheme “b,” and a dark scheme “c.” Figure 8-13 shows the output of the following code example, which displays a follow_us style button in each of the following three color schemes:
@Twitter.FollowButton("stevelydford", followStyle: "follow_us", followColor: "a")

@Twitter.FollowButton("stevelydford", followStyle: "follow_us", followColor: "b")

@Twitter.FollowButton("stevelydford", followStyle: "follow_us", followColor: "c")

Figure 8-13. The three Follow button color schemes
When a user clicks the Follow button they are taken to the Twitter web site, where the specified profile information is displayed.
The second Twitter button helper method available is TweetButton(). When a user clicks on a Tweet button, a pre-defined Tweet, which can contain a hyperlink to a specified page, is created; the user can then send this Tweet from their personal Twitter account. This enables them to easily share a link to your site, without having to leave the current page.
The TweetButton() method has a number of parameters, listed in Table 8-2, all of which are optional.

The following code produces the Tweet button shown in Figure 8-14.
@Twitter.TweetButton(tweetText: "Check this out!",

                     userName: "stevelydford",

                     relatedUsername: "Apress",

                     relatedUserDescription: "Great selection of tech books")
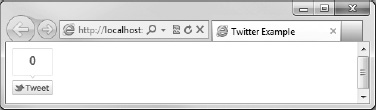
Figure 8-14. The Tweet button rendered in the browser
When the button is clicked, a new browser window is opened, allowing the user to log in to the Twitter.com web site if they are not already authenticated. Once they are logged in, they will be able to amend the message and post the Tweet (see Figure 8-15).
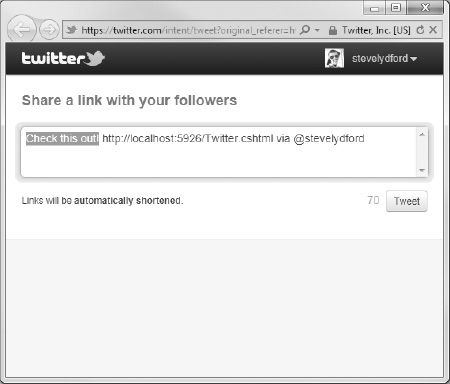
Figure 8-15. The tweet displayed in a new browser window on the Twitter web site
The Facebook helper contains methods that interact with the popular social networking site. The methods fall into two categories: those that require you to register your application on the Facebook.com web site and those that do not. In this section, we will look at methods in both categories and investigate the steps required to register and initialize the application.
Using Facebook without registration or initialization
Adding a “Like Button”
When a user logs in to the Facebook.com web site, a News Feed is displayed, which shows status updates and other news stories that have been posted by the user's friends.
One of the most commonly used Facebook helper methods is the LikeButton(). This displays a Facebook Like button which, when clicked by the user, inserts a story into the user's friends' News Feed with a link back to your web site.
The LikeButton() method has one mandatory parameter, href, which is the URL of the page you wish the Facebook News Feed item to link back to. The following method call displays a Facebook Like button linking back to the ASP.NET web site (see Figure 8-16).
@Facebook.LikeButton("www.asp.net")
Figure 8-16. The Facebook Like button
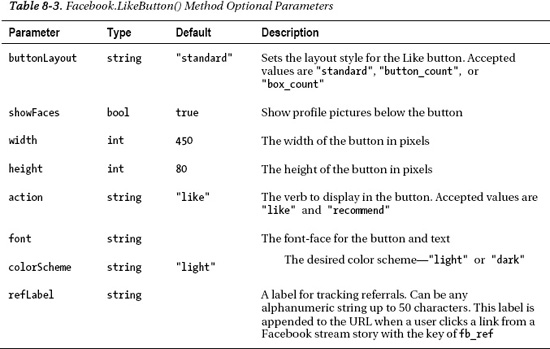
The LikeButton() method also has a number of optional parameters, listed here in Table 8-3.
![]() Tip You can see the number of likes your domain receives each day, along with some demographic detail, by registering at www.facebook.com/insights.
Tip You can see the number of likes your domain receives each day, along with some demographic detail, by registering at www.facebook.com/insights.
Adding an Activity Feed
The Facebook.ActivityFeed() helper displays a panel detailing recent activity on your site. The Activity Feed displays stories when users “Like” content on your site, comment on a page in your site using a Facebook Comments box (see the Enabling Facebook Comments section later in the chapter), or share content from your site on Facebook. If a user is currently logged in to Facebook, they will receive personalized content in the Activity Feed, prioritizing content from their friends.
To display an Activity Feed in your page, call the Facebook.ActivityFeed() method, passing in the domain name of your site. The following example shows an activity feed for the BBC web site, shown in Figure 8-17.
@Facebook.ActivityFeed("www.bbc.co.uk")
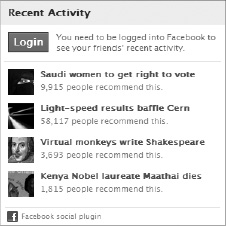
Figure 8-17. The output of the Facebook.ActivityFeed() helper method
The optional parameters available for the ActivityFeed() method are listed here in Table 8-4.

Adding a Recommendations Feed
The Recommendations() helper method displays a panel, similar to the Activity Feed, showing personalized recommendations to users based on all the social interactions with URLs from your site.
To display a Recommendations panel, call the Facebook.Recommendations() helper, passing in your sites domain. The following code displays a Recommendations panel for the ASP.NET web site (see Figure 8-18).
@Facebook.Recommendations("www.asp.net")

Figure 8-18. The Facebook Recommendations panel
The Recommendations() method has a number of optional parameters, which are listed in Table 8-5.

![]() Caution When specifying the required domain name to a relevant Facebook helper method, the domain is matched exactly. For example, if you were to specify
Caution When specifying the required domain name to a relevant Facebook helper method, the domain is matched exactly. For example, if you were to specify news.example.com as the domain, results from catalog.example.com would not be shown.
Helpers requiring initialization
As mentioned previously, some Facebook helpers require initialization before they can be used. In order to initialize, you must first register your application with Facebook in order to obtain an Application ID and Application Secret.
Registering your Facebook Application
To register your Facebook Application, you will need to visit the Create Application page of the Facebook Developers site at http://www.facebook.com/developers/createapp.php.
Click the Create New App button, give your application a name and click Continue (see Figure 8-19).

Figure 8-19. Creating a new Facebook application
Once you have created the application, you will be taken to the Application Summary page; here you will need to make a note of the App ID and App Secret displayed at the top of the page. Finally, choose the option that allows your app to integrate with Facebook via a web site and enter the Site URL (see Figure 8-20).
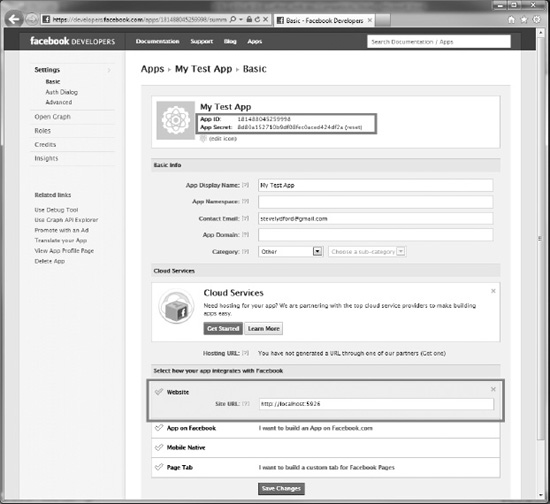
Figure 8-20. The Facebook Application Summary page
If you are working locally using IIS Express in WebMatrix, you will need to set the Site URL to the URL shown at the top of the Content Pane in the Site Workspace in the WebMatrix IDE (see Figure 8-21).
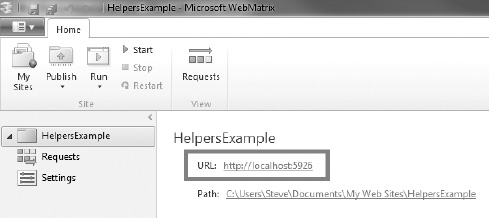
Figure 8-21. Getting the site URL from the Site Workspace in the WebMatrix IDE
Click the Save Changes button and close the browser.
![]() Note It is possible that the port number used by WebMatrix will change when the PC is restarted or another project is opened. In order for the Facebook helpers to initialize correctly, the port number must match that specified in the Facebook Application Summary page. The port to be used by WebMatrix can be changed in the Settings area of the Site workspace.
Note It is possible that the port number used by WebMatrix will change when the PC is restarted or another project is opened. In order for the Facebook helpers to initialize correctly, the port number must match that specified in the Facebook Application Summary page. The port to be used by WebMatrix can be changed in the Settings area of the Site workspace.
Initializing the Facebook helper
To initialize the Facebook helper, create an _AppStart.cshtml page in the root of your site (if one does not already exist) and call the Facebook.Initialize() method, passing in your App ID and App Secret.
@{

    Facebook.Initialize("181488045259998", "8d80a152710b9df08fec0aced424df2a");

}
Before calling any of the Facebook methods that require initialization, you must call the GetInitializationScripts() method. This method initializes the Facebook JavaScript SDK (Software Development Kit), on which the helper relies, for the use of eXtended FaceBook Markup Language (XFBML). You only need to call the GetInitializationScripts() once per page, but it must be called before any calls are made to dependent Facebook helper methods.
![]() Note More information on the Facebook JavaScript SDK and XFBML can be found at http://developers.facebook.com/docs/reference/javascript/
Note More information on the Facebook JavaScript SDK and XFBML can be found at http://developers.facebook.com/docs/reference/javascript/
Enabling Facebook Comments
Adding a Facebook Comments Box to your page enables commenting on your site by Facebook users. If a user leaves the “Post to Facebook” check box ticked, the comment will be posted to their friends' News Feeds, which will also include a link back to your site. The Facebook Comments Box also contains a Like button and provides facilities to administer comments.
To display a Facebook Comments Box, call the Facebook.Comments() method, specifying any of the optional parameters listed in Table 8-6 that you may require.
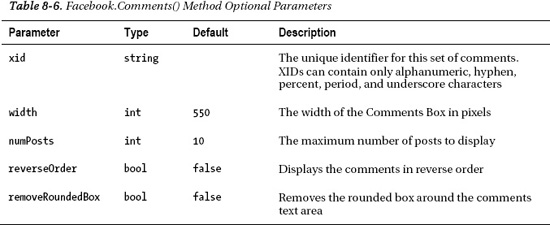
The following code displays the Comments Box shown in Figure 8-22:
@Facebook.GetInitializationScripts()

@Facebook.Comments()

Figure 8-22. The Facebook Comments Box rendered by the Facebook.Comments() helper method
Facepile
The Facepile helper displays the profile pictures of friends of the registered Facebook users that are either currently using your site or have “liked” it in the past. If none of the user's Facebook friends have “Liked” the site and none are currently using it, nothing will be displayed.
The following code displays the UI shown in Figure 8-23:
@Facebook.GetInitializationScripts()

@Facebook.Facepile()
![]() Note The Facebook.GetInitializationScripts() method should be called once per page only. It must be called before the use of any Facebook helper methods that require initialization.
Note The Facebook.GetInitializationScripts() method should be called once per page only. It must be called before the use of any Facebook helper methods that require initialization.
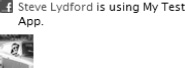
Figure 8-23. The UI presented by the Facepile helper method
The Facepile() method exposes two optional parameters— maxRows, which determines the maximum number of profile pictures to be displayed, and width, which sets the width of the Facepile panel in pixels.
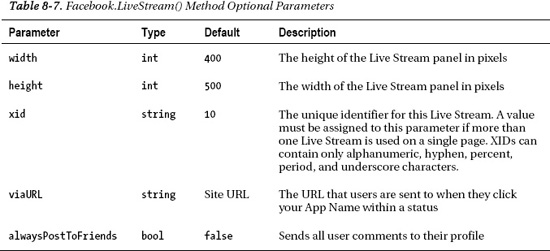
Live Stream
The Facebook Live Stream service lets users of your site share activities and comments in real time. Live Stream is designed to be used when running live real-time events, such as live video streaming of webcasts, live web chats, webinars, or online multiplayer games.
Table 8-7 details the optional parameters exposed by the Facebook.LiveStream() method.
To display a Live Stream panel in your page call the Facebook.LiveStream() method. The following code displays the output seen in Figure 8-24.
@Facebook.GetInitializationScripts()

@Facebook.LiveStream(height: 300)
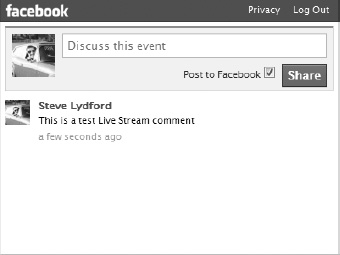
Figure 8-24. The Facebook Live Stream panel output by the Facebook.LiveStream() helper method
![]() Note Using the Facebook helper class, it is also possible to integrate Facebook Login with your site membership system. This feature allows users to login to your site using their Facebook account. We will implement this functionality in our example e-commerce site in Chapter 10.
Note Using the Facebook helper class, it is also possible to integrate Facebook Login with your site membership system. This feature allows users to login to your site using their Facebook account. We will implement this functionality in our example e-commerce site in Chapter 10.
Gravatar
Gravatar (which stands for Globally Recognized Avatar) enables users to upload a small personal image and associate it to an e-mail address. Web sites that use the Gravatar.com service can request the image associated with an e-mail address for display in a web page. This is commonly used to display user images against account information, blog posts, or comments.
In WebMatrix, you can display the Gravatar image associated to an e-mail address by calling the Gravatar.GetHtml() method. The only parameter required by the method is the e-mail address, although there are a number of optional parameters available. By default, if the e-mail address passed to the method doesn't have an associated Gravatar account, the default Gravatar image will be displayed. Table 8-8 explains each of the additional optional parameters.

The following code displays the output seen in Figure 8-25:
@* Email address has associated Gravatar account. *@

@Gravatar.GetHtml("[email protected]")


@* Email address does not have an associated Gravatar

   account. Default image will be displayed instead. *@

@Gravatar.GetHtml("[email protected]")
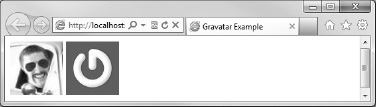
Figure 8-25. A valid Gravatar returned on the left and the default image returned on the right
Gravatar images are self-rated by the owner of the associated account. The rating property can be set to one of five values; G, PG, R, X or Default. This is the maximum permitted image rating that you wish to be displayed. By default, only G rated images are returned. To set the maximum permitted rating, assign the relevant GravatarRating enumeration to the rating property.
@Gravatar.GetHtml("[email protected]", rating: GravatarRating.G)
Xbox Live Gamer Card
An Xbox Live Gamer Card is an information panel that summarizes a user's profile on Microsoft's Xbox Live online multiplayer gaming service. The ASP.NET Web Helpers Library contains a GamerCard helper, which renders an Xbox Live Gamer Card to the browser (see Figure 8-26). The helper has one method, GetHtml(), which requires a one string parameter, gamerTag.
@GamerCard.GetHtml("stinky53")
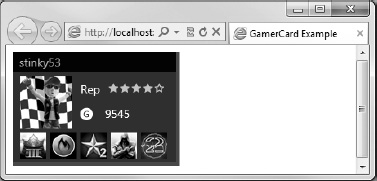
Figure 8-26. GamerCard output
LinkShare
The LinkShare helper renders a set of flair buttons that link to various social bookmarking sites, such as Twitter, Facebook, Digg, and Reddit. To display the LinkShare helper, you call the LinkShare.GetHtml() method, passing in the page title.
@LinkShare.GetHtml("LinkShare Example")
The GetHtml() method has four optional parameters, detailed in Table 8.9.

The linkSite's parameter accepts an array of LinkShareSite enumerations. For example, to display just the Digg, Facebook, Reddit, and StumbleUpon flair buttons, you could use the following code, the output of which is shown in Figure 8-27.
<!DOCTYPE html>


<html lang="en">

    <head>

        <meta charset="utf-8" />

        <title>LinkShare Example</title>

        <style>

            #linkshare a { text-decoration:none }

        </style>

    </head>

    <body>

        <h1>LinkShare Example</h1>

        <div id="linkshare">

            @LinkShare.GetHtml("LinkShare Example",

                            pageLinkBack: "http://www.asp.net",

                            linkSites: new LinkShareSite[] { LinkShareSite.Digg,

                                                             LinkShareSite.Facebook,

                                                             LinkShareSite.Reddit,

                                                             LinkShareSite.StumbleUpon }

                            )

        </div>

    </body>

</html>
You will notice that this markup includes some CSS styling to tidy up the output, preventing unwanted underline characters between buttons.

Figure 8-27. An example of the output rendered by the LinkShare helper
ReCaptcha
The ReCaptcha helper is used to help prevent automated programs (often called bots) submitting data to the forms in your site. The helper displays a CAPTCHA (Completely Automated Public Turing test to tell Computers and Humans Apart) test, which is validated by the reCAPTCHA service (http://www.recaptcha.net). The test displays an image of two distorted words, which the user must enter correctly in order to successfully submit the form.
In order to use the reCAPTCHA service, your web site must be registered at http://www.recaptcha.net. Once you have successfully registered, you will be assigned a public and private key. When the form is submitted, the reCAPTCHA value entered by the user is sent to the recaptcha.net service, along with the public key. If the test validates correctly, the service returns the private key against which you can validate in a post request handler.
![]() Tip When registering on the recaptcha.net web site, requesting a global key will ensure that you can test your code locally. When you deploy your site, you should obtain new keys specific to the required domain.
Tip When registering on the recaptcha.net web site, requesting a global key will ensure that you can test your code locally. When you deploy your site, you should obtain new keys specific to the required domain.
The following code sample displays the form seen in Figure 8-28, displaying the ReCaptcha helper using the GetHtml() method. When the form is submitted, the POST request handler validates the ReCaptcha helper against the private key using the ReCaptcha.Validate() method and adds an error to the page ModelStateDictionary if necessary.
@{

    var PUBLIC_KEY = "6PqBf8gSAA1AAKjVivoiBcEWHFM94a9l-V1bVKOQ";

    var PRIVATE_KEY = "6PqBf8gSAA1AAC19mhZXPGF69t6cGfr6YG3s6lsL";


    if (IsPost)

    {

        // Validate the reCAPTCHA test

        if (!ReCaptcha.Validate(PRIVATE_KEY)) {

            ModelState.AddError("ReCatcha", "The reCAPTCHA test was answered incorrectly");

        }


        if (ModelState.IsValid)

        {

            // Process form data here...

        }

    }

}

<!DOCTYPE html>


<html lang="en">

    <head>

        <meta charset="utf-8" />

        <title>ReCaptcha Example</title>

        <style>

            form div { margin-bottom: 15px; }

            .validation-summary-errors { font-weight: bold; color: #FF0000; }

        </style>

    </head>

    <body>

        <h1>ReCaptcha Example</h1>

        @Html.ValidationSummary("Please correct the following errors:")
        <form action="" method="post">

            <div>

                @Html.Label("Email Address:", "emailAddress")<br />

                @Html.TextBox("emailAddress")

            </div>

            <div>

                @ReCaptcha.GetHtml(PUBLIC_KEY, theme: "white")

            </div>

            <div>

                <input type="submit" />

            </div>

        </form>

    </body>

</html>
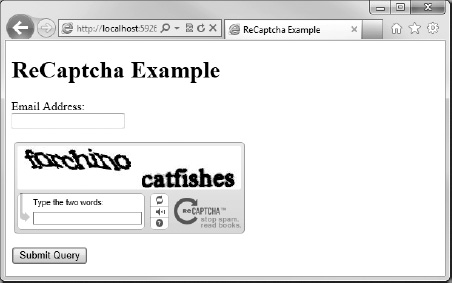
Figure 8-28. Protecting HTML forms against bots using the ReCaptcha helper
![]() Note For more details on the reCAPTCHA service visit http://www.recaptcha.net. More information on the WebMatrix ReCaptcha helper can be found at http://msdn.microsoft.com/en-us/library/microsoft.web.helpers.recaptcha.aspx.
Note For more details on the reCAPTCHA service visit http://www.recaptcha.net. More information on the WebMatrix ReCaptcha helper can be found at http://msdn.microsoft.com/en-us/library/microsoft.web.helpers.recaptcha.aspx.
Analytics
The Analytics class contains methods that generate the scripts necessary to track your page using three of the most popular free, web-based traffic analysis services.
- Google Analytics - http://www.google.com/analytics/
- Yahoo Marketing Solutions - https://marketingsolutions.login.yahoo.com/
- StatCounter - http://www.statcounter.com/
The methods are all very simple to use and simply inject some JavaScript code into your page to enable tracking by the relevant service. First you must register with the analysis service of your choice then call the relevant method (see the following code example), passing in the account details provided to you at registration.
// Google Analytics

@Analytics.GetGoogleHtml(your-analytics-webPropertyId-here)


// Yahoo Marketing Solutions

@Analytics.GetYahooHtml(your-yahoo-accountId-here)


// StatCounter.com

@Analytics.GetStatCounterHtml(your-statCounter-project-id-here, your-security-key-here)
![]() Note The ASP.NET Web Helpers Library package also includes helpers for use with video and images. We will discuss these in depth in Chapter 12- Advanced WebMatrix.
Note The ASP.NET Web Helpers Library package also includes helpers for use with video and images. We will discuss these in depth in Chapter 12- Advanced WebMatrix.
Summary
This chapter has seen the introduction of external web helpers for use in WebMatrix applications. We have seen how to access the WebMatrix IDE Package Manager and use it to install third-party web helper packages.
In the second part of the chapter, we looked in detail at some of the more useful helpers provided within the ASP.NET Web Helpers Library package. These helpers provide easy to use integration features for several popular sites, such as Twitter, Facebook, Bing, reCAPTCHA and Gravatar.
Many other helper packages are available through the Package Manager, some of which we will make use of as we move through the next three chapters, in which we will build a complete e-commerce application using WebMatrix and ASP.NET Web Pages.