Chapter 6
Starting a Tumblr Blog
In This Chapter
![]() Getting familiar with micro blogs
Getting familiar with micro blogs
![]() Creating a Tumblr micro blog
Creating a Tumblr micro blog
![]() Posting to your micro blog on Tumblr
Posting to your micro blog on Tumblr
![]() Customizing the look and functionality of a Tumblr blog
Customizing the look and functionality of a Tumblr blog
![]() Taking a look at your micro blog
Taking a look at your micro blog
Do you think blogging might just be too much work? Before you dismiss my question as sarcastic, consider this: Technorati's 2011 State of the Blogosphere (http://technorati.com/social-media/article/state-of-the-blogosphere-2011-introduction/) study indicated that 40 percent of the surveyed bloggers spend more than three hours a week on their blogs, with half of the respondents taking the time to respond individually to reader comments. That's not an insignificant amount of time, and not everyone has that kind of time to devote to blogging.
So, if you're interested in blogging but worried about time, a micro blog might be an alternative you should consider. Micro blogging is pretty much what it sounds like — creating very short blog posts. But the micro blog may have all the other usual trappings of a blog, such as comments, RSS feeds, and so on.
In this chapter, I introduce you to micro blogging options and walk you through starting a micro blog using Tumblr.
Introducing Micro Blogging
Micro blogging is characterized by very short, quick, and frequent blog posts, often produced from some nontraditional publishing tools such as mobile phones, e-mail, instant messages, and text messages. However, you can still use a web interface to produce a micro blog!
Some micro bloggers use their blogs as mechanisms to collect and archive interesting tidbits of information that they come across while they surf the web. Many micro blogs contain very little personal content in the form of writing but do have a lot of photos, video snippets, and links. In fact, many micro bloggers don't explain why they choose to include something in their blogs at all, and in this way, micro blogs can be much more idiosyncratic to the individual blogger than a regular blog.
We Are the Weirdos (http://wearetheweirdos.tumblr.com) is a micro blog produced with Tumblr. (You can read more about Tumblr in the following sections.) Created by Spencer, the blog (see Figure 6-1) is a motley collection of funny photos, screenshots, videos, audio files, and quotes.

Figure 6-1: Spencer's We Are the Weirdos is a good example of a micro blog.
Other micro blogging tools act a little differently. Facebook, LinkedIn, Google+, Twitter, and MySpace — or any social network that allows you to post status updates — are technically micro blogging tools, as well. I spend more time covering the Twitter phenomenon in Chapter 17.
Status updates are very short text posts that are generally used to let others know what you're thinking or doing.
Some popular tools for micro blogging include
- Tumblr (
www.tumblr.com) - Twitter (
www.twitter.com) - App.net (
www.app.net) - Identi.ca (
www.identi.ca)
Starting a Micro Blog with Tumblr
In this section, I walk you through starting a micro blog by using Tumblr, one of the most popular micro blogging services out there.
Tumblr (www.tumblr.com) is hosted blog software, which means that you don't need to have web hosting, a domain name, or anything more than the capability to access the website in order to get started.
 I cover the differences between hosted and installable blog software in Chapter 3.
Signing up and getting started are simple processes. Feel free to skip past nonessential requests such as following five blogs to get you started in your Tumblr experience. To begin blogging on Tumblr, just follow these steps:
- Point your web browser to
www.tumblr.com.The main Tumblr page opens.
- Type your e-mail address into the Email Address text box.
- Type a password of your choice into the Password text box.
- Type a username.
- Click the Sign up button, as shown in Figure
6-2.

Figure 6-2: You can sign up for a Tumblr micro blog quickly and easily.
Tumblr loads a visual test called a CAPTCHA to make sure you are a human and not a spam script.
- Provide your age and accept the Tumblr terms of service.
Creating a Text Post
Tumblr allows you to create blog posts by using text, photos, quotes, links, chat excerpts, audio files, and video. I show you how to post entries that include some of these different elements in the following sections. For more on including audio, such as podcasts, and video in your blog posts on other platforms, jump to Chapters 12, 13, and 14.
Create a quick text post in your Tumblr blog by following these steps:
- Click the Text Post icon (a capital and lowercase letter A) on your Tumblr dashboard.
Tumblr displays the Add a Text Post page.
- (Optional) Give your blog post a title in the Title field.
- Type the text of your blog post in the Post field.
Use as much or as little text as you want.
If you're ready, you can post to your blog right now by clicking Publish, or you can spend a little time making your post fancy. In the following section, you can find out about the options.
Formatting your blog post
Tumblr, like most blog software, gives you the ability to format your blog post while you create it. The icons just above the content field, shown in Figure 6-3, enable you to format what you've written.
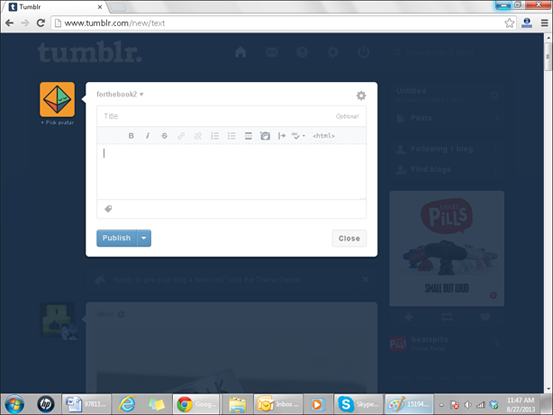
Figure 6-3: Use the formatting tools in Tumblr to format your blog posts.
Tumblr uses a WYSIWG (what you see is what you get) interface, which shows you the effect of a tool in your blog post right when you apply it. This list describes each of the available tools (following the order of the icons from left to right):
- Bold: Make any text in your blog post bold by clicking and dragging over the text that you want to affect and then clicking the Bold icon. The selected text is made bold.
- Italic: Italicize any text in your blog post by clicking and dragging over the text that you want to affect and then clicking the Italic icon. The selected text is then shown in italics.
- Strikethrough: This style is commonly applied to text that you need to correct. Click and drag over the text that you want to affect and then click the Strikethrough icon. The selected text is then made strikethrough.
- Insert/Edit Link: Make any text or image in your blog a clickable link to any website. I give you step-by-step instructions for adding a link in the section “Adding links to your post,” later in this chapter.
- Unlink: You can remove a link that you added by clicking the linked text or photo and then clicking the Unlink icon.
- Ordered List: In web browsers, ordered lists usually appear as numbered lists. You can most easily use this tool by typing each list item into your blog post on a separate line. Click and drag to select all the items; then click the Ordered List icon.
- Unordered List: In web browsers, unordered lists are usually displayed as bulleted lists (like this list you're reading right now). You can most easily use this tool by typing each list item into your blog post on a separate line. Click and drag to select all the items; then click the Unordered List icon.
- Insert “Read More” Break: Break up your post so that only part of it appears on your blog's home page and the rest is visible when the visitor clicks through to the permalink — the page that shows only the post — page.
- Insert/Edit Photo: Add photos to your blog posts by uploading them from your computer. I give you step-by-step instructions for adding photos to your posts in the following section.
- Blockquote: Indent a paragraph clicking anywhere in the line or paragraph of text that you want to affect, and then selecting the Blockquote icon. Your text moves to the right.
- Toggle Spellchecks: Not a great speller? (You aren't alone.) Click the Spellcheck icon to run a spellchecker on your text. If you click the small arrow to the right of the icon, you can choose another language for the spellcheck default.
- Edit HTML Source: Are you an HTML guru? If you want to edit the source code of your blog post directly, click the Edit HTML Source icon and go to town.
Appendix B, at the end of this book, gives you some basic HTML editing code for you to refer to in case you're starting to explore this area.
Use the tools described in the preceding list to format your text, and when you're ready, read the following section to see how to add an image to your text blog post.
Adding an image to your post
Blog posts are more fun with photos! If you want to add an image to a text blog post on your Tumblr blog, you can upload a digital image directly from your computer. Simply click the camera icon in your Text Post window toolbar and select an image file from your computer. After you've uploaded a photo, you can preview how this image will appear in the post by selecting Preview On Blog from the Publish menu (see Figure 6-4).
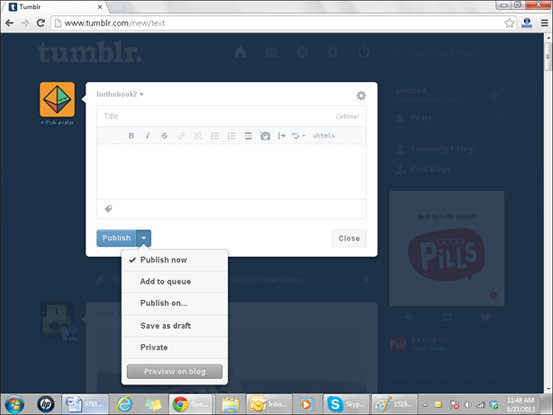
Figure 6-4: The Preview On Blog option allows you to preview your Tumblr post prior to selecting to Publish.
Uploading pictures that don't belong to you? Don't forget to respect copyright law! Hop to Chapter 12 for more information about copyright and images on your blog.
Adding links to your post
Links add a lot of value to a blog post by giving your readers the resources to explore a topic further or find more information about your discussion or idea. As long as you link to useful information, don't hesitate to add links to your posts.
You can add links to both text and images. Follow these steps:
- Select text or click an image in your blog post.
- Click the Insert/Edit Link tool (it's a small piece of chain).
Tumblr opens the Insert/Edit Link window.
- Type or paste a URL into the Link URL text box.
- (Optional) You can give a descriptive title to your link in the Title text box if desired.
- (Optional) If you want to open the link in a new web browser window, select Open Link in a New Window from the Target drop-down list. If you don’t select an option, the default behavior opens the link in the same window.
- Click the Insert link button to add the link to the text or photo in your blog post (see Figure
6-5).

Figure 6-5: Quickly create a link in your blog post by using Tumblr.
The link isn’t clickable in the editing screen because you’d have trouble formatting or removing the link later if it was.
If you want to remove a link that you've created, you can easily do it. Simply click the text or photo on which you placed a link, and then click the Unlink tool.
Publishing your post
When you finish everything that you want to do to your blog post, it's time to publish! Simply click the Publish button (refer to Figure 6-4), and your post appears on your blog for others to view.
 Click the Publish drop-down list (refer to Figure 6-4) to save your post without publishing it or to set a date in the future to launch it.
Customizing How Your Blog Looks
This section introduces you to the customization options for your Tumblr blog. You can change the look and feel of the blog, as well as some of the functionality. Adding your own touches really personalizes a blog and makes it feel more like home.
Get to the customization options by clicking the gear icon in your Tumblr Dashboard (see Figure 6-6).

Figure 6-6: Selecting the customization menu on Tumblr.
A new window opens that allows you to customize and update the following:
- Account: Change your account settings including your e-mail address and password.
- Dashboard: Customize the look of your dashboard by selecting which tools appear.
- Email: Determine when you would like to receive e-mail notifications, such as when your Tumblr blog receives a new follower.
- Blog Customization: Use this menu to access your blog's macro settings as well as customize the appearance of your blog. See “Configuring Your Settings,” later in this chapter, for more information about the settings other than theme customization.
To change the appearance of your blog, select the Tumblr you want to customize from this left sidebar menu. After doing so, select the Customize button from the Theme menu (see Figure 6-7).

Figure 6-7: Selecting Customize allows you to change and edit the visual theme of your Tumblr blog.
Within this setting, you can change everything from your header image to your font style. Get started changing the appearance of your blog by choosing one of the design themes that Tumblr automatically provides. Tumblr offers nearly 200 options. Select the Themes tab in the upper-left corner to get started. If you're good with HTML, you can also use this tab to create your own custom theme. See Appendix B for more information about HTML.
You can also use this section of your Tumblr menu to edit the following:
- Title: Give your Tumblr blog a name.
- Description: Some of the themes (discussed later in this list) display a short description text area. You can describe yourself, your blog, or whatever you think people might want to know about you and what you're doing.
- Background color: This setting allows you to change the link color as well as the title color.
- Font: Use this section to change the body and title font of your blog.
- Header Image: Would you like to add a custom header image? Upload your image file here.
- Appearance: Even if you select a theme that you like, the Appearance tab allows you to further customize the look of your blog.
- Pages: Want to include some content on your blog but don't think it should be a blog post? In this area, you can create a stand-alone page. This might be used to create a bio page or one where you let people contact you.
- Advanced:
- Add Custom CSS: Some themes available on the Theme tab include custom Cascading Style Sheets (CSS) styles. If you're not familiar with CSS, don't worry about it. Custom CSS is part of creating advanced layouts.
- Post per page: Change the number of blog posts that appear on your blog's home page.
Changes can be seen immediately on your blog, which appears to the right of the customization menu, as shown in Figure 6-8.

Figure 6-8: Changes to your Tumblr page appear immediately to the right of the customization menu.
After you make updates in any of the customization tabs, be sure to click the Save button at the top left of the page.
Configuring Your Settings
As mentioned earlier, there are some macro-level settings for your Tumblr blog that you might want to consider customizing as well. You can access these settings by clicking the gear icon in your Tumblr Dashboard and then clicking the name of your blog in the menu.
The settings you can tweak are the following:
- URL: Change the URL of your blog.
- Theme: Change the appearance of your blog.
- Replies: Allow replies to your posts.
- Ask: Allow people to ask you questions.
- Submissions: Allow people to submit posts on your blog.
- Queue: Automatically publish posts you have placed in a queue.
- Facebook: Connect your Tumblr to your Facebook account.
- Twitter: Connect your Tumblr to your Twitter account.
- Post by Email: Retrieve the e-mail address that you can use to post to your Tumblr via e-mail.
- RSS Feeds: Change the settings of your Tumblr's RSS Feed. (See Chapter 16 for more information about RSS.)
- Language: Select the language for your blog.
- Timezone: Select the time zone for your blog.
- Directory: Choose whether your Tumblr will be indexed by search engines and indicate if your blog is NSFW (not safe for work — containing content that may not be safe to view in a work environment, such as explicit photos or language).