Chapter 4
Starting a Blogger Blog
In This Chapter
![]() Signing up with Blogger to get started
Signing up with Blogger to get started
![]() Writing, publishing, and viewing your first blog post
Writing, publishing, and viewing your first blog post
![]() Managing your blog settings
Managing your blog settings
![]() Customizing your blog template to match your style
Customizing your blog template to match your style
Part of the beauty of a blog is how quickly and easily you can get going. You can go from zero to blog in about ten minutes by using good blog software, especially if you go with hosted blog software. One such is Blogger, which is the focus of this chapter. I show you how to set up a blog with Blogger, write and publish blog posts by using its interface, manage your settings, and customize your template to make your space on the web unique.
If you're unfamiliar with hosted blog software versus server-based software, flip to Chapter 3 for an introduction to blog software. In Chapter 5, you can find an introduction to WordPress, which offers both hosted and server-based blogging software. In Chapter 6, you discover Tumblr, a short form of blogging called micro blogging. And in Chapter 7, you can learn about launching a Squarespace blog.
Starting a Blog with Blogger
You can't find a better place to get introduced to blogging than Blogger (www.blogger.com). It's free, fast, and easy to use. Because you can get started so easily, you can use Blogger to play with code and discover how blogging works without having to invest a lot of time and energy in web servers and complicated installation processes.
Blogger promises to get you blogging in three steps: Create an account, name your blog, and choose a template.
 Each hosted blog software platform has a different process for getting started, but each one requires the same kind of information: your contact information and a name for your blog.
Creating an account
Before signing up with Blogger, you need login information (a username and password), which you can get in a couple of ways:
- Through a Google account: If you have an account with one of Google's services, such as Gmail, you can log in to Blogger by using that account information. (Blogger was acquired by the popular search engine company in 2002.)
- Through Blogger: If you don't have a Google account, you get one when you sign up with Blogger.
To sign up for Blogger when you don't have a Google account, follow these steps:
- Click the Get Started button on the Blogger home page (
www.blogger.com). - Click the Sign Up button in the upper-right corner.
- Complete the information fields, including selecting your Google Gmail e-mail and creating a password.
 When you type your password, Blogger indicates whether you need to increase the password strength — meaning how difficult it would be for someone to guess your password.
 - Select whether you would like to set Google as your home page.
- Complete the verification process to prove that you are really a person.
- Agree to the Google Terms of Service and Privacy Policy.
- Elect to allow or not allow Google to use your account information to personalize the content you see.
To sign up for Blogger by using an existing Google account, follow these steps:
- Type your Google account username and password into the appropriate text boxes on the Blogger home page (
www.blogger.com). - Click Sign In.
The Blogger Dashboard appears.
- Click the New Blog link in the Dashboard, and then check out the following section in this chapter.
Naming your blog
When you have a Blogger account set up, you can choose a name for your blog. If you're creating a blog that you plan to actually use (rather than just test, a topic that I discuss in Chapter 3), give a lot of thought to the name that you choose. Your blog name needs to accurately portray your blog's tone and content. If you plan to use this blog as a test space, don't worry too much about choosing a name that has a lot of meaning, but be sure you choose something that you can remember!
To name your Blogger blog, follow these steps:
- Type the name of the blog in the Blog Title text box.
- Decide what phrase you want to use in your URL and type it in the Blog Address text box.
A URL (uniform resource locator) is better known as a web address. To open your blog, visitors type this address into the address bar of their web browsers. You can use any word or phrase that you want as a URL, as long as someone else isn't using it, but you probably want to keep it short, sweet, and memorable so that others can get to your blog quickly and easily. You can't use spaces or punctuation, except dashes, in your URL.
You can type about 35 characters in this text box.
As you type, Google checks to see whether your URL is available and displays the status of that check below the text box.
- Select one of the Template styles shown by clicking the image.
You can change this selection later.
- Click the Create Blog button.
Blogger sets up your new blog and takes you to the Dashboard.
After you complete this setup process, you don't need to repeat it when you want to add a post to your blog. The next time you come to Blogger, simply use the login boxes on the home page to log in and get started posting to your blog.
Using the Dashboard
When Blogger sets up your blog, it adds it to a Dashboard (see Figure 4-1) that displays your new blog and any others you may have. You can use the Dashboard to get quickly to common tasks, such as writing a new post, checking your stats, and viewing your blog.
To write a blog post, click the orange Pencil button next to the name of your blog. The View Blog button opens your blog, allowing you to view it the same way your visitors will see it.
The Posts drop-down list gives you access to all your past posts, pages, comments, stats, earnings information, layout, template, and blog settings. Simply click the arrow in the Posts drop-down list to view all the options, as shown in Figure 4-1.

Figure 4-1: Use the Blogger Dashboard to get started writing blog posts for any blog you maintain using Google.
Writing a Post
You officially join the blogosphere by writing your very first blog post, an entry, for your new blog. (The blogosphere, by the way, is the semi-ironic way that bloggers refer to themselves, their blogs, and the phenomena that is blogging today. You're a member of the blogosphere when you have a blog, regardless of whether you think it's the dumbest word you've heard this year.)
The mechanics of writing a blog post aren't much different from writing an e-mail. Bloggers usually make most posts quite short, and they write those posts directly and conversationally. Of course, you might decide to use your blog to write the next Great American Novel, in which case your posts might be quite a bit longer than what's standard! That's fine, too. Every blog takes on a personality and life of its own. If you want to find your own narrative voice for your blog, go to Chapter 8.
If you've used a web-based e-mail service such as Gmail, Hotmail, or Yahoo!, the Blogger software feels very familiar. To create the post, you simply have to fill in the appropriate text boxes in a form, format the text, and then send it off to its destination — in this case, to your blog, rather than a friend's e-mail inbox.
Follow these steps to write a blog post on Blogger:
- From the Blogger home screen, click the orange Pencil button next to your blog's name.
Blogger opens the Publish entry screen, as shown in Figure 4-2.

Figure 4-2: Posting to your blog is as easy as using a web-based e-mail service.
- Enter a title for your post in the Title text box.
Titles are a lot like newspaper headlines: They should be catchy and informative, and they should encourage visitors to your blog to continue reading the rest of the post.
- Write your post in the large text box.
Consider writing your blog posts in a standard word-processing program, such as Notepad or Microsoft Word — and then saving that post. Too many bloggers have spent hours composing right in the entry box of their blog software, only to find that their Internet connection has failed or another technical problem has occurred — which results in a lost post. You don't want to lose all your carefully considered prose just because your cat pulled the cable modem out of the wall! It's safer to compose offline and then simply copy and paste the text into the blog software.
- Format your post.
Blogger's entry box includes icons across the top that let you change the font style and font size, apply bold and italic to text, and create common formatting styles such as lists. To use these features, select the text that you want to modify by clicking and dragging over the text; then click the appropriate icon or select an option from the desired drop-down list.
 If you know how to write HTML code, you can also try composing your post in the HTML mode. Click the HTML button and include HTML tags in your text, as needed. If you want to find out more about coding HTML, check out the discussion of common tags in Appendix B.
Adding a link
The Link icon deserves special attention. You use this icon whenever you want to link to another blog, a news story, that embarrassing website that your best friend just created, or any other page on the web.
When you want to create a clickable link in your blog post, follow these steps:
- Highlight the text that you want to make clickable by clicking and dragging.
- Click the Link icon.
A pop-up window appears, as shown in Figure 4-3.
- Select Open This Link in a New Window and/or Add ‘rel=nofollow’ Attribute.
- Enter the URL of the website to which you want to link and click OK.

Figure 4-3: Use the Link icon to create clickable text in your blog post.
Include the full URL of the web page in this text box. Don't delete the http:// that's prefilled in the form for you. The URL you use should look like this:
http://www.flickr.com/photos/supersusie/6166429107
And not this: www.flickr.com/photos/supersusie/6166429107
You can most easily make sure that you have the right link by going to the web page to which you want to link. Then copy the URL from the address bar. (Press Ctrl+C to copy and then Ctrl+V to paste; on a Mac, use ![]() rather than Ctrl.) To make sure that the link is going to the right page, you can click the Test This Link link in the Edit Link window to preview the page.
rather than Ctrl.) To make sure that the link is going to the right page, you can click the Test This Link link in the Edit Link window to preview the page.
After you click OK, the linked text appears as underlined blue text in your post. It doesn't become clickable until you publish it.
Don't forget that if you know HTML and would prefer to create the link manually by using HTML code, you can do so on the HTML tab.
Spellchecking your text
Blogger provides a handy tool for anyone who needs help with spelling (and who doesn't?). After you finish writing your post, click the Check Spelling icon. It's the icon that shows the letters ABC with a checkmark below them (refer to Figure 4-2).
Blogger highlights incorrectly spelled words in yellow. Click any misspelled word to see a list of suggested alternatives. Select any suggestion from the list or simply type your own correction.
Including an image
You can make your blog post more appealing by including an image. Longtime bloggers can tell you that adding a photo or artwork encourages visitors to read more of the surrounding text. And, of course, everyone knows how many words that photo is worth!
Blogger has some good built-in tools that allow you to upload an image that's already the right size and format for displaying on the web. For help in formatting photographs from a digital camera or another source, see Chapter 12.
Follow these steps to upload an image from your computer and add it to your blog post:
- Click the Add Image icon.
It looks like a photograph (refer to Figure 4-2).
The Upload window opens.
- Click the Choose Files button to upload an image on your computer.
A File Upload dialog box opens.
- Locate the image that you want to upload from your computer and select it.
- Click Open.
The image is uploaded to Blogger.
- Click Add Selected from the lower-left corner of the Upload screen.
The image is placed in your blog post.
- Select the image and then choose your image formatting options (see Figure
4-4):
- Image Size: Determines how large the display of the image is in your blog post, regardless of the dimensions of the source image. You can choose Small, Medium, or Large.
- Alignment: Determines how text wraps around the image. You can choose None, Left, Center, or Right.
- Caption: Places text directly under the image.

Figure 4-4: Selecting an image you have uploaded allows you to size and align it, as well as add a caption.
You can also add an image to your post from another website, as long as you have permission to use the image or it's in the public domain. (Read more about copyright in Chapter 9.) You can add an image from a site easily by using Blogger. Just follow these steps:
- Find an image or photo on the web that you want to use.
Make sure that you're allowed to use it by checking the website for copyright permission or asking the creator.
- Right-click the image and select Copy Image Location from the menu that opens.
The phrasing of this option may differ from one browser to another. If you don't see anything that looks right, choose Properties from the menu. A window opens that shows you the URL address, which you can then click and drag to highlight. Press Ctrl+C to copy the address (
 +C on a Mac).
 - Head back to Blogger and start a new post, or open one that you've already created.
- Click the Add Image icon.
It looks like a photograph (refer to Figure 4-2).
The Upload window opens.
- Choose the From a URL link and press Ctrl+V (+V on the Mac) to paste the image address into the image URL text box on the right of the window.
Blogger loads a preview of your image.
- Click the Add Selected button to insert the photo in your post.
- Click to select the image to choose from image formatting options (refer to Figure
4-4):
- Image Size: Determines how large the display of the image is in your blog post, regardless of the dimensions of the source image. You can choose Small, Medium, or Large.
- Alignment: Determines how text wraps around the image. You can choose None, Left, Center, or Right.
- Properties: Allows you to provide your image with a title.
- Caption: Places text directly under the image.
Publishing Your Post
When you're satisfied with your blog post, you can publish it so that the world can admire your erudition. Publishing a post isn't hard: Click the orange Publish button at the top of the page. Your post appears on your blog, making it available for others to read.
Before you publish, you can take advantage of three areas of the Blogger Publish page that I find very helpful: previewing, saving as a draft, and selecting post options.
Previewing your post
Before you publish, you can preview what you've created by clicking the Preview button (found at the top-right of the browser window). This preview is WYSIWYG (what you see is what you get), which means that it shows you the post exactly as you formatted it, including links, text colors, embedded images, and so on. The Preview is shown in a new browser window.
I like to preview my post before I publish because I can more easily read for meaning and content at this point. Think of the preview as a last chance to catch grammar problems or even to think twice about what you're posting if it's controversial. Of course, you can also see how the text and content flow around any images that you've added.
If you see changes that you want to make, simply switch back to the editing screen, make your changes, and click the Preview button again.
Configuring post settings
To the right of your blog post, you see the post settings links. These let you decide on a number of important ways your post is handled by Blogger, from when the post is published to whether you allow comments.
Scheduling your post
Many bloggers like to create posts in advance of when they plan to publish them. For example, if you're planning a vacation, you can write several posts before you leave. When you put them into Blogger, click the Schedule link to the right of the post box before you publish your post. Set the date and time you want your post to go live, click Done, and when you click Publish, Blogger will hold your post until that point.
By default, Blogger sets the publication date and time of the entry to the date and time that you began writing that entry. You might choose to change the date or time for a number of reasons:
- Social or professional reasons:
- Create a blog post for a friend's birthday and make the date match the time your friend was born.
- If you're blogging at work, you might want to set your date and time to a period when you weren't supposed to also be at your desk (ahem) working. Chapter 2 discusses blogging and workplace issues in detail (and recommends that you don't blog at work, unless that's part of your job responsibility).
- To work around your schedule:
- If you take a long time to write a post, by the time you're ready to publish it, you might need to put a more realistic time on the entry.
- If you save your post as a draft and publish it later, you can update the date and time to accurately reflect the real publication date.
Allowing comments
You can choose whether you want readers to be able to comment on your blog post by selecting the Options link under Post settings. There are three options: Allow; Don't Allow, Show Existing; and Don't Allow, Hide Existing. Don't Allow, Show Existing keeps already-posted comments visible, even though no one can add new comments.
You can make the decision to turn off comments at any time, so if you decide later that you don't want to receive further comments, you can always edit the entry and turn off this option then.
Most of the time, you want to allow comments; after all, part of what makes a blog exciting to read is the opportunity to interact with the blogger. Sometimes, though, you might write an entry that you don't want to read discussion about, perhaps because you don't want to start a long argument or because the entry has become a target of spammers. You can find more about interacting with your reading community and preventing spam in Chapter 10.
Launching your post
After you have the text and photos laid out nicely and you've chosen your settings, it's time to publish! This is pretty hard, so get ready:
- Click the Publish button at the top of your blog post.
- Ha ha, just kidding. There is no Step 2! Your post is on your blog. Go take a look.
Viewing Your Blog Post
After you publish, you can see how your post looks on the blog. You may find this step rewarding — and you definitely don't want to skip it. Even if you preview your post before publishing, you haven't seen your post in the way that your readers see it. You can do that only by actually going to your blog as it appears to everyone on the web and taking a look.
Computers can still make errors or fail between the moment you click Publish and when the entry shows up on the blog. I like to look at my blog every time I post a new entry to make sure that it actually looks right on the page and that the blog software successfully processed it.
When you click Blogger's Publish button, the system provides you with a handy link to view your blog. Click View Blog to head over to your blog and see your handiwork.
Of course, if you prefer taking the long way, you can always type the web address (the one that you chose when you set up your blog) into the web browser to see your blog without going through the Blogger Dashboard.
While you look at your blog, make sure that the formatting, images, and text look the way that you want them to, and click any links that you created. If anything doesn't work quite properly, go back into Blogger and make changes to your entry.
Selecting the Dashboard Settings
Blog software, as a rule, is quite customizable. As the owner of the blog, you can decide a number of things about the way your blog looks and works, and you can control those elements from the control panel — called the Dashboard in Blogger — of your blog software.
Most blog software packages work quite similarly, and if you know how Blogger works, you can make the most of any other software.
Blogger divides its settings into several areas: Basic, Posts and Comments, Mobile and Email, Language and Formatting, Search Preferences, and Other. I cover important highlights from the settings in the following sections.
You access all the Blogger settings via the Blogger Dashboard. (In other blog software packages, this area is called the control panel, the admin panel, and so on.) To reach the Dashboard, just log in to the Blogger website. If you're already logged in, look for a link to the Dashboard in the upper-left corner of any page and click it. This link is the Blogger icon. My Dashboard is shown back in Figure 4-1.
The Dashboard shows all the blogs that you've started with Blogger. For each blog, you can quickly start a new post, view your blog, or jump into other areas. A single click takes you into the blog settings, or to the template or layout that you're using.
You can access all the Blogger settings for your blog from the Dashboard. Look for the Posts drop-down list (it looks like two pieces of paper) next to the blog you want to configure, and click the arrow to open the menu. Selecting the Settings option (refer to Figure 4-1) takes you into the right area to do everything discussed in this section.
Making basic changes
From the Basic Settings area, you can change the name of your blog (Blogger refers to this name as the blog title) as well as give it a short description. Most of the Blogger templates display the description near the top of the page. Even if you change the title on your blog page, the URL that readers type into a browser to visit your blog stays the same, but you can also change the URL.
You can also add authors to your blog — people who can also contribute blog posts, creating a group blog. To add someone as an author, you simply need that person's e-mail address. If the person you're adding has a Blogger or Google account, I recommend using that address so that all his or her Blogger and Google account services are tied together.
If you aren't happy with the web address for your blog, you can edit the address by changing the Blog*Spot Address setting. For instance, if you start a blog called My New Kitten, Maggie, and your cat grows up (they do that, I hear), you might want to edit both the name and the location of your blog. (You have to make the name change on the Basic Settings tab, which I describe in the preceding section.) Use the Publishing tab to change the URL. For example, you can change
http://mynewkittenmaggie.blogspot.com
into
http://mygrownupcatmaggie.blogspot.com
You can change your address only to one that another Blogger member isn't already using, so you may have to make several tries before you find one that's available. Although you can make changes to the URL of your blog, remember that doing so means that no one can access your blog from the previous address, so anyone who has bookmarked your blog or memorized the address can't reach you after you make the change.
Making comment changes
Comments are both strengths and weaknesses of the blog medium. Both readers and bloggers find the capability to leave a comment, which lets you interact or converse with a blogger, very attractive.
 Commenting has a downside: Spammers have discovered the comment technology, as well. Just as with e-mail, you can expect some commenters to tell you about fabulous mortgage opportunities, Mexican pharmaceuticals, and other less-than-savory possibilities — information neither you nor your readers want.
The Posts and Comments settings help you reduce spam on your blog. One of the best ways to reduce spam is to specify who can comment on your blog. From the Posts and Comments screen, select an option from the Who Can Comment options:
- Anyone: This option allows the widest possible audience, with no limitations on who can comment. It provides no spam prevention, but it also imposes no barriers to leaving a comment to genuine commenters.
- Registered Users: Sets your blog to accept comments only from registered members of Blogger so that you can cut down on some spam. Don't forget that not everyone has a Blogger account — or wants one — so you might lose some real comments.
- Users with Google Accounts: Because Google validates the accounts it creates, letting users who have Google accounts leave comments can help ensure that you get comments from humans rather than spammers.
- Only Members of the Blog: Prevents anyone who isn't a member of your blog from leaving a comment. No one you haven't personally authorized as a member can leave a comment. This option creates a lot of work for you because you have to maintain the list of authorized members, but you don't get any spam.
You can add members to your blog from the Basic Settings page.
Also on the Posts and Comments page, you can specify your comment moderation options. Change the Enable Comment Moderation setting to Always. Turning on comment moderation prevents anyone from posting a comment that you haven't approved. When someone leaves a comment, you get an e-mail that lets you know about the comment. From the Dashboard, you can authorize or reject the publication of the comment. You can also moderate comments via e-mail.
Moderating comments is a lot of work for you, but it improves the quality and readability of comments on your blog for your readers, and it discourages spammers in the future.
Making e-mail changes
On the Mobile and Email settings page, you can turn on a cool feature that allows you to post to your blog by sending an e-mail message. When it's configured, you can simply send an e-mail to the address from any device capable of sending e-mail (such as your smartphone!). The subject of the e-mail becomes the title of the blog post, and the text of the e-mail is the entry body. It's a very quick, easy way to publish to your blog, which makes it great for when you're traveling.
To set up an e-mail address to be used to send a post to your Blogger blog, click the Mobile and Email Settings tab and fill out the Posting Using Email text box. Be sure to save the settings and test to make sure that it works!
In the Mobile and Email page, you can enter an e-mail address in the Comment Notification text box at which you want to receive notification when someone leaves a comment on your blog. This setting helps you keep track of comments left on your blog, especially when you have a lot of old posts on which you might not see comments when you view your blog.
You can also set up your phone with Blogger so that you can post using SMS/MMS. This is especially cool for photo bloggers who use their phones to capture images.
Customizing Your Blog
The look that you picked when you started your blog might be just fine, but many bloggers want to tweak and customize the look and feel of their blogs — I know I did when I started working on my blog. I was using personal words and pictures, and I wanted to make the rest of the site look more like my own website rather than a Blogger design.
Blogger differentiates between the template and layout of your blog. The template dictates the look of the blog; the layout is the placement of the elements of the blog.
When you start your Blogger blog, you choose a template, and that template determines the look and feel of your blog as well as the placement of the elements and what those elements are. However, you should think of the template and the layout it comes with as a starting point; it's not set in stone.
You can change the look of a Blogger blog in four ways:
- Change the template you are using completely.
- Customize an existing template using the Template Designer.
- Create your own template in HTML (see the “Editing templates old-skool: Using code” sidebar).
- Edit the layout of your template to move, add, and remove elements.
Choosing a new template
One of the fun features of Blogger allows you to choose from a number of templates for your blog. The template determines both the look and feel of your blog as well as how the blog elements appear on the page. Blogger has many templates to choose from, and don't forget that you can customize or change the template later if your first choice no longer looks as fresh in six months. (For more info, see the “Using the Template Designer” section, later in this chapter.)
To choose a template, follow these steps:
- From the Dashboard, select Template from the Posts drop-down list.
- Use the scrollbar to browse through the available templates in the Choose a Template screen.
The previews on this page give you an idea of how your blog would look if you used the various templates.
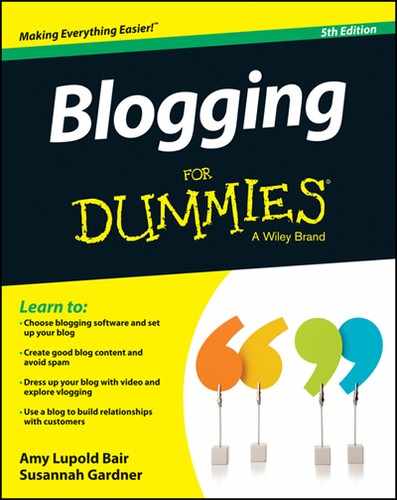
- When you find something intriguing, click the thumbnail image.
A larger image of the template opens in the window so that you can take a closer look, as shown in Figure 4-5.
You can preview as many or as few templates as you want. To close a preview without implementing the template, click the X in the upper-right corner of the preview window.
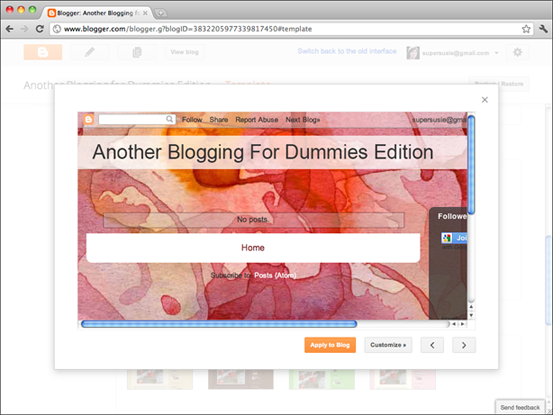
Figure 4-5: You can preview the Blogger templates when you start a new blog.
- After you decide on a template, click the Apply to Blog button on the preview window or click the Apply to Blog link under the template thumbnail.
Blogger displays a confirmation message that the template has been implemented on your blog.
Using the Template Designer
Don't know any HTML but still want to tweak certain elements of your blog's design just a little? You're in luck — the Blogger Template Designer gives you some excellent tools to do just that. In fact, I think you'll be pleasantly surprised to discover just how many things you can change easily.
The Template Designer gives you the capability to change:
- The font face, size, and color of text, links, navigation elements, and sidebar elements
- The background color, image, or both
- Widths of the columns on your blog
- Layouts of your blog to use one, two, three, four, or even five columns
In fact, you can even use the Template Designer to insert some of your own custom styles, if you're up to date with HTML and CSS.
To use the Blogger Template Designer, follow these steps:
- From the Dashboard, select Template from the Posts drop-down list.
- Click the Customize button under the Template you're currently using.
The Template Designer opens.
- Click the Background link in the left column and click the thumbnail in the Background Image box.
The Select Background Image window opens.
- Browse the available backgrounds and select one to preview it, as shown in Figure
4-6.
Looking for something specific? Choose one of the image categories in the left side of the window to see topically selected images, such as Shopping, Technology, or Nature.
You can upload an image from your computer to use as a background by selecting Upload image.

Figure 4-6: Select a new background image within the Blogger Template Designer.
- Click Done.
- If desired, choose a new color theme from the options in the Background page of the Template Designer.
The themes set background, link, text, and other element colors.
- Click the Layout link from the left side of the Template Designer.
This opens the layout page.
- Select the thumbnail that uses the number of columns you want your blog to have.
You can also select the layout to use in the footer — that's the bottom area of your blog.
Selecting a thumbnail implements that layout on your blog.
- Click the Advanced link on the left side of the Template Designer.
- Select an element to customize from the available list.
In Figure 4-7, I customize the Blog Title.
You may customize each element in the following ways:
Font Face: Choose from the standard web fonts, such as Arial, Times New Roman, and many fancier web fonts.
Font Style and Size: Bold, italicize, and make text larger or smaller that the template's initial settings.
Color: Select a color for the element by using the following selection suggestions:
- Hexadecimal Code: If you know the hexadecimal code for the color that you want to use, you can type it into this text box. Hexadecimal code is a code that contains letters and numbers that equate to a color. Primarily graphic and web designers use hexadecimal codes, so don’t worry if this seems like gibberish to you.
- Color Picker: Click the drop-down list on the color picker to really fine-tune an exact color choice (see Figure 4-7).
- Colors from This Template: These colors are already in use in your template.
- Suggested Colors: This palette shows colors that Blogger thinks fit well with the colors already in use.
- Background Color: Choose a color for the background of the element you are customizing. The ways you can select a color are the same as for the font color choices.
Figure 4-7: Select new colors for many elements with the Blogger Template Designer.
When you click a color, Blogger shows a preview of how it looks on your blog in the lower half of the screen.
- After you make your edits, click Apply to Blog.
A Blogger page opens, displaying a confirmation that it has saved your edits. You can return to the Blogger home page or continue making changes in the Template Designer.
Editing page elements
The Layout area of Blogger (see Figure 4-8) gives you, the blogger, a ground-breaking tool that allows you to have detailed control over the layout and look of your blog without requiring you to become an HTML guru and stay up late figuring out the intricacies of web publishing. This kind of editing control reflects the growing do-it-yourself attitude found in the blogosphere: Bloggers want sites that reflect their own sensibilities, but not everyone has the time to become an expert or the budget to hire one.
This access also reflects the growing expertise of many computer users who can edit photographs and create graphics, and it gives them the capability to make the most of those skills.
In the Layout screen (refer to Figure 4-8), a wireframe of your blog template appears. A wireframe is a visual representation of the template layout that uses only outlines, or boxes, of the elements.

Figure 4-8: Use the Layout page in Blogger to customize your blog layout.
The following list explains how you can use the wireframe features to customize your page:
- Edit page elements. Click the Edit link for any page element that is already being used to change its formatting. What you can change depends on what kind of element it is and the features Blogger has given you access to. For example, clicking Edit on the Blog Posts area lets you edit:
- The number of posts on the page
- The date style
- Wording of the byline, labels, and comments areas
- Social networking sharing tools such as Twitter, Facebook, and Google+
- Ad placement in your page
- The order of elements in a blog post
- Add a gadget. Click the Add a Gadget link to place in your sidebar polls, images, lists, advertising, and more from a library of Blogger-provided elements. You have many to choose from, but here’s a quick list to give you a feel for the options:
- Move page elements. Click and drag them to a new position.
- Preview edits that you've made. See how your changes look before you save them to your blog by clicking the Preview button.
- Revert to the original version of your template. Click the Clear Edits button.
You can also remove many elements on the page. Click Edit and look for a Remove button for anything you don't want to include on your blog. Don't worry if you change your mind later — you can always add them back in.