We already know how to create a basic project, and we took a tour of Android Studio. In this chapter, we’ll look at what makes up an Android application.
What makes up an Android project
Overview of Android components
Android Manifest file
Intents
What makes up an Android Project
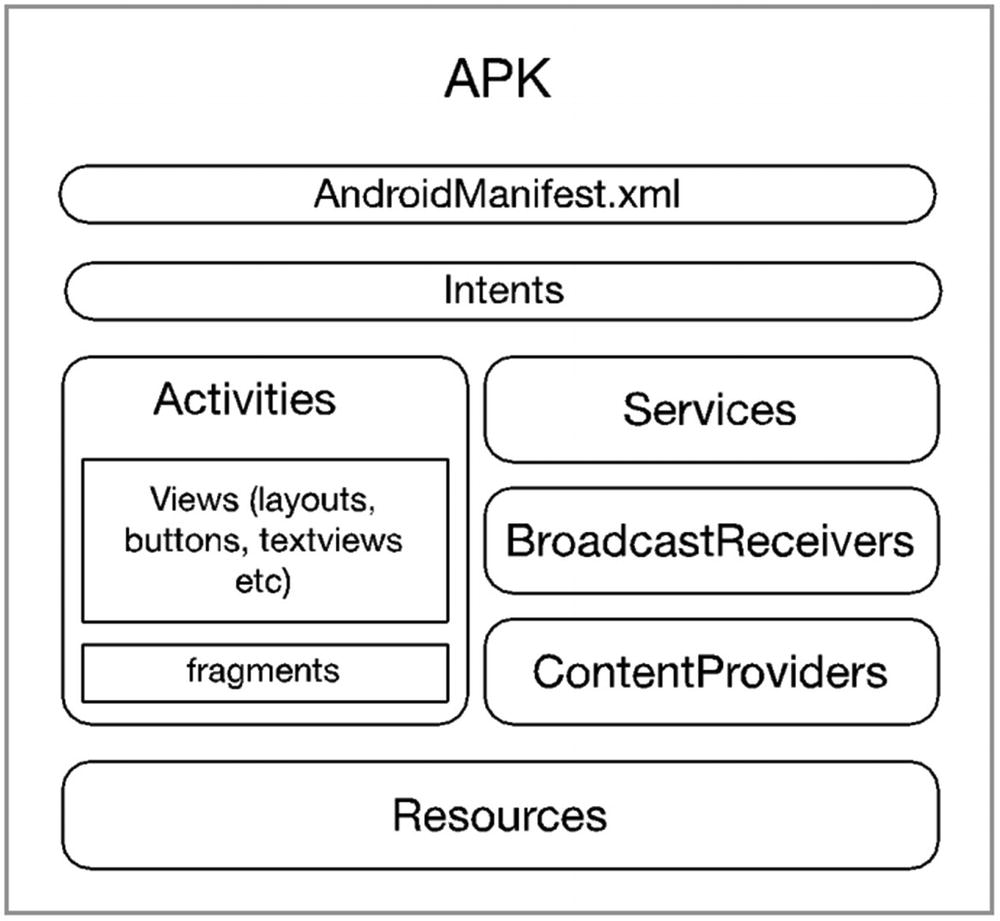
Logical representation of an Android app
The app shown in Figure 4-1 is a big one—it’s got everything in it. Our app won’t be as big; we don’t have to use all the kinds of components in Android, but we need to learn how to use some of them, like Activities and Intents.
Activities, Services, BroadcastReceivers, and ContentProviders are called Android components. They are the key building blocks of an application. They are high-level abstractions of useful things like showing a screen to a user, running a task in the background, broadcasting an event so that interested applications may respond to them, and so on. Components are precoded or prebuilt classes with very specific behavior, and we use them in our application by extending them so that we can add the behavior that will be unique to our application.
Building an Android app is a lot like building a house. Some people build houses the traditional way; they assemble beams, struts, floor panels, and so on. They build the doors and other fittings from raw materials by hand, like an artisan. If we built android applications this way, it could take us a long time, and it might be quite difficult. The skill necessary to build applications from the scratch could be out of reach for some programmers. In Android, applications are built using components. Think of it as prefabricated pieces of a house. The parts are manufactured in advance, and all it requires is assembly.
An Activity is where we put together things that the user can see. It’s a focused thing that a user can do. For example, an Activity may be purposely made to enable a user to view a single email or fill up a form. It’s where the user interface elements are glued together. As you can see in Figure 4-1, inside the Activity, there are Views and Fragments. Views are classes that are used to draw content into the screen; some examples of View objects are Buttons and TextViews. A Fragment is similar to an Activity in that it’s also a composition unit but a smaller one. Like Activities, they can also hold View objects. Most modern apps use Fragments in order to address the problem of deploying their app on multiple form factors. Fragments can be turned on or off depending on the available screen real estate and/or orientation.
Services are classes that allow us to run a program logic without freezing up the user interface. Services are code that run in the background; they can be very useful when your app is supposed to download a file from the Web or maybe play music.
BroadcastReceivers allow our application to listen for specific messages from either the Android system or from other applications—yes, our apps can send messages and broadcast it systemwide. You might want to use BroadcastReceivers if you want to display a warning message when the battery dips to below 10%, for example.
ContentProviders allow us to create applications that may be able to share data to other applications. It manages access to some sort of central data repository. Some ContentProviders have their own UI but some don’t. The main idea why you would use this component is to allow other applications access to your app’s data without them going through some SQL acrobatics. The details of the database access are completely hidden from them (client apps). An example of a prebuilt application that is a ContentProvider is the “Contacts” app in Android.
Your application may need some visual or audio assets; these are the kinds of things we mean by “Resources” in Figure 4-1.
The name of the app.
Which Activity will show up first when the user launches the app.
What kind of components are in the app. If it has activities, the manifest declares them—names of classes and all. If the app has services, their class names will also be declared in manifest.
What kinds of things can the app do? What are its permissions? Is it allowed to access the Internet or the camera? Can it record GPS locations and so on?
Does it use external libraries?
Does it support a specific type of input device?
Are there specific screen densities that this application requires?
As you can see, the manifest is a busy place; there’s a lot of things to keep an eye on. But don’t worry too much about this file. Most of the entries here are automatically taken care of by the creation wizards of Android Studio. One of the few occasions you will interact with it is probably when you need to add permissions to your app.
Google Play filters out incompatible applications from the list of available applications for a specific device. It uses the project’s manifest file to do this filtering. Your app won’t be seen by devices that cannot meet the requirements stipulated in the manifest file.
Application Entry Point
- 1.
An Activity class that serves as the first screen that the user will see
- 2.
A layout file for the Activity class which contains all the UI definitions like text views, buttons, and so on
- 3.
The AndroidManifest file, which ties all the project resources and components together
Excerpt from AndroidManifest.xml
If the application has more than one Activity, you will see several activity nodes in the manifest file, one node for each Activity. The first line of the definition has an attribute called android:name. This attribute points to the class name of an Activity. In this example, the name of the class is “MainActivity”.
The second line declares the intent-filter; when you see something like android.intent.action.MAIN, on the intent-filter node, it means the Activity is the entry point for the application. When the app is launched, this is the Activity that will interact with the user.
Activities
You can think of an Activity as a screen or a window. It’s something that a user can interact with. This is the UI of the app. An Activity is a class that inherits from the android.app.Activity (one way or another), but we usually extend the AppCompatActivity class (instead of the Activity) so we can use modern UI elements but still make the app run on older Android versions; hence, the “Compat” in the name AppCompatActivity, it stands for “compatibility.”
An Activity component has two parts, a Java class (or Kotlin if that’s your language of choice) and a layout file in XML format. The layout file is where you put all the definitions of the UI, for example, the text box, button, labels, and so on. The Java class is where you code all the behavior parts of the UI, for example, what happens when the button is clicked, when text is entered into the field, when the user changes the orientation of the device, when another component sends a message to the Activity, and so on.
Activity life cycle
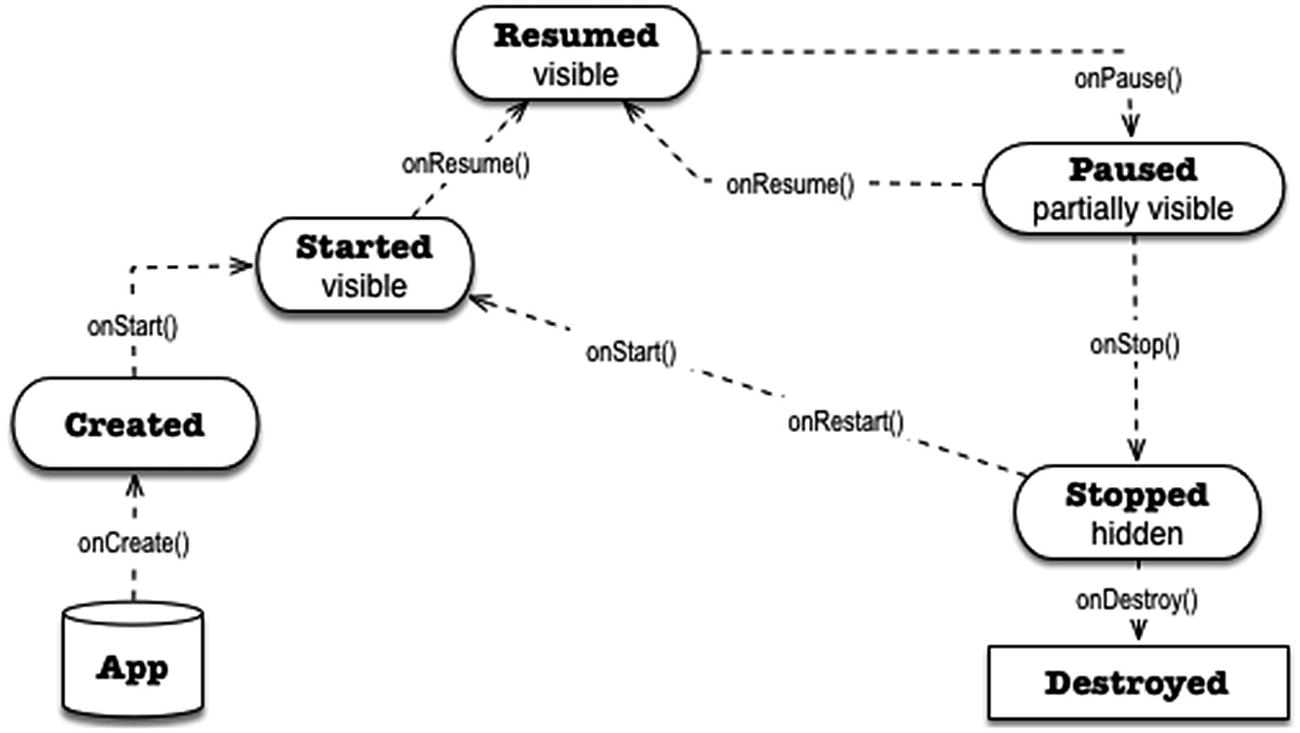
In Figure 4-2, the boxes show the state of an Activity on a particular stage of existence. The name of the method calls is embedded in the directional arrows which connect the stages.
When the runtime launches the app, it calls the onCreate() method of the main Activity which brings the state of the Activity to “created.” You can use this method to perform initialization routines like preparing event handling code and so on.
The Activity proceeds to the next state which is “started”; the Activity is visible to the user at this point, but it’s not yet ready for interaction. The next state is “resumed”; this is the state where the app is interacting with the user.
If the user clicks anything that may launch another Activity, the runtime pauses the current Activity, and it enters the “paused” state. From there, if the user goes back to the Activity, the onResume() function is called and the Activity runs again. On the other hand, if the user decides to open a different application, the Android runtime may “stop” and eventually “destroy” the application.
Intents
Wrong way to activate another Activity
Android’s architecture is quite unique in the way it builds application. It has this notion of components instead of just plain objects. Android uses Intents as a way for its components to communicate; it also uses Intents to pass messages across components.
The reason Listing 4-2 won’t work is because an Android Activity isn’t a simple object; it’s a component. You cannot simply instantiate a component in order to activate it. Component activation in Android is done by creating an Intent object and then passing it to the component you want to activate, which, in our case now, is an Activity.
How to activate another Activity
It may look like there’s a lot of things to unpack on our sample code, but don’t worry, I’ll explain the code with more context as we move further along in the coming chapters.
Key Takeaways
Android applications are made up of loosely coupled components. These components communicate via Intent objects.
An app’s entry point is usually a launcher Activity. This launcher Activity is designated in the app’s AndroidManifest file.
The manifest file is like a glue that holds together the components of the application; everything the application has, can do, or cannot do is reflected in the manifest.