Lesson Files | Lessons > Lesson_08 > 08Cover Letter_Stage 1.pages Lessons > Lesson_08 > 08Letter Copy.rtf Lessons > Lesson_08 > Steven Ironsides.vcf Lessons > Lesson_08 > BIM.ai |
Time | This lesson takes approximately 60 minutes to complete. |
Goals | Add and format text in a word processing document Use styles to format a document Add graphics Proofread a document Use research and reference tools Create an envelope and merge addresses |
At its core, Pages is an easy-to-use word processing application. It features a wealth of tools—including functions to check spelling, find and replace text, and format text with styles as well as refined word processing templates to make great-looking letters, envelopes, forms, résumés, and reports.
Pages shares interface elements with its iWork companions, Keynote and Numbers. If you’ve explored the Keynote or Numbers lessons, you have a head start on learning Pages because the toolbar, format bar, and inspector are very similar. Activities such as formatting text, inserting photos, and creating charts are nearly identical in each part of the iWork application suite.
In this lesson, you will create a customized letter and a series of addressed envelopes. While doing so, you’ll gain an understanding of the word processing tools in Pages.

You can open the Pages application of iWork in three ways:


For this exercise, you’ll open Pages from your Applications folder.
When you first launch Pages, the Template Chooser appears, providing access to Apple-designed templates (and any templates you may have saved). Templates contain formatting and layout settings to help present your information and offer a quick way to start a project.
The Template Chooser contains templates that are useful for home, work, and school purposes. You can display all of the word processing templates at once or select a specific category, such as Letters, and view only those templates.
You can edit templates to include new content, as well as modify color and font styles. Examining templates also gives you a good idea of what is possible using Pages. Let’s begin by choosing a template for your letter.
If the Template Chooser is not already displayed, choose File > New from Template Chooser.
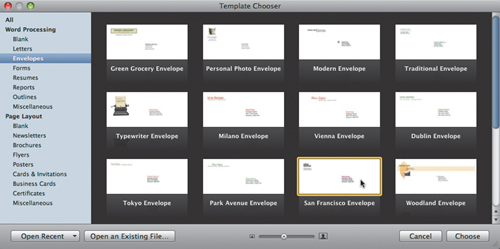
The Template Chooser opens and displays several categories.
The chooser includes 17 letter templates. Some are designed for informal personal correspondence, while others have a very corporate, professional look. Each letter template has a corresponding envelope template. Together, the letter and envelope templates offer great design options for creating attractive stationery.
For this lesson, click the Letters category and then select the San Francisco Letter.

This template works well for corporate correspondence, as it has a wide column on the left suitable for a company logo.
Click Choose to open a new document based on the template.
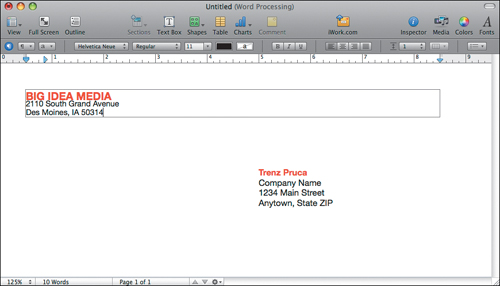
The new template opens. Placeholder text is present in the body of the letter, and information from your Address Book is automatically inserted into the document.
Choose File > Save and name the file 08Cover Letter.pages. Store the file on your local hard drive.
Note
In addition to opening a Pages template, you can open and modify a Microsoft Word document file. Choose File > Open; then navigate to the .doc file you want to use. Pages imports the file and opens it as a word processing document. You can edit the imported document and save it as a Pages template.
Viewing your Pages document in full-screen mode can help you to stay focused on the writing task at hand. Pages displays controls when you need them, while hiding floating windows and email.
Let’s enter full-screen mode:
Choose View > Enter Full Screen, or in the toolbar, click Full Screen.

The document appears in full-screen mode. Pages displays only the document, as well as document information (such as word and page count) at the bottom of the screen.

Note
Although hidden, the menu and format bar are still accessible by moving your pointer to the top of the screen.
You can modify the appearance of full-screen mode using the View and Background controls, which appear on the far right of the format bar.
Let’s make room for the company logo (which you’ll add later in this lesson).
Click the text box containing the text from the desk of, and press Delete to remove it. The text box is removed. You will add a new logo shortly.

Now let’s open the Inspector window so we can precisely modify the document.
Choose View > Show Inspector.
The Inspector window offers precise control over the elements in your document. Let’s explore your navigation options.
Move the pointer to the top of the screen, and when the toolbar appears, set the view to 200%.
Pages zooms in on your document, making the text easier to read. The entire page no longer fits on the screen, so let’s scroll down.
Move your pointer to the right of the document.
A scroll bar appears, allowing you navigate the document. You can also scroll your document using the scroll button on an Apple Mighty Mouse or a two-finger drag on a Multi-Touch trackpad.
Tip
To quickly switch pages in a multipage document, move the pointer to the left edge of the screen to view Pages thumbnails of each page. You can click a thumbnail to switch to a specific page.
You’re now ready to edit your letter. For the rest of the lesson, let’s edit your document using the format bar controls and the menu items at the top of the screen. If you want to exit full-screen mode, choose View > Exit Full Screen or press Esc at any time.
One of the first things you’ll want to do with your document is replace the Lorem Ipsum placeholder text with your own text.

To replace the placeholder text, simply begin typing in the body of the letter.
The entire placeholder text was selected, by default, when you first opened the new document.
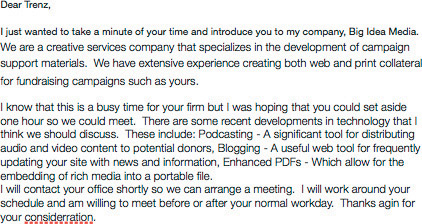
Type the following text: I just wanted to take a minute of your time and introduce you to my company, Big Idea Media.

The remaining text can be entered manually, but you can save time by inserting a file that contains the rest of the letter.
With the insertion point placed at the end of the last sentence, choose Insert > Choose.
From the Lesson_08 folder, choose the file 08Letter Copy.rtf, and click Insert.
The text is added, but it requires some additional formatting because the inserted text does not match the text you’ve typed into the document.
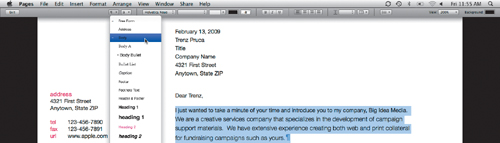
Drag to highlight the three paragraphs of text that you added to the document.
In the format bar, click the Styles pop-up menu and choose the Body paragraph style.
The text is reformatted to match the original template styles. If you look closely, however, the text formatting isn’t quite consistent. Some of the text is in 8-point size, while other text is in 9 point. Additionally, the text mixes Light and Regular versions of the Helvetica Neue font. This variation occurs because the inserted text already had its own formatting. When you apply a paragraph style, the style respects any existing formatting.
You can override the existing formatting and force the text to update to the paragraph style. To do this, you’ll access the Styles drawer.
Press Esc to exit full-screen mode, and in the format bar, click the blue Styles icon. The Styles drawer opens.

Click the disclosure triangle next to the Body paragraph style and choose Revert to Defined Style to update the text.

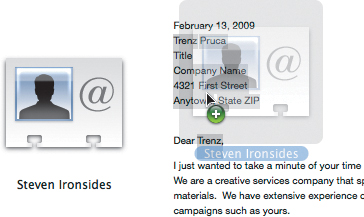
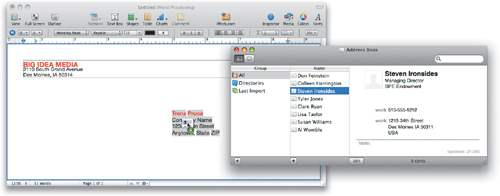
Let’s finish the letter by addressing the recipient. You can use an Address Book card file to do so.
From the Lesson_08 folder, drag the Steven Ironsides.vcf card onto the addressee fields. You can also drag individual contacts into Pages directly from Address Book or drag multiple cards at once to create a mail merge.
Return to full-screen mode and replace the text in the document as follows:
Add your name after the Sincerely Yours text.
Enter a personal address into the return address fields.
Save your work.
You can compare your document with the file 08Cover Letter_Stage 1.pages in the Lesson_08 folder.
You can quickly format text using styles, so that you can concentrate on your writing and not on its appearance. Styles maintain visual consistency within a document and between related documents. Each template includes default styles that you can use, modify, or add to with your own styles. In this lesson, you’ll use existing styles to format your letter.
In the second paragraph of the letter, click to place the insertion point after These include:.

Press Return once to insert a line break and wrap the sentence to the next line.
Repeat step 2 to insert more line breaks so that each service appears on its own line:

Now let’s add emphasis to each service name so that they are easier for a reader to spot.
Select the word Podcasting.
In the format bar, click the Character Styles pop-up menu and choose Emphasis.
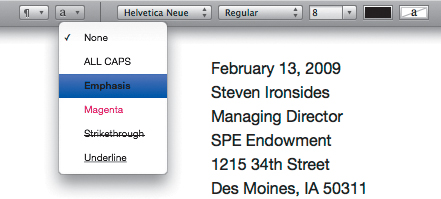
Repeat step 5 to apply the Emphasis character style formatting to the words Blogging and Enhanced PDFs.

Now that the text is formatted, let’s turn it into a bulleted list to add visual order.
Select the three services texts.

In the format bar, click the List Styles button and choose Bullet.

The texts are now formatted as a bulleted list.
Now that the text is formatted as bullets, you can remove the unnecessary punctuation at the end of each bullet. Remove two commas and a period so that the text matches the following figure.

Save your work.
You can compare your document with the file 08Cover Letter_Stage 2.pages in the Lesson_08 folder.
What helps set Pages apart from other word processing applications is its robust support for graphics, from importing images to supporting many graphics formats.
Your corporate letterhead will look more official if you add your company’s logo on the page to reinforce your branding. Pages helps you to add that graphic flair.
To more easily work on positioning the logo, press Esc to exit full-screen mode.
Switch to the Finder and open the Lesson_08 folder.
Locate the BIM.ai file.
Drag the logo into your document.

Pages imports the logo and adds it to the page. The logo causes the text in the document to wrap. You’ll want to reposition the logo.
Drag the lower right corner of the logo to resize it to a width of 1.5 inches.
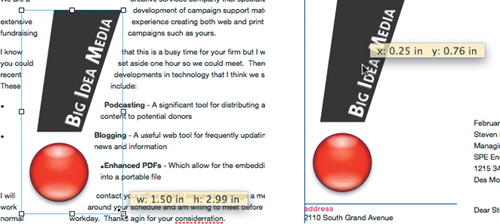
Drag the logo to reposition it above the sender’s address box at the left side of the page. Pop-up alignment guides will help you to position the logo.
Note
If you don’t see the alignment guides, choose Pages > Preferences. Click Rulers and select the checkboxes for “Show guides at object center” and “Show guides at object edges.”
Let’s help the logo stand out a bit on the page.
In the format bar, choose the Shadow option.
Note
If you’d like to customize the drop shadow, open the Inspector window (choose View > Show Inspector) and use the Graphic inspector to modify shadow properties such as color, blur, and opacity.
Let’s match the red text to the red logo.
Highlight the word address.
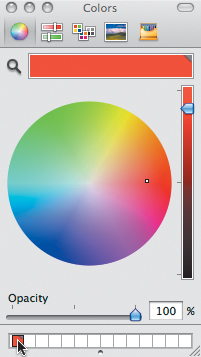
In the format bar, click the color well, and in the color matrix that appears, click Show Colors to open the Colors window.
Click the magnifying glass to select it, and then click the center of the red logo.

The text color updates to match. Let’s store the color for future use.
Drag the red color from the large strip to the color palette at the bottom of the Colors window to store it.
Tip
If you want more room in the color palette to store your favorite colors, drag the handle at the bottom of the Colors window to expand the palette.
Now that the color is stored, let’s recolor the phone number text that currently uses the magenta style.
Click the word tel to select it; then click the new red swatch to apply that color.

Because the text was formatted with a character style, you can redefine it to update other instances in the document.
Move your pointer over the character style Magenta, and then click the disclosure triangle and choose Redefine Style from Selection.

All instances of the Magenta character style update to red.
You have successfully written and formatted your document. You are almost done, but you should proofread your letter for errors.
Before your letter is completed, you will want to thoroughly proofread it. Pages includes a robust set of proofreading and spell-checking tools, as well as a handy thesaurus.
Choose Edit > Spelling > Spelling.
The Spelling window opens.

Pages highlights the first suspected word, agaen.
Pages displays a list of suggested replacement words. Choose again and click Change.
The next misspelled word, considerration, has one r too many. Choose the correct spelling, consideration, and click Change.
Close the Spelling window.
Choose Edit > Proofreading > Proofreader.
The Proofreading window opens, and you’re ready to check for errors. Pages highlights services in the first paragraph and suggests that if services is intended as a verb, serves is a better choice.
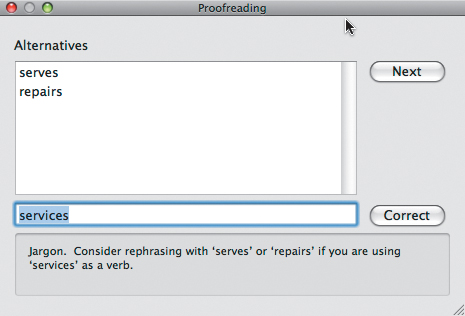
Because you are using services correctly, as a noun, click Next.
The Proofreader highlights no more words in your letter, so your proofreading is completed.
Close the Proofreading window.
Save your work.
You can compare your document with the file 08Cover Letter_Stage 3.pages in the Lesson_08 folder.
In Pages, you can access other research and reference tools when finding and verifying information for a document:
Dictionary and thesaurus—Pages includes both a dictionary and a thesaurus. To check a word using the Mac OS X dictionary, select the word and choose Edit > Writing Tools > Look Up in Dictionary and Thesaurus. The Thesaurus can check for words with a similar or opposite meaning.
Tip
If you want to do a quick lookup without leaving Pages, move your pointer over a word and press Command-Control-D to open a mini-dictionary. Here you can see the definition for the current word. Near the bottom of the window, click Dictionary to switch to a thesaurus. If you want to stay in this mode, release the D key, while still holding down Command-Control, and skim your pointer over new words to look them up.
Google—You can open a Google search in Safari from within your document. Select a word and choose Edit > Writing Tools > Search in Google. If you’re writing a letter, this is a handy way to check an address or search a map.
Wikipedia—If you decide to dig a bit deeper and do research, Pages can connect you to Wikipedia, the online encyclopedia. Select a phrase and choose Edit > Writing Tools > Search in Wikipedia to find Wikipedia results in Safari. You can quickly browse and read more on almost any subject.
Pages can address envelopes for mailing your documents and also merge contact info from Address Book into your Pages documents. This saves you time by allowing you to reuse a letter, contract, envelope, or other document for multiple recipients. Several of the Pages templates contain Address Book fields.
Let’s address an envelope using an Envelope template.
Choose File > New from Template Chooser.
The Template Chooser opens and prompts you to make a choice.
From the Word Processing category, select Envelopes. Scroll to the bottom of the list and select the San Francisco Envelope. Click Choose.
The envelope template is automatically filled in with information from your personal card in Address Book. This information is placed in the sender fields, but it can be modified.
Using the methods you learned earlier in this lesson, change the text and colors as in the following figure:
You may now fill in the recipient fields.
In the Finder, open the Lesson_08 folder.
Double-click the Steven Ironsides.vcf file to add it to your Address Book.
This is a vCard, which contains Address Book information for your client. You used it earlier to address the letter. Your Address Book application opens, and Steven Ironsides is added to your list of addresses.
Drag Steven Ironsides’s card from your Address Book to the recipient fields.
Pages adds and formats the information from the vCard to the envelope template. Unlike the letter, the envelope doesn’t insert the contact’s job title.
Tip
To add a customizable field, choose Insert > Merge Field. You can also open the Link inspector and click the Merge button to customize fields. Be sure to examine the template before creating the merge. Some templates are set to use work addresses, and others use home addresses. Work-oriented templates access corporate info, while more casual templates access home info. You can change which data is entered into template fields by using the inspector.
If you want to send an envelope or letter to multiple recipients, you can perform a merge. By specifying which cards you want to use, you can personalize the document for each recipient. For best results, create a group of cards within the Address Book application.
Return to Address Book and click the Add + (plus sign) button in the Group column. Name the group Clients to Market to.
Click the All group and drag five of your Address Book cards into the new group.
For the purpose of this exercise, any card is acceptable, although cards with business contacts will work best.

Return to Pages.
Choose Edit > Mail Merge.
You can specify a group of contacts for which you’d like to print envelopes.
In the Select a Mail Merge Source dialog, leave the Address Book radio button selected.
From the Address Book Group pop-up menu, choose the “Clients to Market to” group.
For quicker results without editing, you could choose Merge to: New Document for further editing or Merge to: Send to Printer.
From the “Merge to” pop-up menu, choose Send to Printer. Click Merge.

The Printer dialog opens.
Click the Preview button to see how your envelopes will look.
Close the Preview application and return to Pages.
Close the Pages document, but don’t save your work.