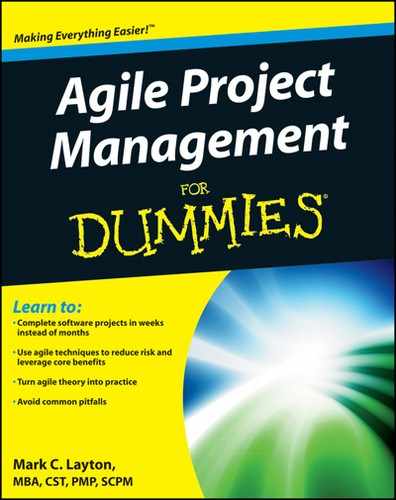
Figure 7-1: Planning in agile with the Roadmap to Value.
Chapter 7
Defining the Product Vision and Product Roadmap
In This Chapter
![]() Planning agile projects
Planning agile projects
![]() Establishing the product vision
Establishing the product vision
![]() Creating features and a product roadmap
Creating features and a product roadmap
To start, let’s dispel a common myth. If you’ve heard that agile projects don’t include planning, dismiss that thought right now. Not only will you plan the overall project, you also will plan every release, every sprint, and every day. Planning is fundamental to agile project success.
If you’re a project manager, you probably do the bulk of your planning at the beginning of a project. You may have heard the phrase, “Plan the work, then work the plan,” which sums up non-agile project management approaches.
Agile projects, in contrast, involve planning up front and throughout the entire project. By planning at the last responsible moment, right before an activity starts, you know the most about that activity. This type of planning, called just-in-time planning or a situationally informed strategy (introduced in Chapter 3), is a key to agile’s success.
 Helmuth von Moltke, a nineteenth-century German field marshal and military strategist, once said, “No plan survives contact with the enemy.” That is, in the heat of a battle — much like in the thick of a project — plans always change. The agile focus on just-in-time planning allows you to accommodate real situations and to be well informed as you plan specific tasks.
This chapter describes how just-in-time planning works with agile. You also go through the first two steps of planning an agile project: the product vision and the product roadmap.
Planning in Agile
Planning happens at a number of points in an agile project. A great way to look at the planning activities in agile projects is with the Roadmap to Value. Figure 7-1 shows the roadmap as a whole.
The Roadmap to Value has seven stages:
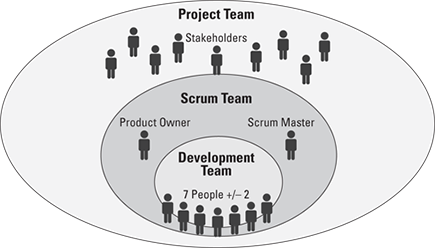
![]() In Stage 1, the product owner identifies the product vision. The product vision is your project’s destination; it’s a definition of what your product is, how it will support your company or organization’s strategy, who will use the product, and why people will use the product. On longer projects, revisit the product vision about once a year.
In Stage 1, the product owner identifies the product vision. The product vision is your project’s destination; it’s a definition of what your product is, how it will support your company or organization’s strategy, who will use the product, and why people will use the product. On longer projects, revisit the product vision about once a year.
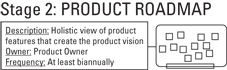
![]() In Stage 2, the product owner creates a product roadmap. The product roadmap is a high-level view of the product requirements, with a loose time frame for when you will develop those requirements. Identifying product requirements and then prioritizing and roughly estimating the effort for those requirements allow you to establish requirement themes and identify requirement gaps. Revise the product roadmap biannually with support from the development team.
In Stage 2, the product owner creates a product roadmap. The product roadmap is a high-level view of the product requirements, with a loose time frame for when you will develop those requirements. Identifying product requirements and then prioritizing and roughly estimating the effort for those requirements allow you to establish requirement themes and identify requirement gaps. Revise the product roadmap biannually with support from the development team.
![]() In Stage 3, the product owner creates a release plan. The release plan identifies a high-level timetable for the release of working software. The release serves as a mid-term goal that the scrum team can mobilize around. An agile project will have many releases, with the highest-priority features appearing first. You create a release plan at the beginning of each release. Find out more about release planning in Chapter 8.
In Stage 3, the product owner creates a release plan. The release plan identifies a high-level timetable for the release of working software. The release serves as a mid-term goal that the scrum team can mobilize around. An agile project will have many releases, with the highest-priority features appearing first. You create a release plan at the beginning of each release. Find out more about release planning in Chapter 8.
![]() In Stage 4, the product owner, the scrum master, and the development team plan sprints, also called iterations, and start creating the product within those sprints. Sprint planning sessions take place at the start of each sprint. During sprint planning, the scrum team determines a sprint goal, with requirements that support the goal and can be completed in the sprint, and outlines how to complete those requirements. Get more information about sprint planning in Chapter 8.
In Stage 4, the product owner, the scrum master, and the development team plan sprints, also called iterations, and start creating the product within those sprints. Sprint planning sessions take place at the start of each sprint. During sprint planning, the scrum team determines a sprint goal, with requirements that support the goal and can be completed in the sprint, and outlines how to complete those requirements. Get more information about sprint planning in Chapter 8.
![]() In Stage 5, during each sprint, the development team has daily scrum meetings to coordinate the day’s priorities. In the daily scrum meeting, you discuss what you completed yesterday, what you will work on today, and any roadblocks you have, so that you can address issues immediately. Read about daily scrums in Chapter 9.
In Stage 5, during each sprint, the development team has daily scrum meetings to coordinate the day’s priorities. In the daily scrum meeting, you discuss what you completed yesterday, what you will work on today, and any roadblocks you have, so that you can address issues immediately. Read about daily scrums in Chapter 9.
![]() In Stage 6, the scrum team holds a sprint review. In the sprint review, at the end of every sprint, you demonstrate the working product to the product stakeholders. Find out how to conduct sprint reviews in Chapter 10.
In Stage 6, the scrum team holds a sprint review. In the sprint review, at the end of every sprint, you demonstrate the working product to the product stakeholders. Find out how to conduct sprint reviews in Chapter 10.
![]() In Stage 7, the scrum team holds a sprint retrospective. The sprint retrospective is a meeting where the scrum team discusses how the sprint went and plans for improvements in the next sprint. Like the sprint review, you have a sprint retrospective at the end of every sprint. Find out how to conduct sprint retrospectives in Chapter 10.
In Stage 7, the scrum team holds a sprint retrospective. The sprint retrospective is a meeting where the scrum team discusses how the sprint went and plans for improvements in the next sprint. Like the sprint review, you have a sprint retrospective at the end of every sprint. Find out how to conduct sprint retrospectives in Chapter 10.
Each stage in the Roadmap to Value is repeatable, and each stage contains planning activities. Planning in agile, like development in agile, is iterative.
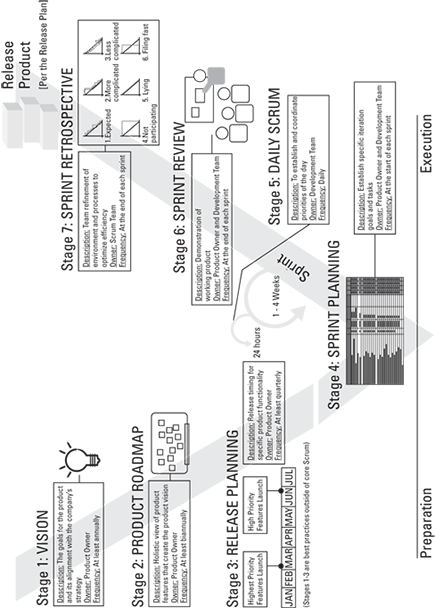
 The various teams on agile projects — the development team, the scrum team, and the project team — have different roles and responsibilities, as you see throughout this chapter and the rest of the book. Figure 7-2 shows how these teams fit together.
Figure 7-2: Teams in agile.
Planning as necessary
During each stage in an agile project, you plan only as much as you need to plan. In the early stages of your project, you plan widely and holistically to create a broad outline of how the product will shape up over time. In later stages, you narrow your planning and add more details to ensure success in the immediate development effort.
Planning broadly at first and in detail later, when necessary, prevents you from wasting time on planning lower-priority product requirements that may never be implemented. This model also lets you add high-value requirements during the project without disrupting the development flow.
The more just-in-time your detailed planning is, the more efficient your planning process becomes.
Some studies show customers rarely or never use 64 percent of the features in an application. In the first few development cycles of an agile project, you complete features that are high priority and that people will use. Typically, you release those groups of features as early as possible.
Inspect and adapt
Just-in-time planning brings into play a fundamental tenet of agile techniques: inspect and adapt. At each stage of a project, you need to look at the product and the process (inspect) and make changes as necessary (adapt).
Planning in agile is a rhythmic cycle of inspecting and adapting. Consider the following:
![]() During the sprint, the product owner provides feedback to help improve the product as the development team creates the product.
During the sprint, the product owner provides feedback to help improve the product as the development team creates the product.
![]() At the end of each sprint, in the sprint review, stakeholders provide feedback to further improve the product.
At the end of each sprint, in the sprint review, stakeholders provide feedback to further improve the product.
![]() Also at the end of each sprint, in the sprint retrospective, the scrum team discusses the lessons they learned during the past sprint to improve the development process.
Also at the end of each sprint, in the sprint retrospective, the scrum team discusses the lessons they learned during the past sprint to improve the development process.
![]() After a release, the customers using the product can provide feedback for improvement. Feedback might be direct, when a customer contacts the company about the product, or indirect, when potential customers either do or don’t purchase the product.
After a release, the customers using the product can provide feedback for improvement. Feedback might be direct, when a customer contacts the company about the product, or indirect, when potential customers either do or don’t purchase the product.
Inspect and adapt is a fantastic tool for delivering the right product in the most efficient manner.
At the beginning of a project, you know the least about the product you’re creating, so trying to plan fine details at that time just doesn’t work. With agile, you do the detailed planning when you need it, and immediately develop the specific requirements you defined with that planning.
Now that you know a little more about how planning works in agile, it’s time to complete the first step in an agile project: defining the product vision.
Defining the Product Vision
The first stage in an agile project is defining your product vision. The product vision statement is an elevator pitch, or a quick summary, to communicate how your product supports the company’s or organization’s strategies. The vision statement must articulate the goals for the product.
The product might be a commercial product for release to the marketplace or an internal solution that will support your organization’s day-to-day functions. For example, say your company is XYZ Bank and your product is a mobile banking application. What company strategies does a mobile banking application support? How does the application support the company’s strategies? Your vision statement clearly and concisely links the product to your business strategy.
Figure 7-3 shows how the vision statement — Stage 1 on the Roadmap to Value — fits with the rest of the stages and activities in an agile project.
Figure 7-3: The product vision statement as part of the Roadmap to Value.
The product owner is responsible for knowing about the product, its goals, and its requirements throughout the project. For those reasons, the product owner creates the vision statement, although other people may have input. After the vision statement is complete, it becomes a guiding light, the “what we are trying to achieve” statement that the development team, scrum master, and stakeholders refer to throughout the project.
When creating a product vision statement, follow these four steps:
1. Develop the product objective.
2. Create a draft vision statement.
3. Validate the vision statement with product and project stakeholders. Revise the vision statement based on feedback.
4. Finalize the vision statement.
The look of a vision statement follows no hard-and-fast rules. However, anyone involved with the project, from the development team to the CEO, should be able to understand the statement. The vision statement should be internally focused, clear, nontechnical, and as brief as possible. The vision statement should also be explicit and avoid marketing fluff.
Step 1: Developing the product objective
To write your vision statement, you must understand and be able to communicate the product’s objective. You need to identify the following:
![]() Key product goals: How will the product benefit the company that is creating it? The goals may include benefits for a specific department within your company, such as customer service or the marketing department, as well as the company as a whole. What specific company strategies does the product support?
Key product goals: How will the product benefit the company that is creating it? The goals may include benefits for a specific department within your company, such as customer service or the marketing department, as well as the company as a whole. What specific company strategies does the product support?
![]() Customer: Who will use the product? This question might have more than one answer.
Customer: Who will use the product? This question might have more than one answer.
![]() Need: Why does the customer need the product? What features are critical to the customer?
Need: Why does the customer need the product? What features are critical to the customer?
![]() Competition: How does the product compare with similar products?
Competition: How does the product compare with similar products?
![]() Primary differentiation: What makes this product different from the status quo or the competition or both?
Primary differentiation: What makes this product different from the status quo or the competition or both?
Step 2: Creating a draft vision statement
After you have a good grasp of the product’s objective, create a first draft of your vision statement.
You can find many templates for a product vision statement. For an excellent guide to defining the overall product vision, see Crossing the Chasm, by Geoffrey Moore (published HarperCollins), which focuses on how to bridge the gap (“chasm”) between early adopters of new technologies and the majority who follow.
The adoption of any new product is a gamble. Will users like the product? Will the market take to the product? Will there be an adequate return on investment for developing the product? In Crossing the Chasm, Moore describes how early adopters are driven by vision, whereas the majority are skeptical of visionaries and interested in down-to-earth issues of quality, product maintenance, and longevity.
Return on investment, or ROI, is the benefit a company gets from paying for something. ROI can be quantitative, such as the additional money ABC Products makes from selling widgets online after investing in a new website. ROI can also be something intangible, such as better customer satisfaction for XYZ Bank customers who use the bank’s new mobile banking application.
By creating your vision statement, you help convey your product’s quality, maintenance needs, and longevity.
Moore’s product vision template is pragmatic. In Figure 7-4, I expand the template to more explicitly connect the product to the company’s strategies. If you use this template for your product vision statement, it will stand the test of time as your product goes from early adoption to mainstream usage.
Figure 7-4: Expansion of Moore’s template for a vision statement.
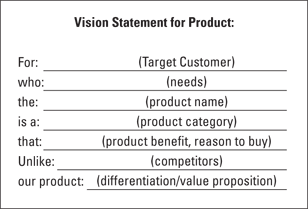
 One way to make your product vision statement more compelling is to write it in the present tense, as if the product already exists. Using present tense helps readers imagine the product in use.
Using my expansion of Moore’s template, a vision statement for a mobile banking application might look like the following:
For XYZ Bank customers
who want access to online banking capability while on the go,
the MyXYZ mobile banking application by XYZ Bank
is a mobile application that can be downloaded and used on smartphones and tablets
that allows bank customers to conduct secure, on-demand banking, 24 hours a day.
Unlike traditional banking at a branch or online banking from your home or office computer,
our product allows users immediate 24-hour access to their financial accounts wherever they have mobile carrier service.
Platinum Edge addition: This supports our company strategy to provide quick, convenient banking services, anytime, anywhere.
As you can see, a vision statement identifies a future state for the product when the product reaches completion. The vision focuses on the conditions that should exist when the product is complete.
 Avoid generalizations in your vision statement such as “make customers happy” or “sell more products.” Also watch out for too much technological specificity, such as “using release 9.x of Java, create a program with four modules that. . . .” At this early stage, defining specific technologies might limit you later.
Here are a few extracts from vision statements that should ring warning bells:
![]() Secure additional customers for the MyXYZ application.
Secure additional customers for the MyXYZ application.
![]() Satisfy our customers by December.
Satisfy our customers by December.
![]() Eliminate all defects and improve quality.
Eliminate all defects and improve quality.
![]() Create a new application in Java.
Create a new application in Java.
![]() Beat the Widget Company to market by six months.
Beat the Widget Company to market by six months.
Step 3: Validating and revising the vision statement
After you draft your vision statement, review it against the following quality checklist:
![]() Is this vision statement clear, focused, and written for an internal audience?
Is this vision statement clear, focused, and written for an internal audience?
![]() Does the statement provide a compelling description of how the product meets customer needs?
Does the statement provide a compelling description of how the product meets customer needs?
![]() Does the vision describe the best possible outcome?
Does the vision describe the best possible outcome?
![]() Is the business objective specific enough that the goal is achievable?
Is the business objective specific enough that the goal is achievable?
![]() Does the statement deliver value that is consistent with corporate strategies and goals?
Does the statement deliver value that is consistent with corporate strategies and goals?
![]() Is the project vision statement compelling?
Is the project vision statement compelling?
These yes-or-no questions will help you determine whether your vision statement is thorough. If any answers are no, revise the vision statement.
When all answers are yes, move on to reviewing the statement with others, including the following:
![]() Project stakeholders: The stakeholders will be able to identify that the vision statement includes everything the product should accomplish.
Project stakeholders: The stakeholders will be able to identify that the vision statement includes everything the product should accomplish.
![]() Your development team: Because the team will create the product, it must understand what the product needs to accomplish.
Your development team: Because the team will create the product, it must understand what the product needs to accomplish.
![]() Scrum master: A strong understanding of the product will help the scrum master remove roadblocks and ensure that the development team is on the right path later in the project.
Scrum master: A strong understanding of the product will help the scrum master remove roadblocks and ensure that the development team is on the right path later in the project.
![]() Agile mentor: Share the vision statement with your agile mentor, if you have one. The agile mentor is independent of the organization and can provide an external perspective, qualities that can make for a great objective voice.
Agile mentor: Share the vision statement with your agile mentor, if you have one. The agile mentor is independent of the organization and can provide an external perspective, qualities that can make for a great objective voice.
See whether others think the vision statement is clear and delivers the message you want to convey. Review and revise the vision statement until the project stakeholders, the development team, and the scrum master fully understand the statement.
At this stage of your project, you might not have a development team or scrum master. After you form a scrum team, be sure to review the vision statement with it.
Step 4: Finalizing the vision statement
After you finish revising the vision statement, make sure your development team, scrum master, and stakeholders have the final copy. You might even put a copy on the wall in the scrum team’s work area, where you can see it every day. You will refer to the vision statement throughout the life of the project.
If your project is more than a year long, you may want to revisit the vision statement. I like to review and revise the product vision statement once a year to make sure the product reflects the marketplace and supports any changes in the company’s needs.
The product owner owns the product vision statement and is responsible for its preparation and communication across and outside the organization. The product vision sets expectations for stakeholders and helps the development team stay focused on the goal.
Congratulations. You have just completed the first stage in your agile project. Now it’s time to create a product roadmap.
Creating a Product Roadmap
The product roadmap, Stage 2 in the Roadmap to Value (see Figure 7-5), is an overall view of the product’s requirements and a valuable tool for planning and organizing the journey of product development. Use the product roadmap to categorize requirements, to prioritize them, and to determine a timetable for their release.
Figure 7-5: The product roadmap as part of the Roadmap to Value.
As he or she does with the product vision statement, the product owner creates the product roadmap, with help from the development team. The development team participates to a greater degree than it did during the creation of the vision statement.
Keep in mind that you will refine requirements and effort estimates throughout the project. In the product roadmap phase, it is okay for your requirements, estimates, and timeframes to be at a very high level.
To create your product roadmap, you
1. Identify product requirements and add them to the roadmap.
2. Arrange the product requirements into logical groups.
3. Estimate requirement effort at a high level and prioritize the product’s requirements.
4. Envision high-level time frames for the groups on the roadmap.
Because priorities can change, expect to update your product roadmap throughout the project. I like to update the product roadmap at least twice a year.
Your product roadmap can be as simple as sticky notes arranged on a white board — which makes updates as easy as moving a sticky note from one section of the white board to another.
You use the product roadmap to plan releases — Stage 3 in the Roadmap to Value. Releases are groups of usable product functionality that you release to customers to gather real-world feedback and to generate return on investment.
The following section goes through the steps to create a product roadmap in detail.
Step 1: Identifying product requirements
The first step in creating a product roadmap is to identify, or define, the different requirements for your product.
Decomposing requirements
Throughout the project, you will break those requirements down into smaller, more manageable parts using a process called decomposition. You can break requirements down into the following sizes, listed from largest to smallest:
![]() Themes: A theme is a logical group of features and is also a requirement at its highest level. You may group features into themes in your product roadmap.
Themes: A theme is a logical group of features and is also a requirement at its highest level. You may group features into themes in your product roadmap.
![]() Features: Features are parts of products at a very high level. Features describe a new capability the customers will have once the feature is complete. You will use features in your product roadmap.
Features: Features are parts of products at a very high level. Features describe a new capability the customers will have once the feature is complete. You will use features in your product roadmap.
![]() Epic user stories: Epics are very large requirements that support a feature and contain multiple actions. You need to break down your epics before you can start creating a product requirement from them. You can find out how you will use epics for release planning in Chapter 8.
Epic user stories: Epics are very large requirements that support a feature and contain multiple actions. You need to break down your epics before you can start creating a product requirement from them. You can find out how you will use epics for release planning in Chapter 8.
![]() User stories: User stories are requirements that contain a single action and are small enough to start implementing. You will see how you define user stories and use them at the release and sprint level in Chapter 8.
User stories: User stories are requirements that contain a single action and are small enough to start implementing. You will see how you define user stories and use them at the release and sprint level in Chapter 8.
![]() Tasks: Tasks are the execution steps required to develop a requirement. You break down user stories into different tasks during sprint planning. You can find out about tasks and sprint planning in Chapter 8.
Tasks: Tasks are the execution steps required to develop a requirement. You break down user stories into different tasks during sprint planning. You can find out about tasks and sprint planning in Chapter 8.
Keep in mind that each requirement may not go through all these sizes. For example, you may create a particular requirement at the user story level, and never think of it on the theme or epic scale. You may create a requirement at the epic user story level, but it may be a lower-priority requirement. Because of just-in-time planning, you may not take the time to decompose that lower priority epic user story until you complete development of all the higher-priority requirements.
When you first create your product roadmap, you likely will start with large, high-level requirements. The requirements on your product roadmap will most likely be at two different levels: themes and features. Themes are logical groups of features and requirements at their highest levels. Features are parts of the product at a very high level. Features describe a new capability the customer will have once the feature is complete.
To identify product themes and features, the product owner can work with stakeholders and the development teams. It may help to have a requirements session, where the stakeholders and the development team meet and write down as many requirements as they can think of.
When you start creating requirements at the theme and feature level, it can help to write those requirements on index cards or big sticky notes. Using a physical card that you can move from one category to another and back again can make organizing and prioritizing those requirements very easy.
While you are creating the product roadmap, the features you identify start to make up your product backlog — the full list of what is in scope for a product, regardless of level of detail. Once you have your first requirement, you have your product backlog started.
Step 2: Arranging product features
After you identify your product requirements features, you work with the development team to group the requirements into themes — common, logical groups of requirements. A stakeholder meeting works well for grouping requirements, just like it works for creating requirements. You can group features by usage flow, technical similarity, or business need.
Here are questions to consider when grouping your requirements:
![]() How would customers use our product?
How would customers use our product?
![]() If we offered this requirement, what else would customers need to do? What else might they want to do?
If we offered this requirement, what else would customers need to do? What else might they want to do?
![]() Can the development team identify technical affinities or dependencies?
Can the development team identify technical affinities or dependencies?
Use the answers to these questions to identify your themes. Then group the features by these themes. For example, in the mobile banking application, the themes might be
![]() Account information
Account information
![]() Transactions
Transactions
![]() Customer service functions
Customer service functions
![]() Mobile functions
Mobile functions
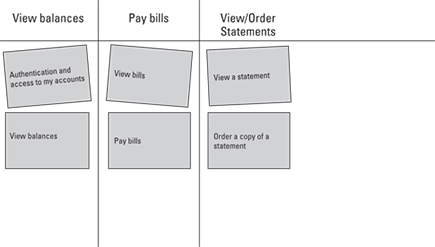
Figure 7-6 shows features grouped by themes.
If you are using sticky notes, you can group your features on a white board, like the example in Figure 7-7.
Figure 7-6: Features grouped by themes.

Figure 7-7: Require-ment categories on a white board.
Step 3: Estimating and ordering the product’s features
You have identified your product requirements and arranged those requirements into logical groups. Next, you estimate and order the requirements. Here are a few terms you need to be familiar with:
![]() Effort is the ease or difficulty of creating a particular requirement.
Effort is the ease or difficulty of creating a particular requirement.
![]() An estimate, as a noun, can be the number or description you use to express the estimated effort of a requirement.
An estimate, as a noun, can be the number or description you use to express the estimated effort of a requirement.
![]() Estimating a requirement, as a verb, means to come up with an approximate idea of how easy or hard that requirement will be to create.
Estimating a requirement, as a verb, means to come up with an approximate idea of how easy or hard that requirement will be to create.
![]() Ordering, or prioritizing, a requirement means to determine that requirement’s value in relation to other requirements.
Ordering, or prioritizing, a requirement means to determine that requirement’s value in relation to other requirements.
![]() Value means just how beneficial a particular product requirement might be to the organization creating that product.
Value means just how beneficial a particular product requirement might be to the organization creating that product.
You can use the estimating and prioritizing techniques in this section for requirements at any level, from themes and features down to single user stories.
Scoring requirement value and effort
To order requirements, you must first estimate a score to represent the value and effort for each requirement. To order your requirements, you also want to know any dependencies. Dependencies mean that one requirement is a predecessor for another requirement. For example, if you were to have an application that needs someone to log in with a username and password, the requirement for creating the username would be a dependency for the requirement for creating the password, because you generally need a username to set up a password.
Estimating, or scoring, requirements on value and effort is a key first step to ordering those requirements.
You work with two different groups to score your requirements:
![]() The product owner, with support from the stakeholders, determines the value of the requirement to the customer and the business.
The product owner, with support from the stakeholders, determines the value of the requirement to the customer and the business.
![]() The development team determines the effort to create the requirement for each requirement.
The development team determines the effort to create the requirement for each requirement.
Scrum teams often use the Fibonacci sizing sequence for creating requirement scores. The Fibonacci sequence goes in a progression like this:
1, 2, 3, 5, 8, 13, 21, 34, 55, 89, 144, and so on
Each number after the first two is the sum of the prior two numbers.
The Fibonacci sequence is named after Leonardo Fibonacci, an Italian mathematician who described the sequence in his book Liber Abaci back in 1202!
When you are creating your product roadmap, your requirements will be on the feature scale. Most of them will have effort scores from 55 to 144. Later, when you plan releases, you break your features down to epic user stories with scores of no larger than 13 to 34. And after you start planning in sprints, your user stories should have effort scores of 1 to 8.
The concept of breaking down requirements into smaller pieces is called decomposition.
Use your scores relatively. Choose a requirement that the project team can agree has a small value and effort, score it, and use that requirement as a benchmark. To score other requirements, decide whether other requirements have more or less value than your benchmark requirement, and whether they are easier or harder than your benchmark requirement.
You might use two benchmark requirements, one for value and one for effort. In the end, the relative score, not the absolute score, matters. Next up is a formula for calculating relative priority.
Calculating relative priority
After you have your value and effort scores for your requirements, you can calculate the relative priority of each requirement. Relative priority helps you understand how one requirement relates to another in terms of value. Once you know the relative priority of your requirements, you can order them on your product roadmap.
Calculate relative priority with the following formula:
Relative priority = value/effort
For example, if you have a requirement with a value of 89 and an effort of 55, the relative priority would be 1.62 (89/55 = 1.62), which you could round to 2.
Using this formula
![]() A requirement with high value and low effort will have a high relative priority. For example, if the value is 144 and the effort is 3, the relative priority is 48.
A requirement with high value and low effort will have a high relative priority. For example, if the value is 144 and the effort is 3, the relative priority is 48.
![]() A requirement with a low value and high effort will have a lower relative priority. For example, if the value is 2 and the effort is 89, the relative priority is 0.0224.
A requirement with a low value and high effort will have a lower relative priority. For example, if the value is 2 and the effort is 89, the relative priority is 0.0224.
![]() This formula usually produces fractional results. If you want, you can round those to the nearest whole number.
This formula usually produces fractional results. If you want, you can round those to the nearest whole number.
Relative priority is only a tool to help the product owner make decisions and prioritize requirements. It isn’t a mathematical universal that you must follow. Make sure your tools help, rather than hinder.
Note the relative priority for each requirement. From here, you can review your requirements simultaneously and prioritize them.
Prioritizing requirements
To determine the overall priority for your requirements, answer the following questions:
![]() What is the relative priority of the requirement?
What is the relative priority of the requirement?
![]() What are the prerequisites for any requirement?
What are the prerequisites for any requirement?
![]() What set of requirements belong together and will constitute a solid release?
What set of requirements belong together and will constitute a solid release?
Using the answers to these questions, you will be able to place the highest-priority requirements first in the product roadmap. When you have finished prioritizing your requirements, you will have something that looks like Figure 7-8.
Figure 7-8: Product roadmap with prioritized requirements.
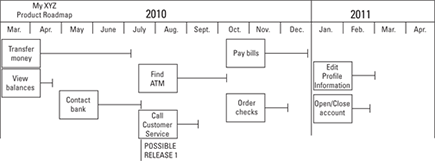
Your prioritized list of user stories is called a product backlog. Your product backlog is an important agile document, or in agile terms, an artifact. You will use this backlog throughout your entire project.
With a product backlog in hand, you can start adding target releases to your product roadmap.
Step 4: Determining high-level time frames
When you first create your product roadmap, your time frames for releasing product requirements will be at a very high level. For the initial roadmap, choose a logical time increment for your project, such as a certain number of days, weeks, months, quarters (three-month periods), or even larger increments. Using both the requirement the priority, you can add requirements to each increment of time.
Creating a product roadmap might seem like a lot of work, but after you get the hang of it, you can create one in a short time. Some scrum teams can create a product vision, product roadmap, and release plan, and be ready to start their sprint in as little as one day! To begin coding the product, you need only enough requirements for your first sprint. You can determine the rest as the project progresses.
Saving your work
Up until now, you could do all your roadmap planning with white boards and sticky notes. After your first full draft is complete, however, save the product roadmap, especially if you need to share the roadmap with remote stakeholders or development team members. You could take a photo of your sticky notes and white board, or you could type the information into a document and save it electronically.
You will update the product roadmap throughout the project, as priorities change. For now, the contents of the first release should be clear — and that’s all you need to worry about at this stage.
..................Content has been hidden....................
You can't read the all page of ebook, please click here login for view all page.