
Chapter Nine. Laying Out Pages and Creating Long Documents
If text frames, graphics frames, lines, and shapes are the building blocks of layouts, then your InDesign documents are the architectural masterpieces you create with the building blocks. By setting up a solid framework using master pages, guidelines, and layers, and by taking advantage of several long-document features, you can quickly build a wide range of design-intensive multipage documents—from newsletters and newspapers to catalogs, magazines, and books.
In this chapter, you’ll learn how to use master pages as backgrounds for document pages and how to use several different kinds of guidelines to place and align objects on pages. You’ll also learn how to use layers to organize objects within documents. Additionally, we explain how to add, move, and delete pages in a multipage document and how to take advantage of features for working with and organizing long documents.
#79 Working with Master Pages
If you use InDesign to create long documents, such as books, catalogs, magazines, and newspapers, understanding and using master pages is critical to working efficiently. A master page serves as the background for document pages and contains elements that appear on all pages, like page numbers, page headers, and page footers. A master page can also contain placeholder frames for text and graphics. Placing objects on master pages and basing document pages on master pages saves you the time and effort required to manually place repeated elements on multiple document pages.
When you create a new document, it contains a single blank master page called A-Master. For facing-page documents, A-Master has a left (verso) page and a right (recto) page. By default, all document pages are based on A-Master. Objects that you place on A-Master are automatically placed on document pages based on A-Master.
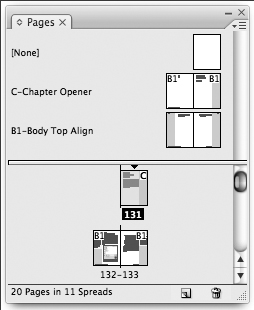
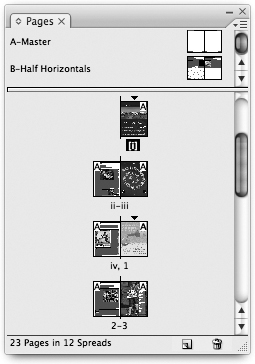
The Pages panel (Window > Pages; Figure 79a) displays thumbnails of master pages (top) and document pages (below). To display a master page in the document window, double-click a master page thumbnail. Use InDesign’s drawing tools to add objects to master pages the same way you do for document pages. Objects you place on a left-side master page in a facing-page document are placed on even-numbered pages; objects you place on a right-side master page are placed on odd-numbered pages. Master objects are placed at the bottom of the layer they’re on—that is, at the bottom of the stacking order (see #82 for more information about layers). If you want to place master objects in front of objects on document pages, create a layer for them and make it the topmost layer.
Figure 79a. By default, master page thumbnails are displayed at the top of the Pages panel. Document page thumbnails display below.
You can create and use as many master pages as a project requires. For example, a newsletter might have a master page that’s based on a three-column format and another that’s based on a two-column format. When laying out the newsletter, you can base its pages on either the three-column or two-column master page.
To create a new master page, choose New Master from the Pages panel menu. In the New Master dialog box (Figure 79b) assign a prefix and a name. The Based on Master menu lets you base a new master page on an existing master page to create a parent-child relationship between the two. Changes you make to the parent master page are automatically applied to the child master page. For a facing-page document, the Number of Pages should be 2 (left side and right side).
Figure 79b. When you create a new master page, you can assign a prefix and a name, and choose another master page as its “parent.”

You can apply a master page to a document page in several ways:
• Drag a master page thumbnail onto a document page thumbnail. If you drag a master page thumbnail onto the corner of a facing-page document page, a black border is displayed around the spread. Release the mouse to apply the master page to both pages of the spread.
• Select one or more document page thumbnails, choose Apply Master to Pages from the Pages panel menu, and then choose a master page from the Apply Master menu.
• If you choose Insert Pages from the Pages panel menu to add pages to a document, you can assign a master page for the new pages by choosing one from the Master menu in the Insert Pages dialog box.
When you change a document page’s master page, the margins, columns, and objects from the old master page are removed from the document page, and the margins, columns, and objects on the new master page are added. When you change an object on a master page, the change is reflected on all pages based on that master page.
If you make a change to a master object on a document page, it remains a master object, and subsequent changes you make to the object on the master page are applied to the master object you modified on the document page. To break a link between a master object on a document page and its master page, select the object on the document page (see sidebar), and then choose Detach Selection From Master from the Pages panel menu. The Pages panel menu includes several commands for working with master pages. Here’s a brief description of a few that are particularly useful:
• Allow Master Item Overrides On Selection. If you check this option, for a selected object on a master page, you can select the object on document pages (Command+Shift-click on Mac OS or Ctrl+Shift-click on Windows) and then modify the object. If you don’t check this option for an object on a master page, you cannot select the object on a document page.
• Override All Master Page Items allows you to make local changes to a master object on a document page and still maintain a link to the object on the master page.
• Remove All Local Overrides allows you to undo any changes you’ve made to master objects on a document page.
• Detach All Objects From Master allows you to break the link between master objects on the current page and its master page.
• Save As Master allows you to save the current document page as a master page.
#80 Setting Margins and Columns
When you create a new document, you can specify the number of columns, the gutter width between columns, and a margin for each page edge. Column and margin settings are used to display guidelines that help you position text frames, graphic frames, and other elements on pages. The settings you specify in the New Document dialog box are used for all document pages unless you change the column and margin settings for the document’s master pages, or you change the settings for individual document pages.
Before you can change column and margin settings for a master page or specific document pages, you must first select—or target—the pages you want to change in the Pages panel. To target both pages of a facing-page master page, click the name of the master page. To target only the verso or recto page of a facing-page master page, click the left or right master page thumbnail. To target a document page, click its thumbnail. To target a range of document or master pages, click the thumbnail of the first page, and then Shift-click the thumbnail of the last page. Command-click (Mac OS) or Ctrl-click (Windows) to select multiple, nonsequential master or document pages.
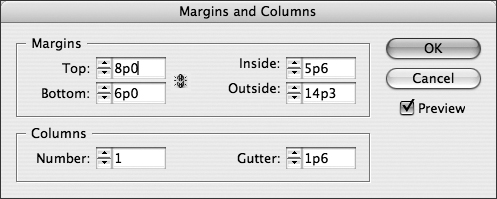
After you’ve targeted the pages whose column and margin settings you want to change, choose Layout > Margins and Columns. In the Margins and Columns dialog box (Figure 80), change the margin and column settings.
Figure 80. The settings you apply in the Margins and Columns dialog box are applied to the pages targeted in the Pages panel.
If you change the settings in the Margins and Columns dialog box when no documents are open, the modified settings become the default settings used in the New Document dialog box.
#81 Using Guides and Grids
If you like to use guidelines when you lay out pages, you may need more than margin and column guides. If that’s the case, you can use ruler guides, a document-wide grid, or a combination of both. For example, you can quickly divide a page into quadrants by adding a vertical ruler guide and a horizontal ruler guide that intersect at the center of the page. Or you can use a document-wide baseline grid for aligning text and objects across columns. While it’s nice to have so many options when it comes to adding guidelines, you probably won’t use them all.
Ruler guides and grids are similar in that they don’t print (unless you want to print them), and they help you align objects. They’re also different in some ways:
• Ruler guides are much like objects. You can select them with the selection tools to move and delete them, and they’re layer specific. Ruler guides can be vertical or horizontal only.
• Gridlines are document-wide and cannot be selected or modified.
You can create ruler guides in two ways: manually by clicking and dragging from a ruler or automatically using the Create Guides command (Layout menu).
• To create a ruler guide manually, click the ruler along the left or top edge of the document window and drag the pointer onto a page or the pasteboard. (Choose View > Show Rulers if the rulers are not showing.) If you click the vertical ruler along the left edge of the document window, you create a vertical ruler guide. If you click the horizontal ruler at the top of the document window, you create a horizontal ruler guide. Release the mouse when the pointer is on a page to create a page guide that spans the page. Release the mouse when the pointer is on the pasteboard to create a spread guide that spans the page or spread and pasteboard.
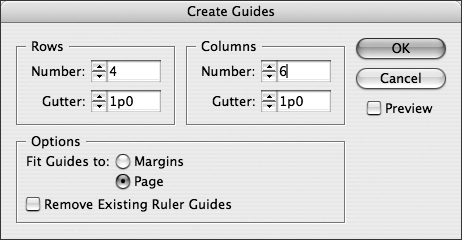
• To create ruler guides automatically, select the document or master pages to which you want to add guides in the Pages panel, and then choose Layout > Create Guides. The controls in the Create Guides dialog box (Figure 81a) let you create horizontal guides (Rows), vertical ruler guides (Columns), or both. If you don’t specify a Gutter value, a single guide is placed for each row/column. If you specify a Gutter value, it’s used as the space between a pair of ruler guides. Other options let you fit the guides within the margins or the page and remove existing ruler guides.
Figure 81a. Use the controls in the Create Guides dialog box to divide a page into rows and columns using ruler guides.
Regardless of the method you use to create ruler guides, you can select, move, and delete them just like objects. You can also copy ruler guides into a Library and between pages.
If you like to use a grid when you lay out your pages, InDesign offers two options:
• A baseline grid is a set of evenly spaced horizontal lines that help align text and objects across multiple columns.
• A document grid is a set of evenly spaced horizontal and vertical lines that resembles graph paper.
The Baseline Grid controls in the Grids pane in the Preferences dialog box (Figure 81b) let you modify a document’s baseline grid. You can specify the Color, Start point, Increment, and View Threshold. The Show/Hide Baseline Grid command (View > Grids & Guides) lets you control the display of the baseline grid. (Note: The Align to Baseline Grid button in the Paragraph panel lets you align the baselines of selected paragraphs to the baseline grid.)
Figure 81b. Use the controls in the Grids pane in the Preferences dialog box to modify a document’s baseline grid and document grid.
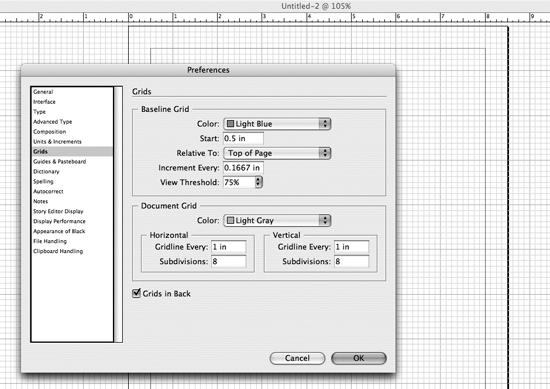
The Document Grid controls let you modify the document grid. You can specify Color as well as increments (Gridline Every) and subincrements (Subdivisions) for Horizontal and Vertical lines. The Show/Hide Document Grid command (View > Grids & Guides) lets you control the display of the document grid.
#82 Working with Layers
By default, every time you create a new document, it contains a single layer named “Layer 1.” Each new object you create occupies a successively higher position in the layer’s stacking order. If you want, you can create additional layers and then use them for organizing objects. For example, you could create one layer called “Text” for all of the text frames in a document and another layer called “Graphics” that holds all graphic elements. You could then show, hide, or print each layer individually or together.
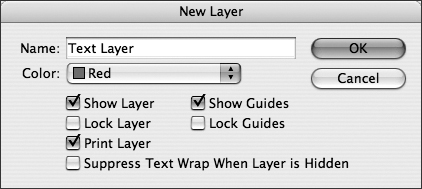
To create a new layer, open the Layers panel (Window > Layers), and then choose New Layer from the panel menu. In the New Layer dialog box (Figure 82a), enter a Name for the layer and use the controls to specify layer attributes.
Figure 82a. Use the controls in the New Layer dialog box to specify attributes of a new layer.
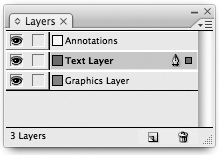
After you create a new layer, it’s displayed in the Layers panel as the topmost layer in the list, which means it’s the topmost layer in the layer stacking order. The selected layer is indicated by the Pen icon (Figure 82b). The small, square icon to the right of the Pen icon shows that the layer contains a selected object. New objects you create with the drawing tools are placed on the selected layer. If you want to add new objects to a different layer, select the layer in the panel, and then add the objects.
Figure 82b. The Layers panel displays a list of a document’s layers and includes controls and commands for working with layers. Here, the second layer in the stacking order, the Text Layer, is selected and contains a selected object.
Two buttons are displayed to the left of each layer’s name:
• Click the button on the left to show and hide a layer.
• Click the button on the right to lock or unlock a layer. You can’t select objects on locked layers.
You can also use the controls in the Layers panel to:
• Delete layers by selecting them and then clicking the Delete (Trash) button.
• Rearrange layers by dragging selected layers up or down within the list. The layer at the bottom of the list is the lowest layer in the stacking order.
• Move a selected object to a different layer by dragging the small square on the right side of the panel to a new layer.
The Layers panel menu contains additional commands for working with layers, including Delete, Hide Others, Lock Others, Merge, and Delete Unused Layers.
Some other details you should know about layers include:
• If you create a group that contains objects on different layers, all objects are moved to the layer of the topmost object and placed consecutively in the stacking order.
• If you place an object on a master page, it’s placed at the bottom of the stacking order of the selected layer. If you want a master object to be placed in front of other objects, put it on a layer that’s higher in the stacking order than the other objects.
#83 Working with Pages
When you create a new document, the value you enter in the Number of Pages field in the New Document dialog box determines how many pages the document has; however, you’re free to change your mind later and add or delete pages as needed. You can also move pages within a document.
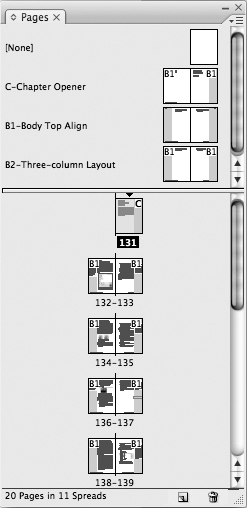
The Pages panel (Window > Pages; Figure 83a) provides the easiest method for working with the pages in a multipage document. By default, the thumbnails at the top of the panel represent a document’s master pages; the thumbnails at the bottom of the panel represent document pages. (For more information about master pages, see #79.)
Figure 83a. The Pages panel displays thumbnails of master pages (top) and document pages (bottom), and includes controls and commands for working with pages.
You can add pages to a document in several ways:
• To add a single blank page, click the Create New Page button at the bottom of the Pages panel. The new page is placed after the page that’s currently displayed in the document window—or at the end of the document if a master page is currently displayed—and uses the master page of the preceding page.
• To add a single page based on a particular master page, drag a master page thumbnail from the top of the panel to the bottom of the panel. To control where the new page is placed, drag the thumbnail to the left or the right edge of a document page. A vertical bar is displayed to indicate where the page will be placed. (If you release the mouse when a page icon is highlighted, you’ll apply the selected master to the document page.) Drag the thumbnail just above or below document page thumbnails to place the new page between the pages. If you select both the left and right thumbnails of a facing-page master page before dragging, two pages are inserted.
• To add multiple pages, choose Insert Pages from the Pages panel menu. The Insert Pages dialog box (Figure 83b) includes controls for specifying the number of pages to insert, where they’re placed, and which master page they’re based on.
Figure 83b. When you choose Insert Pages from the Pages panel menu, the Insert pages dialog box lets you specify the number of pages to add, where to place them, and which master page they’re based on.

A document can contain as many as 9,999 pages, although you wouldn’t want to create such a large document. If you need to create a long document, it’s often a good idea to use InDesign’s book feature to organize it as several smaller documents. For more about creating books, see #85.
Although it’s easy to move pages within a document, you should do so with great care. If a document contains facing-page spreads that were designed as a pair, moving a single page can split them. To move a page, select its thumbnail in the Pages panel and drag it elsewhere. As you drag the thumbnail, a vertical bar is displayed when it’s next to a page edge to indicate where the page will be placed. If you drag the thumbnail between page icons, an arrow indicates how the pages will be pushed apart to accommodate the moved page. To move a spread, select the page numbers below the page icons and drag the spread to a new location.
To delete a page, click its thumbnail in the Pages panel, and then click the Delete (Trash) button. Command-click (Mac OS) or Ctrl-click (Windows) to select multiple, nonsequential pages. Click a thumbnail, and then Shift-click another thumbnail to select a range of pages.
The Pages panel menu includes several more commands for working with documents, master pages, and spreads. Before you choose a command in the Pages panel, you should select the thumbnails of the pages you want to work with. The commands vary depending on whether a single page, a single spread, multiple pages, or multiple spreads are selected in the panel.
The Layout > Pages menu also includes several commands for working with pages, including Add Page, Insert Pages, Move Pages, and Apply Master to Pages. For information about navigating within multipage documents, see #15.
#84 Numbering Pages and Creating Sections
Since publications are not always numbered from page 1 to the end—and since each InDesign document doesn’t necessarily contain an entire publication—you have complete control over the format, placement, and starting number for automatic page numbering. A book, for example, might start out with Roman numerals (i–xvi) for the front matter and then use standard numerals (1–64) for the chapters. A textbook might preface each page number with a letter and start each chapter on page one (A.1–A.24, B.1–B.36, etc.). A range of pages in a document with different page numbering—the front matter, for example—is referred to as a section.
To get started with page numbers, you first need to insert the Auto Page Number character in text. Then you can use the Section options to customize it.
Inserting the Auto Page Number Character
Generally, you will place the Auto Page Number character on a master page. That way, all pages based on that page will have a page number. However, you can insert the Auto Page Number Character on any page, in any location, and it will display the appropriate page number. If you reorder pages, the page numbers update as well. To insert the Auto Page Number character:
1. Select the Type tool.
2. Click in a text frame or on a type path (usually on a master page).
3. Choose Type > Insert Special Character > Markers > Current Page Number.
4. If you’re on a master page, a placeholder displays. The placeholder is the same as the letter prefacing the master page name (that is, B-Master’s Auto Page Number placeholder is a “B”). If you’re on a document page, the appropriate page number displays.
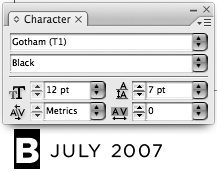
5. Select the page number or placeholder and use the character options in the Control panel or the Character panel (Type menu) to format it (Figure 84a).
Figure 84a. Adding the Current Page Number character to master page B-Master results in the placeholder character “B.” Formatting the selected “B” indicates the character formatting you want for the page numbers.
Creating Sections
While the look of page numbers depends on character formats you apply to the Auto Page Number character, all other attributes of page numbers come from the New Section or Numbering & Section Options dialog box. To use Roman numerals, begin a document on a different page number, include a preface with page numbers, and more, you need to create a section. A section of automatic page numbering will continue through a document until you create a new section (Figure 84b).
Figure 84b. In this document, the first four pages have Roman numerals, i–iv. A new section starts on the fifth page of the document, but starts the numbering at 1 with Arabic numerals.
1. In the Pages panel, click the page you want to be the first page in the section.
2. Choose Numbering & Section Options from the Layout menu or the Pages panel menu. The New Section dialog box displays (Figure 84c); if a section already starts on the selected page, the Numbering & Section Options dialog box displays.
Figure 84c. The New Section dialog box lets you specify the starting page number, the type of numerals to use, and the page number prefix for a section of pages. The lower portion of the dialog box, not shown here, gives you control over the page numbering of chapters within books.
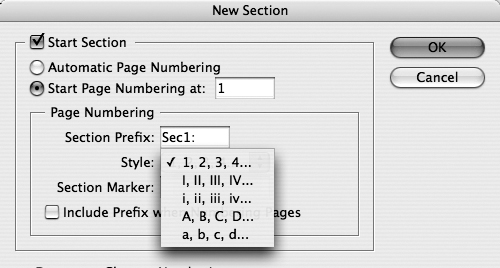
3. Check Start Section. (This is unavailable if you’ve selected the first page of the document.)
4. To pick up the page numbering where the last section left off, click Automatic Page Numbering. To specify a starting page number, click Start Page Numbering At and enter the page number in the field.
5. If you want to include a prefix for page numbers—such as “Chapter 1-” or “Index”—enter that text in the Section Prefix field. To separate the prefix text from the page number, be sure to include a space or other separation character after the text in the Section Prefix field.
6. By default, the prefix text shows with the page number at the bottom of the document window. To actually add the prefix text to the page numbers on the page, check Include Prefix When Numbering Pages.
For information about the Section Marker field, see the sidebar.
#85 Creating a Book
When working on longer publications such as magazines and books, it’s common to separate the content into multiple documents such as one document per article or one document per chapter. This allows multiple people to work on different parts of the publication, and it keeps the file sizes small, which results in files that open and save faster. To manage multiple documents for the same publication—including updating page numbers across documents and making sure styles remain consistent—InDesign provides book files. A book actually displays as a panel, which serves as a container for the documents that make up the publication.
Creating a Book File
A book is another type of InDesign file, recognized by the file extension of .indb. Before you create a book file, however, it’s helpful to get your project organized. Create a folder for the project and place all the documents for the book in it. (You do not need to have all the documents ready—you can add documents to a book at any time.) The project folder is also a good place to store any templates, libraries, graphics, and fonts for the project. To create a book:
1. Choose File > New > Book.
2. In the New Book dialog box, enter a name for the book in the Save As field.
3. Navigate to the folder containing the documents for the book. You can save the book in another location, but it’s easiest to keep track of the files if you store the book and its documents in the same folder.
4. Click Save. The book panel opens with the name of the book.
Opening and Closing a Book
You can open the book like you open any other file—choose File > Open or double-click a book file icon on the desktop. If multiple books are open, each book displays on a separate tab in the Book panel. You can tear off tabs to create individual panels for each book.
To close a book, click the panel’s close button or choose Close Book from the Book panel menu. You will be prompted to save changes to the book (such as adding or rearranging documents) before you close the book. A book does not have to remain open while you work on its documents.
Adding Documents
When you first create a book, it is empty and waiting for you to add documents. You can add up to 1,000 documents to a book, and a single document can be included in multiple books. To add documents to a book:
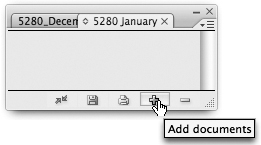
1. Click the Add Documents button ![]() at the bottom of the Book panel (Figure 85a) or choose Add Document from the Book panel menu.
at the bottom of the Book panel (Figure 85a) or choose Add Document from the Book panel menu.
Figure 85a. The Add Documents button lets you select the InDesign documents to include in a book.
2. Select the document you want to add to the book. If multiple documents are in the same folder, you can add them all at once. Command-click (Mac OS) or Ctrl-click (Windows) to select multiple documents, or Shift-click to select a continuous range of documents.
3. Click Open to add the documents.
4. You may see alerts regarding missing fonts, but you can click OK to bypass these for the purposes of adding the documents to the book. (Later, for accurate page numbering and output, you need to be sure no fonts are missing.)
You can also add documents to a book by dragging InDesign files from the desktop into the book.
Working with Books
Once documents are in a book, you can open them through the book for editing, rearrange documents in a book, replace documents with different ones, and remove documents from a book.
• To open a document for editing, open its book. Then double-click the document name in the Book panel.
• To replace a document in a book, select the document in the book and choose Replace Document from the Book panel menu.
• To remove a document from a book, select it and click the Remove Documents button ![]() at the bottom of the Book panel or choose Remove Document from the panel menu.
at the bottom of the Book panel or choose Remove Document from the panel menu.
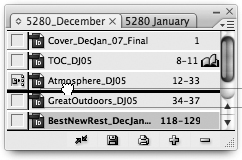
• To rearrange the documents in a book, click a document name and drag it up or down within the list (Figure 85b). If you’re using automatic page numbering within the book, the page numbers update when you reorder chapters.
Figure 85b. You can drag a document to a new location within a book.
Synchronizing Book Styles
To make sure that all the documents that make up a book remain consistent, you can synchronize styles, including master pages, object styles, paragraph styles, character styles, and color swatches. This way, if you modify or add a style, the change can be implemented automatically throughout the entire book. You can synchronize all the documents in a book or selected documents. To synchronize:
1. Determine which document has the “right” styles that you want in all the documents. (For example, if you want to make a global change in a paragraph style, be sure the document in which you make the change has all the appropriate styles.)
2. Click in the box to the left of a document name in the Book panel. The Style Source icon ![]() indicates the styles in that document will be copied to other documents when the book is synchronized.
indicates the styles in that document will be copied to other documents when the book is synchronized.
3. Select the documents in the book that you want to synchronize. To synchronize the entire book, click in the blank area at the bottom of the panel to make sure no documents are selected.
4. Click Synchronize ![]() at the bottom of the Book panel or choose Synchronize Selected Documents from the panel menu.
at the bottom of the Book panel or choose Synchronize Selected Documents from the panel menu.
5. An alert regarding missing fonts may display, but you can click OK to bypass this alert for synchronization purposes.
6. InDesign opens each document, makes the changes, saves it, and closes it. Therefore, you cannot undo synchronization.
To customize this feature, you can specify which styles synchronize by choosing Synchronize Options from the Book panel menu. Check the styles you want to synchronize in the Synchronize Options dialog box (Figure 85c). At this point, you can click the Synchronize button to synchronize all the documents in the book.
Figure 85c. The Synchronize Options dialog box lets you choose which styles to synchronize.

#86 Paginating a Book
One advantage of using a book to manage multiple documents is the ability to use automatic pagination. As you work on documents in a book, adding and removing pages, InDesign can update page numbers throughout all the documents. In addition, if you want all the documents to start on a left-facing (even-numbered) or right-facing (odd-numbered) page, InDesign can automatically insert pages at the end of one document to ensure the next document starts on the correct odd or even page.
By default, books are paginated the same way the documents are. If all the documents that comprise a book use automatic page numbering, and each begins on page 1, the book is paginated sequentially from the first page of the first document to the last page of the last document. If there are any sections of page numbers created within a document, those are reflected in the book. At the start of a new section, the pagination of that section continues to the start of the next section.
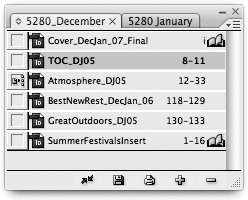
For example, the first document in this book (Figure 86a) is the Cover, and it has the page number of i, although that will not display anywhere. The cover is followed by a series of ads in a document that is not yet added to the book. The second document, TOC (for Table of Contents), has a section start and starts on page 8. The next document follows the previous document’s page numbering, so you see pages 12–33. Because not all the documents are ready for this book, you then see a new section with the Best New Restaurants feature on pages 118–129. The next document, the Great Outdoors, follows the feature and starts on page 130. Finally, at the end of the book, you see a special section of page numbers, 1–16, for an insert.
Figure 86a. Books can have many sections of page numbers.
To specify how page numbering works for a book, choose Book Page Numbering Options from the Book panel menu. In the Page Order area (Figure 86b), specify how each document should start:
Figure 86b. The Book Page Numbering Options dialog box helps you ensure that pages are numbered correctly from document to document.
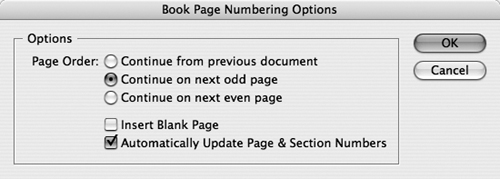
• Continue From Previous Document starts the page numbering according to the last page of the previous document. If the previous document ends on page 10, the next document starts on page 11. If the previous document ends on page 11, the next document starts on page 12. This setting is appropriate for single-sided documents.
• Continue on Next Odd Page always starts the page numbering of a document on an odd (right-facing) page. If a document ends on page 11, the next document starts on page 13. This setting might be appropriate for chapters of a book, which usually start on a right-facing page.
• Continue on Next Even Page always starts the page numbering of a document on an even (left-facing) page. If a document ends on page 12, the next document starts on page 14. This setting might be appropriate for a magazine in which each document is a feature that starts on a left-facing page.
• To insert blank pages at the ends of chapters, click Continue on Next Odd Page or Continue on Next Even Page, and InDesign will insert the blank pages. So, if a document ends on page 12 but the next document must start on page 14, InDesign will automatically insert a blank page 13 at the end of the document. To do this, check Insert Blank Page.
• Check Automatically Update Page & Section Numbers to continually repaginate the book as you work on chapters. If you prefer to wait until the book is more final, you can uncheck this option and choose Update Numbering from the Book panel menu any time you want to update the pagination.
#87 Inserting Footnotes
If you need to insert footnotes, InDesign can automatically format the footnote reference numbers, place and format the footnote text, and update the footnotes as text changes and footnotes are added. You have complete control over the text formatting and layout, so you decide precisely how every aspect of footnotes look. This takes working with footnotes from being a potentially tedious and time-consuming task to an almost effortless process.
To insert a footnote:
1. Click anywhere in text using the Type tool.
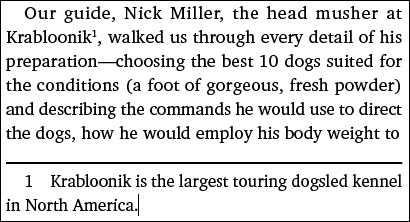
2. Choose Type > Insert Footnote. A footnote reference number is automatically inserted in the body text, and the flashing text insertion bar is placed at the bottom of the column, ready for you to type the footnote’s explanatory text (Figure 87a).
Figure 87a. A footnote is inserted next to “Krabloonik” in the second line of the paragraph. Then, for the footnote text, a definition of “Krabloonik” was typed in.
3. Enter or paste the footnote text, and then choose Type > Go to Footnote Reference to return to the main text.
If text reflows, the footnote and reference text will flow from column to column and page to page as necessary.
Footnotes generally look the same throughout an entire document. Therefore, the controls for specifying the text formatting and placement of footnotes work for all the footnotes in a document, not for individual footnotes. You can change the formatting at any time, but to prevent a lot of text reflow, you may want to set up the footnote formatting before you start inserting footnotes. To format footnotes, choose Type > Document Footnote Options.
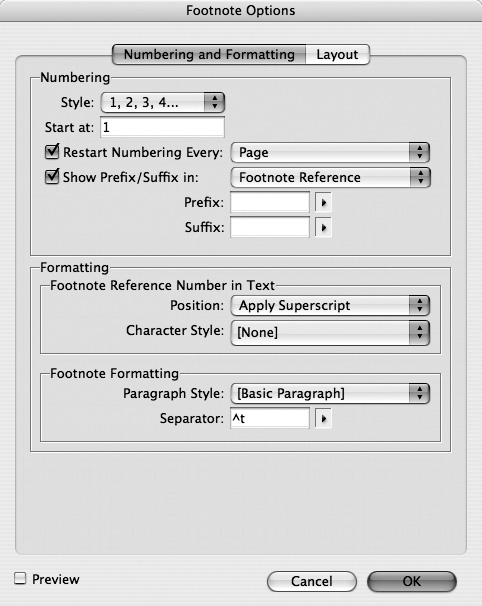
Use the Numbering and Formatting tab (Figure 87b) to specify how footnotes are numbered, the formatting of the footnote reference in text, and the formatting of the actual footnote text.
Figure 87b. In the Numbering and Formatting tab, you can select a character style for footnote reference numbers and a paragraph style for footnote text, among many other formatting options.
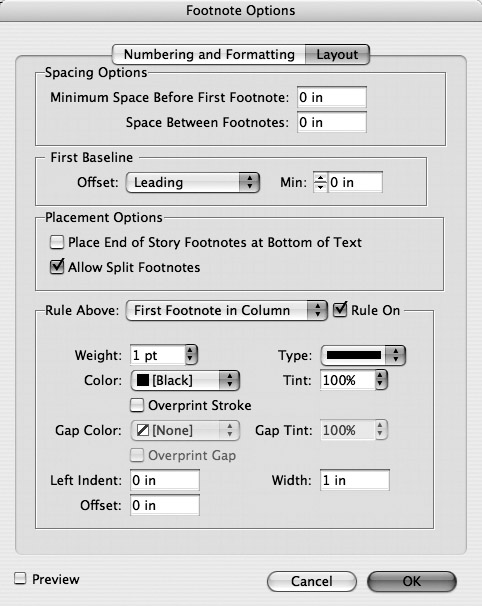
Use the Layout tab (Figure 87c) to control how footnotes are placed on the page, including the amount of space before and between footnotes, and how footnotes are handled if the text is too long to fit on the page. If you want to place a rule above footnotes, you can specify its usage and formatting.
Figure 87c. In the Layout tab, you can customize the rule above footnotes and how footnotes are placed on the page.
#88 Creating Tables of Contents
Creating and updating a table of contents, especially for a long book, can be a chore. Often, the names of heads and subheads change, page numbers change, and chapter order changes—so you’re constantly modifying what’s supposed to be the “final” table of contents. Then there’s the proofreading, to ensure that all the text and page numbers actually match the final content. Fortunately, InDesign offers an automatic way to create a final table of contents, provided that you use paragraph styles to format the chapter names, heads, subheads, and other text that will become part of the table of contents. InDesign can extract the text in those paragraph styles, and then produce and update an accurate, richly formatted table of contents for a single document or a book.
Note that although the feature is called “table of contents,” it’s useful for creating any type of list from a document. For example, you might create a list of images or charts for a book. You can, in fact, create as many different types of “tables of contents” for a book as you need.
Planning for a Table of Contents
Creating a table of contents requires a little preparation and planning. Here are a few steps to start with:
1. Figure out what text you want in the table of contents, such as chapter heads, section heads, and subheads.
2. Determine which paragraph styles are applied to that text. (If necessary, make sure the paragraph styles are applied consistently throughout the documents—if not, text may be left out.)
3. Decide how you want the table of contents to look, including the title of the table of contents, the text formatting, and the placement and look of page numbers.
4. Create paragraph and character styles for the table of contents, including its title, each level of text (chapter names, section heads, etc.), and page numbers. If you use a tab to separate each table of contents entry from its page number, be sure to set that tab and specify any leader characters you want—such as ...—in the paragraph style.
5. Create a placeholder for the table of contents—either blank pages in a document or a blank document in a book. If the table of contents will have a special design, create a master page for it as well.
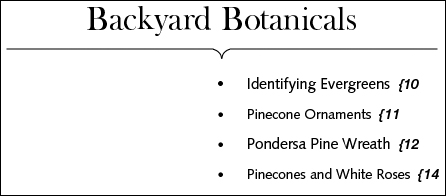
As an example, this craft book has a main table of contents for the entire book and a mini-table of contents for each chapter (Figure 88a). Some of the formatting, such as the bullets and the bracket under the chapter name, are on the master page. The text consists of the chapter name, “Backyard Botanicals,” the craft names followed by a tab, a bracket, and the page number. In the formatted table of contents, the chapter name is centered in 27-point Baskerville Old Face font; the craft names are deeply indented, 12-point Syntax; and the page numbers are 11-point Helvetica Neue Medium Italic.
Figure 88a. InDesign can create richly formatted tables of contents such as this one.
Generating a Table of Contents
Once you’ve prepared by identifying the text you want to include in the table of contents and creating paragraph and character styles for it, choose Layout > Table of Contents. In the Table of Contents dialog box (Figure 88b), you can specify the styles used to create the table of contents or list, how it should be formatted, and more.
• Title area: If you want to place a heading on the table of contents (such as “Contents” or “Figures List”), enter the text in the Title field. To specify the formatting of the title, choose an option from the Style menu at right.
• Styles in Table of Contents area: This is where you specify what text goes into the table of contents. In the Other Styles list at right, locate the paragraph style applied to the first level of head that will go in the table of contents—such as Chapter Head. Select it in the list and click Add. Then select the paragraph style applied to the second level of head and click Add. Continue adding paragraph styles in hierarchical order until you’ve added all the styles that should appear in the table of contents. Be sure to add the styles according to the hierarchy of information, such as Chapter Heads, Section Heads, Subheads, etc.
• Style area: To specify the formatting for the table of contents, click the first paragraph style in the Include Paragraph Styles list. Then choose a paragraph style from the Entry Style menu below. For example, you might map the Chapter Head paragraph style to the TOC Level 1 paragraph style.
• More Options button: To further fine-tune the formatting for each table of contents entry, click More Options. In the Style area, you can specify where page numbers are placed (such as before or after the text) and how they are separated from the entries (such as with an em space or tab). You can also choose character styles for the page numbers and separation characters. In this same area, you can specify that the entries be alphabetized and change the level of information. All the controls in the Style area are specific to the paragraph style selected in the Include Paragraph Styles area; therefore, you may need to set these options for each included style.
• Options area: To produce a table of contents for an entire book, check Include Book Documents. Other options in this area let you automatically create PDF bookmarks for table-of-contents entries, replace an existing table of contents, create a “run-in” table of contents (with semicolons rather than paragraph returns separating entries), and specify whether to include text on hidden layers.
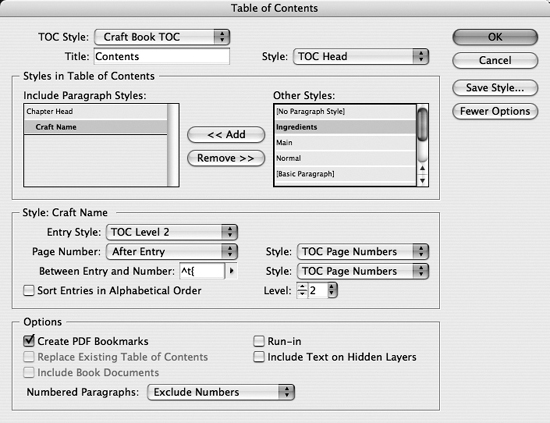
Figure 88b. The Table of Contents dialog box lets you specify what text goes into a table of contents and precisely how it should look. To make the table of contents shown in Figure 88a, the paragraph style “Craft Name” is mapped to “TOC Level 2” and separated from its page number with a tab and a left-facing bracket. Both the page number and bracket are formatted with a character style called “TOC Page Numbers.”
Once you’re finished setting up the table of contents, click OK in the Table of Contents dialog box. InDesign looks through the document or book, finds all the text, formats it, and then loads the cursor with the fully formatted table of contents. Flow the text into a text frame as you usually would.
Don’t be surprised if your table of contents is not perfect the first time. With all the detailed settings, you might miss a paragraph style or forget to select the character style for the page numbers. But don’t be tempted to manually touch up the table of contents. For one thing, manual changes will not be reflected if you create PDF bookmarks. Furthermore, you will inevitably end up making those manual changes more than once. No matter how “final” you think the document or book is, you usually end up generating the table of contents several times. Generating the table of contents is fairly quick, even for a long book, so you can whip one up just to see how many pages you need or to see if you got all the settings right. Then update it as often as needed.
Creating a Table of Contents for a Book
If you’re creating a table of contents for a book, follow these steps:
1. Be sure all the documents in the book are available (not missing or open by another user).
2. Make sure all the fonts are active. If text is reflowing due to missing fonts, the page numbers may not be accurate.
3. Choose Update Numbering from the Book panel menu before you create the table of contents.
4. Open the document in the book that will contain the table of contents. The document must contain all the necessary paragraph and character styles for creating and formatting the table of contents. If necessary, synchronize the book to make sure all the necessary styles are in that document. See #85 for more information.
5. If the table of contents is flowed into the first document in the book, you may want to run a “draft” version first to see how many pages it takes up. Then update the page numbering for the book and update the table of contents. If, for example, you save one page for a table of contents and end up using 10 pages, all the page numbers listed in the table of contents will be wrong (unless the table of contents is in its own section of page numbers).
6. Check Include Book Documents in the Table of Contents dialog box when setting up the table of contents.
7. Click OK in the Table of Contents dialog box to load the cursor with the fully formatted table of contents.
Updating a Table of Contents
As you work on a document or book, the table of contents does not update automatically. You need to update it manually to reflect changes to text, page numbers, and so on by choosing Layout > Update Table of Contents. If Replace Existing Table of Contents is checked in the Table of Contents dialog box, an alert displays indicating a successful update. If the option is not checked, the loaded text icon displays, and you can flow the table of contents wherever you want.
#89 Exporting a Book for PDF or Print
An advantage to working with books rather than juggling multiple documents is that you can output all the documents in a book at once. This includes preflighting, collecting files for output, exporting to PDF, and printing. Before working with output options, be sure all the documents are available (not open by other users or missing), all the linked graphic files are available, and all the necessary fonts are active.
You can output selected documents in a book or all the documents in a book. To work with all the documents, click in the blank area at the bottom of the Book panel to deselect all the documents. To select individual documents, Command-click (Mac OS) or Ctrl-click the document names; to select a continuous range of documents, use Shift-click. To access the output options for books, click the Book panel menu (Figure 89):
• Preflight Book checks each document’s fonts, images, colors, and more to make sure they’re ready for output. See #94 for information about preflighting.
• Package Book lets you choose Book For Print or Book For GoLive, and collects all the necessary files, including documents, fonts, and linked images. See #94 for information about packaging.
• Export Book to Digital Editions exports the book as an XHTML-based eBook intended for the Adobe Digital Editions reader. See the Adobe website (www.adobe.com) for more information.
• Export Book to PDF lets you output all the selected documents in the book as a single PDF. If you checked Create PDF Bookmarks in the Table of Contents dialog box, the PDF will already have links in it. See #95 for more information.
• Print Book opens the Print dialog box so you can print a hard copy of the book. See #98 for more information about printing. In addition to choosing Print Book, you can click the Print Book button ![]() at the bottom of the Book panel.
at the bottom of the Book panel.
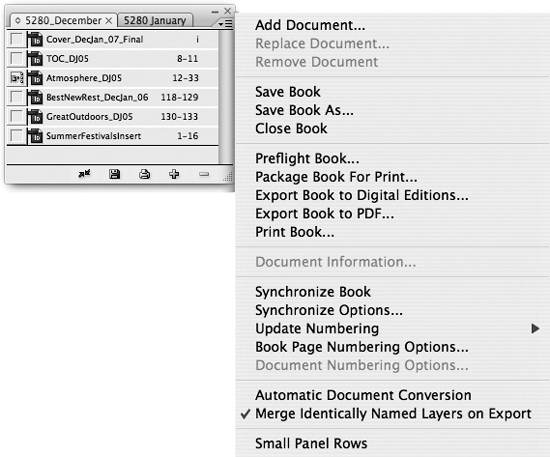
Figure 89. The Book panel menu provides options for outputting all the documents in the book with the same settings. These include preflighting, collecting files for output, exporting the book to PDF, and printing the book.
Note
When documents are selected in the Book panel, the output commands in the Book panel menu change from “Book” to “Selected Documents.” For example, Preflight Book becomes Preflight Selected Documents.