14. Creating Adobe PDF Files with Form Fields
Lesson overview
In this lesson, you’ll learn to do the following:
Set up a workspace for forms.
Add and configure various form field types.
Learn the differences between the types of form fields.
Use prebuilt form elements.
Set the tab order of form fields.
Add a Submit button to a form.
Export an Adobe PDF (Interactive) file with form fields.
Test your form in Adobe Acrobat Reader.

This lesson will take about 45 minutes to complete. To get the lesson files used in this chapter, download them from the web page for this book at adobepress.com/InDesignCIB2023. For more information, see “Accessing the lesson files and Web Edition” in the Getting Started section at the beginning of this book.

Adobe InDesign provides all the tools you need to create simple PDF forms, and you have the option of using Adobe Acrobat Pro DC to add features and functionality that aren’t available in InDesign.
Getting started
In this lesson, you’ll add several different types of form fields to a volunteer registration form, export an Adobe PDF (Interactive) file, and then open the exported file in Adobe Acrobat Reader and test the fields you created.
To ensure that the preferences and default settings of your InDesign program match those used in this lesson, move the InDesign Defaults file to a different folder following the procedure in “Saving and restoring the InDesign Defaults file” on pages 3–4.
 Note
NoteIf you have not already downloaded the project files for this lesson to your computer from your Account page, make sure to do so now. See “Getting Started” at the beginning of the book.
Start InDesign. Choose File > Open, and open the 14_Start.indd file in the Lesson14 folder, located inside the Lessons folder within the InDesignCIB folder on your hard drive. This one-page document is a registration form.
To ensure that the panels and menu commands match those used in this lesson, choose Window > Workspace > [Interactive For PDF], and then choose Window > Workspace > Reset Interactive For PDF.
NoteIf an alert informs you that the document contains links to sources that have been modified, click Update Modified Links.
To see what the finished document looks like, open the 14_End.indd file in the Lesson14 folder.
Close the 14_End.indd file after you have finished examining it, or you can leave this document open for reference.
NoteTo better view the interface onscreen or in print, the screen captures in this book reflect the Medium Light interface rather than the default setting of Medium Dark. In addition, some screen captures illustrate User Interface Scaling for a closer look at interface elements. You can modify interface settings in Preferences.

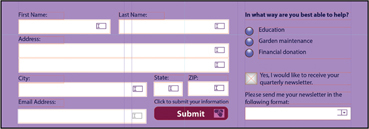
Start file.
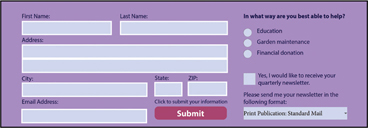
Completed document.
PDF form in Acrobat.
Return to the 14_Start.indd file and choose File > Save As, rename the document 14_PDF_Form.indd, and save it in the Lesson14 folder.
Setting up a workspace for forms
When creating a fillable form with InDesign, you’ll start with a page that has already been designed. The process of taking a designed form and turning it into a form that can be filled out in a PDF uses specific tools. The Interactive For PDF workspace has many of the tools you’ll need readily available. You will be even more efficient if you customize the workspace a little.
First, drag panels off the panel dock that are not needed for forms: Page Transitions and Bookmarks. Drag each panel to the left over the pasteboard. These panels are useful for other types of interactive PDFs but are not needed for forms. Also drag the Links, Color, and Gradient panels to the pasteboard, as they won’t be used for this exercise. You’ll be adding form functionality to a document that is already designed and built. It doesn’t matter if some of the panels dock together as you drag them.
Close each of the panels you just dragged off the panel dock.

Choose Window > Styles > Object Styles to open the Object Styles panel. Choose Window > Properties to open the Properties panel. Then drag each of these panels to the bottom of the panel dock so that you can open and close them as needed while conserving screen space.
Save this workspace so you can use it again. Choose Window > Workspace > New Workspace. Use a name like PDF Forms-Basic or whatever makes sense to you. (For more complicated and long forms, you might want to save a separate workspace with additional tools.) Click OK.
Throughout this lesson, you’ll use the Buttons And Forms panel very often. Arrange your screen so that there is room to leave it open as you work, if possible. Or, open and close it (![]() ) from the panel dock as often as needed.
) from the panel dock as often as needed.
Adding form fields
Some of the setup work on the form fields has already been done. You’ll complete the form by adding more fields and then modifying some of them.
Adding text fields
In a PDF form, a text field is a container into which the person who fills out the form can enter text. All but two of the frames have already been converted into text fields. You’ll add two new frames and convert them into text fields.
Open the Layers panel by clicking the Layers icon (
 ) in the panel dock. Notice that the file is set up with a separate layer, Form Elements. The objects that are part of the form are on this layer. Lock the other layer, Layer 1, so that you can work with the form objects without accidentally moving anything else. Note
You can simplify the display of the page by hiding Layer 1 in the Layers panel. Only the objects in the form area are displayed when you hide Layer 1.
Use the Zoom tool (
 ) to zoom in on the area in the top half of the page that contains the form objects. This is where all of your work in this lesson will be done.
Using the Selection tool (
 ), move the pointer over the white rectangle below “First Name.” Notice that a red dotted line is displayed around the object, and a small icon is displayed at the lower right. The dotted line indicates that the object is a PDF form element; the icon of the text frame indicates that the type of PDF form element is a text field. Click in the text field to select the object. Note
If you do not see the icons (
 ) in the text fields, zoom in more. Try working at 150% zoom or higher.
Click the Buttons And Forms icon (
 ) in the panel dock to display the Buttons And Forms panel. Notice the settings for the text field. Text Field is selected as the type, and the name of the element is First Name. The Description field is displayed to the form user when the pointer hovers over a field, which means you can provide additional guidance to users who fill out a form. The Description field is also set to First Name. Printable is selected by default to enable printing of this form. Leave Font and Font Size at the defaults.

Different types of form fields have different icons in the lower-right corner. This is a text field icon.
Select the frame of the First Name form field (if necessary), press Alt (Windows) or Option (macOS), and drag a copy of it below Last Name. Resize the field to make it longer, aligning it with the fields below, by dragging the center-right handle to the right. The Smart Guides will appear when the pointer is aligned.
In the Buttons And Forms panel, notice that the name of this field is First Name 1. This is an InDesign behavior you must be aware of when creating forms: no fields can have the same name. InDesign enforces this rule by adding sequential numbers to the name of duplicated fields. To make this a unique field with the correct information, change both the Name and Description fields to Last Name.
To create a field from scratch, select the Rectangle tool (
 ) in the Tools panel and draw a frame under the Email Address text frame. Align the right edge with the City frame above and the top edge with the bottom of the Email Address text frame. Use the Smart Guides to make the frame the same height as the City frame. You can convert any kind of frame—text, graphics, or unassigned—into a PDF form field. A text field does not have to be made from a text frame.
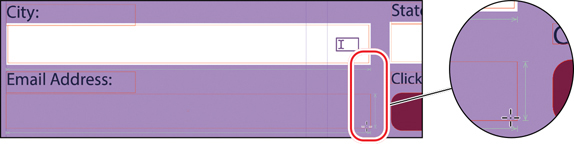
Notice how the Smart Guides help you align and size objects.
Now we will assign the same fill and stroke as the other text fields. An object style for the text field boxes has already been created for this lesson. Open the Object Styles panel by clicking the Object Styles icon (
 ) in the panel dock. Using the Selection tool (), click the box you just drew if it’s not still selected. Select the object style Text Field Box, and then close the Object Styles panel. The same fill and stroke have now been applied to the new frame. Next, make the text field the same height and width as the City field by dragging the rectangle handles slightly. The size has changed slightly because the object style added a stroke to the frame. Watch for the Smart Guides to display again. Confirm that the size of the field is the same as the City field by checking the measurements in the Control or Properties panel. Note
Whenever you add a stroke to a frame, you can set the stroke to align to the center, outside, or inside of the frame edge. The center and outside options change the height and width measurements of the frame.
With this new frame still selected, in the Buttons And Forms panel choose Text Field from the Type menu, and assign it the name and description Email Address. Set Font Size to Auto. Auto is a good choice for fields such as email addresses that can be very long; the setting decreases the font size as needed to fill the frame. This functionality prevents any text from being clipped off when the page is printed. This time, choose a different font from the default.
Choose File > Save.
Adding either/or choices: radio buttons
Radio buttons present the person filling out the form with two or more choices, but only one choice can be selected as the response. A group of radio buttons functions as one field, with a unique value for each button. Checkboxes can appear similar to radio buttons, but every checkbox in the list can be either on or off.
![]() Note
Note
Use radio buttons for either/or (mutually exclusive) choices when the user must specify a status that can have only one answer—for example, whether they are a member, nonmember, or student member of an organization.
Radio buttons are often simple circles; however, you can design your own buttons or choose from several sample buttons included with InDesign. In this exercise, you’ll use one of the sample radio buttons. The prebuilt buttons in this library are vector shapes with various attributes for fill, stroke, and effects.
Choose View > Fit Page In Window, and then use the Zoom tool (
) to magnify the “In what way are you best able to help?” portion of the form.Slide your view to the right so that you can also see part of the pasteboard. The three circles there are a set of radio buttons that is included with InDesign in a library.
 Tip
TipChoose File > Open, and navigate to the InDesign 2023 application folder. Inside, open Presets > Button Library. This library contains many preconfigured objects you can use in interactive projects.
Using the Selection tool (
), drag across the three radio buttons to select them and move them from the pasteboard to a position below the text frame with the text “In what way are you best able to help?” Left-align them with the question and top-align the top one with the first answer. Refer to the following figure for the correct position.In the Control or the Properties panel, and with the three buttons still selected, make sure that the upper-left reference point is selected in the reference point locator (
 ), enter 40% in either of the Scale Percentage fields, make sure that the Make All Settings The Same icon (
 ) is selected, and then press Enter (Windows) or Return (macOS). If necessary, move the buttons to match the figure shown.
Radio buttons before being scaled.

After being scaled to 40%.
With all three buttons still selected, open the Buttons And Forms panel, enter Form of Assistance in the Name field and In what way are you best able to help? in the Description field, and then press Enter or Return. Notice that Type is already set to Radio Button because each circle was already set up as a radio button. By giving them the same name, you ensure that only one can be selected at a time.
Choose Edit > Deselect All, or click an empty area of the page or pasteboard.
Each button must have a unique value, which you’ll do now.
Use the Selection tool (
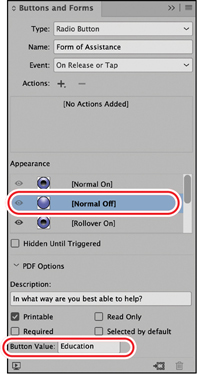
) to select the first radio button (to the left of Education).At the bottom of the Buttons And Forms panel, enter Education in the Button Value field at the bottom of the panel, and then press Enter or Return. Under Appearance, scroll up to [Normal Off] and click to select it. Make sure that Selected By Default is not selected.
NoteThe states listed under Appearance in the Buttons And Forms panel control the look of the radio buttons when you move the pointer over the button in the PDF form.
Repeat steps 7 and 8 to change the Button Value setting of the middle button to Garden maintenance and of the bottom button to Financial donation. Notice that the name of the field is the same for all three buttons; only the Button Value changes. The second and third buttons should already be set to the state [Normal Off] in the Appearance area.
Adding yes or no choices: checkboxes
A checkbox presents a yes-or-no choice for an individual item. A user of the form can click the empty checkbox to add a checkmark or leave it unselected (the default setting in the exported PDF). Now you’ll add a checkbox.
In the pasteboard to the right is a square with a checkmark. This is also a pre-configured button from the Button Library included with InDesign. Use the Selection tool to drag it to the left of the text frame that contains “Yes, I would like to receive your quarterly newsletter,” which is just below the radio buttons you created in the previous exercise. Align the checkbox so that the top of the checkmark frame aligns with the top of the text frame.
Press Shift+Ctrl (Windows) or Shift+Command (macOS) and drag the lower-right handle to scale the checkbox graphic so that it is the same height as the text frame to the right. Use the following image as a guide to position the graphic.

Checkbox graphic after being scaled.
With the checkbox graphic still selected, open the Buttons And Forms panel by clicking the icon (
) in the panel dock. Enter Receive Newsletter in the Name field, and then press Enter or Return. Notice that Type is already set to Check Box and that Button Value is Yes. Under Appearance, click [Normal Off]. In the Description field, enter Check here if you’d like to receive our newsletter. Make sure Selected By Default is not selected.
The checkbox and radio buttons will have red highlights because they are on the Form Elements layer. As you work on any form, it’s a good practice to check that elements are on the layer where they belong. Doing so helps keep your work organized and becomes especially important when you work on complicated forms. This file is set up with all of the form objects on a separate layer from the other elements. Choose Edit > Deselect All, and then open the Layers panel (
). Click the square next to the Form Elements layer and all objects on that layer are highlighted, allowing you to ensure that the objects are on the correct layer. NoteLayer 1 should already be locked, so the new objects should already be on the correct layer. Keeping the form elements on a separate layer is an important standard practice to implement when you start creating your own forms.
Choose Edit > Deselect All again, and then choose File > Save.
Adding a list of choices: combo box
A combo box creates a menu that lists multiple predefined choices. The user can select only one of the choices. Next, you’ll create a combo box that offers three choices.
![]() Note
Note
List boxes are similar to combo boxes in that you add a list of items; however, combo boxes allow you to select only one item from a list in the PDF form. If you select Multiple Selection for a list box, a user of the PDF form can make more than one choice. An example of when to use a list box is when the question is a “check all that apply” situation.
Use the Selection tool (
) to select the text frame below the “Please send me your newsletter in the following format:” heading.In the Buttons And Forms panel (
), choose Combo Box from the Type menu, and then enter Newsletter Format in the Name field. In the Description field, enter Choose which way you’d like to receive our newsletter. Change Font Size to 10. To provide the viewer of the PDF form with different choices, you’ll add three list items.In the lower half of the Buttons And Forms panel, in the List Items field enter Print Publication: Standard Mail, and then click the plus sign (
 ) to the right of the field. Notice that the text you entered is now displayed in the list below the field.
Repeat the previous step to add Adobe PDF: Email Attachment and Link to online newsletter: Email to the list. Select the Sort Items option to sort list items alphabetically.
TipYou can also modify the order of list items by dragging them up or down in the list.
Click Print Publication: Standard Mail in the list of items to make it the default selection. When the user opens the exported PDF file, Print Publication: Standard Mail will already be selected.
Choose Edit > Deselect All, and then choose File > Save.
Setting the tab order of the fields
The tab order you establish for a PDF form determines the order in which fields are selected as a user presses the Tab key. To make the form user-friendly, the order must be logical to the user. You would not want the tab to move from First Name to ZIP and skip the fields in between. Next, you’ll set the tab order for the fields in this form.
From the Object menu, choose Interactive > Set Tab Order.
In the Tab Order dialog, click Last Name (the name of the text field you created that holds the surname of the person filling out the form), and then click Move Up until Last Name appears below First Name near the top of the list. Use the Move Up and Move Down buttons or drag field names up or down to rearrange them to match the order on the page. Click OK to close the dialog.

Tab order before being rearranged.

You can drag more than one field at a time.

After being rearranged.
Choose File > Save.
Adding a button to submit the form
If you distribute a PDF form, you’ll want to include a way for anybody who fills out the form to return it to you electronically. To accomplish this, you’ll create a button that sends the filled-out PDF form to your email address.
![]() Tip
Tip
Any object or group can be converted into a button. The example in this lesson is a text frame with a fill color and the text “Submit.” To convert a selected object or group into a button, choose Button from the Type menu in the Buttons And Forms panel.
Use the Selection tool (
) to select the rounded-corner text frame with a red fill and the text “Submit,” scrolling to the left to see this frame if needed.In the Buttons And Forms panel (
), choose Button from the Type menu, enter Submit Form in the Name field, and then press Enter or Return. In the Description field, enter Send the completed form via email.Click the plus sign (
) to the right of “Actions:” and then choose Submit Form from the menu.In the URL field, enter mailto:. Make sure you enter a colon after “mailto.” Do not enter a space or a period before or after the colon.
TipThe ability to add an action to a button is one of the most versatile tools for interactive PDFs.
Enter your email address (for example, [email protected]) after mailto:. This will return the completed form to you.
To cause the button’s appearance to change when a user moves the pointer over the Submit button, you’ll add a Rollover appearance.
TipA button’s appearance can have three different states. The state that’s displayed depends on the user’s interaction. The Normal state is the default display when no interaction occurs, the Rollover state displays when the pointer is over the button, and the Click state displays when the mouse button is clicked.

Click [Rollover] in the Appearance area of the Buttons And Forms panel. Click the arrow to the right of Fill Color in the Control panel, and enter 50 in the Tint field. Press Enter or Return to accept the change and close the fill area of the panel. (Using the Control panel will leave the Buttons And Forms panel open at the same time.)
Return to the Buttons And Forms panel. Notice that the [Rollover] appearance is now lighter than the [Normal] appearance, reflecting the tint change you just made. Click [Normal] to display the default appearance.
TipIf you don’t want the Submit button itself to appear on a printout of the form, deselect the Printable option in the Buttons And Forms panel for the button.


Zoom in to see that the icon for a button is a finger pointing to a rounded-corner rectangle.

Users will see this visual cue when hovering over the button.
Open the Layers panel by clicking the icon (
) in the panel dock, or choose Window > Layers and make sure all layers are visible (in case you hid Layer 1 earlier in the lesson).Choose Edit > Deselect All, and then choose File > Save.
Form field types
![]() Button: The most versatile interactive element. A button can trigger many actions.
Button: The most versatile interactive element. A button can trigger many actions.
![]() Checkbox: For yes-or-no choices, a checkbox is either selected or unselected. Use checkboxes for “Check all that apply” questions.
Checkbox: For yes-or-no choices, a checkbox is either selected or unselected. Use checkboxes for “Check all that apply” questions.
![]() Combo box: The user can choose only one answer from a list.
Combo box: The user can choose only one answer from a list.
![]() List box: Similar to a combo box except that the user can choose more than one answer.
List box: Similar to a combo box except that the user can choose more than one answer.
![]() Radio button: For either/or choices, the user can choose only one answer.
Radio button: For either/or choices, the user can choose only one answer.
![]() Signature field: Enables the user to sign a form with a digital signature.
Signature field: Enables the user to sign a form with a digital signature.
![]() Text field: Allows the user to type text information.
Text field: Allows the user to type text information.
Exporting an interactive PDF file
Now that you’ve finished work on the form fields, you’re ready to export an interactive Adobe PDF file and then test the exported file.
Choose File > Export. In the Export dialog, choose Adobe PDF (Interactive) from the Save As Type menu (Windows) or Format menu (macOS). Name the file 14_PDF_Form.pdf and navigate to the Lesson14 folder, located inside the Lessons folder within the InDesignCIB folder on your hard drive.
NoteYou may not need to enter a filename because the default behavior is to name the exported file with the name of the InDesign file. That means the PDF name may automatically be 14_PDF_Form.
Click Save. The Export To Interactive PDF dialog opens.
In the Export To Interactive PDF dialog, click the General tab. In the Options area, make sure that Include All is selected for Forms And Media. This is the most important setting to make the form fields work in the PDF.
TipIn many scenarios where you’ll create a form, you’ll need to complete the Title, Author, Subject, and Keywords fields. You do so in Acrobat after the file is exported from InDesign. In Acrobat, choose File > Properties and then click the Description tab to fill out these fields.

Choose Fit Page from the View menu to display the entire page when the exported PDF is opened. Click Export.
Testing your form in Adobe Acrobat Reader
You should always test your forms in Acrobat Reader because the end user is most likely to use that version of Acrobat when filling out the form. If you do not have Acrobat Reader, install it now. The current version is Adobe Acrobat Reader DC. It’s a free download at https://get.adobe.com/reader.
![]() Note
Note
If you have Acrobat Pro DC as part of your Creative Cloud subscription, that is the professional version of Acrobat, which most users of the form probably will not have.
Open Acrobat Reader and open the PDF you just exported. Zoom in to the form area of the page. First, click in the First Name field and press the Tab key. Continue to tab through all the fields to make sure that the tab order is correct. Fill out each field with sample information before tabbing to the next field. Be sure to type in a very long email address in that field and notice how the text size gets smaller once you type beyond the length of the field at the original font size. Also check whether this field has a different font than the rest as you specified.
Next, click the radio buttons under “In what way are you best able to help?” and notice that you can make only one choice at a time.
Click the box beside “Yes, I would like to receive your quarterly newsletter” to see that the checkmark appears. Then choose one of the newsletter formats from the drop-down menu.
Move the pointer across each field, pausing for a moment, and notice the tips that appear (called “tool tips”). These are the descriptions that you entered in the Buttons And Forms panel for each field.

If you find any errors, go back to the InDesign file and fix them. Then export and test again.
When you’re done, click the Submit button that emails the filled-out form to you. A dialog will open asking which email program you want to use. Make your choice and then click Continue. Your email software will open with the filled-out form attached to a new message. Send the form and then return to InDesign.
NoteA security warning dialog may display when Acrobat creates an email message with the completed form as an attachment. Click Allow.
Look at the email you received and notice the subject line: Form Returned: 14_PDF_Form.pdf. This is a default function of the Submit Form action of the Submit button. Therefore, it’s important to consider the name of the PDF when you create forms to be emailed.
Congratulations! You’ve created a PDF form and tested it.
Exploring on your own
Use the Ellipse tool (
 ) to create a small circular frame. Choose a fill color from the Swatches panel and use the Buttons And Forms panel to convert the frame into a button. Assign the Go To URL action to the button and enter a complete URL in the URL field (for example, https://www.adobepress.com). Assign a different fill color to the Rollover state. To test this button, export an Adobe PDF (Interactive) file and click the button.
There is a sample List Box in the pasteboard to the right of the Newsletter field. Drag this frame and the text frame above it onto the page. Export an Adobe PDF (Interactive) file and test selecting more than one choice.

Experiment with the other actions that can be applied to a button for interactive PDFs. Note the section of actions in the middle of the list that work only with EPUB or Publish Online files, not PDFs. Export and test the result.

Review questions
1 What panel lets you convert an object into a PDF form field and specify settings for form fields?
2 What is the difference between a radio button and a checkbox?
3 What action can you assign to a button that enables a viewer of the exported PDF form to send a copy of the filled-out form to an email address?
4 What programs can be used to open and fill out an Adobe PDF form?
5 What are the three most important things to do when exporting your InDesign file to create a fillable PDF form?
6 How do you control the order in which a user can tab through the fields when filling out a form?
Review answers
1 The Buttons And Forms panel (Window > Interactive > Buttons And Forms) lets you convert objects into PDF form fields and specify settings for them.
2 Radio buttons are for questions that have an either/or answer; the user of the form can choose only one. Checkboxes are for questions whose answer is a simple yes when the box is selected.
3 To enable the viewer of a PDF form to return a filled-out form, use the Buttons And Forms panel to assign the Submit Form action to the button. After you assign the Submit Form action, enter mailto: followed by an email address (for example, mailto:[email protected]) in the URL field.
4 You can open and fill out PDF forms using Acrobat Pro DC or Acrobat Reader DC, as well as third-party apps.
5 First, in the Export dialog, choose Adobe PDF (Interactive) from the Save As Type menu (Windows) or Format menu (macOS). Then in the Options area of the General tab, make sure that Include All is selected for Forms And Media. Then test the form in an app the intended audience is likely to use, such as Acrobat Reader.
6 From the Object menu, choose Interactive > Set Tab Order. Then move the field names up or down so that they follow the visual order that the user will see.