Most shots require some degree of color correction and color grading. With Adobe After Effects, you can easily remove color casts, brighten images, and change the mood of a clip.
Getting started
Color influences the way viewers see and respond to your movie. After Effects provides several features that let you alter or adapt the color of a captured image. Strictly speaking, color correction is the act of adjusting the color in a shot to correct errors in white balance and exposure, and to ensure color consistency from one shot to another. However, you can use the same color-correction tools and techniques to perform color grading, which is the subjective manipulation of color to focus attention on a key element in a shot or to create a color palette for a specific visual look.
In this lesson, you will adjust saturation, hue, and other color components to enhance the color in three clips. First, you’ll separate the clips from a video file into three individual layers that you can manipulate separately. Then, you’ll apply a variety of color-correction effects to enhance the images and alter the mood. You’ll also use mask tracking and motion tracking to replace the unremarkable background of one image with stylish drapery.
First, you’ll preview the final movie and set up your project.
Make sure the following files are in the Lessons/Lesson10 folder on your hard disk, or download them from your Account page at adobepress.com now:
In the Assets folder: Collectibles.mp4, drapes.jpg, and TrinketsText.psd
In the Sample_Movie folder: Lesson10.mp4
Open and play the Lesson10.mp4 sample movie in Windows Movies & TV or QuickTime Player to see what you will create in this lesson. When you are done, close Windows Movies & TV or QuickTime Player. You may delete the sample movie from your hard disk if you have limited storage space.
Start After Effects, and then immediately hold down Ctrl+Alt+Shift (Windows) or Command+Option+Shift (macOS). When prompted, click OK to delete your preferences.
Click New Project in the Home window.
After Effects opens to display an empty, untitled project.
Choose File > Save As > Save As.
In the Save As dialog box, navigate to the Lessons/Lesson10/Finished_Project folder. Name the project Lesson10_Finished.aep, and then click Save.
Creating the composition
You’ll create a new composition based on the Collectibles movie file.
Choose File > Import > File.
Navigate to the Lessons/Lesson10/Assets folder. Select the Collectibles.mp4 file, and select Create Composition.
Click Import or Open.
After Effects creates a composition named Collectibles and opens it in the Composition and Timeline panels.
Press the spacebar to preview the footage. Notice that there are three distinct scenes. Depending on your computer’s volume, you may also hear some static noise for most of the footage.
Detecting scenes in a composition
The video includes three scenes, which you need to edit independently. You’ll rearrange the order of the scenes, change the length of each, apply different color corrections, replace the background in one, and clone an object in the final scene. All of these edits are much easier to perform in separate layers. You’ll use Scene Edit Detection to split the layers, but first, you’ll mute the composition’s audio to remove the static noise so it doesn’t carry over to the new scenes.
Press the Home key or move the current-time indicator to the beginning of the composition.
Click the Audio switch for the Collectibles.mp4 layer to mute its sound.
With the Collectibles layer selected, choose Layer > Scene Edit Detection.
In the Scene Edit Detection dialog box, select Split Layer At Scene Edit, and click OK.
After Effects splits the footage into three layers, each with the same name as the original file. Notice that all three layers are muted. The footage begins with the bottom layer (layer 3) and ends with the top layer (layer 1). You’ll reorganize the layers.
Select Layer 1, press Enter or Return, and rename the layer Trinkets. Press Enter or Return again to accept the new name.
Repeat step 5 to rename Layer 2 Ceramics and Layer 3 Art Glass.
In the Timeline panel, drag the Ceramics layer to the top of the layer stack. Drag the Trinkets layer to the bottom.
Drag the footage to match the layer order: Drag the Ceramics layer to the beginning of the timeline (0:00); drag the Art Glass layer to 2:05; and make sure the Trinkets layer starts at 3:20.
Choose File > Save to save your work so far.
Making color enhancements
You’ll use color-correction effects to make some subtle enhancements to the Ceramics clip, punching up the color and increasing the contrast.
Adjusting saturation
The hue is the actual color of an image, while saturation is the purity of that image. With the Hue/Saturation effect, you can adjust the hue, saturation, or lightness of an image.
You’ll start by adjusting the saturation in the Ceramics clip.
Press the Home key or move the current-time indicator to the beginning of the composition.
Select the Ceramics layer in the Timeline panel.
Choose Effect > Color Correction > Hue/Saturation.
The Hue/Saturation effect options appear in the Effect Controls panel.
First, you’ll punch up the color by adjusting the saturation.
Increase the Master Saturation to 25.
All of the colors are slightly more intense, particularly the pink cloth. Now you’ll enhance the shimmer in the metallic finishes by increasing just the yellow value.
From the Channel Control menu, choose Yellows.
Increase the Yellow Saturation to 25.
Hide the Hue/Saturation properties in the Effect Controls panel.
Adjusting contrast
The Auto Contrast effect adjusts the overall contrast and mixture of colors. It maps the lightest and darkest pixels in the image to white and black, and then redistributes the intermediate pixels so that highlights appear lighter and shadows appear darker.
You’ll adjust the contrast so that the details of the ceramic birds are more pronounced.
With the Ceramics layer selected, choose Effect > Color Correction > Auto Contrast.
After Effects applies the default settings to adjust the contrast in the image, and it opens the Auto Contrast effect options in the Effect Controls panel.
The default settings are a nice start, but you’ll animate the settings to increase the contrast over time.
Make sure the current-time indicator is at the beginning of the time ruler. Then click the stopwatch icon () for the Black Clip property in the Effect Controls panel to create an initial keyframe.
Go to 2:02, where the text is in its final position.
Increase the Black Clip value to 2.00.
The background darkens, making the text more pronounced.
Hide the Auto Contrast options in the Effect Controls panel.
Choose File > Save to save your work.
Adding a colorized effect
The Colorize option in the Hue/Saturation effect adds color to an image. It’s an easy way to create a stylized duotone. To add some visual interest, you’ll create a transition from a duotone to full color at the beginning of the clip.
Press the Home key or move the current-time indicator to the beginning of the time ruler.
Select the Ceramics layer, and choose Edit > Duplicate.
Select the Ceramics 2 layer, press Enter or Return, and rename the layer Ceramics Intro. Press Enter or Return to accept the new name.
Select the Ceramics Intro layer. Then, in the Effect Controls panel, delete the Auto Contrast effect.
In the Effect Controls panel, open the Hue/Saturation effect, if it isn’t already open. Then, select Colorize.
Increase the Colorize Hue value to 25°.
Increase the Colorize Lightness value to 30.
In the Timeline panel, press T to reveal the Opacity property for the Ceramics Intro layer.
Click the stopwatch icon () for the Opacity property to create an initial keyframe.
Go to 0:15, and change the Opacity to 0.
Drag the current-time indicator from 0:00 to 0:15 to preview the transition.
Hide the properties for all layers, and save your work.
Replacing a background
The background footage for the art glass is bland and there’s an unsightly outlet in the corner. To resolve this, you’ll replace the background with an image of drapery.
You’ll start by masking the background and tracking the mask.
Using the mask tracker
The mask tracker transforms a mask so that it follows the motion of an object or objects in a movie. It’s similar to the face tracker you used in the Extra Credit project in Lesson 9. You can use it to mask a moving object so that you can apply a special effect to it, for example. In this case, you’ll use it to track the art glass as the camera moves through the scene.
Select the Art Glass layer, and go to 2:05, the beginning of the art glass footage.
In the Composition panel, zoom out to see the pasteboard outside the frame.
Select the Pen tool () from the Tools panel.
Draw a mask around the pieces and the table, extending the top and side boundaries beyond the edge of the clip as in the image below.
Press the M key to display the Mask properties.
Choose None from the Mask Mode menu.
Mask modes (blending modes for masks) control how masks within a layer interact with one another. By default, all masks are set to Add, which combines the transparency values of any masks that overlap on the same layer. While Add is chosen, areas outside the mask disappear. Choosing None from the Mask Mode menu reveals the entire clip in the Composition panel, not just the masked area, so it’s easier to edit.
Right-click (Windows) or Control-click (macOS) Mask 1, and choose Track Mask.
After Effects opens the Tracker panel. The mask tracker does not alter the shape of the mask to follow a shape; the mask remains the same shape but the tracker can change its position, rotation, or scale based on the motion in the clip. You’ll use it to track the edges of the bottles and table without having to manually adjust and track the mask. Because the glass objects curve along the round table edge, you’ll track the perspective of the mask.
In the Tracker panel, choose Perspective from the Method menu. Click the Track Selected Masks Forward button () to begin tracking forward from 2:05.
When the tracking is complete, manually preview the clip to see the mask. If it slips out of place, adjust the mask on individual frames. You can shift the entire mask or reposition individual points, but don’t delete any points, as that will change the mask for all the frames that follow.
Note
If the mask requires adjustment on more than a few frames, delete it and draw the mask again.
Adding a new background
With the mask tracked, you’re ready to add drapery to the scene.
Choose Add from the Mask Mode menu, and select Inverted next to Mask 1 in the Timeline panel.
Hide the properties for the Art Glass layer, and then go to 2:05, the beginning of the scene.
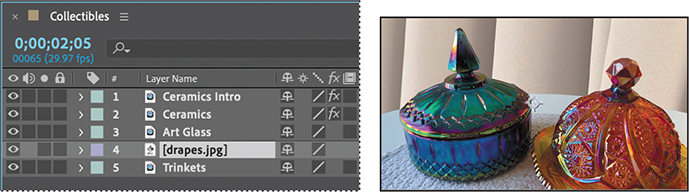
Double-click an empty area in the Project panel to open the Import File dialog box, and navigate to the Lessons/Lesson10/Assets folder. Select the drapes.jpg file, deselect Create Composition, and click Import or Open.
Drag the drapes.jpg file from the Project panel to the Timeline panel, placing it below the Art Glass layer.
Drag the ends of the drapery footage in the Timeline panel so that its duration matches the Art Glass layer.
With the drapes.jpg file selected in the Timeline panel, choose Layer > Transform > Fit to Comp Width.
Use the Selection tool () to reposition the image, aligning it with the top of the composition.
Color-correcting using Auto Contrast
Although the background is now less bland, the contrast of the drapes doesn’t quite match the foreground elements. You’ll use the Auto Contrast effect to correct that.
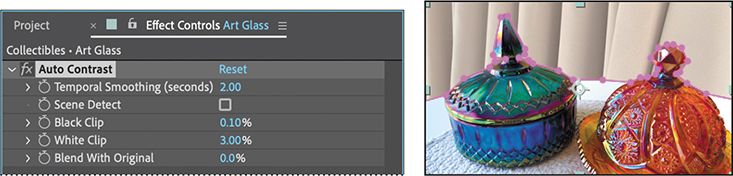
Select the Art Glass layer in the Timeline panel, and then choose Effect > Color Correction > Auto Contrast.
In the Effect Controls panel, change Temporal Smoothing (seconds) to 2.00.
Change the White Clip value to 3.00% to brighten the foreground elements.
The Black Clip and White Clip values determine how much of the shadows and highlights (respectively) are clipped to the new extreme shadow and highlight colors in the image. Set the clipping values only as high as you need to as excessive clipping can reduce detail in the shadows or highlights.
Choose File > Save to save your work.
Cloning an object in a scene
Cloning in After Effects is similar to cloning in Photoshop, but in After Effects, you can clone across the entire timeline, rather than in a single image. When you add an object, you can use motion tracking to ensure it remains in sync with the rest of the scene.
You’ll use the Clone Stamp tool to place an additional pawn on the other side of the queen in the Trinkets layer.
Go to the beginning of the Trinkets footage at 3:20.
Double-click the Trinkets layer to open it in the Layers panel. Then zoom in on the queen and pawn chess pieces in the lower right.
Select the Clone Stamp tool () in the Tools panel.
The Clone Stamp tool samples the pixels on a source layer and applies the sampled pixels to a target layer; the target layer can be the same layer or a different layer in the same composition. You use painting tools, including the Clone stamp tool, in the Layers panel.
When you select the Clone Stamp tool, After Effects adds the Brushes and Paint panels to the stack.
Enlarge the Paint panel if necessary. Make sure the Mode is set to Normal and the Duration to Constant. The source should be set to Current Layer. Select Aligned and Lock Source Time, and make sure the Source Time is set to 0 frames.
Open the Brushes panel and set up a brush with a Diameter of 21 pixels and Hardness of 80.
Note
If the Brushes panel is dimmed, select the Brush tool in the Tools panel to activate it, and then select the Clone Stamp tool again.
The Constant setting applies the Clone Stamp effect from the current time forward. Because you’re starting at the beginning of the timeline, the changes you make will affect every frame in the layer.
When Aligned is selected in the Paint panel, the position of the sample point—the clone position—changes for subsequent strokes to match the movement of the Clone Stamp tool in the target Layer panel so you can use multiple strokes to paint the entire cloned object. The Lock Source Time option lets you clone a single source frame.
In the Layer panel, position the cursor at the top of the pawn. Alt-click (Windows) or Option-click (macOS) to designate a source point for cloning.
Click next to the left side of the queen midway between the queen and the owl. Contiunally pressing the mouse, drag back and forth to paint the new pawn. Be careful not to clone too much of the wooden table in the process. If you make a mistake, undo and start over with a new source point.
Note
Painting the pawn without lifting the mouse makes it easier to ensure the entire pawn will move with the video later.
When the second pawn is in place, scrub through the clip. The cloned pawn is stationary while the rest of the scene moves; it isn’t in sync with the other objects. You’ll use tracking data to fix the problem.
Go to 3:20. With the Trinkets layer selected, open the Tracker panel, and click Track Motion.
The cloned pawn disappears. Don’t worry; it’s still there.
Drag the track point (the empty portion of the inner box) to the top of the queen’s head for the best tracking results.
Select Raw for Track Type, and then click the Analyze Forward button.
Note
You’ll learn more about using track points in Lesson 14.
In the Timeline panel, go to 3:20, the beginning of the footage.
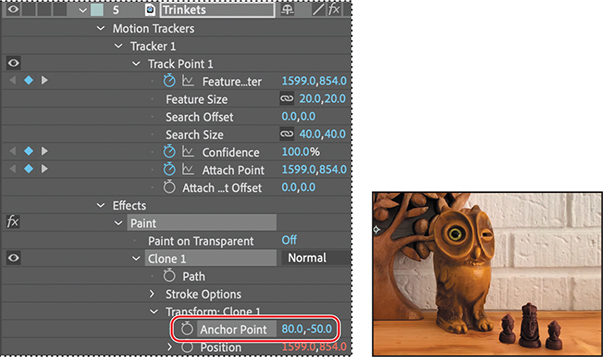
Expand the Trinkets layer > Motion Trackers > Tracker 1 > Track Point 1.
In the Trinkets layer, expand Effects > Paint > Clone 1 > Transform Clone 1.
Drag the pick whip for the Transform: Clone 1 Position property to the Track Point 1: Attach Point property, and release it. (You may need to enlarge the Timeline panel to see both properties at once.)
Note
If you used multiple strokes to paint the cloned pawn, you’ll need to drag the pick whip from the Position property for each clone (Clone 1, Clone 2, etc.) to the Track Point 1 Attach Point.
The expression you created ties the position of the cloned pawn to the tracking data you created for the clip earlier in the lesson. The pawn will travel with the image.
Click the Composition: Collectibles tab to bring the Composition panel forward so you can see the cloned pawn.
The pawn is in the wrong place. You can correct its relationship to the other objects by adjusting its anchor point.
Adjust the Transform: Clone 1: Anchor Point property until the pawn is positioned next to the queen. We used 80, -50.
You might need to zoom out to see where the pawn is while adjusting the anchor point values. Your values will probably be different from ours.
Choose Fit from the Magnification Ratio pop-up menu so that you can see the whole composition.
Scrub through the clip to verify that the pawn is positioned properly. When you’re satisfied that it is, close the Layer panel, hide the properties for all layers in the Timeline panel, and restore the Timeline panel to its original size.
Choose File > Save to save your work.
Darkening a scene
The third scene is looking pretty good. You’ll add an image of the business logo and adjust the brightness of the footage to make the text stand out clearly.
Adding a title image
You’ll import a Photoshop file of the business logo to add to the third scene.
Select the Trinkets layer, and go to 3:20, where the clip begins.
Double-click an empty area in the Project panel to open the Import File dialog box, and navigate to the Lessons/Lesson10/Assets folder. Select the TrinketsText.psd file. Choose Footage from the Import As menu, and click Import or Open.
In the TrinketsText.psd dialog box, accept Merged Layers for the Layer Options, and click OK.
Drag the TrinketsText.psd file from the Project panel into the Timeline panel, placing it directly above the Trinkets layer.
With the TrinketsText layer selected, press Alt+[ (Windows) or Option+[ (macOS) to set the In point to 3:20, so that it starts at the same time as the Trinkets footage.
The text sits nicely in the middle of the frame, but the brightness of the scene makes it difficult to read. You’ll fix that.
Adding a vignette
You’ll use a new solid layer to create a vignette, which will emphasize the text in the center as a focal point.
Select the Trinkets layer, and go to 3:20, the beginning of the clip.
Choose Layer > New > Solid.
In the Solid Settings dialog box, do the following:
Name the layer Vignette.
Click the Make Comp Size button.
Change the color to black (R=0, G=0, B=0).
Click OK.
Select the Ellipse tool (), hidden beneath the Rectangle tool () in the Tools panel, and then double-click the Ellipse tool to add an elliptical mask that is automatically sized to fit the layer.
Tip
Press Shift while you double-click the Ellipse tool or Rectangle tool to create a perfect circle or square, respectively.
In the Timeline panel, select the Vignette layer, and press Alt+[ (Windows) or Option+[ (macOS) to set the In point to match the Trinkets clip.
Expand the Mask 1 properties. Change the Mask Mode to Subtract, and change the Mask Feather value to 600 pixels.
Change the Mask Opacity to 50%.
Hide the properties for all layers and then save the file.
Adjusting the brightness
The vignette helped, but the Trinkets layer remains a little too bright. You’ll use the Brightness and Contrast effect to reduce the brightness over time. Then, you’ll animate the opacity of the layer so that the business name shines at the end of the clip.
Select the Trinkets layer, make sure you’re at 3:20, and choose Effect > Color Correction > Brightness & Contrast.
After Effects open the Brightness & Contrast controls in the Effect Controls panel.
In the Effect Controls panel, click the stopwatch icon for the Brightness property to create an initial keyframe at its current value.
Go to 5:17, the end of the clip.
Change the Brightness value to –150.
Drag the current-time marker across the time ruler to preview the clip.
The business name is much more readable at the end of the footage. Now you’ll animate the TrinketsText layer so that it fades in as the footage gets darker.
Go to 5:17, and select the TrinketsText.psd layer.
Press T to reveal the Opacity property, and click the stopwatch icon to create an initial keyframe at 100%.
Go to 3:20, the beginning of the layer. Change the Opacity to 0.
Hide the properties for all layers, and then preview the Trinkets clip. The text now fades in as the scene darkens, making it more pronounced and legible.
Freezing the action
After Effects includes features that let you freeze a frame, stopping the action until you start it again or through the end of a layer. You’ll freeze the last frame in each scene to give the viewer a chance to read the text and take in the image. First, though, you’ll precompose the scenes and expand the composition to make room for the extra time.
Precomposing the scenes
First, you’ll simplify the timeline elements by precomposing the individual scenes.
Press the Home key or move the current-time indicator to the beginning of the time ruler. Then, press the spacebar to preview the entire composition. Press the spacebar again to stop the playback.
Overall things look good, but each scene is too short; the viewer doesn’t have enough time to read the titles.
In the Timeline panel, Shift-select the Ceramics Intro and Ceramics layers.
Choose Layer > Pre-compose.
In the Pre-compose dialog box, name the composition Ceramics Comp.
Select Adjust Composition Duration To The Time Span Of The Selected Layers, and then click OK.
Shift-select the Art Glass and drapes layers.
Choose Layer > Pre-compose.
In the Pre-compose dialog box, name the composition Art Glass Comp.
Select Adjust Composition Duration To The Time Span Of The Selected Layers, and then click OK.
Shift-select the TrinketsText.psd, Vignette, and Trinkets layers.
Choose Layer > Pre-Compose.
In the Pre-compose dialog box, name the composition Trinkets Comp,
Select Adjust Composition Duration To The Time Span Of The Selected Layers, and then click OK.
Expanding the composition time
Before you add the freeze frames, you’ll increase the duration of the composition to accommodate them.
In the Project panel, select the Collectibles composition, and choose Composition > Composition Settings.
In the Composition Settings dialog box, increase the Duration to 8:18.
You’ve increased the duration by three seconds, one second for each scene.
Click OK.
In the Timeline panel, drag the Time Navigator End tab to the right to see the entire duration of the composition.
Adding the freeze frames
Now you’re ready to freeze the action and extend each scene.
Right-click or Control-click the Ceramics Comp layer, and choose Time > Freeze On Last Frame.
After Effects enables time remapping and places a hold keyframe at the position of the last frame in the layer.
Move the current-time indicator to 3:04. With the Ceramics Comp layer selected, press Alt+] (Windows) or Option+] (macOS) to set the Out point for the layer at 3:04.
Shift the Art Glass Comp and Trinkets Comp layers to the right, so that the Art Glass Comp layer now begins where the Ceramics Comp layer ends.
Right-click or Control-click the Art Glass Comp layer, and choose Time > Freeze On Last Frame.
Move the current-time indicator to 5:18. With the Art Glass Comp layer selected, press Alt+] (Windows) or Option+] (macOS) to set the Out point for the layer at 5:18.
Shift the Trinkets Comp layer to the right so that it begins where the Art Glass Comp layer ends.
Right-click or Control-click the Trinkets Comp layer, and choose Time > Freeze On Last Frame.
The Trinkets Comp layer extends to the end of the composition, at 8:18.
Press Home or move the current-time indicator to the beginning of the time ruler. Press the spacebar to preview the entire composition. Press the spacebar again to stop playback.
Hide the properties for all layers, and choose File > Save to save your work.
Adding transitions
The composition is almost done. The lighting and color look great and the text remains on screen long enough for the viewer to read it. But the scenes change abruptly. You’ll add transitions to make that change just a little more gradual.
In the Timeline panel, Shift-select the Ceramics Comp and Art Glass Comp layers.
The Art Glass Comp layer follows the Ceramics Comp layer; you’ll add a transition between them.
1 Color correction is performed to correct errors in white balance and exposure or to ensure color consistency from one shot to another. Color grading is more subjective; its goals are to optimize the source material, to focus attention on a key element in the shot, or to create a color palette to match the visual look the director prefers.
2 Select Colorize in the Hue/Saturation effect controls to colorize a scene. The effect makes it easy to create a duotone effect.
3 Use the mask tracker when you need to track a mask that does not change shape, but that does change position, scale, or rotation through a clip. For example, you can use it to track a person in an action shot, a wheel, or an area of the sky.


 ) for the Black Clip property in the Effect Controls panel to create an initial keyframe.


 ) from the Tools panel.

 ) to begin tracking forward from 2:05.
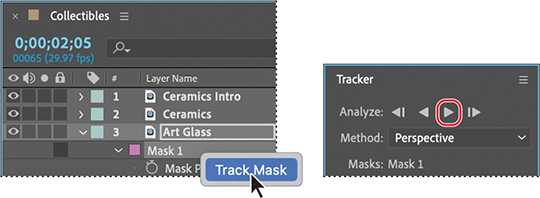
 Note
Note


 ) to reposition the image, aligning it with the top of the composition.

 ) in the Tools panel.


 ), hidden beneath the Rectangle tool (
 ) in the Tools panel, and then double-click the Ellipse tool to add an elliptical mask that is automatically sized to fit the layer.
 Tip
Tip


