
Chapter 6. Composite Pattern
What we need to do is learn to work in the system, by which I mean that everybody, every team, every platform, every division, every component is there not for individual competitive profit or recognition, but for contribution to the system as a whole on a win-win basis.
In a logically perfect language, there will be one word and no more for every simple object, and everything that is not simple will be expressed by a combination of words, by a combination derived, of course, from the words for the simple things that enter in, one word for each simple component.
A complex system that works is invariably found to have evolved from a simple system that works.
What is the Composite Pattern?
The composite pattern provides a robust solution to building complex systems that are made up of several smaller components. The components that make up the system may be individual objects or containers that represent collections of objects. Think of a car as a complex system that is made up of several smaller components. The car contains an engine, body, chassis, seats, tires, etc. For the sake of simplicity, let’s consider a tire as an indivisible or primitive object. A car would be composed of four tires (in reality a tire contains several smaller components such as hubcap, rim, tube, etc.). Similarly, a car contains one steering wheel. However, the engine contains several smaller components such as cylinders, compressor, radiator, etc. The engine is a component of the car, but the engine itself is a collection of components. We refer to a component that is a collection of other components as a composite object. The beauty of the composite pattern is that it allows clients to treat primitive objects and composite objects the same way. For example, when adding, or removing a component, the client doesn’t have to bother with figuring out if the object is a primitive or composite object. The client can just as easily remove the engine or a tire through a common interface.
A useful way to understand the composite pattern is to think of complex composite objects as hierarchical trees. We’re talking about upside-down trees as in Figure 6-1, where the system begins with a root node and cascades down, subdividing into several branches.

In Figure 6-1, the nodes that contain other components are composite objects. The leaf nodes are indivisible or primitive components that cannot have any children. Each leaf node is a child of a composite node and each composite node can have multiple children, including other composite nodes. Likewise, the composite node that’s immediately up the hierarchy from a leaf is called its parent. As shown in the class diagram in Figure 6-2, the composite pattern provides a common interface to deal with both composite and leaf nodes.

The common interface for both composite and leaf nodes is the Component class. The component class is usually
defined as an abstract class. Therefore, the Component class can define default implementations for both composite
and leaf nodes. At a minimum, the Component class
declares: add(), remove(child:Component), and getChild(n:int) methods. These methods allow clients to build the
composite system. The Leaf and Composite classes extend the Component class and override necessary methods. The default
implementation defined in the component usually applies to the concrete Leaf classes. Because adding, removing, and getting
child nodes aren’t relevant to leaf nodes, the default implementation for these
methods in the Component class is to raise an
exception (throw an error). However, these methods should be overridden and
implemented in the Composite class. Note how a
composite object can be composed of several children of type component. The children property in the Composite class aggregates
child components.
The real power of the composite pattern is evident in how the operation() method is implemented both in the Leaf and Composite
classes in the diagram in Figure 6-2.
Operations that apply to both leaves and nodes are defined in the Component class. In most cases, these operations are
defined as abstract methods, forcing both the Leaf and Composite classes to
provide implementations. The composite classes need to provide a recursive
implementation for the operation() method. It
needs to call the operation() method in each of
its child components referenced by the children
property. When we think of hierarchical trees, the operation() method call will traverse the tree calling the operation() method in all child components.
To understand how common operations apply to all children recursively, look at the similarities between the composite pattern and a mobile (Figure 6-3).
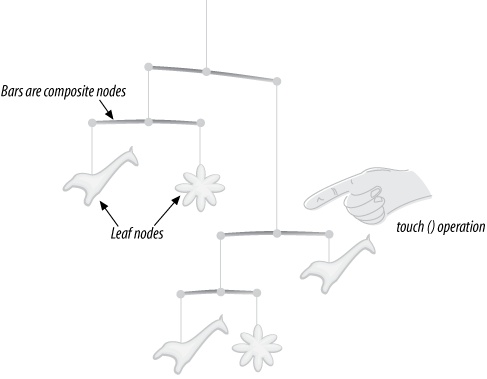
The bars represent composite nodes, and the fish and starfish are leaf nodes. The
interesting aspect of the mobile is to visualize what happens when you touch one of
the components. We can think of touch() as a
common operation that applies to all components in the mobile. Generally, the touch
operation makes the mobile component rotate. If you touch a composite node, it will
rotate not only itself, but all its children as well. Touching a leaf node such as a
fish will rotate only that component, as leaf nodes have no children. The fact that
the client manipulating the composite structure does not have to worry about whether
the operation’s being carried out on a leaf or a composite node is one of the key
features of the composite pattern.
Key Features of the Composite Pattern
The composite pattern streamlines the building and manipulation of complex structures that are composed of several related pieces.
Complex structures are built as hierarchical trees.
The components of the structure can be individual components (primitives or indivisible objects) or composite components that hold a collection of other components.
They allow clients to treat both individual components (leaf nodes) and composite components (composite nodes) the same way, simplifying the interface.
Minimalist Example of a Composite Pattern
This example implements the composite shown in the class diagram in Figure 6-2. The Component.as file (Example 4-17) contains the
Component abstract class that defines the
interface for both leaf and composite nodes. The Leaf.as file (Example 6-2) contains the Leaf class, and the Composite.as file (Example 6-3) contains the
Composite class. Both Leaf and Composite
classes extend the Component class and provide
necessary implementations. The Main.as file
(Example 2-7) contains the client class Main (also known as the document class for the
Flash document).
package
{
    import flash.errors.IllegalOperationError;

    // ABSTRACT Class (should be subclassed and not instantiated)
    public class Component
    {
        public function add(c:Component):void
        {
            throw new IllegalOperationError
                 ("add operation not supported");
        }

        public function remove(c:Component):void
        {
            throw new IllegalOperationError
                 ("remove operation not supported");
        }

        public function getChild(n:int):Component
        {
            throw new IllegalOperationError
                 ("getChild operation not supported");
            return null;
        }

        // ABSTRACT Method (must be overridden in a subclass)
        public function operation():void {}

    }
}
The Component class should behave as an
abstract class and should not be instantiated. It also defines the abstract
interface for managing child components, and provides default implementations for
the add(c:Component), remove(c:Component) and getChild(n:int) methods. The default implementations for these
methods are designed for leaf nodes and will raise an exception by throwing an
IllegalOperationError. This should be the
case as leaf nodes cannot have children and should not implement operations that
deal with child nodes. In addition, the operation() method is defined as an abstract method without
implementation. It is left up to the classes that subclass Component to provide an implementation for it.
package
{
    public class Leaf extends Component
    {
        private var sName:String;

        public function Leaf(sNodeName:String)
        {
            this.sName = sNodeName;
        }

        override public function operation():void
        {
            trace(this.sName);
        }
    }
}
The Leaf class extends the Component class. It declares a property called
sName that holds the name of the leaf. It
also implements a parameterized constructor that takes a string value that’s then
set to the sName property. It implements the
operation() method by tracing sName. When operation() is called in a leaf node, it will output its name in the
output panel.
package
{
    public class Composite extends Component
    {
        private var sName:String;
        private var aChildren:Array;

        public function Composite(sNodeName:String)
        {
            this.sName = sNodeName;
            this.aChildren = new Array();
        }

        override public function add(c:Component):void
        {
            aChildren.push(c);
        }

        override public function operation():void
        {
            trace(this.sName);
            for each (var c:Component in aChildren)
            {
                c.operation();
            }
        }
    }
}
The Composite class extends the Component class. It also declares a property called
sName that holds the name of the composite
node and sets it to the value passed to it in the parameterized constructor. A
unique feature of the Composite class is that it
needs to define a structure to hold references to child components and implement the
methods that operate on child nodes. The simplest structure to hold references to
child nodes is an array. The array called aChildren is initialized in the constructor. Whenever a component is
added to a composite node via the add(c:Component) method, it’s added to the aChildren array using the push()
method. The operation() method is also unique in
the sense that, it not only implements it by tracing sName, but calls operation() in
all of its children. This ensures that the operation() method call recursively traverses all child nodes in the
tree structure.
package
{
    import flash.display.MovieClip;

    public class Main extends MovieClip
    {
        public function Main()
        {
            var root:Composite = new Composite("root");

            // create a node
            var n1:Composite = new Composite("composite 1");
            n1.add(new Leaf("leaf 1")); // add a child leaf
            n1.add(new Leaf("leaf 2")); // add a child leaf
            root.add(n1); // add node to root as child

            // create another node
            var n2:Composite = new Composite("composite 2");
            n2.add(new Leaf("leaf 3")); // add a child leaf
            n2.add(new Leaf("leaf 4")); // add a child leaf
            n2.add(new Leaf("leaf 5")); // add a child leaf
            root.add(n2); // add node to root as child

            // add a child leaf to the root node
            root.add(new Leaf("leaf 6"));

            root.operation(); // call operation on root node
        }
    }
}
The Main class shown in Example 2-7 represents the client. It creates a composite
root node and adds several composite and leaf nodes to it.
The resulting composite structure is shown graphically in Figure 6-4.

The Main class constructor ends with a call to
the operation() method on the root node. This
method recursively traces the names of all subsequent components in the structure.
The following is the output from this operation.
root
composite 1
leaf 1
leaf 2
composite 2
leaf 3
leaf 4
leaf 5
leaf 6
It is important to note that the client sees only the
interface defined by the Component class. The
client doesn’t need to differentiate between composite and leaf nodes, and isn’t
tied to how the operation() method is
implemented. It can simply call operation() on
any leaf or composite node and get consistent results.
Accessing Child Nodes
You may have noticed that we didn’t override and implement the getChild(n:int) method in the Composite class. However, this method’s very
important to the composite pattern, as it allows the client to develop a
composite structure by not declaring variables, as in the previous example. This
ensures proper garbage collection when removing nodes. Garbage collection allows
the application to recover memory and resources allocated to deleted nodes, and
will be discussed in more detail later in the chapter. The getChild() method allows the client to access the
children of any composite node. The following getChild() method is implemented in the Composite class.
override public function getChild(n:int):Component
{
    if ((n > 0) && (n <= aChildren.length))
    {
        return aChildren[n-1];
    } else {
        return null;
    }
}
The parameterized getChild() method returns
the child object by the position indicated by the parameter n (index starts from 1). After doing a range
check, the method returns the child node or null if no children exist. The client can now leverage the
getChild() method and build the same
composite structure more efficiently.
// create root node
var root:Composite = new Composite("root");

// add a node to root
root.add(new Composite("node 1"));
root.getChild(1).add(new Leaf("leaf 1"));
root.getChild(1).add(new Leaf("leaf 2"));

// add another node
root.add(new Composite("node 2"));
root.getChild(2).add(new Leaf("leaf 3"));
root.getChild(2).add(new Leaf("leaf 4"));
root.getChild(2).add(new Leaf("leaf 5"));

// add a child leaf to the root node
root.add(new Leaf("leaf 6"));

root.operation(); // call operation on root node
Removing Nodes
Implementing the remove() method in the
Composite class can be a little tricky.
The safe way to remove nodes is to do it from the parent. In order to implement
node removal, we need to create a reference to its parent from each node.
Creating a parent reference
Because all nodes, excluding the root node, will have parent references,
it makes sense to declare the parent reference, and the methods that access
it, in the Component class. The parentNode property can be declared as
follows.
protected var parentNode:Composite = null;
Note that the parentNode property is
declared as type Composite, and defaults
to null. This does introduce a dependency
between the Component and Composite classes. However, the tradeoff is
type safety over class dependency. The parent reference is also declared as
protected to make it accessible only to the current
class and its subclasses. Two methods to set and get the parent reference
should also be implemented in the Component class.
internal function setParent(compositeNode:Composite):void
{
    this.parentNode = compositeNode;
}

public function getParent():Composite
{
    return this.parentNode;
}
Note that the getParent() method is
declared as public to make it accessible to clients.
However, the setParent() method is
declared as internal to prohibit setting the parent
from outside the package. This is important as the
parent link should only be set in the add() method implementation in the Composite class. The add()
method should be modified as follows to set the parent reference of the
child node to the current composite node.
override public function add(c:Component):void
{
    aChildren.push(c);
    c.setParent(this);
}
Executing the following statements accesses the third child of the second child of the root node; which is leaf 5. The parent of leaf 5 is the second child of the root node (see Figure 6-4).
var leaf5:Component = root.getChild(2).getChild(3);
var leaf5Parent:Composite = l5.getParent();
Calling the operation() on the parent
of leaf 5 should give the following output.
composite 2
leaf 3
leaf 4
leaf 5
Implementing the remove method
The primary concern with removing nodes has to do with removing all
references to deleted objects so that the garbage collector can recover the
memory they used. For example, before removing a composite node, all its
child nodes need to be deleted. If one of the child nodes is itself a
composite, then the remove method should recursively delete its children as
well. Therefore, the remove method will work similar to the operation() method.
From the previous scenario, it is evident that we need to treat leaf nodes
and composite nodes differently when deleting them. Therefore, it’s useful
to declare a getComposite() method in the
Component class to return the
composite object if it is indeed a composite, and null if not. The default behavior would be to return null. The following method would be defined
with its default implementation in the Component class.
internal function getComposite():Composite
{
    return null;
}
The Composite class would override this
method and return the actual composite object.
override internal function getComposite():Composite
{
    return this;
}
In addition, the parent references of components should be removed before
components can be removed. The following method to remove the parent
reference should be defined and implemented in the Component class.
internal function removeParentRef():void
{
    this.parentNode = null;
}
The default remove(c:Component) method
declared with its default implementation in the Component class is overridden and implemented in the Composite class (Example 6-5).
remove() method1 override public function remove(c:Component):void
2 {
3 if (c === this)
4 {
5 // remove all my children
6 for (var i:int = 0; i < aChildren.length; i++)
7 {
8 safeRemove(aChildren[i]); // remove children
9 }
10 this.aChildren = []; // remove references to children
11 this.removeParentRef(); // remove my parent reference
12 } else {
13 for (var j:int = 0; j < aChildren.length; j++)
14 {
15 if (aChildren[j] == c)
16 {
17 safeRemove(aChildren[j]); // remove child
18 aChildren.splice(j, 1); // remove reference
19 }
20 }
21 }
22 }The remove() method takes one parameter
that is an instance of the Component
class. Based on the passed component instance, the remove() method has to deal with two situations: (a) what to
do when the component to delete is the current object, and (b) what to do if
it isn’t. If the passed component is the current object, then the current
object has to recursively remove all child components (lines 6-9), and then
remove references to its parent (line 11) and children (line 10). In the
second scenario, if the passed component is not the current object, it’s
assumed to be one of its children. In this case, the program loops though
all its child nodes (lines 13–20) and checks if one of its children needs to
be removed. If so, it removes the child component (line 17), and deletes the
reference to the removed child from the aChildren array (line 18).
The remove() method uses safeRemove(), shown in Example 6-6, to safely remove child components.
The safeRemove() method first checks if
the passed component is a composite, and if so, calls its remove method. If
the passed component is not a composite (it’s a leaf node), it removes its
parent reference.
safeRemove() methodprivate function safeRemove(c:Component)
{
if (c.getComposite())
{
c.remove(c); // composite
} else {
c.removeParentRef();
}
}Following the proper sequence when removing parent and child references is essential, so that deleted objects are left isolated without incoming or outgoing references. This is a necessary condition for the garbage collector to dispose of the object and recycle the memory used by it.
Building and Manipulating a Composite Structure
Let’s test how the remove() method works by
building the composite structure shown in the first column of Figure 6-4 and removing
selected leaves and composite nodes. From the client,
execute the statements in Example 6-7.
package
{
    import flash.display.MovieClip;

    public class Main extends MovieClip
    {
        public function Main()
        {
            var root:Composite = new Composite("root");

            // create a node
            var n1:Composite = new Composite("composite 1");
            n1.add(new Leaf("leaf 1")); // add a child leaf
            n1.add(new Leaf("leaf 2")); // add a child leaf
            root.add(n1); // add node to root as child

            // create another node
            var n2:Composite = new Composite("composite 2");
            n2.add(new Leaf("leaf 3")); // add a child leaf
            n2.add(new Leaf("leaf 4")); // add a child leaf
            n2.add(new Leaf("leaf 5")); // add a child leaf
            root.add(n2); // add node to root as child

            // add a child leaf to the root node
            root.add(new Leaf("leaf 6"));

            root.operation(); // call operation on root node
            trace("display tree");
            trace("============");
            root.operation();

            trace("remove first child of the second child of root");
            trace("==============================================");
            root.getChild(2).remove(root.getChild(2).getChild(1));
            root.operation();

            trace("remove the second child of root");
            trace("===============================");
            root.remove(root.getChild(2));
            root.operation();        }
    }
}
Executing the statements in Example 6-7 will generate the following output. The operation() method traverses the tree structure recursively using
a depth-first approach, and prints the component names accordingly.
display tree
============
root
composite 1
leaf 1
leaf 2
composite 2
leaf 3
leaf 4
leaf 5
leaf 6
remove first child of the second child of root
==============================================
root
composite 1
leaf 1
leaf 2
composite 2
leaf 4
leaf 5
leaf 6
remove the second child of root
===============================
root
composite 1
leaf 1
leaf 2
leaf 6
You can easily visualize what happens to the component tree by looking at what happens graphically in Figure 6-5.

Key OOP Concepts in the Composite Pattern
The key OOP concept embedded in the composite pattern is polymorphism. Polymorphism can be broadly defined as the ability of objects instantiated from different classes to respond to the same method calls in specific ways. This is possible because the method signature’s the same, even though the objects are instantiated from different classes. In short, the methods in the different classes show a common interface to clients.
Since the composite pattern allows clients to treat both leaf and composite nodes the same way through a common interface, it’s a good example of polymorphism. This is due to both leaf and composite classes implementing the same component interface by subclassing the abstract component class.
Implementations of operations truly exemplify polymorphism. In the minimalist
examples, the operation() method was implemented
one way in the leaf nodes and another way in the composite nodes. The composite
nodes have to forward the operation() call to all
its child nodes. The operation() responds
differently in both leaf and composite nodes, but the client doesn’t need to know or
care about these differences. The client doesn’t see the different implementations;
it sees only the interface.
Example: Music Playlists
Have you created music playlists in your favorite digital music jukebox? If so, have you taken the next step and embedded playlists inside other playlists to create ever larger playlists? This is a perfect application to implement a composite pattern. A library of digital music contains songs and playlists. A song is a primitive object, while a playlist is a composite object that contains a collection of songs. Let’s first create the component class for our playlist example application.
The Component.as file (Example 6-1) contains the Component abstract class that defines the interface for both songs
and playlists. The Song.as file (Example 6-10) contains the Song class,
and the Playlist.as file (Example 6-9) contains the Playlist
class. Both Song and Playlist classes extend the Component class and provide necessary implementations.
package
{
    import flash.errors.IllegalOperationError;

    // ABSTRACT Class (should be subclassed and not instantiated)
    public class Component
    {
        public function add(c:Component):void
        {
            throw new IllegalOperationError
                ("add operation not supported");
        }

        public function remove(c:Component):void
        {
            throw new IllegalOperationError
                 ("remove operation not supported");
        }

        public function getChild(n:int):Component
        {
            throw new IllegalOperationError
                 ("getChild operation not supported");
            return null;
        }

        // ABSTRACT Method (must be overridden in a subclass)
        public function play():void {}
    }
}
The Component class defines the abstract
interface for both the Song and Playlist classes. It also defines the abstract method
play().
package
{
    public class Playlist extends Component
    {

        private var sName:String;
        private var aChildren:Array;

        public function Playlist(sName:String)
        {
            this.sName = sName;
            this.aChildren = new Array();
        }

        override public function add(c:Component):void
        {
            aChildren.push(c);
        }

        override public function play():void
        {
            trace("Queuing playlist: " + this.sName);
            for each (var c:Component in aChildren)
            {
                c.play();
            }
        }
    }
}
The Playlist class extends the Component class and is almost identical to the
composite class in the minimalist example.
Queuing Songs to Play in Sequence
Much of the Song class shown in Example 6-10 deals with queuing songs and handling events. Because
songs need to be played in sequence and not simultaneously, several static
properties are declared in the class. The soundChannel property is declared as static
to ensure that only one sound channel is used to play music by all instances of
the Song class. This ensures that different
song objects don’t open multiple sound channels simultaneously to play music.
The Song class also declares a static
property called aSongQueue, which is an array
that holds the list of songs queued to play. Finally, a static property called
songPlayingFlag holds a Boolean value
that indicates whether a song’s currently playing.
1           package
2           {
3               import flash.events.*;
4               import flash.media.Sound;
5               import flash.media.SoundChannel;
6               import flash.net.URLRequest;
7
8               public class Song extends Component
9               {
10               private var sName:String;
11               private var song:Sound;
12               private static var soundChannel:SoundChannel =
                     new SoundChannel();
13               private static var aSongQueue:Array = [];
14               private static var songPlayingFlag:Boolean = false;
15
16               public function Song(sName:String)
17               {
18                   this.sName = sName;
19               }
20
21               override public function play():void
22               {
23                   var request:URLRequest = new URLRequest
                          ("music/" + sName);
24                   song = new Sound();
25                   song.addEventListener(Event.COMPLETE, songLoaded);
26                   song.addEventListener(IOErrorEvent.IO_ERROR, loadError);
27                   song.load(request);
28               }
29
30               private function songLoaded(event:Event):void
31               {
32                   aSongQueue.push(song);
33                   playIfIdle();
34               }
35
36               private function loadError(event:Event):void
37               {
38                   trace("Error loading song " + this.sName);
39               }
40
41               private function playDone(event:Event):void
42               {
43                   songPlayingFlag = false;
44                   playIfIdle();
45               }
46
47               private function playIfIdle():void
48               {
49                   if (!songPlayingFlag)
50                   {
51                       var s:Sound = aSongQueue.shift();
52                       if (s)
53                       {
54                           songPlayingFlag = true;
55                           trace("playing " + s.id3.songName);
                                 // from ID3 tag
56                           soundChannel = s.play();
57                           soundChannel.addEventListener
                                 (Event.SOUND_COMPLETE, this.playDone);
58                       }
59                   }
60               }
61           }
62       }
The filename of the song clip is passed to the parameterized constructor and
set to the sName property. The play() method loads the songs from a subfolder
called media. The event handler called
songLoaded is registered to listen to the
Event.COMPLETE event (line 25). When the
song is loaded, the songLoaded() method
pushes the song into the aSongQueue play
queue (line 32). It then calls the playIfIdle() method that determines if a song is playing and if
not, gets the song from aSongQueue using the
Shift function (line 51), starts to play the song, and assigns it to the
soundChannel sound channel (line 56). The
aSongQueue array functions as a song
queue (first-in first-out). The event handler called playDone is registered to listen to the Event.SOUND_COMPLETE event (line 57).
When the sound stops playing, the Event.SOUND_COMPLETE event will trigger the playDone() method that calls the playIfIdle() method again.
We can now create some playlists and listen to some music.
Building Composite Playlists
Let’s develop two playlists and embed them into a larger playlist. The following code should be executed from the document class of a Flash document.
// create playlist
var drumlicks:Playlist = new Playlist("drum licks");
drumlicks.add(new Song("bongo.mp3"));
drumlicks.add(new Song("tabla.mp3"));
drumlicks.add(new Song("djembe.mp3"));

// create another playlist
var guitariffs:Playlist = new Playlist("guitar riffs");
guitariffs.add(new Song("acousticguitar.mp3"));
guitariffs.add(new Song("electricguitar.mp3"));

// create composite playlist
var eclectic:Playlist = new Playlist("eclectic");
eclectic.add(drumlicks);
eclectic.add(new Song("balladpiano.mp3"));
eclectic.add(guitariffs);
eclectic.play();
The example application will first build the playlist named “drum licks.” It will then build another playlist called “guitar riffs.” Finally, it will build and play a new playlist called “eclectic” that includes both previous playlists and an additional song. The following text output shows the song play sequence.
Queuing playlist: eclectic
Queuing playlist: drum licks
Queuing playlist: guitar riffs
playing bongo
playing tabla
playing djembe
playing ballad piano
playing acoustic guitar
playing electric guitar
When the “eclectic” playlist is queued for play, it queues and plays the
embedded “drum licks” and “guitar riffs” playlists as well. This is exactly the
behavior we expect from our composite playlist structure. You can easily remove
songs and playlists by implementing the remove() method as shown in the minimalist example.
Example: Animating Composite Objects Using Inverse Kinematics
There are many examples of excellent Flash games that use ActionScript to animate characters on stage. Even a simple animated figure can have independently functioning body parts such as arms and legs that can be animated to jump, run, and kick. Can we develop complex animated figures by treating body parts as composite and component objects? Do we gain an advantage by being able to treat component and composite parts of an animated figure in the same way? Indeed, the composite pattern brings several advantages to animation, as will be evident by the animated snake that will be developed in this example. Figure 6-6 shows a screenshot of the snake that moves by means of inverse kinematics.

Using Inverse Kinematics
Inverse kinematics is a method by which rigid objects interconnected by joints can move to form different poses. A good example of this type of object is a marionette: a puppet controlled by a puppeteer using strings. The hands and legs of the puppet consist of several parts connected by joints. For example, the upper arm would be connected to the torso at the shoulder. The upper arm would in turn be connected to the forearm through the elbow joint. The hand would be connected to the forearm at the wrist. These interconnected objects form a kinematic chain. Inverse kinematics allows kinematic chains to move, constrained by the range of motion allowed by the joints. The simplest form of a kinematic chain has a free end that’s controlled externally. For example, the hand of a marionette would be a free end since it’s attached to a puppeteer’s string. Because joints connect them, the hand, forearm, and upper arm move when the puppeteer pulls this string. Try this yourself: let your left arm go limp, and pull it up by the hand using your right arm. Notice how the external force is pulling your left hand, which translates the pulling motion to the forearm, which in turn pulls the upper arm. The notion of interconnected objects pulling each other is the primary concept in inverse kinematics. This type of motion is very similar to the motion of the snake application we will develop.
In the example application, users will control the head of the snake using the keyboard. When the head moves, interconnected body segments will move based on inverse kinematic principles. The whole snake will be a kinematic chain.
Kinematic chains consist of one or more kinematic pairs. For example, the upper arm and forearm form a kinematic pair. Adjoining body segments in our snake will also form kinematic pairs. We will develop the snake as a composite object. The head of the snake will be the root node, and body segments will be connected to each other. Each node will be a composite object as they have child objects connected to them. The last segment of the snake, which is the tail (or the rattle for a rattlesnake), will be a component object.
Creating Component and Composite Nodes for the Snake
All our components will be display objects on the stage.
Therefore we can develop the component class by extending the Sprite class. This allows us to inherit the
properties and methods to manipulate components on the stage to make them move
and respond to events. Example 6-8 shows the Component class that’ll be used to create animated
figures. The only difference in this class when compared to previous component
classes is that it extends the Sprite class
and declares a method called update().
package
{

    import flash.errors.IllegalOperationError;
    import flash.display.Sprite;

    // ABSTRACT Class (should be subclassed and not instantiated)
    public class Component extends Sprite
    {

        protected var parentNode:Composite = null;

        public function add(c:Component):void
        {
            throw new IllegalOperationError(
                 "add operation not supported");
        }

        public function remove(c:Component):void
        {
            throw new IllegalOperationError(
                 "remove operation not supported");
        }

        public function getChild(n:int):Component
        {
            throw new IllegalOperationError(
                 "getChild operation not supported");
            return null;
        }

        // ABSTRACT Method (must be overridden in a subclass)
        public function update():void {}

        internal function setParent(aParent:Composite):void
        {
            parentNode = aParent;
        }

        public function getParent():Composite
        {
            return parentNode;
        }
    }
}
The Composite class shown in Example 6-12 extends the
Component class and overrides the
update() method.
package
{
    public class Composite extends Component
    {
        protected var aChildren:Array;

        public function Composite()
        {
            this.aChildren = new Array();
        }

        override public function add(c:Component):void
        {
            aChildren.push(c);
            c.setParent(this);
        }

        override public function getChild(n:int):Component
        {
            if ((n > 0) && (n <= aChildren.length))
            {
                return aChildren[n-1];
            } else {
                return null;
            }
        }

        override public function update():void
        {
            for each (var c:Component in aChildren)
            {
                c.update();
            }
        }
    }
}
Both the Component and Composite classes should behave as abstract
classes; they need to be subclassed. We will develop the Head and BodySegment classes that subclass Composite, and the Tail class
that subclasses Component to build the
snake.
Building the Snake Head
The head of the snake will be the root node of the snake’s composite
structure. Each component of the snake will consist of a line 20 pixels in
length. Example 6-13 shows the Head class, which draws the head of the snake. The constructor
receives a color parameter that represents
the color of the snake’s head.
package
{
    public class Head extends Composite
    {
        public function Head(color:uint = 0xC0C0C0)
        {
            graphics.lineStyle(20, color);
            graphics.moveTo(0, 0);
            graphics.lineTo(20, 0);
        }
    }
}
The snake’s head will be controlled by keyboard events. The next step is to develop the document class that will build the snake, and register keyboard events to control the snake.
Controlling the Snake
Example 5-4 shows the Main
class that builds the composite snake structure and registers event handler
methods to control the snake. As a first step, only the snake’s head will be
created (lines 18-23). The arrow keys will make the snake head move forward,
backward, rotate left, and right. The snake’s head will be the free end of the
kinematic chain that represents the snake. Just like the puppeteer’s string
pulling on the marionette’s hand, key presses will pull on the snake’s head and
rotate it.
1           package
2           {
3               import flash.display.Sprite;
4               import flash.events.*;
5               import flash.geom.*;
6               import flash.ui.Keyboard;
7
8            /**
9            *    Main Class
10           *    @ purpose:        Document class for movie
11           */
12           public class Main extends Sprite
13           {
14               private var snake:Composite;
15
16               public function Main()
17               {
18                   // create snake
19                   snake = new Head();
20                   snake.x = snake.y = 200;
21
22                   // add snake to stage
23                   addChild(snake);
24
25                   // register with the stage to receive key press events
26                   stage.addEventListener(KeyboardEvent.KEY_DOWN, onKeyPress);
27               }
28
29               private function onKeyPress(event:KeyboardEvent):void
30               {
31                   switch (event.keyCode)
32                   {
33                       case Keyboard.LEFT :
34                           snake.rotation -= 10;
35                           break;
36                       case Keyboard.RIGHT :
37                           snake.rotation += 10;
38                           break;
39                       case Keyboard.UP :
40                           var newFWLocOffset:Point = Point.polar(
                                 5, snake.rotation * Math.PI / 180);
41                           snake.x += newFWLocOffset.x;
                                 // move forward by the x offset
42                           snake.y += newFWLocOffset.y;
                                 // move forward by the y offset
43                           break;
44                       case Keyboard.DOWN :
45                           var newBKLocOffset:Point = Point.polar(
                                 5, snake.rotation * Math.PI / 180);
46                           snake.x -= newBKLocOffset.x;
                                 // move back by the x offset
47                           snake.y -= newBKLocOffset.y;
                                 // move back by the y offset
48                           break;
49                   }
50               }
51           }
52       }
Line 26 in the Main class (Example 5-4) registers the onKeyPress handler method to respond to Key_DOWN events. The left and right arrow keys make the snake
head rotate counter-clockwise and clockwise by 10 degrees. The up and down arrow
keys make the snake head move forward or back by 5 pixels. The Point.polar method comes in handy here, as the
snake needs to move in the direction that it’s facing (rotation angle). The
Point.polar method returns a point that
is the distance and angle from the origin (0, 0). Adding the coordinates of this
point (x and y properties of the Point
class) to the current location gives us the new location.
Before developing the body segments of the snake, we need to explore how a kinematic chain works.
Moving a Kinematic Pair
As discussed before, our snake will be a composite object consisting of several connected components that represent a kinematic chain. Kinematic chains are composed of kinematic pairs: two rigid segments connected by a joint. How do kinematic pairs move and orient themselves? The basic idea is that the parent segment pulls the child segment. In a simple kinematic pair, the only restriction on movement is the joint. Because it’s the free end, the parent segment will move and rotate independent of the child. The child will strive to rotate and orient itself to face the joint, and move to keep up with its parent.
Figure 6-7 shows a four-step sequence by which a parent segment will pull a child in a kinematic pair. Even though the parent pulls, the child segment does all the work.

The following steps relate to Figure 6-7.
Initial condition where the kinematic pair consists of two line segments. The registration point of the segments is at the beginning of the lines (C1 for the child and P1 for the parent). The distance between the registration point of the child C1 and the joint is
d.Parent segment moves to position P2 and rotates (independent of the child segment).
Child segment rotates to orient itself to point to the joint.
Child segment moves towards point P2 to maintain distance
d.
There is some trigonometry involved in this whole process. However, we will
use the built-in Point class methods to
accomplish much of the rotation and motion. We can now build the body segments
for the snake.
Building the Body and Tail Segments
We didn’t have to worry about inverse kinematic motion for the snake head as
it was the root node of the composite structure. Head motion was controlled by
the keyboard. However, the body segments that’ll be attached to the head have to
move as kinematic pairs. Example 6-15 shows the BodySegment class. It’s a composite object and
extends the Composite class shown in Example 6-12. The constructor draws the body segment, and the
update() method is overridden to
implemented inverse kinematic motion.
1           package
2           {
3               import flash.geom.Point;
4
5               public class BodySegment extends Composite
6               {
7                   private var segLen:Number = 20;
8
9                   public function BodySegment(color:uint = 0xC0C0C0)
10               {
11                   graphics.lineStyle(10, color); // grey color
12                   graphics.moveTo(0, 0);
13                   graphics.lineTo(segLen, 0);
14               }
15
16               override public function update():void
17               {
18                   var myParent:Composite = this.getParent();
19                   var parentLoc:Point = new Point(myParent.x, myParent.y);
20                   var myLoc:Point = new Point(this.x, this.y);
21
22                   // rotate to orient to parents new location
23                   var tempPoint:Point = parentLoc.subtract(myLoc);
24                   var angle:Number = Math.atan2(tempPoint.y, tempPoint.x);
25                   this.rotation = angle * 180 / Math.PI;
26
27                   // move to maintain distance
28                   var currentDistance:Number = Point.distance(
                         parentLoc, myLoc);
29                   var myNewLoc:Point = Point.interpolate(myLoc, parentLoc,
                         segLen / currentDistance);
30                   this.x = myNewLoc.x;
31                   this.y = myNewLoc.y;
32
33                   super.update();
34               }
35           }
36       }
The update() method implements steps three
and four described in Figure 6-7. Lines
18-20 access the current component’s parent and create two points that represent
C1 and P2 in step 3 of Figure 6-7.
Lines 22-25 calculate the new angle for the child component, so that it can
orient to the new location of the joint. Subtracting point C1 from P2 in step 3
of Figure 6-7
provides a point whose x and y properties represent the horizontal and vertical
distance between the two points. Thus the new angle of rotation for the child
can be easily calculated by feeding these values to the arctangent function.
Note that the Math.atan2 function returns the
angle in radians. This has to be converted to
degrees before assigning to the rotation property.
Lines 27-31 move the now correctly oriented child segment to maintain the
joint and registration point distance (shown as d in
step 3 of Figure 6-7). The
current distance between points C1 and P2 is calculated first (line 28). Next,
the Point.interpolate function is used to
determine the intermediate point C2 that would maintain the correct segment
length d. The third parameter in the Point.interpolate function is a ratio value
(between 0 and 1) that represents a point between two points.
Finally, the update() method calls itself
in the superclass (line 33) to update its child components.
The tail component, the last segment of the snake, is shown in Example 6-16. The Tail class
subclasses Component (Example 6-8), draws the tail in its constructor, and
implements the update() method. The tail is
drawn as a rattle, transforming our generic snake into a rattlesnake. Unlike the
BodySegment class, the update() method does not call itself in the
superclass, as the tail is a component that can’t have any children.
package
{
    import flash.geom.Point;

    public class Tail extends Component
    {

        private var segLen:Number = 20;

        public function Tail(color:uint = 0xC0C0C0)
        {
            graphics.lineStyle(10, color);
            graphics.moveTo(0, 0);
            graphics.lineTo(segLen, 0);
            graphics.lineStyle(3, 0x000000);
            for (var i:uint = 1; i < 4; i++)
            {
                graphics.moveTo(i * 5, -5);
                graphics.lineTo(i * 5, 5);
            }
        }

        override public function update():void
        {
            var myParent:Composite = this.getParent();
            var parentLoc:Point = new Point(myParent.x, myParent.y);
            var myLoc:Point = new Point(this.x, this.y);

            // rotate to orient to parents new location
            var tempPoint:Point = parentLoc.subtract(myLoc);
            var angle:Number = Math.atan2(tempPoint.y, tempPoint.x);
            this.rotation = angle * 180 / Math.PI;

            // move to maintain distance
            var currentDistance:Number = Point.distance(
                 parentLoc, myLoc);
            var myNewLoc:Point = Point.interpolate(myLoc, parentLoc,
                  segLen / currentDistance);
            this.x = myNewLoc.x;
            this.y = myNewLoc.y;
        }
    }
}
You may be wondering why the update()
method was not implemented in the Component
class. We implemented the most basic form of inverse kinematics in this case.
Our snake is a real contortionist and is able to freely rotate around its
joints. The real power of inverse kinematics is realized when limiting angles
are introduced. Limiting angles bring constraints to joint rotation, just like
the elbow joint restricts the angle of motion of the forearm. Introducing
different limiting angles will make the update() method implementations unique for different segments.
Therefore, declaring it as abstract in the Component class makes sense. We can now draw the
whole snake.
Building the Composite Snake
Example 6-17 shows the updated constructor
of the Main class from Example 5-4 that constructs the whole snake. Lines 10- 25 add the
body segments to the snake in black and gray alternating colors. Finally, the
tail component is added in lines 26 through 28. The update() method is called once (line 30) to fit and display all
components on the stage as they’re initially placed offscreen (line 22). The
completed snake should look like Figure 6-6.
1           public function Main()
2           {
3               // create snake
4               snake = new Head();
5               snake.x = snake.y = 200;
6
7               // add snake to stage
8               addChild(snake);
9
10           // add multiple body segments
11           var parentNode:Composite = snake;
12           var color:uint;
13           for (var i:uint = 0; i < 10; i++)
14           {
15               if (i % 2) {
16                   color = 0x000000; // black
17               } else {
18                   color = 0xC0C0C0; // grey
19               }
20               var segment:Composite = new BodySegment(color);
21               parentNode.add(segment);
22               segment.x = segment.y = -50; // place it off screen
23               addChild(segment);
24               parentNode = segment;
25           }
26           var tail:Component = new Tail();
27           addChild(tail);
28           parentNode.add(tail); // add rattle
29
30           snake.update(); // to fit the segments together
31
32           // register with the stage to receive key press events
33           stage.addEventListener(KeyboardEvent.KEY_DOWN, onKeyPress);
34       }
Note how the snake is constructed using the composite pattern, by adding
children to parent nodes. Construction is very straightforward as component and
composite nodes are added the same way. The tail is added by calling the same
add() method as you would a composite
body segment. In addition, the update()
method cascades down seamlessly through the structure to animate the snake. Here
again, we don’t need to call separate update methods or differentiate between
component and composite objects. Even though our simple snake had only a single
kinematic chain, this application can be extended to incorporate multiple
kinematic chains and multiple children attached to the same parent. The
construction of the structure and the update() call would not get any more complicated than
this.
Using Flash’s Built-in Composite Structure: the Display List
In the previous example, we extended the Sprite class to develop composite structures that
display on stage. We first add the object to the composite structure, and
subsequently add it to the display list using the addChild() method. What’s the display list in
ActionScript 3.0 applications? The display list is a tree structure with the
stage as its root node. It consists of all the visible
elements that’ll be displayed on the stage. The display list consists of two types
of objects: (1) display objects and (2) display object containers. Every element
that appears on the stage is a type of display object. In
contrast, display object containers not only have a visual
representation on the stage, they can also have other display objects, and display
object containers as children.
Close examination of the inheritance structure of the Sprite class will show two classes called DisplayObject and DisplayObjectContainer in its inheritance hierarchy.
The DisplayObject class consists of methods and
properties that deal mainly with the visual presentation of an object such as the
x and y
properties that represent its position. The DisplayObjectContainer class inherits from DisplayObject, defines necessary properties, and implements methods
to handle child objects (see the ActionScript 3.0 documentation for more detail).
Some of the child handling methods implemented by the DisplayObjectContainer class are listed below.
addChild(child:DisplayObject):DisplayObject;
getChildAt(index:int):DisplayObject;
removeChild(child:DisplayObject):DisplayObject;
The display list is indeed a composite structure with the DisplayObject and DisplayObjectContainer representing the component and composite
classes.
Both DisplayObject and DisplayObjectContainer are abstract classes and cannot be
instantiated directly. We have to either extend these classes to define unique
components or use the classes that inherit from them. The Shape and Bitmap classes extend
the DisplayObject class. The more commonly used
Sprite class extends DisplayObjectContainer, and is the preferred base class for composite
objects.
The obvious question then is whether we can leverage the child handling methods in
the DisplayObjectContainer class without having
to re-implement them. We can indeed, and will develop a composite airplane to show
how in some cases, it’s better to use the built-in child-handling methods.
Creating a Composite Airplane
Figure 6-8 shows the
composite airplane that will be developed in this example. We will leverage the
display list to build the visual components. The
utility of the composite pattern will be demonstrated by automatically
calculating the weight of the total aircraft, by adding up component weights. In
addition, the composite pattern implementation will help keep track of damage to
each component, and figure out the overall damage to the aircraft. You will also
see how particular components can be removed from the structure when damage
exceeds a certain amount using the built-in methods of the DisplayObjectContainer class.

Developing the Component and Composite Classes for the Airplane
Because we will use the built-in methods of the DisplayObjectContainer class to manipulate child objects, the
component and composite classes are simple to implement. We need only to define
the operations for the composite structure. The first step
is to define an interface for the operations supported by the airplane. Example 6-18 shows the IPlane
interface. It defines two operations, getDamage()and getWeight(),
that return the weight and damage.
package
{
    public interface IPlane
    {
        function getDamage():Number;
        function getWeight():Number;
    }
}
Example 6-19 shows the component class for the airplane.
It extends the Shape class and implements the
IPlane interface. As explained
previously, Shape subclasses the DisplayObject class. The constructor takes the
weight and initial damage parameters, and assigns them to the nWeight and nDamage properties. The implementation for getWeight() and getDamage() is to simply return the requested property, as
components do not have children.
package
{
    import flash.display.Shape;

    public class Component extends Shape implements IPlane
    {
        protected var nDamage:Number;
        protected var nWeight:Number;

        public function Component(weight:Number, damage:Number = 0)
        {
            this.nDamage = damage;
            this.nWeight = weight;
        }

        public function getDamage():Number
        {
            return nDamage;
        }

        public function getWeight():Number
        {
            return nWeight;
        }
    }
}
It is important to note that the Shape
class doesn’t inherit from the InteractiveObject class. Therefore, airplane component class
cannot respond to user input such as mouse clicks and key presses.
Example 6-20 shows the composite class for the airplane.
It extends the Sprite class and implements
the IPlane interface. The Sprite class
extends the DisplayObjectContainer class that
inherits from DisplayObject. Therefore, our
implementation follows the composite pattern framework. The significant
difference between the composite and component classes is the implementation of
operations. In the Composite class, both the
getWeight() and getDamage() methods iterate across all their children, and return
the aggregate weight and damage for the composite branch of the hierarchical
tree. We do not have to implement any of the child handling methods, as they are
inherited from the DisplayObjectContainer
class.
package
{
    import flash.display.*;

    public class Composite extends Sprite implements IPlane
    {
        protected var nDamage:Number;
        protected var nWeight:Number;

        public function Composite(weight:Number, damage:Number = 0)
        {
            this.nDamage = damage;
            this.nWeight = weight;
        }

        public function getDamage():Number
        {
            var localDamage:Number = nDamage;
            for (var i:uint = 0; i < this.numChildren; i++)
            {
                var child:DisplayObject = this.getChildAt(i);
                localDamage += IPlane(child).getDamage();
            }
            return localDamage;
        }

        public function getWeight():Number
        {
            var localWeight:Number = nWeight;
            for (var i:uint = 0; i < this.numChildren; i++)
            {
                var child:DisplayObject = this.getChildAt(i);
                localWeight += IPlane(child).getWeight();
            }
            return localWeight;
        }
    }
}
Unlike the Shape class, Sprite does inherit from InteractiveObject. Therefore, composite components in the
airplane can respond to user interface events. We can now develop the component
and composite classes that make up the airplane.
Creating the Fuselage, Wings, and Engines
Now that the Component and Composite classes have been developed, we can
create the nodes that make up the airplane. Example 6-21 through
Example 6-24 show the Fuselage, MainWing, TailWing, and Engine classes. The Fuselage
and MainWing classes represent composite
nodes that hold other components and extend the Composite class (see Example 6-20). The
TailWing and Engine classes are leaf nodes and extend the Component class (see Example 6-11). The implementation of all these subclasses is
very similar to each other. The component is drawn with simple lines, using the
graphics property of the DisplayObject class.
The first parameter of the constructor method is the weight, and the second is
the initial damage (defaults to zero). Note the call to the superclass
constructor using the super keyword in the
last line of the constructor. This ensures proper initialization of properties
defined in the superclass.
package
{
    import flash.events.*;

    public class Fuselage extends Composite
    {
        public function Fuselage(weight:Number, damage:Number = 0)
        {
            graphics.lineStyle(40, 0xC0C0C0);
            graphics.moveTo(0, 0);
            graphics.lineTo(0, 150);
            super(weight, damage);
        }
    }
}package
{
public class MainWing extends Composite
{
public function MainWing(weight:Number, damage:Number = 0)
{
graphics.lineStyle(25, 0x999999);
graphics.moveTo(0, 0);
graphics.lineTo(100, 0);
super(weight, damage);
}
}
}package
{
public class TailWing extends Component
{
public function TailWing(weight:Number, damage:Number = 0)
{
graphics.lineStyle(20, 0x999999);
graphics.moveTo(0, 0);
graphics.lineTo(30, 0);
super(weight, damage);
}
}
}package
{
public class Engine extends Component
{
public function Engine(weight:Number, damage:Number = 0)
{
graphics.lineStyle(20, 0x666666);
graphics.moveTo(0, 0);
graphics.lineTo(0, 30);
graphics.lineStyle(5, 0x000000);
graphics.moveTo(-20, -12);
graphics.lineTo(20, -12);
super(weight, damage);
}
}
}Even though our airplane is a simple line drawing (to reduce complexity), it’s possible to create the airplane components using high fidelity graphic images loaded from external files.
Building the Composite Structure
Figure 6-9 shows the hierarchical composite structure of the airplane. The fuselage and main wings are composite nodes. The fuselage contains two main wings and two tail wings. Each main wing contains an engine.

Example 5-8 shows the Main
class that builds the composite airplane structure. This should be specified as
the document class of the Flash document. The plane is
displayed in top-down view, as shown in Figure 6-8. The build procedure
is very straightforward. Each component is instantiated and positioned relative
to its parent by assigning values to its x
and y parameters. The component is then added
to its parent composite node using the addChild() method. The airPlane variable references the root node of the airplane. The
whole composite plane structure plane is then added to the display object
container linked to the Main class (line 18).
Because the Main class is the
document class of the Flash document, the airplane is
added to the stage, which is the root node of the display
list.
1           package
2           {
3               import flash.display.Sprite;
4
5               /**
6               *    Main Class
7               *    @ purpose:        Document class for movie
8               */
9               public class Main extends Sprite
10              {
11               private var airPlane:Composite;
12
13               public function Main()
14               {
15                   // create airplane
16                   airPlane = new Composite(0.0);
17                   airPlane.x = 250; airPlane.y = 100;
18                   addChild(airPlane);
19
20                   // add fuselage
21                   var fuselage:Composite = new Fuselage(1000, 0)
22                   airPlane.addChild(fuselage);
23
24                   // add main wing on the left (port side)
25                   var rightWing:Composite = new MainWing(200, 0);
26                   rightWing.x = 20; rightWing.y = 50;
27                   fuselage.addChild(rightWing);
28
29                   // add main wing on the right (starbord side)
30                   var leftWing:Composite = new MainWing(200, 0);
31                   leftWing.scaleX = -1; // flip on vertical axis
32                   leftWing.x = -20; leftWing.y = 50;
33                   fuselage.addChild(leftWing);
34
35                   // add engine to right wing
36                   var rightEngine:Component = new Engine(300, 0);
37                   rightEngine.x = 50; rightEngine.y = -20;
38                   rightWing.addChild(rightEngine);
39
40                   // add engine to left wing
41                   var lefttEngine:Component = new Engine(300, 0);
42                   lefttEngine.x = 50; lefttEngine.y = -20;
43                   leftWing.addChild(lefttEngine);
44
45                   // add tail wing on the right
46                   var leftTailWing:Component = new TailWing(50, 0);
47                   leftTailWing.scaleX = -1; // flip on vertical axis
48                   leftTailWing.x = -20; leftTailWing.y = 150;
49                   fuselage.addChild(leftTailWing);
50
51                   // add tail wing on the left
52                   var rightTailWing:Component = new TailWing(50, 0);
53                   rightTailWing.x = 20; rightTailWing.y = 150;
54                   fuselage.addChild(rightTailWing);
55
56                   trace('Weight of airplane: ' + airPlane.getWeight());
                         //total weight
57               }
58           }
59       }
Calculating the Total Weight of the Airplane
Line 56 of the Main class shown in Example 5-8 calls the getWeight() method on the root node of the airplane. The
following output is the result of this statement.
Weight of airplane: 2100
The getWeight() method calculates the
weight iteratively by adding the weights of all components in the airplane
structure. This is a very powerful way of keeping track of an overall parameter
in a complex composite structure. If this airplane were used in a game, the
weight is essential to craft realistic movement dynamics using motion physics.
The weight of the plane can change dynamically. For example, the plane could be
carrying passengers, bombs, and a fuel tank. Adding passengers will increase
weight; dropping bombs will reduce weight, and flight will progressively reduce
weight by using up fuel. The getWeight()
method will work exactly the same way if we extend the airplane to add and
remove other components such as passengers, fuel, etc.
Modifying Components to Reflect Damage
We will modify the composite components of the airplane to increase their
damage property when clicked by the mouse. In a realistic game scenario, the
source of damage will be bullets, missiles and random malfunctions in
components. However, in the interest of keeping things simple, we’ll imagine
that a mouse click is a bullet hit. In Example 6-26 we will modify the
Fuselage (Example 6-21)
and MainWing (Example 6-22)
classes to respond to mouse clicks.
Fuselage
class1 package
2 {
3 import flash.events.*;
4
5 public class Fuselage extends Composite
6 {
7 public function Fuselage(weight:Number, damage:Number = 0)
8 {
9 graphics.lineStyle(40, 0xC0C0C0);
10 graphics.moveTo(0, 0);
11 graphics.lineTo(0, 150);
12
13 addEventListener(MouseEvent.CLICK, doDamage);
14
15 super(weight, damage);
16 }
17
18 private function doDamage(evt:Event)
19 {
20 this.nDamage += 10;
21 trace('Damage to the fuselage is now ' + this.nDamage);
22 evt.stopPropagation(); // stop event propegation
// to subsequent nodes
23 }
24 }
25 }Line 13, in the modified Fuselage class
constructor (Example 6-26),
registers the doDamage() method to receive
mouse click events. The doDamage() method
simply increments the nDamage property
defined in the superclass by 10. The stopPropagation() event call in line 22 is important to isolate
event responses to embedded display objects such as this. If not, the event
would propagate up the display list running other registered click event
handlers in parent nodes. This statement ensures that the lowermost registered
node in the clicked branch of the display list hierarchy handles the event. The
ActionScript 3.0 documentation has more details on event propagation. In Example 6-27, we will now modify the
MainWing class to exhibit similar
behavior.
MainWing
class1 package
2 {
3 import flash.events.*;
4
5 public class MainWing extends Composite
6 {
7 public function MainWing(weight:Number, damage:Number = 0)
8 {
9 graphics.lineStyle(25, 0x999999);
10 graphics.moveTo(0, 0);
11 graphics.lineTo(100, 0);
12
13 addEventListener(MouseEvent.CLICK, doDamage);
14
15 super(weight, damage);
16 }
17
18 private function doDamage(evt:Event)
19 {
20 this.nDamage += 20;
21 trace('Damage to this wing is now ' + this.nDamage);
22 if (this.nDamage > 50)
23 {
24 trace('Wing detached from fuselage - fatal crash!'),
25 parent.removeChild(this);
26 }
27 evt.stopPropagation();
// stop event propegation to subsequent nodes
28 }
29 }
30 }Example 6-27 shows the modified
MainWing class. Note the conditional
statement in lines 22- 26. If the damage exceeds 50, this node removes itself
from the display list (and the airplane composite structure) by calling removeChild in its parent. Before we can test our
modified components, a few changes to the Main class are necessary to display
total damage.
Calculating Total Damage to the Airplane
In the interests of keeping the example simple, we will register a mouse click
handler called showDamage to the
stage to display the total damage to the airplane. The
following statement needs to be added at the end of the constructor in the
Main class shown in Example 5-8.
stage.addEventListener(MouseEvent.CLICK, showDamage);
In addition, the following showDamage event
handler method should be added to the Main
class as well.
private function showDamage(evt:Event)
{
    trace('Total damage: ' + airPlane.getDamage());
}
Clicking on the stage will display the total damage to the airplane in the output panel. Likewise, clicking on either the fuselage or main wings will display the current damage to each of those components. The following output is a result of several clicks.
Damage to this wing is now 20                // clicked on right wing
Damage to this wing is now 40                // clicked on right wing
Damage to the fuselage is now 10            // clicked on fuselage
Damage to the fuselage is now 20            // clicked on fuselage
Damage to this wing is now 20                // clicked on left wing
Total damage: 80                        // clicked on stage
Damage to this wing is now 60                // clicked on right wing
Wing detached from fuselage - fatal crash!
The right wing was removed from the display list as its damage was more than 50. Ideally, the wing should not disappear, but drop off. If each component had additional routines for autonomous motion, then the wing component could have been removed from the fuselage and then added to the stage as a child, where it would fall off due to gravity and other simulated physical effects.
Leveraging the display list in ActionScript 3.0 to develop composite
structures has many advantages because of its seamless integration with the
Flash document object model. This method is preferable only when the composite
object is rigid—when all component parts move with the larger whole. The
airplane is a rigid body, even though it consists of several components.
Assigning values to the x and y parameters of the root node will move the whole
airplane. However, this method is not suitable when components move independent
of each other as they did with the snake application. In the snake, the location
of component nodes was not dependent on the location of the root node, but on
their immediate parent. Additional geometric transformation would be required if
its composite structure was implemented using the display list.
Summary
The composite pattern allows you to build complex systems that are made up of several smaller components. The components that make up the system may be individual components or containers that represent collections of components. The primary advantage of the composite pattern is that it allows clients to treat both individual components (leaf nodes) and composite components (composite nodes) the same way through a common interface. This pattern has particular utility in ActionScript, as the display list already implements the composite pattern, allowing developers to easily build and manipulate complex display objects.