Chapter 26. Testing practices
- Designing and testing routes
- Unit-testing controllers
- Unit-testing custom model binders
- Unit-testing action filters
Testing is a key tenet of any type of engineering, and software engineering is no different. Because software needs to be fully retested on every new build, the act of executing test cases can be slow and error-prone if done by hand. Creating automated tests is an accepted best practice, and ASP.NET MVC eases this effort.
Chapter 20 covered full-system testing and the specific techniques necessary to test an ASP.NET MVC application. This chapter moves beyond the most important type of testing, full-system testing, to more targeted tests that point directly to problem areas when unexpected churn occurs in the code base.
Because controllers are normal classes and actions are merely methods, we can load and execute actions and then examine the results. But even though testing controllers is simple, we must consider an important caveat. When we test a controller action, we’re only able to write assertions for the behavior we can observe. The true test of a working application is running it in a browser, and there are significant differences between viewing a page in a browser and asserting results in a controller action test.
First, we don’t know if a particular URL will even end up executing our controller unless we test it. We can make sure that the correct view is chosen, but we can’t assert that the correct view is shown at runtime. We can assert that we put correct information into ViewData, but we can’t ensure that the view uses all the information we give it. We also can’t assert that all possible controller code paths place the necessary objects into ViewData. With action filters, it’s quite possible that a view will need data that isn’t present. Controller action tests don’t run the entire MVC engine, so things like action filters aren’t executed. Although action unit tests add value, they don’t replace end-to-end application-level testing.
Tip
If you’re new to automated unit testing, be sure to pick up The Art of Unit Testing by Roy Osherove.
This chapter will dive into writing automated unit tests for some of the most common bits of code you’ll write in an ASP.NET MVC application. We’ll begin by exploring how to create automated test cases for routes.
26.1. Testing routes
Routing is perhaps the biggest innovation of the ASP.NET MVC project—so big, in fact, it was included in the .NET Framework 3.5 SP1 release, well ahead of the ASP.NET MVC release. With .NET 4.0, routing is merged into System.Web.dll and will be considered a core part of ASP.NET. Given that routing is part of the standard ASP.NET request pipeline just like HTTP modules, you’re well served investing some time learning how to design routes for testability as well as how to test them.
Like any new tool, routing is easy to abuse. Unless routes are tested thoroughly, changes to routes can break existing URLs; and changes to public URLs can break links and bookmarks, lower search rankings, and anger end users. The design of custom routes and URL patterns should come from business requirements. In this section, we’ll examine some practices for testing routes to ensure we don’t break our application.
When we create custom routes, we need to ensure both that the routes we’re creating are correct and that any existing routes aren’t modified. We can start with the built-in routes and lock those down with tests. The default routes are shown in listing 26.1.
Listing 26.1. The default routes in a new application
routes.IgnoreRoute("{resource}.axd/{*pathInfo}");

routes.MapRoute(
    "Default", // Route name
    "{controller}/{action}/{id}", // URL with parameters
    new {controller = "Home", action = "Index", id = UrlParameter.Optional}
    // Parameter defaults
    );
For many applications, this route is sufficient and doesn’t necessarily need to be tested on its own. If we add additional routing behavior, we’ll want to ensure that existing routes that follow this format aren’t broken.
But before we start writing tests, we need to think of a few scenarios. The URLs listed in table 26.1 should work in the default project template that ships with ASP.NET MVC 2.
Table 26.1. URLS that the default sample application supports
|
URL |
Result |
|---|---|
|
/ |
HomeController.Index() |
|
/home |
HomeController.Index() |
|
/home/index |
HomeController.Index() |
|
/home/index/5 |
HomeController.Index(5) |
|
/home/index?id=5 |
HomeController.Index(5) |
|
/home/about |
HomeController.About() |
To make things more interesting, we’ll add a simple ProductController to list, view, and search products, as shown in listing 26.2.
Listing 26.2. A simplified product controller
using System.Web.Mvc;
using Routes.Models;

namespace Routes.Controllers
{
    public class ProductController : Controller
    {
        public ViewResult Index()
        {
            var products =
                new[]
                    {
                        new Product {Name = "DVD Player"},
                        new Product {Name = "VCR"},
                        new Product {Name = "Laserdisc Player"}
                    };
            return View(products);
        }
        public ViewResult Show(int id)
        {
            return View(new Product {Name = "Hand towels"});
        }

        public ViewResult Search(string name)
        {
            return View("Show", new Product {Name = name});
        }
    }
}
ProductController supports a List, a Show, and a Search function. Each action uses the default view name. The actions will be exposed by the default route, but we want to support more interesting URL scenarios, like these:
- /product/show/5 maps to ProductController.Show
- /product/SomeProductName maps to ProductController.Search(SomeProductName)
Out of the box, the built-in routes support the first scenario but not the second.
Before we start messing around with our routes, we need to add tests to our existing scenarios. Testing routes is possible by creating a fake HttpContext and Http-Request, but it’s much easier with the testing extensions of the MvcContrib open source project.
We’ll test the first scenario from table 26.1 in listing 26.3 using these testing extensions.
Listing 26.3. Testing a blank URL
[Test]
public void Should_map_blank_url_to_home()
{
    "~/".Route().ShouldMapTo<HomeController>(c => c.Index());
}
Using extension methods contained in the MvcContrib.TestHelper namespace, the test first transforms a string into a Route object with the Route extension method. Next, we use the ShouldMapTo extension method to assert that a route maps to the Index method on HomeController.
ShouldMapTo<T> is a generic method, taking an expression. It’s similar to other expression-based methods, such as Html.TextBoxFor<T>. The expression is used to perform strongly typed reflection, as opposed to doing something like passing the controller and action name in as strings, which will fail under refactoring scenarios.
Unfortunately, this test doesn’t pass, because we haven’t called anything to set up our routes. We’ll accomplish this in a test setup method to be executed before every test, as shown in listing 26.4.
Listing 26.4. Registering the routes in a setup method
[SetUp]
public void Setup()
{
    RouteTable.Routes.Clear();
    MvcApplication.RegisterRoutes(RouteTable.Routes);
}
With our setup method in place, our test now passes.
The next scenarios we want to test are the other built-in scenarios. The tests are shown in listing 26.5.
Listing 26.5. Testing the built-in routing scenarios
[Test]
public void Should_map_home_url_to_home_with_default_action()
{
    "~/home".Route().ShouldMapTo<HomeController>(c => c.Index());
}

[Test]
public void Should_map_home_about_url_to_home_matching_method_name()
{
    "~/home/about".Route().ShouldMapTo<HomeController>(c => c.About());
}
[Test]
public void
Should_map_product_show_with_id_to_product_controller_with_parameter()
{
    "~/product/show/5".Route().ShouldMapTo<ProductController>(
        c => c.Show(5));
}
With the default scenarios added, we can now proceed with modifying our route to support the special case of a search term directly in the URL.
Before we get there, though, let’s make sure our routes don’t already support this scenario by adding a test to verify the functionality. After all, if this test passes, our work is done! The new test is shown in listing 26.6.
Listing 26.6. New scenario routing product search terms

This new test tries to prove that a route with some product name ![]() in it will map to the Search action
in it will map to the Search action ![]() , passing in the product name. Alas, our test fails, and our work isn’t yet done. The test fails with the message “MvcContrib.TestHelper.AssertionException
: Expected Search but was SomeProductName.”
, passing in the product name. Alas, our test fails, and our work isn’t yet done. The test fails with the message “MvcContrib.TestHelper.AssertionException
: Expected Search but was SomeProductName.”
To make our test pass, we need to add the appropriate changes to the routes, as shown in listing 26.7.
Listing 26.7. Additional route for searching products
routes.MapRoute(
    "SearchProduct",
    "product/{name}",
    new {controller = "Product", action = "Search"}
    );
With this addition to our routes, our new test passes, along with all the other tests. We were able to add a new route to our routing configuration with the assurance that we didn’t break the other URLs.
Because URLs are now generated through routes in an MVC application, testing our routes becomes of utmost importance. The test helpers in MvcContrib wrapped up all the ugliness that usually comes with testing routes. In the next section, we’ll examine how to avoid unnecessary test complexity.
26.2. Avoiding test complexity
Any behavior decision an application makes must be tested, either manually or through an automated test. If we add complexity to an application, we add to the testing burden. By keeping the behavior simple, we drastically reduce the number of test cases that we have to write. This applies specifically to how routes leverage controller and action names.
Although the default routes in an MVC application match a URL to a method name on a controller, the defaults can be changed. As shown in section 16.3, we can map the second URL segment to a parameter on a specific action. When using the MVC extension points of the ActionNameSelectorAttribute and ActionMethodSelectorAt-tribute attributes, the name of an action method on a controller doesn’t exactly match the method name. The two concepts of action name and action method name are completely separate and can be configured independently.
We can override the action name by applying the ActionNameAttribute as shown in listing 26.8.
Listing 26.8. Modifying the action name for an action method

In the controller shown in listing 26.8, we specified that the action method name ![]() should be different from the action name
should be different from the action name ![]() . The action name, originally “Index,” is now “Foo.” Navigating to /changedactionname or /changedactionname/index now results
in a 404 Not Found error. The action name is now “Foo,” and we can only access this action through /changedactionname/foo.
Because view names correspond to action names, not action method names, our view is named Foo.aspx.
. The action name, originally “Index,” is now “Foo.” Navigating to /changedactionname or /changedactionname/index now results
in a 404 Not Found error. The action name is now “Foo,” and we can only access this action through /changedactionname/foo.
Because view names correspond to action names, not action method names, our view is named Foo.aspx.
When method names differ from action names, we can no longer use expression-based URL generators. Without compile-time verification, URL generation is more easily susceptible to subtle refactoring and renaming errors. This can be alleviated by introducing global constants for action names, but it still creates a string-based system with another level of indirection between action methods and action names that isn’t needed in many cases.
In short, unless there’s no other way, don’t use ActionNameAttribute. In most applications, we’re better served adhering to the convention that action names match action method names.
26.3. Testing controllers
For controllers to be maintainable, they should be as light and skinny as possible, delegating all real domain work to other objects. Our controller tests will reflect this choice, as assertions will be small and will target only the following:
- What ActionResult was chosen
- What information was passed to the view, in ViewData or TempData
All other web-related information, whether it’s security, cookies, or session variables, should be encapsulated in a domain-specific and domain-relevant interface. Although it eases testing, encapsulation and separation of concerns are the most significant reasons to leave these other HttpContext-related items out of controllers.
The simplest example of a controller action is one that simply passes data into a view, as shown in listing 26.9.
Listing 26.9. A simple action
public ViewResult Index()
{
    Product[] products = _productRepository.FindAll();

    return View(products);
}
In this example, _productRepository is a private field of type IProductRepository, as shown in listing 26.10.
Listing 26.10. The controller with its dependency
namespace UnitTestingExamples.Controllers
{
    public class ProductsController : Controller
    {
        private readonly IProductRepository _productRepository;

        public ProductsController(IProductRepository productRepository)
        {
            _productRepository = productRepository;
        }
        . . . snip . . .
    }
}
When we test the ProductsController, we don’t need to supply the actual implementation of the IProductRepository interface. For the purposes of a unit test, we’re testing only the ProductsController, and no external dependency is used. To maximize the localization of defects, our unit tests should test only a single class. We don’t want a controller unit test to fail because we have a problem with our local database.
In a unit test, we’ll have to pass a test double into the ProductsController repository. A test double is a stand-in for an actual implementation, but one that we can manipulate to force our class under test to execute specific code paths. Our controller unit test will need to set up the stubbed IProductRepository with dummy data and then assert that the right action result is used, the right view is chosen, and the right data is passed to the view. This is shown in listing 26.11.
Listing 26.11. Testing our Index action
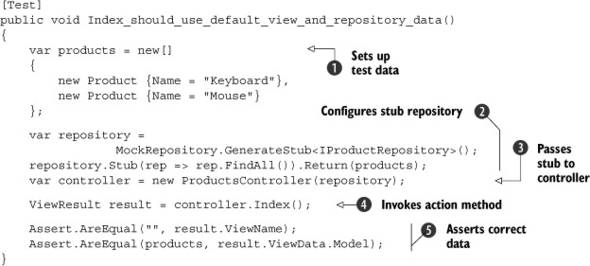
We first set up product data for our test ![]() . The values inside don’t matter for the purposes of our unit test, but they aid in debugging if our test fails for an unknown
reason.
. The values inside don’t matter for the purposes of our unit test, but they aid in debugging if our test fails for an unknown
reason.
We then create a stub of our IProductRepository by calling a Rhino Mocks API. Rhino Mocks is a popular test-double creation and configuration framework—you can find this
library, created by Oren Eini (a.k.a. Ayende Rahien), at www.ayende.com/projects/rhino-mocks.aspx. After we create a test double of our IProductRepository, we stub out the call to FindAll to return the array of Products we created earlier ![]() . With the stubbed IProductRepository, we create a ProductsController
. With the stubbed IProductRepository, we create a ProductsController ![]() .
.
With all of the classes and test doubles set up for our unit test, we can execute our controller action and capture the resulting
ViewResult object ![]() . We assert that the ViewName should be an empty string (signifying we use the Index view) and that the model passed to the view is our original array of products
. We assert that the ViewName should be an empty string (signifying we use the Index view) and that the model passed to the view is our original array of products ![]() . Our test passes with the implementation of our action from listing 26.9.
. Our test passes with the implementation of our action from listing 26.9.
A two-line action method is tested easily, but it isn’t very interesting. In a more interesting scenario, we’d edit a model and then post it to a form. Such a test would do a series of things:
- Check the model state for errors.
- If errors exist, show the original view.
- If not, save the model and redirect back to the index.
Let’s start with the error path, where a user enters incorrect information. We’ll assume that errors are generated as a result of validation. For the purposes of our test, shown in listing 26.12, the means of validation isn’t important, but rather, how the controller behaves under this condition.
Listing 26.12. Testing the Edit action when errors are present

This test uses the MvcContrib.TestHelper library for an easy test API. To force our controller into an invalid model state, we need to add a model error to ModelState with the AddModelError method ![]() .
.
After setting up our controller, we invoke the Edit action ![]() and examine the result returned
and examine the result returned ![]() . We assert that a view is rendered with the AssertViewRendered method, which returns a ViewResult object. The ViewName on the ViewResult should be an empty string, signifying that the Edit view is rerendered.
. We assert that a view is rendered with the AssertViewRendered method, which returns a ViewResult object. The ViewName on the ViewResult should be an empty string, signifying that the Edit view is rerendered.
Finally, we assert that the Save method on our repository wasn’t called. This negative assertion ensures that we don’t try to save our Product if it has validation problems.
We tested the error condition, and now we need to test our controller in the positive condition that our model didn’t have any validation problems. That’s shown in listing 26.13.
Listing 26.13. Testing our controller action when no errors are present

In this test, we set up our dummy product and controller in a manner similar to the last test, except this time we don’t add
any model errors to our ModelState. We invoke the Edit action with the product we created ![]() and then verify values on the result. We cast to a RedirectToRouteResult to ensure the type we expect
and then verify values on the result. We cast to a RedirectToRouteResult to ensure the type we expect ![]() . Then, we assert that the correct action name is in the route values
. Then, we assert that the correct action name is in the route values ![]() .
.
To make both of these tests pass, our action looks like listing 26.14.
Listing 26.14. Implementation of the Edit action
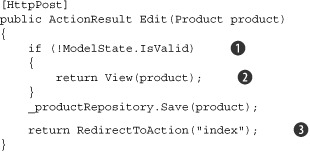
In our Edit action, we check for any ModelState errors with the IsValid property ![]() and return a ViewResult with our original Product
and return a ViewResult with our original Product ![]() . Our Edit view likely will use styling to highlight individual model errors and display a validation error summary. If there are no
validation errors, we save the Product and redirect back to the Index action
. Our Edit view likely will use styling to highlight individual model errors and display a validation error summary. If there are no
validation errors, we save the Product and redirect back to the Index action ![]() .
.
With our controller’s behavior locked down sufficiently, we can confidently modify our Edit action in the future and know whether our changes break existing functionality.
In the next section, we’ll examine strategies for testing custom model binders.
26.4. Testing model binders
Custom model binders eliminate much of the boring plumbing that often clutters action methods with code not pertinent to the method’s true purpose. But with this powerful tool comes the need for thorough testing. Our infrastructure needs to be rock solid because it will be executing on a large majority of requests.
Testing model binders isn’t as straightforward as testing action methods, but it’s possible. The amount of testing needed varies depending on what you’re doing with your custom model binder. Implementing the IModelBinder interface likely means you’ll only need to worry about a single BindModel method and a ModelBindingContext during testing. Inheriting from DefaultModelBinder is a bit more challenging, because any code we add will execute alongside other code that we don’t own. We must ensure that any behavior we add works correctly in the context of the other responsibilities of the base DefaultModelBinder class. The DefaultModelBinder class design has extensibility in mind, and key extension points are available through specific method overrides, but we still need to test these methods in the context of an entire binding operation (such as a single BindModel call).
In section 14.1, we created a custom model binder that bound entities from a repository. A similar model binder is shown in listing 26.15. If you’ve implemented a custom model binder in ASP.NET MVC 1, you’ll notice the redesigned value provider API.
Listing 26.15. Implementing an entity model binder
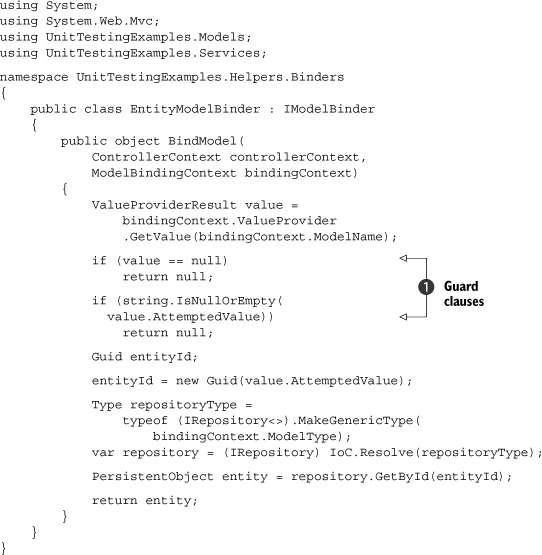
We have several guards ![]() protecting against bad input, but we didn’t include the check for a user or part of our application putting an invalid GUID
into the query string (or form variable). Rather than allow an exception to be thrown during binding, we’d like to handle
this by returning null, as shown in the test in listing 26.16.
protecting against bad input, but we didn’t include the check for a user or part of our application putting an invalid GUID
into the query string (or form variable). Rather than allow an exception to be thrown during binding, we’d like to handle
this by returning null, as shown in the test in listing 26.16.
Listing 26.16. Test for bad GUID values

Our model binder uses only a ModelBindingContext, not the ControllerContext. We need only focus on creating a ModelBindingContext representative of an invalid GUID value.
First, we create a value provider ![]() . For the key and value in the value provider’s collection, we’ll substitute bad GUID values to force our model binder to
throw an exception. We can now create our ModelBindingContext
. For the key and value in the value provider’s collection, we’ll substitute bad GUID values to force our model binder to
throw an exception. We can now create our ModelBindingContext ![]() using the same Model-Name as was used in our value provider. Because we use the ModelName directly to look up values in our model binder, any mismatch will cause our custom model binder to not execute the code we’re
interested in.
using the same Model-Name as was used in our value provider. Because we use the ModelName directly to look up values in our model binder, any mismatch will cause our custom model binder to not execute the code we’re
interested in.
When we execute this unit test, it fails with a System.FormatException because our model binder isn’t yet able to handle invalid GUIDs. To make our test pass, we can either parse the input string using regular expressions or use a try..catch block.
For simplicity, we’ll use the exception-handling method, with the additions shown in listing 26.17.
Listing 26.17. Modifying the GUID parsing code to handle invalid values

With these changes, our test now passes. We surrounded our original GUID constructor with a try..catch block for the specific FormatException type thrown when the parsed value isn’t of the right format ![]() .
.
There are other interesting scenarios we could add tests for, but all of them employ the same technique of creating a ModelBindingContext representative of a certain model-binding scenario. Unit tests for model binders go a long way to proving the design of a model binder, but they still don’t guarantee a working application.
Note
Guid.TryParse and Enum.TryParse<T> have both been added to .NET 4. Up through .NET 3.5 SP1, there was no built-in way to see if a string was a valid GUID, although you can find plenty of regular-expression solutions on the web. If you’d like to look into this issue yourself, please browse the original Microsoft Connect issue and workarounds logged since 2004 at http://mng.bz/VuSa.
Model binders are one cog in a larger machine, and only through testing that larger part can we have complete confidence in our model binders. It can often take quite a bit of trial and error to get the model binder to function correctly. When it’s working correctly, we need only construct the context objects used by our model binder in our unit test to re-create those scenarios.
Unfortunately, merely looking at a model binder may not show us how to construct the context objects it uses. A common test failure is a NullReferenceException, where a call to an MVC framework method requires other supporting objects in place. The easiest way to determine what pieces our model binder needs in place is to write a test and see if it passes. If it doesn’t pass because of an exception, we keep fixing the exceptions, often by supplying test doubles, until our test passes or fails due to an assertion failure.
In the next section, we’ll see how to test action filters.
26.5. Testing action filters
Testing action filters is similar to testing model binders. Unit testing is possible, and its difficulty is directly proportional to how much the filter relies on the context objects. Generally, the deeper the filter digs into the context object, the more that will need to be set up or mocked in a unit test. Table 26.2 illustrates the types of filters and the context objects used for each.
Table 26.2. Filters and their supporting context objects
|
Filter type |
Method |
Context object |
|---|---|---|
|
IActionFilter |
OnActionExecuted |
ActionExecutedContext |
|
OnActionExecuting |
ActionExecutingContext |
|
|
IAuthorizationFilter |
OnAuthorization |
AuthorizationContext |
|
IExceptionFilter |
OnException |
ExceptionContext |
|
IResultFilter |
OnResultExecuted |
ResultExecutedContext |
|
OnResultExecuting |
ResultExecutingContext |
Each context object has its own difficulties for testing and its own dependencies for usage. All context objects have a no-argument constructor, and a unit test may be able to use the context object as is without needing to supply it with additional objects. Although our filter may use only one piece of the context object, we may find ourselves needing to supply mock instances of more pieces, because many of the base context object constructors have null argument checking. We may find ourselves far down a long path that leads to supplying the correct dependencies for a context object, and these dependencies may be several levels deep.
Let’s add tests to the filter shown in listing 26.18.
Listing 26.18. Creating a simple action filter
public class CurrentUserFilter : IActionFilter
{
    private readonly IUserSession _session;
    public CurrentUserFilter (IUserSession session)
    {
        _session = session;
    }
    public void OnActionExecuting(ActionExecutingContext filterContext)
    {
        ControllerBase controller = filterContext.Controller;
        User user = _session.GetCurrentUser();
        if (user != null)
        {
            controller.ViewData.Add(user);
        }
    }
    public void OnActionExecuted(ActionExecutedContext filterContext)
    {
    }
}
In this filter, we have the requirement that a User object is needed for a component in the view, likely for displaying the current user in a widget. Our CurrentUserFilter depends on an IUserSession, whose implementation contains the logic for storing and retrieving the current logged-in user from the session. Our filter retrieves the current user and places it into the controller’s ViewData. The controller is supplied through the ActionExecutingContext object.
If possible, during unit testing, we prefer to use the no-argument constructor and supply any additional pieces by merely setting the properties on the context object. The ActionExecutingContext type has setters for the Controller property, so we’ll be able to use the no-argument constructor and not worry about the larger, parameter-full constructor.
Our complete unit test, shown in listing 26.19, is able to create a stub implementation for only the parts used in our filter.
Listing 26.19. Action filter unit test
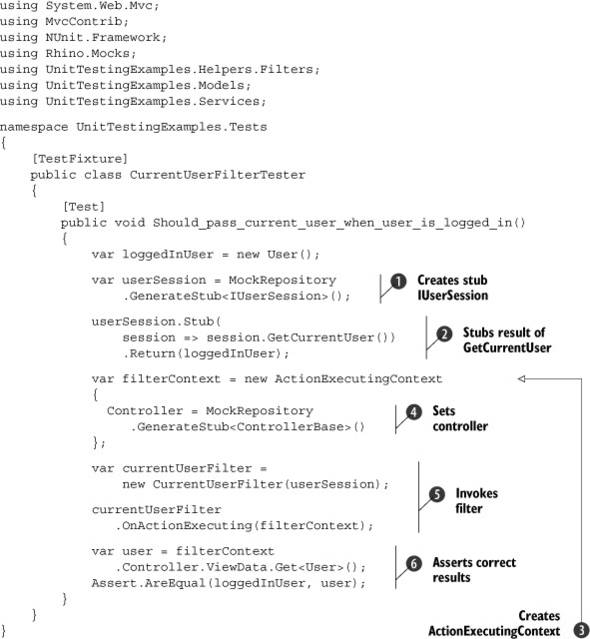
Our CurrentUserFilter depends on an implementation of an IUserSession interface ![]() , which we supply using Rhino Mocks. Next, we stub the GetCurrentUser method on our IUserSession stub to return the User object created earlier
, which we supply using Rhino Mocks. Next, we stub the GetCurrentUser method on our IUserSession stub to return the User object created earlier ![]() . Because the implementation of IUserSession requires the full HttpContext to be up and running, supplying a fake implementation gives us much finer control over the inputs to our filter object.
. Because the implementation of IUserSession requires the full HttpContext to be up and running, supplying a fake implementation gives us much finer control over the inputs to our filter object.
Next, we create our ActionExecutingContext ![]() but call only the no-argument constructor. The controller can be any controller instance, and we again use Rhino Mocks to
create a stub implementation of ControllerBase
but call only the no-argument constructor. The controller can be any controller instance, and we again use Rhino Mocks to
create a stub implementation of ControllerBase ![]() . Rhino Mocks creates a subclass of ControllerBase at runtime, which saves us from using an existing or dummy controller class. In any case, the ControllerBase provides ViewData, so we don’t need to provide any stub implementation for that property.
. Rhino Mocks creates a subclass of ControllerBase at runtime, which saves us from using an existing or dummy controller class. In any case, the ControllerBase provides ViewData, so we don’t need to provide any stub implementation for that property.
With our assembled ActionExecutingContext and stubbed implementation of IUserSession, we can create and exercise our CurrentUserFilter ![]() . The OnExecutingMethod doesn’t return a value, so we need to examine only the ActionExecutingContext passed in. We assert that the controller’s ViewData contains the same logged-in user created earlier
. The OnExecutingMethod doesn’t return a value, so we need to examine only the ActionExecutingContext passed in. We assert that the controller’s ViewData contains the same logged-in user created earlier ![]() , and our test passes!
, and our test passes!
Getting to this point required trial and error to understand what the context object required for execution. Because filters are integrated and specific to the MVC Framework, it can be fruitless to try to write filters using test-first test-driven development—only the fact that the complete website is up and running proves the filter is working properly. We supplied dummy implementations of the context objects, but we constructed them in a way that the MVC Framework will likely not use.
26.6. Summary
In this chapter, we looked at testing some of the most popular types of code we’ll write with the ASP.NET MVC Framework. We learned how to test routes using the test helpers available in MvcContrib. We also learned how to create automated tests for controllers, model binders, and action filters. Each of these types of code has special behaviors, and each of these needs automated test cases.
Because code can be executed on every request, it’s vital to ensure that code behaves as desired. The true test of a working MVC application is using it in a browser. Refer back to chapter 20 on full-system testing for more than just unit testing.
In chapter 27, we’ll learn how to apply jQuery to create an autocomplete text box.