
11 Client-side technologies and AJAX
- Choosing your client-side technology
- Calling page handlers from client-side code
- Working with JSON in Razor Pages
- Isolating CSS styles on a per-page basis
All the code examples we have worked with have relied on the HTML for the page being generated in full on the server, except in one area: client-side validation. The validation error messages were generated using client-side libraries, specifically Microsoft’s jQuery Unobtrusive Validation library. As a feature, client-side validation enhances the usability of the website. It gives users instant feedback on form validation errors, without waiting for the entire form to be submitted to the server for processing.
Usability is critical if you want to keep your users happy, and usability can be improved dramatically in server-side applications using client-side technologies. In this chapter, we will look at how to implement some common patterns that use client-side technologies within a Razor Pages application. Since it is included as part of the default project template, we will look at jQuery for DOM manipulation and making asynchronous HTTP requests initiated by the browser. We will also explore alternatives, using plain JavaScript, and consider the future of jQuery.
Asynchronous HTTP requests (commonly known as AJAX) enable you to obtain data from the server without a full-page postback, so they are invisible to the user. You can do what you want with that data. You can use it to perform calculations or update parts of a page. Or you can provide the data as a file download. The data itself can be in many forms. It can be HTML or structured as XML or, more commonly, as JSON. In this chapter, you will look at how to use page handler methods to generate HTML and JSON data from AJAX requests and learn about the limitations of this approach. You will also look at how to post data to page handlers successfully.
If you want to work with JSON extensively, the recommended path is building Web API controllers into your application, which provide the foundation for RESTful HTTP services. I don’t cover API controllers in this book, but we will explore a newly simplified request-handling feature introduced in .NET 6 (based on the minimal API) that offers a similar bang for your buck with considerably less ceremony. We will also look at another new feature in .NET 6 that enables you to isolate CSS styles to the scope of a single page without increasing the number of HTTP requests. Before we get into some code examples, we will discuss how you might approach your client-side development.
11.1 Choosing your client-side technology
The jQuery library is, without a doubt, the most used JavaScript library of all time. Introduced in 2006, it quickly became the de facto way to manipulate the DOM, handle events, manage CSS transitions, and perform asynchronous HTTP requests (AJAX). When jQuery was launched, implementations of these APIs differed widely across browsers. jQuery acted as an adapter, providing a set of APIs that worked the same way across all supported browsers.
Many other client-side libraries took dependencies on jQuery, including the leading UI framework library, Bootstrap, which is bundled into the default ASP.NET Core web application templates. The latest version of Bootstrap (version 5) included in the new templates from .NET 6 onwards dropped its dependency on jQuery. These days, most browsers adhere to standards much more closely than they used to. Many of them share the same underlying technology. The problem jQuery was designed to solve has largely disappeared.
Despite that, jQuery is still included in the default Razor Pages applications template to provide support for client-side validation. In the longer term, this may well change because there is an open issue on GitHub that discusses the potential replacement of client-side validation so that it no longer depends on jQuery (https://github.com/dotnet/aspnetcore/issues/8573). Nevertheless, jQuery is still widely used, so in this chapter, we will look at implementing client-side solutions using both jQuery and plain JavaScript.
Other client-side libraries exist. Probably the most widely used among them are React and Angular. Angular is more accurately referred to as an application framework, but both are primarily used for building single-page applications (SPAs) for which workflow logic executes in the browser rather than on the server. They can be used as part of a Razor Pages application, but they are overkill if all you want to do is add isolated instances of client-side functionality.
11.2 Calling page handlers from JavaScript
This section focuses on calling named page handler methods from client-side code. We will cover how to use a partial page to return a snippet of HTML you can use to update a section of a page. Then we will explore how to post a standard form to a page handler and standalone data. We will pay particular attention to request verification when we do this, remembering it is baked into the Razor Pages framework by default. Finally, we will cover how to work with JSON when interacting with page handlers from client code.
11.2.1 Using a partial page to return HTML
In the first example, you will look at loading snippets of HTML into a page asynchronously. Specifically, you will load details of a property into a Bootstrap modal when the user clicks on the name of a property in a list. You will use partial pages for this exercise. One partial will contain the outline HTML for the modal, the head and foot, which will be included in the existing City page. The modal body will be loaded from the server when the user clicks on a property listing on the city page. You will add client-side code that identifies which property was clicked and then makes a request to a page handler that returns a PartialResult, which, if you remember from chapter 3, represents the processing of a partial page. It is perfect for generating fragments of HTML, such as those that might be used for updating regions of pages.
You will create the outline of the modal to start. Add a new cshtml file to the PagesShared folder. Remember, there is no template for partial views, so if you are using Visual Studio, you can choose the Razor View > Empty template and then remove the default content. Name the partial file _PropertyModalPartial.cshtml, and replace any existing content with the following code.
Listing 11.1 The PropertyModalPartial content based on Bootstrap 5 modal
<div class="modal fade" id="property-modal">
  <div class="modal-dialog">
    <div class="modal-content">
      <div class="modal-header">
        <h5 class="modal-title">Property Details</h5>
        <button type="button" class="btn-close"
         ➥ data-bs-dismiss="modal" aria-label="Close"></button>
      </div>
      <div class="modal-body">

      </div>
      <div class="modal-footer">
        <button type="button" class="btn btn-secondary"
         ➥ data-bs-dismiss="modal">Close</button>
      </div>
    </div>
  </div>
</div>
This code is more or less lifted straight out of the Bootstrap 5 documentation for modals. It is a standard modal with no content in its body. You have changed the title to be more relevant to your application and added an id attribute, so you can identify the modal from client code. You have also added the fade class to the modal, so it animates when appearing and disappearing.
Now you need some content for your modal. This will be placed in another partial named _PropertyDetailsPartial.cshtml, which is also placed in the PagesShared folder. Its content is simple. You pass a Property in as the model for the Razor file and render details of the property as follows.
Listing 11.2 The partial containing the property details that will be loaded
@model Property
<h3>@Model.Name</h3>
<address>
    @Model.Address
</address>
<p>Availability: @(Model.AvailableFrom < DateTime.Now ?
➥ "Immediate" : Model.AvailableFrom.ToShortDateString())</p>
<p>Day Rate: @Model.DayRate.ToString("c")</p>
<p>Max Guests: @Model.MaxNumberOfGuests</p>
<p>Smoking permitted? @(Model.SmokingPermitted ? "Yes" : "No")</p>
Next you need a page handler that uses this partial to generate HTML. Add the following handler method to the City.cshtml.cs file after the existing OnGetAsync method.
Listing 11.3 The named handler that generated HTML as a PartialViewResult
public async Task<PartialViewResult> OnGetPropertyDetails(int id)
{
    var property = await _propertyService.FindAsync(id);
    return Partial("_PropertyDetailsPartial", property);
}
This is a named handler method. It takes an int as a parameter, representing the identity of the chosen property. It uses the property service to obtain the property details from the database and then passes it to the partial file, returning the rendered result. You need to inject the property service into the constructor of the PageModel.
Listing 11.4 Injecting the property service into the CityModel constructor
private readonly ICityService _cityService;
private readonly IPropertyService _propertyService;

public CityModel(ICityService cityService, IPropertyService propertyService)
{
    _cityService = cityService;
    _propertyService = propertyService;
}
The final steps involve some changes to the City.cshtml file. Iterate a collection of properties within the selected city, and render their details in this file. The name of the property is presented in an h5 heading, which has role="button" assigned to it, so the cursor becomes a pointer when the user hovers over the heading. You need to modify the heading to add some data attributes. One will help you identify the specific property, and others are used to trigger the modal. I’ve broken the resulting declaration of the h5 element over several lines in the following listing, so it is easier to annotate the code.
Listing 11.5 The amended h5 element designed to trigger a modal
<h5 role="button"
data-id="@property.Id"                ❶
data-bs-toggle="modal"                ❷
data-bs-target="#property-modal"      ❸
>@property.Name</h5>
❶ The data-id attribute has the property Id assigned to it. You will retrieve this value and pass it to the named page handler you just added.
❷ This Bootstrap custom attribute makes the element a trigger for a modal.
❸ This attribute takes the id of the target modal.
Finally, include the modal partial in the page (listing 11.6), and use the scripts section to add a block of JavaScript. The client-side code uses jQuery to add a click event handler to all h5 elements. Within the click handler, the id of the specified property is retrieved from the data-id attribute. A URL is constructed, with query string parameters representing the name of the page handler method and its id parameter. This is used in the jQuery load method that uses the GET method to make an HTTP request and then loads the response into the specified element.
Listing 11.6 Adding a partial and the script block to the page
<partial name="_PropertyModalPartial" />                             ❶
@section scripts{
<script>
$(function(){
    $('h5').on('click', function() {                                 ❷
        const id = $(this).data('id');                               ❸
        $('.modal-body').load(`?handler=propertydetails&id=${id}`);  ❹
    });
});
</script>
}
❶ Use a partial tag helper to include the modal partial.
❷ Add a click event handler to all h5 elements.
❸ Within the handler, retrieve the Id of the selected property from the data-id attribute.
❹ The jQuery load method uses the GET method to call the specified URL and inserts the response into the element specified in the selector. In this case, that’s the modal body.
Run the application, click a city on the home page, and then click the property’s name in the resulting list. The details should appear in the modal.
Removing the reliance on jQuery, you can use the Fetch API instead, which is supported by all modern browsers. The only change you need to make is to the scripts section.
Listing 11.7 Calling a named handler with the Fetch API
@section scripts{
<script>
document.querySelectorAll('h5').forEach(el => {                          ❶
    el.addEventListener('click', (event) => {                            ❶
        const id = event.target.dataset.id;                              ❷
        fetch(`?handler=propertydetails&id=${id}`)                       ❸
        .then((response) => {
            return response.text();                                      ❹
        })
        .then((result) => {
            document.querySelector('.modal-body').innerHTML = result;    ❺
        });
    });
});
</script>
}
❶ Add a click event handler to all h5 elements.
❷ Within the handler, retrieve the Id of the selected property from the data-id attribute.
❸ Make the requests to the specified URL, as before.
❹ Call the text() method on the Response object to obtain the returned content as a string.
❺ Assign it to the modal body.
If you make these changes and run the application, you should not see any difference in behavior. The Fetch example is a little more verbose than the jQuery example, but it is not that complicated once you understand what’s going on within the code.
Fetch works with promises, which are similar to .NET tasks. They represent the future result of an asynchronous operation. The Fetch HTTP call returns a response as a stream. Use the text() method to read the stream into a string, and then use the resulting string to update the modal body. If you are unfamiliar with it and would like to learn more about Fetch, I recommend the Mozilla Developer Network docs as a good starting point: http://mng.bz/vXO4.
Before we move on, it is essential to understand what goes on behind the scenes when these asynchronous calls are being made. You will use the browser developer tools to view the actual request being made and examine its response. The browser developer tools are an essential aid whenever you do client-side work because they reveal what is going on in the browser. You should refer to your browser’s documentation for more information on how to access the tools and use them, but for Chrome and Edge users, all you have to do is press your F12 key when you have your browser open. Once the tools are exposed, click the Network tab that shows details of network traffic (requests), shown in figure 11.1. Then navigate to one of the city pages, and click a property name. You should see details of the request appear.

Figure 11.1 The request is recorded in the Network tab.
In this example, the request URL is berlin?handler=properydetails&id=39. The HTTP response status code is 200, and the type is specified as Fetch because my screengrab was taken using the Fetch example. If I had taken the grab using the jQuery code, the type would be recorded as xhr, representing the browser’s XmlHttpRequest object that jQuery relies on for making AJAX calls. You may have different headings depending on your configuration, but you can right-click any of the headings to customize your view. If you click the name of the request in the Network tab, you can see more details of the actual request (figure 11.2), including the request and response headers and details of any data being passed in the request.

Figure 11.2 Click the request to see more details.
You can use the Response tab to see the actual response returned from the server on the right-hand side. In the example shown in figure 11.3, you can immediately tell from the existence of unicode characters that I have not configured any additional encodings beyond the default Basic Latin character set I covered in section 3.1.5.

Figure 11.3 The raw response is captured in the Network tab.
So that’s a simple GET request completed successfully. In the next exercise, you will attempt to post the content of a form to a page handler.
11.2.2 Posting to a page handler
Once you have the details of the selected property in the modal, it would be useful to select arrival and departure dates, specify the number of guests in your party, and obtain a total cost for a stay. In this section, you will add a form to the modal that enables you to do that and then post the content of the form to another handler method, which will return the total cost of the stay.
First, you need an input model to wrap a Property instance and the form values. Add the class declaration in the following listing to the CityModel class, so it is nested within it.
Listing 11.8 BookingInputModel added as a nested class to CityModel
public class BookingInputModel
{
    public Property Property { get; set; }
    [Display(Name = "No. of guests")]
    public int NumberOfGuests { get; set; }
    [DataType(DataType.Date), Display(Name = "Arrival")]
    public DateTime? StartDate { get; set; }
    [DataType(DataType.Date), Display(Name = "Departure")]
    public DateTime? EndDate { get; set; }
}
In addition to Property, this class includes properties for the form fields you will add to the modal. The BookingInputModel will replace Property as the model for the modal. You haven’t included any BindProperty attributes because you will pass BookingInputModel as a parameter to the handler method that processes the request. The code for the handler method follows in listing 11.9. It calculates the total cost of a stay, based on the number of days, the day rate, and the number of guests. This is also added to the CityModel.
Listing 11.9 The OnPostBooking handler method
public ContentResult OnPostBooking(BookingInputModel model)
{
    Var numberOfDays = (int)(model.EndDate.Value -
    ➥ model.StartDate.Value).TotalDays;
    var totalCost = numberOfDays * model.Property.DayRate *
    ➥ model.NumberOfGuests;
    return Content(totalCost.ToString("c"));
}
This handler method returns a ContentResult, which is a way of returning a string as a response. It is not something you are likely to use very often in real-world apps. However, it helps simplify this example. In addition, the fundamental logic for calculating the cost would usually belong in a service in a business logic layer. But again, I want to keep the example simple. The next listing shows the form added to the _PropertyDetailsPartial.cshtml file. I have not included validation, again, to keep the example simple.
Listing 11.10 The booking form added to the property details partial
<form id="booking-form">
    <input type="hidden" asp-for="Property.DayRate" />                ❶
    <div class="form-group">
        <label asp-for="StartDate" class="control-label"></label>
        <input asp-for="StartDate" class="form-control" />            ❷
    </div>
    <div class="form-group">
        <label asp-for="EndDate" class="control-label"></label>
        <input asp-for="EndDate" class="form-control" />              ❷
    </div>
    <div class="form-group">
        <label asp-for="NumberOfGuests" class="control-label"></label>
        <input asp-for="NumberOfGuests" class="form-control" max="@Model.Property.MaxNumberOfGuests" />                       ❸
    </div>
</form>
❶ Include a hidden field containing the selected property’s day rate.
❷ Add inputs for arrival and departure dates.
❸ Use the max attribute to limit the numeric input to the maximum number of guests the selected property can accommodate.
You also need to change the model type for the partial. Currently it is a Property. You will be changing that to a BookingInputModel, so replace the first line of _PropertyDetailsPartial.cshtml with the following:
@model CityModel.BookingInputModel
Next add a new button to the property modal partial; the partial that acts as a frame for the dynamically loaded property details. Add the bold line in the following listing to the footer element.
Listing 11.11 The Book button added to the modal partial
<div class="modal-footer">
    <button type="button" class="btn btn-secondary"
     ➥ data-bs-dismiss="modal">Close</button>
    <button type="button" class="btn btn-success"
     ➥ data-bs-dismiss="modal">Book</button>
</div>
Finally, you need to wire the new button up to a click handler that posts the form to the page handler method. The jQuery version is shown in the following listing.
Listing 11.12 Adding a new handler to the new button using jQuery
$('.btn-success').on('click', function(){
    const data = $('#booking-form').serialize();             ❶
    $.post('?handler=booking', data, function(totalCost){    ❷
        alert(`Your stay will cost ${totalCost}`);           ❸
    });
});
❶ Use the jQuery serialize method to convert the form field values into a URL-encoded string for posting.
❷ Post to the page handler and define a callback function that takes the response as a parameter.
❸ Incorporate the response into a string that is displayed in a browser alert.
You are ready to test this out. Once you have the new version of the City page in your browser, make sure you have your developer tools open on the network tab. Then click a property, enter a start and an end date for the booking, and then specify the number of guests. Click the Book button. You should now see a 400 error code in the Network tab (figure 11.4).

Figure 11.4 The request fails with a 400 error code.
The 400 HTTP status code represents a malformed client request. In Razor Pages, this error occurs most commonly because a POST request is missing a request verification token. If you recall from chapter 6, the token is generated as a hidden field when the form tag helper has its method set to post. If you check the code you added in listing 11.10, there is no method attribute on the form element; hence, the hidden input was not generated.
The fix is straightforward in this case. You just add method="post" to the form element and rerun the application. The hidden field will be generated and will be included in the serialized values posted to the server. However, it is not uncommon to have no form element at all when you post values with AJAX. You might want to post the result of a calculation, for example, rather than the content of a form field. So in those cases, what are your options?
First, you could consider disabling request verification. This has to be done at the PageModel level by adding the IgnoreAntiforgeryToken attribute on the handler class. You cannot disable request verification at the page handler level (unlike an MVC action method), so if you have other handlers on your page that process POST requests, you will disable request verification for those too. That is probably not acceptable, and disabling this security feature is generally not advisable anyway. That leaves you with generating a token value and including it within the AJAX request.
You can render a hidden input with a token value using the AntiForgeryToken method on the Html helper property of the Razor page:
@Html.AntiForgeryToken()
Alternatively, you can use the @inject directive to inject the IAntiforgery service into the page and use its GetAndStoreTokens method to generate a token set and access the resulting RequestToken property.
Listing 11.13 Generating a request verification token from the IAntiforgery service
@using Microsoft.AspNetCore.Antiforgery
@inject IAntiforgery antiforgery
@{
    var token = antiforgery.GetAndStoreTokens(HttpContext).RequestToken;
}
This approach is only suitable if your JavaScript code is embedded in the Razor page because you need to render the C# token variable within the script. You cannot include C# code in external JavaScript files, so if you prefer to keep the script out of your pages, you will have to use the AntiForgeryToken method to render the hidden field.
Next include the token within the request, either as a form field (posting form values) or as a request header value. The default name of the form field is __RequestVerificationToken (with two leading underscores), and the default name of the request header is RequestVerificationToken (with no leading underscores). Redo this example without the form element to illustrate. First, remove the form tags from the property details partially, so the inputs are no longer enclosed within a form. Next, add a call to the Html.AntiForgeryToken method to the City Razor page. I placed mine just above the partial tag helper:
@Html.AntiForgeryToken()
<partial name="_PropertyModalPartial" />
@section scripts{
You only need to change how the data is assigned in the script block. You can no longer serialize a form because there isn’t one, so create an object with properties that mirror the input model the page handler expects as a parameter. You only need to specify property values required by the page handler. The following listing shows the altered button click event handler.
Listing 11.14 Altering the button click event handler to use an object
$('.btn-success').on('click', function(){
    const data = {                                       ❶
            startdate: $('#StartDate').val(),            ❷
            enddate: $('#EndDate').val(),                ❷
            numberofguests: $('#NumberOfGuests').val(),  ❷
            __requestverificationtoken: $('[name="__RequestVerificationToken"]').val(),          ❸
            property:{                                   ❹
                dayrate: $('#Property_DayRate').val()    ❹
            }                                            ❹
        }
    $.post('?handler=booking', data, function(totalCost){
        alert(`Your stay will cost ${totalCost}`);
    });
});❷ Use the jQuery val() method to get the form field values and assign them to properties.
❸ The token’s hidden field doesn’t have an id attribute, so you use its name as the jQuery selector.
❹ The Property property of the input model is nested.
The jQuery library takes care of converting the JavaScript object represented by the data variable into a URL-encoded string for posting and assigning the correct content-type header to the request (x-www-form-urlencoded). In the plain JavaScript version of the button click handler, which is available in the chapter downloads, you flatten the input model by including a top-level DayRate property. This is so you can use the browser’s URLSearchParams interface (http://mng.bz/49vj) to generate a URL-encoded string of values suitable for posting easily. This interface is not capable of serializing objects that have nested properties.
11.2.3 Working with JsonResult
Up to now, you have passed simple values and JavaScript objects to the page handler. This section will begin to look at working with JSON, which has become the de facto data format for exchanging data between the client and the server in web applications. You will use plain JavaScript for this example and serialize the JavaScript object you constructed from the form fields to JSON before posting it to the page handler. Then you will convert the page handler method to return a JsonResult rather than a ContentResult.
When you specify x-www-form-urlencoded as the content type for a request, the framework knows it should parse the request body for the posted name-value pairs that constitute the data you are sending to the server. You let the framework know when you post JSON by setting the content type to application/json. But you also tell the page handler where to get the data. You do this by applying the FromBody attribute to the page handler parameter. Listing 11.15 shows how the page handler method looks with the changes needed to work with JSON. In the code, you create an anonymous type to represent the returned data. While this works fine for ad hoc situations, a more robust approach would involve declaring classes or records for your return types, so they are testable.
Listing 11.15 Using JsonResult and the FromBody attribute
public JsonResult OnPostBooking([FromBody]BookingInputModel model)    ❶
{
    var numberOfDays = (int)(model.EndDate.Value -
    ➥ model.StartDate.Value).TotalDays;
    var totalCost = numberOfDays * model.Property.DayRate *
    ➥ model.NumberOfGuests;
    var result = new  { TotalCost = totalCost };                      ❷
    return new JsonResult(result);                                    ❸
}
❶ Change the return type to JsonResult and add the [FromBody] attribute to the handler parameter to tell the framework where to find the JSON data.
❷ Create an object to represent the returned data.
❸ Pass the object to the JsonResult constructor, serializing it appropriately.
Listing 11.16 shows the plain JavaScript version of the button click event handler that generates the JSON, posts it to the server, and processes the result. There are some essential points to note. You must pass the request verification token in the header this time. You cannot include it within the JSON in the request body because request verification takes place before the framework parses the JSON. In addition, you must specify the content type of the request as application/json. Finally, when you use the Fetch API, you use the json() method on the response (as opposed to the text() method you used previously) to deserialize the response, so you can work with it. The default JSON serializer generates property names using camel case, so the TotalCost property of the anonymous object you passed to the JsonResult constructor becomes totalCost.
Listing 11.16 The button click handler that posts JSON using the Fetch API
document.querySelector('.btn-success')
    .addEventListener('click', () => {
        const token = document.querySelector(
        ➥ '[name="__RequestVerificationToken"]').value;
        const data = {
                startdate: document.getElementById('StartDate').value,
                enddate: document.getElementById('EndDate').value,
                numberofguests: document.getElementById(
                ➥ 'NumberOfGuests').value,
                property: {
                    dayrate: document.getElementById(
                    ➥ 'Property_DayRate').value
                }
            };
            fetch('?handler=booking', {
                method: 'post',
                headers: {
                    "Content-type": "application/json",              ❶
                    "RequestVerificationToken" : token               ❷
                },
                body: JSON.stringify(data)                           ❸
            }).then((response) => {
                return response.json();                              ❹
            }).then((result) => {
                alert(`Your stay will cost ${result.totalCost}`);    ❺
            });
        });
❶ You must specify the content type as application/json.
❷ You must pass the request verification token as a request header.
❸ Use the JSON.stringify method to serialize your JavaScript object to JSON format.
❹ Use the json method on the response, which parses the return JSON into an object.
❺ Access the totalCost property of the resulting object.
Note that the header’s name for the token does not have leading underscores. If you get a 400 error code when working with JSON, check the header’s name once you have checked it is present. If you don’t specify the content type as application/json, it will default to text/plain, and your handler will error because it will not attempt to parse the request body.
The jQuery version (listing 11.17) uses the ajax method rather than the shorthand post method to request because the ajax method enables you to set headers. The request’s content type is specified using one of the contentType options in the settings rather than explicitly setting a header value.
Listing 11.17 Posting and processing JSON with jQuery and a page handler
$('.btn-success').on('click', function(){
    const token = $('[name="__RequestVerificationToken"]').val();   ❶
    const data = {
            startdate: $('#StartDate').val(),
            enddate: $('#EndDate').val(),
            numberofguests: $('#NumberOfGuests').val(),
            property:{
                dayrate: $('#Property_DayRate').val()
            }
        }
    $.ajax({
        url: '?handler=booking',
        method: "post",
        contentType: "application/json",                            ❷
        headers: {
            "RequestVerificationToken" : token                      ❸
        },
        data: JSON.stringify(data)                                  ❹
    })
    .done(function(response){
        alert(`Your stay will cost ${response.totalCost}`);
    });
});❷ Set the content type via the contentType option.
❹ Use the JSON.stringify method to serialize the JavaScript object to JSON format.
The key points to working with page handlers and JSON are as follows:
-
Remember to apply the FromBody attribute to handler parameters.
-
Use the Network tab in the browser developer tools to diagnose issues.
In my opinion, using a page handler method to process and return JSON is acceptable in moderation. Remember that every time a page handler is executed, an instance of the PageModel is instantiated, and all of its dependencies are resolved. If you find you are injecting additional dependencies that are only needed for a JSON-processing page handler, that suggests a bit of a code smell. At that point, or if your needs are more extensive, you should consider using minimal request-handling APIs, a new feature introduced in .NET 6.
11.3 Minimal request-handling APIs
Before .NET 6, the recommended way to handle extensive services over HTTP in ASP.NET Core, such as those that consume and produce JSON, was to use the Web API framework that forms part of the MVC framework. To do that, you create classes that derive from ApiController, add the required action methods to them for processing requests, add the relevant services to your application, and map the controller action methods as endpoints. Incorporating Web API controllers in your application involves a degree of ceremony.
If you recall from chapter 1, a larger part of the motivation behind the introduction of Razor Pages was to reduce the ceremony required by the existing MVC framework to generate HTML on the server. The effort to reduce ceremony has continued in .NET 6. You have already seen how application bootstrapping and configuration have been simplified down to one file, in chapter 2, based on a new minimal hosting API. As part of an overall minimal APIs feature, a slimmed-down approach to handling requests was also introduced that allows you to map a route to a function, and it just works.
You register minimal API request handlers with the Map[HttpMethod] method on WebApplication—MapPost, MapGet, MapPut, and so on—using the same convention with which you register page handler methods in a PageModel class. Recall that an instance of the WebApplication type is returned from the builder.Build method call in Program.cs. You pass in a route template and a route handler, a standard .NET Delegate that executes when the route matches. This can be a named function or a lambda expression that can take parameters (figure 11.5).

Figure 11.5 Anatomy of a minimal API request handler. This is a nonoperational, slimmed-down version of the actual request handler you will build, designed purely to illustrate the moving parts.
The route handler can be configured to return one of many built-in response types, including JSON, text, and files. The obvious omission from the built-in return types is HTML. That’s what Razor Pages is for.
11.3.1 An example minimal API
In the next exercise, you will migrate the current booking page handler to the minimal API approach. You will define an endpoint that responds to POST requests at /api/property/booking. It takes a BookingInputModel as a parameter and returns a JSON response. Open the Program.cs file, and just before app.Run(), add the lines of code from the following listing.
Listing 11.18 Migrating a page handler to a minimal API
app.MapPost("/api/property/booking", (BookingInputModel model) =>    ❶
{
    var numberOfDays = (int)(model.EndDate.Value -
    ➥ model.StartDate.Value).TotalDays;
    var totalCost = numberOfDays * model.Property.DayRate *
    ➥ model.NumberOfGuests;
    return Results.Ok(new { TotalCost = totalCost });                ❷
});
❶ Use the MapPost method to map a POST request to the specified route, accepting a BookingInputModel as a parameter.
❷ Use the Results.Ok method to serialize the data to JSON and return it.
Next you’ll modify the client script to call this new endpoint. By default, browsers do not allow scripts to make HTTP requests to another domain in a web page. This security feature is designed to mitigate cross-site request forgery, so request verification is not needed and is, therefore, not enabled for APIs. Listing 11.19 shows the client-side code amended accordingly. It only includes the Fetch request section, and the remainder is the same as the previous example. The URL for the request is modified to reflect the template passed to the MapPost method, and the request verification header is removed.
Listing 11.19 The Fetch request to the minimal API
fetch('/api/property/booking', {               ❶
    method: 'post',
    headers: {
        "Content-type": "application/json",    ❷
    },
    body: JSON.stringify(data)
❶ Change the URL to point to the one specified in the API registration.
❷ No need to include the request verification token
The code for the route handler itself is not that different from the OnPostBooking page handler you were working with before. However, the route handler itself performs better, not least because a PageModel does not need to be instantiated. Notice also that you don’t have to tell the request handler where to find the data for the BookingInputModel parameter. We will look at the parameters in more detail in the next section.
The route template you passed to the request handler is similar to those discussed in chapter 4. You can specify route parameters and use constraints in the same way. The resulting template will be added to the collection of endpoints along with your pages.
11.3.2 Parameters in minimal APIs
Minimal API parameters are bound from a number of sources. They are (in order)
You can use one of the From* attributes to let the framework know which source to target explicitly:
When binding parameters from the body, minimal APIs expect the parameter format to be JSON and attempt to deserialize it. Binding from forms is not supported in .NET 6. If you are working with a later release of .NET, you should check the documentation to see if this has changed, although, as you have seen, it is easy enough to serialize a form to JSON on the client before you pass it to the API.
In the following example, you will migrate the booking calculation to a service you will register with the dependency injection system and then add as a parameter to the request handler. This is the recommended way to separate the application logic because it makes it easier to debug and test. First add a new class to represent a booking to the Models folder. The class is named Booking, and its properties represent the data required to calculate a booking.
Listing 11.20 The Booking class
namespace CityBreaks.Models
{
    public class Booking
    {
        public DateTime StartDate { get; set; }
        public DateTime EndDate { get; set; }
        public int NumberOfGuests { get; set; }
        public decimal DayRate { get; set; }
    }
}
Add the following interface to the Services folder. It specifies a method that returns a decimal and takes an instance of the Booking class.
Listing 11.21 The IBooking interface
using CityBreaks.Models;

namespace CityBreaks.Services
{
    public interface IBookingService
    {
        decimal Calculate(Booking booking);
    }
}
Add the following implementation of the IBooking interface to the Services folder. The code for the Calculate method is essentially the same as that currently within the request handler.
Listing 11.22 The BookingService class
using CityBreaks.Models;

namespace CityBreaks.Services
{
    public class BookingService : IBookingService
    {
        public decimal Calculate(Booking booking)
        {
            var numberOfDays = (int)(booking.EndDate -
            ➥ booking.StartDate).TotalDays;
            var totalCost = numberOfDays * booking.DayRate *
            ➥ booking.NumberOfGuests;
            return totalCost;
        }
    }
}
Now you register the service in Program.cs:
builder.Services.AddSingleton<IBookingService, BookingService>();
Finally, you amend the request handler to take the service as a parameter and the route handler to utilize it to perform the calculation.
Listing 11.23 The request handler taking the BookingService as a parameter
 app.MapPost("/api/property/booking",
    (BookingInputModel model, IBookingService bookingService) =>   ❶
{
    var booking = new Booking {                                    ❷
        StartDate = model.StartDate.Value,                         ❷
        EndDate = model.EndDate.Value,                             ❷
        NumberOfGuests = model.NumberOfGuests,                     ❷
        DayRate = model.Property.DayRate                           ❷
    };                                                             ❷
    var totalCost = bookingService.Calculate(booking);             ❸
    return Results.Ok(new { TotalCost = totalCost });
});
❶ The handler takes the IBookingService as a parameter.
❷ An instance of the Booking class is instantiated from the input model.
❸ It is passed to the service as a parameter, and the returned value is sent back to the client.
In this example, the binding sources are inferred. The framework will search for them from all sources, until a matching one is found. To make them explicit, and thereby narrow the search, you add From* attributes accordingly:
app.MapPost("/api/property/booking",
    ([FromBody]BookingInputModel model,
     [FromServices]IBookingService bookingService)
11.3.3 Minimal API return types
In the example so far, you have used the Results.Ok method to return the data serialized to JSON with a 200 status code. This is one of several return types you can use with a minimal API request handler. The static Results class, introduced in .NET 6, includes other methods for different return types, which all implement IResult. The ones you will use most often in a Razor Pages application are detailed in table 11.1.
Table 11.1 The commonly used methods in the Results class
In addition to these options, you can return a plain string or a more complex type. For example, your handler can obtain the total cost from the service and simply return that:
return bookingService.Calculate(booking);
The response will consist of just the value, with a content type set to text/plain. Note that you will need to adjust your Fetch code on the client to use the text() method instead of the json() method, and you will supply the entire response to the interpolated string in the alert:
}).then((response) => {
    return response.text();
}).then((result) => {
    alert(`Your stay will cost ${result}`);
});
If you return a complex type, the value will be serialized to JSON, and the content type will be set to application/json:
var totalCost = bookingService.Calculate(booking);
return new { TotalCost = totalCost };
These options might be handy in some cases, but they only save a few keystrokes compared to using one of the IResult options, which are strongly typed and lend themselves to being tested.
Route handlers can take part in authorization along with your pages. You can pass the Authorize attribute in before any parameters. For example,
app.MapPost("/api/property/booking", [Authorize](BookingInputModel model) => Alternatively, you can chain the RequireAuthorization method to the handler:
app.MapPost("/api/property/booking", (BookingInputModel model) => {
    ...
}).RequireAuthorization();
The RequireAuthorization method takes a params string[] as a parameter, enabling you to pass in the name or names of any authorization policies that should be applied to the route handler.
11.4 CSS Isolation in Razor Pages
In chapter 2, I briefly mentioned the Layout.cshtml.css file in the Shared folder, which contains CSS style declarations that are applied to the _Layout.cshtml file. I mentioned that the slightly odd name for the stylesheet is part of a convention used by CSS Isolation, which was introduced to Razor Pages in .Net 6. This section discusses what CSS isolation is and how it works.
First, have a look at the kind of problems CSS isolation is intended to mitigate. As you build a web application, you will generally place CSS style declarations in a global stylesheet that is referenced in the main layout file. That way, the declarations within the stylesheet are available to all pages that make use of the layout, whether they are needed in a specific page or not. As you continue to develop the application, new styles will be added that relate to specific pages or even sections. You might want to change the default font for a single page, for example, so you add a new CSS selector to your stylesheet that you can use to target elements on that page only and update the class attributes of the target elements accordingly. Your global stylesheet grows and grows. You find yourself relying more and more on your editor’s search feature to locate the declaration for a particular style you might want to update. Over time, you forget which style declarations are actually being used and which can safely be removed.
Let’s say, for example, you want to apply some CSS to the h5 headings on the City page. They are currently targeted by an event handler that listens for a click event and populates the modal dialog with the property details. Typically, users expect the cursor to change from an arrow to a pointing finger when they hover over clickable elements on a web page. So it makes sense to apply the cursor:pointer rule to all the h5 elements on the page. You don’t want to apply this change to all other h5 elements in the application, so you need to narrow down the applicable scope for the CSS rule. You could add a CSS class to the h5 elements and then use that to target the headings selectively:
h5.clickable{
    cursor: pointer;
}
Add this to the global stylesheet, and you are in business. Obviously, you have to remember the purpose of the clickable class, and you have to remember to apply it to all h5 elements on the page. It may be that you want to modify the style on different pages. You can do this by adding further CSS classes to act as filters. Alternatively, you can use the sections featured in Razor to include a page-specific stylesheet:
@section styles{
<link href="/css/city.css" rel="stylesheet">
}
The downside to this approach is that you increase the number of HTTP requests for the site, especially if you add page-specific stylesheets for multiple pages. You can’t really use bundling to combine all these page-specific stylesheets because that defeats the object of the exercise.
CSS isolation in Razor Pages facilitates page-specific stylesheets that do not rely on sections and are bundled into one single file. The feature is enabled by default in Razor Pages, so there is no need to add additional packages or configure any services or middleware. All you have to do is place a stylesheet alongside the page it is intended to affect. You just need to follow a specific naming convention: the Razor page filename with .css on the end.
Taking the example above, add a file named City.cshtml.css to the Pages folder, and in it, place the style declaration to affect clickable h5 elements:
h5{
    cursor: pointer;
}
The reference to the stylesheet goes on the layout page. The filename you use in the reference is in the following format: [name_of_application].styles.css. The name of your application is CityBreaks, and you should already find the reference on the layout page. It was placed there as part of the project template:
<link href="~/CityBreaks.styles.css" rel="stylesheet" />
When you run the application and navigate to the City page, you can see that the cursor changes to a pointer when you hover over the names of the properties (figure 11.6). If you navigate to /claims-manager, you can see that the h5 elements used to display the usernames are not affected by the same CSS rule, despite the fact that the stylesheet you just added is referenced globally in the layout file.

Figure 11.6 The isolated CSS style declaration is applied to level-3 headings on this page only.
So how does it work? Well, if you look at the rendered source for the City page, you can see that an additional attribute (b-jbmzjjkv6t) has been injected into every HTML element in the City.cshtml template (figure 11.7).
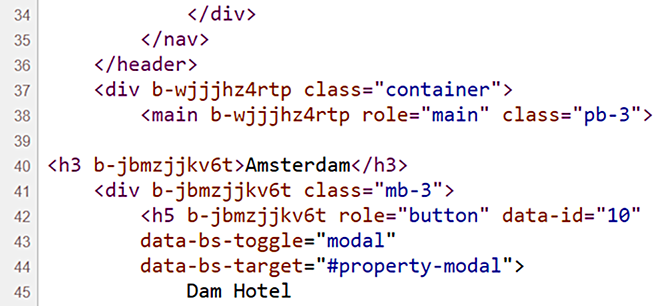
Figure 11.7 An additional attribute (b-jbmzjjkv6t) is injected into each HTML element in the City page.
This attribute, the scope identifier, uniquely identifies elements within City.cshtml. Notice that the main and div elements with the container CSS class have different scope identifiers injected. They belong to the _Layout.cshtml file. Each Razor file that has an accompanying isolated stylesheet gets its identifier.
At build time, all the isolated stylesheets are combined into one, and their style declarations are altered, so they only apply to elements with the identifier associated with the page they target. Here’s a snippet that shows the first few lines of the generated stylesheet for my example, which includes the City.cshtml.css file content along with the _Layout.cshtml.css content.
Listing 11.24 Combining all isolated stylesheets into one at build time
/* _content/CityBreaks/Pages/City.cshtml.rz.scp.css */               ❶
h5[b-jbmzjjkv6t]{                                                    ❷
    cursor:pointer;
}
/* _content/CityBreaks/Pages/Shared/_Layout.cshtml.rz.scp.css */     ❶

a.navbar-brand[b-wjjjhz4rtp] {                                       ❷
  white-space: normal;
  text-align: center;
  word-break: break-all;
}
❶ A comment is injected that shows which page the following style applies to.
❷ The style is isolated to elements that have the specific attribute injected into them.
The scope identifier is generated by the framework, using the format b-{10 character string}, and by default, each file gets its unique string, guaranteeing isolation of styles. You might, however, want to share styles across a small number of pages. You can achieve this by customizing the generated identifier, so multiple pages get the same value. This is done in the project file. The following example results in both the Layout and City pages sharing the same identifier: shared-style.
Listing 11.25 Customizing the isolation identifier for selected pages
<ItemGroup>
    <None Update="Pages/Shared/_Layout.cshtml.css" CssScope="shared-style" />
    <None Update="Pages/City.cshtml.css" CssScope="shared-style" />
</ItemGroup>
Given that CSS isolation is a build-time feature, it isn’t supported for tag helpers because they generate their output at run time.
This chapter wraps up our look at application development in Razor Pages. The final chapters concentrate more on configuring and publishing your application and ensuring it is safe against hostile activity. We’ll start in the next chapter with a look at approaches to minimize errors in your application, how to handle them gracefully when they occur, and how to use logging to understand what is happening once your application is live.
Summary
-
Client-side technologies can help you to improve the usability of your application.
-
While it is still a great library, the case for using jQuery for manipulating the DOM and making asynchronous (AJAX) requests is diminishing as more and more browsers align behind standards.
-
You can use a PartialResult for returning blocks of HTML to an AJAX call.
-
You must ensure you include a request verification token when posting form values via AJAX to a page handler method.
-
The request verification token can be included in the header or within the request body when the request content type is x-www-form-urlencoded.
-
You must include the token as a header when posting JSON in the request body.
-
When posting JSON to a page handler, you must mark the handler parameter with the FromBody attribute to tell the framework which binding source to use.
-
Request handers are a new feature in .NET 6 and form part of the minimal API.
-
Request handlers map routes to functions and can take parameters.
-
Request handler parameter binding sources can be implicit or made explicit using the From* attribute, where the wildcard * represents the source—Body, Services, Route, and so on.
-
Request handlers return IResult, strings, or other types serialized to JSON.
-
Request handlers can partake in authorization via the Authorize attribute or the RequireAuthorization method.
-
CSS isolation enables you to maintain styles scoped to a page in separate files for easier maintenance, without increasing the number of HTTP requests across your application.
-
CSS isolation injects attributes into HTML elements at build time and uses them to scope CSS declarations to the page.
-
Only one stylesheet is generated, which includes all scoped styles, reducing HTTP requests.