
Chapter 9. Access Points
This chapter covers the following subjects:
• IEEE 802.1X and Wireless
• Configuring IEEE 802.1X on Access Points and Wireless LAN Controller
• Configuration Example Based on Some EAP Types Available on ACS 4.2 and ACS 5.1
This chapter is an extension of Chapter 8, “IOS Switches.” The fundamental concepts that you learned in the previous chapter also apply to wireless infrastructure. The configuration part on ACS will also remain the same while configuring Protected Extensible Authentication Protocol (PEAP) and Extensible Authentication Protocol-Transport Layer Security (EAP-TLS). In the case of wireless infrastructure, you need only configure a wireless device for EAP authentication (authenticator). In today’s world, whenever there is wireless (802.11) deployment, it is mostly bundled with IEEE 802.1X security to enhance network security.
Using what you learned from the previous chapter, this chapter shows how you can configure the Access Point (AP) and Wireless LAN Controller (WLC) for EAP authentication (authenticator).
Configuring Wireless NAS for IEEE 802.1X Authentication on an AP
Configuring an AP can be done from either the web interface or from the command-line interface (CLI). This section looks at configuration from the web interface.
The step-by-step procedure that follows looks at the configuration portion for EAP authentication and RADIUS server configuration on an Access Point; assuming that you already have a Service Set Identifier (SSID) configured with Wi-Fi Protected Access/Temporal Key Integrity Protocol (WPA/TKIP) or Wi-Fi Protected Access version 2/Advanced Encryption Standard (WPA2/AES) configured on it. The configuration steps are as follows:
Step 1. Log in to the Access Point graphical user interface to generate the resulting screen in Figure 9-1.
Figure 9-1. Access Point Web Interface
Step 2. Go to the SECURITY > Server Manager section to configure the RADIUS server in the Access Point configuration. In this section, specify the RADIUS server hostname or IP address and the shared secret key under Corporate Servers as shown in Figure 9-2.
Figure 9-2. RADIUS Server Configuration

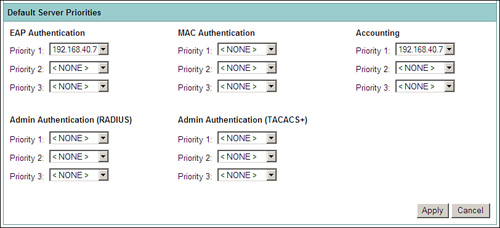
In this section, you will also see the Default Server Priorities. Here you configure the global priority of the RADIUS server for various authentication and accounting tasks. You can configure the same RADIUS server as the primary server for EAP authentication and accounting as shown in Figure 9-3.
Figure 9-3. RADIUS Server for EAP Authentication and Accounting
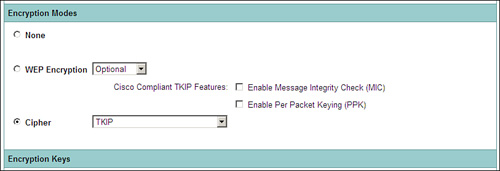
Step 3. Go to SECURITY > Encryption Manager to configure TKIP or AES for the VLAN.
As Figure 9-4 shows, you are configuring TKIP (WPA) as the cipher for VLAN 15.
Figure 9-4. Cipher TKIP on VLAN
If the requirement is to configure AES so that WPA2 can be enabled, you can configure the cipher as shown in Figure 9-5.
Figure 9-5. Cipher AES on VLAN

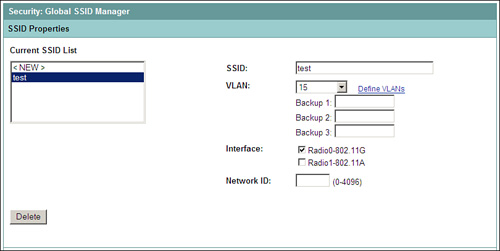
Step 4. Now select the SSID associated with the VLAN for which you configured a cipher in step 3 from SECURITY > SSID Manager (see Figure 9-6).
Figure 9-6. SSID for IEEE 802.1X Authentication
Step 5. After selecting the SSID that needs to be configured for IEEE 802.1X authentication, move to the section Client Authentication Settings.
Select Open Authentication and choose with EAP from the drop-down options.
Select Network EAP and keep the selection as <NO ADDITION>.
Also under Client Authentication Settings, you can either specify a particular RADIUS server for authentication or you can let it be the default; that is, Use Defaults. The Use Defaults option refers to RADIUS server priority as defined in step 2.
Figure 9-7 shows the configuration for this step.
Figure 9-7. Client Authentication Settings on SSID

Step 6. The final step is to specify the key management on the AP. For both WPA and WPA2, you will have the same setting on the AP.
For Key Management, choose Mandatory and check WPA as shown in Figure 9-8.
Figure 9-8. Client Authenticated Key Management

Note
Configuring RADIUS accounting is similar to specifying the server for the EAP authentication on an Access Point. You can choose to send accounting information to a specific RADIUS server in a specific order, or you can send the accounting information to a RADIUS server as defined under Default Server Priorities by checking Use Defaults for the SSID.
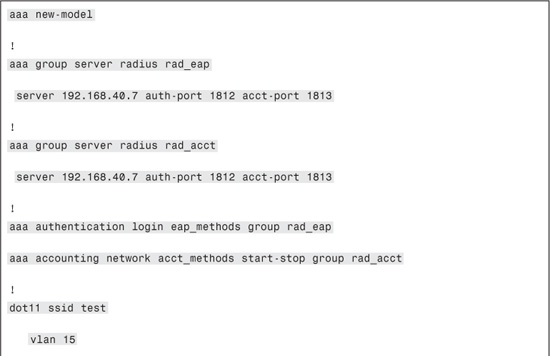
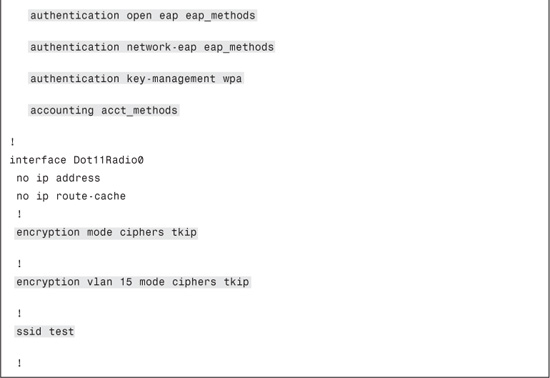
Example 9-1 illustrates CLI-based configuration example for a Cisco Access Point using WPA/TKIP. This CLI configuration is equivalent to one shown through the GUI.
Example 9-1. IEEE 802.1X Configuration on an Access Point
Configuring Wireless NAS for IEEE 802.1X Authentication on a WLC
The Cisco Wireless LAN Controller (WLC) is a part of Cisco Unified Wireless Network (CUWN) solution. Along with WLC, the CUWN solution consists of associated Lightweight Access Point Protocol (LWAPP) APs.
The following step-by-step procedure outlines the configuration required for IEEE 802.1X authentication on WLC:
Step 1. Log in to the WLC to get to the screen shown in Figure 9-9.
Figure 9-9. WLC Graphical User Interface

Step 2. Configure the RADIUS server for authentication. If accounting is desired, a RADIUS server instance must be added exclusively for accounting, too.
To add a RADIUS server for authentication, go to SECURITY > AAA > RADIUS > Authentication > New
In the resulting screen in Figure 9-10, fill in the RADIUS server details. Ensure that the Network User option is enabled for wireless client authentication. You can also specify the global priority of the server entry on WLC (the lower the number, the higher the priority). The shared secret can be specified either in ASCII format or hex format.
Figure 9-10. Adding RADIUS Server for Authentication on WLC

The Key Wrap is designed for Federal Information Processing Standards (FIPS) customers and requires a key-wrap–compliant RADIUS authentication server. Cisco Secure Access Control Server is among compliant RADIUS authentication servers.
To add the RADIUS server for accounting, go to SECURITY > AAA > RADIUS > Accounting > New for the resulting screen in Figure 9-11. All the fields are similar to those used while creating an authentication server instance on WLC. The only difference in the configuration would be to specify the correct port number for RADIUS accounting.
Figure 9-11. Adding a RADIUS Server for Accounting on WLC

Step 3. Now select and edit the SSID on which you want to configure IEEE 802.1X. The assumption here is that the security on the SSID is WPA/WPA2 TKIP/AES.
Go to WLANs > Edit the SSID > Security to get to the screen shown in Figure 9-12.
Figure 9-12. Layer 2 Security on SSID

Go to the AAA Servers tab under Security for an SSID and choose the authentication server or authentication and accounting server both in this section; as shown in Figure 9-13.
Figure 9-13. AAA Servers Section Under SSID Configuration

This would be the minimum configuration required on WLC for IEEE 802.1X authentication.
If you are passing attributes/VSA from AAA server, for the WLC to acknowledge and apply them, you must allow AAA override. This option enables you to apply VLAN tagging, QoS, and ACLs to individual clients based on the returned RADIUS attributes from the AAA server.
To configure AAA override; go to WLANs > Edit SSID > Advanced.
Check Allow AAA Override and apply the settings as shown in Figure 9-14.
Figure 9-14. AAA Override on WLC

Alternatively, you can configure WLC from the CLI using the commands described in the text that follows.
The two commands to configure a RADIUS server instance on WLC for authentication and accounting are as follows:
config radius auth add index server-ip-address port# {ascii | hex} shared-secret
config radius acct add index server-ip-address port# {ascii | hex} <shared_secret>
The following commands are used to configure a SSID with WPA/WPA2 TKIP/AES, along with specifying IEEE 802.1X authentication, accounting, and AAA override feature:

Configuring ACS 4.2 for LEAP
On ACS 4.2, you will find LEAP configuration under the Global Authentication Setup section.
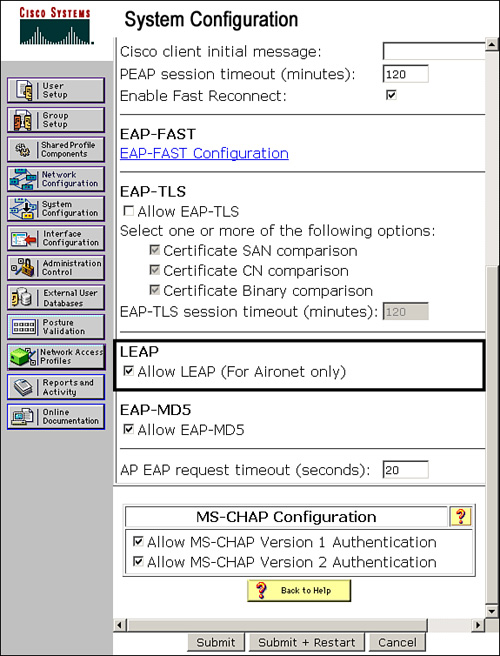
To configure LEAP on ACS 4.2, go to System Configuration > Global Authentication Status.
Ensure that the Allow LEAP option is checked under the LEAP section as shown in Figure 9-15.
Figure 9-15. LEAP Configuration on ACS 4.2
Configuring ACS 5.1 for LEAP
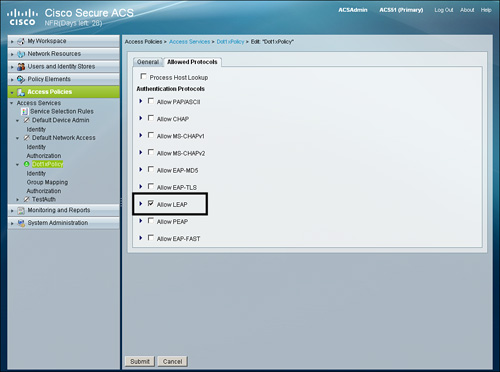
To allow LEAP on ACS 5.1 it needs to be allowed on an access service. To allow LEAP on an already configured access service, go to Access Policies > Access Services.
Edit the desired access service and go to the Allowed Protocols tab to enable LEAP as shown in Figure 9-16.
Figure 9-16. LEAP Configuration on ACS 5.1
Configuring ACS 4.2 for EAP-FAST
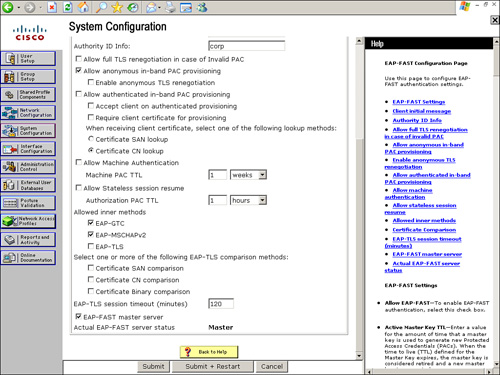
EAP-FAST configuration options are available under the Global Authentication Setup section on ACS 4.2. To configure EAP-FAST, go to System Configuration > Global Authentication Setup > EAP-FAST Configuration.
This section contains all configuration parameters related to EAP-FAST. To enable EAP-FAST, check Allow EAP-FAST.
If you are configuring anonymous Protected Access Credential (PAC) provisioning, you must configure the following:
Note
PACs are strong shared secrets that enable ACS and an EAP-FAST end user client to authenticate each other and establish a TLS tunnel for use in EAP-FAST phase two. Before that, PACs need to be supplied to the end user client (that is, provisioned). Automatic PAC provisioning sends a new PAC to an end user client over a secured network connection. Automatic PAC provisioning requires no intervention of the network user or an ACS administrator provided that you configure ACS and the end user client to support automatic provisioning.
• Active master key TTL: The amount of time that a master key is used to generate new PACs. A master key expires when it is older than the sum of the master key TTL and the retired master key TTL. When the TTL that is defined for the master key expires, it is considered retired and a new master key is generated. The default master key TTL is one month.
• Retired master key TTL: The amount of time the PACs generated by using a retired master key are acceptable for EAP-FAST authentication. When an end-user client gains network access by using a PAC that is based on a retired master key, ACS sends a new PAC to the end-user client. The default retired master key TTL is three months.
• Tunnel PAC TTL: The duration that a PAC is used before it expires and must be replaced. If the master key that is used to generate the Tunnel PAC has not expired, new PAC creation and assignment is automatic. If the master key used to generate the Tunnel PAC that expired, you must use automatic or manual provisioning to provide the end-user client with a new PAC.
• Authority ID Info: This field is mandatory. It is the textual identity of the ACS server, which an end user can use to determine which ACS server to be authenticated against.
• Allow anonymous in-band PAC provisioning: ACS provisions an end-user client with a PAC by using EAP-FAST phase zero. ACS establishes a secured connection with the end-user client for the purpose of providing the client with a new PAC.
• Allowed inner methods (EAP-GTC & EAP-MSCHAPv2): This option determines which inner EAP methods can run inside the EAP-FAST TLS tunnel. For anonymous in-band provisioning, you must enable EAP-GTC and EAP-MS-CHAP for backward compatibility. If you selected Allow anonymous in-band PAC provisioning, you must select EAP-MS-CHAP (phase zero) and EAP-GTC (phase two).
Figure 9-17 and Figure 9-18 show the configuration of the items in the preceding list.
Figure 9-17. EAP-FAST Configuration on ACS 4.2

Figure 9-18. EAP-FAST Configuration on ACS 4.2
Configuring ACS 5.1 for EAP-FAST
To allow EAP-FAST on ACS 5.1, it needs to be allowed on the access service. To allow EAP-FAST on an already configured access service, go to Access Policies > Access Services.
Edit the desired access service and go to the Allowed Protocols tab to enable EAP-FAST as shown in Figure 9-20.
Also configure the suboptions of EAP-FAST. Allow the inner method that needs to be allowed. For anonymous PAC provisioning, check the option Allow Anonymous In-Band PAC Provisioning. With anonymous in-band PAC provisioning, the inner methods used are MS-CHAPv2 and EAP-GTC. In this section, you can define Tunnel PAC TTL, which restricts the lifetime of PAC. The default value is one day.
In this section you also have an option for a proactive PAC update. This option is configured as percentage of the remaining TTL. This ensures that the end-user client has a valid PAC. The default value is 10%.
Figure 9-19. EAP-FAST Configuration on ACS 5.1

If you need to change the authority ID for the server or master key generation period, go to System Administration > Configuration > Global System Options > EAP-FAST > Settings as shown in Figure 9-20. In this section, you can also use the Revoke option to revoke all previous master keys and PACs. The Revoke operation should be used with caution because revoking master keys and PACs will cause all the end-user clients to obtain new PACs from the server.
Figure 9-20. EAP-FAST Settings on ACS 5.1

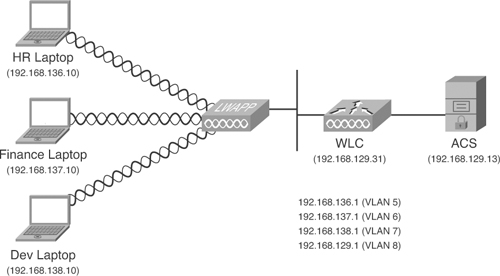
Lab Scenario #10: Configure WLC, ACS and Cisco Secure Services Client for IEEE 802.1X Authentication Using LEAP
ABC Inc. has a requirement to secure all the Windows XP workstations connected through its wireless network. The company has three departments: HR, Finance, and Development, but has only a single SSID—data101_1. All members of each team connecting to the corporate wireless network must be authenticated using ACS and then placed into the following VLANs:
• HR team: VLAN 5
• Finance team: VLAN 6
• Development team: VLAN 7
For this lab scenario, you will need to configure the WLC, client, and ACS for LEAP authentication.
Lab Setup
The lab setup requires one switch, one ACS server, one Lightweight Access Point Protocol (LWAPP) AP, one WLC, and one Windows XP machine with Cisco Secure Services Client installed for wireless communication. Figure 9-21 shows the required setup.
Figure 9-21. Setup for Lab Scenario #10

Lab Solution
The solution to this scenario assumes certain things that are very basic and are expected to be configured by the candidate using the knowledge obtained from previous sections. Only IEEE 802.1X-related configuration on WLC will be covered in this solution section.
The assumptions are as follows:
A. WLC entry exists on ACS configuration:
• ACS 5.1: Under Network Resources > Network Devices and AAA Clients
• ACS 4.2: Under Network Configuration > ... > AAA Clients
B. Three groups are created in the ACS configuration: HR, Finance, and Development:
• ACS 5.1: Under Users and Identity Stores > Identity Groups
• ACS 4.2: Under Group Setup
C. Users are configured under each of the three groups.
• ACS 5.1: Under Users and Identity Stores > Internal Identity Stores > Users
• ACS 4.2: User Setup
ACS 4.2 Configuration Requirements
Note
Dynamic VLAN assignment requirements are the same as required in the Chapter 8 Lab Scenarios. For detailed screenshots for the configuration section, please refer back to the Lab Scenario sections in Chapter 8.
A. Ensure that RADIUS attributes for dynamic VLAN assignment are enabled for the group. Go to Interface Configuration > RADIUS (IETF) and check the following:
• [064] Tunnel-Type
• [065] Tunnel-Medium-Type
• [081] Tunnel-Private-Group-ID
If you are not sending multiple attributes for other RADIUS IETF attributes, change the Tags to Display Per Attribute to 1.
B. Under individual groups configure the attributes as follows:
HR group:
• [064] Tunnel-Type, Tag: 1, Value: VLAN
• [065] Tunnel-Medium-Type, Tag: 1, Value: 802
• [081] Tunnel-Private-Group-ID, Value: 5
• [064] Tunnel-Type, Tag: 1, Value: VLAN
• [065] Tunnel-Medium-Type, Tag: 1, Value: 802
• [081] Tunnel-Private-Group-ID, Value: 6
Development group:
• [064] Tunnel-Type, Tag: 1, Value: VLAN
• [065] Tunnel-Medium-Type, Tag: 1, Value: 802
• [081] Tunnel-Private-Group-ID, Value: 7
C. From the section System Configuration > Global Authentication Setup, check Allow LEAP under the LEAP section.
After configuring attributes for individual group and ensuring the LEAP is enabled, click Submit + Restart to ensure that settings take effect.
ACS 5.1 Configuration Requirements
A. Create a device filter named Dot1xWLC for the WLC configured under the Network Resources > Network Devices and AAA Clients section.
• The device filter can be created from Policy Elements > Session Conditions > Network Conditions > Device Filters.
B. Create three authorization profiles under Policy Elements > Authorization and Permissions > Network Access > Authorization Profiles:
• HR VLAN Profile
• Finance VLAN Profile
• Development VLAN Profile
Under the RADIUS Attributes tab, configure following two attributes for each profile:
Note
VLAN assignment on ACS 5.1 can also be configured using common task as described in the section, “Dynamic VLAN Assignment for ACS 5.1,” in Chapter 8.
• Dictionary Type: RADIUS-IETF
• RADIUS Attribute: Tunnel-Type
• Attribute Type: Tagged Enum
• Attribute Value: Static: VLAN
Tag: 1
• Dictionary Type: RADIUS-IETF
• RADIUS Attribute: Tunnel-Medium-Type
• Attribute Type: Tagged Enum
• Attribute Value: Static: 802
Tag: 1
For the last attribute required for dynamic VLAN assignment, you must have the values 5, 6, and 7 for the Attribute Value for each respective profile:
• Dictionary Type: RADIUS-IETF
• RADIUS Attribute: Tunnel-Private-Group-ID
• Attribute Type: Tagged String
• Attribute Value: Static: 5
Tag: 1
• Dictionary Type: RADIUS-IETF
• RADIUS Attribute: Tunnel-Private-Group-ID
• Attribute Type: Tagged String
• Attribute Value: Static: 6
Tag: 1
• Dictionary Type: RADIUS-IETF
• RADIUS Attribute: Tunnel-Private-Group-ID
• Attribute Type: Tagged String
• Attribute Value: Static: 7
Tag: 1
C. Create an access service named Dot1xPolicy under Access Policies > Access Services.
• For Policy Structure for access services, only check Identity & Authorization.
Under Allowed Protocols, only allow LEAP.
D. Create a rule to match and to apply the access service configured in the previous step from Access Policies > Access Services > Service Selection Rules. Under Conditions select the following:
• Protocol: match: Radius
• Device Filter: match: Dot1xWLC
• For Result, select Dot1xPolicy
WLC Configuration Requirements
Please refer to the section “Configuring Wireless NAS for IEEE 802.1X Authentication on a WLC” in this chapter to configure the SSID for IEEE 802.1X. Ensure that you enable AAA override to allow dynamic VLAN assignment.
Client Configuration Requirements
On the client, ensure that Cisco Secure Services Client (CSSC) is already installed. In CSSC, add SSID by clicking the Add SSID option. Add the SSID data101_1 and choose the appropriate security setting corresponding to WLC configuration.
Under the IEEE 802.1X Configuration section, select LEAP as the EAP method and password as the credential type as shown in Figure 9-22.
Figure 9-22. CSSC LEAP Configuration

Lab Scenario #11: Configure WLC, ACS, and Cisco Secure Services Client for IEEE 802.1X Authentication Using EAP-FAST
The lab setup will remain the same as Lab Scenario #10, with the only requirement change being the shift from LEAP to EAP-FAST.
Lab Solution
The lab solution for the changed requirement will require changes in some sections of the solution provided for Lab Scenario #10. The sections that follow cover only the changes that should be made to get this lab setup to work.
ACS 4.2 Configuration Requirements
Refer to step C in the “ACS 4.2 Configuration Requirements” section for the Lab Scenario #10 Solution. Under System Configuration > Global Authentication Setup, configure EAP-FAST instead of LEAP in the screens shown previously in Figure 9-17 and Figure 9-18. The rest of the configuration remains the same.
ACS 5.1 Configuration Requirements
Refer to step C in the “ACS 5.1 Configuration Requirements” section for the Lab Scenario #10 solution. Under Allowed Protocols, configure EAP-FAST instead of LEAP in the screen shown previously in Figure 9-19. The rest of the configuration remains the same.
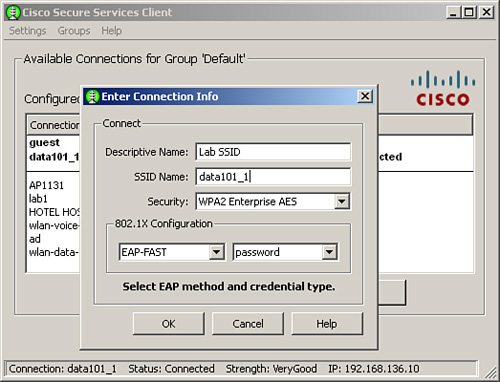
Client Configuration Requirements
On the client, ensure that Cisco Secure Services Client (CSSC) is already installed. On CSSC, add SSID by clicking the Add SSID option. Add the SSID data101_1 and choose the appropriate security setting corresponding to WLC configuration.
Under the IEEE 802.1X Configuration section, select EAP-FAST as the EAP method and password as the credential type as shown in Figure 9-23.
Figure 9-23. CSSC EAP-FAST Configuration
Troubleshooting IEEE 802.1X
The following commands can be useful while troubleshooting IEEE 802.1X issues on WLC:
![]()
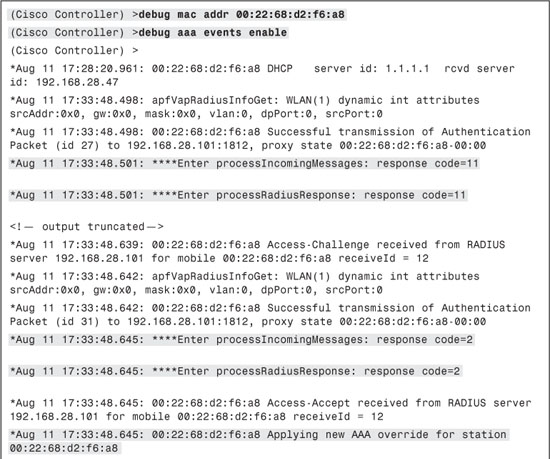
Example 9-2 illustrates output from debug aaa events enable from the Cisco WLC. In these debugs you can clearly see RADIUS message exchanges. These message exchanges can be used to track the issue during troubleshooting. In addition, the debug mac address mac-address command can prove very useful when troubleshooting a particular end-user client.
Example 9-2. debug aaa events enable Output

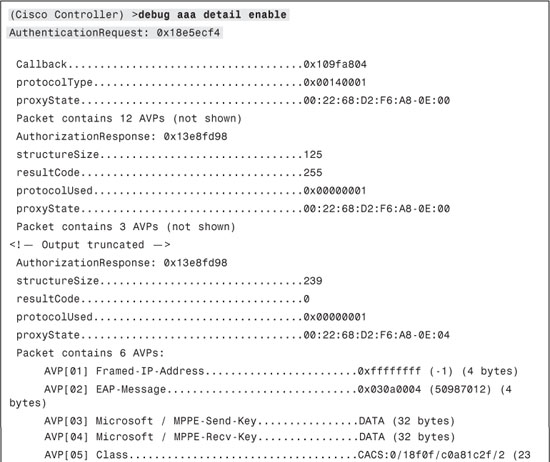
Example 9-3 illustrates output from the debug aaa detail enable command. This debug can be used to check the Attribute Value Pair (AVP) being sent and received for troubleshooting purposes on a Cisco WLC.
Example 9-3. debug aaa detail enable Command Output

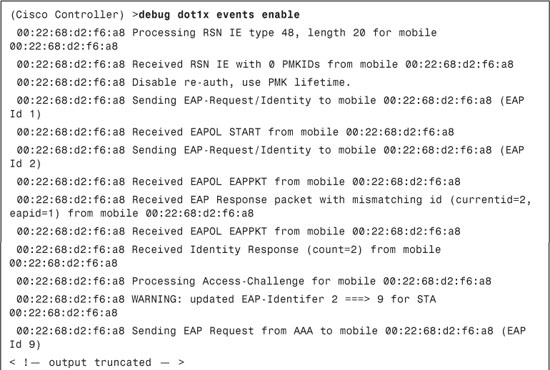
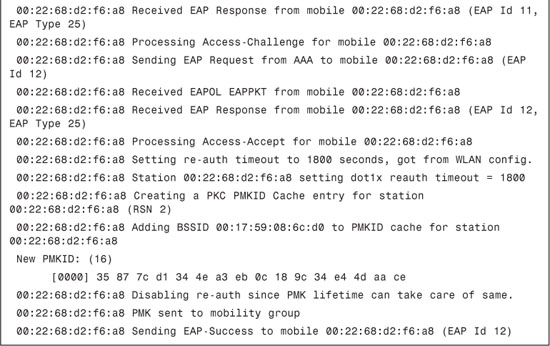
Example 9-4 illustrates output from the debug dot1x events enable command. This is another useful debug that can be used for troubleshooting to track the message exchange that takes place between the end-user client and the RADIUS server through Cisco WLC.
Example 9-4. debug dot1x events enable Command Output
The following commands can be useful while troubleshooting IEEE 802.1X issues on autonomous AP:
debug dot11 aaa authenticator state-machine
debug dot11 aaa authenticator process or debug dot11 aaa dot1x process
debug radius authentication
debug aaa authentication
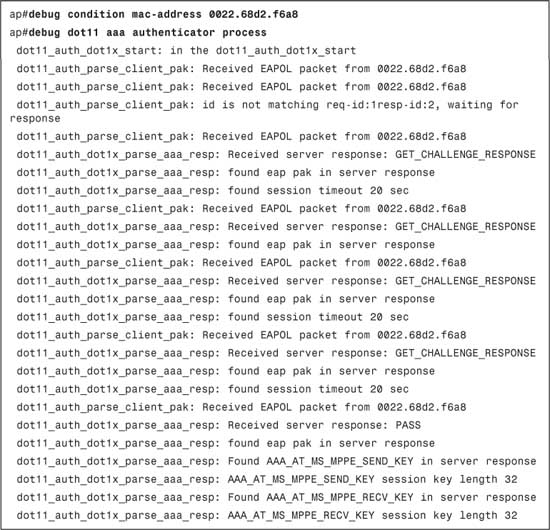
Example 9-5 illustrates output from the debug dot11 aaa authenticator process command. This debug can be used during troubleshooting authentication issues with an end-user client through a Cisco Access Point. You can also use the debug condition mac-address mac-address-of-client to debug a particular end-user client message exchange.
Example 9-5. debug dot11 aaa authenticator process Command Output
Summary
In Chapter 8, you learned about the basic concepts of IEEE 802.1X and its practical approach in a wired environment. In this chapter, you learned how to apply your knowledge of IEEE 802.1X in a wireless environment. As IEEE 802.1X is more popular among wireless deployments to secure the wireless access, that is easily accessible. The key concepts and skills learned in this chapter are as follows:
• Enabling and configuring LEAP on ACS 4.2 and ACS 5.1
• Enabling and configuring EAP-FAST on ACS 4.2 and ACS 5.1
• Configuring SSID on autonomous access point for IEEE 802.1X authentication
• Configuring SSID on WLC for IEEE 802.1X authentication
• AAA override on WLC to apply RADIUS attributes returned by AAA server
• Lab exercise illustrating practical application of LEAP and EAP-FAST using Cisco Secure Services Client