
Chapter 8
State Inference
In Chapter 5 we saw that, in the HiTL control loop, the stage that follows data acquisition is state inference. Subsequently, we have also justified the use of artificial neural networks (ANNs) as our mood inference tool. In this chapter, we will approach the implementation and development of our neural network, as well as the user feedback mechanisms, both of which are cornerstones of state inference in our sample HappyWalk app. In this context, our objective is to implement a learning mechanism that will receive periodic feedback from the user and learn to associate emotions with sensory inputs. The frequency of these feedback requests will be dynamically adapted to the accuracy of the network.
We will first start, in Section 8.1, by explaining how to implement the neural network that will be used as an inference tool. Next, in Section 8.2, we will deal with the problem of requesting user feedback, following which we will present the solutions for processing user feedback, in Section 8.3.
8.1 Implementing a Neural Network
HappyWalk's neural network will be implemented using the Encog Machine Learning Framework [140].1 For this, we will perform the following steps:
- Reference the Encog library in our build dependencies.
- Declare and initialize a BasicNetwork object.
- Fetch input, feed it into the neural network, and collect the result.
During the first step identified above, the library must be referenced in the app/build.gradle file, similar to what we did for org.apache.commons.math3 (see line 20, below):

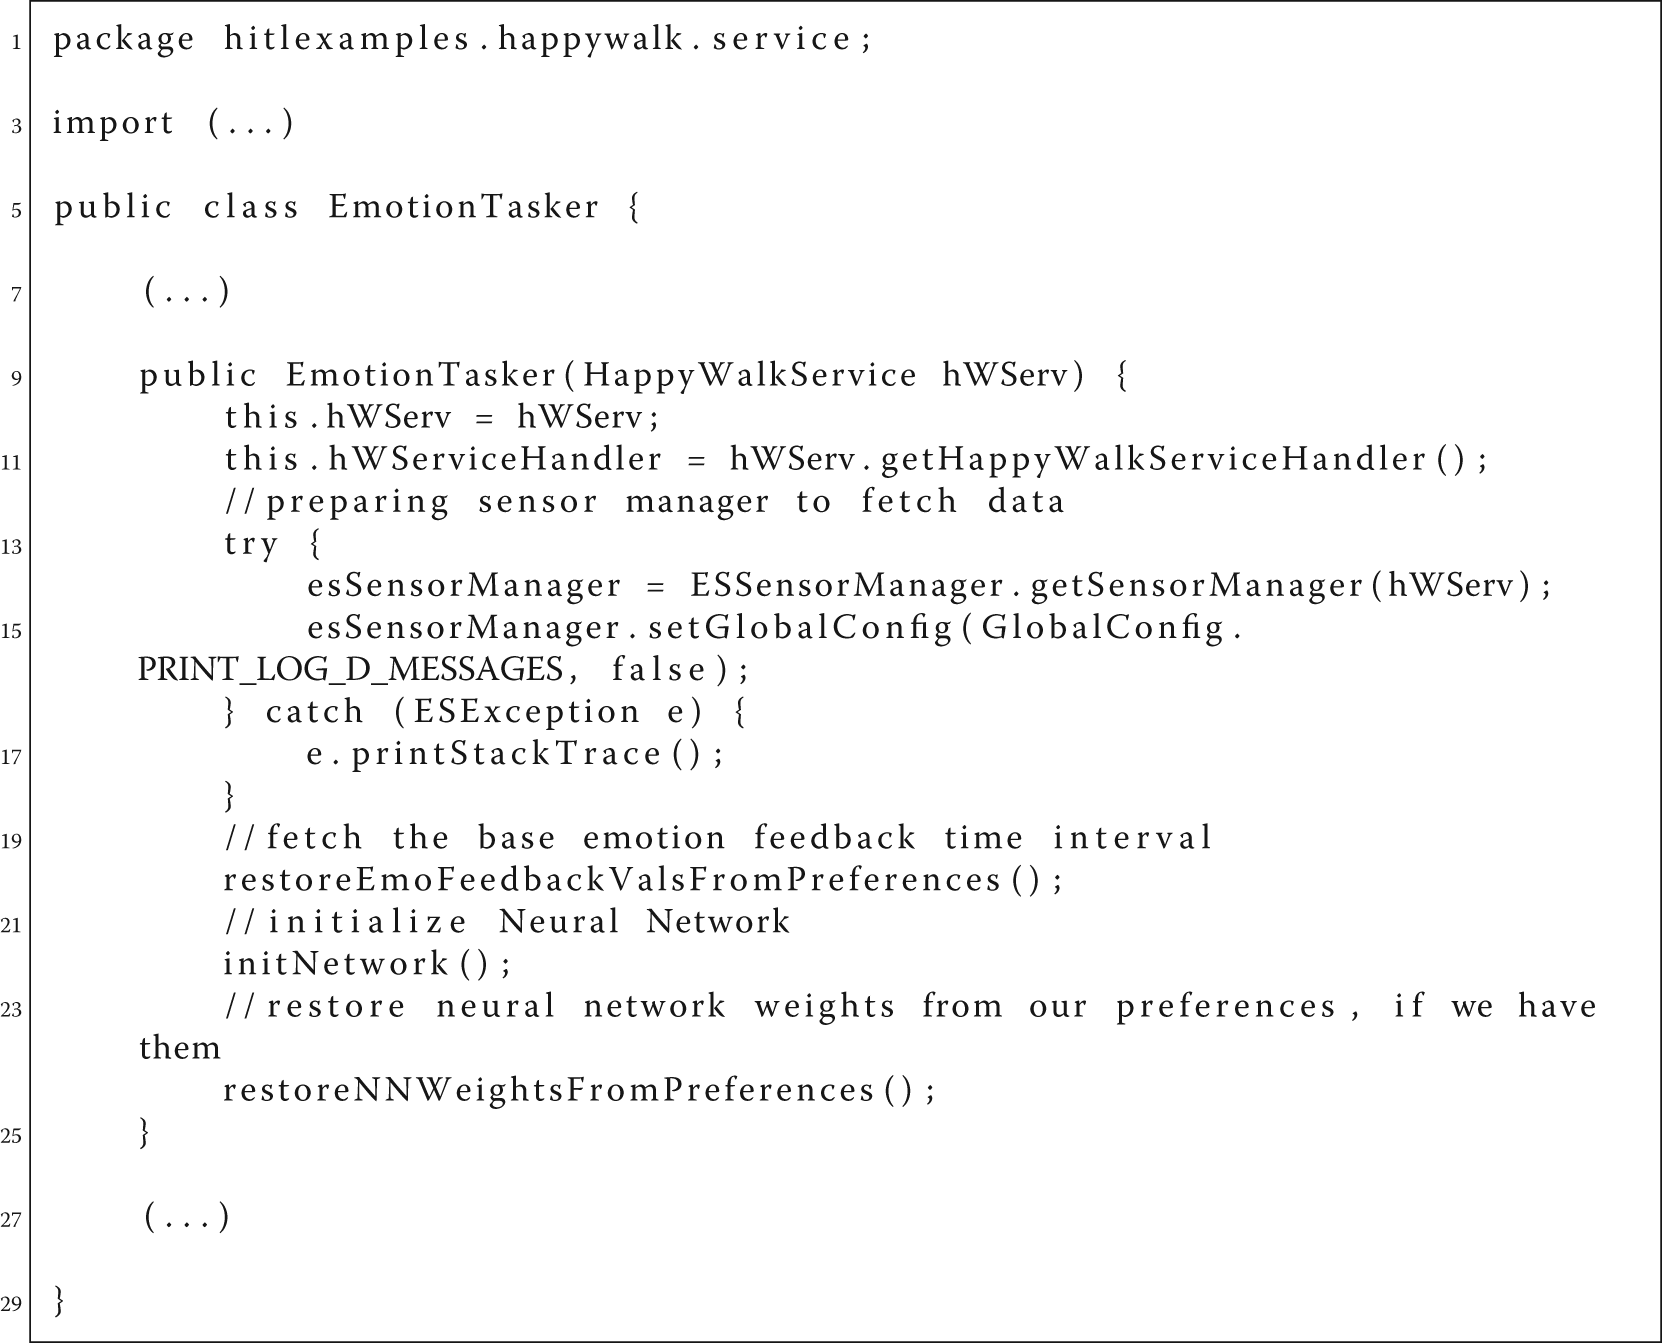
Our next step is to declare a BasicNetwork object within our EmotionTasker, which conceptually represents our neural network (see line 11, below). We also require a method which initializes this object (lines 21–29):

In accordance with what we discussed in Section 5.3, this initialization code creates a neural network which receives four inputs, has two hidden layers, and outputs two values.
Its first input layer will receive latitude, longitude, noise, and movement data. It is defined in line 23, where the GlobalVariables.NN_INPUTS variable is used (as we had seen back on page ???). As for the two hidden layers, the first one contains three neurons (line 24, determined by the GlobalVariables.NN_HL1_NEURONS variable) and the second two neurons (line 25, determined by the GlobalVariables.NN_HL2_NEURONS variable). The final output layer is defined in line 26, and the number of its neurons by GlobalVariables.NN_OUTPUTS.
Each layer has an activation function. Activation functions are mathematical functions which define the output of a neuron from its input. There are several types of activation functions typically used with neural networks. In our case, we will use Encog's ActivationSigmoid class, which represents an activation function with a sigmoidal shape that generates only positive numbers, similar to what is shown in Figure 8.1. As such, and since we have two neurons in our final layer, our neural network's output will be two values, ranging from 0 to 1.

Figure 8.1 An example of a sigmoid activation function.
The reader is welcome to experiment by adding more hidden layers (using the addLayer() method) and/or by changing the number of neurons in the hidden layers we have defined above. As we have seen in Section 5.3.2, different types of neural networks may result in different performance requirements and accuracies. For example, one could experiment and compare the implementation above with one that uses a 4-10-10-10-2 neural network configuration (three hidden layers with 10 neurons each) by changing the values of GlobalVariables.NN_HL1_NEURONS and GlobalVariables.NN_HL2_NEURONS to 10 and by adding the following code after line 25:
network.addLayer(new BasicLayer(new ActivationSigmoid(), false, 10));
Changing the number of inputs and outputs is not advised, since it would conflict with the rest of the tutorial.
The most important building blocks of our EmotionTasker class are now in place: we can fetch inputs and use a neural network. The next logical step will be to feed these inputs to our network and collect the result. Since this is a task we will be performing periodically, we will define a new subclass within EmotionTasker to perform it, named EmotionRecognitionTask (lines 26 to 41), as well as an appropriate object declaration (line 10):
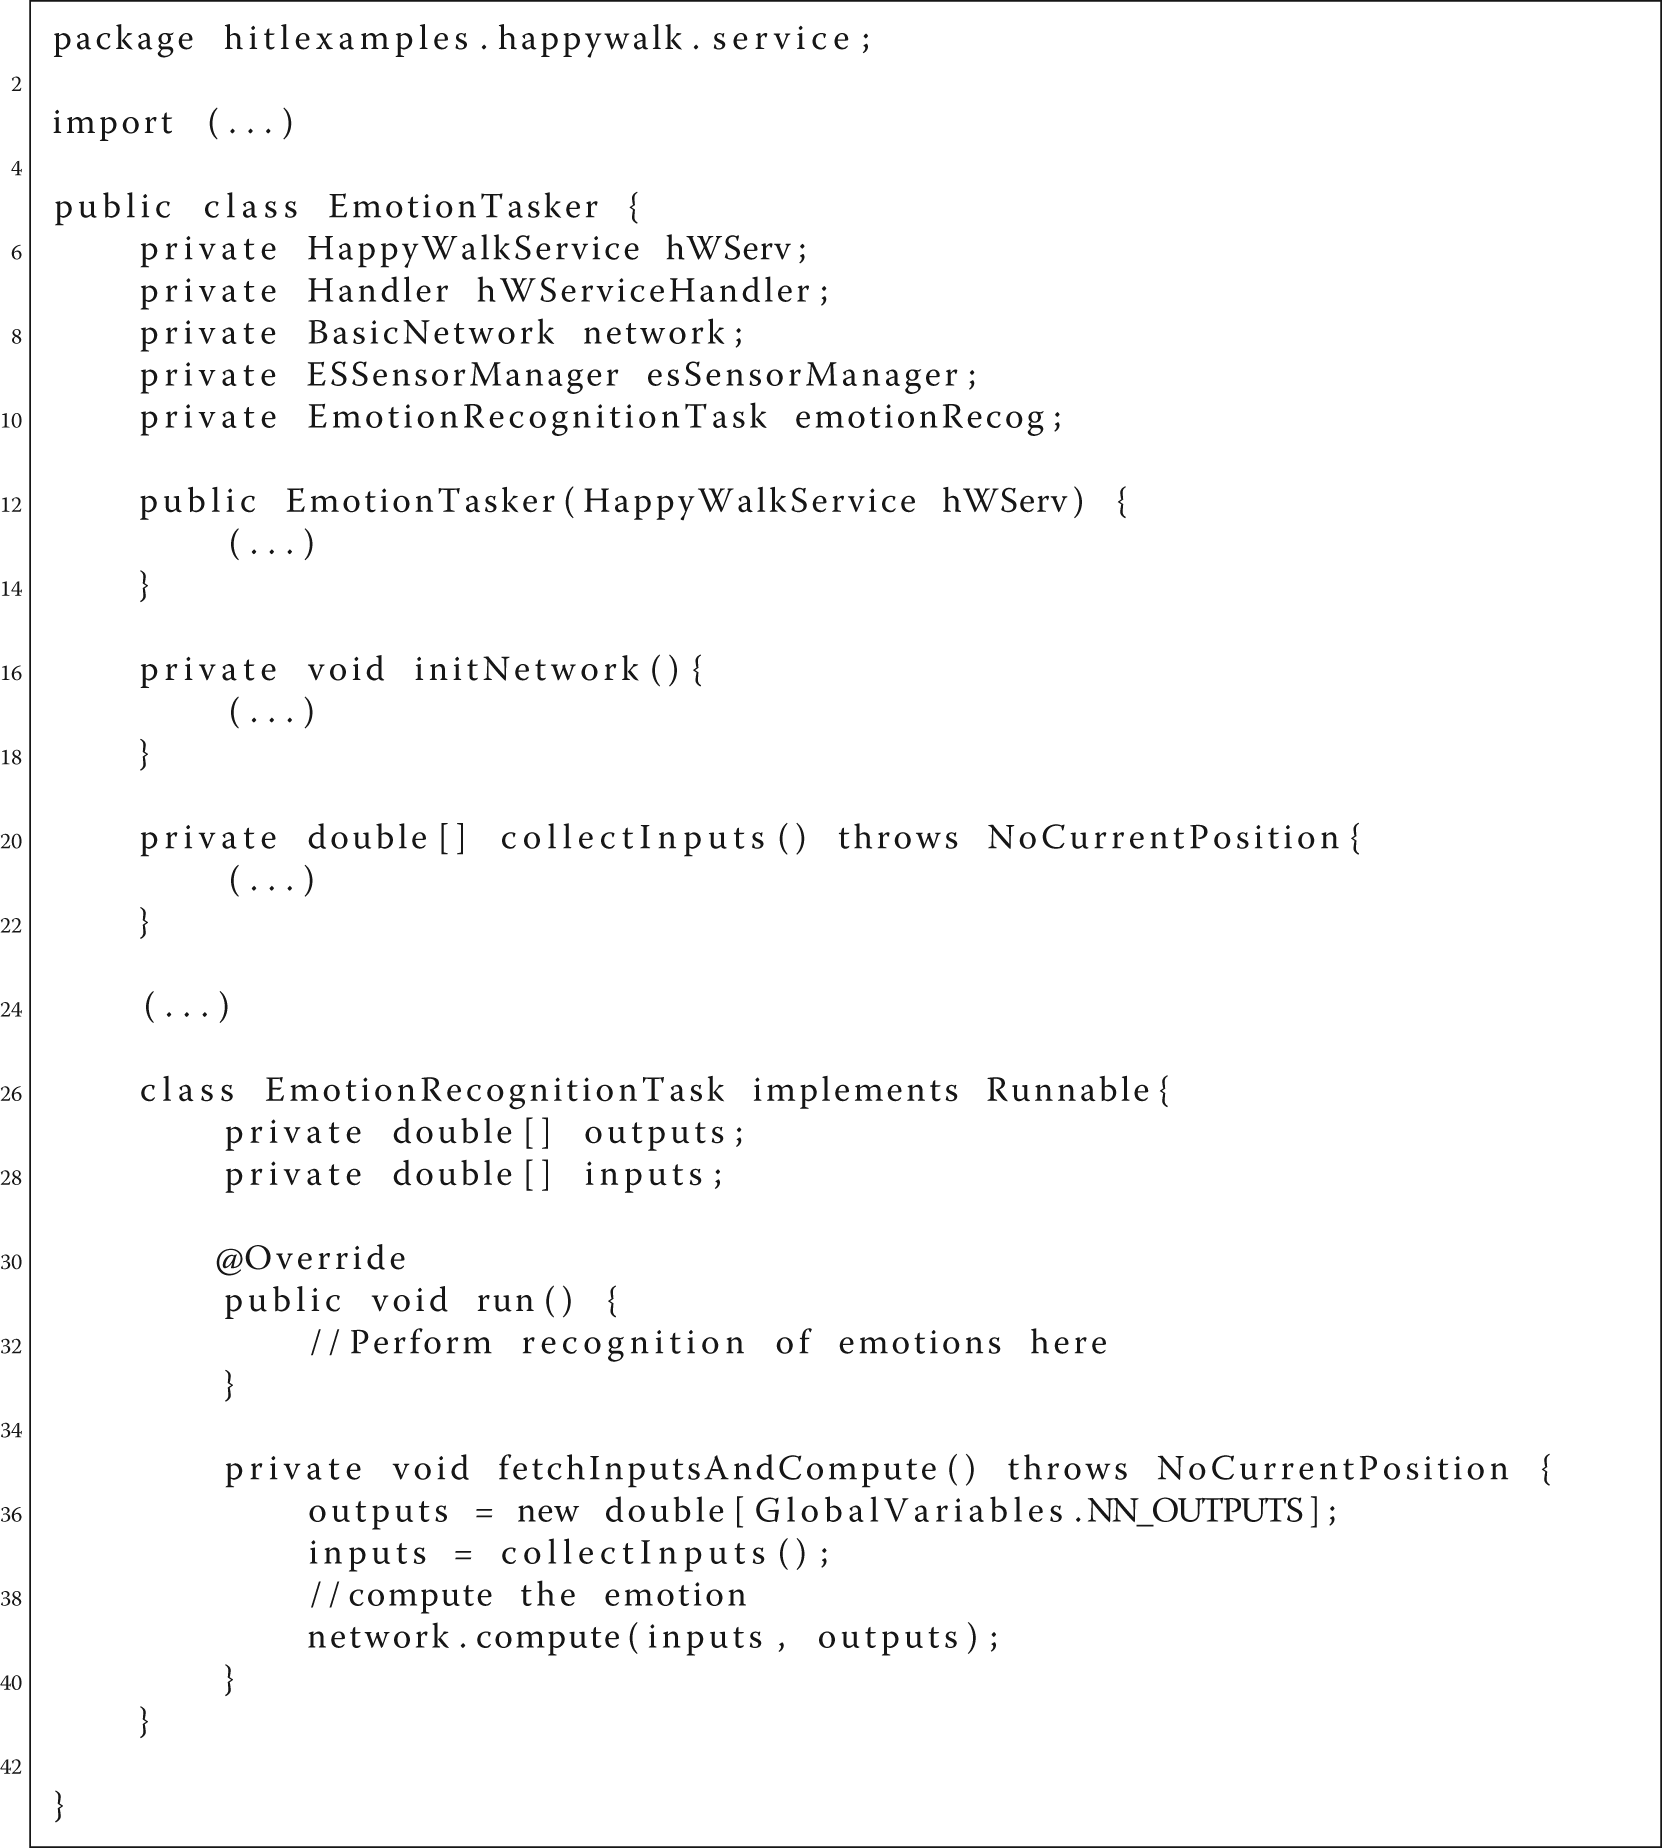
The code above shows the skeleton of our new subclass. It is important to note that this class implements the Runnable interface. This allows us to run it on a thread other than the main one; for example, as a background task. We have already implemented an inner method named fetchInputsAndCompute() (lines 35-40), where we use our previous collectInputs() method to collect the necessary inputs and then use them on our network object. Notice how Encog simplifies the use of this machine learning technique: we can compute our result in a single line of code: network.compute(inputs, outputs); - the output is stored in the outputs array variable, the size of which is determined by the global variable GlobalVariables.NN_OUTPUTS.
8.2 Requesting User Feedback
Now that we can gather input and compute emotions, we need to present these results to the user, so that he/she may provide us with some feedback. To do so, we will create a new activity especially dedicated to requesting user feedback. This comprises the following steps:
- Create the EmotionFeddback activity, which will be responsible for handling the process of acquiring emotional feedback, as we showed with Figure 5.9 and discussed back on page ??.
- Implement the EmotionSpace view, which will represent a color space where the user can point his/her current mood.
- Finish EmotionFeedback by making it use EmotionSpace and send emotional feedback results back to EmotionTasker.
- Show a feedback request notification that the user may press to provide emotional feedback. We will also dynamically control the frequency of these feedback requests.
8.2.1 Creating the EmotionFeedback Activity
Right-click on the activities package and select New ![]() Activity
Activity ![]() Basic Activity (see Figure 8.2). Name this activity EmotionFeedback, as shown if Figure 8.3.
Basic Activity (see Figure 8.2). Name this activity EmotionFeedback, as shown if Figure 8.3.

Figure 8.2 Creating a new basic activity.

Figure 8.3 Name the activity as EmotionFeedback.
After the completion of this process, AS will have created and opened two new files, a Java class activities/EmotionFeedback.java and a layout file res/layout/activity_emotion_feedback.xml, as shown in Figure 8.4 and the code that follows it.

Figure 8.4 The files that compose the EmotionFeedback activity.

We want the user to provide feedback only once per emotional inference. Thus, we have to avoid the possibility of having the user return to the feedback activity after feedback has been given. We also want to avoid having multiple feedback screens opened at any one time. Therefore, we need to make sure that only a single instance of this activity is allowed. Additionally, the entire HappyWalk application is developed towards the portrait orientation.
Let us edit the file happywalk/app/src/main/AndroidManifest.xml and add the attributes android:screenOrientation=“portrait” and android:launchMode=“singleInstance” to our new activity:

This activity will require a means to interface with the user and receive his/her emotional feedback. In this tutorial, this will be achieved through a specialized implementation of an Android View named EmotionSpace, which will be described next.
8.2.2 Implementing the EmotionSpace View
The objective of EmotionSpace is to allow the user to point to his/her current mood. To do so, EmotionSpace will extend the android.view.View class. Our goal is to achieve an interface similar to the one shown in Figure 8.5: a view which presents the user with a color space and two circles: the yellow circle represents the output of the neural network and the green circle can be dragged by the user to provide feedback.

Figure 8.5 Our goal for the EmotionSpace view.
To achieve this view, we will go through several steps. We will begin by creating a new package and, within it, a new class that extends android.view.View, implementing its required constructors. We will then begin to translate the concept of an EmotionCircle into actual code. In doing so, we will make an effort to keep our code flexible and reusable with different kinds of graphical interfaces. Afterwards, we will focus on the task of drawing our graphical resources on screen and updating their position whenever the user interfaces with them. To do so, we will also need to consider what positioning means in the context of emotional inference and discover how to relate a certain position with an emotional output. Finally, we will handle the proper initialization of our EmotionSpace and the retrieval of emotional feedback. This will make our view usable by activities, including our own EmotionFeedback.
As mentioned above, the implementation of this EmotionSpace view will begin with the creation of a new class. Create a new package named feedback under the previous emotion package. Within it, we create a new class named EmotionSpace, as shown in Figure 8.6.

Figure 8.6 Creating the EmotionSpace class.
The first thing to do is make EmotionSpace extend android.view.View. To do so, simply add extends View in front of the class name, as shown in Figure 8.7. Do not forget to add the appropriate import declaration, as explained on page ???. However, in doing so, AS will note that There is no default constructor available in 'android.view.View'; we need to create one. One easy way of doing so is placing the cursor on top of the class declaration and pressing the Alt + Enter keys simultaneously. A pop-up similar to the one shown in Figure 8.7 will appear. Choose the option Create constructor matching super and then the option View(context:Context, attrs:AttributeSet) (see Figure 8.8). AS should add the necessary constructor and associated imports automatically.

Figure 8.7 Create EmotionSpace constructor matching super.

Figure 8.8 Choose View(context:Context, attrs:AttributeSet).
Looking back at Figure 8.5, it shows us that there are several components that must be conceptually represented in EmotionSpace: there is a color space with the four emotions, the yellow circle for neural network output and green circle for user feedback. Let us consider the concept of EmotionCircle, which encompasses both the green and the yellow circles. We will represent this concept through an inner class within EmotionSpace:

The EmotionCircle class contains two class variables: Bitmap, which represents the graphics of our circle, and Point, which is its position within the EmotionSpace. We also define a constructor that takes Bitmap and places the circle within point 0,0 (the origin of EmotionSpace; we will talk about where this point is located on page ???). The developer will be able to specify the initial positions of each circle within another function we will implement later on. After the standard Getters and Setters, we also define a setPoint method that rewrites the internal point variable.
In this tutorial, the EmotionSpace class will only be used with the previously defined EmotionFeedback. However, let us imagine that, for some reason, we wanted to provide different types of EmotionFeedback activities, with different colors, button placements and graphics, depending on how the user is feeling. Or, in another possibility, the reader might be interested in expanding HappyWalk by adding other means of providing feedback. In these cases, it is a bad practice to “hardcode” the bitmaps used for the circles and the EmotionSpace background. Therefore, as an exercise, let us attempt to implement the EmotionSpace class in a flexible way that allows the developer to easily reuse the class and change its appearance.
A possible way of doing this is to define which bitmaps should be used within the layout of the activity that uses EmotionSpace (in our case, EmotionFeedback). Let us inspect the code behind EmotionFeedback's layout file, res/layout/activity_emotion_feedback.xml. To do so, change to the Text view, as shown in Figure 8.9.

Figure 8.9 Changing from the layout Design view to Text view.

Defining the background's bitmap this way is straightforward, since Android provides an android:background that can point to a bitmap of our choosing. In the example above, we use @drawable/emotion_color_map (line 15), which represents the bitmap emotion_color_map.png already present in our project, placed in the folder app/res/drawable. The reader is welcome to replace this background with another of his/her own choosing and to experiment with the android:layout_width and android:layout_height values.
However, what about the bitmaps for the neural network output and user feedback circles? Despite the fact that there is not a straightforward way of defining these bitmaps within the layout file, fortunately Android provides a way of defining custom layout attributes. Therefore, we can create our own attributes to define the circle bitmaps.
These attributes can be defined in a new Values resource file. Let us create one by right-clicking on the app/res/values folder and choosing File ![]() New
New ![]() Values resource file (see Figure 8.10). On the popup window that appears, name the file as attrs and leave Directory name as values (see Figure 8.11).
Values resource file (see Figure 8.10). On the popup window that appears, name the file as attrs and leave Directory name as values (see Figure 8.11).

Figure 8.10 Creating a new Values resource file.

Figure 8.11 Naming the Values resource file.
AS should open the new app/res/values/attrs.xml file, which should contain an empty resources root element. Our custom attributes are resources that should be declared inside a <declare-styleable> child element. Additionally, each individual attribute has a name and a value and can be defined within a particular <attr> element. As such, attrs.xml can be defined as shown in the code below:

Despite having a single <declare-styleable> element, we have named it with the same name as our EmotionSpace view. This allows us to easily identify which attributes belong to a view, in case we want to expand our application. As the code shows, we have named our attributes as neuroCircleImage (for the circle representing the neural network output) and userCircleImage (for the circle representing the user feedback). Readers unfamiliar with Android might be puzzled as to why the format of each attribute is of the type integer, since we are attempting to reference bitmap images. This is because resources in Android are internally referenced by a resource ID, an integer belonging to Android's R class. Therefore, our new attributes are actually intended to represent this resource ID, which will, in turn, point towards its respective bitmap file.
We can now use the EmotionSpace's new attributes within EmotionFeedback's layout, as illustrated below:

Notice the additional namespace declaration at the top of the XML file, xmlns:custom=“http://schemas.android.com/apk/res-auto” (line 4). This allows us to use our custom-defined attributes custom:neuroCircleImage and custom:userCircleImage, which represent an integer pointing towards a bitmap. In this case, we are using the yellow_circle and green_circle bitmaps already present in our project, placed in the folder app/res/drawable. Again, the reader is welcome to replace these bitmaps with others of his/her own choosing, although it is convenient that they still represent a circle of the same radius (we will discuss why in the next few paragraphs).
Now that the new attributes have been defined, we need to retrieve their values from within EmotionSpace. This can be done on the class constructor, as shown by the following code:


The TypedArray object contains references to the previously defined attributes. From this array, we fetch their associated values and perform a check to see if these are, indeed, bitmaps that can be used and not some other form of resources (e.g. text). If they do not represent bitmaps, we throw a RuntimeException which will, essentially, crash our application (since the developer is providing nonsensical resources). Finally, we instantiate two class variables of type EmotionCircle using the provided bitmaps.
Our circles now have bitmaps and coordinates, but how and when are they displayed on the device's screen? Android abstracts the drawing of graphical information through the onDraw method of android.view.View. We can Override this method to tell View how it should update its graphical information. In our case, what exactly does EmotionSpace do each time it needs to update what the user is viewing? First, it needs to confirm whether it should actually be drawing anything; we should have a mechanism that avoids drawing onto the screen until we are ready to do so. In case we can draw, EmotionSpace should verify the current position of each circle and redraw their bitmaps accordingly. The following shows an implementation of onDraw (lines 15 –23) that follows this logic:

The variable showEmotionCircles (declared in line 9) acts as a control that impedes onDraw from doing anything unless we want it to (through the if branch in line 18). The rest of the method is straightforward: we simply tell our Canvas (an object that represents what is going to be drawn) to draw the neurocircle's and the emotioncircle's bitmaps at the correct position (lines 20 and 21).
Another question that we must ask ourselves is what exactly does this position mean? First, let us study how Android handles positioning coordinates within a View by looking at Figure 8.12.

Figure 8.12 The coordinates of the EmotionSpace view.
The origin of our View rests on the top left corner, whereas the bottom right corner corresponds to the point where X and Y are equivalent to its width and height, respectively. As we have seen in Section 8.1, the output of our neural network is two decimal values, with the range [0,1]. As it stands, these values remain meaningless: it is left to us to give them meaning.
We will give meaning to the output of our ANN by associating each value with an axis. In this way, we can translate an emotional value into a position within EmotionSpace. As shown by Figure 8.12, the provided EmotionSpace bitmap implies that the x axis (width) corresponds to an Anxiety-Calmness value, whereas the y axis (height) corresponds to an Euphoria-Boredom value. As such, two variables are defined within GlobalVariables which store this associative meaning:

We can now simply refer to these two variables to know which position of the output array an emotional axis corresponds to.
Now, let us continue to build upon this association by translating ANN output values to EmotionCircle points:


Here, we have implemented four new methods; updateNeuroCirclePosition (line 24) and updateUserCirclePosition (line 28) are minor helper methods which simply use updateCirclePosition (line 32) to update and redraw the position of the neurocircle and the emotioncircle, respectively.
How does the redrawing of the position work? In Android, the developer does not have direct control over when the screen is updated. In fact, onDraw (discussed on page ???) is called when View is initially drawn and whenever the system feels it is necessary. As developers, the only thing we can do is request a current View to be redrawn, through a method named invalidate(). As such, the method updateCirclePosition updates an EmotionCircle's Point variable (line 33) and calls invalidate() (line 35) to request Android for a redrawing of the View.
To update the Point variable, updateCirclePosition uses another method named calculatePointFromEmotion (defined between lines 38 and 47) which receives two variables of type double, euphoricBored and anxiousCalm, that should correspond to outputs from the neural network (line 32). In any case, we implemented a simple assertion (between lines 39 and 42) to ensure that these values are at least within the [0,1] range; otherwise, our application would probably crash. This is because we use these values to determine the corresponding position of the EmotionCircle within the View; for values greater than 1 or less than 0, we would most likely return negative positions or ones that are outside of the View's limits.
At first glance, one could be tempted to simply multiply the emotion outputs by their corresponding axis (euphoriaBoring by the View's height and anxietyCalm by its width). However, it is important to notice that the EmotionCircles' bitmaps also have their own height and width. For the sake of usability, we will now impose that these bitmaps always remain fully inside the View. Since the coordinates of bitmaps follow the same convention as those of Views (shown in Figure 8.12), the maximum value of an emotional output corresponds to the size of the view minus the size of the circle's bitmap. This is reflected in the proposed implementation of the calculatePointFromEmotion method.
Since the idea behind EmotionSpace is for the user to drag and drop the usercircle, marking how he/she is feeling, we need some way of distinguishing whether or not the circle is being touched. There are several ways to accomplish this. One way of doing so is to assume that the provisioned bitmap is, in fact, a circle, with a diameter equivalent to the bitmap's width. We can then take advantage of this fact to compute the circle's radius and, therefore, determine whether the point where the user touched is within this radius. This is illustrated below.


Let us begin by focusing on the code that follows line 29. To avoid constantly calculating the circle's radius each time the user touches the View, we have extended the EmotionCircle class. After adding a small documentation comment where we express our assumptions regarding the provided bitmap, we added a new inner variable named radius (line 38), which is calculated during the construction of the EmotionCircle (line 44). This variable is used within a new method named getCenterPosition(), which returns the current position of circle's center (lines 59–61).
These new functionalities are used by the method isTouchingUserCircle(Point touchPoint) (lines 14–27) which implements the logic proposed above. Considering the circle radius as a strict frontier makes sense in theory (the user is either touching inside or outside the circle), but in practice we have found this to be too restrictive. As such, a new final variable named TOUCHING_DEVIATION was created (line 6), which increases (or decreases, if its value is set to less than 1) the effective touching radius (see line 23). The reader is free to adjust this value to his/her own liking. Finally, we have also defined a new control Boolean, named isTouchingUserCircle (line 5), which will be used by EmotionSpace to evaluate the current touching state.
As previously mentioned, the usercircle should remain fully inside View. This is important, since otherwise the user could fully or partially drag the circle to the outside of View and not be able to drag it back in. Let us write a simple method that verifies and corrects the usercircle's positioning:

Remember that the lone getWidth() and getHeight() methods are implemented by the parent class. Since EmotionSpace extends android.view.View, they return EmotionSpace's width and height, respectively. The method is rather self-explanatory: if its bitmap is extending beyond the View's limits (lines 15, 18, 21, and 24), we set the usercircle's coordinates to the outermost value that is still inside the View (lines 16, 19, 22, and 25). Afterwards, we use invalidate() to redraw EmotionSpace (line 27).
We now have all the necessary methods to handle the user's touch gestures. Each time the user touches our EmotionSpace view, Android calls upon the View's method onTouchEvent(MotionEvent event). There are three types of touch events which we need to consider:
- ACTION_DOWN: The user has just touched the screen. Here, we need to check if the user is touching the usercircle.
- ACTION_MOVE: The user is still touching the screen and moving around. If the user was previously touching the usercircle, we shall move it according to the input gesture.
- ACTION_UP: The user has lifted his/her finger from the screen. Now is the time to check if the usercircle has been left inside the View and, if not, correct its position.
Let us translate this logic into Java code:


Again, after some experimentation, we found that slightly adjusting the placement of the usercircle resulted in a more intuitive manipulation. As such, we defined a new double variable MOVING_DEVIATION, which influences said placement (line 14). The reader is free to adjust and fine-tune this value.
To effectively use EmotionSpace we still need to allow the developer to somehow initialize it. There has to be some way to define the initial positions of the neurocircle and the usercircle. After such initialization has taken place, we can then set the showEmotionCircles variable to true, which will trigger the drawing and manipulation capabilities of View. However, this process is not completely straightforward. Before we allow drawing and dragging, we need to make sure that the parent activity (in our case, EmotionFeedback) has fully drawn EmotionSpace. This is because, if EmotionSpace has yet to be drawn, the view's coordinate system is nonexistent and we cannot properly place the bitmap circles. Therefore, we need to somehow know when our view is ready to be initialized. This can be achieved through a ViewTreeObserver object, as shown by the code below:


Note that, as mentioned in the comments (lines 34–36), we are using a deprecated function. This shouldn't cause any issues. However, if for some reason the above code does not work in future Android versions, the reader is encouraged to try to use removeOnGlobalLayoutListener() instead of removeGlobalOnLayoutListener(). When onGlobalLayout() is called, we know that the global layout is fully drawn and, as such, so is our EmotionSpace view. Therefore, we then use the emotion axes provided by the developer (which should reflect the output of the ANN) to place our emotion circles (both start at the same position). Finally, we set showEmotionCircles to true.
Now that the user can see, move, and place his/her feedback intent, we need a way to retrieve it. In our particular example, we want a way for the EmotionFeedback activity to get the emotion values corresponding to the last position of the usercircle:


The public method getEmotionFeedback, as shown above, handles this task (line 17). First, we need to check if EmotionSpace has been initialized. We can do this through the showEmotionCircles variable (line 18). If it was not, it is not possible to return meaningful feedback. Therefore, an exception is thrown, warning the developer of his/her mistake (line 19). We encourage the reader to create a new class under the package exceptions named InitializationException, similarly to what was done for the NoCurrentPosition exception back on page ???. Below, a possible implementation of InitializationException is presented:

Let us return our focus to the getEmotionFeedback() code. If, on the other hand, EmotionSpace has been properly initialized the else branch in line 21 is run. In this case, all we need to do is fetch the position of the usercircle. Since emotion values are restricted to the [0,1] range, the value of the user feedback is given by the position of the circle divided by the maximum possible value, which is the size of the view minus the size of the bitmap (as discussed on page ???). This reasoning is applied in lines 30 and 32. To avoid divisions by zero, we also verify if the bitmap does not fill the entire view (which could happen, if the developer is not careful in picking a bitmap which is sufficiently small), and throw an AssertionError if necessary (line 28).
Our feedback acquisition view should finally be complete! The full code is presented below:


8.2.3 Finishing EmotionFeedback
In this section we will finish our EmotionFeedback activity by connecting it with our background HappyWalkService. We will then create a “provide feedback” button and make use of EmotionSpace. Finally, we will handle sending emotional feedback results back to EmotionTasker.
Returning to our EmotionFeedback activity, after we get the user's feedback we will need to make use of it by sending it back to EmotionTasker somehow. As such, one of our priorities should be to connect and get a reference to our background HappyWalkService:


The above code shows our proposed implementation. As we may remember from Section 5.2.1, the method onResume() is run after onCreate() and every time the user returns to the activity from the foreground (see Figure 5.3). Therefore, onResume() (lines 27–31) is a prime candidate for attempting to connect and get a reference to our background service, by calling bindService() (available to Activities) to connect to HappyWalkService (line 29). While doing so, we provide an appropriate Intent and Context.BIND_AUTO_CREATE flag (which automatically creates the service as long as the binding exists). We also provide a reference to an hwConnection object, which is responsible for handling the connection of the service.
As the reader may see, hwConnection is an object of type ServiceConnection (line 33) which implements the onServiceConnected() method (line 34), called right after the connection to HappyWalkService has been established, and where a reference to the HappyWalkService object is acquired (line 36). After we have our reference we may set up the EmotionSpace through the setupEmotionSpace() method (in line 41, which we shall implement in the next paragraphs). Also, whenever the activity is paused, we unbind the service (line 54).
Now, we need a way for the user to indicate that he/she is ready to provide feedback. We can do this through a simple button. First, let us define the text that appears inside this new button. In Android, it is good practice to define all strings in a proper XML resource file, located at src/main/res/values/strings.xml:

For the sake of readability, we define a new separator comment “<!–Emotion Feedback –>”. We then define a new string resource emotFeedButton whose value is “This is how I feel” (the reader is welcome to change this value to one of his/her own preference).
Now, we can easily add our button to EmotionFeedback through its layout activity_emotion_feedback.xml:

As the reader might remember from page ???, EmotionSpace should already be set up within app/res/layout/activity_emotion_feedback.xml. The id of EmotionFeedback's EmotionSpace is defined by the android:id attribute. Here, we use “@+id/emotionSpace” (line 18) to tell Android to store a new id named emotionSpace, which represents our EmotionSpace view.
The code presented above also shows that the button's text is defined by the android:text attribute. This attribute is pointing to the string resource emotFeedButton we just defined. The id of the button is defined to be emotionFeedbackButton (line 25). Finally, the android:onClick=“emotionFeedback” attribute (line 30) indicates that whenever the user presses this button the emotionFeedback() method should be called.
Now that our layout elements are properly defined and identified, we can use them in EmotionFeedback's code:


The method setupEmotionSpace() (lines 19–29) is called right after we get a reference to HappyWalkService. First, it fetches a reference to EmotionSpace through its id (line 20). Then, we expect that whoever starts EmotionFeedback also provides an array of doubles containing the output of the neural network. This can be done through the extras of the Intent that started EmotionFeedback. An Intent's extras is a bundle that can be used to pass any additional information. The keys used to fetch this array from the Intent's extras should be already defined within the GlobalVariables class (BND_EXTRA_EMOTION_OUTPUT_ARRAY_KEY, in line 22).
The output of the neural network is stored in a class private variable nnOutput (declared in line 15). We then use its values to initialize EmotionSpace (line 24). Now that the activity is ready, we enable the feedback button (lines 27 and 28).
The method emotionFeedback() (lines 35–51) is called after the button has been pressed. It is responsible for storing the position of the green circle within a double array (line 38) and passing this information, together with the corresponding neural network inputs and outputs, and a timestamp, to the EmotionTasker (line 41). Notice that the information is passed through the processUserFeedback() method, which we will implement later on.
It is equally important to note that we expect from whoever starts EmotionFeedback to also provide the inputs and timestamp, through the Intent's extras. The global variables BND_EXTRA_EMOTION_INPUT_ARRAY_KEY and BND_EXTRA_EMOTION_TIMESTAMP_KEY hold the keys needed to fetch these values (lines 39 and 40). Afterwards, the method shows the map (lines 43 and 44) and closes the EmotionFeedback activity (line 49).
We have now finished our EmotionFeedback activity! Below, the reader can find its complete Java code:


8.2.4 Showing a Feedback Request Notification
Before processing the feedback, we still need to request it first. As discussed on page ??, a possibility is to use a notification which will prompt the user to teach our neural network mechanism. In this section we will implement a way of showing a feedback request notification to the user, which may be pressed to trigger the emotional feedback process. To do so, we will begin by extending our EmotionTasker with a new method that can create and remove this notification. We will then focus on creating a dynamic mechanism that adapts the frequency of feedback requests to the accuracy of our neural network.
Let us create a method within EmotionTasker that will present a notification to the user which, when pressed, will call the EmotionFeedback activity. We should also assume that our emotion inference has an expiration date: it does not make sense for the user to provide feedback to an inference task that was performed a long time ago. Therefore, we need to consider a mechanism that will revert notifications and filter feedback which has “expired”. This can be achieved using a simple timestamp:


EmotionTasker's new showEmotionFeedbackNotification() method is responsible for creating a notification that asks the user for feedback (lines 29–67). First, it cancels previous notification removal tasks (those that revert to expired notifications, which we will discuss below) since a new one will be created (line 31). As the reader may remember from page ???, if we intend to use the EmotionFeedback activity, we need to provide additional data in an extras Bundle. Therefore, our method also includes the sensory input, the neural network output, as well as a timestamp, into a Bundle to pass to EmotionFeedback. Notice that we use the correct global variable key for each data element (lines 34, 36, and 40). The timestamp is also stored in the lastEmotionNotifMillis variable. This will be used to check if the user feedback is still valid.
In line 41, we add an integer to our extras Bundle with the key BND_EXTRA_REQ_CODE_KEY. This integer represents a “request code key”, which we will use later on in this tutorial. Its purpose is to help our MapsActivity to initialize differently, depending on who called it. In this case, the value GlobalVariables.AREQ_EMOTION_FEEDBACK_NOTIF is used to clearly identify that redirections to MapsActivity come from emotion feedback notifications.
Afterwards, showEmotionFeedbackNotification() builds an Intent describing the desire to call EmotionFeedback (line 44). It also builds a PendingIntent from this original Intent using the getActivity() method (line 47). A PendingIntent is a type of Intent that can be handed to other elements so that they can perform the action at a later time. In our case, this means that our notification will only call EmotionFeedback when pressed. Notice that we pass FLAG_UPDATE_CURRENT during our PendingIntent's construction. This way, if the described PendingIntent already exists it will be kept, but its extra data shall be replaced with the one from the new Intent.
The method then uses a NotificationCompat.Builder, several resource strings, and a bitmap icon to construct our notification message (lines 55–62). A working bitmap should already be present in src/main/res/drawable/emot_notif_icon.png (represented by the id R.drawable.emot_notif_icon). The reader is free to use his/her own image. As for the strings, we need to define emotionFeedbackNotifContent within src/main/res/values/strings.xml), as shown below (line 8):

The final result should be a notification that says, “Can you tell me how you feel?” (or any other sentence, in case the reader decides to personalize the emotionFeedbackNotifContent resource), as shown in Figure 8.13.

Figure 8.13 The emotion feedback notification.
Going back to our EmotionTasker code on page ???, we have also implemented yet another method within EmotionRecognitionTask named postNotificationRemovalTask() (line 80). It makes use of a NotificationRemovalTask inner class, which also implements the Runnable interface (much like EmotionTasker, as we saw on page ???). The NotificationRemovalTask uses the lastEmotionNotifMillis and the GlobalVariables.EXPIRE_EMOTION_MILLIS variables to evaluate if an emotion notification has expired (see lines 96–105). This mechanism serves as a failsafe, in case a newer notification is fired before the previous NotificationRemovalTask has been run. This could happen when the period of emotion recognition tasks (dictated by the variable GlobalVariables.RECOG_MIN_HOURS_WITHOUT_FEEDBACK) is lower than the time an emotion is considered valid (GlobalVariables.EXPIRE_EMOTION_MILLIS). However, since we cancel previous notification removal tasks before creating a new notification, this situation should never occur under normal circumstances.
Now that we have our feedback request notifications in place, we can begin thinking about when they should be fired. If we repeatedly request user feedback, there is no point to our learning mechanism: the main focus of our HiTL app should be to become as unobtrusive as possible. Therefore, we are going to devise a simple mechanism that will determine when user feedback requests are necessary. Since we want to avoid overly complex solutions, let us consider the following pseudocode:

The previous approach simply associates the time it takes until the next feedback request with the distance between the result of the neural network and the user feedback (line 2). To smooth this change, we perform a weighted mean (line 3); that is, newer emotional feedback with very low accuracy won't punish a previously well-performing neural network too harshly. A newFeedbackTime value is calculated based on a direct linear variation of the weighted mean of the Euclidean distance (line 4). This value is then used to calculate the base time to the next emotion feedback request through another weighted mean. We also introduce some randomness to the equation: this lessens the possibility of users starting to associate their feedback with specific feedback request intervals (line 8). Finally, we store a timestamp to keep track of when the last feedback request was performed (line 11). Below follows this reasoning in concrete Java code:


We define and use several important new class variables on the code above:
- wMeanEuclideanDistance (line 17): is a weighted mean of the Euclidean distance, which relates to the history of the performance of our neural network.
- baseTimeToNextEmoFdbckReq (line 15): represents the time, in milliseconds, until our next emotion feedback request.
- lastEmoFeedbackReq (line 16): is a timestamp of the last emotion feedback request.
The new inner class UpdateEmotionAccuracyTask (lines 38–87) allows us to easily compute and update each of these values. As the reader may see from line 38, this class implements the Runnable interface and, as such, can be used as a background task. We define a simple constructor (lines 42–50) which receives two arrays of doubles: output (the output of the neural network) and idealOutput (the feedback from the user). The constructor also serves to verify if the two arrays are of equal size.
The actual workload of UpdateEmotionAccuracyTask rests on its run() method (lines 53–86). It begins by calculating the Euclidean distance between output and idealOutput (line 56). To do so, it uses the computeEuclideanDistance() method, which is defined between lines 24 and 31.
The value of wMeanEuclideanDistance is calculated in line 61. It is a simple weighted mean where new Euclidean distance values have a weight of WEIGHT_OF_NEW_EUCLIDEAN_DISTANCE (which, by default, is 0.4).
We then calculate the maximum possible Euclidean distance (line 64). This is used to compute newFeedbackTime (line 71) through a simple direct linear variation based on the weighted mean of the Euclidean distance. Here, newFeedbackTime represents a temporary value that will be used to compute baseTimeToNextEmoFdbckReq, the time until the next emotion feedback request.
As we can see in line 76, baseTimeToNextEmoFdbckReq is also calculated through a simple weighted mean, where newFeedbackTime has a weight equivalent to WEIGHT_OF_NEW_EMOTION_FEEDBACK_TIME (which, by default, is also 0.4). We then shuffle this value by adding a randomized margin, calculated from a percentage of baseTimeToNextEmoFdbckReq in line 79, and applied in line 81. This shuffling is a preventive measure against user habituation (e.g. the user expects a notification at certain intervals), which may happen when the user repeatably provides similar feedback.
The variables wMeanEuclideanDistance, baseTimeToNextEmoFdbckReq, lastEmoFeedbackReq, and lastEmotionNotifMillis remain important even when the user stops using our app, since they provide us with the necessary history that allows us to comprehend how well our neural network has been performing and when the user should be consulted. Thus, they should be made persistent. To do this, we will be using Android's SharedPreferences APIs.2 These allow us to easily store a relatively small collection of key-value pairs. As such, let us write some helper methods that store and retrieve these values from the app's preferences:


Let us begin with the saveEmoFeedbackValsToSharedPreferences() method (lines 35–43). As the reader can see, storing values on SharedPreferences is a relatively simple task. We begin by getting a reference to the default SharedPreferences, in line 36. This allows us to acquire a SharedPreferences.Editor (line 37), which we use to store the desired values together with their corresponding global variable keys (lines 38–41). Finally, we commit the changes using the editor's commit() method (line 42).
We also wrote a restoreEmoFeedbackValsFromPreferences() method to load the values from storage into memory (lines 11–30). We begin by fetching a reference to SharedPreferences in line 12. We then attempt to restore baseTimeToNextEmoFdbckReq (line 15). One property of SharedPreferences's getter methods is that they allow us to define a default value, in case the provided key does not exist. We use this to our advantage by defining a getDefaultBaseEmoFeedbackTime() method (lines 49–53). This method simply averages the global variables RECOG_MAX_HOURS_WITHOUT_FEEDBACK and RECOG_MIN_HOURS_WITHOUT_FEEDBACK, which define the maximum and minimum periods for feedback requests (in hours), and returns the result in milliseconds.
We use a similar strategy for restoring lastEmoFeedbackReq (line 19) and lastEmotionNotifMillis (line 22), except we provide the default value of 0 for both. For the maxEuclideanDistance variable, we define its default value as half of the maximum Euclidean distance. As we will see in Section 9.2, these default values make sense, since they will ensure that we perform feedback requests if there is no data stored and that newly created neural networks perform a certain amount of training before having their results taken into account.
Lest we forget, let us actually use the saveEmoFeedbackValsToSharedPreferences(). Since EmotionTasker is intimately related to our service, we should save its values when the service is about to be destroyed, as can be seen below:

As we have seen in Section 5.2.1, the method onDestroy() is called at the end of the service's lifecycle (see Figure 5.3). In order to save EmotionFeedback's values, we changed HappyWalkService's onDestroy() method by adding a call to saveEmoFeedbackValsToSharedPreferences(), in line 18.
Now that we know when to request and how to retrieve user feedback, it is time to start thinking about how to process this information.
8.3 Processing User Feedback
In this section we will handle what happens after the user presses the emotionFeedback button in the EmotionFeedback activity. This triggers the processing of user feedback, which, as mentioned on page ???, is passed on to the EmotionTasker through the processUserFeedback() method. We will begin by implementing this method, where we restore the HappyWalk notification to its default status and verify if the provided emotional data is still valid. If it is valid, we shall use it to train the neural network and then send it to the server. As such, let us detail each of these tasks in its respective subsection.
8.3.1 Processing Feedback on the EmotionTasker
As mentioned above, the EmotionTasker shall process feedback within a processUserFeedback() method, which we will now implement:


This method achieves several objectives. First, it checks if the last fired notification corresponds to the emotion currently being processed (line 19). If it does, we can safely remove the pending notification removal task (line 21) and revert the notification to its default status (“HappyWalk is walking with you”) by passing a false Boolean value to HappyWalkService's showNotification() method (line 23). If there are newer notifications, we shall do nothing that interferes with their lifecycle.
Afterwards, the method uses the timestamp to check if the emotion we are about to process is still valid (line 26). As noted in the comments (lines 14–18), it is possible that the user opened the EmotionFeedback activity and forgot to provide feedback until much later. If it is valid, we use the feedback to train the neural network (through a NeuralNetworkTrainingTask class, in line 27), send this information to the server (through a sendEmotionToServer() method, in line 28), and update the frequency of user feedback requests, through the UpdateEmotionAccuracyTask that we implemented in the previous section (line 30).
As the reader might have noticed, we still need to implement the NeuralNetworkTrainingTask class and the sendEmotionToServer() method. Let us consider each of these issues separately.
8.3.2 Training the Neural Network
In this section we will implement our neural network's training process. We will first create a task specifically tailored for this purpose, which will use the Encog library to train the network. We will then use the SharedPreferences API to make our neural network's state persistent.
As we have seen in the previous section, the processUserFeedback() method references a NeuralNetworkTrainingTask, which is responsible for training the neural network based on the provided feedback. Thankfully, the Encog library makes this step a rather painless process:


The NeuralNetworkTrainingTask's code is rather self-explanatory. Similar to what we previously did for UpdateEmotionAccuracyTask (back on page ???), this task also implements the Runnable interface (line 15) and defines a simple constructor that takes two arrays of doubles: inputs and idealOutput (lines 19–22). The inputs array represents the original sensory input, which should still be accompanying the current emotion (the result of collectInputs(), discussed back on page ???, which is then passed to showEmotionFeedbackNotification(), EmotionFeedback and, finally, processUserFeedback()). The idealOutput, on the other hand, represents the user feedback that was provided by EmotionFeedback.
In the class run() method these two arrays are used in conjunction to create a BasicMLDataSet object, which is Encog's representation of a set of training data (line 28). Notice that the BasicMLDataSet's constructor takes two double[][] objects and we only have a single emotion to process. As such, we first translate inputs and idealOutput into two double[][] arrays (lines 26 and 27).
Afterwards, we use a technique named “Resilient Propagation” (line 29) to train the network until its error is below a certain customizable threshold. The training is performed inside a do while loop (lines 31–33), and the threshold is defined by the NN_MAX_TRAINING_ERROR global variable (line 33). Ideally, this training process should use more than one training value; however, since this task will be performed each time the user provides feedback, we should still expect the neural network to adapt over a considerable period.
The result of the neural network training is another element that has to be made permanent. Each time the app is started, the previous state of the neural network must be loaded from the device's storage, so that HappyWalk may progressively become more accurate and personalized. Thus, we reference a method saveNNWeightsToPreferences() to save this information. Let us implement this and another helper method (restoreNNWeightsFromPreferences()) to save and load the neural network's state information from the app's preferences:


The saveNNWeightsToPreferences() method (lines 32–37) is somewhat similar to saveEmoFeedbackValsToSharedPreferences(), which we wrote back on page ???. We begin by getting a reference to the default SharedPreferences (line 33) and then to its Editor (line 34). The major difference is that we only have a single key-value pair to store: a weights string and its key (stored in the REF_NEURALNETWORK_WEIGHT_KEY global variable). These shall contain our neural network's weights (line 35). Once again, we commit the changes using the editor's commit() method (line 36).
The restoreNNWeightsFromPreferences() method (lines 13–30) also begins by acquiring a reference to the default SharedPreferences (line 15). We then verify if PREF_NEURALNETWORK_WEIGHT_KEY exists in the SharedPreferences (line 16). If it does, we attempt to store its corresponding string within a variable called weights (line 17). If the weights string does exist (line 18), we split it by the “,” character, and store the corresponding substrings within a weights_string_array (line 19). These substrings are then converted into an array of doubles (lines 20–24). Finally, we use the BasicNetwork.decodeFromArray() method to restore our neural network (line 25). If we cannot find weights stored within SharedPreferences our neural network will reset, and we log this occurrence (line 28).
We can make use of restoreNNWeightsFromPreferences() and the other helper methods we have written so far to further initialize our EmotionTasker:
As the code above shows, we have edited our EmotionTasker's constructor to better initialize the class. We now use restoreEmoFeedbackValsFromPreferences() to restore our emotion feedback values (line 20), initialize the neural network using the initNetwork() method we previously implemented on page ??? (line 22), and restore the neural network's state using restoreNNWeightsFromPreferences() (line 24). This way, the constructor now handles the initialization of the sensing library, fetches the base values of emotional feedback requests, initializes the ANN, and restores its weights. Let us move on to the task of sending emotional information to the server.
8.3.3 Sending Emotional Information to the Server
As previously discussed back in Section 5.3, one of the objectives of HappyWalk is to display a near real-time average of the mood at each POI, through heatmaps with different colors, so that users may pick walking destinations with the moods they desire. To do this, the server needs to collectively acquire the current moods of HappyWalk users, and it is up to the Android app to send this information. As such, what kind of data do we need to send?
First of all we need to obviously send emotional data, so that the server may aggregate it. We also need to send location data, since we need to know where the user is before we can associate his/her emotions with a certain POI. Finally, to avoid duplicate data, we also need to somehow identify individual user records.
Here, it is important that we comply with the requirement of anonymization, since we are dealing with possibly sensitive information. To do so, HappyWalk generates a pseudo-random universally unique identifier (UUID), a “practically unique” 128-bit value. This identifier will serve as the only means of “tracking” each user's data, thus avoiding the storage of any type of personal information. HappyWalkService makes use of Java's java.util.UUID utility class to handle the generation of these identifiers.
Therefore, our implementation should send this anonymous UUID of the user, his/her current position and his/her emotional feedback. This information is going to be aggregated by the server in order to be shared with the community, so that users may know the average mood at a certain POI as well as the number of people in its surroundings.
Let us write a new class that sends this information to the server. Create a new class under hitlexamples.happywalk/tasks, as shown in Figure 8.14.

Figure 8.14 Creating TaskSendEmotion.
Name this new class TaskSendEmotion. Below, the reader can find a suggested implementation:


The TaskSendEmotion class implements the Runnable interface; as such, it can be fed as a task to be run in the background through our HappyWalkServiceHandler (line 7). Its constructor takes a uuid string, two double values corresponding to the Anxiety–Calmness and Euphoria–Boredom axes, as well as the user's latitude and longitude (lines 15–21). The requestSendEmotion() method creates a JSON object containing the necessary information (lines 38–54). Finally, the run() method uses CommunicationClass (a utility class that contains several communication methods) to send our JSON object to a service hosted by the server named setEmotion/ (line 29). We will consider the implementation of this service later on, in Section 9.1.
Now that we have TaskSendEmotion, we can use it to easily implement EmotionTasker's sendEmotionToServer() method, previously discussed on page ???:

The sendEmotionToServer() method simply fetches the device's current position (line 15) and sends it to the server, together with the user's UUID and emotional information (lines 16–21).
With its last piece in place, our processUserFeedback() method should now be complete. With this, we have completed the app's ability to acquire and use feedback to train the neural network.
8.4 In Summary..
In this chapter we have handled the state inference process of our HiTLCPS. Figure 8.15 shows a summary of the current state of our HiTLCPS. It illustrates many of the tasks we have performed during this chapter. We began by implementing a neural network and creating an activity for acquiring user feedback. This activity is triggered by an emotion feedback notification, the frequency of which is controlled by a dynamic mechanism based on the performance of the neural network. We also handled persistence by saving and restoring the values pertaining to this dynamic notification frequency and to the state of our neural network's weights. Finally, the processing of user feedback was covered, where we performed the training of our neural network and sent relevant data to the server.

Figure 8.15 Current state of our HiTLCPS at the end of Chapter 8.
However, as the reader may have noticed, there are several parts of Figure 8.15 that we have yet to address, identified by dashed arrows and squares. At the top we have EmotionRecognitionTask, which is still incomplete. As the reader may remember, its run() method (line 77 of the code on page ???) still needs to be implemented. This task should run periodically (once or twice an hour), as we decided back on page ??. It should also trigger the beginning of the data acquisition process, which we handled in Chapter 7. We still need to feed the acquired data to our neural network. This has been partially handled by the fetchInputsAndCompute() method (lines 35–40 of the code on page ???), but the method has yet to be used within EmotionRecognitionTask.
Additionally, the dynamic feedback mechanism we implemented in Section 8.2.4 only computes the neural network's performance and the feedback notification period. These values still need to be put to use, to decide if we should trust the neural network (i.e. if its performance is good enough), and to determine whether the application should show a feedback request or actuate.
In what concerns feedback requests, we covered most of the necessary work in this chapter. However, within our HiTL application we still need to be able to use the neural network to effectively produce a positive effect on the user. This challenge lies within the Actuation part of the app. In the next chapter, we will discuss how to use the ANN results to present suggestions to the user through the map interface.