
Appendix D. Updating current applications for the iPad
Developing for the iPad is nearly identical as developing for the iPhone, so you should almost always release a version of your application for both. iPad users can always run your iPhone application in 2x mode (which stretches your iPhone application to fit the dimensions of the iPad screen), but this makes for an overall poor experience.
In a development document titled “iPad Programming Guide,” Apple provides a clear and concise method for porting your application from the iPhone to the iPad. Rather than restating that document, we felt it would be more beneficial to walk you through each step in converting an actual application.
You’ll follow a few standard steps to convert iPhone applications into iPad applications:
- Configure Xcode. Create two separate build targets: one for iPhone and one for iPad.
- Update the Info.plist, which is needed to support multiple interface orientations.
- Add iPad-specific interface components.
- Update the views. Because the device is larger, you need to update the frames of all your views.
- Add multiple-orientation support.
In this appendix, you’ll convert the collage application that you created in chapter 11 to an iPad application.
D.1. Configuring Xcode
The process for updating your build target to include iPad support is simple. This is because the latest version of Xcode includes a tool that performs the migration for you. Apple strongly recommends against manually updating your files to support the iPad.
Follow these steps:
1.
Open the collage project in Xcode.
2.
Right-click your collage target, and select Upgrade Current Target for iPad (see figure D.1).
Figure D.1. Upgrading your build target for the iPad

3.
Select Two Device-Specific Applications from the next screen. You may choose to have one universal binary build, but it’s usually a little more challenging to maintain and has a few more gotchas. For this tutorial, you’ll build two separate applications.
As soon as you perform the upgrade, you’ll notice that a Resource-iPad folder is added to your project. It contains a new MainWindow-iPad.xib file for the main window of your application. If you attempt to build and run the application for the iPad now, it will fail because you haven’t updated your Info.plist.
D.2. Updating Info.plist to support multiple orientations
As we mentioned in chapter 7, all iPad applications are required to support all interface orientations. In order to do this, you must add the UISupportedInterface-Orientations key to your project’s Info.plist. The steps to do this are as follows.
1.
Open the Info.plist file, right-click in the plist window, and select Add Row.
2.
In the Key column, type UISupportedInterfaceOrientations~ipad. The ~ipad after the field denotes that this field applies to the iPad only. You can just as easily add ~iphone or ~ipod to apply the field to the other devices.
3.
Right-click the field and set the value type to Array.
4.
Right-click again, add a row, and add each of the three interface types. Figure D.2 shows what the plist should look like when you’re finished.
Figure D.2. Info.plist to support multiple interface orientations

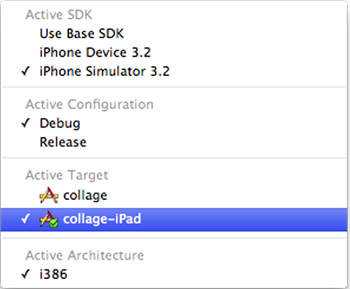
You can now build the application and run it in the iPad Simulator. Because you have multiple targets, you must specify which target to run. Set the active build target to collage-iPad by clicking the Overview drop-down menu on the Xcode toolbar and selecting it as shown in figure D.3. You should also set the Active SDK to iPhone Simulator 3.2.
Figure D.3. Set the active build target to collage-iPad.
Your application should now run in the iPad Simulator (see figure D.4). Notice that most of the interface is resized for you. This is because you have a simple interface composed of native UI elements. More complicated interfaces require more updates, similar to those in figures D.3 and D.4.
Figure D.4. Collage application running on the iPad
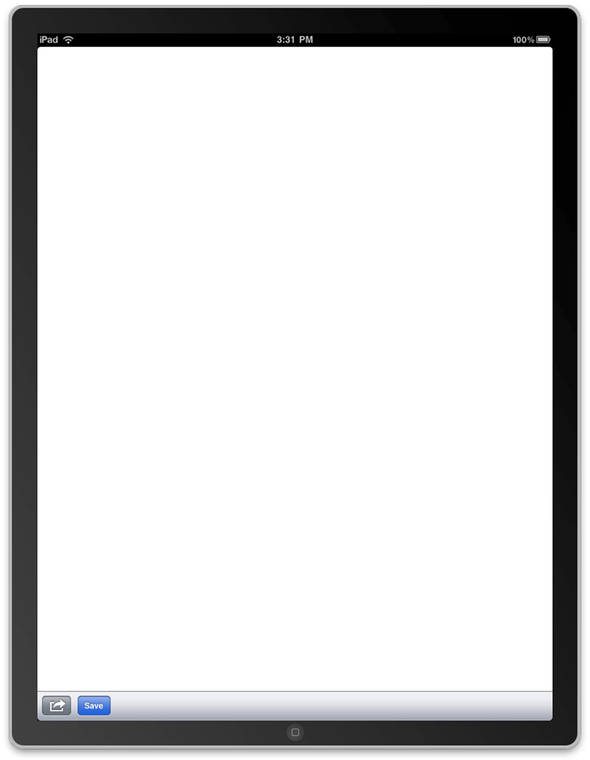
If you tap the arrow in the lower-left corner of the screen to add images, the application crashes. An error displays on the console, reading “UIImagePickerController must be presented via UIPopoverController”; this is because the iPad displays the UIImagePickerController differently than the iPhone. You’ll now make the necessary change to correctly display the picker.
D.3. Adding iPad-specific interface components
With the iPhone, the UIImagePickerController is presented modally. The iPad requires that it be displayed using a UIPopoverController. As you start experimenting with iPad development, you’ll notice little changes like this that vary from project to project. The compiler generally notifies you of these issues by printing a message to the terminal.
You can use compiler directives to determine the device for which you’re building. Based on the build device, you handle the UIImagePickerController differently. Open the file collageViewController.m, and update the choosePic method to look like listing D.1.
Listing D.1. Adding compiler directives in collageViewController.m

As of this writing, this is the currently accepted way to determine if you’re building for the iPhone or the iPad. Although the condition of the if statement is likely to change in the future, the logic will remain the same.
You first determine if the build target is the iPad ![]() . If so, the code displays the UIImagePickerController inside of a UIPopoverController that is oriented around the button that was tapped. The picker’s behavior remains the same—it’s just presented in a different
manner. Finally, the code presents the picker modally if you’re building for the iPhone.
. If so, the code displays the UIImagePickerController inside of a UIPopoverController that is oriented around the button that was tapped. The picker’s behavior remains the same—it’s just presented in a different
manner. Finally, the code presents the picker modally if you’re building for the iPhone.
The application is now almost fully functional. You can choose photos, add them to the screen, and move and scale them. But one problem remains: if you notice, the area that you have to work with is restricted to 320 x 400 pixels. This is because you need to update the frame of the working area.
D.4. Updating your views for the iPad
When you’re updating applications, you’ll spend the most time updating your view frames. If you’re an iPhone developer, you’re probably so used to the 320 x 480 resolution that you have no problem hardcoding those numbers in your applications. Because you now have a 1024 x 768 interface, you must make your view sizes a little more dynamic.
The best approach to resizing views is to make all of their sizes relative to the device size. That way, you can build for all devices without using compiler directives. You can obtain the size of the screen by using the following method call on UIScreen:
[[UIScreen mainScreen] applicationFrame]
This returns a CGSize containing your device’s height and width. What makes it even more dynamic is the fact that these values are automatically adjusted when the device is rotated. This will aid you in the next section as well.
In the collage application, two major areas break on the iPad. The first is the working area in which you can place images: currently, you’re restricted to the 320 x 480 resolution. Second, the UISlider has been absolutely placed and appears in the center of the screen. Figure D.5 shows these issues.
Figure D.5. Broken interface on the iPad

Let’s start by solving the issue of photos being restricted to the 320 x 480 frame. Open tempImageView.m, and change the touchesMoved method to look like listing D.2.
Listing D.2. Updating the image-view frame in tempImageView.m

You get the current dimensions of the device’s screen ![]() and then restrict the x position of the user’s photo to the screen bounds
and then restrict the x position of the user’s photo to the screen bounds ![]() . You do the same thing for the y coordinate
. You do the same thing for the y coordinate ![]() .
.
If you run the application at this point, you can drag the photos all around the screen. But there is still a problem with the UISlider: it’s obviously in the wrong area.
In the original application, the UISlider was positioned to appear on top of the toolbar. You did this by placing it on top of the UIToolbar at the bottom. This wasn’t the best approach for building on multiple devices. The solution is to add the UISlider as a subview of the UIToolbar. That way, as the UIToolbar scales and rotates, so does the UISlider. Open CollageViewController.m, locate imagePickerController:didFinishPickingImage:, and update the lines
mySlider = [[UISlider alloc] initWithFrame:CGRectMake(90,415,210,44)];
[self.view addSubview:mySlider];
to the following:
mySlider = [[UISlider alloc] initWithFrame:CGRectMake(90,0,210,44)];
  [myTools addSubview:mySlider];
Now that the UISlider is a subview of the toolbar at the bottom, you won’t have to worry about its positioning. It will always appear in the toolbar next to the Done button. Figure D.6 shows the updated interface with these improvements.
Figure D.6. Updated iPad interface

The application is starting to look much more complete. But one problem remains: when the user rotates the device, the interface stays in portrait mode. You need to tell the interface to rotate as well as update the frames of the main views.
D.5. Adding multiple-orientation support
As we mentioned earlier, adding support for all orientations is necessary for iPad applications. To do this, you must implement the shouldAutorotateToInterfaceOrientation method on all your views. This method should respond to the interface changes and return YES. To update the application, open collageViewController.m and add the following code:
- (BOOL)shouldAutorotateToInterfaceOrientation:
    (UIInterfaceOrientation)interfaceOrientation {
#if __IPHONE_OS_VERSION_MAX_ALLOWED >= 30200
    return YES;
#else
    return (interfaceOrientation == UIInterfaceOrientationPortrait);
#endif
}
Because you’ve been careful when updating your view frames in the previous chapters, no real work is needed here. The code returns YES if you’re building for the iPad device and returns YES for the iPhone if in portrait mode.
All built-in interface components should rotate and resize automatically. Problems generally occur when you create custom views with hardcoded sizes. Making sure you develop according to the device’s screen size will drastically reduce the amount of work you have to do in this method. Figure D.7 shows what the final interface looks like in landscape mode.
Figure D.7. The collage application in landscape mode

For the most part, converting applications won’t be as simple as this, because the collage is such a basic application. But the conversion patterns are the same. For more information about porting applications from the iPhone to the iPad, read the “Starting Your Project” section of Apple’s developer article titled “iPad Programming Guide”; you can find it by searching in the help documents.