
Chapter 7
Putting Common Apps to Work
IN THIS CHAPTER
![]() Setting reminders
Setting reminders
![]() Making notes
Making notes
![]() Using Notification Center
Using Notification Center
![]() Navigating with Maps
Navigating with Maps
![]() Staying current with News
Staying current with News
As I’ve said many times before in my books, “If it works in one place, it’s likely to show up in another.” In this case, five popular time-saving (and headache-preventing) apps have crossed over from the world of iOS devices — the iPhone and iPad— and have securely landed on your Monterey Desktop. These apps are Reminders, Notes, Notification Center, Maps, and News, all taken from the iOS world.
That’s not the only good news, though: These five Mac applications work seamlessly with an iCloud account. So if you also use an iOS device (with the same Apple ID), much of the data you store — such as the notes you take and the reminders you make — is automatically synchronized among all your Apple computers and devices.
Because all five of these applications have a similar goal — keeping you in touch with the information, daily tasks, locations, and digital events that matter to you — I decided to cover them in one shiny chapter. Consider this chapter a guide that demonstrates how you can remind, note, notify, read, and map like a true power user.
Remind Me to Use Reminders
In its simplest form, a reminder is just a short phrase or sentence. You don’t need to look far to find the Reminders application on your iMac. Just click the Reminders icon on the Dock to display the main window, shown in Figure 7-1.

FIGURE 7-1: The main Reminders window in action.
These are the highlights of the Reminders window:
- Search box: Click here and type a phrase or name to search for it among your reminders.
Reminders Sidebar: You can add as many separate reminder lists as you like in the application (one for work, for example, and another for your Mac user group). In the Sidebar, you can switch quickly among your lists.
 You can hide or show the Reminders Sidebar at any time using the View menu or by pressing ⌘ +Control+S. You save a significant amount of screen real estate when the display is hidden.
- Add List button: Click this button (or press ⌘ +Shift+N) to add a new reminder list to the Sidebar. The list name is highlighted in a text box, so you can simply type the new name and press Return.
- Reminders: These entries are the reminders themselves. Each reminder is prefaced by a radio button; select the radio button when the reminder is complete, thereby moving that reminder automatically to the Completed link. And yes, if you click the Show link next to the number of completed reminders to display them and deselect the radio button for a reminder, it returns (like a bad penny) to the original list.
- Add Reminder button: Click this button (or press ⌘ +N) to add a reminder to the selected list. Press Return afterward to save the reminder to your list.
Adding a reminder is straightforward. First, click an entry in the My Lists display or click the Today or Scheduled group and then click the Add Reminder button. Type the desired text and press Esc to create a basic reminder.
Naturally, you’re not limited to a simple text message! When you create a reminder, the application allows you to add notes, link a location, or add a date to display a message.
Monterey introduces tags to the Reminders app, allowing you to search for specific reminders using terms that you create. (They work much like Keywords in the Photos app.) When adding a new reminder, click the Add Tags field and type one or more tags separated by spaces. Each tag needs to start with the # character, as in #wedding or #newfeatures. Reminders even displays a # button that you can click to enter the symbol. After you’ve entered tags within all your reminders, you can use the Search box at the top of the Reminders Sidebar to display just those reminders that include the tags you specify. Tags also show up in the Sidebar (making them easy to display with a single click) and under the reminder entry. Neat!
You can also hover your cursor over any existing reminder to display an Info button (the lowercase i-in-a-circle icon that appears at the right side of the window). Click the Info button to display the Edit sheet, shown in Figure 7-2.
These fields are on the Edit sheet:
- Reminder text: Click this text to edit the reminder text itself.
- Flag: Click this button (bearing a flag icon) to add this reminder to your Flagged group. This button allows you to display just the flagged reminders you’ve created.
- Tags: Click this field to add a tag, or click any existing tag to edit it.
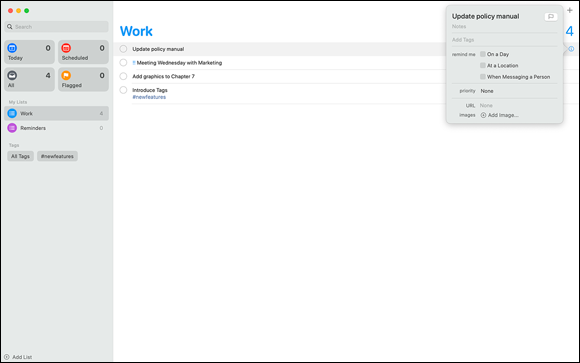
FIGURE 7-2: Editing a reminder.
- Notes: Click the Notes label to enter a free-form text note along with the reminder.
- On a Day: Select this check box if the reminder should appear in Notification Center on a particular day. By default, the date is the one selected when you created the reminder. You can click the Date and Time fields to change them.
- At a Location: This feature is powerful. Select the At a Location check box and you can type an address in the Enter a Location field. Reminders monitor your current location on your iPad or iPhone by using Location Services. They notify you when you’re leaving or arriving at that approximate location (and, optionally, on the date and time you specify in the On a Day field). You could create a reminder that notifies you on your iPhone when you’re arriving at the mall on September 15 to pick up the watch that’s being repaired. You can even specify that a reminder appear when you send a Message text to a specific person. Shazam!
- Repeat: If you select the On a Day check box, you can also set this reminder to repeat every day, week, month, or year at the same time.
- Priority: You can assign one of four priorities to the reminder: Low, Medium, High, or None. Assigning a priority prefaces the reminder text with one (Low), two (Medium), or three (High) blue exclamation points so that the reminder stands out from the crowd.
- URL: Click this field and enter a web page to associate with the reminder. When the reminder is displayed, you can click this address to launch Safari and display that page.
- Images: Click the Add Image button to browse your system for a photo to add to this reminder.
Click anywhere outside the Edit sheet when you’ve finished making changes. You can edit a reminder as often as you like. I sometimes need to change the date on a reminder multiple times as my schedule changes, for example.
To delete a reminder from the list, right-click it and choose Delete from the shortcut menu.
iCloud connectivity allows the Reminders application to share information with other Macs and iOS devices, as well as Microsoft Outlook on both PCs and macOS. To share reminders, click the System Preferences icon on the Dock, click the Internet Accounts icon, and then click one of the accounts on the left side of the pane. If an account allows you to share data from the Reminders application — such as the iCloud account — you’ll see a Reminders check box on the right side of the pane.
Taking Notes the Monterey Way
Imagine a notepad of unlimited pages that’s always available whenever you’re around your iMac, iPhone, or iPad. That’s the idea behind Notes, and it’s superbly simple. To open the macOS version of the application, click the Notes icon on the Dock. The window shown in Figure 7-3 appears.
The salient stuff in the Notes window includes these items:
- Search box: If you’re hunting for a specific note, click this box and type a phrase or name to search for it.
- Folders list: You can create new folders to hold specific kinds of notes. In Figure 7-3, for example, I added a Work folder. To add a new folder, choose File ⇒ New Folder or press ⌘ +Shift+N and type the new folder name. To switch between folders, display the Folders list and click the desired folder. You can display or hide the Folders list from the View menu.
- Notes list: Each note you create appears as a separate entry in the list. You can click a note in the list to switch to it immediately.
- New Note button: Click this button to add a new note. Notes uses the first line of text you type as the title of the note, which appears in the list.
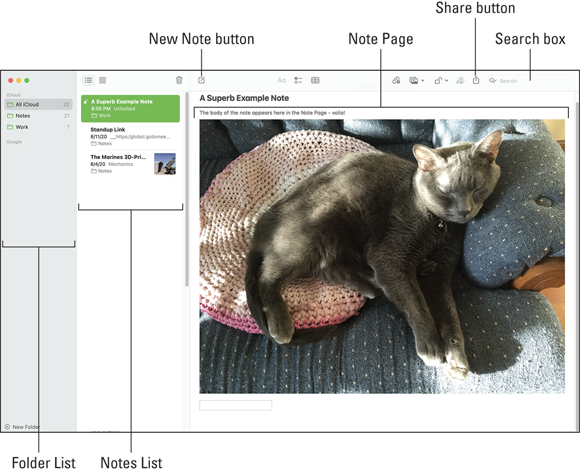
FIGURE 7-3: The notable Notes application window.
- Note page: This free-form pane is where you type the body of your note. You can also drag images from a Finder window to include them in the body of the note, or embed PDF and audio files by dragging them from a Finder window as well. The Photos Browser, available from the Notes toolbar, makes it easy to add images from your Photos library.
- Share button: Got a shopping list to distribute? Open this pop-up menu to share the contents of the current note, just like the Share button that appears on the Finder window’s toolbar. Sharing options can include a new email message, a new message in the Messages application, and exchanging information with another device via AirDrop.
To edit a note, click it to select it in the Notes list and then simply make your changes or additions on the note page. You can format the text from the Format menu, choosing everything from fonts and colors to bulleted and numbered lists. Toolbar buttons make it simple to add a checklist (complete with fancy controls that you can click to mark something completed) or lock specific notes with a password. You can use tags in notes as well, just as I describe in the previous section on Reminders — and don’t forget to preface your tag with the # symbol.
To delete a note you no longer need, right-click it in the Notes list and choose Delete from the shortcut menu. The application moves the note to the Recently Deleted folder, where it can be retrieved for up to 30 days.
You can pin a note to the top of the Notes list to make it more visible; the note stays anchored to the top of the list whenever it’s visible. Right-click the desired note in the list and choose Pin Note from the shortcut menu (or choose Unpin Note to return the note to regular status).
A note can include tables to help organize your data, much like the Pages application! Click the Table button on the Notes toolbar to create a default table (two columns and two rows); then click the first field and begin typing. Press Tab to continue to the next field in the table. To create a custom table, click within a cell (or select the table as a whole) and use the row and column controls that appear to specify the number of rows and columns.
Like Reminders, the Notes application can share information with Macs and iOS devices, as well as with Microsoft Outlook on both Macs and PCs. The process is the same: Open System Preferences and click the Internet Accounts icon; then click the desired account on the left side of the pane. Accounts that support sharing data from Notes display a Notes check box on the right side of the pane. Imagine all the sundry things you include in a class project — notes, photos, charts and tables — all in one convenient location!
Need an extra layer of security for your notes? The application allows you to lock your notes to keep them private, requiring a password to view them. Click Notes ⇒ Preferences and click Set Password, then enter your password twice and click the Set Password button. (iMac keyboards with a Touch ID sensor can unlock notes with a fingerprint! Click Use Touch ID to start the ball rolling.) After your password or Touch ID is set, you can select a note in the list and click the Lock icon that appears in the Notes toolbar to lock it, which places a tiny lock icon next to the note’s title.
Staying Current with Notification Center
Unlike Reminders and Notes, Notification Center isn’t an application that you launch. Instead, Notification Center appears at the far-right end of the Monterey Desktop. It’s always running, and you can display or hide Notification Center at will.
Click the clock display icon (or, if you’re using the trackpad, swipe with two fingers from the right edge to the left) to display your notifications. These notifications can be generated by a host of Monterey applications and functions, including Calendar, Mail, FaceTime, Reminders, Game Center, Photos, Messages, Safari, Facebook, and even the Mac App Store. Third-party applications can also generate notifications.
Notification Center displays all sorts of information that specifically applies to today’s date (as shown in Figure 7-4), including Calendar events, Reminders, the current weather, and the latest stock figures. (In fact, Notification Center actually scrolls vertically to show you more content.) You can specify what information is displayed by clicking the Edit Widgets button at the bottom of Notification Center (not shown in Figure 7-4). To switch back to Notifications view, click the Done button that appears at the bottom of the Edit Widgets view.
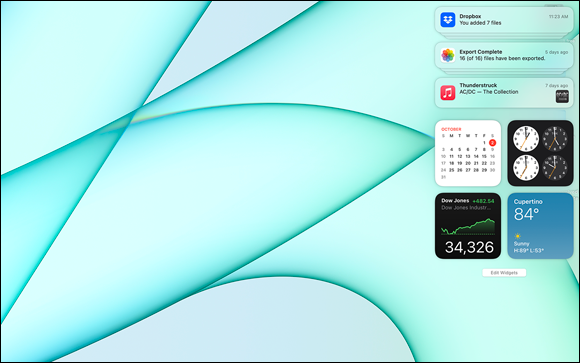
FIGURE 7-4: Notification Center muscles your desktop to the side.
I love how Notification Center doesn’t interfere with open applications; it simply moves the entire desktop to the left so that you can see the Center. You can close Notification Center at any time by clicking anywhere on the Desktop to the left, clicking the clock display on the Finder menu bar again, or swiping two fingers across the trackpad in the opposite direction.
Notification entries that appear in Notification view are grouped below the application that created them. You can delete many entries from Notification Center by clicking the Delete button that appears next to the application heading (which bears an X symbol). Other entries, such as Calendar alerts, remain in Notification Center until the event has passed.
But wait — there’s more to Notification Center than a strip of widgets! Depending on the settings you choose, notifications can also appear without Notification Center being open at all. These notifications are displayed as pop-up banners (which disappear in a few seconds) and alerts (which you must dismiss by clicking a button).
Monterey can also allow actions in notifications. Depending on the application or function that generates the notification, you may see buttons on a banner or an alert that allow you to take care of business (without requiring the application to be running). If a new email message is received in Apple Mail, for example, you can choose to reply to or delete the message. Websites can display updates as notifications, and you can answer a FaceTime or an iPhone call directly from the notification.
You can configure the notifications for all your applications from the Notifications & Focus pane in System Preferences. You can find details on the Notifications & Focus pane in Chapter 5.
Introducing the Maps Application
If you own an iPad or iPhone, prepare yourself for a joyful state: Your beloved iOS Maps application also resides on your Dock! As long as you have a connection to the Internet, Maps is ready to display locations, provide directions, and even supply informal views of important sites worldwide. (Recognize the grand dame in Figure 7-5?)

FIGURE 7-5: The Statue of Liberty shines in the Maps application.
Displaying an overhead view of an address is one of the simplest chores in all of macOS. In the Maps window, just click the Search box at the top of the window, type the address, and press Return. Maps displays the address with a red pushpin to help you locate it.
Depending on the location you’ve chosen, you may also see a tiny Info icon (which looks like a lowercase i within a circle) next to the name. To view more information, click the Info icon.
If you’re in range of a Wi-Fi signal and have Location Services turned on, you can quickly map your current location by choosing View ⇒ Go to Current Location or pressing ⌘ +L.
Ah, but why stop with a simple address? You can also enter the following types of information:
- The name of a landmark, monument, or building (such as Statue of Liberty).
- The name of a business or restaurant (or even a genre of food, such as Chinese) followed by the city name. Maps displays matching sites with pushpins, complete with reviews, and you can click any of the pushpins to find more information on a location. Figure 7-6 illustrates a search for pizza restaurants in my hometown of Columbia, Missouri. You see the Info pop-up window that appears when I click the Info icon next to the restaurant’s name, complete with a link to the website and reviews aplenty.
- Attractions and services, followed by the city name. You can search for a gas station, movie theater, or local park.
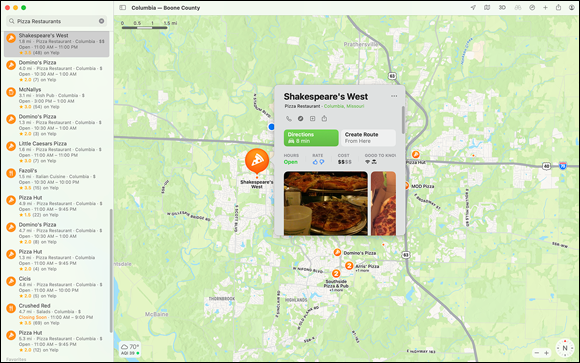
FIGURE 7-6: Looks like this pizza joint is highly rated.
If you need to zoom in or zoom out on a Maps display, use the scroll function on your pointing device, click the plus and minus buttons in the bottom-right corner of the Maps window, or press the ⌘ +plus and ⌘ +minus shortcuts. To move around the Maps window, click and drag the map in the desired direction.
Teachers and parents, take note: A virtual flyby of a famous site in Maps is a valuable (and cool) resource. Look for a 3D Flyover Tour option in the Sidebar at the left side of the window (or in the Info panel) when you’re viewing famous tourist sites!
Switching Views in Maps
A traditional printed map offers you only one view, which may be perfectly fine for determining a route but provides no visual interest. (The word banal comes to mind.) Maps, on the other hand, offers three types of views, each of which offers certain advantages:
- Default (or Map) mode is a familiar line map with streets and highways marked. Default mode, which is just like an old-fashioned paper map, is best for planning a road trip.
- Satellite mode is a photographic overhead view without streets or highways marked, which is great for getting panoramic views of your neighborhood or a location and its surroundings. (Note that if you zoom far enough out in Satellite view, Maps presents the Earth as a globe!)
- Transit mode displays public-transportation routes and bus, subway, and train schedules. Note, however, that Transit information isn’t available in every location.
To select your view, click the Map Mode Menu button in the toolbar (it resembles a folded map) or press ⌘ +1 for Default Map, ⌘ +2 for Transit, or ⌘ +3 for Satellite. Figure 7-5, shown earlier in this chapter, illustrates Satellite view, whereas Figure 7-7 shows off the same location in Default view.
Have I mentioned the 3D map yet? No special glasses are required! For additional visual thrills, you can angle the Maps display with a slight 3D effect — nothing quite as grand as a 3D TV, but it does help add depth to Satellite view. To toggle 3D, press ⌘ +Shift+1 or click the 3D Map icon in the toolbar.
By default, Maps is oriented with north at the top of the screen, but if you need to change the orientation, click the red compass arrow in the bottom-right corner of the screen and drag it in the desired direction. To return to having north at the top of the screen, press ⌘ +1 or choose View ⇒ Snap to North.
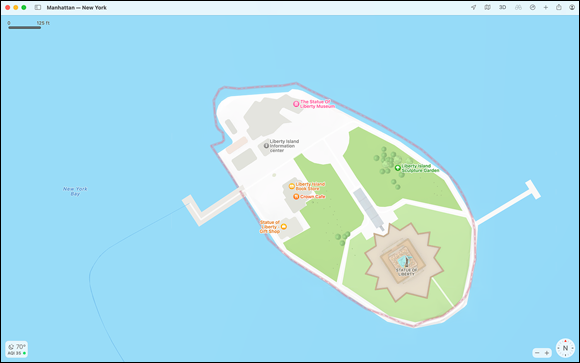
FIGURE 7-7: Standard view reminds me of an auto GPS unit.
Getting Directions Over Yonder
My primary use for a map is to get directions from one point to another, and Maps doesn’t disappoint when it comes to navigation. Click the Directions button in the toolbar (which looks like an arrow in a circle) to display the panel you see in Figure 7-8, and you’re ready to plot your course.
Follow these steps to get directions between two addresses:
In the Start box, type the starting address.
As you type, Maps provides a pop-up list of suggestions taken from your recent locations, as well as addresses from your Contacts database and matching streets from around the globe. To choose one of these suggestions, just click it. To clear the contents of the field, click the X button that appears on the right side of the box.
Press Tab to move to the End box, and type the destination address.
Note that your destination doesn’t have to be a specific address. Memphis, TN, for example, works just fine.
- Click the Drive button for road directions, click the Walk button for walking directions, click the bicycle icon for cycling directions, or display mass-transit information by clicking the Transit button.
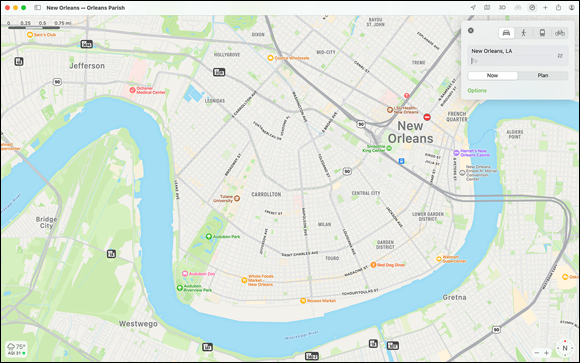
FIGURE 7-8: The Directions panel is ready to provide directions to your next crawfish boil.
Maps usually offers more than one route for your trip. The first route provided is typically the fastest or shortest, and it appears in bright blue. To view one of the other routes, click a light-blue line, which turns bright blue to indicate that now it’s the selected route. (You can see the approximate mileage and time for the selected route in the Directions panel.) Click the arrow next to the option you prefer and you’ll see a turn-by-turn list that provides the approximate mileage for each leg of the journey.
You can easily print the route map and directions by choosing File ⇒ Print (or pressing ⌘ +P) and then clicking the Show Details button at the bottom of the Print sheet to display all the options.
If you’d rather create a PDF document with your map and directions, choose File ⇒ Export As PDF.
Finally, Maps allows you to share your maps and directions by using Mail, Messages, Notes, Reminders, or AirDrop, as well as to send the information directly to your iOS devices. Click the Share button at the far-right side of the Maps toolbar and then choose the desired sharing method.
Creating and Using Guides
How many times has a friend or member of your family asked you for an informal “itinerary” to a city or tourist attraction that you know well? Or perhaps you’ve arrived as a stranger to a big city, wondering where to go and what to do. With the Guides feature in Maps, you have an expert travel resource handy whenever your iMac is near — and you can even create your own Guides for others to use!
As an example, say that you’ve just arrived in New York City and can’t wait to explore the Big Apple. Sure, everyone is familiar with Times Square, the Empire State Building, and the Statue of Liberty, but what else should you see? With Maps, just enter New in the Search box and click New York, NY in the list of results. Maps displays New York City and its surroundings, along with the Info panel. Scroll down just a bit in the Info panel and you’ll see some of the top Guides for New York City — in this case, “The Best Pumpkin Patches Near NYC” from tinybeans, as shown in Figure 7-9. If you’ve found the Guide that catches your interest, click the thumbnail to display it.

FIGURE 7-9: Here’s a Guide for pumpkin lovers in the Big Apple.
Creating your own Guide is just as easy! You’ll notice a heading in the Maps Sidebar named My Guides. Hover your cursor over this heading and then click the plus sign icon to display the New Guide panel. Here, you can enter a name for your Guide and select an image (or key photo) to appear with the Guide. Press Return to add the Guide to the Sidebar.
Now comes the fun part: Use the Search box to locate a specific location that you want to add to your Guide, whether it be a restaurant, hotel, or landmark. On the Directions panel for that location, click the ellipsis icon (the three dots at the upper right of the panel), choose Save to Guide, and click the name of the Guide you just created. Note that the entry for your Guide now indicates that the Guide includes one place, and Maps will keep track of how many places you include.
To share a Guide with others, click the Guide entry in the Sidebar and then click the Sharing icon in the Maps toolbar. You can send a link to your Guide via Messages, Mail, Notes, Reminders, or by using AirDrop.
Catching Up on News
Are you a current events junkie like I am? Before the arrival of the Internet, I used to remain glued to my TV, absorbing the latest information from the news channels — heck, I even subscribed to an old-fashioned newspaper! (To be honest, I still do, but it’s the online edition of my hometown paper.) If news is your passion, let me introduce you to Monterey’s News app, shown in Figure 7-10.

FIGURE 7-10: All the news that fits, News displays!
The News window includes a number of items to help in your perusal:
- Toolbar: This familiar strip of buttons allows you to share stories and mark favorites with a single click.
Sidebar: The News Sidebar makes it easy to navigate among topics, news sources, and stories you’ve saved. You can display or hide the Sidebar from the View menu, or you can click the Show/Hide Sidebar button in the toolbar.
Although the items in the Sidebar change over time (as News “learns” your preferences and you add channels), you can click the Edit link at the top of the Sidebar to remove items whenever you like.- Content pane: Here’s where News displays its content. Similarly to a web page in Safari, you can click on an item title or accompanying image to load the entire story. When a single story occupies the Content pane, a left arrow appears at the far left side of the toolbar; when you’re ready to return to the item list, just click the arrow.
- Share button: If you’d like to share a link to the displayed story within a Mail message, social media post, or a Message, click the Share button to display the pop-up menu. You can also create a new Reminder or Note from the story. (The Share button appears only when you’re reading a story, so it doesn’t appear in Figure 7-10.)
Are you rushed for time? To save a story you’re reading in the Sidebar for later, press ⌘ +S. News adds the story under the Saved Stories heading in the Sidebar.
Using Favorites and Channels
As I mention earlier, News actually “learns” what type of stories you like as you use it and will present stories that it thinks will interest you in the Sidebar (under the “Suggested” heading). However, there are two News features that help you focus even more on certain topics and news sources: favorites and channels.
 Many channels require that you pay a subscription fee (either through Apple or the provider themselves) before you can view the content — for example, the Washington Post and Wired magazine. Of course, you can always find plenty of free content within News, but don’t be surprised if a premium channel is off-limits unless you subscribe.
News allows you to mark a specific topic as a favorite, indicating that you’d like to see more stories covering similar subjects. To mark a story you’re reading as a favorite, press ⌘ +L (for Loved Story) or click the Favorites button on the toolbar. If, on the other hand, you’d like to avoid seeing similar stories in the future, press ⌘ +D (for Dislike Story) or click the Dislike button on the toolbar.
Within News, you can specify a news source as a channel, such as Bloomberg or BBC News. They will appear in the News Sidebar under the “Channels & Topics” heading. The topics you’ve marked as Favorites appear under the same header. To choose channels or topics, click File on the News menu bar and click Discover Channels & Topics. When you see a news source or a topic you’d like to monitor, click it (which makes the Favorites heart icon turn red). After you click Done, you see that your channel and topic selections are added to the Sidebar under the “Channels & Topics” heading. To stop following a channel or topic, display the channel or topic in the Content pane and click File ⇒ Follow Channel/Topic to remove the check mark.
If you’d like to block all the stories from a specific channel or topic, display it in the Content pane and click File ⇒ Block Channel/Topic. You can edit your Block list from the File menu as well.