CHAPTER 6
Hardening the Wireless Infrastructure
Infrastructure hardening has a special place in my heart; it's how I got involved with network security in the beginning. As part of architecting networks for clients and upgrading switches, routers, firewalls, and wireless, hacking into the devices (with the client's permission of course) was how we were able to access the systems in cases where a team inherited an environment or lost key personnel. Among the various projects, there was only one router we weren't able to access. Every other device or network offered a way in, either through misconfiguration or lack of hardening.
Secure architecture planning should address hardening the infrastructure, and many of these best practices should be in place before the wireless infrastructure is deployed, even in a test or proof of concept (PoC) deployment.
This chapter introduces concepts related to hardening the infrastructure including securing management access, implementing controls to guarantee integrity of the system, guidance for hardening client-facing services, and additional considerations and vendor-dependent features.
After you've worked through your planning tasks covered in Chapter 5, “Planning and Design for Secure Wireless,” the next considerations to incorporate are the hardening aspects.
Hardening recommendations vary by organization based on risk tolerance, threats, and the resources available. It's important to note that not every organization will be able to implement all of the following controls. It may be an unpopular opinion from a security perspective, but security is a balancing act, and each organization should carefully consider the pros, cons, and trade-offs presented here.
For example, many of the hardening mechanisms presented will drastically reduce the organization's visibility of the environment—a trade-off that may not be acceptable or desirable. However, those limiting controls are appropriate for targeted environments such as those in federal agencies, national defense agencies, and financial organizations where additional resources and processes are in place to properly manage such an environment.
For that reason, this chapter includes tiered guidance to address recommendations for environments of all sizes, and organizations across multiple industries. All organizations should follow the minimum guidance for hardening, while additional controls are suggested for higher security tiers.
Content on hardening the infrastructure in this chapter includes the following:
- Securing Management Access
- Designing for Integrity of the Infrastructure
- Controlling Peer-to-Peer and Bridged Communications
- Best Practices for Tiered Hardening
- Additional Security Configurations
Securing Management Access
The first low-hanging-fruit task for hardening is to ensure all management protocols are configured to use encryption and proper authentication.
These tasks entail enabling encrypted protocols and disabling unencrypted protocols (such as enabling SSH and disabling Telnet for CLI access), removing all default passwords throughout the system components, tightening management access to enforce user-based logins (versus shared logins), and restricting the allowed sources of management traffic.
In this section we'll also address how to handle cases where shared logins are required, with proper use of credential vaulting for credentials, SSH, and API keys.
To wrap up the topic of securing management access, final considerations including privileged access management are addressed. Securing management access is broken down into these topic areas:
- Enforcing Encrypted Management Protocols
- Eliminating Default Credentials and Passwords
- Controlling Administrative Access and Authentication
- Securing Shared Credentials and Keys
- Addressing Privileged Access
- Additional Secure Management Considerations
Enforcing Encrypted Management Protocols
There are a few best practices for hardening that should be followed even in the laxer scenarios of labs and proofs of concept, and enforcing encrypted management protocols (along with removing default credentials) is one of them.
Even in a secured production environment with a dedicated management VLAN and restricted administrative access, configuring network devices for encrypted management protocols is a must. In doing so, you're ensuring critical and sensitive administrative traffic can't be exposed via eavesdropping—a scenario just as likely caused by security tools as it is a malicious user.
In most networks, some or all traffic is examined as it traverses the network for purposes of security inspection or populating baseline analytics. This could be via network-based security tools such as user and entity behavior analytics (UEBA) and security information and event management (SIEM) or through gateway security products performing advanced filtering, deep packet inspection (DPI), or SSL inspection of secured web traffic. Regardless of the source or reason, you never want management traffic to be passed in cleartext because you really never know where it may be exposed to eavesdropping and have its contents exposed or intercepted.
In addition to providing the confidentiality from encryption, secure management protocols add integrity through strong (ideally mutual) authentication of the administrative user to the system and also incorporate message integrity. These added integrity features ensure management traffic is not only confidential, but also has non-repudiation and is tamper-resistant.
Generating Keys and Certificates for Encrypted Management
Prior chapters addressed the use of certificates for purposes of authenticating RADIUS servers to endpoints, and optionally, endpoints to the server for 802.1X/EAP authentication. Discussion of certificates here is focused on securing management of the devices.
Using certificates for authentication and keys for encryption of course means that the certificates and keys have to exist on the managed device (in this case, some part of the wireless infrastructure). There's quite a bit of divergence among vendors as to how they handle certificate and key generation, but there's a general theme and common requirements underlying all products. You'll just have a bit of extra homework to do to research your vendors' latest documentation related to it.
Methods supported by vendors for certificate and key generation include:
- Self-signed certificates
- Certificates tied to secure unique hardware ID
- Certificates issued from third-party or public root CAs
- Certificates issued from internal domain CAs or PKI
- Keys generated on the device using key pairs
Certificates for secure device management are used in the following ways:
- For secure HTTPS web UI management
- For authenticating a controller to APs and vice versa
Key pairs for secure device management are used for:
- Secure Shell (SSH) authentication (as proof of an allowed certificate)
- Secure Shell (SSH) encryption
- Secure Copy Protocol (SCP), based on SSH
Some versions of wireless controllers also support SFTP for secure file transfers, which is not based on certificates or key pairs described here.
Although implementations and vendor support vary slightly, there's common guidance for creation and use of certificates and key pairs for secure management.
- Self-signed Certificates Self-signed certificates are supported by all wireless products but are not recommended. Instead, for a trusted infrastructure you should use either hardware-based certificates (if supported) or certificates issued from a root CA (either internal or third party).
The purpose of certificates is to provide integrity and confidentiality—specifically, authentication and encryption. By using a self-signed certificate, you're effectively invalidating the authentication portion of the mechanism since the client has no way to validate the server certificate against a known and trusted root CA.
In addition to the security risk, organizations will get penalized or flagged for using self-signed certificates and wildcard certificates in the environment during security assessments. The less secure certificate practices are never recommended, but they're especially bad practice when securing management of the infrastructure.
- Certificates Tied to Secure Unique Hardware ID For more than a decade, the industry has been working toward cryptographic bindings tied to immutable secure hardware-based IDs. The value is that it provides devices (infrastructure and/or endpoint) with a strong integrated mechanism for interoperable authentication and encryption without having to manually provision certificates to the devices.
The IEEE 802.1AR standard specifies Secure Device Identifiers (DevIDs) to be used for authentication, provisioning, and management purposes, including 802.1X EAP authentication, using X.509 certificates that are bound to the device hardware at time of manufacturing.
In addition to the DevID, some products allow network administrators to create and add additional certificates with Local Device Identifiers (LDevIDs). The 802.1AR work builds on long-standing initiatives such as the Trusted Platform Module (TPM), which can be used with 802.1AR.
In more specific terms, this technology is found in Cisco's Secure Unique Device Identifier (SUDI), which is an 802.1AR-compliant secure device identity. Cisco's SUDI on the controller can be used for several functions including as the trusted certificate for AP join functions, the HTTPS certificate, SSH, and zero touch provisioning.
It's worth noting that Cisco wireless products produced between July 2005 to mid-2017 have manufacturer-installed certificates that expire after 10 years. That was addressed for 9800 series WLCs starting in 2019, but other models and products have an integrated certificate expiration of 2037. When the hardware certificate expires, any feature using the SUDI certificate will fail; see manufacturers' field notices for workarounds.
Other manufacturers are moving toward secure hardware-based IDs such as those based on 802.1AR and TPM. The 802.1AR device identities are hardware-specific and not applicable to cloud-hosted managers and virtualized appliances.
- Certificates Issued from Third-Party or Public Root CAs Certificates for devices such as wireless controllers can be manually requested and installed, including from third-party and public root CAs. In these cases, you'll follow the request for creation of a certificate signing request (CSR), which is used to request a certificate from the issuing CA, and then you'll download and manually install the signed certificate(s).
- Certificates Issued from Internal Domain CAs or PKI Manual certificate requests and installations are supported for both third-party and internal domain CAs, but enrollment can be more automated when using internal CAs.
In service of the enrollment of domain-issued certificates, network infrastructure devices such as wireless systems can utilize standards-based processes for requesting and installing certificates from the domain infrastructure. In most products, this is supported through the use of either Simple Certificate Enrollment Protocol (SCEP) or Enrollment over Secure Transport (EST). In both cases, the controller will proxy the requests for and installation of certificates on behalf of the APs.
Based on past experience and current vendor documentation, products will support one or the other protocol for certificate enrollment, so there's no need to choose; you'll simply use whatever the product supports. At time of writing, Cisco's IOS-XE code uses SCEP and EST and Aruba's Aruba AOS 8-code chain uses EST.
- Keys Generated on the Device using Public/Private Key Pairs For protocols that rely on key pairs, such as SSH, simply follow the vendor's guidance for key creation.
As is always the case when using certificates, clock synchronization is critical and should be performed before generating or using certificates. Along with time synchronization settings, you'll also need to specify the device's hostname and domain so it has a FQDN when generating a certificate signing request (CSR) or a self-signed certificate.
Certificates come in several file formats; just like there are different graphics file formats (such as .gif, .jpg, and .png), certificate files used by vendors exist as X.509 PEM (encrypted or unencrypted), DER, PKCS#7, or PKCS#12, among others.
The most common are PEM (originally designated as privacy enhanced email) file formats, which are text ASCII-based and with readable headers such as -----BEGIN CERTIFICATE-----. A PEM file may contain a single certificate, a private key, or multiple certificates forming a chain of trust (to support the root CA and intermediaries), and are often of the file extensions .crt, .cert, and .pem (for certificates or chains) or .key (for private keys). DER and PKCS formats are binary formats, where DER and PKCS#12 can store certificates along with full trust chains and private keys like PEM, but PKCS#7 is a format for single certificates only.
For chained certificates used by APs to authenticate to the infrastructure, vendors will require the chained certificates to be in a specific order within the file, usually starting with the AP certificate, followed by the intermediate CA certificate, the root CA certificate, and then the private key.
The important point to note is that each vendor will support different file formats, and it's possible to convert to and from formats as needed. Consult your vendor product documentation or instructions from the issuing certificate authority for how-to details.
Figure 6.1 shows the standard readable header and footer of a PEM certificate with “Begin Certificate” and “End Certificate.” DER certificates contain binary with no human-readable text as shown in Figure 6.2.

Figure 6.1: Sample PEM certificate file format

Figure 6.2: Sample DER certificate file format
Enabling HTTPS vs. HTTP
Enabling HTTPS will require a certificate, which can be any of the certificate types just described—a self-signed (not recommended), a hardware-based certificate issued at time of manufacturing (such as those based on 802.1AR), or a certificate issued by a root CA either public or internal to the organization.
Infrastructure products will either create a self-signed certificate at initial boot or allow the generation of a self-signed certificate manually. Although self-signed certificates shouldn't be used in production, if the administrator is initially accessing the controller or device by web UI, then there will be a first-time use where unsecured HTTP or HTTPS using a self-signed certificate will occur.
Supported methods for the creation of, enrollment to, or installation of certificates are described earlier in the section “Generating Keys and Certificates for Encrypted Management.”
Once a proper certificate is installed on the controller or device, access by HTTP should be immediately disabled, and instead enforce HTTPS, which is encrypted. If your organization doesn't manage devices by web UI, you can (and should) disable both HTTP and HTTPS.
Some products may support a setting to auto-direct from HTTP to HTTPS, which should be enabled if supported.
Lastly, many wireless products may require an additional setting to enable the management of the device over wireless.
Some products may also support authenticating admins via client certificates for HTTPS management, with or without the addition of username and password authentication. In these cases, only a client device with the installed certificate (designated as allowed in the controller) would be allowed management access to the device over HTTPS. With that configuration, access can require the client certificate by itself, or in combination with an administrator login.
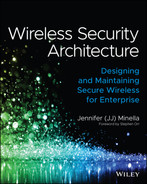
In most Wi-Fi products you can configure the use of HTTPS and disable HTTP in a web UI or CLI. The settings in a Cisco 9800 controller via the web UI are shown in Figure 6.3.
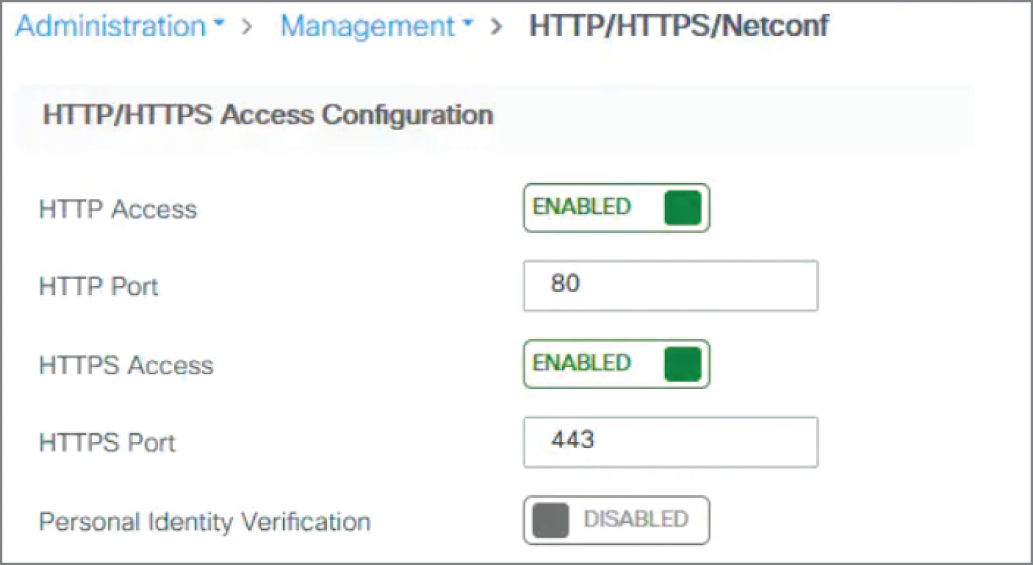
Figure 6.3: In most products you can enable HTTPS and disable HTTP in the web UI or CLI.
Enabling SSH vs. Telnet
Working with Secure Shell (SSH) for administrative access is two-fold—it can serve as both an encryption mechanism as well as authentication. First, SSH uses key pairs to enable encryption for CLI-based remote management access. Second, and often overlooked, SSH can use client keys as a management authentication mechanism (like certificates), and as described previously, this can be implemented with or without username and password credentials. Spoiler alert: in most organizations, I recommend always enforcing username-based logins since SSH keys are often mismanaged.
The first use case is straightforward. Just as with the other secure protocols, you'll need to complete the requisite steps to generate key pairs, and then enable SSH and disable its unencrypted counterpart Telnet. As with certificate creation, to generate the SSH key pairs, you'll first need to specify a hostname and domain for the device. SSHv2 should be used versus SSHv1, which has known vulnerabilities.
The second use case involves using SSH keys as a form of credential, either instead of or in addition to an authorized username-password credential.
When used for key-based authentication, an administrator or automated system generates a unique key pair for use by that user on that device (e.g., wireless controller), and the client key is then downloaded and used by an SSH terminal application (such as PUTTY) to authenticate the admin user to the wireless controller.
SSH public keys for authentication can be created using a common tool like PUTTYGEN (an add-in included with the PUTTY terminal application), or OpenSSL. See Figure 6.4. The private key should be saved and secured properly as part of a holistic SSH key management process. Then, in the wireless controller, you'll upload (or copy/paste) the public key of the pair and associate it with a user. Figure 6.5 shows an example of this operation in an Aruba Controller. The public key for the user is uploaded in the certificate store, and then associated with a user, as shown in this view.
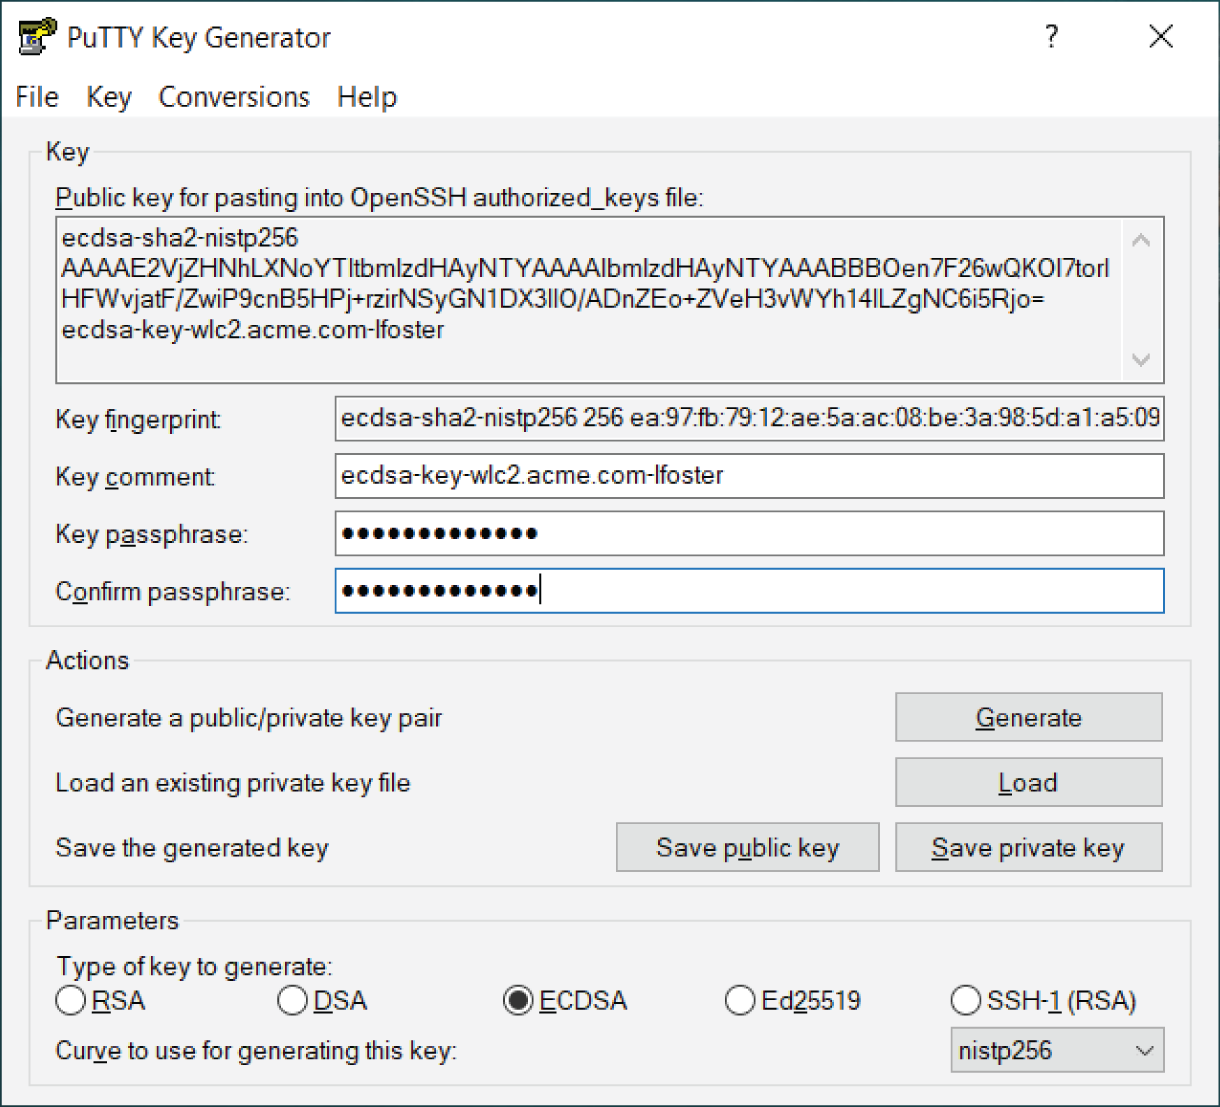
Figure 6.4: Creation of an ECDSA SSH key pair with PUTTYGEN
Figure 6.5: Many enterprise Wi-Fi products support public key authentication as shown in this Aruba controller example.
https://the-ethernets.com/2020/10/ssh-aruba-mm-md-via-public-key-auth/
Enabling Secure File Transfers
There are occasions where we need to move files around, to or from the wireless controller, and file transfer protocols should also be encrypted to protect the payload in transit.
Files that may get moved to or from the device include configuration files, software updates and patches, lists of APs, certificate files, MIB files, and CSV files such as a list of guest users or MAC addresses for an allowlist.
Files transferred using the web UI will be encrypted by the HTTPS protocol, but files transferred via the CLI should be secured with secure copy (SCP) or secure FTP (SFTP) to provide authentication and encryption.
SCP relies on SSH, and therefore configuring SSH at least for the encryption aspect (versus public key authentication) is a prerequisite.
Because SCP requires SSH, authentication, and authorization to have already been configured, many products default to unencrypted FTP (File Transfer Protocol) and TFTP (trivial FTP). While FTP is authenticated but not encrypted, TFTP is neither authenticated nor encrypted. Some products do also support SFTP (secure FTP), which also relies on SSH for encryption.
As with prior recommendations, enable SSH and then SCP and/or SFTP and disable TFTP and FTP, or configure management functions to each use SCP or SFTP if disabling TFTP and FTP is not a global setting. Table 6.1 provides an overview of the file transfer protocols and details, which include authentication and encryption.
Table 6.1: Overview of file transfer protocol security
| PROTOCOL | AUTHENTICATED | ENCRYPTED |
|---|---|---|
| Secure Copy (SCP) | Yes | Yes |
| Secure FTP (SFTP) | Yes | Yes |
| File Transfer Protocol (FTP) | Yes | No |
| Trivial FTP (TFTP) | No | No |
Enabling SNMPv3 vs. SNMPv2c
Simple Network Management Protocol (SNMP) is a standard protocol for monitoring and managing network devices such as switches, routers, and wireless products in addition to servers and endpoints such as laptops and printers.
SNMP data is organized in management information bases, or MIBs. Think of the MIB attributes as being a database with an element and then its corresponding configurations, such as “hostname” with the value of “wlc02.acme.com.” There are standard MIB elements for most aspects of a network-connected device and they can be queried and/or modified. A query of “what is the hostname” would return the value “wlc02.acme.com” in this example, where as an SNMP management instruction to modify the MIB element of hostname may push a new value of “wlc-east.acme.com.”
In addition to these examples of get and set, SNMP can be used for a trap function, which is a form of alerting to a logging system. Instead of a monitoring system polling the device for information, the system can gratuitously send a trap to a configured server. Traps can be enabled based on level or configured per group or type of trap.
The two versions of SNMP most widely used today are SNMPv2C and SNMPv3. There are a few devices in the world still relying on SNMPv1 but that has been deprecated for security reasons. Anecdotally, prior to SNMPv2c there was an SNMPv2, which offered encryption and other security but was not adopted due to its complexity.
- SNMPv2c SNMPv2c relies on community strings versus true authentication, and it's not encrypted, which is troublesome. Community strings are simply strings of alphanumeric characters that act as a passphrase (much like a RADIUS shared secret). And as hinted, the community strings are sent in cleartext, meaning neither the management data nor the pseudo-authentication of community strings is protected.
- SNMPv3 SNMPv3 was then created to address the lack of real authentication, encryption, and data integrity. With SNMPv3, users are created and specified with an authentication scheme (MD5, SHA) and an authentication password as well as a privacy protocol (AES, DES) and a corresponding privacy password. An SNMPv3 user is more of a machine account than an actual user account attached to a human. Users are created for each management or monitoring system.
SNMPv3, like any password-based mechanism, can be compromised by brute force and dictionary attacks but is leaps and bounds beyond better than SNMPv2c and any predecessors. In addition to the privacy and authentication controls, SNMPv3 includes security mechanisms to prevent spoofing and eliminates the use of cleartext credentials or data payloads.
If your infrastructure is managed or monitored with SNMP, use of SNMPv3 is always recommended over any prior versions.
See Table 6.2 for a summary of secure management protocols.
Table 6.2: Summary of management protocols and recommended encrypted versions
| USE CASE | UNSECURE PROTOCOL(S) | SECURED PROTOCOL(S) |
|---|---|---|
| Web UI Management | HTTP | HTTPS |
| CLI Terminal Management | Telnet | Secure Shell (SSH) |
| File Transfer | FTP, TFTP | Secure Copy (SCP) and Secure FTP (SFTP) |
| SNMP and API | SNMPv1, SNMPv2, SNMPv2c | SNMPv3 and APIs |
Eliminating Default Credentials and Passwords
Our next hardening task is to seek out and eliminate all default credentials on the wireless infrastructure devices. As you'll see, this isn't always as clear cut as it sounds.
Changing Default Credentials on Wireless Management
For on-prem-based products, such as wireless controllers, tunnel termination gateways, and wireless management platforms, ensure the default users and credentials are removed. At a bare minimum, this means changing the default password, but a much better case is to change both the default usernames and passwords. This decreases the likelihood of a successful brute force attack because the combinations of passwords and usernames outstrip the attack tools.
For example, if the default credential is user “admin” with password “admin123”, by changing the password to “somethingreallylonglikethis”, the password length will make it challenging, but a malicious user can initiate a brute force attack using dictionaries or rainbow tables with the user “admin” and different passwords. If, however, the username was changed to “adminsys242” along with the longer password, the likelihood of a successful attack drops drastically. If proper monitoring tools are in place to alert on repeated failed login attempts, then you're in a great position.
Different products support different management protocols, as we saw in the preceding section, and it's not uncommon for products to come preconfigured with a set of default credentials, such as default console access, default CLI/terminal credentials, and even a default web UI management account. These default accounts are becoming less common in products with more robust security features but are still prevalent.
Lastly, in addition to the normal management interfaces, highly integrated platforms may have credentials used for integrations with other products from the vendor or integrated third-party solutions.
The takeaway is to hunt down any and all default users and credentials, knowing there is likely more than one.
For cloud-managed products, there are usually no default credentials or users, except for access granted on the back end of the system by the vendor's support team (which can be disabled). The benefit is there's no default user; the downside is your management interface is exposed to the entirety of the Internet, making strong passwords and use of multi-factor authentication essential for securing management access.
Changing Default Credentials on APs
The management platforms and controllers aren't the only place default passwords are lurking. In every controller-based product, the APs are preconfigured (or configured through the controller) with default username and passwords. This can be configured and set centrally within the controller or management software.
Figure 6.6 shows an example of this setting on a Cisco 9800 web UI with options to change the default AP username and password from Cisco/Cisco to custom attributes.

Figure 6.6: Where possible, always change the APs' default username and password.
Removing Default SNMP Strings
In the previous topics of enabling encrypted management protocols, we covered why SNMPv3 is greatly preferred over SNMPv2c or any prior version, even if used for read-only and monitoring purposes.
Historically it has been common for vendors to include default community strings for SNMPv2c, and also to have SNMPv2c enabled by default. That means, even if you've chosen to use the more secure SNMPv3 and configured it properly, it's possible the infrastructure is at risk due to the default settings from the vendor.
Always check, double-check, and recheck SNMPv2c settings and make sure it's not enabled (if you're using SNMPv3) or if it is enabled, make sure the community strings are custom. Specifically, avoid the use of “public,” “private,” and any common permutations of those two words. Because SNMPv2c community strings are sent in cleartext, do not configure strings that are real passwords for anything else. Your SNMP strings, if used, should be “somerandomstring” not “supersecretpassword”. Even if SNMPv2 is not enabled, be sure any default strings are not configured.
This is probably the one setting you need to check regularly, as there have been cases where vendor code upgrades have changed (re-enabled) protocols such as SNMPv2c. Regular audits and monitoring of configuration changes is a topic covered in Chapter 7, “Monitoring and Maintenance of Wireless Networks.”
Controlling Administrative Access and Authentication
The task of securing management access continues with controlling administrative access and authentication. This topic addresses the discrete considerations and features available for restricting management access only to the people (or non-person entities) that need it, from approved networks or sources, and ensuring that access is logged and auditable.
Enforcing User-Based Logons
An easy and exceptionally impactful management control is the enforcement of user-based logons versus using shared accounts and credentials such as admin or root accounts.
Aside from segmentation, one of the most pervasive requirements for any security controls or compliance framework is the restriction of shared and group account credentials. For example, NIST SP 800-53 specifies a suite of controls and baselines for restricting use of shared accounts, and additional controls for monitoring and life-cycle management in the event a shared account is required. The same control suite also specifies requirements for credential vaulting in the cases of shared accounts, something covered shortly.
Administrative access needs to be logged and auditable with attribution (to a specific person) in addition to being authenticated and encrypted. To support that objective, it's recommended that all organizations (regardless of size) rely on user-based management logons. In most products, this is supported through AAA (authentication, authorization, and accounting) protocols primarily via RADIUS or TACACS+, or alternatively through a connection to LDAP, which offers authentication but not accounting.
Options for user-based management authentication include:
- RADIUS
- TACACS+
- LDAP to on-prem
- LDAP to cloud with SAML (e.g., via Azure SSO services and ADFS)
In talking to clients over time, the perception they often have is this is a daunting and complicated task that requires a lot of time, additional infrastructure, and a TACACS+ server. The reality is, TACACS+ is just one option for user-based management authentication and many organizations opt to use RADIUS for administrative access authentication, allowing them to leverage the infrastructure already in place for user-based 802.1X/EAP authentication. Also, the configurations for authenticating using AAA (RADIUS or TACACS+) can be pushed to multiple devices (such as edge switches or APs) at once through scripts or APIs and can be easily configured in a traditional wireless controller.
RADIUS and TACACS+ can both be used for management authentication and authorization but differ in granularity of authorization and security features (see Table 6.3). Most specifically, TACACS+ supports specific authorization policies, allowing the super user to specify which discrete commands an administrative user can issue on the device.
Granularity in the TACACS+ implementations vary, but usually follows one of two models:
- Mapping of privilege level to authorization rights
- Mapping of specific commands to authorization rights
As an example of mapping of privilege level to rights, for web UI access authenticated against TACACS+, Cisco's current code version on a 9800 maps users with privilege levels 1–10 to accessing the monitor tab features, and users with privilege level 15 have full administrative access. That's a web UI example; when implemented for SSH, per-command policies can be enforced versus the basic two tiers in the web UI.
As an example of specific commands, Aruba controllers support per-command authorization when used with ClearPass Policy Manager TACACS+ policies for management. In this example, a management user's rights could be restricted to only allow executions of specific commands, versus mapping to an entire privilege tier.
Table 6.3: Comparing TACACS+ and RADIUS for management
| FEATURE | RADIUS | TACACS+ |
|---|---|---|
| Industry Adoption | Open standard | Until September 2020, proprietary Cisco protocol that has to be licensed by third parties; new IETF RFC 8907 |
| Authentication Security | Username may be sent in cleartext if not secured with other means or RADSEC | All authentication elements encrypted |
| Authorization Granularity | Authentication and authorization are tied, no granular authorization policies | Supports tiered privilege mapping or per-command authorization for granular policies |
| Logging and Accounting | Authentication | Authentication plus detailed authorization |
| Protocol | UDP, by design | TCP |
Whether using RADIUS or TACACS+ for management authentication, the configurations are similar AAA configurations on the wireless infrastructure and will mimic the steps followed for 802.1X/EAP end-user authentication. For authentication against LDAP, a basic bind is configured along with the parameters for domain names, groups, and objects.
Creating a Management VLAN
Management VLANs are recommended as a best practice by vendors and also required by several cybersecurity controls frameworks.
A management VLAN can simply be a VLAN described for management of infrastructure devices, or it can be a more formal implementation by designation of a management VLAN within certain wired implementations. Formally designating a VLAN as a “management VLAN” in some wired products will automatically lock certain features and access to and from that network (which may or may not be desirable). Please consult your switch product documentation for guidance.
Formal designations aside, a VLAN that is simply defined as use for management of some or all of the infrastructure entails creating the VLAN, naming it, assigning an IP interface at the router(s), and configuring infrastructure devices (such as a wireless controller and APs) for that VLAN. Additional wired configurations for ACLs should be used to segment the management traffic from the client data traffic and other VLANs. Obviously in large environments, there will be multiple management VLANs, not one.
Depending on the size of the environment and organization, a single management VLAN could be used for several classes of infrastructure devices (such as switches, routers, servers, and wireless controllers), or the wireless infrastructure may need its own set of management VLANs. In this case, there may be one or more AP management VLANs, and one or more VLANs where on-prem controllers reside. Both scenarios are acceptable.
Management VLANs offer two primary benefits for security architecture:
- Segmentation of management traffic for integrity and confidentiality
- Segmentation of management traffic for availability
Segmenting for integrity and confidentiality helps protect management traffic from eavesdropping, injection, or modification from users or devices not authorized for management access.
Segmenting for availability offers the added benefit of reducing broadcast domains and protecting from denial-of-service (DoS) interruptions due to broadcast storms (often introduced via network loops), oversubscribed network segments (where management traffic is delayed due to other data along the same path), and malicious attacks.
If your wireless infrastructure devices aren't currently configured on a management VLAN, moving them (or moving other devices off their currently configured network) is highly recommended in all environments. Depending on the management architecture, it can be a tedious task, but the security benefits are well worth the effort.
Defining Allowed Management Networks
Network products, both wired and wireless, often support the specification of allowed management networks. This is a slight variation from a defined management VLAN described earlier in that allowed management networks enforce a basic access control list (ACL) for management traffic, which can be defined as allowed by one or more subnets. Management traffic received from other networks is simply ignored.
As an example, in many wireless products, you may have to explicitly allow management from clients connecting through the wireless interface.
Securing Shared Credentials and Keys
This topic, securing shared credentials, and the next one—addressing privileged access—go hand in hand, but are worthy of their own headings.
Even though best practices demand user-based management logins, just about every environment will have some shared credentials, and/or non-user-based accounts such as the admin and root accounts required for system provisioning. Even after user-based management authentication has been configured, there will still remain a certain volume of shared credentials, and those need to be addressed.
In the era of increasing security threats, remote work, third-party access to systems, and zero trust initiatives, credential vaulting is taking center stage as a critical network security tool.
Credential vaulting is akin to an enterprise password management tool on steroids. Mature vaulting products are designed to manage an assortment of secrets such as:
- Certificates
- Certificate private keys
- SSH keys
- API keys
- Shared and group passwords
- Service account credentials
- Other credentials for non-person entities (NPEs)
With vaulting tools, management of secrets is centralized and can therefore be controlled by the organization and integrated into identity and access management (IAM) security practices.
These tools also help organizations meet security compliance requirements, such as those mapping to NIST. For example, in NIST SP 800-53 revision 5, control item AC-2(9) mandates the restriction of shared and group credentials and control item IA-2(5) mandates that “When shared accounts or authenticators are employed, require users to be individually authenticated before granting access to the shared accounts or resources.” (Source: https://csrc.nist.gov/publications/detail/sp/800-53/rev-5/final.) “AC” controls are Access Control, and “IA” controls are Identification and Authentication.
Credential vaulting solutions do just that and more. Let's say there's a scenario where our organization has user-based management authentication but for some reason the RADIUS server is unreachable, and the system must fall back to local authentication. Instead of logging in directly with the user “admin” and the associated password, my terminal application attaches to a credential vaulting tool, I log in to the tool as me, and the vault passes through the admin credentials to the controller. In that process, I never see the username “admin,” nor the password associated with that user.
Most vaulting products have advanced credential life-cycle management and can update and rotate credentials on a predefined schedule. For example, if the organization rotates SSH keys or API keys every 90 days, the vaulting tool can automate those processes, or even update the password to a service account in the domain.
IT administrators and architects are often over-extended and putting out fires on a daily basis. In that daily grind and fray, it's common for sensitive credentials to be generated and stored insecurely. And, in fact, only the very large, very mature, or very regulated companies tend to have proper credential management.
If your organization doesn't have a credential vaulting solution now, please take this opportunity to make an appeal to your leadership to budget for that. It's a critical component to a holistic security strategy, and there are very affordable products, and probably even some free and open source options.
For context, popular credential vaulting applications include Azure Key Vault, Amazon AWS Key Management, and products like those from Beyond Trust (which can be deployed in the cloud or on-prem), all of which can be used to store not only SSH keys but certificates and other credentials.
Addressing Privileged Access
Privileged accounts are defined as accounts with elevated privileges or access above and beyond what a standard user is authorized for. Traditionally, management of privileged accounts has focused on access rights for users and services accessing specific data sets or applications—typically those containing regulated records such as health records, financial records, or personally identifiable information (PII).
The trends of remote access, cloud-managed services (including SaaS, PaaS, and IaaS offerings), and rising security threats are causing the tides to turn a bit and privileged access management will be incorporating control of admin accounts for infrastructure components such as the wireless infrastructure.
Here, we'll hit the highlights of privileged access with the understanding that this is an initiative usually driven by the organization's identity and access management (IAM) or security compliance teams.
It's a relevant and timely topic for network and system administrators, though, and your architecture strategy should include processes and tools for securing administrative access to the infrastructure.
Securing Privileged Accounts and Credentials
Along with privileged accounts (used by humans) are privileged credentials that may include SSH keys as well as API keys and tokens used by services, applications, and microservices. Granting authorization to a thing rather than a person presents challenges and breaks many legacy authentication models (such as hardware tokens). To support these shifts in use cases, regulations are starting to address the security of access by what the industry is now calling non-person entities (NPEs).
The subject of non-person entities is most prevalent when discussing security of workloads such as containers and microservices as well as robotic process automation (RPA), but it's extending to the infrastructure as the use of APIs becomes more prevalent.
Examples of privileged accounts and privileged credentials as defined for compliance and security policy include:
- Local host admin accounts
- Super user accounts (including management access to wireless)
- Domain admin accounts
- Privileged business user
- SSH keys, API keys, and other secrets
- Service and application accounts
- Emergency accounts
It never makes sense to add complexity unless there's a need, but protecting privileged accounts will emerge as a central theme of network security architecture due to account misuse, abuse, and lost or stolen credentials.
In fact, privileged account management is such a prevailing factor in security breaches and incidents that Verizon's Data Breach Investigations Report (DBIR) now includes privileged access as its own risk classification in the report: https://www.verizon.com/business/resources/reports/dbir.
Figure 6.7 and Figure 6.8 demonstrate a few data points from the Verizon DBIR 2021 report.
While privilege misuse is in a downward trend, lost and stolen credentials and miscellaneous errors are both continuing and expected to grow with more cloud-connected and remote access models. The graphics represent data related to actual breaches, not just incidents, which are classified separately.

Figure 6.7: Figure 10 from the Verizon DBIR 2021 report, showing privilege abuse as the highest contributor in top misuses resulting in a breach. Command shell access is number 5 in the top hacking vectors in breaches.
https://www.verizon.com/business/resources/reports/dbir/2021/

Figure 6.8: The report highlights credentials as top data varieties in breaches, above personal, medical, and banking data assets.
https://www.verizon.com/business/resources/reports/dbir/2021/
In a prior report, some notable findings demonstrated that:
- Weak or common passwords were the cause of 63 percent of all breaches
- 53 percent of the breaches were due to the misuse of privileged accounts
Privileged Access Management
The practice of managing privileged access is called privileged access management (PAM) and comes in the form of organizational policies, processes, and tools or applications.
PAM isn't just a best practice, it's also specifically called out as a mandated control in most regulations including Sarbanes-Oxley (SOX), the Federal and North American Energy Regulations Commission (FERC/NERC), HIPAA, and state-level regulations such as the California Information Practice Act.
International regulations for data privacy such as those outlined in the EU's General Data Protection Regulation (GDPR) may not specifically mandate PAM, but they do stipulate the organization must evaluate how it gathers and stores data as well as who has access to it.
Privileged access management processes and tools include:
- Privileged account and credential vaulting
- Monitoring and alerting of access
- Regular auditing of access and accounts
- Privileged account life-cycle management
- Proper password/passphrase security
- Enforcing the principle of least privilege
Privileged Remote Access
There's one more phrase to be familiar with—privileged remote access, or PRA, since we like acronyms so much. If you've followed along this far, there's likely no explanation needed.
Privileged remote access is a subset of privileged access management designed to address the unique aspects of accessing protected systems from the Internet or across other untrusted networks. It can also be used to manage access for employees and third parties, even if they're onsite.
Just like PAM, privileged remote access entails policies, processes, and tools but remote access tools are often different than standard PAM tools, meaning there may be a separate product used for this purpose, which is why I'm addressing it here.
Also, a recent forecast from IDG found 87 percent of enterprises expect their employees to continue working from home three or more days per week. This includes network architects, engineers, and sys admins who will rely greatly on privileged remote access moving forward. (Source: https://www.idc.com/getdoc.jsp?containerId=prUS46809920.)
With zero trust strategies surfacing and more and more users accessing systems remotely, the days of legacy VPN access where users are dropped on the network are coming to an end, and the dawn of granular PAM and PRA controls is coming.
Features for privileged remote access products vary, but in addition to the benefits of PAM, purpose-built remote access also addresses:
- Securely accessing systems remotely
- Maintaining detailed change logs for audit purposes
- Supporting various consoles and applications (e.g., for web UI or SSH access)
- Streamlining access by third parties including non-domain users (such as vendors' systems and support engineers)
- Enforcing multi-factor authentication
Additional Secure Management Considerations
There are a few fringe topics that don't warrant their own sections but are worth mentioning and considering in your security architecture.
- Enforce Secure Passwords Follow the organization's guidance for enforcing strong passwords that are resilient to cryptographic attacks. Password length is the most important factor with complexity being a second factor. Password security should be applied to local administrative accounts as well as directory-based user logins such as those through TACACS+, RADIUS, or LDAP.
- System Logon Banners Logon banners warn a user before attempting to log in to a restricted system, such as administrative access of the infrastructure.
Logon banners have legal implications and are recommended in most hardening guides as a best practice. The logon banner should include appropriate language warning an unauthorized user about attempts to access the system. It's worth noting that some vendors' features do not support the use of logon banners when enabled, so please consult your product documentation.
- Limit Concurrent Administrative Sessions and Set Timeouts Network devices most often allow configuration of a maximum number of concurrent admin sessions through terminal VTY (virtual terminal) settings, with many products supporting configuration options ranging from one to an unlimited number of logins.
Best practice is to configure a reasonable maximum for concurrent admin sessions, taking into account not only human managers but security, management, and monitoring systems that may be using SSH.
Along with maximum sessions, there should be timeouts configured for all administrative access to the system.
- Multi-factor Authentication (MFA) Although most compliance regulations define requirements for enabling MFA on administrative access of systems, it's still relatively rare as a direct control, meaning that box is checked and the requirement technically met via an intermediary like a jump box or through VPN access requiring MFA.
Regardless of how it’s implemented, MFA is strongly suggested for all administrative access, whether local or remote. Consider it a crucial requirement (versus recommended control) for remote access and management access to cloud solutions (such as cloud-managed networking like Juniper Mist, Meraki, ExtremeCloud, and Aruba Central).
- Logging and Monitoring of Administrative Access and Attempts Management access to systems including the wireless infrastructure and management should be logged and monitored appropriately. As with many of the topics here, this type of logging and alerting is specified as a requirement in most security regulations. This is a topic covered more in the next chapter. As part of your architecture planning, include monitoring for admin login password retries.
Designing for Integrity of the Infrastructure
Our hardening journey continues by designing for integrity of the infrastructure. At a high level, this involves authenticating the infrastructure to itself, ensuring the integrity of software and configurations, addressing secure backups, physically securing infrastructure components, and pruning unused protocols.
Infrastructure integrity is organized into the following topics:
- Managing Configurations, Change Management, and Backups
- Configuring Logging, Reporting, and Alerting
- Verifying Software Integrity for Upgrades and Patches
- Working with 802.11w Protected Management Frames
- Provisioning and Securing APs to Manager
- Adding Wired Infrastructure Integrity
- Planning Physical Security
- Disabling Unused Protocols
Managing Configurations, Change Management, and Backups
Configuration management is unfortunately often disregarded but remains a key element of infrastructure integrity. A common practice for many network admins is to save a known good configuration before a scheduled upgrade, but policies, processes, and activities related to managing configurations, change management, baselines, and backups go ignored in many cases.
If you're working in a regulated industry or conforming to NIST standards, your organization probably has a robust configuration management program. If you're not quite there yet, here are a few key items to incorporate into your security architecture.
Configuration Change Management
Change control processes address the life cycle of configuration maintenance and vary wildly. In small or unregulated environments, the change management process may be undocumented and a simple notification from the admin to a manager or request for a maintenance window is sufficient.
Large and regulated environments (including most federal government agencies and publicly traded companies) abide by strictly enforcing change management that involves some or all of the following:
- Formal request to implement a configuration change
- Analysis and rating of the change in terms of business impact, technical impact, and security risk
- Testing and validation of the planned change in a controlled test or lab environment
- Review by a change management board or approval committee
- Implementation of the change including notifications before, during, and after
- Testing and validation of the change in the production environment
- Exhaustive documentation and approvals at each step including rollback procedures
For professionals working in a more ad-hoc manner, it's recommended to incorporate tasks beyond simply scheduling a configuration change. These steps provide a minimal structure and documentation appropriate for organizations lacking mature change management:
- Document the planned change.
Capture the reason for the change and expected outcomes and known issues to resolve or monitor for. Also document the tests to perform validation of the configuration and any additional testing required to validate security controls.
Ideally, document how the change should be implemented e.g., through web UI, SSH, and the commands or steps associated with the change plus the steps for a rollback if needed.
If the organization doesn't have a platform for asset and configuration management but has an internal ticketing system, use that. At a bare minimum, create a text file or document with this information and start a file in a secure, shared storage area.
- Review the planned change with at least one technical peer or manager.
As a sanity check if your organization has no formal processes for change management reviews and approvals, review the planned change with at least one technical peer (which could be from another group or team) and/or your direct manager.
- Optionally but ideally validate the planned change in a test or lab environment.
This is highly recommended for numerous reasons, but some organizations simply don't have access to test or lab environments. If the environment you're in has a low tolerance for unplanned outages, it's likely worth the time and effort to make a request for lab equipment or even virtual appliances where applicable.
- Schedule and document the change window.
Before proceeding, back up the current configuration to a secured corporate-managed storage location. Schedule the maintenance window for the change to occur, and document the activities including the date and time stamps of when the changes were made or committed to the system.
This is exceptionally helpful for later troubleshooting and technical support if there is an issue after an upgrade or configuration change.
- Test and validate the change in production.
For most changes, the testing and validation in production is a two-phased task. First immediate testing is performed at the time of the change, and then most often a window is defined to validate operation when the system is under full load.
Here's the process described using a real-world scenario:
- The wireless architect is planning to change an existing WPA2-Personal SSID to use the more secure WPA3-Personal Only security mode.
This is performed in the web UI under the template for the SSIDs using a radio button. The known issue is that endpoints not updated to support WPA3-Personal will not be able to connect; the organization is aware of this, has monitored the environment and is ready to proceed.
Testing after the change includes connecting a WPA3-Personal-capable client to the SSID to ensure it can connect and attempting to connect a device only capable of WPA2-Personal and verifying it is not able to connect, which proves the configuration worked.
- The architect has reviewed the planned changes with the network operations team, help desk team, and his/her manager and a maintenance window has been agreed upon.
- The architect tests the process in the lab using a small physical controller running the same code as the production controllers.
Both a WPA2-Personal and WPA3-Personal client are tested and results match with the expected outcomes defined in step 1.
- The architect makes the change during the scheduled maintenance window, documents the date and time of the change, repeats the same client tests in the production environment, and confirms proper operation of the change.
- The next day, the network operations team monitors the environment for failed connection requests on the updated WPA3-Personal network and the help desk fields calls from users with WPA2-Personal devices that aren't able to connect.
Although a possible real-world scenario, this example is drastically oversimplified and many change management tasks involve multiple changes, multiple testing sequences, and may have unknown or unintended consequences, such as a vendor bug.
In the absence of mature processes for change management, the best practice is to incorporate the due diligence tasks described here, ensure everything is well documented, and involve at least one other party or person in the process.
Configuration Baselines
Large and complex environments should have processes and practices around the creation and management of baseline configurations, which serve as the approved template for configurations that meet the organization's business and security requirements.
Baseline configurations describe the organization-certified state for implementing systems of a specific type. For example, a company with hundreds of locations and local wireless infrastructure at each site would create a standard configuration baseline to deploy secure wireless at each. Baselines can be detailed documents with specifications or well-documented configuration file templates or scripts.
There may also be variables within configuration baselines and elements dependent on the type of location or geography, for example.
Small environments may not have formal configuration baselines as the time to document them may be unrealistic for the value derived, and of course in many environments there may only be limited wireless infrastructure.
Having said that, for small organizations in some sectors and those required to meet specific guidance against NIST or ISO standards, it's possible there will be a requirement to document an approved secure configuration baseline.
Configuration Backups and Rollback Support
Configuration management encompasses ensuring configuration backups are retained and properly secured in an approved location.
And, an approved location, regardless of the organization's size, is not the wireless admin's laptop. An approved backup location should be a designated, secure repository accessible by other authorized administrators or systems. The repository could be a network management tool (such as Cisco Prime, Cisco DNA Center, HPE Intelligent Management Center, HPE OneView, SolarWinds, Aruba Fabric Composer, etc.) or it could be a designated place in cloud or network storage where backups can be sent via secure file transfer on an automated schedule (using SCP or SFTP).
Ideally, configuration backup management includes a platform that supports automating the configuration backup of the wireless infrastructure, added functionality to annotate configuration files to note inflection points or changes, a tool to perform a “diff” or comparison of two configuration files to highlight changes, methods to alert on unplanned configuration changes, and tools for validating security configurations against approved baselines.
Backups should be tiered and stored in two places, such as on-prem with a secondary sync to a cloud repository, or in two geographically diverse datacenters.
Rollback support is another consideration, and the backup plan should allow for an appropriate number of prior revisions and support retrieval for a restoration in the event a rollback is needed.
Monitoring and Alerting for Unauthorized Changes
Changes in the system configuration should be monitored and alerted upon. This could be implemented within the system itself, if supported, or via syslog or SNMP traps to a SIEM or logging server, or through network management products described earlier.
Logging and reporting are covered a bit more next, and examined in more depth in Chapter 7.
Configuring Logging, Reporting, Alerting, and Automated Responses
Hardening any infrastructure necessitates monitoring and alerting of attempts to bypass or breach security controls. For wireless, appropriate monitoring and alerting encompasses not only the management access but also client access and data security.
Chapter 7 deals with security monitoring in much more detail. In the context of hardening—logging, reporting, and alerting should (at a minimum) be designed to identify:
- Unauthorized configuration changes
- Attacks to the wireless (RF) medium including jamming
- Attacks to the wireless data infrastructure including spoofing and DoS attacks
- Attacks to the wired network initiated from the wireless network
- Administrative login attempts (failed and successful) and logging of usage
- Rogue and unauthorized devices (endpoints and infrastructure)
- Anomalous behavior
Verifying Software Integrity for Upgrades and Patches
Keeping the wireless infrastructure secure demands regular security patching and (optionally but recommended) steps to validate the software integrity.
Verifying Software Integrity
With everything so inter-connected these days, and masses of Internet resources, knowledge bases, blogs, articles, and file repositories, verifying software integrity is a little extra step worth considering.
With file or code integrity checking, the creator of the code (such as the wireless vendor) will use a standard hash algorithm and provide the hash output separately from the file. When you download that file, you can then verify the file hasn't been modified (through malicious tampering or inadvertent corruption) by using the same hash algorithm to verify the contents haven't changed.
As an example, let's say I'm going to share my prized award-winning, almost-famous recipe for Gluhwein (mulled wine). If I upload it on a file sharing platform for you to download, I can run a hash function—in this case SHA-1—and provide the output.
In fact, the SHA-1 hash of my Gluhwein recipe is 1DFE3F21AC012FE615CCF797DD439F436C378B7F.
When you download the file, you want to verify that some evil person hasn't tampered with it and modified the recipe to include grasshopper legs. You also want to ensure you have the whole recipe and the second page didn't get corrupted in transit. To do that, you simply run a hash function on the file, and if all is well, you come up with the same value (the string ending in 8B7F).
For the integrity checks to work, the hash function has to be provided in a way you know it's from the entity asserting itself (in this case me). Otherwise, a malicious user could simply post a bad recipe, named to match my file, with the hash of the fake/malicious file, and you'd never know the difference because the hashes would match.
When you download software and update files for systems, you have the option to perform the same validation.
Validation checks can happen a few ways—often it's supported in network management tools (like the ones mentioned in “Configuration Backups and Rollback Support”). You can also manually validate the hash using any online hash calculator.
Upgrades and Security Patches
During the topic of system resiliency in Chapter 4, “Understanding Domain and Wi-Fi Design Impacts,” it was noted that upgrading traditional on-prem wireless controllers was a gruesome and painful experience. The topic included a few anecdotes of upgrades gone wrong, and the general sentiment of Wi-Fi professionals that controller upgrades only be performed when deemed absolutely necessary (usually when there's a user-impacting issue that requires a code upgrade or a patch for resolution).
Even with my own personal intimate (and extensive) experiences with the headaches of controller upgrades, keeping systems up to date and patched is absolutely critical for maintaining a secure infrastructure. There are simply no exceptions to that—no matter how painful it may be.
In a perfect world, the realms of networking operations and security operations will come together and your newfound buddies in the security operations center (SOC) will be responsible for parts of the vulnerability management program, including scanning and alerting when patches are required. That doesn't alleviate the fact that you'll have to schedule and perform the upgrade, but it may help focus attention on the updates that are truly requisite for security purposes.
In most organizations, network admins are wearing many hats and it's untenable for them to read every line of every code release for every system they manage and make decisions about upgrades and patches. A patch may fix one problem but break three (or eight) others. And not all fixes and features are in use in every environment.
Knowing all that, and understanding the burden it imposes, regular updates for security patching is just not something to be sidestepped. Work it into your architecture planning. If you truly can't sustain the workload of updates, then discuss options for a cloud-managed platform that will alleviate much of that workload or approach your leadership about adding additional headcount or resources, and/or using a managed service.
It doesn't matter how the security patching happens; it just needs to be done.
Working with 802.11w Protected Management Frames
In 802.11 WLANs, there are management frames, control frames, and data frames. The data frames include the client data and are encrypted as defined in the SSID security profile, with a client that is authenticated. In the decades of 802.11 WLANs, the management frames have had no form of integrity—meaning, they've been neither authenticated nor encrypted.
The result of unprotected management frames is multifaceted. There are countless legitimate wireless operations that have exploited this gap to offer specific security-related features, such as an enterprise Wi-Fi system spoofing de-authentication packets to prevent a managed corporate endpoint from connecting to a rogue AP. In fact, many traditional wireless IPS (WIPS) functions have taken advantage of unprotected management frames.
Of greater concern of course is the reality that the exposed management frame model leaves the wireless infrastructure vulnerable to a host of malicious attacks, abuse, and misuse. To solve this gap and bolster the integrity of the wireless infrastructure over the air, the 802.11 standard was updated to incorporate additional protections.
I‘m stretching the hardening topic a bit by covering PMF here, but there are components of the 802.11w standard for PMF that play a role in infrastructure integrity (including preventing AP spoofing). But also, Cisco has a proprietary feature called Infrastructure PMF, which is different than 802.11w PMF, and is a suite designed for infrastructure security. You'll see a sidebar on that at the end of this section.
The IEEE 802.11w standard for Management Frame Protection (aka PMF or MFP) has been available and supported since 2009 but only now required as part of the new WPA3 suite of security standards. In fact, it's the use of protected management frames that defines WPA3 (versus WPA2).
The benefits of PMF were introduced in Chapter 2, “Understanding Technical Elements”:
- Prevent forgery of management frames (through SA query)
- Prevent spoofing of AP or endpoint
- Prevent replay attacks
- Hinder eavesdropping of certain management frames
Wi-Fi Management Frames
Wi-Fi management frames are used between APs and endpoints to find, join, and leave networks, and include:
- Beacons and probe requests and responses
- Association and re-association requests and responses
- Disassociation notifications and requests
- 802.11 authentication and de-authentication
Remember that the 802.11 authentication referenced here is the part of the association process all endpoints go through to join a network and is not the network authentication (such as 802.1X/EAP).
Unprotected Frame Types
The processes for endpoints to find and join a network requires that certain frames be accessible to any and all endpoints even before joining the network. In these instances, it's not feasible to encrypt or validate integrity of the parties. As an aside, there are some experts who are advocating for and proposing solutions to extend management frame protection to include frames prior to the 4-way handshake, as well as to control frames.
These unprotected management frames include:
- Beacon and probe request/responses before association
- Announcement traffic indication message (ATIM)
- 802.11 authentication
- Association request/response
- Spectrum management actions
Protected Frame Types
We've covered the 4-way handshake in several topics throughout the book, so it's probably no surprise that protected management frames are primarily tied to interactions that happen after the endpoint and AP have established a formal relationship.
Once an endpoint has joined the network (via the 4-way handshake), the AP and endpoint have exchanged information to derive encryption keys and are then able to prove their identity to one another as well as exchange encrypted packets.
Management frames that are protected include:
- Beacon and probe request/responses after association
- Disassociation (AP or endpoint terminating the session)
- 802.11 de-authentication (of endpoint to AP)
- Certain action frames such as block acknowledgments, QoS, spectrum management, and Fast BSS Transition (FT)
- Channel change announcements sent as broadcast
- Channel change announcement sent as unicast to the endpoint
The 802.11 de-authentication and disassociation frames are the two types of interactions most often spoofed (maliciously or intentionally from WIPS).
The new security association (SA) query function adds a lookup step, where the AP will check the association table before processing certain requests from an endpoint (such as a disassociation). If the association entry is present, the request will have to be sent via the protected frames or it will be discarded/ignored. This is part of the mechanism to prevent spoofing and forging of frames.
For unicast exchanges that are encrypted, existing cipher suites and keys are used, specifically the sender's pairwise transient key (PTK) is used for encryption of the unicast traffic.
For broadcast and multicast management frame protection, a new key is specified—the integrity group transient key (IGTK) along with a message integrity check (MIC) function. The IGTK is added to message 3 of the 4-way handshake, and after that 802.11w uses broadcast integrity protocol (BIP) to protect (integrity not encryption) broadcast and multicast management frames. The purpose of BIP is integrity and replay protection, not confidentiality.
Validated vs. Encrypted
With 802.11w enabled, some frames are not protected, others are protected with integrity by validating the sender, and a subset are also encrypted.
Which frames are encrypted versus which offer integrity only can be summarized as follows:
- After the 4-way handshake, unicast frames are encrypted (offering both confidentiality and integrity)
- After the 4-way handshake, broadcast and multicast frames are afforded integrity only (no encryption)
Encrypted unicast management frames include action frames, disassociation frames, and de-authentication frames. Contents are encrypted with the PTK, and while the payload is encrypted, the headers (including the endpoint MAC address) are not encrypted.
Multicast and broadcast traffic for PMF-secured endpoints use the BIP with IGTK just discussed to offer integrity and ensure the message is coming from a proven source and not spoofed.
WPA3, Transition Modes, and 802.11w
To recap some of the material from Chapter 2, here are the scenarios that dictate the operation of 802.11w:
- WPA3 associations (including Personal and Enterprise) require the use of Protected Management Frames (PMF)
- WPA3 Only Modes support WPA3 clients only, and PMF is required for all clients to join
- WPA3 Transition Modes support both WPA2 and WPA3, where 802.11w/PMF is supported/optional and WPA3 clients will use PMF; WPA2 if supported/configured may use PMF (and will be classified as WPA3); WPA2 clients that don't support PMF will join without PMF
- WPA2 networks optionally support PMF, which may be enabled but is optional
- Enhanced Open with OWE (encrypted open networks) require the use of PFM
Caveats and Considerations for 802.11w
PMF makes strides toward a high-integrity infrastructure but isn't a security silver bullet. A few of the limitations and security considerations include:
- Control frames are not protected including CTS and RTS (clear-to-send and request-to-send), which offers no protection against layer 2 DoS attacks.
- The 4-way handshake is not protected, meaning the endpoint is susceptible to man-in-the-middle attacks and evil twin attacks at first connection to the network.
- Slivers of time exist where de-authentication or disassociation packets could be spoofed in the small window of time between the 4-way handshake and establishment of PMF.
- On WPA-Personal networks, PMF does not protect against vulnerabilities of the passphrase to online or offline dictionary attacks.
- On WPA3 transition networks that support WPA2 and WPA3, PMF is not required and some clients will be vulnerable to attacks.
- The enhancements for broadcast and multicast traffic enhancements against endpoints not joined to the network, but offer no protection from malicious users or devices attached to the network and participating in broadcast integrity protocol (BIP).
Provisioning and Securing APs to Manager
A trusted infrastructure relies on its composite components to be known, validated, and authorized to one another. Within the wireless infrastructure our goal is to control the environment and ensure only authorized APs are attached to our management system, that the management system and APs are mutually authenticated, and that we're being intentional about the AP authorizations and assignment to proper groups or roles. Optionally, we may want to encapsulate or even encrypt client traffic along the path.
The discipline of prescribing security for the rules that route and direct client traffic is described as control plane security, and it encompasses many aspects including infrastructure component authentication, approving devices into the infrastructure, and securing communication between the devices. In essence, control plane security introduces integrity and confidentiality to the infrastructure devices.
As you might imagine, control plane security is managed a bit differently in cloud-managed architectures versus on-prem controller architectures, but the overarching concepts and tasks remain the same.
Divergence comes when we ascribe responsibility to the tasks; in cloud-managed platforms, the onus is on the vendor to perform certain tasks such as ensuring the APs have a unique ID and a secure connection to the management platform.
Because the cloud-managed architecture blurs some of the lines between management and control planes, I've opted to not title this “control plane security” and am using the term “manager” to indicate a controller and/or a cloud management platform.
Execution of management and control plane security is covered in the following topics:
- Approving or Allowlisting APs
- Using Certificates for APs
- Enabling Secure Tunnels from APs to Controller or Tunnel Gateway
- Addressing Default AP Behavior
Approving or Allowlisting APs
Every controller or management platform will have a method (or several methods) to approve APs. This process can happen ahead of time, as in pre-authorizing APs by serial number or MAC address, or it can happen after an AP has discovered the controller or management system, but before it's fully adopted into the platform.
The settings may be called AP allowlisting (also known as whitelisting), AP adoption, AP approval, or AP authorization, among other things. Luckily the phrases are self-explanatory for the most part.
The general trend in the industry has been for vendors to support increased security postures by changing the default behavior to more secure configurations. For example, in the past a vendor may have had a default setting that automatically adopted APs that discovered the controller, authorized them, and put them in a default group. Over time, the default behavior changed and will now show the new APs in a pending state, force a network admin to manually approve them (or approve them through a predefined rule), and then assign them to a group.
Table 6.4 shows the most common options for ways the management platform may uniquely identify the AP; when the AP can be approved; and how manual or bulk approvals can be used. Methods may vary slightly between campus APs, remote APs, and mesh APs as vendor implementations differ.
Table 6.4: AP provisioning models supported
| METHOD TO IDENTIFY AP | TIMES OF APPROVAL | BULK AND MANUAL APPROVAL |
|---|---|---|
| Vendor-issued certificate | Prior to AP discovery of controller | Serial numbers |
| Serial number | After AP discovery of controller | MAC address |
| MAC address | During AP installation via vendor app | IP address |
Auto-discovery of the controller or management platform by APs is expected; that's not where we implement the controls. Once the AP has found the manager (or ahead of time if desired) we control the AP adoption from the manager (versus the AP).
As part of your hardening strategy, plan AP adoption carefully, and follow best practices including:
- Do not allow auto-adoption of APs to the manager
- Verify all expected APs are in the manager and none are missing
- For bulk adoption, use the most reasonable level of granularity such as the IP subnet of the AP management network(s)
- Audit inventory occasionally and alert on APs that unexpectedly leave or join the manager
Using Certificates for APs
One way to authenticate APs to the manager is with certificates, and those certificates can then be used for encryption. This is another area where cloud and controller architectures differ.
Cloud-managed APs will have a certificate preinstalled at time of manufacturing. The AP phones home over the Internet to the cloud manager and has everything it needs to be uniquely identified and provisioned to the proper customer account.
Controller-managed APs could also have a certificate preinstalled, but it's more common (at least for now) for the controller to issue certificates to the APs when they register (and are approved) to the controller. Alternatively, most enterprise products support use of standard protocols to enroll APs (or other infrastructure) into an existing PKI infrastructure. As mentioned earlier in the section “Generating Keys and Certificates for Encrypted Management,” Enrollment over Secure Transport (EST) and Simple Certificate Enrollment Protocol (SCEP) are two protocols supported by Wi-Fi vendors.
And while controller-managed APs may not ship with a pre-installed certificate, it's becoming more popular to see the controllers themselves pre-provisioned with certificates; specifically, vendors are beginning to make use of the TPM chips and IEEE 802.1AR (also discussed earlier).
With certificates in place, the administrator has the option to configure encryption between the AP and the manager.
Enabling Secure Tunnels from APs to Controller or Tunnel Gateway
It's been a bumpy road, but we've arrived at a time when enterprise-grade controller-based products ubiquitously offer the option to encrypt traffic from the AP to the controller, over the wire. Encrypted tunnels can be used to secure both management traffic and/or client traffic.
Encryption of data over the wire has been a staple of regulations for over a decade. Moving forward, zero trust initiatives will further the mission of pervasive encryption along the entire data path.
Just as with any encryption scenario, an encrypted tunnel requires two ends or terminations, mutual authentication, and encryption keys. Issuing certificates to the APs as described in the previous section sets you up for success here.
And, as described in the topic of data paths in Chapter 2, tunneling or bridging client data can be configured per-SSID (and in some cases more granularly than that).
From a secure management plane point of view, cloud-managed solutions have a bit of a leg up here since they're pre-provisioned with certificates and ready to connect securely to the cloud manager. Since the manager is on the Internet, by definition traffic will be traversing an untrusted network and therefore demands encryption for the management plane.
For cloud-managed solutions that incorporate a local tunnel termination appliance (such as a Mist Edge appliance or an Aruba Gateway appliance in ArubaOS 10), encryption can be extended to the data plane for client traffic. And the configuration options are similar to that of a controller, but feature depth will vary per vendor.
It is important to note that enabling encryption between APs and a controller or tunnel termination gateway will incur processing and bandwidth overhead. There may be limits or recommended ranges from the vendors for a maximum number of APs on their hardware models. Please consult your vendor team or documentation to discuss limitations and other considerations.
Addressing Default AP Behavior
On a related note, one last best practice in AP provisioning is to control the default behavior of a newly discovered AP. Whether you're working in a cloud or controller platform, this guidance is the same.
Along with the instruction to disallow auto-adoption, you also want to manage what happens to an AP after it's adopted or allowed, but before it's fully configured or assigned to a site or group.
If the platform includes a default group, never use that group for a live production network. Consider the default group a holding place, research to see if the default group is associated with any policies such as configured for broadcasting SSIDs, radio management profiles, etc.
The end goal is to exert full control over the AP as it joins the network. By whatever means needed—ensure that when an AP is adopted and allowed on the controller, whatever happens next is not that it starts broadcasting networks.
Adding Wired Infrastructure Integrity
Hardening may include adding integrity between the APs and the wired network. Chapter 4 included a few topics of wired infrastructure in discovery protocols, loop protection, and dynamic routing. There are hardening disciplines for every protocol used on networks—from routing to DNS, SNMP, and beyond—and there are volumes written on each.
For our purposes, this topic focuses on authenticating the AP to the wired infrastructure and managing the edge port VLANs that service APs.
As you'll see in the following content, these integrity controls are valid best practices, but reserved for organizations that have a need for a heightened level of security and which have the appropriate staffing resources to manage the additional operational overhead.
Authenticating APs to the Edge Switch
This topic comes with a caveat—it's often not manageable for organizations to perform this level of wired side hardening via AP authentication. However, there are organizations out there that require this level of integrity, so it's included here along with some how-tos and things to look out for. For most environments, there are many other hardening tasks that will give you a lot more bang for your buck.
Along with provisioning APs to the controller or manager, we can also authenticate or bind the APs to the wired infrastructure by using 802.1X or MAC address port security. Just as with client-based authentications, the APs too can use pure 802.1X/EAP, or 802.1X with MAB, or non-1X port security based on binding the MAC address to the port or switch. This section covers how to:
- Authenticate APs to ports with 802.1X/EAP
- Authenticate APs to ports with 802.1X and MAC Authentication Bypass (MAB)
- Bind APs to ports or switches with MAC address
Authenticating APs to ports with 802.1X/EAP
If you plan to authenticate APs to the edge switch using 802.1X, the requirements are that the edge switch will need to support AAA configurations—no problem, that's supported on every enterprise-grade switching product—and the AP will need to have an 802.1X supplicant and support for one or more EAP methods. Controller-based APs support full 802.1X authentication and most products can be configured with EAP-PEAP with MSCHAPv2, EAP-TTLS, or EAP-TLS.
Authenticating APs to ports with 802.1X and MAC Authentication Bypass (MAB)
For environments that require hardening with APs that don't have an 802.1X supplicant, a secondary option is to authenticate them with MAC Authentication Bypass, or MAB. As covered in Chapter 3, “Understanding Authentication and Authorization,” MAB comes with a few caveats and security concerns. Since it's a subfunction of the 802.1X protocol, the edge switch ports will require several lines of AAA commands as well as the added MAB commands.
The benefit of this model is that APs can be authenticated to the switch port (centrally by an authentication server) even if the AP doesn't support 802.1X natively.
In turn, that means you'll just need to configure 802.1X with MAB on the edge switch and ports servicing APs, and no additional configuration is required on the AP itself.
Binding APs to ports or switches with MAC address
To authorize the AP to the edge switch locally (versus via an authentication server) with the AP's MAC address, instead of configuring 802.1X (AAA) on the switch ports, you'll use a port security command. Consult your switch vendor's documentation but it will usually be found in the port security section of the configuration guides.
Most products support several options such as configuring the port for a fixed or static MAC address, a learned or dynamic MAC address, and then options such as sticky MAC (see Table 6.5). If you go this route, pay extra special attention to the maximum MAC address configurations. When used with an AP in bridged mode, the edge switch will see the client MAC addresses and you may find the switch has locked the port due to a MAC count violation.
Table 6.5: Comparison of AP-to-switch authentication options
| METHOD | AP REQUIREMENT | SWITCH REQUIREMENT | VISIBILITY/CONTROL |
|---|---|---|---|
| Authenticate APs to ports with 802.1X/EAP | 802.1X supplicant required | 802.1X AAA support | Centralized in authentication server |
| Authenticate APs to ports with 802.1X and MAB | None | 802.1X AAA support | Centralized in authentication server |
| Bind APs to ports or switches with MAC address | None | MAC-based port security support | Distributed visibility and control; configured per switch |
Just remember, the AP won't pass traffic or be able to perform any client services until it's authenticated to the network if any of these controls are enabled. In Figure 6.9, the switch port 2 is using port security with a local MAC lookup. Port 5 is configured for AAA/802.1X with MAC Authentication Bypass (MAB), which uses the AP's MAC address also. Port 14 is configured for AAA/802.1X with no bypass. The AP on this port will need an 802.1X supplicant and credentials—either a certificate or username/password—configured.

Figure 6.9: Demonstrating three AP to switch authentication options
Specifying Edge Port VLANs
A seemingly small task that's a best practice for any environment is to allow only the required VLANs on each edge port. This may entail pruning additional VLANs and/or specifying a native/untagged VLAN designated for AP management.
And, while this task sounds insignificant, it can be time consuming depending on the wired and wireless products. Some vendors, like Juniper's Mist products, use the APs to collect additional wired-side data and report things like VLAN mismatches (too many or too few) in the admin console. With most products, this has historically been a tedious, manual process.
This is another best practice that's dependent on the resources available. Due to the potentially heavy operational cost and the often dynamic nature of environments, this may not be the best use of time in organizations that aren't implementing change management processes.
Ideally though, you could perform this task once, and then ensure the proper VLANs (and only the proper VLANs) have been configured at the edge ports through those new change management controls and baseline configurations described earlier.
Planning Physical Security
Many network attacks rely on physical access to the infrastructure by an ill-intentioned person. And many environments assume the assets enjoy a certain level of protection from physical access—the building access requires a key and/or an RFID badge; the server room requires additional access rights, etc. But in most cases, it's not fair to assume every network port is physically protected nor that a malicious user would not be able to access one.
Without a port security protocol or a network access control (NAC) product controlling the wired edge ports, many ports remain vulnerable to misuse.
In all cases, network security architecture should control points of entry to the network including edge switch ports. This means designing physical security controls at networking closets and edge ports, including ports that connect to APs, which may be in publicly accessible areas.
Securing Access to Network Closets
Securing physical access to servers, storage, network devices (including wireless controllers), and networking or data closets is one of the most basic best practices for good network hygiene.
Ideally these assets should be located in places that enforce identity-based access, meaning not just a key but an RFID badge, biometric entry, or some way to correlate the access to a specific person. Earlier in this chapter we talked about enforcing user-based logins to manage network devices instead of using shared logins like “admin,” and this control is simply an extension of the same concept. We want attribution along with access control.
If identity-based access control isn't possible, the next best option is some physical control such as a hardware lock. As my friend Jack Wiles would expound, be sure to select a lock type commensurate with what it's protecting. Locks have ratings like safes that indicate how hard they are to break or pick.
If you've never tried your hand at lockpicking, I suggest checking out a Lockpick Village the next time you visit an information security conference. It'll give you the chance to see exactly how vulnerable most locks are. Regardless of your lockpicking skills, consult a locksmith or consultant that specializes in physical security to choose the right lock types.
And while physically securing access to networking closets seems like a no-brainer, as noted earlier, sometimes that's not how the organization operates. For those cases (and for general added security) there are additional controls that can be employed. Not protecting physical access to network closets and datacenters may result in:
- Access by unauthorized parties including internal personnel
- Inadvertent reconfiguration e.g., through someone adding or connecting a network cable
- Denial of service through inadvertent introduction of a network loop, creating a broadcast storm
- Denial of service by taking a system component such as a switch or controller offline
- Subversion of visibility by taking a monitoring system offline, such as a management platform or security monitoring
- Outages due to improper system environment such as too high humidity or outside vendor–specified operating temperature ranges
Securing Access to APs and Edge Ports
It's important to maintain physical control of the entire data path, which means both ends and any terminations of network cabling. Outside of the networking closets and datacenters, protection should be extended to the network drops distributed throughout the environment including those servicing APs.
Ultimately the goal is to protect against an attacker removing an AP and using the AP's network connection to infiltrate the production network. Aside from the controls mentioned earlier—segmentation, AP authentication to the switch, port security, and monitoring—we can deter this behavior by making the APs difficult to access or difficult to remove. If an attacker gains access to an AP network port, the following actions could follow:
- Launch of denial-of-service (DoS) attack against the wireless infrastructure via the wired network
- Launch of denial-of-service (DoS) attack against other wired resources
- Lateral movement to endpoints and targets within the wired network
- Sniffing of network traffic
- Injection of malicious payloads
- Injection to switching and routing functions to disrupt or reroute packets
Wireless is full of dichotomies and AP mounting is no exception. Most Wi-Fi design professionals and vendors will direct clients to mount APs below a ceiling grid (where applicable) and generally otherwise not obstruct the RF signals by concealing an AP. So then, the APs are just hanging out, visible to all who pass.
If the AP is mounted on a wall 25 feet up and requires a lift to access, it's extremely unlikely to be accessed for ill deeds. But if that AP is mounted on a wall, or below a standard eight- or ten-foot ceiling, it's trivial for an assailant to get their hands on it.
As such, physically securing the AP (in addition to controlling the switch port security if appropriate) is key to protecting the network infrastructure.
There are several levels and methods of physically securing an AP, ranging from deterrent to dang near impossible to breach. In order of least to most secure, they are:
- Mounting hardware with tamper deterrence
- Mounting hardware and enclosures with latch locks
- Mounting hardware and enclosures with key locks
AP mounts come in an assortment of form factors and materials. Some are full enclosures (boxes), others designed to fit within existing ceiling grids, or attach to the underside of a ceiling grid. There are also surface mounts and right-angle mounts, along with concealed mounting such as bollards. Most are available with tamper deterrence and/or key locks. Many box enclosures may also have latch locks.
Figure 6.10 and Figure 6.11 show just a tiny sample of the thousands of mounting options available. Figure 6.10 is a polycarbonate enclosure manufactured by Ventev, designed for use in prisons and other harsh indoor and outdoor environments. Figure 6.11 shows a mounting enclosure with a key lock. This particular model is a suspended ceiling tile enclosure from Oberon.

Figure 6.10: Example of a mounting enclosure with tamper-resistant screws (usually torx)

Figure 6.11: Example of a mounting enclosure with a key lock
Locking Front Panel and Console Access on Infrastructure Devices
If controlling physical access to the wireless controller, APs, and other network devices isn't enough or isn't viable, hardening can include disabling or locking management functions available on the hardware itself.
Should a malicious user gain physical access to system devices without front panel and console security, they would be able to perform an array of attacks from denial of service to reconfiguration and locking out the legitimate system owners.
Without front panel and console security, the system is at risk of an attacker performing one or more of these actions:
- Unauthorized reboots (although this may be possible still by removing the power source)
- Factory reset (wipes the configuration)
- Password reset (some products include a button sequence to clear passwords)
- Reconfiguration (the system could be made insecure, unreachable, or otherwise compromised)
- Tamper with passwords (an attacker could change passwords and lock out legitimate management admins)
- Install malicious payloads (through software uploads via the USB or console)
For controllers, hardening front panel access involves controlling or locking ports on the hardware appliance, disabling the USB, disabling physical buttons to reset or reload services, and locking console access or any management features available to a person with physical access to the hardware (see Figure 6.12 and Figure 6.13). Vendors also offer pre-hardened configuration with FIPS-compliant products that will enforce front panel security (and other features).

Figure 6.12: An Aruba 7200 series Mobility Controller. Notice the console port, USB port, and function buttons on the front right panel.
https://www.arubanetworks.com/products/wireless/gateways-and-controllers/7200-series/
Similarly, most APs have console ports and USB ports, among other things. These additional inputs to management functions can be disabled via the controller or management system to prevent an attacker from compromising the infrastructure by penetrating the AP's configuration (see Figure 6.14).

Figure 6.13: Diagram of the front panel components of a Cisco 9800-80 Controller. Labels 8, 9, 10, 11, 13, and 15 include various console and management ports including USB and Mini USB console ports.
Figure 6.14: Image of an Aruba Networks 600 series AP with mini USB console
https://www.arubanetworks.com/products/wireless/access-points/indoor-access-points/530-series/
In addition, federal agencies and high-risk environments may want to take console access security a step further with additional controls:
- Tamper-evident labels (TELs) placed over console/management ports that are not in use
- Disable TAC support password recovery via console
Tamper-evident labels (see Figure 6.15) can ensure unused physical ports are only accessed in case of emergency, if permitted. The label is used to cover the port(s) and if it's removed to access the port, it will be evident. These can be custom printed for an organization and would be placed over management access ports, such as a console port, that should only be used in emergencies.
Most manufacturers support some form of password recovery as part of their technical assistance center (TAC) support processes. In these instances, someone authorized on the account would need physical console access to the device, at which time they can engage the vendor TAC for a one-time password with a short validity period. To prevent this bypass, the password recovery can be disabled.

Figure 6.15: An example of a tamper-evident label
Disabling Unused Protocols
In the same vein as disabling unused physical ports, hardening should absolutely incorporate disabling any and all unused protocols—not just the unencrypted management protocols presented at the beginning of the chapter.
Unused protocols are often ignored and become a blind spot for network and security operations. In an ideal world, the SOC (or someone) is running vulnerability scans internally as part of a vulnerability management program. These scans will certainly help identify at-risk devices using services with known vulnerabilities, but there may be known good protocols that still have no place in your network design.
The services, ports, or protocols you disable will be dependent on your infrastructure, but may include some or all of the following:
- Zero Touch Provisioning
- BootP Service
- IPv6
- UDP support of echo, discard, daytime, and chargen (small services)
- All unencrypted management protocols (HTTP, Telnet, FTP, TFTP, SNMPv2c, etc.)
- Encrypted management protocols not in use (e.g., HTTPS)
For the more security-conscious organizations and defense agencies, additional hardening is usually recommended by oversight bodies and can also include:
- ICMP
- Discovery protocols (such as LLDP and CDP)
- TCP and UPD support of echo, discard, daytime, and chargen (small services)
- IP source routing
- IP routing protocols not in use (specifically to/from a controller)
- ARP proxy
- Physical ports not in use
Disabling some protocols (such as ICMP, CDP/LLDP, Echo) may disrupt network monitoring and management tools. If you plan to follow more extreme hardening, ensure the organization has the proper processes and policies to support that, including detailed documentation, approvals, asset inventory, and strict change management.
Controlling Peer-to-Peer and Bridged Communications
Restricting client traffic falls on the fringe of traditional infrastructure hardening but remains a relevant and timely topic.
Here, we'll look at a few specific methods to bolster integrity by eliminating or reducing risky traffic and behavior on the network. These hardening tasks include:
- Blocking Ad-Hoc Networks
- Blocking Wireless Bridging on Clients
- Filtering Inter-Station Traffic, Multicast, and mDNS
A Note on Consumer Products in the Enterprise
This seems like a logical time for a quick soapbox speech on consumerization; a topic I've had a long history with.
Consumerization is defined differently depending on who you ask, but I like this Gartner definition that says,
Consumerization is the specific impact that consumer-originated technologies can have on enterprises. It reflects how enterprises will be affected by, and can take advantage of, new technologies and models that originate and develop in the consumer space, rather than in the enterprise IT sector. Consumerization is not a strategy or something to be “adopted.” Consumerization can be embraced, and it must be dealt with, but it cannot be stopped.
https://www.gartner.com/en/information-technology/glossary/consumerization
Enterprise environments have been dealing with consumerization for more than a decade, and frankly even though the conversation died out, the trend of bringing consumer-grade devices into the corporate network has only become more rampant.
These devices, designed for home networks and personal use, were simply never designed to be used within an enterprise environment, and certainly not within a secured network infrastructure. By definition, they're created to operate in the absence of formal network services such as DNS, DHCP, and authentication servers.
I remember the first time an enterprise client had me reconfigure their environment to support Bonjour. It was a highly regulated industry, I pushed back a bit, explaining the risks, but ultimately, I (and their CIO) was overruled because an executive demanded to be able to use his Apple iPad with his Apple printer, and wanted the ease of the services extended throughout the headquarters office.
If you've followed the book this far, I think the pattern that's evident is that the recommendations for best practices include a lot of conditional statements, “it depends,” or “if, then, else” logic. What I'm about to say next will probably not be well received, but it has to be said:
Consumer and personal devices have no place inside a secured enterprise infrastructure.
Please take that sentence, highlight it, copy, paste, screenshot, share or do whatever you need to do and get it in front of your executive leadership.
However, I'm not a complete jerk, so if you've lost the battle and have to support these devices on the network, the following offers guidance to do it as thoughtfully and securely as possible. You can have consumer and personal devices on a network, it just won't be a very secure network.
Specifically, consumer and home devices that I personally do not recommend allowing include (but are not limited to) these:
- Home automation products including lighting, sensors, cameras not designed for commercial use
- Voice-assisted devices such as Amazon Echo suite, Google Home, and Apple HomePod, which introduce an excess of security and privacy risks
The ideal alternative is to seek out a commercial-grade version of a similar technology that meets the connectivity and security requirements of the organization. If these devices absolutely must be used for some reason within the environment, they should be on a dedicated wireless network, not with corporate devices.
Many professionals and non-technical executives are fearful of the risks from our hyperconnected ecosystem of IoT devices, but the scary truth is—consumer devices and protocols on the network are one of the biggest risks we're facing. They allow attackers easy access into the network, and unlike most IoT implementations, by nature of the use, these consumer devices are most often connecting to our smartphones, tablets, laptops, and printers. Meaning, isolating them from the endpoints they need to interact with is not possible (while retaining functionality).
Allowing an Apple HomePod because an employee finds it convenient or wants to listen to music is absolutely not a valid reason to expose the network to increased risk.
If your organization doesn't have a policy that addresses consumer and personal devices on the network, that should be a priority. Tools to identify, locate, and even block these devices and risky protocols are readily available in the Wi-Fi products.
Other devices that may use consumer-grade protocols (such as Bonjour) but have legitimate use cases in enterprise environments include:
- Digital TV and screen casting
- Certain wireless printing applications
Shortly, we'll look at specific protocols popular in consumer devices and discuss the behavior, security risks, and recommendations for each.
Blocking Ad-Hoc Networks
There are a few ways peer wireless devices can communicate to one other; two are:
- Peer communication through enterprise AP
- Peer communication in an ad-hoc network
Of concern here is the latter—ad-hoc networks. We'll address peer communication through an enterprise AP shortly.
With true ad-hoc networks, the endpoints are communicating directly, over the air, and through any part of the infrastructure you control or can even see. The lack of visibility introduces security vulnerabilities and prevents the organization from controlling (and securing) the data path appropriately.
Since ad-hoc networks aren't performed through the enterprise Wi-Fi system, they can't exactly be controlled that way. I say “exactly” because there are some mitigations available with wireless intrusion prevention systems (WIPS) we'll cover in Chapter 7.
Here are three actions you can take to identify and prevent ad-hoc networks:
- Disable wireless interfaces on devices that support ad-hoc networks (this may include certain features of screen casting applications, printers, etc.)
- Disable ad-hoc networking support on endpoints
- Configure the enterprise Wi-Fi to monitor the air for ad-hoc networks and alert on their presence
Figure 6.16 highlights the difference between peer client communication through an enterprise AP (shown in data path 1) and ad-hoc networks (shown in data paths 2 and 3). Data path 2 is an ad-hoc Bluetooth network for a presentation control to a laptop and data path 3 is an ad-hoc Wi-Fi network between a smart TV and a tablet for screen casting. In scenario 1, data can be filtered and secured by the AP or controller, whereas scenarios 2 and 3 are peer-to-peer connections that don't traverse the enterprise network. These may be 802.11 (Wi-Fi), Bluetooth, or other.

Figure 6.16: Peer communication through an enterprise AP vs. ad-hoc networks
Blocking Wireless Bridging on Clients
Another function that involves endpoint configuration and isn't controlled by the enterprise Wi-Fi is bridging of the wireless interface to other network interfaces (such as a wired interface).
As with ad-hoc networking, remediation actions are similar:
- Disable interface bridging on endpoints
- Configure endpoint security or endpoint detection response tools to alert if bridging is enabled
- Configure the enterprise Wi-Fi to monitor the networks for bridged clients and alert on their presence
Interface bridging can also be extended to service other endpoints with an ad-hoc network served by the sharing client. In Figure 6.17, the laptop is configuring its own Wi-Fi network and bridging peer traffic through its own interfaces. As soon as the user checks the box for Internet Sharing in the top window, the Mac will be broadcasting its own SSID and could be serving an enterprise network to unauthorized users or devices. This presents obvious security risks and can impact all Wi-Fi devices in the area by reducing the quality of the RF.


Figure 6.17: On most devices, it's trivial for a user to share network connections including sharing over Wi-Fi that isn't properly secured.
Filtering Inter-Station Traffic, Multicast, and mDNS
This topic covers filtering and security controls for peer traffic that does traverse the enterprise Wi-Fi system. Client-to-client interactions over the Wi-Fi can occur through standard layer 2 adjacency (just like two endpoints on the same VLAN in a switch) and/or through peer-based multicast and broadcast protocols such as mDNS, Link-Local Multicast Name Resolution (LLMNR), and UPnP (covered shortly).
SSID Inter-Station Blocking
Inter-station blocking goes by different names, but in any vendor implementation it's the utility of blocking wireless clients on the same SSID from communicating directly with one another. Again, this is similar to blocking traffic between two wired endpoints within the same VLAN on a switch.
Inter-station blocking doesn't mean that endpoints can never talk to one another; it simply forces the clients to go through the AP or controller to be processed, where rules can be applied, and the traffic can be evaluated and allowed or blocked.
Long ago and far away, enabling inter-station blocking was a de facto state for any Wi-Fi deployment. Uncontrolled consumerization and the introduction of home-use protocols into the enterprise network caused the industry to flip and enable peer communication by default. Since then, more granular controls have been added.
Consumer technology aside, for the most part, secure enterprise environments should have no need for (and should not allow) direct peer client communication. If there is a situation that calls for it, an allow policy can be explicitly enforced within the Wi-Fi infrastructure.
This is an especially critical control in the heat of ransomware and zero trust initiatives, where implicit trust should be removed, and lateral movement should be limited.
Figure 6.18 shows options for inter-station blocking, multicast filtering, and Bonjour gateway on the Juniper Mist platform. Aruba controllers and Aruba Central cloud (shown in Figure 6.19) have two similar options. The Deny Intra VLAN Traffic option blocks both layer 2 and layer 3 traffic between endpoints on the same network. Deny Inter User Bridging blocks non-IP (layer 2) traffic between endpoints on the same network including ARP.


Figure 6.18: Juniper Mist options for inter-station blocking and multicast controls

Figure 6.19: Aruba Networks Central Cloud SSID configuration
Peer-Based Zero Configuration Networking
And now back to the elephant in the room—peer-based multicast protocols such as Apple's Bonjour, mDNS, and other mechanisms of zero-configuration (zeroconf) networking.
Zeroconf networking describes a suite of protocols based on TCP/IP but designed to work in the absence of standard enterprise domain services such as DHCP and DNS. These are best thought of as peer-based self-organizing networks. Part of the zeroconf operations include:
- Link-local addressing, an address autoconfiguration (aka Automatic Private IP Addressing) that works with or replaces client IP addresses from DHCP
- Endpoint self-designation of a hostname (such as Joe-Smiths-iPad.local) instead of enterprise DNS entries
- Peer name service resolution such as mDNS, which uses multicast to all reachable zeroconf peers in the network, versus an authoritative DNS server
- DNS-based service discovery such as DNS-SD and SSDP in UPnP
- Universal Plug-n-Play (UPnP) protocols
Following is a sample of technologies that use Bonjour services, zeroconf, and mDNS for peer discovery and communication:
- Amazon TV
- Google ChromeCast
- Roku Media Player
- Misc. printing apps
- Phillips Hue Lights
- Airplay
- Apple TV
- AirServer Mirroring
- Apple AirTunes
- Apple AirPrint
- Apple FileShare
- Apple iTunes
The challenges supporting these and other zeroconf protocols on the enterprise network are two-fold:
- They introduce a very high level of risk to the network and endpoints with little to no options for reasonable mitigation.
- They are designed to work on layer 2 adjacent networks and not across IP subnets, as is a common (and recommended) architecture in enterprise networks.
In the recommendations later, Link-Local Multicast Name Resolution (LLMNR) will be referenced. This was a Windows protocol similar to mDNS, but mDNS was ratified as an IETF RFC, and Windows supports mDNS, so LLMNR is likely to be unused. If it exists in the environment, it should be managed the same as mDNS and Bonjour.
I'm not getting on the consumerization soapbox again, but these protocols were never designed to be used in enterprise networks, which you'll see in the following sections.
Disabling and Filtering Bonjour and mDNS Protocols
I'm going to level with you here; like others, I've been familiar with mDNS and related peer protocols but had never stopped to read the entire specification nor fully researched the vulnerabilities associated with it until recently. Capturing the result of that research, the sentiment went from “mDNS isn't ideal” to “holy smokes this is a ridiculously risky protocol.”
Apple, the creator of Bonjour and mDNS, even states, “In a hostile environment other mechanisms must be used to ensure the cooperation of participants or to distinguish untrusted Multicast DNS messages.” (Source: “Security implications of Bonjour protocol for developers and administrators,” https://support.apple.com/en-us/HT205195.) “Hostile” in this context means a network comprised of endpoints that the user doesn't have full control over (e.g., a corporate or public network as contrasted with a home network).
As described earlier, these zeroconf protocols are peer-based and don't include any form of authentication or authoritative source. They bypass the enterprise services and are often not visible or reported on by monitoring tools.
The attacks on networks and endpoints through Bonjour and mDNS are countless. The security considerations around these technologies include:
- mDNS packets share open port information of targets, providing security details on par with vulnerability scanning and attack discovery tools.
- mDNS may also show full directory and file structures.
- mDNS and zeroconf protocols do not include any form of authentication or identity validation, making it easy to spoof a peer device or service and collect sensitive information or even deliver malicious payloads to an endpoint.
- Bonjour and mDNS bypass enterprise domain services including DNS, DHCP.
- Default Bonjour behavior usually shares (via multicast) the hostname as the device owner's first and last name, exposing the user's identity including information classified as PII (personally identifiable information) by many government regulations.
- Per the IETF RFC specification, fully securing the enterprise against mDNS requires extensive modification to the enterprise environment including moving to authenticated and encrypted DNS protocols within the organization.
- In some instances, an attacker can hijack or spoof legitimate traffic and redirect users to malicious websites and payloads.
- By virtue of its multicast nature, mDNS creates volumes of unnecessary traffic on large networks, flooding it with multicast traffic from hundreds or even thousands of devices.
- Bonjour introduces additional vulnerabilities by allowing peer communication between devices without visibility, security inspection, or control.
- mDNS automatically resolves any and all unconfigured and explicit local domain names, whether that's the desired behavior or not.
The information security community is in lockstep when it comes to Bonjour and mDNS—it's not appropriate for secured enterprise networks.
Hardening guides from almost every manufacturer including Apple recommend disabling Bonjour on endpoints and filtering it on the network. The NIST SP 800-179 explicitly states, “Bonjour multicast advertisements should be disabled in all environments except Standalone.”
Even more shockingly, Trustwave's SpiderLabs security team demonstrated that mDNS multicasts (to all peers, unencrypted) the status of the endpoint's open ports, as shown in Figure 6.20.
In Figure 6.20, you'll notice the four lines at the bottom include the following lines, indicating Rodrigo's device has ports 22 (SSH) and 5900 (VNC, a desktop sharing and remote control application) open. This behavior is worse than allowing a user to run a port scanner; it's actively broadcasting open ports, in plain text, for all to see:
- Hostname: Rodrigo.Lab.local with Port Listening: 22
- Hostname: Rodrigo.Lab.local with Port Listening: 5900

Figure 6.20: Excerpt from Trustwave's post on the security vulnerabilities of mDNS
Plus, in a 2020 article on poisoning attacks, a security consulting firm confirmed mDNS is still a major issue, citing that “mDNS can be abused via an attacker answering an mDNS request and impersonating a legitimate resource or computer on a network. Attackers can even use the same tool, the notorious ‘Responder,' as published by Trustwave's SpiderLabs. The result is that the attacker can cause a device to send sensitive information directly to the attacker's machine, whether that be a print job for a document containing personal information or worse: a user's credentials.” Source: https://www.crowe.com/cybersecurity-watch/poisoning-attacks-round-2-beyond-netbios-llmnr.
Excerpts of the security considerations included in the IETF RFC for mDNS include:
- “In an environment where there is a group of cooperating participants, but clients cannot be sure that there are no antagonistic hosts on the same physical link, the cooperating participants need to use IPsec signatures and/or DNSSEC [RFC4033] signatures so that they can distinguish Multicast DNS messages from trusted participants (which they process as usual) from Multicast DNS messages from untrusted participants (which they silently discard).”
- “If DNS queries for *global* DNS names are sent to the mDNS multicast address (during network outages which disrupt communication with the greater Internet) it is especially important to use DNSSEC, because the user may have the impression that he or she is communicating with some authentic host, when in fact he or she is really communicating with some local host that is merely masquerading as that name. This is less critical for names ending with ‘.local.’, because the user should be aware that those names have only local significance, and no global authority is implied.”
- “Most computer users neglect to type the trailing dot at the end of a fully qualified domain name, making it a relative domain name (e.g., “
www.example.com”). In the event of network outage, attempts to positively resolve the name as entered will fail, resulting in application of the search list, including “.local.”, if present. A malicious host could masquerade as “www.example.com.” by answering the resulting Multicast DNS query for “www.example.com.local.”. To avoid this, a host MUST NOT append the search suffix “.local.”, if present, to any relative (partially qualified) host name containing two or more labels.”
Disabling and Filtering UPnP Protocols
Universal Plug-n-Play (UPnP) is a vile, vile thing. Not only does the protocol perform some auto-discovery functions, but it takes the liberty of reconfiguring firewalls, poking inbound holes, and introducing extreme security risk. Read that sentence again.
And, in fact, it was UPnP that opened the doors that led to the massive Mirai botnet attack in 2016. Connecting to devices inside networks via holes opened by UPnP and using just a small list of default usernames and passwords for commercial devices, Mirai infected tens of thousands of IoT devices across the world and then used them to launch DDoS attacks to several targets, including the website of professional friend and reporter Brian Krebs.
Luckily UPnP performs this assault on consumer-grade routers, but there are plenty of small businesses, autonomous branch sites, or outposts that may walk into a retail technology store and pick up a consumer brand firewall or router for the office.
UPnP has been under fire since around 2001 when several government agencies issued security guidance to disable it within networks, but the vulnerabilities continue.
As recently as 2020, researchers updated reports on yet another flaw. A callback vulnerability named “CallStranger” allows an attacker to execute a variety of attacks including data exfiltration and DDoS attacks. It's not new, and a fix was issued years ago, but researchers expect CallStranger to remain a threat for years to come since many devices running UPnP aren't easily or often upgraded.
The recommendation for UPnP is simple—absolutely, under no conditions should it be enabled in networks. Not home networks, not small business networks, not enterprise networks. Specific actions include:
- In home and small offices using consumer Internet routers, or firewalls, access the management configuration and disable UPnP
- In enterprise environments, disallow consumer routers by policy, implement monitoring controls to identify them
- On IoT endpoint devices and gateway systems, change default passwords
A Message on mDNS and Zeroconf from a Pen Tester
After reading the mDNS RFC, I reached out to one of my go-to pen tester teams and asked if and how mDNS and Bonjour played a role in their testing. I think their response sums up the risks nicely:
Both mDNS and zeroconf were never intended to be on corporate networks. They're literally designed for smaller networks that don't have an internal nameserver or IT folks capable of configuring network services. In the RFC for mDNS (
https://datatracker.ietf.org/doc/html/rfc6762), the very first paragraph says that it's only intended for “the ability to operate with less configured infrastructure … in the absence of a conventional managed DNS server.”The tool Responder [an mDNS tool] is one of the first things we run on internal pen tests. It listens for requests from mDNS, LLMNR, and NetBIOS names, and spoofs responses telling the requester that our attack machine is the system it's looking for. That forces the victim to connect through us, allowing us to man-in-the-middle the traffic.
I'd also point out that zeroconf is the exact opposite of zero trust which is becoming increasingly popular. The former is focused on trusting the network and accepting whatever anyone on it provides. The latter is designed on the assumption that you can't trust any network or anyone on it.
Nathan Sweaney, Principal Security Consultant at Secure Ideas (
www.secureideas.com)
Recommendations for Securing Against Zeroconf Networking
In high security environments, zeroconf protocols should be completely disabled and strictly enforced. These tasks include:
- Disable all zeroconf protocol support on endpoints, including Bonjour, mDNS, LLMNR, and UPnP
- Monitor for and filter/block all mDNS and zeroconf traffic including Bonjour on the network
- Monitor for and restrict zeroconf protocols at the endpoint using endpoint security applications and/or endpoint detection and response (EDR)
- Create or update organizational and acceptable use policies to reflect this guidance
- Use assessments and penetration tests to validate posture
For organizations that are prepared to accept the risk of allowing zeroconf protocols on the network (against all hardening and security guidance), here are a few recommendations:
- Disable UPnP on devices and do not allow UPnP by policy; monitor and alert on UPnP
- Monitor for and filter/block UPnP traffic
- Do not allow organization-managed endpoints to participate in zeroconf networking, and disable Bonjour on these devices
- If permitted by policy, only allow Bonjour and mDNS on networks designated for Internet-only or personal device use (such as guest networks or residential halls) and properly segment those networks from organization-managed secured networks
- For mDNS, at a minimum, disable mDNS advertisements on all endpoints/devices
- Create or update organizational and acceptable use policies to reflect this guidance
- Use assessments and penetration tests to validate posture of the secured network(s)
The issues with mDNS and zeroconf networking protocols are well documented with numerous reports of exploits by security researchers and pen testers, guidance within the IETF RFC that these are not designed for enterprise use, and explicit guidance by technology manufacturers (including Apple) and NIST to disable these protocols in secure enterprise environments.
Knowing all this now, I personally consider it quite negligent for leaders to ignore the risks and continue permitting these protocols unchecked.
In my experience, the IT and networking teams within organizations are aware (at least in part) of the security risks, but unfortunately are often overruled by non-technical leaders who feel convenience trumps security. My hope is that the technical professionals are more heavily armed with this volume of data and can approach their leadership with solid evidence of the level of risk associated with Bonjour and mDNS.
Best Practices for Tiered Hardening
This chapter has covered a great breadth and depth of topics for hardening the wireless infrastructure. Promised earlier was tiered guidance to help you get started, wherever you are with the journey.
Some of the recommendations here are considered minimal-effort, must-do tasks, and then stringency increases from there based on the organization's risk tolerance and current security posture.
As with the rest of the best practices, there will always be exceptions and outliers, and while one could argue that a true best practice is applicable across the board, the reality is organizations have to work with the resources they have.
In the tables in the Figures to follow, recommendations are outlined by hardening topic and then organized by tasks for low security, medium security, and high security environments.
- Low Security Environments Low security environments include minimum configuration even for labs and proof of concept (PoC) deployments. This tier is also appropriate for a small organization without many IT resources or a large footprint.
- Medium Security Environments Medium security environment controls are what I consider baseline for mature and security-conscious organizations including moderately regulated industries such as healthcare and financial.
- High Security Environments High security environments express requirements for an exceptionally locked-down environment. Many of these controls are specified in hardening requirements from federal governments and defense agencies.
Your organization or environment may fall between these three tiers and may also have unique circumstances; adjust accordingly.
Each of the tiers builds upon the prior, meaning the controls outline for low security environments should be followed or built upon by medium tier, and the same with medium to high. See Figure 6.21 for tiered guidance for securing management access, Figure 6.22 for tiered guidance for designing for integrity, and Figure 6.23 for guidance on restricting peer-to-peer communications and interface bridging.
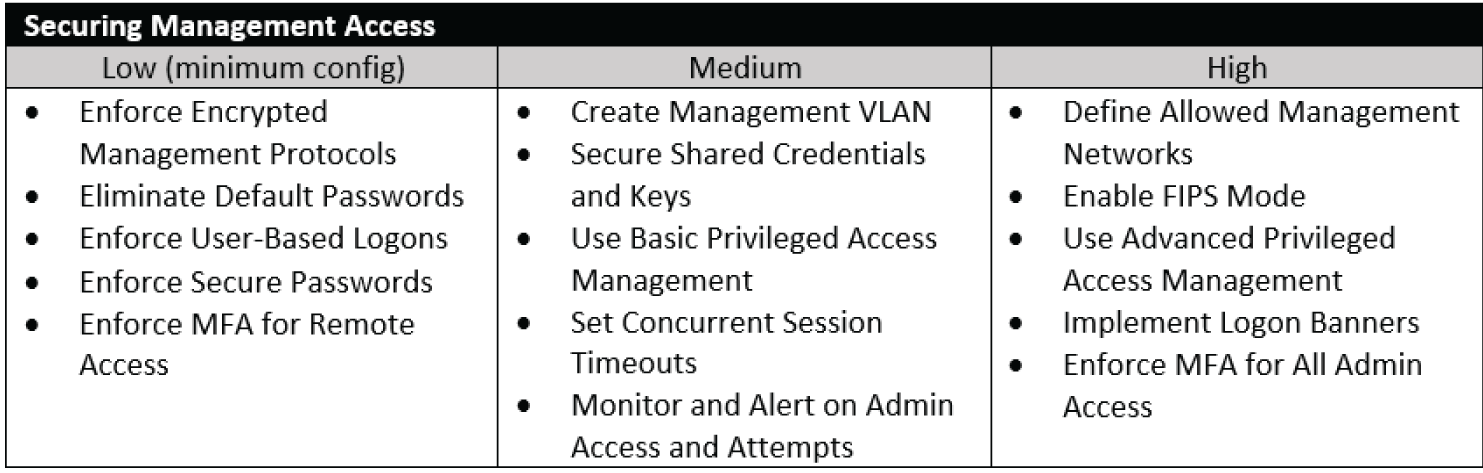
Figure 6.21: Tiered guidance for securing management access for low, medium, and high security environments
Additional Security Configurations
The direction offered thus far is, of course, nowhere near an exhaustive list. These highlight the activities that speak to meeting the most basic compliance frameworks and resolving the vulnerabilities penetration testers and malicious users exploit to gain access to networks.
In addition to the preceding lists, there are a few fringe considerations that warrant mentioning, including:
- Security Monitoring, Rogue Detection, and WIPS
- Considerations for Hiding or Cloaking SSIDs
- Requiring DHCP for Clients
- Addressing Client Credential Sharing and Porting

Figure 6.22: Tiered guidance for designing for integrity in low, medium, and high security environments

Figure 6.23: Tiered guidance for controlling peer-to-peer and bridged communications
Security Monitoring, Rogue Detection, and WIPS
Every secure architecture necessitates meaningful security monitoring, alerting, and reporting, and wireless networks are no exception. In fact, wireless probably demands a higher degree of monitoring than other systems just by virtue of the over-the-air access medium.
Considerations for Hiding or Cloaking SSIDs
When it comes to hiding Wi-Fi SSIDs, there has been some poor advice doled out across the Internet by security enthusiasts who don't quite fully understand 802.11 WLAN protocols.
In residential and enterprise Wi-Fi products, the option often exists to “not broadcast SSID” or “hide SSID” or even “enable SSID cloaking.”
All this setting does is tell the AP to only answer an 802.11 probe request when it contains the explicit name of the SSID. Otherwise, the default behavior is for the AP's beacons to include the SSID name. Functionally, the SSID name is what the user sees in the list of available networks. If the SSID is hidden, the beacon still exists, it just doesn't include the network name.
This adds zero additional security from an attacker, and in fact introduces additional vulnerabilities to mobile endpoints that may be used outside of the organization's walls.
When a legitimate client needs to connect to a hidden SSID, it's forced to announce to the world who it's looking for. It's another silly analogy but think of it like this—pretend you've been instructed to give $1,000 to Oscar. Oscar is some person you haven't met, but your contact assures you he's the guy you need and when you pay him, you'll get tickets to the sold out Six Nations Rugby match coming up. You walk down the street, holding the cash in your hand, calling out for Oscar. Finally, a nice young gentleman (noticing that wad of cash) approaches you, “I'm Oscar” he assures you. You hand him the cash. He said he was Oscar, but really his name is Jussi. At this point, he may run away, or he may lure you to a dark closet, tie you up, and steal your wallet.
This is demonstrated in Figure 6.24, where AP-1 is broadcasting the SSID names and Laptop-A is able to select and connect. However, AP-2 and AP-3 are both broadcasting all hidden SSIDs. Laptop-B has to announce it wants to connect to “Gizmo-Secure” SSID, after which AP-3 allows the connection. AP-2 is also shown to demonstrate it could be an enterprise AP and AP-3 may be a malicious user spoofing a corporate network.
That's what happens in the invisible world of Wi-Fi when we send our laptops and phones out into the world, and they're configured to look for a hidden SSID. The alternative would be going out onto the street and everyone having name tags. You walk until you find Oscar. It is possible Jussi could have stolen Oscar's name tag, but Jussi didn't know you were looking for Oscar, so that chance is low. And that's what it looks like when SSIDs are broadcast.

Figure 6.24: Conceptual comparison of connecting to a hidden SSID versus a broadcast SSID
Endpoints can be configured to connect to networks that are hidden. Additional configurations are required, as shown in Figure 6.25. The network name must be entered, and in most platforms it's case-sensitive. In the case of the Windows example here, the option to connect even if this network is not broadcasting is what tells the laptop this SSID may be hidden.
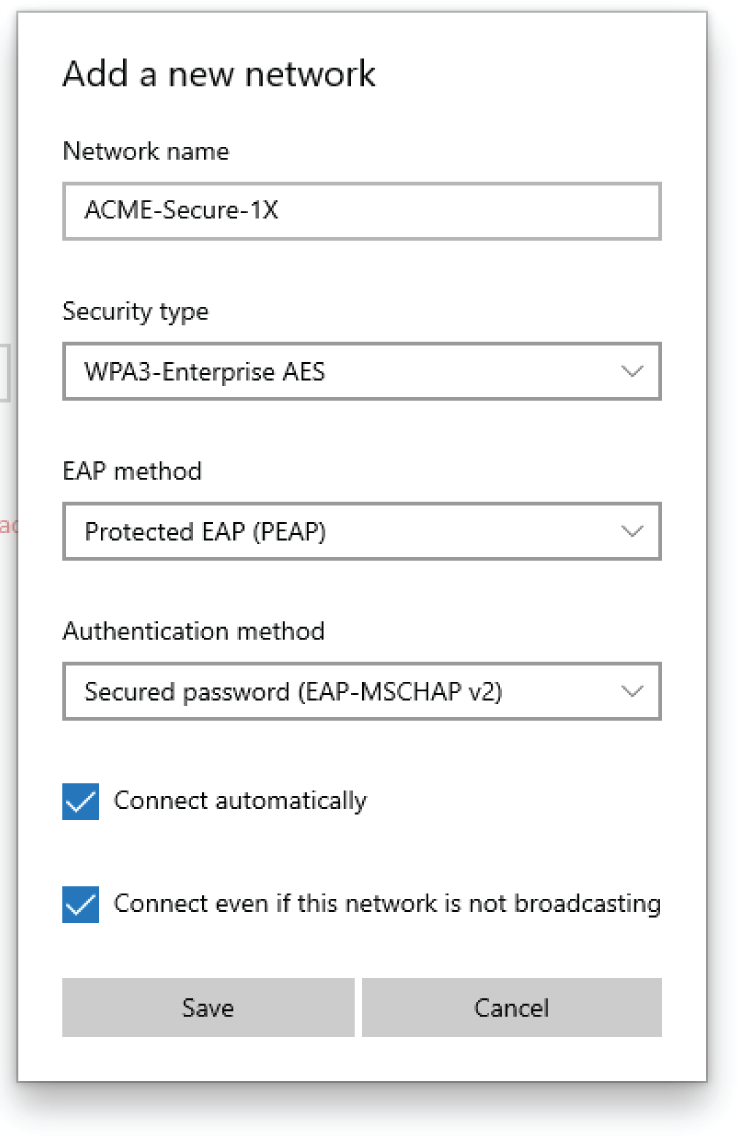
Figure 6.25: A Windows configuration option to connect to an SSID even if it's not broadcasting (meaning it's hidden)
Hiding the SSID has other impacts on availability and connectivity for clients, and the full list of considerations are as follows:
- Hiding the SSID only removes the network name from the beacons; an attacker can easily obtain the SSID name with basic attacks.
- It causes additional latency in the association process of many clients including Apple iOS devices.
- Other devices behave unreliably or can't connect at all to hidden SSIDs.
- Hiding SSIDs does not reduce the noise or traffic over the air.
- Additional risk is introduced by mobile clients actively probing for the enterprise SSID outside the organization.
There are some cases where it makes sense to hide one or more SSIDs. Primarily it makes sense in a complex environment for networks serving endpoints that remain within the physical boundaries of the organization. Therefore, the best practices for hiding SSID are as follows:
- Don't hide SSIDs for networks serving mobile clients that travel outside the physical boundary of the organization.
- Hide SSIDs for networks that are a) serving endpoints that remain physically within the boundaries of the organization and b) are preferred to be hidden to prevent attempted or accidental connection from users.
- Don't hide SSIDs as a security mechanism.
Two common use cases of hiding SSIDs include hospitals and manufacturing. Hospitals have one or more networks for clinical systems that remain in the building, and which aren't connected to by human intervention—meaning it's a pre-provisioned IoT-type device, not a user with a laptop that needs to select the network from a list. Warehouse, manufacturing, and retail all too have various handheld scanners, communications devices, and inventory management systems that would be hidden. See Figure 6.26 and Figure 6.27 for examples of settings to hide SSIDs on Juniper Mist and Aruba.

Figure 6.26: The Hide SSID option in Juniper Mist

Figure 6.27: The Hide SSID option of Aruba Networks Central Cloud platform
Requiring DHCP for Clients
One simple control to consider may be requiring DHCP for clients. These days, many network security and profiling tools rely on being able to see DHCP traffic (through IP helpers, network taps, or span/mirror ports) and conversely, subverting DHCP is one way an attacker can gain unauthorized access to networks.
Most Wi-Fi products offer a setting to force clients to use DHCP, and that's a great option for networks that aren't servicing intentionally statically configured clients. Requiring DHCP helps prevent access from misconfigured endpoints and ensures when a client connects it will have the appropriate network parameters (IP address, gateway, and DNS servers) to access resources.
The big caveat here is that there still exist many endpoints with statically configured IP addresses. This is less common on traditional endpoints, and more often seen on IoT devices or non-traditional IP devices that are being managed by a third party. For example, in healthcare networks there's pretty much always a subset of clinical devices with static IPs, and the hospital may not have purview or management access of the devices to change that.
When possible, all networks should rely on DHCP for addressing. If a static IP is needed, using a DHCP reservation in the server is the most appropriate approach.
Addressing Client Credential Sharing and Porting
Recently I put together a list of the top five vulnerabilities of Wi-Fi based on feedback from several penetration testers with different companies. After organizing and standardizing the responses, five topics bubbled up. We've addressed four of them so far in the book—including segmentation, Bonjour and other zeroconf protocols, porting credentials from clients, and lack of hardening.
The fifth one was a bit of a surprise to me; it involves attacks on credential sharing among endpoints, and several specifically cited the Apple Share Network Password function available in iPhone, iPad, and iPod devices.
With this option, any iOS user with a passphrase for a network (WPA2-Personal or WPA3-Personal) can easily port it to any other iOS user. It's as easy as the steps shown in Figure 6.29. From the infrastructure side, there's nothing you can do to prevent or even monitor for this; the peer devices may be communicating over Wi-Fi or Bluetooth, which is unlikely to be monitored.
This isn't an Apple-only problem. Many platforms incorporate some form of passphrase sharing. Android allows users to share passphrase secured networks via a QR code that can be scanned from the screen or emailed (see Figure 6.28). Microsoft also joined in when it introduced the hotly contested Wi-Fi Sense feature designed to share public hotspot passphrases. It removed the feature in 2016 according to Krebs on Security (Source: https://krebsonsecurity.com/2016/05/microsoft-disables-wi-fi-sense-on-windows-10/). Figure 6.29 shows the ease of sharing Wi-Fi passwords from an Apple iOS device.
Recommended workarounds are to not use passphrase networks where possible or to enable MAC address allowlists for authorized endpoints. New vendor privacy mechanisms such as MAC randomization further complicate any attempts to filter on MAC address or use an 802.1X secured network with MAC Authentication Bypass (MAB).
Options for controlling this behavior are limited and controls for a secure network would rely on not using passphrase-based (Personal) networks. With that being the only control, these are additional notes and considerations for protecting against credential sharing:
- Devices (such as Apple iOS) can share between devices of different owners
- Devices automatically sync network credentials to other devices by the same owner (via iCloud for Apple and other sync options for Android and Microsoft)
- If network passwords are shared between devices, the organization will have no knowledge of it
- There is no way to prevent network password sharing on unmanaged devices
- Network password sharing can be controlled on corporate-managed devices with an MDM through settings AirDrop for Apple devices
- The only protection from network password sharing is to not use passphrase-secured SSIDs with unmanaged devices
The last bullet is the real kicker since passphrase-secured networks are exactly what an organization will typically use for personal and BYOD devices.

Figure 6.28: The option to share a passphrase credential via QR code from an Android phone

Figure 6.29: Screenshot from Apple on sharing network passwords
Summary
This chapter has taken us through our hardening journey, from securing management access to building infrastructure integrity, controlling peer-to-peer and ad-hoc networks, and a few additional hardening considerations.
One important takeaway from this chapter is that overlay networks for personal- and residential-use devices introduce innumerable security risks to the enterprise networks. I hope this chapter has demonstrated the undeniable dangers of mDNS, Bonjour, UPnP, and other zeroconf networking protocols, and that your organization will take that into consideration when planning security enhancements. As Gartner cites in their definition, consumerization is something enterprises have to “deal with.” Our hope is this chapter will help you deal with it securely.
The other takeaway is that hardening exercises are best taken in steps, and a sample of tiered guidance has been provided, starting with the lowest level appropriate for any devices under corporate ownership or touching any corporate owned networks (lab, production, or otherwise). The tiered guidance continues with a medium level security suite of recommendations, followed by a high-security tier with the most stringent controls. As a reminder, most environments will fall in between these three coarse tiers.
Some of the recommendations around hardening, mDNS, and SSID cloaking may be novel or unexpected. And the realization that virtually any consumer endpoint can easily share and port passphrases from WPA2-Personal and WPA3-Personal networks may be eye-opening. There's certainly a lot to consider in balancing usability with security these days.
Last, but not least, this chapter has probably demonstrated how twisty Wi-Fi technology can be, including with the numerous considerations for protected management frames (PMF), its interoperability with Fast Transition roaming, and WPA2/WPA3 secured networks.
One of the major tasks in hardening entails monitoring, alerting, and reporting of the security posture of the network, and we've dedicated an entire chapter to this topic next.