
![]()
Windows Azure Mobile Services
Windows Azure Mobile Services (WAMS) at its core is a ready-made combination of a database and a web site through which CRUD operations can be performed on the data. Hosting these services in the Windows Azure infrastructure provides stability and scalability as well as ready access to this data from virtually any client platform. WAMS also provides various other supporting services including integration with various federated identity providers (Microsoft Account, Facebook, Google, and Twitter) as well as easy integration with the Windows, Apple, and Google push notification services. Direct integration with these types of services can be challenging at best, so having all of the heavy lifting done for you in advance is a huge advantage.
The first thing you will need to get started integrating your own applications with WAMS is an Azure account. Microsoft offers a free trial1 of the service, and MSDN subscription holders have various amounts of free Azure services included with their subscriptions.2 For all the details including pricing information, you should check out the Azure site at www.windowsazure.com.
![]() Note Recipes 12-1 and 12-2 introduce you to the WAMS portal and how to create a mobile service. If you are unfamiliar with navigating the portal, you should work through those recipes first. Also, if you haven’t registered your application with at least one authentication provider and set the proper permissions on your tables, the scripts that use the user object are going to fail. Recipe 12-4 covers authentication.
Note Recipes 12-1 and 12-2 introduce you to the WAMS portal and how to create a mobile service. If you are unfamiliar with navigating the portal, you should work through those recipes first. Also, if you haven’t registered your application with at least one authentication provider and set the proper permissions on your tables, the scripts that use the user object are going to fail. Recipe 12-4 covers authentication.
Let’s do some science! Here are the recipes we’ll be reviewing:
- 12-1. Create a Mobile Service
- 12-2. Work with Data
- 12-3. Work with Server-Side Scripts: Validation and Access Control
- 12-4. Work with Authentication Providers
- 12-5. Work with Push Notifications
12-1. Create a Mobile Service
Problem
You want to take advantage of the functionality provided by WAMS.
How It Works
Open your browser and navigate to www.windowsazure.com. Click the Portal link at the top right of the page to be taken to the Windows Azure Management Portal. There is also a link on the home page to sign up for a free trial if you don’t already have an account. Enter the Microsoft account ID and password to log into the management portal for the account associated with that ID. Figure 12-1 shows the Azure home page.

Figure 12-1. The Windows Azure home page
You will find all of the various Azure services available to you listed down the left side of the portal page. The one we are concerned with here is the Mobile Services tab. You will be presented with the default page advising you that you have no mobiles services (assuming this is your first time working with WAMS). Click the CREATE A NEW MOBILE SERVICE link to begin the process. See Figure 12-2.
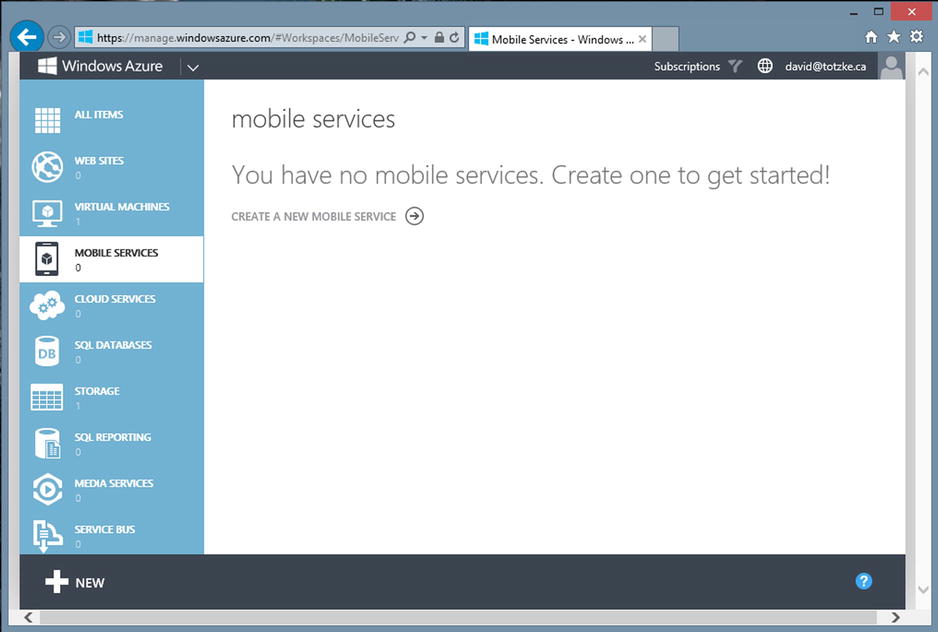
Figure 12-2. The WAMS home page in the Windows Azure Management Portal
The Create a Mobile Service dialog requires you to supply a URL for your service, choose a database, link this service to an Azure subscription (you can have more than one associated with your account) for billing purposes, and choose a deployment region. The domain .azure-mobile.net will be appended to the URL you supply. The name you choose must be unique across all of WAMS, so you may need to get a little creative here. The region you choose for deployment should be the one that is physically closest to the bulk of people who will be using your service. You can choose from East US, West US, Northern Europe, and East Asia. Figure 12-3 shows the dialog filled in for this recipe.

Figure 12-3. The Create a Mobile Service dialog
Click the right-pointing arrow in the bottom right of the dialog to be taken to the next step in the process. This next page, shown in Figure 12-4, allows you to configure the database settings for the database that will be used with this service. The name of the database, like the URL in the previous step, must be unique. The dialog will automatically validate the database name as you type and will display a green circle with a check mark in it if all is well. You database will be hosted on an instance of SQL Server that is dedicated to your account. You can choose an existing server from your account in the drop-down list if you have already set one up, or you can choose to create a new one. You will need to enter a login name and password for the new database server. There is the ability to specify some advanced database settings, but the defaults are fine for our needs. When you have entered everything, click the check at the bottom right of the dialog to complete the new mobile service creation process. Figure 12-5 shows the results.

Figure 12-4. Database and server settings

Figure 12-5. You are returned to this screen after completing the wizard. Note how it says “Creating” in the STATUS column
![]() Note Generally speaking, there is a cost associated with almost everything you have running in Azure. The costs are reasonable, there is a certain amount that is free, and by default there is a spending limit in place to avoid massive charges. Still, you should make yourself aware of these costs and how they may be incurred.
Note Generally speaking, there is a cost associated with almost everything you have running in Azure. The costs are reasonable, there is a certain amount that is free, and by default there is a spending limit in place to avoid massive charges. Still, you should make yourself aware of these costs and how they may be incurred.
It won’t take long, usually just a few minutes, until your service is ready; you will see the STATUS column says “Ready.” The URL column, as shown in Figure 12-6, now contains a URL to your service. Click the link to be taken to the status page for your new service. Clicking the name of your new service will take you to the default landing page shown in Figure 12-7.
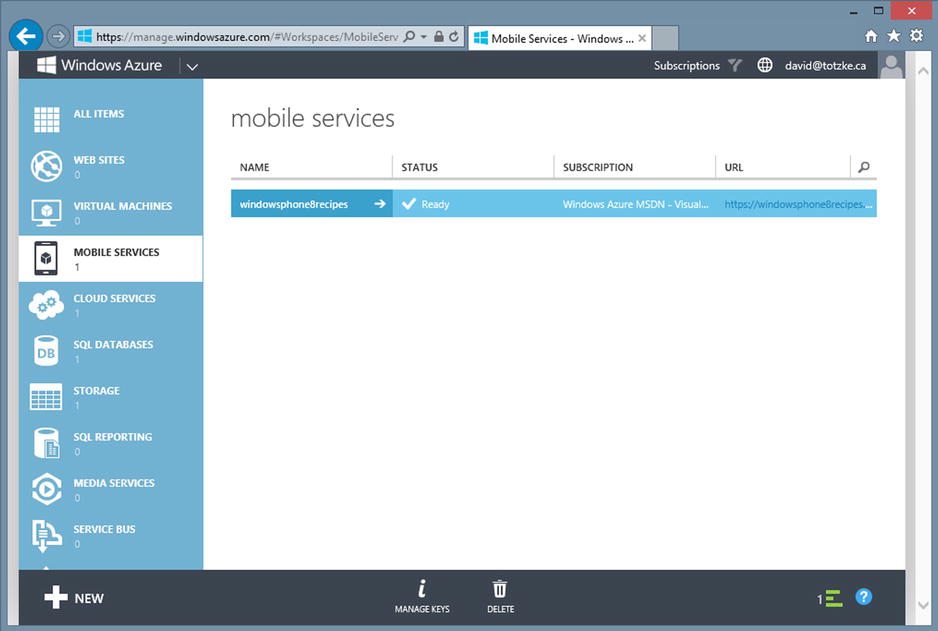
Figure 12-6. The new mobile service ready to go

Figure 12-7. The default landing page for a new mobile service
From this landing page you can download a sample application that is preconfigured to work with your new service. Samples are available for Windows Store and Windows Phone 8 as well as iOS, Android, and HTML/JavaScript.
12-2. Work with Data
Problem
You keep “losing” the list of tasks your spouse has set for you. You need a more robust solution for tracking these items.
Solution
Use a WAMS service to store the list items in an Azure database so that they can be updated and added to from multiple client devices.
How It Works
As discussed in the introduction, the core purpose of WAMS is to enable easy storage and manipulation of data. In fact, the creation of a new mobile service requires that it be associated with a database. Recipe 12-1 covers the creation of a new mobile service, so if you don’t already have one, you can follow the instructions there to create one and then return here. Before we continue, there are a few basic aspects of the interaction between your application and WAMS that you should understand. Table 12-1 shows the JSON and CLR data types and how they map to SQL Azure Table data types. The third column is how the data type is displayed when viewing the table schema in the WAMS Management Console.
Table 12-1. Data Type Mappings
| JSON/CLR Data Type | T-SQL Type in Azure Table | Displayed As |
|---|---|---|
| Numeric values (integer, decimal, floating-point) | float(53) the highest-precision data type | Number |
| Boolean | Bit | Boolean |
| DateTime | DateTimeOffset | Date |
| String | nvarchar(max) | String |
The default dashboard for your new service allows you to create a new basic application that you can immediately compile and run. I find that many people, including myself, learn and retain new skills by doing, so rather than just examining a sample, we’ll build our own. The other advantage to this approach is that you will learn how to connect any existing applications you may have to a new service to enhance their features. Open Visual Studio 2012, create a new Windows Phone 8 application, and call it HoneyDo.
Defining the Data
The first thing we will need is a reference to the Windows Azure Mobile SDK. The SDK is no longer available as a separate installation but is now provided as a NuGet package. Right-click your new solution and select Manage NuGet Packages for Solution. You can then search online for WindowsAzure.MobileServices; finally, click INSTALL and follow the instructions.
Next we’re going to need an object to represent a task that we’ve been given. This object will also be used to send our items across the wire for storage in the database. We’ll keep it simple; Listing 12-1 shows a suitable class.
Listing 12-1. The HoneyDoThis Class Definition
public class HoneyDoThis
{
    public int Id { get; set; }
    public string Instructions { get; set; }
    public bool DidYouDoIt { get; set; }
}
Dynamic schema generation is enabled by default for WAMS, and as such, the first time you submit an object for insertion, WAMS will inspect the JSON sent over the wire and automatically create the table for you. The name of the class becomes the table name, and each public property becomes a column name. Data types are mapped as outlined in Table 12-1. There is no need to apply attributes to your class definition, but I like to be explicit about these things. Listing 12-2 shows our HoneyDoThis class with the DataTable and DataMember attributes applied.
![]() Note The DataMember attribute is the same one used when defining a WCF data contract and is found in the System.Runtime.Serialization namespace. The DataTable attribute, however, is found in the Microsoft.WindowsAzure.MobileServices namespace.
Note The DataMember attribute is the same one used when defining a WCF data contract and is found in the System.Runtime.Serialization namespace. The DataTable attribute, however, is found in the Microsoft.WindowsAzure.MobileServices namespace.
Listing 12-2. The HoneyDoThis Class Definition with Attributes Applied
[DataContract]
[DataTable("HoneyDoThis")]
public class HoneyDoThis
{
    [DataMember(Name = "Id")]
    public int Id { get; set; }

    [DataMember(Name = "Instructions")]
    public string Instructions { get; set; }

    [DataMember(Name = "DidYouDoIt")]
    public bool DidYouDoIt { get; set; }

    [IgnoreDataMember]
    public string DoNotSaveThis { get; set; }
}
![]() Note You’ll notice that the class definition in Listing 12-2 contains an Id property of type int. Any class that is going to be used with WAMS must have an Id property of type integer. This property is then mapped to an Identity column in the SQL Azure table that is created for it. Although GUIDs would also work as a unique identifier, the WAMS implementation requires that you use integer. There is no way to change this.
Note You’ll notice that the class definition in Listing 12-2 contains an Id property of type int. Any class that is going to be used with WAMS must have an Id property of type integer. This property is then mapped to an Identity column in the SQL Azure table that is created for it. Although GUIDs would also work as a unique identifier, the WAMS implementation requires that you use integer. There is no way to change this.
The DataTable attribute constructor has a required string parameter used to pass in the name of the target table. It can be the same or different from the actual class name. You could use this to map a class onto an existing table, for example. The DataMember attribute has a parameter-less constructor; however, you can use named parameters to set a name that you want used for the column name. Again, this can be the same or different from the property name on the class.
You’ll notice the addition of another property in Listing 12-2 from the previous class definition. This property demonstrates the use of the IgnoreDataMember attribute. A column for any property decorated with this attribute will not be created, and the data will not be serialized on the wire. Next, we’ll need a table in which to store our data.
Log into your account at http://manage.windowsazure.com and click the mobile icon on the left side of the page to see a list of your mobile services. Click the service to which you want to connect to be taken to the dashboard. If you are taken to the Quick Start page, click DATA in the top navigation. On the toolbar at the bottom of the browser, you will see the CREATE button. Click the button and then enter HoneyDoThis in the TABLE NAME text box. Leave the default permissions, and then click the check mark. See Figure 12-8.

Figure 12-8. Creating a new table in WAMS
The CRUD permissions for any new table that is created in a mobile service are set to only allow callers with the application key to be able to perform those operations. The first thing you are going to need then, in order to be able to communicate with your mobile service, is the application key. You can obtain the application key by downloading the sample application available from the management portal, but it’s important that you know where to retrieve the keys directly within the portal. You will also need the site URL.
Log into your account at http://manage.windowsazure.com and then click the mobile icon on the left side of the page to see a list of your mobile services. Click the service to which you want to connect to be taken to the dashboard. If you are taken to the Quick Start page, click DASHBOARD in the top navigation. Figure 12-9 shows the dashboard, and you can see the mobile service URL at the bottom right of the picture. Make note of this URL.

Figure 12-9. WAMS dashboard showing the mobile service URL
On the toolbar at the bottom of the browser, as shown in Figure 12-10, you will see the MANAGE KEYS button. Clicking that button opens a dialog wherein you can retrieve both the application key and the master key. The master key is used by a calling application to identify itself as having greater authority. The master key will map the caller to the administrator role. Figure 12-10 shows the Manage Access Keys dialog. Don’t bother, I’ve already changed them. Make note of the application key.

Figure 12-10. The Manage Access Keys dialog
Now that we have the site URL and the application key, we can return to our HoneyDo project and configure a MobileServiceClient that will allow us to communicate with WAMS. Open the App.xaml.cs file for editing and then add the code from Listing 12-3 at the top of the App class.
Listing 12-3. Declaration of a MobileServiceClient Property
private static readonly MobileServiceClient mobileClient =
    new MobileServiceClient("https://windowsphone8recipes.azure-mobile.net/", "KpkRfKXGTXkeDFtiyfhd452ANMQfWQ64");

public static MobileServiceClient MobileClient
{
    get
    {
        return mobileClient;
    }
}
You’ll recognize the two values passed into the constructor of the MobileServiceClient, with the first being the mobile service URL and the second one being the application key you retrieved earlier. Make sure to replace the values in the code listing with those from your own service.
Now that we have the client configured, we’re ready to start interacting with our service.
Interaction with the WAMS service client is remarkably easy. Retrieving an object follows a slightly different pattern, so we’ll cover that separately. Inserting, deleting, and updating data all follow the same operational pattern.
- Create or retrieve the target object.
- Get a reference to the target data table.
- Await the appropriate asynchronous method, passing in the target object.
Creating an object is simplicity itself; you simply “new” one up. The MobileServiceClient provides a generic GetTable method that you use to get a reference to the target table. The generic parameter you provide is the type associated with the table. In our example, this would be the HoneyDoThis type, as shown in the following line of code:
IMobileServiceTable<HoneyDoThis> honeyDoThisTable =
    App.MobileClient.GetTable<HoneyDoThis>();
Listing 12-4 contains code that first creates a new item and then updates it to mark it as done. Add this code to the MainPage.xaml.cs file in your project and then run the application. After the application loads and the code executes, you should be able to return to the DATA section in the Azure portal and see the record in the table, as shown in Figure 12-11.
Listing 12-4. Inserting, Updating, and Deleting a Record
protected async override void OnNavigatedTo(NavigationEventArgs e)
{
    HoneyDoThis thingToDo = new HoneyDoThis();
    thingToDo.Instructions = "Take out the garbage";

    IMobileServiceTable<HoneyDoThis> honeyDoThisTable =
        App.MobileClient.GetTable<HoneyDoThis>();
    await honeyDoThisTable.InsertAsync(thingToDo);

    // the instance will now have an Id so we
    // can simply modify it and submit the update
    thingToDo.DidYouDoIt = true;

    await honeyDoThisTable.UpdateAsync(thingToDo);

}

Figure 12-11. The new record updated in the data table
Deleting the new record is simply a matter of creating an instance of the HoneyDoThis class, setting its Id property to the ID of the record you want to delete, and then passing it into the DeleteAsync method on the MobileServicesClient. Listing 12-5 shows the code to accomplish this.
Listing 12-5. Deleting a Record from the Data Table
HoneyDoThis deleteThis = new HoneyDoThis();
deleteThis.Id = 2;
await honeyDoThisTable.DeleteAsync(deleteThis);
Now, it’s unlikely that you will update an object immediately after creating it, so it would probably be helpful to be able to retrieve a specific record at a later time. As mentioned earlier, retrieving records from the data table uses a different pattern than the other three operations. You still start by getting a reference to a data table using the GetTable method of the MobileServicesClient, but the similarity ends there.
IMobileServiceTable<HoneyDoThis> honeyDoThisTable =
    App.MobileClient.GetTable<HoneyDoThis>();
The GetTable method returns an instance of a type that is an implementation of IMobileServiceTable<T>. This interface exposes a Where method. You simply provide the Where method with a lambda expression that will be used to filter the records that will be returned. Listing 12-6 shows an example that will return all HoneyDoThis items that are not complete yet. The first thing you’ll notice is that the Where method does not return an IEnumerable<T> but rather an IMobileServiceTableQuery<T>. To retrieve the results of the query, you must call either ToListAsync or ToEnumberableAsync.
Listing 12-6. Querying the Data Table for Unfinished Items
IMobileServiceTable<HoneyDoThis> honeyDoThisTable =
    App.MobileClient.GetTable<HoneyDoThis>();

IMobileServiceTableQuery<HoneyDoThis> thingsToDoQuery =
    honeyDoThisTable.Where(hdt => hdt.DidYouDoIt == false);

List<HoneyDoThis> thingsToDo = await thingsToDoQuery.ToListAsync();
This recipe covered the basic data interactions you have access to using the MobileServicesClient. Recipe 12-3 will cover server-side scripts that you can use to validate data before it is inserted, updated, or deleted as well as storing and working with per-user data. Recipe 12-4 will cover integrating your mobile service with an authentication provider.
12-3. Work with Server-Side Scripts: Validation and Access Control
Problem
You want to ensure that only valid data gets saved into the database while also controlling who has access to that data.
Solution
Implement server-side scripts that validate data as it is inserted or updated as well as filter the data based on the current user.
How It Works
It is a widely accepted principle that we should validate incoming data whenever it crosses a trust boundary. You may think that because our application owns, so to speak, both sides of the boundary that there is an implicit trust between client and service. This is true, to a point, but because WAMS can be accessed via REST as well as via the MobileServicesClient, we can’t depend on the validation we included in our client-side application. Someone could easily craft a request using a web page or other medium and completely bypass our validation. This is where server-side scripting comes into play.
WAMS provides you with the ability to add a script for each of the insert, update, delete, and read functionalities. The scripts are written in JavaScript using a basic editor provided in the WAMS portal. The scripts are table-specific, so you have to validate each table’s data separately and they cannot be shared between two or more tables. You can create and define functions to organize your code within each operational script, but these functions cannot be shared across operations. Any function you want to use in another script will have to be copied into it.
Log into the WAMS portal, click the Mobile Services icon in the left navigation, and then click your service to get to the dashboard. Click the DATA item in the top menu and then click the name of the table for which you want to add scripts. Once on the page for your table, click SCRIPT in the top menu. Figure 12-12 shows the script authoring page. The OPERATION drop-down list allows you to select the operation you want to script (insert, update, delete, and read). We’ll examine each of the four operations in turn and then bring everything together by examining the techniques required to control the operations on a per-user basis.
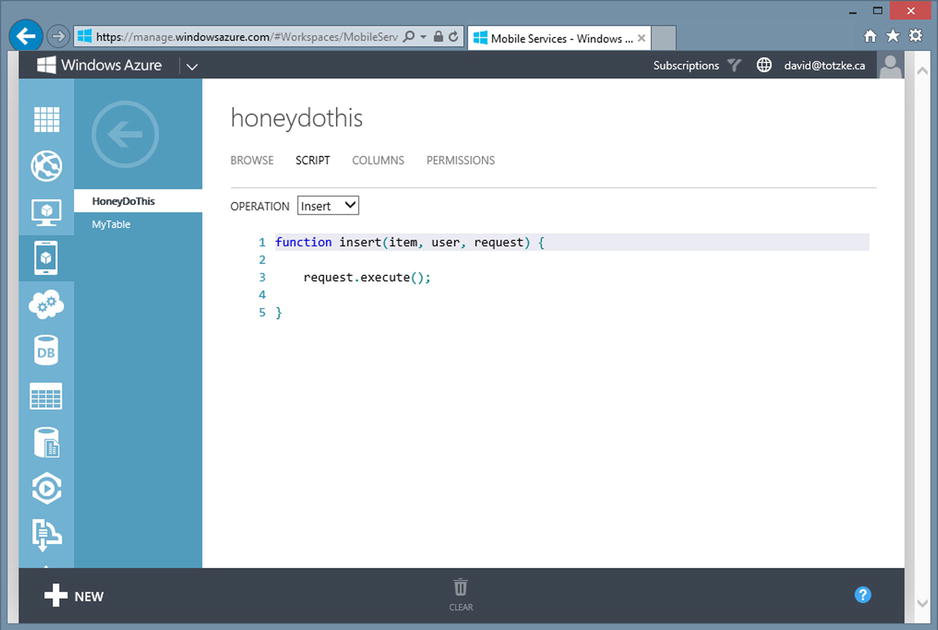
Figure 12-12. The WAMS portal script editor showing the default insert operation script
The script for each operation is executed before the actual operation itself, which provides you with the opportunity to add or modify the incoming data, cancel the operation entirely, or even do something entirely different. It’s worth calling out here that, at a minimum, each script must call one of either request.execute() or request.respond() on every code path. Failure to do so will result in the mobile service not sending a response to the caller. This will be evidenced on the client by a timeout of the call to the service.
This is a fairly long recipe because there is a lot to cover for what on the surface seems to be a relatively simple set of tasks.
The script for each operation takes three parameters. The last two parameters, user and request, are the same for each operation. Only the first parameter is different. Figure 12-12 shows the default insert function, the first parameter of which is the actual item that is to be inserted into the table. The function as it stands now amounts to a NOOP, and the record is simply inserted into the table. Let’s modify it a little bit to do some basic validation and cancel the insert if validation fails. Listing 12-7 shows our new insert script. For the purposes of demonstration, we’ll continue with our theme, introduced in Recipe 12-2, of a list of items that have been assigned by our “honey.” Now, I’m certainly not going to do anything unless it has approval. Happy wife, happy life, and all that. We’ll add an Approved property to our HoneyDoThis object, and we want to insert the record only if it has been approved. The script checks the approved property, and if it’s true, it then calls the execute method of the request object. If the item is not approved, the script calls the respond method, passing in a status and a message describing the error. The statusCodes object is an enumeration that represents a subset of HTTP response codes that are supported by WAMS. Table 12-2 lists the valid response codes.
Listing 12-7. Basic Insert Validation Script That Cancels the Operation If Validation Fails
function insert(item, user, request) {

   if (item.Approved) {
        request.execute();
    } else {
            request.respond(statusCodes.FORBIDDEN, "This task has not been approved.");
    }
}
Table 12-2. Members of the statusCodes Scripting Enumeration for Use with the Respond Method of the Request Object
| Member | Code |
|---|---|
| OK | 200 |
| CREATED | 201 |
| ACCEPTED | 202 |
| NO_CONTENT | 204 |
| BAD_REQUEST | 400 |
| UNAUTHORIZED | 401 |
| FORBIDDEN | 403 |
| NOT_FOUND | 404 |
| CONFLICT | 409 |
| INTERNAL_SERVER_ERROR | 500 |
Now that we are validating that only approved tasks are being saved, we should also ensure that we can track the tasks on a per-user basis because the WAMS database is shared by all the users of this application. From an object design perspective, the userId of the person to whom the task is assigned isn’t really an attribute because it’s obviously the person to whom the phone belongs. Devices aren’t generally used by more than a single person and I don’t know of a way that you can even switch between different users. Our HoneyDoThis class therefore now looks something like this:
public class HoneyDoThis
{
    // attributes have been omitted for clarity.
    public int Id { get; set; }
    public string Instructions { get; set; }
    public bool DidYouDoIt { get; set; }
    public bool Approved { get; set; }
}
We could modify the class to include a userId property, but then we are still dependent on the client application setting that value when it submits a HoneyDothis record. Also, since this is a service, it could be used by any number of clients and not just our application. Now we are relying on additional client applications to submit the userId. An arguably better approach would be to make use of the user object that gets passed to our server-side script. We don’t even need to change our class definition.
Given the dynamic nature of JavaScript and the underlying WAMS data architecture, we can simply “pretend” that the UserId property exists on our HoneyDoThis class and set its value using the user object passed to the insert function. WAMS will automatically map this additional property to a column in the data table and as an added bonus will create the column if it doesn’t already exist.
In reality, the dynamic schema creation functionality should be disabled in a production deployment of your application. It’s very useful during development but could lead to trouble and perhaps even open you up to a denial-of-service attack when someone figures out that they can add columns at will to your data tables.
Listing 12-8 shows the modified version of the insert script.
Listing 12-8. The New Insert Script That Records the userId of the Purchaser
function insert(item, user, request) {

   if (item.Approved) {
       item.UserId = user.userId;
        request.execute();
    } else {
            request.respond(statusCodes.FORBIDDEN, "You can only insert approved items.");
    }
}
The update script is the same as the insert script in that it has the item, user, and request objects as parameters and simply calls the execute method on the request, which translates to a NOOP. In addition to performing some type of validation before allowing the record to be updated, you could also use this script to add some auditing information to it, something like a last-updated time and date, for example. Listing 12-9 shows the script to accomplish this.
Listing 12-9. Adding a Last-Updated Date to the Object Before Updating the Record
function update(item, user, request) {

    item.Instructions = "Hello from the script."
    item.LastUpdate = new Date();
    request.execute();
}
Notice once again that because of the dynamic nature of JavaScript combined with the dynamic schema creation of WAMS, the LastUpdated property does not need to exist on the actual object that is being passed to the server for update. WAMS just figures it out and does the right thing. This script also demonstrates the fact that you can modify the properties of the object passed into it or even change it altogether. Figure 12-13 shows the results of our script.

Figure 12-13. The results of the update script from Listing 12-9
You will notice in Figure 12-13 that the record with the id set to 3 has a value of NULL for the LastUpdate column. This is because the record existed prior to the implementation of the update script and there is no way to provide a default value for existing records. You would need to update any existing records and set their values individually.
One other validation that is important here is to make sure the user actually owns the record they are trying to modify. We can’t examine the incoming object because the client can send us anything it wants and, besides that, our implementation doesn’t include a client-side user identifier anyway. What we need to do is retrieve the existing record from the database and then test the UserId of it. We’ll cover how to do that in the Managing Per-User Data Operations section.
The delete script still has the user and request objects as its second and third parameters, respectively, but differs from the insert and update scripts in that only the id of the record to be deleted gets passed in. The first thing you’ll notice about the delete script, shown in Listing 12-10, is that it’s actually named del. This is because delete is a reserved word in JavaScript. The default script is all you need if you want to let the delete just happen.
Listing 12-10. The Default Delete Script
function del(id, user, request) {

    request.execute();

}
There isn’t really much validation you can do in the delete script since you have only the ID of the record to work with. If you are of a sadistic nature, you might want to make every second request fail silently by testing the ID to see whether it is divisible by two, as shown in Listing 12-11. The client code will have no idea if the statusCodes.OK was the result of the request being successfully executed or if it was simply returned as the response from the script. While this is clearly the work of a madman, it does illustrate an interesting aspect of the server-side scripts. Failing silently is sometimes a legitimate response, but statusCodes.FORBIDDEN or statusCodes.UNAUTHORIZED is a likely better response depending on the circumstances.
Listing 12-11. Failing Silently Only for Even-Numbered Records
function del(id, user, request) {

    if(id % 2 === 0) {
        request.respond(statusCodes.OK, "Everything went fine.");
    } else {
        request.execute();
    }

}
Now, admittedly, this isn’t exactly useful. It would be useful to retrieve the corresponding record first to ensure it actually exists and, second, to examine it and apply any rules prior to deletion. The insert script in Listing 12-8 added a UserId property to our table and set its value to that of the caller provided by the user parameter of the function. We’ll get to that shortly, but first let’s take a look at the read script.
The read script is the last of the operations in the CRUD quartet. Like the functions for insert, del, and update, the read script is passed the user and request objects as its second and third parameters, respectively. The first parameter is somewhat different in that it is not the object or its ID but rather the incoming query itself. This query object already contains any predicates, ordering, or projections that were applied on the client side. Any additional modifications we make to the query here will be additive. In the “Working with the Client Proxy” section of Recipe 12-2, we saw how we could retrieve only items that were not completed.
IMobileServiceTableQuery<HoneyDoThis> thingsToDoQuery =
    honeyDoThisTable.Where(hdt => hdt.DidYouDoIt == false);
The query object passed into the read script will already contain this filter. Keep this in mind as you develop your server-side scripts.
Probably the most useful and common application of the read script is to apply one or more filters to the incoming query that you want applied to every read. Filtering the data so that a client can only ever see their own records is a prime example. We not only remove the burden of filtering from the client but in so doing also ensure that no one ever sees anyone else’s data.
The query parameter of the read script function has a where method with two overloads. The first overload accepts a JSON object as input. This JSON object defines the criteria that should be applied to the query. Listing 12-12 shows how we can add a filter to the query so that only records that match the userId of the client making the request get returned. Keep in mind that JavaScript is a case-sensitive language, so make sure you get that right.
Listing 12-12. Filtering Records by userId Using JSON
function read(query, user, request) {
    query.where({ UserId: user.userId, Approved: true});
    request.execute();
}
Just to make sure we’re all on the same page here, Listing 12-12 is roughly the equivalent of writing the following SQL query:
SELECT * FROM TableName
WHERE UserId = user.userId AND Approved = true;
The where method returns an object of type query, which means we can use the result to compose our query as a series of method calls. Listing 12-13 shows three ways of writing the query defined in Listing 12-12. All three are semantic equivalents.
Listing 12-13. Variations on a Theme: All Three Statements Are Semantic Equivalents
function read(query, user, request) {
    query.where({ UserId: user.userId, Approved: true});
    request.execute();
}

function read(query, user, request) {
    query.where({ UserId: user.userId});
    query.where({ Approved: true});
    request.execute();
}

function read(query, user, request) {
    query.where({ UserId: user.userId})
         .where({ Approved: true});
    request.execute();
}
The final method of applying additional criteria to the incoming query is provided by the second overload of the where method. This version takes a JavaScript function as a parameter. This is similar to the way you can pass a lambda expression to the Where extension method in LINQ. Listing 12-14 shows two examples of how to use a JavaScript function as a filter.
Listing 12-14. Filtering Using a JavaScript Function
function read(query, user, request) {
    query.where(function(currentUserId){
    return this.UserId == currentUserId;
    }, user.userId);
    request.execute();
}

function read(query, user, request) {
    query.where(function(currentUserId){
    return this.UserId == currentUserId && this.Approved == true;
    }, user.userId);
    request.execute();
}
There is an important limitation that is imposed on the function that you pass to the where method of the query. It can contain only a single statement, and that statement must be a return. While the script in Listing 12-15 will pass validation by the rudimentary editor in the portal and the script will save, the client will get a MobileServiceInvalidOperationException.
Listing 12-15. This Script Will Fail
function read(query, user, request) {
    query.where(function(currentUserId){
        var x = true;
        return this.UserId == currentUserId && this.Approved == x;
    }, user.userId);
    request.execute();
}
Managing Per-User Data Operations
The ability to manage application data on a per-user basis is arguably one of the most common requirements when dealing with a shared data environment. We’ve already seen how we can record the identity of the user making the request in the section on the insert script. The section on the read script showed us how to filter the stored data at the service layer so that each client sees only their own data. We’ll cover the update and del scripts together in this section because they require a similar technique in their implementation.
When an update or delete request arrives at the service, there is no guarantee that the associated item belongs to the user who is requesting the operation. An authenticated user with malicious intent can easily craft a request using the REST interface and supply an arbitrary identifier. For both operations then, you need to retrieve the existing object from the database and compare the userId that was associated to it.
![]() Note It’s extremely important to keep the REST interface in mind when writing your server-side scripts. A malicious REST request is ludicrously easy to craft, and the dynamic nature of JavaScript means you need to be careful how you handle incoming data.
Note It’s extremely important to keep the REST interface in mind when writing your server-side scripts. A malicious REST request is ludicrously easy to craft, and the dynamic nature of JavaScript means you need to be careful how you handle incoming data.
The first thing we’ll need then is a reference to the table that contains the record in question. The WAMS scripting environment exposes several intrinsic objects that you can use to perform various operations. One of these objects is the tables object. The tables object exposes a getTable method that we can use to get a reference to the HoneyDoThis table. With the table in hand, we can use the where and read methods to retrieve the record and examine it. Listing 12-16 contains an example update script.
Listing 12-16. Retrieving and Updating an Existing Record
function update(item, user, request) {
    var table = tables.getTable('HoneyDoThis'),
    table.where({ id: item.id }).read({
        success: function (results) {
            if (results.length) {
                var existingItem = results[0];
                if (existingItem.UserId === user.userId) {
                    request.execute();
                } else {
                    request.respond(statusCodes.BAD_REQUEST, "Invalid user");
                }
             } else {
                 request.respond(statusCodes.NOT_FOUND);
             }
         }, error: function () {
             request.respond(statusCodes.NOT_FOUND);
         }
     });
}
The script’s logic should be fairly self-evident. Let’s walk through it one step at a time. A reference to the HoneyDoThis table is retrieved, and the filter for the item’s id is added to the where method.
var table = tables.getTable('HoneyDoThis'),
table.where({ id: item.id })
The read method is then chained to the where, and a function is passed to the success parameter. The success function checks that a result was returned and, if so, retrieves the first element in the result set. The UserId of that element is tested against the userId of the caller. The request is executed if they match. Just before the call to the execute method is also a good place to put any additional validation logic.
.read({
      success: function (results) {
          if (results.length) {
              var existingItem = results[0];
              if (existingItem.UserId === user.userId) {
                  request.execute();
              }
In the case that the user IDs do not match, a BAD_REQUEST status code is returned to the client.
else {
    request.respond(statusCodes.BAD_REQUEST, "Invalid user");
}
Finally, if no matching item is found in the table, a NOT_FOUND status code is returned to the client.
} else {
    request.respond(statusCodes.NOT_FOUND);
The only difference between this update script and that needed for the del script, aside from the name, is that the del script only gets the id of item and not the item itself. Listing 12-17 contains a sample del script.
Listing 12-17. Sample Script for Per-User Delete Operation
function del(id, user, request) {
    var table = tables.getTable('HoneyDoThis'),
    table.where({ id: id }).read({
        success: function (results) {
            if (results.length) {
                var existingItem = results[0];
                if (existingItem.UserId === user.userId) {
                    request.execute();
                } else {
                    request.respond(statusCodes.BAD_REQUEST, "Invalid user");
                }
             } else {
                 request.respond(statusCodes.NOT_FOUND);
             }
         }, error: function () {
             request.respond(statusCodes.NOT_FOUND);
         }
     });
}
The user object that is provided to every server-side script has another useful property called level. The level property is set to one of three values: anonymous, authenticated, or master. The master key, found along with the application key, as shown in Recipe 12-1, must be present in the request in order for the user object level to be set to master. Guard the master key carefully; it opens all the doors.
Many other server-side scripting objects are available to you, and I encourage you to investigate them all so that you can enrich the functionality of your applications. You can find documentation of the scripting objects on the Microsoft site at http://msdn.microsoft.com/en-us/library/windowsazure/jj554226.aspx.
12-4. Work with Authentication Providers
Problem
You have an application that requires the user to log on so that you can manage user-specific information, but you don’t want the burden of managing user accounts and credentials.
Solution
Register with and connect your application to one of the authentication providers supported by Windows Azure Mobile Services.
How It Works
I have always found the management of user accounts and credentials to be one of the most annoying parts of creating an application. Almost every new application requires the same functionality to a greater or lesser degree. Fortunately, there is a better way that has been around for a long time but has only been gaining wide acceptance in the last few years. It is what is known as federated identity.
Now, a full discussion of federated identity and the workings thereof is enough to fill a book of its own and is certainly well beyond the scope of this one.3 However, a brief introduction to the concept is appropriate to aid in your understanding of what is going on in this recipe.
Federated Identity: What Is It?
You can think of federated identity as off-loading the responsibility for verifying the identity of a specific person or entity to a trusted third-party, trust being the key. Perhaps an example from the physical world will help in understanding.
When traveling to another country, you need to be able to identify yourself, especially when returning home. You need to be able to prove that you are you. We use a passport to accomplish this. The passport has been issued to you by the government of your country. Each authority that wants to verify your identity trusts that the issuing government has done its due diligence in verifying your identity, that reasonable steps have been taken to prevent large-scale forgery, and that the document can be trusted. The passport is a kind of token that you can present as proof of identity. The requesting authority doesn’t need to contact the issuer directly because of the trust relationship that the two share. The token is enough. Although not as universally accepted, a driver’s license is another token of identity issued by a trusted provider.
Back in software-land, we have the same need for identity. This is where identity providers come into play. WAMS, at least at the time of this writing,4 has support for four identity providers.
- Microsoft Account (formerly Microsoft Live ID)
Registering Your Application
The first thing you need to do in order to use one of these third-party identity providers is to establish a trust relationship between your application and the provider. This functionality is exposed by something called a secure token service. You need to know when a valid token is being presented to your application. This relationship hinges on two things: an application ID and a shared secret.
The application ID . . . well . . . identifies your application to the provider, and the shared secret is used to secure communications. The underlying plumbing that makes all of this happen is complex to say the least, but it is thankfully hidden from us. All four of the providers work in the same manner, and registration is a simple matter of obtaining a developer account and then registering your application to obtain the application ID and secret. We’ll cover only the Microsoft account provider in detail in this recipe.
Microsoft Account Provider Registration
Log into the Live Connect Developer Center at http://dev.live.com. The sign-in page provides a link to register for a Microsoft account (formerly Live ID) if you don’t already have one. Once you are signed in, click the “My apps” link at the top left of the page. You should arrive at the page shown in Figure 12-14.
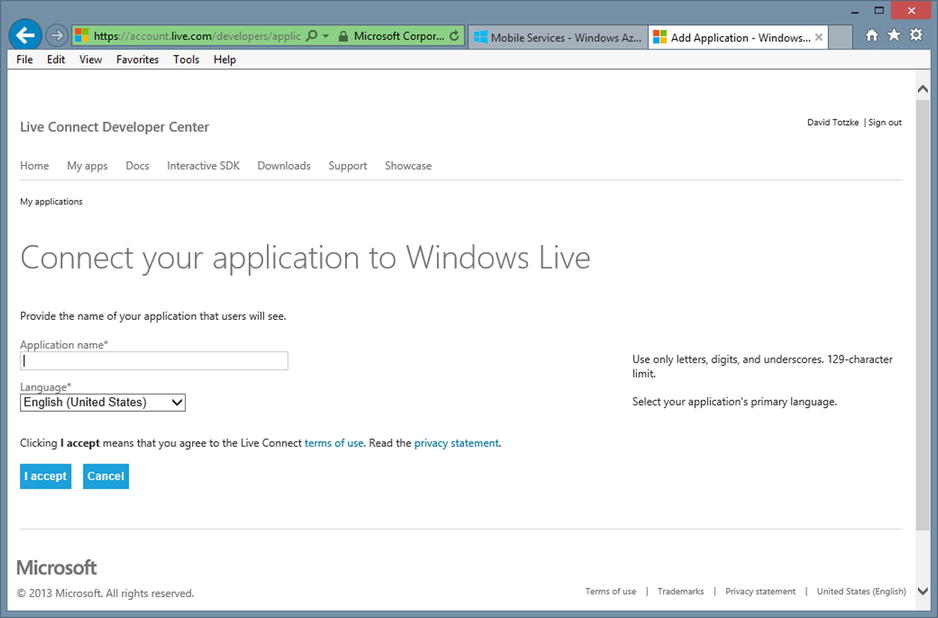
Figure 12-14. The “My apps” page in the Live Connect Developer Center
Enter the name of your application, and select its primary language. Review the terms of use and the privacy statement and then click the button labeled “I accept.” Figure 12-15 shows the API Settings page for your application, which will appear next.

Figure 12-15. The application API Settings page in Live Connect Developer Center
Make a note of the client ID and client secret because you will need these values later.
You need to enter one more piece of information before your application is fully configured: the redirect domain. You might be thinking “I’m doing Windows Phone, so this is a mobile client app,” but that isn’t the case. We’re actually establishing the trust relationship between the mobile service and the provider, and the mobile service is a web application. Enter the domain you assigned to your service when you created it and then click the Save button.
Configuring Authentication for Your Service
Now that you have registered your application with one or more identity providers, you need to configure the settings in your mobile service. Log into the WAMS Management Portal, click the Mobile Services icon in the left navigation pane, and then click the name of the service you want to configure. Along the top of the page there is an IDENTITY link. Click that to be taken to the page shown in Figure 12-16. There is a section for each of the four identity providers where you can enter the client ID and shared secret.

Figure 12-16. The Identity Settings screen in the WAMS Management Portal
The last thing we need to do is configure our table security to limit access to only those users who have been authenticated. Navigate to the page for your table in the WAMS portal and click the PERMISSIONS link at the top. For each of the operations, select Only Authenticated Users from the drop-down and then click the Save button in the bottom toolbar. Figure 12-17 shows the result.

Figure 12-17. Allowing only authenticated users access to the table
With all of that out of the way, we are now ready to enable authentication in our client application.
So far, getting our service up and running hasn’t been too much trouble. There are a lot of moving parts that need to be connected, and we had to write some JavaScript,5 but it hasn’t been a particularly arduous journey. You might be thinking, as I was, that the client-side code is going to be just completely ugly to compensate for that. Against all expectations, it’s arguably the easiest part of the entire process.
If you refer to Listing 12-3 in Recipe 12-2, you’ll see that we exposed a static property of type MobileServiceClient on the App class and used that to interact with our mobile service. The MobileServiceClient class has a method called LoginAsync. The LoginAsync method takes a single parameter of the enumeration type MobileServiceAuthenticationProvider. This one line of code is all it takes:
await App.MobileClient.LoginAsync(MobileServiceAuthenticationProvider.MicrosoftAccount);
The call to LoginAsync will then display the user interface that is appropriate for the specified provider. You don’t even need to provide a UI to enter a username and password. How cool is that? Figure 12-18 shows an initial opt-in screen for the Microsoft account provider if this is the first time you are connecting. Beside it is the actual sign-in page.
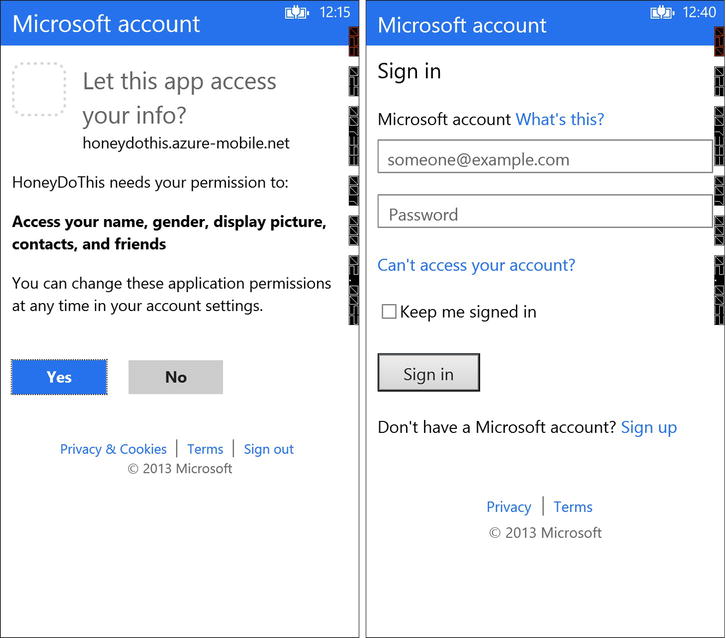
Figure 12-18. The opt-in page (left) and the sign-in page (right) for the Microsoft account provider
And that’s all there is to it. You’ll want to wrap the call in a try/catch to trap the InvalidOperationException, which gets thrown if the authentication fails for any reason and makes it nice for the user, of course, but that’s easy.
12-5. Work with Push Notifications
Problem
You have an application that helps people track their to-do items, and you want to be able to periodically send productivity tips to anyone running the application.
Solution
Register your application with one of the push notification services that is supported by Windows Azure Mobile Services. Your application can then register the client device with your mobile service to receive notifications.
How It Works
There are two basic approaches to architecting a periodic update system: push and pull. While there are certainly situations where polling for an update and pulling down the data is appropriate, it can be a fairly inefficient method. This is especially true if the updates are infrequent and polling will create a lot of unnecessary network traffic. Users who have a metered connection are not going to be happy with your application.
The push or, more commonly, publish-subscribe pattern is far more efficient. Clients subscribe to a channel, and the service publishes the information to all subscribers. WAMS has built-in support for several of the most popular push notification services. The four supported providers are as follows:
- Microsoft Push Notification Service (MPNS)
- Windows Notification Service (WNS)
- Apple Push Notification Services (APNS)
- Google Cloud Messaging (GCM)
Windows devices will interact with either MPNS or WNS. Android and iOS devices that want to interact with your mobile service will do so via either the Apple or Google service. We’ll be working through registering with and using WNS; however, the flow of interactions is the same for all the services. Figure 12-19 illustrates the various interactions involved.

Figure 12-19. Interactions between client applications, WAMS, and WNS
Push notifications can be received by two components of a Windows Phone application: the application itself if it’s running and a background task. You can send two types of notifications from your service: XML and raw (Binary). XML notifications are by far the easiest to use and require very little client-side processing. Raw notifications, on the other hand, require your application to provide 100 percent of the message processing and do everything needed to display the message on the device.
![]() Note Push notifications are triggered in one of two ways: from one of the server-side scripts attached to a table or from a script that is associated with a scheduled job.
Note Push notifications are triggered in one of two ways: from one of the server-side scripts attached to a table or from a script that is associated with a scheduled job.
Registering Your Application
Just as you did in Recipe 12-4, you need to register your application with one of the supported service providers. The steps are virtually the same. A unique application identifier and shared secret need to be generated for your application, and then you need to configure this information in the WAMS Management Portal.
We’re going to concern ourselves only with the Windows Push Notification Service, but the basic procedure will be roughly the same for the Apple and Google services.
![]() Note The Microsoft Push Notification Service does not require you to authenticate your service in order to send push notifications. Notification volume is limited to 500 notifications per user per day. It’s an easy choice with no configuration overhead if you have modest notification needs.
Note The Microsoft Push Notification Service does not require you to authenticate your service in order to send push notifications. Notification volume is limited to 500 notifications per user per day. It’s an easy choice with no configuration overhead if you have modest notification needs.
Windows Notification Service Registration
The first thing you will need in order to register your application is a developer account in the Windows Dev Center at http://msdn.microsoft.com/en-us/windows/apps. There is a cost associated with this account; however, it’s not hugely expensive, and you do need to have it if you want to publish applications to the Windows Store.
Once you are logged in to the developer center, click the DASHBOARD link at the top right of the page and then click the “Submit an app” link in the left navigation. Figure 12-20 shows the page you should now be seeing.

Figure 12-20. The “Submit an app” landing page in the Dev Center
Click the “App name” icon and then enter a name for your application in the text box on the page that comes up next; then click the “Reserve app name” button. The next page will confirm the name registration, assuming that the name is available. Click the Save button. Figure 12-21 shows the final application page you should land on assuming everything went well.
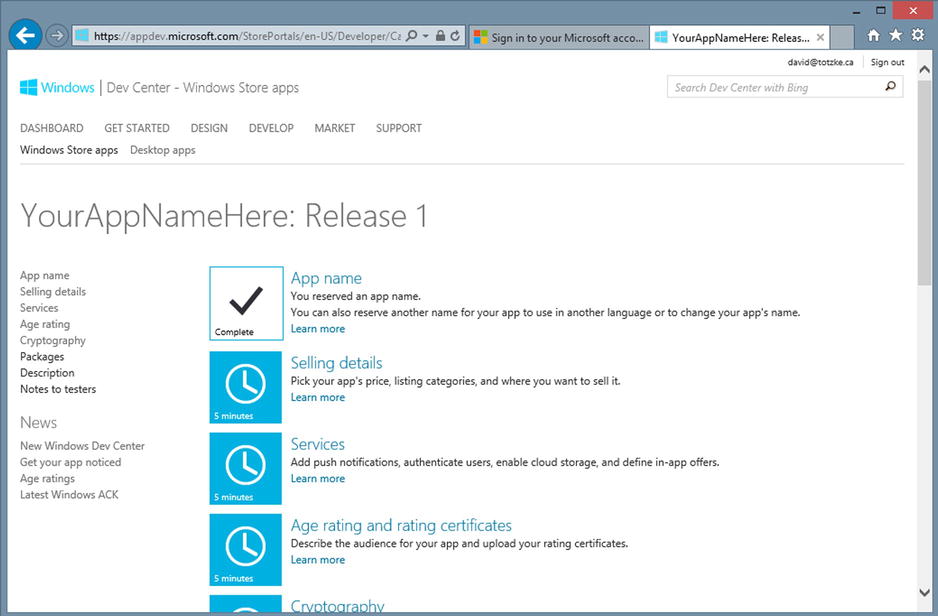
Figure 12-21. The app submission details page showing a reserved name
The next step is to retrieve the unique application identifier and shared secret for your application. Click the Services icon to start the process. The page that appears next is a little confusing. What you are looking for is the link to the Live Services site. I’ve highlighted it in Figure 12-22. That link will land you on the “Push notifications and Live Connect services info” page shown in Figure 12-23. Click the “Identifying your app” link in the WNS section to be taken to the page shown in Figure 12-24.

Figure 12-22. Highlighted link to the Live Services site

Figure 12-23. “Push notifications and Live Connect services info” page

Figure 12-24. “Identifying your app” page
Take heart, dear reader, for we are nearly there. Click the “Authenticating your service” link at the bottom of the page shown in Figure 12-24, and you will finally be presented with the information you need. Figure 12-25 shows the page that displays your package security identifier (SID) and the client secret.

Figure 12-25. Package security identifier (SID) and client secret page
Make a note of the identifier and secret so that you can enter them in the WAMS portal.
Configuring Your Service for Push
The final step in the process of setting up your mobile service to support push notifications is to enter the package security identifier and client secret you retrieved in the previous step into the configuration of your mobile service. Those of you who have worked through Recipe 12-4 will note the similarity.
Log into the WAMS portal and then click the Mobile Services icon in the left navigation. Click the name of the mobile service you want to configure and then click PUSH in the top navigation links. This should land you on a page similar to the one in Figure 12-26. Enter the client secret and package SID from the previous step into the boxes in the “windows application credentials” section and then click Save in the bottom toolbar.

Figure 12-26. Entering the client secret and package SID to configure push notifications
Application Functionality
The problem statement for this recipe says that we want to be able to send periodic tips to all the users of the application. Now that we have our mobile service configured to authenticate with the Windows Push Notification Service, we can work on implementing the rest of the application logic.
Figure 12-27 recalls an image we saw earlier. When the application first starts, it requests a notification channel. The URI of that channel is what the mobile service will use to communicate with the client device to deliver the notification. The client registers the URI with the mobile service by inserting it into a table. When it’s time for a notification to be sent, the mobile service simply loops through all the registered clients and sends a notification to each one. The Windows Push Notification Service is then responsible for delivering the message to the devices.

Figure 12-27. Push Notification Service interactions
The first thing we need to do is expose a static CurrentChannel property on the App class. Add this line of code to the App.xaml.cs file of your application:
public static HttpNotificationChannel CurrentChannel { get; private set; }
Next we’ll add code that runs when the application is launched that will request a channel instance. Add the function defined in Listing 12-18 to App.xaml.cs and then add a call to this method in the Application_Launching method.
Listing 12-18. The AcquirePushChannel Method
private async void AcquirePushChannel()
{
    CurrentChannel = HttpNotificationChannel.Find("MyPushChannel");

    if (CurrentChannel == null)
    {
        CurrentChannel = new HttpNotificationChannel("MyPushChannel");
        CurrentChannel.Open();
        CurrentChannel.BindToShellToast();
    }

    IMobileServiceTable<Channel> channelTable =
        App.MobileClient.GetTable<Channel>();
    List<Channel> existingRegistration = await channelTable
        .Where(r => r.PublisherHostId == HostInformation.PublisherHostId).ToListAsync();

    if (existingRegistration.Count == 0)
        await registrationTable.InsertAsync(new Channel()
        {
            Uri = CurrentChannel.ChannelUri.ToString(),
            PublisherHostId = HostInformation.PublisherHostId
        });
    else
        if (existingRegistration[0].Uri != CurrentChannel.ChannelUri.ToString())
        {
            existingRegistration[0].Uri = CurrentChannel.ChannelUri.ToString();
            await registrationTable.UpdateAsync(existingRegistration[0]);
        }
}
Let’s walk through the AcquirePushChannel code. To obtain a channel reference, we simply call the static Find method of the HttpNotificationChannel class, passing in a name for the channel. The name can be any arbitrary string. The result of the method call is assigned to our static CurrentChannel property. Take note of the following line of code in the method:
CurrentChannel.BindToShellToast();
Normally when an application exits, any channel that it had open would become invalid. A push channel persists after an app exits only if it has been bound to Tile or Toast notifications so that these notifications can still be received even though the app is not running. Since our application will be sending Toast notifications, we call BindToShellToast.
A notification channel will remain valid for a period of 30 days from the time of its creation. The mobile service will error if it tries to send a notification to an invalid channel and there’s no way for the service to request a new channel on behalf of the client. The client needs to manage updating the service should the ChannelUri change, and that’s exactly what the next bit of code does. Our application defines a Channel class that it uses to send a unique device identifier and channel URI to the mobile service. Listing 12-19 shows the Channel class.
Listing 12-19. The Channel Class Definition
[DataContract]
[DataTable("Channel")]
public class Channel
{
    [DataMember]
    public int Id { get; set; }

    [DataMember]
    public string PublisherHostId { get; set; }

    [DataMember]
    public string Uri { get; set; }
}
![]() Note You’ll need to create a Channel table in your mobile service. You can also create a ProductivityTip table while you’re there since we’ll be needing that next. Refer to Recipe 12-2 for information on creating a table in the WAMS Management Portal.
Note You’ll need to create a Channel table in your mobile service. You can also create a ProductivityTip table while you’re there since we’ll be needing that next. Refer to Recipe 12-2 for information on creating a table in the WAMS Management Portal.
The code queries the Channel table using the unique device identifier, and if no match is found, a new Channel record is inserted. If a matching record is found, the existing ChannelUri is compared to the CurrentChannel’s ChannelUri. The URI is then updated if they don’t match. In this way, the service will (well, should) always have a valid URI to work with for each client.
A Hot Tip
As mentioned earlier, push notifications can be sent only via server-side scripts. There is no client API. For this problem, we’ll use the insert script on a ProductivityTip table to trigger the push. Inserting a record into this table will trigger code that sends the new tip to all of the registered client channels. The ProductivityTip class is defined in Listing 12-20. Recipe 12-2 demonstrates inserting records into a table using the client proxy.
Listing 12-20. The ProductivityTip Class Definition
[DataContract]
[DataTable("ProductivityTip")]
public class ProductivityTip
{
    [DataMember]
    public int Id { get; set; }

    [DataMember]
    public string Content { get; set; }
}
Our goal for this application is to send a notification whenever a new productivity tip is inserted into the database. We’ll do this by adding an insert script to the ProductivityTip table. Log into the WAMS portal and navigate to the script editor for the ProductivityTip table and then select insert from the drop-down. Listing 12-21 has the required JavaScript for the insert.
Listing 12-21. The Insert Script for the ProductivityTip Table
function insert(item, user, request) {
    request.execute({
        success: function() {
            request.respond();
            sendNotifications();
        }
    });
function sendNotifications() {
    var channelTable = tables.getTable('Channel'),
    channelTable.read({
        success: function(channels) {
            channels.forEach(function(channel) {
                push.wns.sendToastText01(channel.uri, {
                    text: item.Content
                }, {
                    success: function(pushResponse) {
                        console.log("Sent push:", pushResponse);
                    }
                });
            });
        }
    });
}
}
The script is very straightforward. The list of subscribed clients is retrieved from the Channel table, and then we use one of the startlingly numerous send methods of the push.wns object to send the actual notification.
There is one particular aspect of this script that is worth calling out specifically. Take a look at the first few lines of the insert function:
function insert(item, user, request) {
    request.execute({
        success: function() {
            request.respond();
            sendNotifications();
You’ll notice that the request is immediately executed, which would normally end things right there. In this case, we’ve added a function call to the success option. The very first thing that the success function does is to call respond on the request. This allows the client that submitted the new item to get on with its life, and the rest of the script executes asynchronously on the server.
It’s been a long journey, but once all of the moving parts are connected, supporting push notifications in your Windows Phone 8 application is remarkably simple.
1www.windowsazure.com/en-us/pricing/trial/
2www.windowsazure.com/en-us/pricing/member-offers/msdn-benefits/
3 “Fill its own book and beyond the scope of this one.” I can think of no cliché more worthy to be the last one I write . . . at least in this book.
4 OK, that’s the last one.
5 My eyes! The goggles do nothing!