Get Information into DEVONthink
Whether you’re starting from scratch with newly created data or importing content from existing files or Internet sources, DEVONthink offers many mechanisms for collecting information. In fact, the biggest problem you may have is deciding which method you should use to put a particular piece of information into your database.
In this chapter, I begin by discussing what you can put in DEVONthink and helping you figure out where you want DEVONthink to place newly added content by default. With this important decision out of the way, I then explain the major ways of adding data. I finish with Joe’s Recommendations for Getting Stuff into DEVONthink, a topic aimed at helping you come to grips with all the choices.
What Can I Put in DEVONthink?
In case you’re wondering what kinds of documents you can put in DEVONthink, the answer is any kind at all! DEVONthink can index anything containing text, and it can display nearly any kind of text or graphics file, most audio and video files, and even documents from Microsoft Office and Apple’s iWork apps.
Even if you import a document that DEVONthink can’t display, the document can stay in the database, and you can open it using another program (see Edit Documents in External Applications).
Decide Where Your Documents Will Go
As you use DEVONthink, you can put each document in a specific group, in a catch-all inbox—perhaps in any of several databases—or in the global Inbox. For the most part, you get to choose where documents go, although there are cases in which you may not have realized what your choice was, so the result may be confusing if you’re not familiar with DEVONthink’s system.
The general rule (to which there are a few exceptions) is that documents go in either of two places:
- Where you put them
- A default destination, which you can choose (within limits)
When you create a new document from within DEVONthink—and that includes importing or indexing documents using the File > Import or File > Index command—it goes in the currently selected or open group or tag; if nothing is selected or open, it goes to the top of the selected database. In other words, documents created from within DEVONthink are always in the “where you put them” category.
Likewise, if you drag a document, text clipping, email message, or anything else from the Finder or another application into the DEVONthink window, it goes where you drop it—into a particular group, an inbox, or the top level of the database, as the case may be. Once again: it goes where you put it.
However, if you start from outside DEVONthink—for example, when scanning a paper document, dropping a file on DEVONthink’s Dock icon, using the Services menu (see Use the Services Menu), or using a bookmarklet (see Web Bookmarklets)—the imported document goes to your default destination for importing data.
To choose your default destination, go to DEVONthink > Preferences > Import and set the Destination preference at the bottom to one of these:
-
Select Group: If you select this radio button, then when you import or index something starting from outside DEVONthink, a version of the Groups panel will appear, allowing you to select a group to put the item in that group, click New Group to create a new group and put the document there, or, if you’re unsure, select your global Inbox or a database-specific inbox.
Depending on how you import, you may see either of two versions of the Groups panel. If you drag something to DEVONthink’s Dock icon, the panel looks like Figure 25—it shows only groups (including the inbox) in currently open databases, plus your global Inbox. If you use another method of importing or indexing a document, such as a Safari bookmarklet or the Services menu, the panel also includes a field at the top in which you can type one or more tags (instead of, or in addition to, choosing a group).

- Global Inbox: Everything you import or index goes straight to the global Inbox, no questions asked. This is the default in DEVONthink Professional and DEVONthink Pro Office.
- Inbox of Current Database: Items you import or index go to the inbox of whichever database happens to be selected in DEVONthink at that moment. Note that this isn’t a specific default database! It’s the currently selected database. So, if you have two databases open, and switch between them frequently during the course of the day, this preference may yield unpredictable results, because you may not be certain which database is currently selected!
Because of the inherent uncertainty of Inbox of Current Database, unless you normally have only one database open, one of the other two options is a more logical (and reliable) choice. Which you choose depends on whether you prefer to organize as you go or sort later, as I discuss in the sidebar Stepping Stone: Sort Now or Sort Later?, just ahead.
Create Documents in DEVONthink
Most people use DEVONthink primarily as a place to store documents that originated elsewhere, but you can, in fact, generate many types of documents without leaving the app. If you’re using DEVONthink to take notes, perform research on the Web, or brainstorm ideas for your next novel, it’s more efficient to create your documents within DEVONthink than to create them elsewhere and import them.
To create a new document, choose a command on the Data > New submenu or the Data > New from Template submenu or one of its lower-level submenus. (Some of these commands also have toolbar buttons, keyboard shortcuts, or both.) Many options are available, and I encourage you to explore them if you have time. What follows are the document types you can create in DEVONthink.
With Clipboard
To make a new document in the current (or default) location with the contents of the Clipboard, choose Data > New > With Clipboard (Command-N). If the Clipboard contains styled text, the note will be in Rich Text format; if it’s unstyled text, it will be in plain text format; and if it’s a graphic, it will be stored as a TIFF image.
Plain Text
To create a plain text document, choose Data > New > Plain Text (Command-Control-Option-N). This is what I normally use for notes that don’t specifically need styles, which is most of them—I find the consistency of a single font and size more pleasing to my eyes. You can, however, make a copy of a plain text document in rich text format by choosing Data > Convert > To Rich Text.
Rich Text
Rich text, in DEVONthink’s usage, means text that can contain a variety of fonts, sizes, styles, and colors, as well as graphics and links; rich text documents are stored on disk as .rtf (Rich Text Format) files. To create a rich text document, choose Data > New > Rich Text (Command-Control-N). You’ll find the formatting controls on the Format menu or its submenus.
Formatted Note
A formatted note, like a rich text document, can contain styled text, graphics, and links. Although the range of formatting options is somewhat smaller than what rich text offers (for example, tables and numbered or bulleted lists aren’t supported), the advantage of this format is that DEVONthink saves the document in HTML format. (In fact, it’s a special, self-contained HTML document that has all graphics embedded within it.) This means you can drag the document to any Web browser to view it (or drag it to the Finder and then post it on a Web server), no exporting required. To create a formatted note, choose Data > New > Formatted Note.
HTML Page
An HTML page is just that—a page composed of HTML. That may sound just like a formatted note, but they’re different. DEVONthink always displays and edits formatted notes in WYSIWYG mode. However, HTML pages are rendered (that is, shown in uneditable preview mode) by default; if you switch to text-only mode by clicking the Text ![]() button, you can then see and edit the underlying HTML source. To create a new HTML page, choose Data > New > HTML Page.
button, you can then see and edit the underlying HTML source. To create a new HTML page, choose Data > New > HTML Page.
Markdown Text
If you like to write using Markdown formatting (or with the MultiMarkdown variant), you can do so in DEVONthink and switch between the Markdown code (text-only mode) and the rendered page (preview mode). To create a new Markdown document, choose Data > New > Markdown Text. The document is initially in text-only mode so you can type your text and Markdown code; click the Preview ![]() button to view the final, rendered product. Alternatively, you can use Markdown syntax in any plain text document and use the Preview
button to view the final, rendered product. Alternatively, you can use Markdown syntax in any plain text document and use the Preview ![]() button to display it in rendered form.
button to display it in rendered form.
Sheet
To enter tabular data (a grid of columns and rows), create a sheet by choosing Data > New > Sheet. In the dialog that appears (Figure 26), click the plus ![]() button, type a column name, and repeat as needed for each column. (You can always add more later.) Then click OK.
button, type a column name, and repeat as needed for each column. (You can always add more later.) Then click OK.
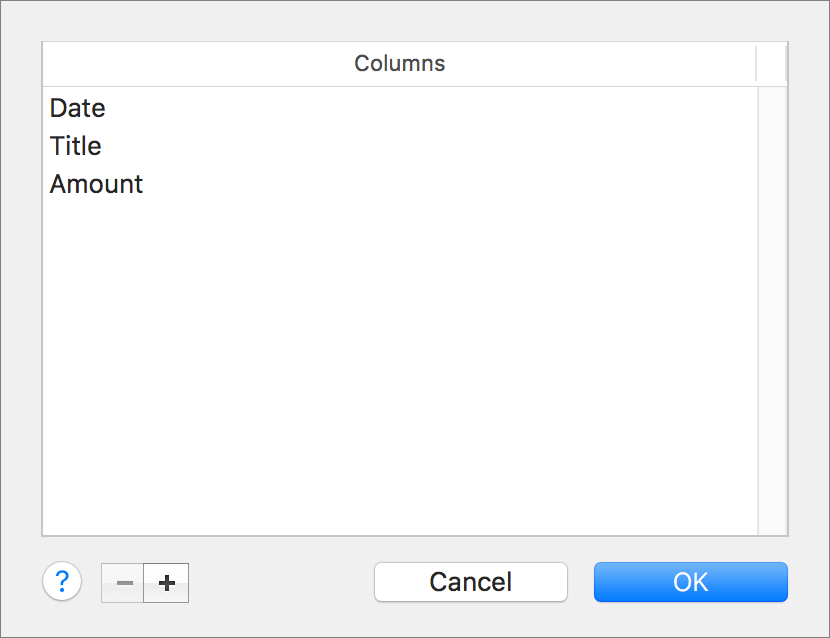
The newly created sheet (Figure 27) is initially empty. To add a blank record (row), choose Edit > Sheets > New Record, or click the New Record button on the toolbar. To add or remove columns or rows, use the other (self-explanatory) commands on the Edit > Sheets menu.

Template
When you create a new document, you need not always start with a blank slate. Instead, you can use a template to create a document that already contains boilerplate text, variables, and other custom attributes. The Data > New from Template submenu contains several commands on the top level, plus a number of lower-level submenus full of additional commands, all of which can be used to create new types of data (of one sort or another) in your database.
So, what’s a template? A template is an ordinary document; you can see a list of all DEVONthink’s templates by looking in ~/Library/Application Support/DEVONthink (Pro) 2/Templates.noindex. When you create a document from a template using the commands on this menu, what you’re really doing is opening a copy of one of those template documents (much like using a stationery pad in the Finder).
Templates can include, along with regular text, special codes that result in the insertion of variables such as the current date and time or a link to a selected document (see DEVONthink’s help for a complete list of these codes). They can even be written in AppleScript, enabling them to perform complex operations. These features give templates more power and flexibility than regular stationery documents.
For example, if you select a document and then choose Data > New from Template > Annotation, DEVONthink displays a window like the one in Figure 28.

Fundamentally, the annotation is just a rich text document with a bit of placeholder text; the idea is that you use it to store comments or annotations to another document—perhaps the other document is a graphic or something else you can’t or don’t want to alter. Notice that in addition to the boilerplate text, it has the creator’s name, the date and time it was created, and a blue, underlined link to the original document (and if the original is a PDF, it even links to the currently displayed page in that PDF). All these were provided by variable codes in the template file.
Templates are powerful and flexible, and I could spend quite a few pages talking about them—but there are other pressing matters at hand! So try some of the existing templates to get a feel for what’s included with the program, and make your own if you feel the urge.
Use the Import or Index Command
For adding individual documents, the methods described later in this chapter (using drag and drop, the Services menu, the Sorter, and so on) make the most sense. But if you want to suck in hundreds or thousands of documents at once, a more logical approach may be to use DEVONthink’s Import or Index command. (Flip back to Importing vs. Indexing if you need a refresher on these options.)
Import
To import files and folders, do the following:
- Choose File > Import > Files and Folders.
- Navigate to the location where the items are stored.
- Select one or more files or folders (Command-click to select more than one item), and click Open.
DEVONthink imports the items, putting them in the location you specified in your preferences.
Index
To have DEVONthink index files and folders (without copying their contents into its database), do the following:
- Choose File > Index.
- Navigate to the location where the items are stored.
- Select one or more files or folders (Command-click to select more than one item), and click Open.
DEVONthink indexes the items, putting references to them in the location specified in your preferences. Items that are indexed rather than physically stored in your database appear with an arrow ![]() icon to the right of their filenames.
icon to the right of their filenames.
If you later decide that you want a given indexed document to be imported instead, select it and choose Move into Database from the Actions ![]() pop-up menu on the toolbar, or right-click (Control-click) it and choose Move into Database from the contextual menu. You can also undo this action by choosing Move to External Folder from the Actions
pop-up menu on the toolbar, or right-click (Control-click) it and choose Move into Database from the contextual menu. You can also undo this action by choosing Move to External Folder from the Actions ![]() pop-up menu or the contextual menu.
pop-up menu or the contextual menu.
Use Drag and Drop
The method I use most often to get information into DEVONthink is good old-fashioned drag and drop. You can drag almost anything to DEVONthink—one or more files or folders, selected text or graphics in most applications, the URL from a browser’s address bar, and so on. (For the most part, if you can drag it, you can drag it to DEVONthink.)
However, when I say, “drag to DEVONthink,” that could mean several different things, any of which you may want to use from time to time:
- Dock icon: Drag something to DEVONthink’s Dock icon to import it to your default location.
- A group or tag: Drag something to any group or tag in a visible DEVONthink window to add it to that group or apply that tag.
- The Groups & Tags panel: If the Groups & Tags panel is visible, drag something to the group or tag of your choice in that panel.
-
The DEVONthink window: You can drag items directly into some portions of the main DEVONthink window—specifically, any location other than the sidebar or an edit pane. When you drag something into the DEVONthink window and your pointer is over a valid target area, that portion of the window is outlined in blue and your pointer acquires a green plus
 badge.
When you drag a file to the DEVONthink Dock icon, a DEVONthink window, or the Groups & Tags panel, DEVONthink ordinarily imports the file—that is, it copies it into its database and doesn’t delete the original. If you want to import it and move the original to the Trash, hold down Command while dragging it. Or, if you prefer to index a file—without making a copy of it—hold down Command and Option while dragging it. (That’s the same shortcut used to make an alias in the Finder, which is roughly analogous to what you do when you index a file in DEVONthink.)
Yet another way to use drag and drop involves the system-wide global Inbox, which I describe next.
Use the System-wide Global Inbox
Because the Professional and Pro Office Editions of DEVONthink support multiple databases, they also offer a global Inbox where you can store items without having to decide immediately which database to put them in (see Inboxes for more details). This global Inbox is basically a special folder that appears in DEVONthink’s sidebar and at the top of the hierarchy in the Groups & Tags panel. However, you can also make it available in the Finder and in any application’s Save dialogs; in this context, I refer to it as the system-wide global Inbox.
The system-wide global Inbox isn’t installed automatically. If you didn’t opt to install it when you first ran DEVONthink, choose DEVONthink > Install Add-ons, check Global Inbox in Save Dialogs, and click Install. Thereafter, you should see an Inbox icon in the sidebar of Finder windows under Favorites (Figure 29). If you prefer, you can drag it to a different location within the Favorites group.

To add a file or folder to your DEVONthink database from the Finder, simply drag it to this convenient icon. But…
Dragging files to the system-wide global Inbox icon works much differently from what you may expect if you’re used to dragging files to DEVONthink’s Dock icon, to the DEVONthink window, or to the Groups & Tags panel. Specifically:
- When you drag something to the system-wide global Inbox, you move that file or folder to DEVONthink rather than just copying it; the original disappears. (To force a copy instead, hold down Option as you drag; to force an index rather than an import, hold down Command and Option.)
- Dragging to the system-wide global Inbox icon always puts the item(s) in DEVONthink’s global Inbox, regardless of your preferences for how imports are usually handled. Items dragged to this icon never go into database-specific inboxes, and never trigger the display of the Groups & Tags panel.
- If DEVONthink is running, the system-wide global Inbox icon essentially functions as a one-way drop box—it always appears empty, because it sends everything you put in it directly into your global Inbox. If DEVONthink isn’t running, it acts as a regular folder; you can drag things out of it later if you wish.
Now, this different behavior may, in fact, be exactly what you prefer. For example, if you like to put documents into DEVONthink and then delete the originals, simply dragging them to the system-wide global Inbox saves you the extra step of deleting. But just be sure you know what you’re getting yourself into.
The system-wide global Inbox also appears in the sidebar of every application’s standard Save dialog (Figure 30).

When saving a file from your favorite word processor, graphics editor, or other app, you can select that icon in the sidebar as the destination and thereby save it directly into your DEVONthink global Inbox! If you create a lot of documents in other apps that you want to store in DEVONthink, this saves you numerous steps. But, beware: the files you save in this way won’t show up in the Finder; the only place you’ll see them is in DEVONthink’s global Inbox. So that should be the first place you look if you’re missing a file that you’re sure you saved.
Use the Services Menu
One of the Mac’s best-kept secrets is a mechanism called Services, which lets an app share some of its capabilities with other applications. Using services, you can take advantage of a handful of DEVONthink features even when you’re working in certain other programs. Specifically, services provide yet another way to get information into DEVONthink (along with a couple of other cool capabilities).
Although services should in theory be global, you may occasionally encounter apps that do not take advantage of them. Even so, in situations where they do work, services can save a great deal of time and effort.
Services appear in several places. One is the Services submenu of the application menu (that is, the menu bearing the name of the current application—e.g., the Mail menu if you’re in Mail). Select a file in the Finder, or text in Safari, say, and go to this menu to see what services apply to whatever it is you’ve selected. You can also find services listed at the bottom of the Actions ![]() pop-up menu on the toolbar of Finder windows and at the bottom of the contextual menu that appears when you select something and right-click (or Control-click).
pop-up menu on the toolbar of Finder windows and at the bottom of the contextual menu that appears when you select something and right-click (or Control-click).
In addition, some services have keyboard shortcuts (as shown on the Application > Services menu and in Figure 31), and you can add your own shortcuts (as I describe shortly).

DEVONthink can add up to eight commands to the various Services menus:
- Add to DEVONthink: Imports the selected items (for example, in the Finder) to DEVONthink’s default destination.
- Take Plain Note and Take Rich Note: Creates new plain or rich text notes, respectively, from the current text selection.
- Append Plain Note and Append Rich Note: Adds the selected text to the note most recently taken via a DEVONthink service.
- Capture Web Archive: Saves whatever is currently selected in a Web browser as a Web archive. (This works on full pages only if you first select the whole page.)
- Lookup: Opens a new search window in DEVONthink, with the selected text filled in.
- Summarize: Creates a new note containing a summary of the selected text.
After installing DEVONthink, you must log out and log back in (or restart your Mac) before its services become available. You can turn each service on or off individually, and customize its keyboard shortcut, as you prefer:
- Go to System Preferences > Keyboard > Shortcuts > Services.
- In the list on the right, navigate to the service you want to enable or disable, and check (or uncheck) its box. All of DEVONthink’s services start with “DEVONthink” (or, to be more precise, the exact name of the edition of DEVONthink you’re using), but they’re found under various headings—Add to DEVONthink is found under “Pictures,” Capture Web Archive is found under “Files and Folders,” and the others are all located under “Text.”
- Optionally, to add (or change) a keyboard shortcut for a service, double-click the space to the right of the service name and press your desired key combination.
The changes you make to services become available immediately.
Use the Sorter
A DEVONthink feature that provokes strong reactions—users either love it or hate it—is a system-wide tool called the Sorter, a translucent panel that lets you add data to any of numerous predetermined DEVONthink groups or tags using drag and drop. But wait! Doesn’t that sound like the Groups & Tags panel? It’s conceptually similar, but the Sorter has two main benefits over the Groups & Tags panel:
- It can disappear almost entirely when not in use, making it much less obtrusive.
- It lets you add material to your database even when DEVONthink isn’t running.
If you see a little gray tab on the side of your screen that says “DEVONthink,” the Sorter is already running (as it will be if you accepted all the defaults during installation). If not, turn it on by choosing Tools > Show Sorter or by going to DEVONthink > Preferences > Sorter and clicking Show.
With the Sorter running, you can display it by clicking the gray tab. When you do this, the Sorter slides out to reveal a grid of squares, with the (global) Inbox in the top-left square. Drag any other tags or groups from DEVONthink into other squares to add them to the Sorter (and drag them out to remove them). Figure 32 shows the Sorter with a few tags and groups added. Click the tab again to hide the Sorter.

To use the Sorter, either display it first and then drag a file, folder, or text selection to the Inbox or one of the group or tag icons; or, if the Sorter is hidden, simply drag the item to the tab itself, and when the Sorter slides open, drop the item onto your icon of choice.
Notice in Figure 32, above, that the Inbox icon and the Research icon both have blue badges with numbers in them; the Research icon also has a different icon. A badge indicates the number of items you’ve dragged into its square that haven’t yet been processed (as would be the case if DEVONthink isn’t running). And the custom icon is a thumbnail of the most recently added item. As soon as you open DEVONthink, items in the Sorter are moved into your database.
Many applications, including DEVONthink, support the Mac’s Full Screen mode. This leads to a small interface complication: should the Sorter—which normally floats above all other windows—appear when another application is in Full Screen mode? In some cases you may want it available so you can grab text or graphics from the application; in other cases, you may find the Sorter irrelevant and prefer not to give it any screen space. To address this issue, DEVONthink lets you choose—for each app that supports Full Screen mode—whether to hide the Sorter.
When the Sorter is visible and you click the Full Screen ![]() icon in another app, a dialog like the one in Figure 33 appears. Click Hide to prevent the Sorter from appearing when that particular app is in Full Screen mode, or Ignore to keep it visible.
icon in another app, a dialog like the one in Figure 33 appears. Click Hide to prevent the Sorter from appearing when that particular app is in Full Screen mode, or Ignore to keep it visible.

If you change your mind about this setting later, you go to DEVONthink > Preferences > Sorter (Figure 34) and select or deselect the Hide checkbox by any app to change the way the Sorter behaves when that app is in Full Screen mode.

Here are a few additional tips to help you make the most of the Sorter:
- Add specific inboxes: You can’t remove the global Inbox from the Sorter (or move it from its home in the upper-left corner), but you can drag the inbox from any of your other databases to the Sorter. By default, every inbox has the same name and icon, but if you rename an inbox manually before dragging it to the Sorter, it will show the new name. Giving each inbox a name that reflects its database can make the Sorter easier to use.
- Make the tab less visible: If you want to use the Sorter but find that gray tab too distracting, you can increase its translucency to the point that it’s nearly invisible. To do this, go to DEVONthink > Preferences > Sorter and uncheck Full (next to “Visibility”). Then click Quit to close the Sorter and Show to reopen it. The tab darkens only when you hover over it—after closing the preferences window.
-
Display the Sorter as a list: Click the List
 icon at the bottom of the Sorter to change from a grid of large icons to a scrollable list of smaller icons. To switch back to grid view, click the Grid
  icon.
icon. - Reposition the Sorter: With the Sorter hidden, you can drag the tab to reposition it anywhere along the left, right, or bottom of your display; if you have multiple displays, you can put it on an edge of any of the displays. (Presumably, you’ll want to put it where it won’t interfere with your Dock.)
- Open a group or tag: Double-click any box in the sorter to open the corresponding group or tag in DEVONthink.
- Resize the Sorter: To change the number of columns or rows shown in the Sorter, drag the resize control in the lower-right corner.
-
Take a note: Want to type a quick note into DEVONthink, even if it’s not running? Open the Sorter and click the Take Note
 icon, type your note (optionally with title, URL, and tags; and in your choice of format), and click Save. The note goes into your global Inbox. (You can assign a keyboard shortcut to the Take Note action in DEVONthink > Preferences > Sorter.)
 - Copy the selection: Similar to the Take Note feature is the Copy Selection feature. Assign a keyboard shortcut to this action by choosing DEVONthink > Preferences > Sorter and clicking the Copy Selection Hotkey field, and when you make a selection in any document and press that key combination, the resulting data is saved in your global Inbox as a note or as an image, depending on the type of data selected and which application you’re in.
- Get rid of the Sorter: If you find the Sorter too annoying (even with its tab repositioned or made less visible), you can turn it off until the next time you open DEVONthink by choosing Tools > Quit Sorter. If you want to prevent it from reopening when you next use DEVONthink, go to DEVONthink > Preferences > Sorter and uncheck Start Sorter at Login (if it’s checked, as it is by default).
Use the Share Extension
Extensions give apps additional ways to talk to each other and exchange data. One type of extension, the Share extension, lets apps add commands to the Share ![]() pop-up menu (or, in some cases, a submenu of that menu) that appears in the Finder, most Apple apps, and a growing number of third-party apps. By choosing a command from this menu, you can send the document, Web page, or other content you’re currently viewing to another app or Web service.
pop-up menu (or, in some cases, a submenu of that menu) that appears in the Finder, most Apple apps, and a growing number of third-party apps. By choosing a command from this menu, you can send the document, Web page, or other content you’re currently viewing to another app or Web service.
To add the DEVONthink Share extension to the Share ![]() pop-up menu in apps such as Safari and Notes:
pop-up menu in apps such as Safari and Notes:
- Go to System Preferences > Extensions > Share Menu (or, alternatively, open an app that supports Share extensions, such as Safari, Preview, or Notes, click the Share
 icon on the toolbar, and choose More from the pop-up menu).
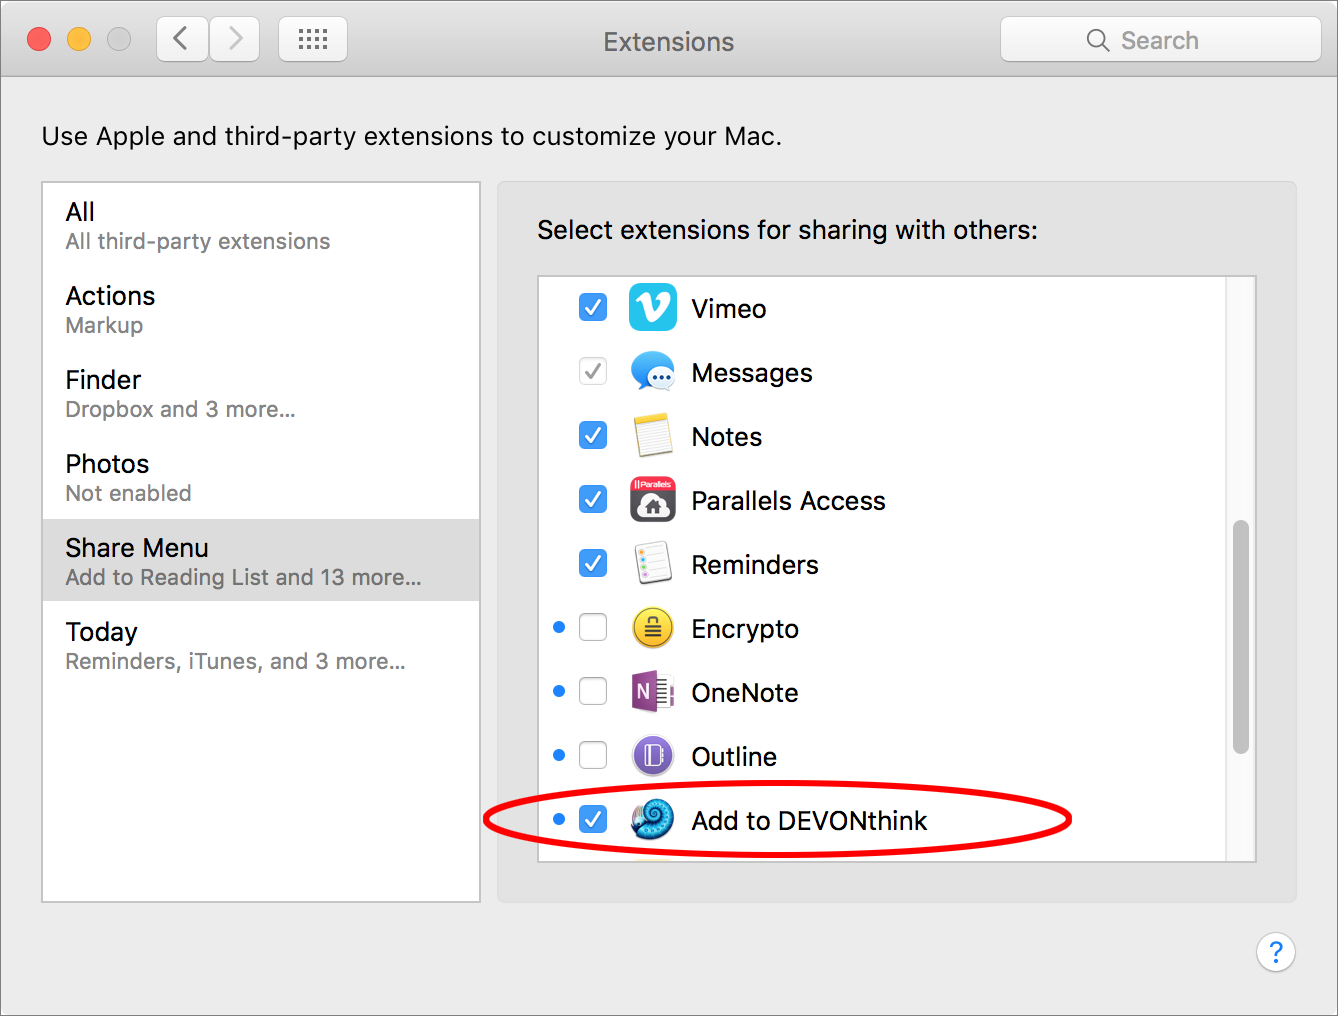
Figure 35: Select this checkbox to include the Add to DEVONthink command on your Share menus. - Select the Add to DEVONthink checkbox.
- Close System Preferences.
Once you’ve done this, Add to DEVONthink appears on the Share ![]() menu in every app that includes one. To capture information into DEVONthink from that app, choose Share
menu in every app that includes one. To capture information into DEVONthink from that app, choose Share ![]() > Add to DEVONthink (keeping in mind that the command may be on a submenu). The Clip to DEVONthink window then appears, which you can use as described shortly ahead in this chapter, in Clip to DEVONthink Browser Extension.
> Add to DEVONthink (keeping in mind that the command may be on a submenu). The Clip to DEVONthink window then appears, which you can use as described shortly ahead in this chapter, in Clip to DEVONthink Browser Extension.
Add Web Content
Although several other options discussed in this chapter will work for Web content, DEVONthink also provides two Web-specific options for adding Web pages to DEVONthink:
-
Clip to DEVONthink Browser Extension: This extension works in Chrome, Firefox, and Safari, and once installed you can simply click Clip to DEVONthink
 button to add the entire Web page. You’ll be able to choose from variety of formats for storing the page, including rich text, HTML, PDF, or only the bookmark.
 - Web Bookmarklets: This option may be right for you if you don’t want to install the Clip to DEVONthink browser extension. It also may be the fastest way to add a Web page: it has one bookmarklet that works the same as the Clip to DEVONthink browser extension, allowing you to choose the format you want each time, but it also offers an individual bookmarklet for each format, making adding a page a one-click operation.
Clip to DEVONthink Browser Extension
If you accepted the defaults when installing DEVONthink, the browser extensions may already be on your Mac—you can tell by looking in your browser’s toolbar for the Clip to DEVONthink ![]() button. If it’s there, you’re good to go. If not, choose DEVONthink > Install Add-ons; select one or more of Google Chrome Extension, Firefox Extension, or Safari Extension; and click Install. Then switch to the browser(s) in question and follow the prompts to complete the installation process.
button. If it’s there, you’re good to go. If not, choose DEVONthink > Install Add-ons; select one or more of Google Chrome Extension, Firefox Extension, or Safari Extension; and click Install. Then switch to the browser(s) in question and follow the prompts to complete the installation process.
To capture a page while you’re browsing, click the Clip to DEVONthink ![]() button. The Clip to DEVONthink panel (Figure 36) appears.
button. The Clip to DEVONthink panel (Figure 36) appears.

Optionally edit the Title and URL fields, and fill in a Note about the page; if any text was selected on the page, that text is pre-entered in the Note field.
Then, to save the page in DEVONthink, choose a location from the pop-up menu at the top of the panel, and then choose the format you prefer from the Format pop-up menu at the bottom of the panel (all of which preserve the page’s URL):
- Plain Text: Saves the entire page or the selected text as plain text.
- Rich Text: Saves the entire page, including text styles, as rich text.
- Bookmark: Saves only the page’s URL.
- Formatted Note: Saves the document, including text styles, as a formatted note.
- HTML Page: Saves the HTML source of the page (without graphics).
- Markdown: Saves the entire page (even if you have text selected) as Markdown. This will produce only an approximation of the original formatting.
- Web Archive: This choice, the default, saves the page’s entire contents (including any graphics) as a Web archive, which lets you view it again in its current state even if you’re offline (or if its content changes later).
- PDF (One Page): Saves the entire Web page as a (perhaps very long) single-page PDF.
- PDF (Paginated): Saves the entire Web page as a PDF with page breaks.
Of these formats, I tend to go with PDF (One Page), which is more compact and universal than a Web archive, and yet faithfully reproduces what the Web page looked like when I captured it.
Whichever format you choose, you can also optionally select the Reformat with Instapaper checkbox (or, for Markdown, Reformat with Readability), which tells the browser extension to use the Instapaper (or Readability) API to save the page in an uncluttered and nicely readable format—without ads and most other distractions. (This option does not save the page to your Instapaper account, if you have one; it merely alters the format of the page saved in DEVONthink.)
Once you’ve selected the location and format you want, and entered any tags or a note if you want them, click Clip to save the page.
Web Bookmarklets
Another way to get Web content into DEVONthink is bookmarklets—special strings of text that your browser sees as bookmarks, but which contain JavaScript code that let them perform interesting tasks.
DEVONthink offers eight bookmarklets, each of which stores data in a different way. The most versatile of these is Clip to DEVONthink, which works exactly like the Clip to DEVONthink browser extension I described earlier.
The other seven bookmarklets capture content to your default destination in a single, specific format, with no extra options. The Archive, Bookmark, HTML, PDF, and PDF (paginated) bookmarklets operate just as their counterparts in Clip to DEVONthink do. To save just selected text from a page as a (plain text) note, choose the Selection bookmarklet. To save all the text from the current page as a note, choose the Text bookmarklet.
To install the bookmarklets, follow these steps:
- Open the browser you want to use, and go to the DEVONtechnologies Extras and Manuals page.
- Make sure your Favorites (or Bookmarks) bar is visible. If not, then in Safari, choose View > Show Favorites Bar; in Chrome, choose View > Always Show Bookmarks Bar; or in Firefox, choose View > Toolbars > Bookmarks Toolbar.
- Under the page’s Bookmarklets heading, drag the Drag to Bookmarks button next to Clip to DEVONthink directly onto the Favorites (or Bookmarks) bar. Repeat, if desired, with any or all of the other bookmarks.
- If you prefer all your DEVONthink bookmarklets to be grouped in a folder on your Favorites (or Bookmarks) bar, use your browser’s bookmark editing tools to create a folder and drag the bookmarklets to that folder.
(If you use a different browser, the steps should be similar; if in doubt, check the browser’s documentation for how to install bookmarklets.)
Once the bookmarklets are installed, using them is a simple matter of clicking the bookmarklet’s name (or choosing one of the bookmarklets from the a pop-up menu) in your Bookmarks bar (Figure 37).

Add Email Messages
You can easily add individual email messages or even thousands of messages at a time to DEVONthink. Of course, there’s nothing wrong with keeping email messages in your email client, but DEVONthink offers interesting advantages for at least some of your messages:
- You can store correspondence about a project with the project files.
- You can use all of DEVONthink’s organizational features (replicants, tags, See Also, etc.) with your email messages, which probably goes far beyond what your email client offers.
- You can use DEVONthink’s fast and flexible searching.
You can import your messages into DEVONthink by drag and drop or using the Import feature (described next), or you can Use the Mail Plugin with Apple Mail or Use the Outlook AppleScripts.
Import Messages
The most universal method of importing mail data into DEVONthink, which works with data from most Mac email clients, is the Import feature. This feature works fine for even one message, but you may find it particularly helpful for importing many messages all at once (notice the Archive Mailbox option in the steps below).
To import messages, follow these steps:
- Choose File > Import > Email (Command-Control-Option-M).
- From the Mail Source pop-up menu, choose the name of your email client (such as Apple Mail or Microsoft Outlook), or Unix Mailbox (that is,
.mbox—a generic format used by numerous email clients). If you chose Unix Mailbox, navigate to where the mailbox is stored, select it, and click Open. - In the Mailbox list on the left, select the account whose mail you want to import, or (if you like) navigate to a particular mailbox. (You can select multiple accounts or mailboxes by Command-clicking.)
- Optionally, to restrict the import to a certain date range or other characteristics, select the criteria you want to include or exclude on the right side of the window.
- Now you have two choices:
- To import all the messages in the selected mailbox(es)—or only the specific message(s) you’ve selected—click the Import button on the toolbar. DEVONthink imports the messages, tagging each one with the name of its original mailbox.
- To import everything (including sub-mailboxes and their contents) in the selected account(s) or mailbox(es), click Archive Mailbox. DEVONthink imports the items into a top-level Emails group in the current database. If you use the Archive Mailbox command with mailboxes you’ve already imported, only new messages are added to DEVONthink; existing messages aren’t duplicated.
In addition to the Import feature just described, DEVONthink offers importing shortcuts for two specific situations:
-
.mbox files: If you have email stored in a
.mboxfile, you can import the entire mailbox at once by dragging the.mboxfile into the DEVONthink window (for example, to your inbox or another group). If you instead drop the.mboxfile on the DEVONthink icon in your Dock, DEVONthink displays the mail import dialog as in the previous set of steps—you can pick up at Step 3. - Individual messages: You can drag individual email messages from many email clients directly into the DEVONthink window, dropping them in the location where you want to import them. (Dragging messages to the Sorter also works, and in certain cases, dragging them to DEVONthink’s Dock icon also works.)
Use the Mail Plugin
If you use Apple Mail, you can also send one or more selected messages to DEVONthink from within Mail, making it easy to archive particular messages (as opposed to entire mailboxes) as you work.
Before you can do this, you must make sure DEVONthink’s Mail plugin is installed. In Mail, select a message, pull down the Message menu, and look for a command called Add to DEVONthink Pro Office. If it’s not there, quit Mail, open DEVONthink, choose DEVONthink > Install Add-ons, check Apple Mail Plugin, and click Install. Then reopen Mail.
To use the plugin, simply select one or more messages and choose Message > Add to DEVONthink Pro Office (Command-Control-Option-M). DEVONthink imports the message(s), storing them in the location specified in your preferences.
Use the Outlook AppleScripts
If you use Microsoft Outlook for email, you can also send messages or mailboxes to DEVONthink without leaving your email client. In this case DEVONthink relies on AppleScripts to do its thing.
The scripts are found on the system-wide Script ![]() menu, which should appear among the little icons on the right side of your menu bar. If you don’t see it there, open the Script Editor utility (found in
menu, which should appear among the little icons on the right side of your menu bar. If you don’t see it there, open the Script Editor utility (found in Applications/Utilities/), choose Script Editor > Preferences, and select Show Script Menu in Menu Bar. (You can then quit Script Editor.)
When you’re running Outlook, there are two DEVONthink-specific scripts at the bottom of the system-wide Script ![]() menu, both of which are self-explanatory:
menu, both of which are self-explanatory:
- Add Mailbox(es) to DEVONthink
- Add Message(s) to DEVONthink
Select the mailbox(es) or message(s) you want to import, and then choose the appropriate script from the menu.
Work with Imported Messages
When you view an imported email message in DEVONthink, it looks much like the original—generally, including headers and any text styles. However, URLs in plain text messages may not initially be clickable links, and certain attachments may not appear. If this happens, switch from the default preview mode to text-only mode by choosing View > Text Alternative (Command-Option-P) or clicking the Text ![]() button on the navigation bar.
button on the navigation bar.
You can do all the same things with imported email messages that you can with other DEVONthink documents. You can also do one extra thing: reply to the message! To reply, right-click (or Control-click) a message and choose Send Reply, or choose Send Reply from the Actions ![]() pop-up menu on the toolbar. DEVONthink switches to your default email client and opens a new message window, pre-addressed to the sender of the selected message, with the message contents quoted in the window.
pop-up menu on the toolbar. DEVONthink switches to your default email client and opens a new message window, pre-addressed to the sender of the selected message, with the message contents quoted in the window.
Use the PDF Menu
Every Mac app that can print also has the capability to create PDF files. One common use of this feature is saving PDF copies of Web pages with purchase confirmations in your ~/Documents/Web Receipts folder; another is attaching PDF copies of documents from any program to email messages.
The commands used to send PDF files of the current document to various locations are found in the PDF pop-up menu at the bottom of every Print dialog (Figure 38).

DEVONthink adds a command to this menu: Save PDF to DEVONthink (Pro). Choose File > Print followed by this command to save anything printable directly to DEVONthink as a PDF. (I use this capability all the time for Web receipts, because it’s just as easy as choosing Save PDF to Web Receipts Folder but has the benefit of putting the item with all my other financial info in DEVONthink.)
Scan Documents
DEVONthink makes a great place to keep digital copies of paper documents, and if you have a scanner, chances are excellent that DEVONthink’s integrated scanner support will enable it to talk to your scanner directly, rather than forcing you to scan into a separate app and then import each document into DEVONthink.
Generally speaking, scanned documents (as opposed to scanned pictures) are stored in PDF format. A PDF file can contain both a bitmapped image of the scanned document (such that if you were to print it, it would look just like the original) and an invisible layer with the document’s text, which can be indexed, searched, selected, copied, annotated, and so on. DEVONthink Pro Office can perform optical character recognition (OCR) on the scanned image—automatically or manually—to add the searchable text layer; or if you prefer, you can use another app to do that. (ABBYY FineReader Pro, Acrobat Pro, PDFpenPro, ReadIRIS Pro, and numerous other Mac apps can do this; your scanner may even have included bundled OCR software.)
Depending on what scanner you have, what software it comes with, and how the hardware and software are set up, you may be able to use either of two methods to get scanned documents into DEVONthink:
- Scanner-initiated: You load a document into your scanner’s sheet feeder and press a button. As soon as the document is scanned, your scanner’s software sends it directly to DEVONthink, which can then (if you like) automatically perform OCR. (In a variation of this method, the scanner’s software performs the OCR and then sends the document to DEVONthink.) This is my preferred method, because it’s the simplest, and it works well with dedicated document scanners such as Fujitsu’s ScanSnap series.
- User-initiated: You place a document in your scanner (typically, a flatbed scanner) and then, in DEVONthink, choose File > Import > From Scanner or Camera. You can then make any desired changes to the settings and initiate the scan. This option essentially integrates all the capabilities of Apple’s Image Capture app—and even its user interface—right into DEVONthink. As long as your scanner or digital camera works with Image Capture, it should work here. This option avoids the need to launch any external app. I say more about this ahead, in Pull an Image from a Scanner or Camera.
Because scanning involves so many variables—and because DEVONthink’s built-in help does such a nice job of covering all the steps to take in various situations—I’m not going to provide detailed instructions for every scanner here. (To see what DEVONthink’s help has to say about scanning, choose Help > DEVONthink Pro Office Help, click “Getting your data in,” and then click “Capturing paper.”)
I do, however, want to call your attention to a few key scanning topics.
Use a Fujitsu ScanSnap
Fujitsu’s ScanSnap scanners make an especially good match for DEVONthink Pro Office, not only because they can send incoming scans to DEVONthink (which then performs OCR) without any user intervention but also because DEVONthink can configure your ScanSnap Manager software to do so automatically.
When you open DEVONthink Pro Office, it checks to see if ScanSnap Manager is installed, and if so, whether it’s set up to send scans to DEVONthink. If not, you’ll see a dialog (Figure 39) asking if you’d like DEVONthink to fix that for you. Click Fix to configure everything for maximum happiness. (You’re prompted to quit ScanSnap Manager, which reopens after the configuration is complete.)

Thereafter, simply pop one or more documents in your ScanSnap, press the button, and wait a few moments (depending on document length and your settings) for the scanned, searchable PDF to show up in DEVONthink.
Use ExactScan
ExactScan is software that enables many PC document scanners to work on a Mac. If you have ExactScan installed and a compatible scanner, DEVONthink can interact with it in almost exactly the same way as with a Fujitsu ScanSnap (described just previously). The only differences are that DEVONthink’s Install Add-Ons dialog has an Install ExactScan Support checkbox, and the dialog in Figure 39 refers to ExactScan instead of ScanSnap Manager.
Pull an Image from a Scanner or Camera
If you have a Fujitsu ScanSnap, or another document scanner that can be configured to “push” scanned images directly to DEVONthink, you’ll enjoy the convenience of being able to scan and import documents in a single step, merely by pressing a button on your scanner. However, if you have a scanner (or digital camera) that expects all scans to be initiated from within an application on your Mac, you can still “pull” documents from it into DEVONthink—and now it’s even easier than before. Follow these steps:
- Choose File > Import > From Scanner or Camera.
- Select your scanner or camera in the Devices list in the sidebar.
- Follow the procedure you would normally use in Image Capture to scan or import your images.
- When you’re done scanning or importing, select Scans & Images in the sidebar.
- Optionally, click Properties at the bottom of the window to fill in metadata such as title and tags, and to choose a destination in DEVONthink (if different from your default destination). If you want DEVONthink to perform OCR on the document as soon as you add it, also check OCR if it isn’t checked already. (In case you’re curious, the Convert to Searchable PDF checkbox in OCR Preferences, as discussed in the next section, has no effect when using the File > Import > From Scanner or Camera command.)
- Also optionally, click Edit to make any desired adjustments to the image, such as exposure, color balance, cropping, and rotation.
- Select the images you want to add to your DEVONthink database and click the Send To icon in the lower-right corner of the window.
DEVONthink stores the images in the location you chose in Step 5—or, if you skipped Step 5, in your default destination.
Configure OCR Preferences
If your scanner’s software doesn’t perform OCR itself, you can have DEVONthink automatically convert documents to searchable form as soon as a scan is complete. To set up DEVONthink’s OCR preferences (which also apply when you manually convert documents to searchable PDFs), go to DEVONthink > Preferences > OCR (Figure 40).

Your options, along with my suggestions, are as follows:
- Incoming Scans: Check the Convert to Searchable PDF box to make DEVONthink perform OCR automatically on all scans initiated from within DEVONthink or sent to DEVONthink by known scanning software (such as ScanSnap Manager or ExactScan). If this is unchecked, the scans will still be imported into DEVONthink, but only as bitmapped images. (You can do OCR later, however; see the tip Perform OCR on Documents in Your Database, ahead.)
-
Original Document: If you check Move to Trash, then after DEVONthink creates a searchable PDF, it moves the original scan (with just the bitmapped image) to the Trash—in this case, the Finder’s Trash, not DEVONthink’s. In most cases, that’s probably what you want, because otherwise you’ll end up with two copies of every scanned document.
However, if you have DEVONthink reduce the resolution or quality (as discussed below), it could in some cases produce a searchable PDF with an image you find unacceptable. So you might want to leave this unchecked until you’re satisfied that the typical visual quality of the searchable PDFs that DEVONthink produces is suitable for your needs.
-
Searchable PDF: If Enter Metadata after Text Recognition is checked, as it is by default, then every time you scan a document into DEVONthink, the program displays a dialog (Figure 41) in which you can enter a title, subject, tags, and other metadata. A scrollable preview of the document, on the left, helps you remember what’s in it—handy if you’re scanning a large stack of documents at once.

Figure 41: To name and tag scanned documents as the text is recognized, select Enter Metadata after Text Recognition in the OCR preference pane, which results in this dialog appearing after each scan. If you don’t enter this data as you scan, you’ll end up with files with unhelpful names like “2016_08_21_20_40_53” and no tags. On the other hand, if you’re scanning lots of documents at once, stopping what you’re doing every minute or two to enter document details can be a drag. Because I usually scan only one or two documents at a time, I find it most effective to leave this box checked.
- Resolution: DEVONthink can optionally modify the image in the scan after performing OCR, reducing its resolution to save disk space once the extra data is no longer needed for text-recognition accuracy. (Lower-resolution images won’t print as clearly, however.) To reduce the resolution, enter a number in this box (150 dpi is the default), or—my personal preference—check Same as Scan to leave the resolution as is.
- Quality: To compress the image further, enter a percentage in the Quality box. I generally find that 75 percent keeps images adequately crisp while slimming the files a bit, but you may want to experiment to find a suitable value.
- Recognition: Select Fast for quicker recognition at the expense of accuracy or Accurate for more-accurate but considerably slower scans. Automatic (the default, and my suggestion) doesn’t mean that DEVONthink switches between the two modes, but rather it represents a combination of pretty good accuracy and reasonable speed.
- Primary Language: Choose the language that most of your documents will be in (presumably English if you’re reading this book).
- Secondary Languages: If you expect to scan documents in any language other than the primary language, select each of those languages in the Available list and click the left arrow button to add them to the Selected list. (I put French in this list, because many of the documents I scan are in French.)
Import Previously Scanned Documents
If you have a bunch of scanned documents that don’t already have a searchable PDF text layer, DEVONthink is happy to import them and perform OCR after the fact. (These images need not have come from a scanner—even photos or screenshots can be used, although accuracy depends on resolution, sharpness, contrast, and other factors.)
To import images and convert them to searchable PDFs, follow these steps:
- Choose File > Import > Images (with OCR).
- Navigate to the folder where the images are stored. Select one or more files (Command-click to select multiple files).
- To move the original file in the Finder to the Trash after DEVONthink imports it, click the Options button and then check Move to Trash; to leave the original in place, uncheck the box.
- Click Open.
DEVONthink now imports the selected files, performs OCR, and (depending on your preferences) may prompt you for titles and other metadata.
Use the Built-in Web Browser
DEVONthink includes Apple’s WebKit, the same rendering engine Safari uses to display Web pages. So you can view a Web page in DEVONthink and it should look the same as it would in Safari. The difference is that even though you can store bookmarks, follow links, use multiple tabs, and click previous/next page buttons, DEVONthink treats each page as a separate (dynamic) document. That means (among other things) there’s no editable address bar—only the URL of the current page. So even though DEVONthink can show you the contents of Web pages, it’s not so much a browser (that is, it doesn’t facilitate random browsing) as a tool that can fetch, render, and store Web pages.
There being no address bar, how do you open a Web page in the first place? Choose Data > New from Template > Web Browser. In the window (or edit pane) for the new document that appears, type or paste a URL and click Go to Address. DEVONthink then displays the resulting Web page as an ordinary document (Figure 42). (The empty template remains in your database, so you can go back to it whenever you want to view a new Web page instead of using the menu.) Alternatively, to open a URL in a new tab, choose Data > New from Template > Tabs > Open Location, enter a URL, and click OK.

Having found a Web page you like, what if you want to add it to your database? The Web Browser document you created by choosing Data > New from Template > Web Browser doesn’t remember the URL of the last Web page you visited in it or store its contents; each time you select it, it shows only the address field. So, to store a Web page you visit in DEVONthink, right-click (or Control-click) anywhere on the page and then, from the Capture Page submenu of the contextual menu, choose one of:
- Bookmark: Stores a bookmark for the page—that is, a document containing only its URL. When you select this bookmark in your database, DEVONthink attempts to connect to the site to download and display the page, in whatever state it’s in at that point. Alternatively, you can capture the address by choosing Data > New > Bookmark. (Or, drag the proxy icon—the icon in DEVONthink’s title bar, just to the left of the title—onto a group or tag.)
- Formatted Note: Stores the page as a formatted note.
- HTML: Stores the Web page as an HTML file.
- Web Archive: Stores the page and any associated media as a Web archive.
- PDF (One Page): Stores the page as a (non-paginated) PDF file.
- PDF (Paginated): Stores the page as a paginated PDF file.
DEVONthink doesn’t attempt to be a full-featured browser, but it does offer a few common browser features—if you know where to find them:
-
Tabbed browsing: DEVONthink can open multiple browser tabs in a single window or edit pane, but to use this capability, you must first turn it on—go to DEVONthink > Preferences > General and check Enable Tabbed Browsing.
Thereafter, to open a link in a new tab, Command-click it (to keep the tab in the background) or Command-Shift-click it (to switch to the new tab). You can also open a new tab by using commands on the Data > New from Template > Tabs submenu.
You can switch to a particular tab by clicking it or close it by closing its close button; you can also press Command-Shift-] to move to the next tab or Command-Shift-[ to move to the previous tab. You can’t, however, rearrange tabs within a window.
-
Previous/next page: To move to the page you previously visited in the current window, edit pane, or tab, press Command-[ or click the Go Back
 button on the navigation bar; to move forward to the next page, press Command-] or click the Go Forward
  button.
 -
Reload: Right-click (or Control-click) anywhere on the page and choose Reload from the contextual menu; or click the Reload
 button on the navigation bar.
Read RSS Feeds
Just as DEVONthink can display individual Web pages as documents, it can grab all the articles from an RSS (or RDF or Atom) news feed, treating each article as a separate document and displaying its contents using the same WebKit rendering engine.
To add a feed, navigate to the location where you want to store it and choose Data > New > Feed. In the dialog that appears (Figure 43), enter the feed’s URL (which usually begins with either feed://, filled in by default, or http://), optionally type one or more tags (pressing Tab after each one) and enter a name if you want to override the feed’s default name, and click Add. DEVONthink connects to the feed and downloads its current articles.

To read an article in a feed, select the article under the feed name (Figure 44); doing so marks it as read. To manually change an article’s read status, select it and choose Data > Mark > As Unread (or As Read), Command-K. (These commands are also available on the Actions ![]() pop-up menu and the right-click/Control-click contextual menu.)
pop-up menu and the right-click/Control-click contextual menu.)

A feed behaves much like a group, in that it contains other documents. Whatever tags a feed has are inherited by all its constituent articles, but unlike ordinary groups, feeds don’t pass on their own names to enclosed documents as group tags. In other words, if you have the CNN.com feed in a Feeds group, every news article in the feed gets the Feeds tag, but not a CNN.com tag. You can, of course, manually change the tags of any individual article, or even drag an article to an entirely different location—once it’s in DEVONthink, you can treat an RSS article just like any other document.
DEVONthink offers several ways to adjust feed behavior, all found in DEVONthink > Preferences > RSS (Figure 45).

You can adjust the following preferences:
- Check for Updates: Choose how often DEVONthink should check each feed for new articles. The default is Every 15 Minutes, but you can choose an interval as short as Every 5 Minutes or as long as Every Day; you can also choose After Opening the Database or Manually.
- Skip Duplicates: Leave this box checked to avoid re-downloading any duplicate articles in a feed.
- Convert Categories to Tags: Many RSS feeds label each article with categories defined by the creator. To assign these categories to articles as tags (which I generally find helpful), leave this box checked.
- Remove Articles: RSS feeds contain only a limited number of articles (typically 10–20 or so); as new ones are added, old ones disappear. You can have older articles disappear from DEVONthink too by choosing a time period from this pop-up menu, such as After One Week or After Two Months. Or, choose Manually, and the articles remain there until you delete them. (If you check Also Unread Articles, this setting applies to unread articles too; if it’s unchecked, only read articles are removed automatically.)
-
Feed Style Sheet: DEVONthink uses Cascading Style Sheets to determine the appearance of feed articles. Normally, you probably want Simple.css or Leopard.css, both of which offer clean styled text on white backgrounds (but with different fonts and spacing).
Default.css is a plain-text style sheet with a small font; there’s also Tiger.css, which is similar to Leopard.css but has a lower-contrast gray background.) After changing the style sheet, switch to a different article to refresh the display with the new styles.
Joe’s Recommendations for Getting Stuff into DEVONthink
Whew! That’s a lot of ways to get data into DEVONthink, and, in fact, there are a few more that I didn’t mention. You can’t fault the app for a lack of flexibility—no matter where you are or what sort of data you’re looking at, there’s at least one way, and probably several, to add it to DEVONthink.
If you’re feeling overwhelmed with all these choices, you’re not alone. Sometimes I mentally go around in circles trying to figure out the best way to get, say, text from a Web page into DEVONthink. Bookmarklet? (Which one?) Services menu command? (Which one?) Clip to DEVONthink extension? Share extension? Drag and drop to the Groups & Tags panel…or the Sorter…or the Dock icon…or an open DEVONthink window? Or what about a keyboard shortcut? I could use the one for the Take Rich Note command on the Services menu or the one for the Sorter’s Copy Selection command, or I could copy, switch to DEVONthink, and press Command-Control-N to paste the contents of the Clipboard as a new note! It’s enough to make you crazy, thinking about all the ways you can proceed.
Everyone’s different, and I don’t pretend to have a one-size-fits-all solution. But after thinking about my own experiences and listening to what many other DEVONthink users had to say, I’ve come up with some guidelines that you may find helpful:
- Small screen: Are you feeling cramped on an 11-inch MacBook Air? Is your display (of whatever size) filled with windows ten layers deep? If so, you’ll want to avoid more screen clutter. Turn off the Sorter and the Groups & Tags panel, and consider hiding your Dock and using Spaces to put DEVONthink in a space by itself. Then, to get data into DEVONthink from another program, use the Services menu, the Share extension, or, in a Web browser, the Clip to DEVONthink extension or a bookmarklet (which gives you more flexibility). In the Finder, use the system-wide global Inbox.
- Large screen: If you’re fortunate enough to have, say, a 27-inch iMac and a secondary display or two (or, better yet, a Mac Pro with six displays!), make the most of your screen real estate by keeping the Groups & Tags panel open (and resized to show as much as possible) in a convenient corner, and use drag and drop to put clippings and documents right where you want them.
- Low RAM or slow CPU: If you have an older or slower system, or one without much RAM, you may prefer to have as few apps running at a time as possible. In that case, the system-wide global Inbox and the Sorter are your friends, because both of them let you capture data without DEVONthink having to run in the background.
- Keyboard focus: People who prefer to keep their hands on the keyboard will want to get used to the keyboard shortcuts for two of DEVONthink’s Services: Take Plain Note [Command-(] and Take Rich Note [Command-)], which work on selections in many different applications. You can also (following the instructions in Use the Services Menu) assign a keyboard shortcut to the Save to Sorter’s Inbox command. And, if you’ll have the Sorter open anyway, also visit DEVONthink > Preferences > Import and assign a convenient hotkey to Copy Selection.
- Neat freak: If you believe in the motto “a place for everything, and everything in its place,” then it may bother you to dump everything into an inbox (especially if it’s the global Inbox) and sort things later. So, if you already have an arrangement of groups and tags you’re happy with and you want to make sure everything is classified immediately, keep the Groups & Tags panel open so you can drag data to a specific location, and set DEVONthink’s Destination preferences (in DEVONthink > Preferences > Import) to Select Group, so you’re prompted to choose a group each time you import.
- Compulsive collector: Perhaps you’re capturing information constantly, importing new data every few minutes, and it’s too time-consuming and intrusive to figure out where everything goes in real time. In that case, set your default Destination to Global Inbox, and get in the habit of reviewing its contents from time to time (perhaps using Auto Group and Auto Classify to help you sort).
-
Joe: If you’re Joe Kissell…I know, you’re not me, but if you’re curious to know what I do, here it is. I leave Groups & Tags off, because I prefer to organize my documents after the fact rather than take the time to do that when I capture them. When I’m working on my 27-inch iMac, I have the Sorter on, since I have plenty of space, but on my MacBook Pro I leave it off because I need every last pixel. I almost always have at least two databases open, so I usually have my default Destination set to Global Inbox (although the option I’d prefer is one that doesn’t exist—Inbox of My Chosen Database).
In Safari, I typically use the (unpaginated) PDF bookmarklet (because it requires fewer clicks than the Clip to DEVONthink extension), and for random files or text selections, I drag them to the system-wide global Inbox or, if it happens to be more convenient, to DEVONthink’s Dock icon (on the right side of my screen). I also occasionally use the Save PDF to DEVONthink Pro command on the PDF menu in the Print dialog. But most of the contents of my database comes come by way of scanning, thanks to my trusty Fujitsu ScanSnap scanner and automatic OCR.
I regularly sort through my inbox, using Auto Classify where possible, to put everything in a logical location.