
Creating Views
Views are created using the CREATE VIEW statement. Views can be created from a single table, multiple tables, or another view. To create a view, a user must have the appropriate system privilege according to the specific implementation.
The basic CREATE VIEW syntax is as follows:
CREATE [RECURSIVE]VIEW VIEW_NAME
[COLUMN NAME [,COLUMN NAME]]
[OF UDT NAME [UNDER TABLE NAME]
[REF IS COLUMN NAME SYSTEM GENERATED |USER GENERATED | DERIVED]
[COLUMN NAME WITH OPTIONS SCOPE TABLE NAME]]
 AS
{SELECT STATEMENT}
[WITH [CASCADED | LOCAL] CHECK OPTION]
The following subsections explore different methods for creating views using the CREATE VIEW statement.
Note
There is no provision for an ALTER VIEW statement in ANSI SQL.
Creating a View from a Single Table
A view can be created from a single table. The WITH CHECK OPTION is discussed later this hour.
The syntax is as follows:
CREATE VIEW VIEW_NAME AS
SELECT * | COLUMN1 [, COLUMN2 ]
FROM TABLE_NAME
[ WHERE EXPRESSION1 [, EXPRESSION2 ]]
[ WITH CHECK OPTION ]
[ GROUP BY ]
The simplest form for creating a view is one based on the entire contents of a single table, as in the following example:
							CREAT VIEW CUSTOMERS AS
							SELECT *
							FROM CUSTOMER_TBL;
View created.
The next example narrows the contents for a view by selecting only specified columns from the base table:
							CREATE VIEW EMP_VIEW AS
							SELECT LAST_NAME, FIRST_NAME, MIDDLE_NAME
							FROM EMPLOYEE_TBL;
View Created.
Following is an example of how columns from the BASE TABLE can be combined or manipulated to form a column in a view. The view column is titled NAME by using an alias in the SELECT clause.
							CREATE VIEW NAMES AS
							SELECT LAST_NAME || ', ' ||FIRST_NAME || ' ' || MIDDLE_NAME NAME
							FROM EMPLOYEE_TBL;
View created.
Now you select all data from the view that you created, called NAMES.
							SELECT *
							FROM NAMES;
							NAME
-----------------
STEPHENS, TINA D
PLEW, LINDA C
GLASS, BRANDON S
GLASS, JACOB
WALLACE, MARIAH
SPURGEON, TIFFANY
6 rows selected.
The following example shows how to create a view with summarized data from one or more underlying tables:
							CREATE VIEW CITY_PAY AS
							SELECT E.CITY, AVG(P PAY_RATE) AVG_PAY
							FROM EMPLOYEE_TBL E,
							EMPLOTEE_PAY_TBL P
							WHERE E.EMP_ID = P.EMP_ID
							GROUP BY E.CITY;
View created.
Now, if you select from your summarized view:
							SELECT *
							FROM CITY_PAY;
CITY            AVG_PAY
--------------- -------
GREENWOOD
INDIANAPOLIS   13.33333
WHITELAND

3 rows selected.
By summarizing a view, SELECTs that may occur in the future are simplified against the underlying table of the view.
Creating a View from Multiple Tables
A view can be created from multiple tables by using a JOIN the SELECT statement. WITH CHECK OPTION is discussed later this hour. The syntax is as follows:
CREATE VIEW VIEW_NAME AS
SELECT * | COLUMN1 [, COLUMN2 ]
FROM TABLE_NAME1,
							TABLE_NAME2 [, TABLE_NAME3 ]
WHERE TABLE_NAME1 = TABLE_NAME2
[ AND TABLE_NAME1 = TABLE_NAME 3 ]
[ EXPRESSION1 ][, EXPRESSION2 ]
[ WITH CHECK OPTION ]
[ GROUP BY ]
The following is an example of creating a view from multiple tables:
							CREATE VIEW EMPLOYEE_SUMMARY AS
							SELECT E.EMP_ID, E.LAST_NAME, P.POSITION, P.DATE_HIRE, P.PAY_RATE
							FROM EMPLOYEE_TBL E,
							EMPLOYEE PAY_TBL P
							WHERE E.EMP_ID = P.EMP_ID;
View created.
Remember that when selecting data from multiple tables, the tables must be joined by common keys in the WHERE clause. A view is nothing more than a SELECT statement itself; therefore, tables are joined in a view definition the same as they are in a regular SELECT statement. Recall the use of table aliases to simplify the readability of a multiple-table query.
Creating a View from a View
A view can be created from another view using the following format:
CREATE VIEW2 AS
SELECT * FROM VIEW1
Do Not Create Views too Deep
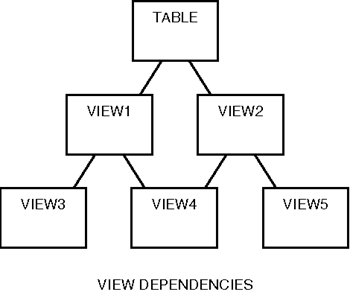
A view can be created from a view many layers deep (a view of a view of a view, and so on). How deep you can go is implementation-specific. The only problem with creating views based on other views is their manageability. For example, suppose that you create VIEW2 based on VIEW1 and then create VIEW3 based on VIEW2. If VIEW1 is dropped, VIEW2 and VIEW3 are no good. The underlying information that supports these views no longer exists. Therefore, always maintain a good understanding of the views in the database and 0on which other objects those views rely. See Figure 20.2 on view dependency.
Figure 20.2. View dependencies.
Note
If a view is as easy and efficient to create from the base table as from another view, preference should go to the view being created from the BASE TABLE.
Figure 20.2 shows the relationship of views that are dependent not only on tables, but on other views. VIEW1 and VIEW2 are dependent on the TABLE. VIEW3 is dependent on VIEW1. VIEW4 is dependent on both VIEW1 and VIEW2. VIEW5 is dependent on VIEW2. Based on these relationships, the following can be concluded:
If VIEW1 is dropped, VIEW3 and VIEW4 are invalid.
If VIEW2 is dropped, VIEW4 and VIEW5 are invalid.
The WITH CHECK OPTION
The WITH CHECK OPTION is a CREATE VIEW statement option. The purpose of the WITH CHECK OPTION is to ensure that all UPDATE and INSERTs satisfy the condition(s) in the view definition. If they do not satisfy the condition(s), the UPDATE or INSERT returns an error. The WITH CHECK OPTION has two options of its own: CASCADED and LOCAL. The WITH CHECK OPTION actually enforces referential integrity by checking the view's definition to see that it is not violated.
The following is an example of creating a view with the WITH CHECK OPTION:
							CREATE VIEW EMPLOYEE_PAGERS AS
							SELECT LAST_NAME, FIRST_NAME, PAGER
							FROM EMPLOYEE_TBL
							WHERE PAGER IS NOT NULL
							WITH CHECK OPTION;
View created.
The WITH CHECK OPTION in this case should deny the entry of any NULL values in the view's PAGER column, because the view is defined by data that does not have a NULL value in the PAGER column.
Try to insert a NULL value in the PAGER column:
							INSERT INTO EMPLOYEE PAGERS
							VALUES ('SMITH','JOHN',NULL);
insert into employee_pagers
            *
ERROR at line 1:
ORA-01400: mandatory (NOT NULL) column is missing or NULL during insert
The WITH CHECK OPTION worked.
CASCADED Versus LOCAL
There are two options when choosing to use the WITH CHECK OPTION during creation of a view from a view: CASCADED and LOCAL. CASCADED is the default, assumed if neither is specified. The CASCADED option checks all underlying views, all integrity constraints during an update for the base table, and against defining conditions in the second view. The LOCAL option is used to check only integrity constraints against both views and the defining conditions in the second view, not the underlying base table. Therefore, it is safer to create views with the CASCADED option because the base table's referential integrity is preserved.
Updating a View
A view can be updated under certain conditions:
The view must not involve joins.
The view must not contain a GROUP BY clause.
The view cannot contain any reference to the pseudocolumn ROWNUM.
The view cannot contain any group functions.
The DISTINCT clause cannot be used.
The WHERE clause cannot include a nested table expression that includes a reference to the same table as referenced in the FROM clause.
Review Hour 14, "Using Subqueries to Define Unknown Data," for the UPDATE command's syntax.
Inserting Rows into a View
Rows of data can be inserted into a view. The same rules that apply to the UPDATE command also apply to the INSERT command. Review Hour 14 for the syntax of the INSERT command.
Deleting Rows from a View
Rows of data can be deleted from a view. The same rules that apply to the UPDATE and INSERT commands apply to the DELETE command. Review Hour 14 for the syntax of the DELETE command.
Joining Views with Tables and Other Views
A view can be joined with tables and with other views. The same principles apply to joining views with tables and other views that apply to joining tables to other tables. Review Hour 13, "Joining Tables in Queries," on the joining of tables.
Creating a Table from a View
A table can be created from a view, just as a table can be created from another table (or a view from another view).
The syntax is as follows:
CREATE TABLE TABLE_NAME AS
SELECT {* | COLUMN1 [, COLUMN2 ]
FROM VIEW_NAME
[ WHERE CONDITION1 [, CONDITION2 ]
[ ORDER BY ]
First, create a view based on two tables:
							CREATE VIEW ACTIVE_CUSTOMERS AS
							SELECT C.*
							FROM CUSTOMER_TBL C,
							ORDERS_TBL O
							WHERE C.CUST_ID = O.CUST_ID;
View created.
Next, create a table based on the previously created view:
							CREATE TABLE SUCTOMER_ROSTER_TBL AS
							SELECT CUST_ID, CUST_NAME
							FROM ACTIVE_CUSTOMERS;
Table created.
Finally, select data from the table, the same as any other table:
							SELECT *
							FROM CUSTOMER_ROSTER_TBL;
CUST_ID    CUST_NAME
---------- -------------------
232        LESLIE GLEASON
12         MARYS GIFT SHOP
43         SCHYLERS NOVELTIES
090        WENDY WOLF
287        GAVINS PLACE
432        SCOTTYS MARKET
6 rows selected.
Note
Remember that the main difference between a table and a view is that a table contains actual data and consumes physical storage, whereas a view contains no data and requires no storage other than to store the view definition (the query).
Views and the ORDER BY Clause
The ORDER BY clause cannot be used in the CREATE VIEW statement; however, the GROUP BY clause when used in the CREATE VIEW statement has the same effect as an ORDER BY clause.
Note
Using the ORDER BY clause in the SELECT statement that is querying the view is better and simpler than using the GROUP BY clause in the CREATE VIEW statement.
The following is an example of a GROUP BY clause in a CREATE VIEW statement:
							CREATE VIEW NAMES2 AS
							SELECT LAST_NAME || ', ' || FIRST_NAME || ' ' ||MIDDLE_NAME NAME
							FROM EMPLOYEE_TBL
							GROUP BY LAST_NAME || ', ' || FIRST_NAME || ' ' || MIDDLE_NAME;
View created.
If you select all data from the view, the data is in alphabetical order (because you grouped by NAME).
							SELECT *
							FROM NAMES2;
							NAME
-----------------
GLASS, BRANDON S
GLASS, JACOB
PLEW, LINDA C
SPURGEON, TIFFANY
STEPHENS, TINA D
WALLACE, MARIAH
6 rows
selected.