
In this recipe, we are going to show you how to build a web application to monitor the server CPU load and memory usage. The server status in the example is sent by a .NET client, but you can expand the example using other languages or operating systems; it's enough to publish a message using the de facto standard JSON protocol—a textual protocol with a very simple grammar (see http://www.json.org/ for the full description). For example, a simple JSON-encoded message looks like the following text:
{"UPDATETIME":"23/06/2013 22:55:32","SERVERID":"1","CPU":10,"MEM":40}We will introduce Spring Insight now. With Insight, you can monitor the web application's performance and its correct behavior.
Check http://gopivotal.com/products/pivotal-tc-server for more information.
On the client side, we will use JQuery, Bootstrap by Twitter, and Google Chart.
At the end of the example, you will be able to put to work a working monitoring console where each server and the information is updated dynamically, as shown in the following screenshot:

You can find the web application's source at Chapter05/Recipe01/web and the client at Chapter05/Recipe01/csharp.
To put the example to work, you need Java 1.7+.
In order to build the web application, we suggest you use Spring Tool Suite (also called STS) downloadable from http://spring.io/tools.
For the client, you need the .NET 3.5+ Framework.
To start quickly, you can use the MVC Spring template to create a complete and simple Spring project as follows:
- Open STS and then navigate to File | New | Other | Spring Template Project | Spring MVC Project.
- Modify
POM.xmlto add the Tomcat'sWebSocketlibraries:tomcat-coyotetomcat-servlet-apitomcat-catalina - Also, add the RabbitMQ client library to the POM:
amqp-client - Create a
RabbitMQinstancebean to store the RabbitMQ parameters. - Create the
RmqWebSocketclass that extends the Tomcat class,WebSocketServlet, in order to use the WebSocket. Inside theRmqWebSocket.javafile, you will also find the RabbitMQ consumer code. - Create the
monitor_exchange_5_1exchange and bind the consumer to it. - Implement the
handleDeliverymethod from theActualConsumerclass to redirect the messages to the connected clients, iterating over theclientslist as follows:for(ClientMessage item: clients){ CharBuffer buffer = CharBuffer.wrap(message); try { item.myoutbound.writeTextMessage(buffer); - On the client side, where the JavaScript runs into the browser, connect the WebSocket instance using:
new WebSocket('ws://' + window.location.host + window.location.pathname+ "websocket"); - Implement the
ws.onmessage()event to parse the JSON message and update the charts:var obj = jQuery.parseJSON(message.data); xcpu =obj.CPU ; xmem = obj.MEM; xupdate = obj.UPDATETIME; var data = google.visualization.arrayToDataTable([ ['Label', 'Value'], ['Memory', xmem], ['CPU', xcpu]]);
- As a producer, we have created a .NET application in this example. In general, the producer has to publish a JSON message to the
monitor_exchange_5_1exchange. The exchanged JSON message will look like the following code:{"UPDATETIME":"23/06/2013 22:55:32","SERVERID":"1","CPU":10,"MEM":40}Here the application is ready, but if you want to configure Spring Insight, you have to perform the following steps:
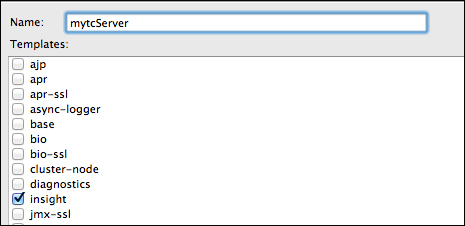
- Go to the server section, then click on new server wizard, and select vFabric server as shown in the following screenshot:

- Then, move on and configure the instance name and the insight flag as follows:
- Add your web application that you've created by following steps 1-10.
- Start the vFabric server and go to the
http://localhost:8080/insight/address. - In order to quickly install the RabbitMQ Insight plugin, you can download the JAR plugin from
- Copy the
insight-plugin-rabbitmq-client-XXX.jarfile in your$STSHOMEINSTALLATION/vfabric-tc-server-developer-2.8.2/mytcinstance/insight/collection-pluginsfolder. - Finally, copy the RabbitMQ Java client to
$STSHOMEINSTALLATION/vfabric-tc-server-developer-2.8.2/mytcinstance/insight/lib. - Point your browser to
http://localhost:8080/exampleto get the server load in real time, as shown in the screenshot reported at the beginning of the recipe. - Point your browser to
http://localhost:8080/insightor click on the Click if insight is enabled! button on the home page to go to the Insight page.
In steps 1-3 we have configured the environment; by default the wizard template creates a Maven project.
Spring 3.2.x doesn't support WebSocket yet (Version 4.x will), and we need to add the websocket Tomcat dependencies to the POM.xml file (step 2).
The RabbitMQ java client is also present on the Maven repository, and in step 3, we add the dependency.
The RabbitMQinstance bean contains the RabbitMQ connection parameters.
The bean's life cycle is defined in root-context.xml, with the init and destroy methods and custom parameters. (Check out http://static.springsource.org/spring/docs/3.2.x/spring-framework-reference/html/beans.html#beans-factory-lifecycle for more information.)
When the client sends a message (step 10) to the monitor_exchange_5_1 exchange, the web application gets the message and redirects it to the WebSocket client's browser that is currently connected (step 7).
When the JSON message reaches the web page on the browser, it gets parsed by JQuery and finally it is used to update the Google Chart's pie diagrams.
Steps 11-14 support the Spring Insight configuration, so you can monitor your application; using the RabbitMQ Insight plugin, you can also monitor RabbitMQ, as in the following screenshot:
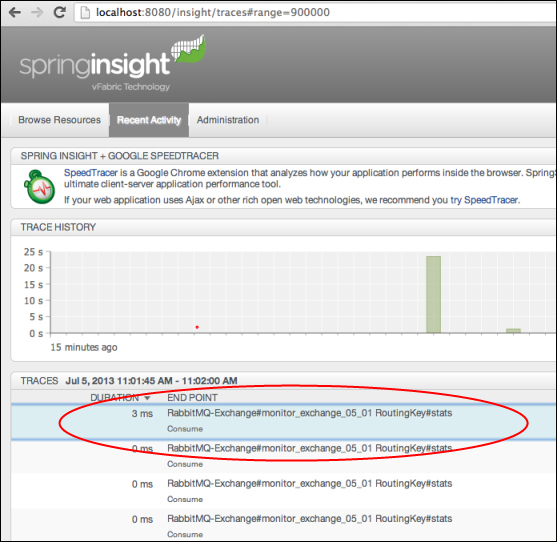
Spring Insight can help you to monitor the application's behavior. Thanks to the plugin, you can also monitor RabbitMQ. It's certainly a more complex topic and we suggest you read from the following links:
http://gopivotal.com/products/pivotal-tc-server
Anyway, we will still use it in the next recipes.